1
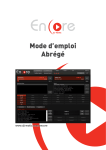
Ave: user manual
Introduction
The Initial Window
The Lists button
About the Search Pattern
The Families button
The History button
The Language button
Tools
GPS Tracking
Viewing tracks and records
The Species Window
The Song controls
The Distribution Map
The Observations field
Records
The Species Window's menu
Song menu items
Adding species to current list
Links and downloads
The Databases
Adding your own lists
Your list descriptions
Adding your own database(s)
Integrating user's photos
Disclaimer
Ave has two main windows: the app Initial Window, and the Species
Window with its menu. The Initial Window is used to search for species
in the databases, while the Species Window displays the individual
species data when a specific species is selected in the Initial Window.
TIP: Use the Volume keys on the Initial Window to change font sizes to
your liking.
The Initial Window [TOP]
◊ At the top-left corner initials indicate the current species list in use.
Click on this field to open a grid with all species lists in databases;
select one of them to change the list. Long clicking this field pops-up
the List descriptions, if available: the current list is highlighted, and you
can also click on a row to switch to the corresponding list.
◊ About the Search Pattern: A space indicates 'any character
sequence', while a dot means 'any character'. There is no need to use
accents, apostrophes or cedillas. Therefore, searching for 'saira' will
return all saíras in current species list, while 'saira cores' will only
return the 'saíra-sete-cores' (if present in current list). You can search
for Taxon, English or Common names.
Usability TIP: By long-pressing the Search button , Ave looks for the
Search Pattern in all lists, not just in the current one.
◊ The Families button shows all families in current list; select one of
them to get the corresponding family members in the current list. Press
again the Families button to list by species.
◊ The History button shows the species selected so far, in reversed
chronological order. To erase the history, either long-press History, or
select Tools > Delete History.
◊ The small button at the left of Families is used to switch the output
between Taxon, English and Common names.
◊◊ Some tools and configuration options are available under the Tools
button . In particular, the location of the Main Folder (this allows to
have different guides for, say, different classes of animals), your Photo
Folder (to integrate Ave with your own pictures, see below), two
buttons to update independently Ave and its main database. For
convenience, these update buttons become enabled only when an
Internet connection is active and new updates are available. The track
viewer is also under tools; see below.
◊ There is an option to change the default main database web address
folder, if you want to use an alternative custom main database, or if
there is no desire to update it. To use an alternative custom main
database, write the web address of the folder where the alternative
files aves_database, family-descriptions.txt, list-descriptions.txt and
status-descriptions.txt reside. To disable main database updates enter
"none" or "-".
◊◊ When GPS is enabled in the device before Ave is launched, the GPS
button at the top indicates that Ave is ready to begin tracking and
saving your position through GPS. This button toggles GPS tracking
when long-clicked. After enabling tracking, a green button indicates
that the track is being recorded; if the button turns red it means that
there is some problem writing the track file, or that GPS was disabled
in the device. A yellow button indicates that the device GPS is looking
for a fix.
◊◊ Tracks are saved in a track file in the MYTracks folder inside the
Main Folder in CSV format, with names of the form:
ave_YYMMDD_HHMMSS.csv.
You can see your tracks and records (even multiple ones) in a satellite
map using the corresponding Tool options (Internet connection or
previous cache required).
In addition, in the shortcut/widget section of the device it is installed a
stand alone activity called Ave Map that provides the same track
saving and viewing features as Ave, but without the need to run the
whole application, being then much faster to load and a bit less
resource intensive.
Moreover, you can also view tracks and records with a web browser
loading them in this link:
http://luis.impa.br/ave/map
TIP: As long as Ave keeps running, the tracks are all saved and
appended to the same file, even after stopping the device GPS or
pressing Ave's GPS button. To save a track to a fresh new file, just
close Ave, open it again, and activate the GPS feature as explained
above.
TIP: Ave map can also open and save files containing landmarks that
are shown as yellow stars . Landmark files are CSV files with the
format place,latitude,longitude,altitude,remark (this has to be the first
line of the file). To add a landmark, just doubleclick on the map and set
its title as place/remark, while to remove new landmarks just
doubleclick on them. New landmarks are automatically saved in files
named marks_YYMMDD_HHMMSS.csv when the map is closed.
TIP: If you observe blank squares in the map with the inscription
"Sorry, we have no imagery here" while using a working internet
connection, try clicking in "Delete map cache". Notice that this tool is
enabled only when an internet connection is active.
The Species Window [TOP]
This window opens when a species is selected in the Initial Window, or
when the search returns only one species.
◊ The Song Controls are located at the top, together with length
indication, song number, and total number of songs.
◊ The Distribution Map is located at the bottom, together with a button
to open species images and/or thumbnails. Click on the map to switch
to additional user added maps.
◊ The information displayed for a species includes an optional Obs field.
This field appears when the Information folder contains a non-empty
text file obs.txt, and in that case it displays its content. You can create
or modify this file as you please to show additional informations.
◊ The REC button pops up a dialog to add a record of the species:
several data is stored in CSV format alongside the track file, in the
MyTracks folder, and with names matching
ave_YYMMDD_HHMMSS_REC.csv. If GPS is enabled and tracking the
GPS data is also stored, but GPS is not required to use the record
feature.
◊ Inside the Species Window's menu there is a menu item to list all
the Family members of the species in the Initial Window, as well as a
pop-up with More info, that displays the content of a text file info.txt
contained in the Information directory.
◊ While a song is being played, three more menu items will appear: one
to delete the song, a second one to display its ID3 tag, and a third to
make it first to play. In order for the latter to work properly, it is
strongly recommended that the songs are named with a leading two
digit number.
Usability TIP: Long-pressing the Play button also shows the ID3 tags
of the current song.
◊ If the species is not a member of the current list, an additional menu
item appears to add it to the current list by adding the SPECIES;LIST
combination to the mylists.txt file (see below).
◊◊ When Internet connection is available, one more menu item will
appear, for internet related stuff, in particular, to download additional
songs and record maps (for birds guide only).
The Databases [TOP]
They are located in the root of the main directory, together with Songs,
Maps, Thumbs and Information directories:
∼ aves_database: This is the main database file. You can modify it as
you please, but take into account that it is overwritten if you update
databases from the Initial Window's Tools. To store your own data,
better use the mylists.txt file as follows.
∼ mylists.txt: This text file is created and modified exclusively by you,
and contains one species per line with the additional lists it belongs to.
That is, each line has the form
SPECIES;LIST1,LIST2,...
where SPECIES is either the Taxon, English or (all) Common names
exactly as they appear in the database files. If this name is not found in
any database file, Ave will complain while loading, showing a list of the
wrong names for you to fix, and that species will be ignored.
∼ mylists-descriptions.txt: This text file contains the descriptions of
your lists defined in the mylists.txt file. Its format is the same as the
provided lists-descriptions.txt file, i.e., one description per line of the
form
LIST;description
∼ Additional Database files can be added, for species not present in
the aves_database file. They have to be named aves_database_1,
aves_database_2, etc. Each line should refer to one species, and has to
have the form
Family;Taxon Name;English Name;Common Name1,Common
Name2,...;Status;LIST1,LIST2,...;
(one line per species, no spaces except inside species names).
Remarks: 1. Observe how commas and semicolons are used:
semicolons separate fields, while commas set multiple Common names
and lists. Take a look at the main aves_database file for reference.
2. Beware of duplicate species when creating additional
aves_database_... files, as they will appear twice when searching and
may contain different and/or duplicate information. Use the mylists.txt
file as described above for species already in databases.
Integrating user's photos [TOP]
To integrate Ave with your photos in order for them to appear together
with the thumbnails in the Species Window, each one has to be named
cleanname_....jpg, or it has to be located in a directory named
cleanname inside the Photo Folder (path configurable through Tools >
Photo Folder...). Here, cleanname stands for any of the species names
as they appear in the databases, but without any accents, apostrophes
or cedillas. In addition, you need to build an index of your photos using
Tools > Rebuild photo index.
Remember: Rebuild the photo index each time you add new pictures,
or if you modify the name of any of the old ones, as the search and
index are filename based.
◊ When the Photo Folder is properly set, a new Info button will appear
at the top of the Initial Window. Clicking this button will then list all the
places of the file names that match the Search Pattern, together with
the dates YYMMDD. This assumes you named your pictures as
...somefolder/cleanname_..._place-YYMMDD-...
If you don't follow this file naming convention the Info button will not
return anything meaningful.
DISCLAIMER [TOP]
You can add Songs, Maps, Thumbs and Information at will, just by
adding them to the corresponding subdirectory named cleanname (see
above). Ave is provided without any of these files, and the author does
not assume any responsibility on how or where the user obtains or
uses them.