1
HDs3D2
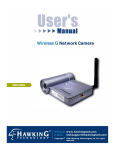
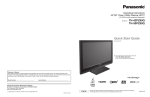
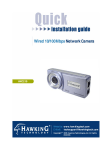
Unpack the Box
Here's what's included:
HIGH DEFINITION STEREOSCOPIC 3D VIDEO PROJECTOR
Quick
Start
Projector with Lens Cap
HDMI
Cable
Remote Control
Power
Cable
DVI to
HDMI Cable
Save your box and packing materials.
PLEASE NOTE: Eye-synchronization options include using Passive Polarized Glasses
(with DepthQ® Polarization Modulator) or Active LC Shutter Glasses (using an IR
Emitter or DLP-LinkTM technology), These items must be purchased separately.
Visit depthq.com/accessories or depthq.com/modulator for more info.
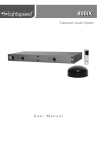
Ensure Remote has a Battery
A 3V lithium battery (CR2025) battery is typically included (with an insulating
tab) to save battery life. To access and remove tab or change the battery:
1
2
3
Note: All projector control is accomplished using the remote.
Projector Status
The top of your projector includes an ON/OFF power
switch and LAMP & POWER LEDs to indicate status:
A product of Lightspeed Design, Inc.
LAMP LED blinking RED = Error Code - see User Manual;
LAMP LED solid RED = Lamp Failure.
POWER LED blinking BLUE = Initializing or Cooling;
POWER LED solid BLUE = Standby or ON (Lamp is lit).
POWER LED solid BLUE and LAMP LED solid RED = OFF (Lamp is off)
Bellevue, Washington, USA
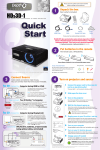
Connect 2D or 3D Source
Step-by-Step Set-Up Guide
You can connect more than one source if needed.
Connect from: Computer using the DVI to HDMI Cable
D
2D
Connect your source via HDMI or DVI to HDMI1. Set resolution to 1920x1080 at 60Hz.
2D
A
Computer
Blu-Ray, DVD, Receiver, Sat/Cable Box or Game Console
Connect your source via HDMI. If necessary, set your source to 1080P.
3D
B
Step 1: Connect the HDMI cable between the 3D Blu-Ray Player/Game Console
and the back of the DepthQ® HDs3D2 Projector.2
Step 2: Connect your DepthQ® Polarization Modulator Control Unit to the 3D Sync
output on the back of the DepthQ® HDs3D2 Projector.
Step 3: Position the DepthQ® Modulator in front of the lens, tilt it towards the
center of your silver screen3, connect power, and don your Passive 3D glasses.
Step 4: Play your 3D Blu-Ray/Game content. The DepthQ® Polarization
Modulator Control Unit will report ~144Hz. Enjoy triple-flashed 144Hz 3D.
C
Use either the HDMI 1 or HDMI 2 input port (A). Audio is not transmitted via VGA. For 2D video + audio,
also connect either a mono RCA cable to AUDIO IN (B), or stereo RCA cables (not included) to L and R
Audio inputs (C). If your computer has a digital output, use the included HDMI or DVI cable for both
video and audio from one cable. Audio over DVI may not be transmitted by some graphics cards.
3D
or Game Console using the HDMI Cable
Use either the HDMI 1 or HDMI 2 input port (A). Component, S-Video and Composite inputs may also
be used (cables not included). These formats do not carry Audio. Use (B) or (C) above.
For 3D also connect Sync to: Your IR Emitter or DepthQ®
Polarization Modulator
These devices can receive 3D Sync from several sources:
Infra-Red Emitter
(not included)
From a 3-pin DIN Sync Output on an NVIDIA QuadroTM graphics
card at the back of your computer
Or in the case of NVIDIA 3D VisionTM, from an open USB port on
your computer.
Section 4 will guide you case-by-case.
DepthQ Modulator (not included)
Blu-Ray/Game Console + Generic Active or DLP Link®4
Step 1: Connect the HDMI cable between the 3D Blu-Ray Player and the back of
the DepthQ® HDs3D2 Projector.2
Step 2: Connect your Active Shutter Glasses system to the 3D Sync output on the
back of the DepthQ® HDs3D2 Projector.
Step 3: Position your emitter per system instructions, connect power, activate
your 3D shutter glasses (if required) and don them.
Step 4: Play your 3D Blu-Ray/Game content. Enjoy triple-flashed 144Hz 3D.
OR Connect from: Blu-Ray, DVD, Receiver, Sat/Cable Box,
From the 3-pin DIN Sync Output (D) on the back of the projector
Blu-Ray/Game Console + DepthQ® Modulator
3D
Sat/Cable + DepthQ® Modulator
Step 1: Connect the HDMI cable between the Sat/Cable Box and the back of the
DepthQ® HDs3D2 Projector.2
Step 2: Play some 3D content to determine whether it is in a Side-by-Side or
Top/Bottom format.
Step 3: Turn on 3D in the DepthQ® HDs3D2 Projector: Using the DepthQ®
HDs3D2 remote, press Menu; then use the left or right arrows to highlight
Settings 1 and press “Enter” , then arrow down to Advanced 1 and press ;
then arrow up to highlite 3D Setting and ; then arrow up to select 3D Format
and ; then arrow up or down to select either Top/Bottom or Side by Side and
. Let the menu time out and it will disappear.
Step 4: Connect your DepthQ® Polarization Modulator Control Unit to the 3D Sync
output on the back of the DepthQ® HDs3D2 Projector.
Step 5: Position the DepthQ® Modulator in front of the lens, tilt it towards the
center of your silver screen3, connect power, and don your Passive 3D glasses.
Step 6: Play your 3D content. The DepthQ® Polarization Modulator Control Unit
will report ~120Hz. Enjoy double-flashed 120Hz 3D.
a
3D
Step-by-Step Set-Up Guide, cont’d
b
Step 6: Position the DepthQ® Modulator in front of the lens, tilt it towards the
center of your silver screen3, connect power, and don your Passive 3D glasses.
Step 7: Run your 3D-enabled application.5 The DepthQ® Polarization Modulator
Control Unit will report ~120Hz. Enjoy double-flashed 120Hz 3D.
Step 8: The L>R R>L Eye-Coding will be selected randomly upon projector sync.
You may have to use your 3D app to change the stereo polarity (swap eyes) to
correct for pseudo-stereo. Exiting the app or otherwise causing the projector to
re-sync will again choose a random eye-coding. This is normal.
Sat/Cable + Generic Active or DLP Link®4 3D Glasses
Step 1: Connect the HDMI cable between the Sat/Cable Box and the back of the
DepthQ® HDs3D2 Projector.2
Step 2: Play some 3D content to determine whether it is in a Side-by-Side or
Top/Bottom format.
Step 3: Turn on 3D in the DepthQ® HDs3D2 Projector: Using the DepthQ®
HDs3D2 remote, press Menu; then use the left or right arrows to highlight
Settings 1 and press “Enter” , then arrow down to Advanced 1 and press ;
then arrow up to highlite 3D Setting and ; then arrow up to select 3D Format
and ; finally arrow up or down to select either Top/Bottom or Side by Side and
. Let the menu time out and it will disappear.
Step 4: Connect your Active Shutter Glasses system to the 3D Sync output 3-pin
DIN on the back of the DepthQ® HDs3D2 Projector.
Step 3: Position your emitter per system instructions, connect power, activate
your 3D shutter glasses (if required) and don them.
Step 4: Play your 3D content. Enjoy double-flashed 120Hz Stereo 3D.
3D
3D
PC Quadro 720P + Generic Active or DLP Link®4
Identical to “PC Quadro 720P + DepthQ® Modulator”, except for Steps 4 & 5:
Steps 1-3: Refer to Steps 1-3 of “PC Quadro 720P + DepthQ® Modulator”.
Step 4: Connect your Active Shutter Glass system to the 3D Sync output 3-pin DIN
on the back of the Computer's NVIDIA Quadro card.
Step 5: Position your emitter per system instructions, connect power, activate
your 3D shutter glasses (if required) and don them.
Step 6: Run your 3D-enabled application.5 Enjoy single-flashed 120Hz 3D.
PC Quadro 720P + DepthQ® Modulator
3D
Step 1: Connect the supplied DVI-to-HDMI cable between the Computer's NVIDIA
Quadro card and the back of the DepthQ® HDs3D2 Projector.2
Step 2: Set the Windows Desktop resolution under "PC" to 1280x720 (or
1280x800) 120Hz.
Step 3: In the NVIDIA Control Panel, under Manage 3D Settings, set Stereo Enable to On, and set Stereo - Display Mode to On-board DIN Connector.
Step 4: Connect your DepthQ® Polarization Modulator Control Unit to the 3D Sync
output 3-pin DIN on the back of the Computer's NVIDIA Quadro card.
Step 5: Position the DepthQ® Modulator in front of the lens, tilt it towards the
center of your silver screen3, connect power, and don your Passive 3D glasses.
Step 6: Run your 3D-enabled application.5 The DepthQ® Polarization Modulator
Control Unit will report ~120Hz. Enjoy single-flashed 120Hz 3D.
3D
Step-by-Step Set-Up Guide, cont’d
PC Quadro 1080P + Generic Active or DLP Link®4
Identical to “PC Quadro 10 80P + DepthQ® Modulator”, except for Steps 4 & 6:
Steps 1-3: Refer to Steps 1-3 of “PC Quadro 1080P + DepthQ® Modulator”.
Step 4: Connect your Active Shutter Glass system to the 3D Sync output 3-pin DIN
on the back of the DepthQ® HDs3D2 Projector.
Step 5: Refer to Step 5 of “PC Quadro 1080P + DepthQ® Modulator”.
Step 6: Position your emitter per system instructions, connect power, activate
your 3D shutter glasses (if required) and don them.
Step 7-8: Refer to Steps 7-8 of “PC Quadro 1080P + DepthQ® Modulator”.
3D
PC Quadro 1080P + DepthQ® Modulator
PC Quadro (3D Vision) + NVIDIA 3D Glasses
1280x720 & 1280x800 120Hz
Step 1: Connect the supplied DVI-to-HDMI cable between the Computer's NVIDIA
Quadro card and the back of the DepthQ® HDs3D2 Projector.2
Step 2: Set the Windows Desktop resolution under "PC" to 1920x1080 60Hz.
Step 3: In the NVIDIA Control Panel, under Manage 3D Settings, set Stereo Enable to On, and set Stereo - Display Mode to Generic Active Stereo.
Step 4: Connect your DepthQ® Polarization Modulator Control Unit to the 3D Sync
output on the back of the DepthQ® HDs3D2 Projector.
Step 5: Turn on 3D in the DepthQ® HDs3D2 Projector: Using the DepthQ®
HDs3D2 remote, press Menu; then use the left or right arrows to highlight
Settings 1 and press “Enter” , then arrow down to Advanced 1 and press ;
then arrow up to highlite 3D Setting and ; then arrow up to select 3D and ;
finally arrow right to select DepthQ® and . Let the menu time out and it will
disappear.
Step 1: Plug in the NVIDIA 3D Vision emitter to an open USB port on your
computer.
Step 2: Connect the supplied DVI-to-HDMI cable between the Computer's NVIDIA
Quadro card and the back of the DepthQ® HDs3D2 Projector.2
Step 3: Set the Windows Desktop resolution under "PC" to 1280x720 (or
1280x800) 120Hz.
Step 4: In the NVIDIA Control Panel, under Manage 3D Settings, set Stereo Enable to On, and set Stereo - Display Mode to Generic Active Stereo (with
NVIDIA 3D Vision).
Step 5: Position your emitter per system instructions, connect power, activate
your 3D shutter glasses (if required) and don them.
Step 6: Run your 3D-enabled application.5 The DepthQ® Polarization Modulator
Control Unit will report ~120Hz. Enjoy single-flashed 120Hz 3D.
LIMITED WARRANTY
c
3D
Step-by-Step Set-Up Guide, cont’d
Subject to the Limitations, Exclusions and Disclaimers hereof, Lightspeed Design, Inc ("Lightspeed") warrants that the Projector,
Lamps and Accessories (hereinafter collectively or individually referred to as "Product" as appropriate) will conform to Lightspeed’s
specifications and be free from defects in material or workmanship for the respective Limited Warranty period provided below. If
the Product, while subject to this Limited Warranty, is defective in material or workmanship during the warranty period, then
Lightspeed, at its option, will REPAIR or REPLACE the Product. Lightspeed’s sole obligation is to supply (or pay for) all labor necessary
to repair the Product found to be defective within the Limited Warranty period and to repair or replace defective parts with new parts
or, at the option of Lightspeed, serviceable used parts that are equivalent or superior to new parts performance, but shall not exceed
the return of the amount of the purchase price paid by the purchaser.
PC GeForce or Quadro (3D Vision) + DepthQ® Modulator
1280x720 60P or 1920x1080 24P
Limited Warranty Periods are as follows:
•
Projector Product Limited Warranty Period (Excluding Lamps): Two (2) years from date of proof of purchase.
•
The warranty period for LCD engines is either 1 year from the date of purchase of the projector or 2500 hours of projector
usage, whichever comes first.
•
Lamp Product Limited Warranty Periods: Unless the maximum lamp hours noted in the Product specification (see
www.depthq.com/support) have been exceeded thereby voiding the Lamp Product Limited Warranty, the original installed
lamp shall have a six (6) month Limited Warranty period from date of Projector proof of purchase. All replacement Lamps will
have a six (6) month Limited Warranty from date of Lamp proof of purchase, and replacement lamps purchased at the time of
Projector Product purchase will have a six (6) month Limited Warranty from date of first use, unless the maximum lamp hours
noted in the Product specification have been exceeded thereby voiding the Lamp Product Limited Warranty.
•
Accessory Product Limited Warranty Period: Ninety (90) days from date of purchase.
Step 1: Connect the supplied DVI-to-HDMI cable between the Computer's NVIDIA
GeForce or Quadro card and the back of the DepthQ® HDs3D2 Projector.2
Step 2: In the NVIDIA Control Panel, under Stereoscopic 3D, select Set up
stereoscopic 3D, check Enable stereoscopic 3D then click the Apply button.
Then set Stereoscopic 3D display type to 3D TV Play and click the Apply button.
Step 3: Connect your DepthQ® Polarization Modulator Control Unit to the 3D Sync
output 3-pin DIN on the back of the DepthQ® HDs3D2 Projector.
Step 4: Position the DepthQ® Modulator in front of the lens, tilt it towards the
center of your silver screen3, connect power, and don your Passive 3D glasses.
Step 5: Run your 3D-enabled application.5 The DepthQ® Polarization Modulator
Control Unit will report either ~120Hz or ~144Hz depending on your resolution.
3D
WARRANTY LIMITATION AND EXCLUSION
THIS WARRANTY SETS FORTH LIGHTSPEED’S MAXIMUM LIABILITY FOR ITS PRODUCT. THIS WARRANTY EXTENDS ONLY TO PRODUCTS
PURCHASED FROM LIGHTSPEED OR A LIGHTSPEED AUTHORIZED RESELLER.
Lightspeed shall have no further obligation under the foregoing Limited Warranty if the Product has been damaged due to abuse,
misuse, exposure to smoke, accident, service other than by Lightspeed or its authorized agents, or failure caused other than from
ordinary use or failure to properly use the Product in the application for which said Product was intended. In addition, failure of the
end-user to follow maintenance procedures as outlined in the Product's user guide will not be covered under this Warranty. Finally,
Lightspeed shall have no further obligation if Lightspeed Product was subjected to operating conditions outside of the range specified
in the user's guide or in this warranty. This warranty does not cover maintenance/repair/replacement of parts due to normal wear and tear.
PC GeForce or Quadro (3D Vision)
+ Generic Active or DLP Link®4 3D Glasses
Use of a lamp that is not a genuine InFocus lamp manufactured according to InFocus specifications may void the warranty of the
Lightspeed Product in which the non genuine lamp was installed. In such a case, Lightspeed will not have any further obligation
for the Lightspeed Product. Remanufactured Products and Software Products are exempt from the foregoing Limited Warranty.
Please refer to the appropriate Remanufactured Product Limited Warranty or Software Product Limited Warranty for applicable
Warranty information.
Identical to “PC GeForce or Quadro (3D Vision) + DepthQ Modulator”, except
for Steps 3 & 4:
DISCLAIMER OF UNSTATED WARRANTIES
THE WARRANTY PRINTED ABOVE IS THE ONLY WARRANTY APPLICABLE TO THIS PRODUCT. ALL OTHER WARRANTIES, EXPRESS OR
IMPLIED, INCLUDING, BUT NOT LIMITED TO, THE IMPLIED WARRANTIES OF MERCHANTABILITY AND FITNESS FOR PARTICULAR
PURPOSE ARE DISCLAIMED. THERE ARE NO WARRANTIES THAT EXTEND BEYOND THE DESCRIPTION ON THE FACE HEREOF AND THE
FOREGOING WARRANTY SHALL NOT BE EXTENDED, ALTERED OR VARIED EXCEPT BY WRITTEN INSTRUMENT SIGNED BY LIGHTSPEED.
SOME JURISDICTIONS DO NOT ALLOW LIMITATIONS ON HOW LONG AN IMPLIED WARRANTY MAY LAST, SO SUCH LIMITATIONS MAY
NOT APPLY TO YOU.
Steps 1-2: Refer to Steps 1-2 of “PC GeForce or Quadro (3D Vision) + DepthQ®
Modulator”.
Step 3: Connect your Active Shutter Glasses system to the 3D Sync output 3-pin
DIN on the back of the DepthQ® HDs3D2 Projector.
Step 4: Position your emitter per system instructions, connect power, activate
your 3D shutter glasses (if required) and don them.
Step 5: Run your 3D-enabled application.5 Enjoy either ~120Hz or ~144Hz 3D.
LIMITED WARRANTY PERIOD
The Limited Warranty periods hereof commence on the date of proof of purchase by the end-user customer. SOME JURISDICTIONS
MAY GRANT YOU CONSUMER RIGHTS WITH MINIMUM WARRANTY DURATION THAT DIFFER FROM THE DURATIONS PROVIDED
HEREIN, AND LIGHTSPEED WILL HONOR ALL SUCH CONSUMER RIGHTS UPON PROOF OF PURCHASE IN THAT JURISDICTION. To Obtain
Warranty Service: During the Limited Warranty period, to exercise this Limited Warranty, the purchaser must first contact 1) Lightspeed
(Mailing address: Lightspeed Design, Inc., 1611 116 th ave NE, Suite 112, Bellevue, WA 98004-3048 USA; or via the web at
www.depthq.com/support), 2) a service facility authorized by Lightspeed or 3) the place of original purchase. For Warranty service,
the purchaser will pay to return or deliver the defective Product and will pay all freight, duty, taxes, VAT, fees, incidental clearance and
customs charges to ship the unit to a Lightspeed Service Center or to a service facility authorized by Lightspeed. When returning
Product to Lightspeed, a Return Material Authorization Number (RMA #) is required and must be clearly displayed on the outside of
the shipping carton or a similar package affording an equal degree of protection. Lightspeed or the service facility authorized by
Lightspeed will return the repaired/replaced Product freight prepaid to the purchaser.
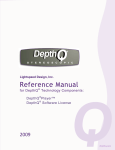
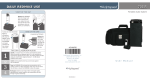
Adjust Zoom and Focus
Use the Image-Zoom Control (A) to
adjust the size of the projected
image.
LIMITATION OF LIABILITY
IT IS UNDERSTOOD AND AGREED THAT LIGHTSPEED’S LIABILITY SHALL NOT EXCEED THE RETURN OF THE AMOUNT OF THE PURCHASE
PRICE PAID BY PURCHASER. Where applicable national or state law prohibits the exclusion or limitation of liability, Lightspeed excludes
or limits its liability to the maximum extent permitted by national law. Limitation on Bringing Action - No action, regardless of form,
arising out of the agreement to purchase the Product may be brought by purchaser more than one year after the cause of action has
accrued. Governing Law - Any action, regardless of form, arising out of the agreement to purchase the Product is governed by the
laws of the state of Washington, USA. Mandatory Arbitration - Any action, regardless of form, arising out of the agreement to purchase
the Product is subject to mandatory arbitration. THIS WARRANTY DOES NOT AFFECT YOUR LEGAL RIGHTS UNDER APPLICABLE
NATIONAL LAWS RELATING TO THE SALE OF CONSUMER PRODUCTS.
Use the Image-Focus Control (B) to
sharpen the projected image.
Adjust the zoom first, then focus the
center of the image.
Refer to the User Manual for more
detailed information regarding
Front/Rear projection, keystoning,
throw ratios, and much more.
DECLARATION OF CONFORMITY
For Declaration of Conformity information, see the certification label on the product and the user documentation available for download
at www.depthq.com/support
VGA can be used in cases where cable length is required to be longer than HDMI allows.
Use either the HDMI1 or HDMI2 input.
Ensure you are projecting on a polarization-preserving screen (aka silver screen).
4
To use DLP LinkTM select "DLP-Link" 3D mode in the HDs3D2 Menu section instead of "DepthQ®". DLP-LinkTM glasses do not use an IR emitter or the 3-pin mini-DIN connector.
5
The NVIDIA Quadro won't actually make a sync signal until there is actual 3D content being displayed.
1
2
3