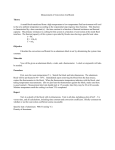
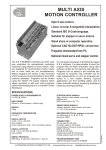
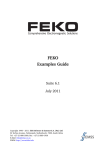
1
RUBENS STD 1 USER’S MANUAL MANUAL VERSION : 1.03 Refers to software version:: MANUAL CODE: DATE: 20 LUGLIO 2000 RUBENS 1.00 NC LC C / P : 3.00 / 3.00 MA RUB U STD1 13 RUBENS- USER’S MANUAL This documentation has been produced by S&h for the exclusive use of purchasers of the Rubens manufactured by the same S&h. Its contents are the property of S&h and may not be reproduced in whole or in part without the written consent of S&h. The information contained in the present documentation is subject to change without prior notice and does not constitute a commitment on the part of S&h. © Copyright 1998 S&h. All rights reserved J:\Int\Manuali\P2000\Eng\RUBENS_E.Doc 2 RUBENS- USER’S MANUAL Index GENERAL ......................................................................................................................... 5 INTRODUCTION ...................................................................................................................................5 VERSION ............................................................................................................................................5 FIRMWARE GENERAL STRUCTURE......................................................................................................6 OPERATION MODE..............................................................................................................................7 COMMUNICATION ...............................................................................................................................8 CUSTOMISING THE SYSTEM ................................................................................................................8 INSTALLATION AND CONNECTIONS....................................................................................... 9 UNPACKING .......................................................................................................................................9 CHECKING THE BOARD.......................................................................................................................9 PRELIMINARY CONFIGURATION ........................................................................................................10 CONFIGURATION OF THE PC...................................................................................... 10 COMMUNICATION SOFTWARE .................................................................................... 10 BACH SOFTWARE INSTALLAT ION AND CONFIGURATION ............................................................................................ 10 CONNECTION EXAMPLE ....................................................................................................................11 TECHNICAL DATA ............................................................................................................ 13 DIMENSIONS ....................................................................................................................................13 RUBENS PANEL................................................................................................................................14 CONNECTORS ON THE RUBENS PANEL ...........................................................................................15 TERMINALS ON THE RUBENS PANEL ................................................................................................17 SERIAL PORT CONNECTIONS ...........................................................................................................18 CONNECTOR: X8, X19 ............................................................................................ 18 ENCODER CONNECTIONS .................................................................................................................19 CONNECTOR: X4, X7, X10, X13 .............................................................................. 19 ENCODER SUPPLY.................................................................................................... 20 DRIVE CONNECTIONS (ANALOGUE)..................................................................................................21 CONNECTORS: X3, X6, X9, X12 .............................................................................. 21 DRIVER CONNECTIONS (FREQUENCY )...............................................................................................22 CONNECTORS: X3, X6, X9, X12................................................................................ 22 DIGITAL INPUT CONNECTIONS ..........................................................................................................23 TERMINALS: X18, X17, X16, X14 ............................................................................ 23 RUBENS IMAGE OF INPUTS 31….0 ........................................................................... 24 DIGITAL OUTPUT CONNECTIONS ......................................................................................................25 TERMINALS: X15 .................................................................................................... 25 RUBENS IMAGE OF THE OUTPUTS 31….0 .................................................................. 26 ANALOGUE INPUT CONNECTIONS .....................................................................................................27 CONNECTOR: X5 .................................................................................................... 27 ANALOGUE OUTPUT CONNECTIONS .................................................................................................28 CONNECTOR: X11 .................................................................................................. 28 CONNECTION OF THE PROXIMITY SWITCH .........................................................................................29 CAN-BUS CONNECTION .............................................................................................................30 INSTALLATION RECOMMENDATIONS ............................................................................ 30 3 RUBENS- USER’S MANUAL 4 RUBENS- USER’S MANUAL G ENERAL I NTRODUCTION The present manual contains all information regarding the technical characteristics and the performance of the CNC on the Rubens board. It is designed as a useful guide which can be referred to for a quick understanding and for efficient application of all its functions. The Rubens CNC is a NUMERICAL CONTROLLER packaged in a metal case for rear-of-panel mounting. It is designed to control up to 4 axes that can be STEPPER, DC or BRUSHLESS motors both in point to point positioning and in linear or circular interpolation. It can handle the machine I/O (16 inputs and 8 outputs) both in sequential mode and as a PLC program (optional). The I/O can be expanded up to 128 inputs and 128 outputs via Can-Bus. Main features: • Power supplies: +24Vdc • Maintains data and programs even in the event of a power out. • 1…4 axes STEPPER, DC OR BRUSHLESS • PID control algorithm and programmable feedforward action. • Point to point positioning, linear interpolation, circular interpolation • Programmable velocity profiles • Encoder feedback, even for stepper motors • 16 in and 8 out that can be handled sequentially or in PLC logic (optional), expandable to 128+128 using industrial Can-Bus. • Programming language: ISO (extended) for the axes control section, AWL (in the PC) for the PLC section. • Fast input for acquisition of the axes co-ordinates (touch probe) • Auxiliary analogue inputs (max. 8) • Handling the program “Variables” • Serial port (definable as RS232/422/485) for connecting the machine control panel “MCP”. • 4 incremental encoders • Parallel process control • Interface for DC or BRUSHLESS motor drives: REF (±10V / 16bit), DIR, ENABLE, FAULT • Interface for STEPPER motor drives: PULSE(800KHZ), DIR, ENABLE, FAULT V ERS ION The information in this manual refers to the “Rubens Software Version “ shown on the cover. The message showing the software version installed in the Rubens can be read using the %99 instruction. 5 RUBENS- USER’S MANUAL F IRMWARE G ENERAL STRUCTURE The Rubens has an operating system inside that performs the control of several processes in parallel; in particular the following tasks are executed: RUBENS RTOS Operating System(*) (1) (2) CNC P LC (3) AUXILIARY PROCESSES C NC This is the task for the control of the axes BACH P LC This task handles the machine I/O (as PLC section) A UX ILIAR Y P ROCE S S E S Performs the service tasks: communication, error handling, timing, alarms, watchdog, etc. (*): Real Time Operating System 6 RUBENS- USER’S MANUAL O PERATION MODE The operation mode of the Rubens controller can be illustrated by the following drawing, in which the components, that are described later, are divided into groups by function. ♦ Power supply unit: the group of components that make up the electronics that are used to supply the correct power to the control unit (and other parts of the system). Usually made up of a transformer and the associated protection and manoeuvring devices that must be provided by the user. ♦ Controller: electronics of the mechanical displacement system that takes care of, together with other parts of the system, the movement along the axes, the electromechanical actuators and any sensors present on the machine. ♦ Drive Unit: the electronics of a mechanical displacement system that receives and transmits analogue and digital signals from the external controller and drives the motor in such a way that it performs the movements required by the controller ♦ Motor: is the component, driven by the drive unit, and coupled with the mechanical parts, physically performs the movements along an axis. 7 RUBENS- USER’S MANUAL ♦ Encoder: is the electronic component that supplies the position information for the mechanical axis (displacement transducer). It may not be used if the system is designed as “open loop” (e.g. with stepper motors). C OMMUNICATION The Personal Computer can control the (1)Cnc and (2)Plc processes directly, using the BACH support software that enables the operator to: upload/download programs, setup and calibration of the axis parameters, writing/compilation/debugging of the Plc program etc.. C USTOMIS ING THE SYSTEM The @ commands may be used to customise the system by assigning values that differ from those of the default parameters. ♦ For a full description of these commands, refer to the manual supplied with the Picasso 2000 board. 8 RUBENS- USER’S MANUAL I NSTALLATION AND C ONNECT IONS U NPACKING The Rubens package contains the following components: C HECKING THE BOARD Before installing the Rubens controller, check that there are no obvious anomalies. In spite of all the careful checks performed in the factory, it is possible that they can become damaged during the packing or transport. If this is the case, please contact our factory immediately. 9 RUBENS- USER’S MANUAL P REL IMINARY C ONF IGURATION C ONFIGUR ATION O F THE PC Check that the number of the serial port (COM) selected for the communication with the PICASSO2000 board is different from serial ports already present on the PC. In you wish to install the Picasso2000 board on a serial port that is already occupied on the PC, then it is necessary to disactivate the serial port of the PC in the system BIOS. C OMMUNIC ATION S O FTW ARE The BACH program is support software created by S&h. It is designed to be installed on a PC running Windows 95/98 operating system. BACH S OF TW ARE I NST AL L AT IO N A ND C O NF IG URAT IO N See the instructions provided. 10 RUBENS- USER’S MANUAL C ONNECTION EXAMPLE COM 24VDC SERIAL CONNECTION RS 232 WITH PC 24VDC CONTROLLER POWER SUPPLY INPUT-OUTPUT POWER SUPPLY COM 24VDC 24VDC 11 RUBENS- USER’S MANUAL Connect the Rubens controller to the serial port of the PC (COM1 or COM2) using a PC-PC serial cable and configure the port as indicated in the section “Serial link connection”. Power up the controller as indicated in the figure. If the connection is made correctly, the “RUN” indicator on the front of the Rubens will flash for a few seconds and then will become fixed. At the same time, the “F1” indicator will light up. Although this is not fitted if the encoder has external power supply. Power up the controller inputs and outputs as shown in the drawing. If the “F2” indicator illuminates, the connection is correct. Run the BACH program. Click on the connection key. If the connection is not effected automatically, the “Connection” window will appear. Select the Rubens controller and the communication port used. Now it will be possible to communicate with the controller. 12 RUBENS- USER’S MANUAL T ECHNICAL DATA POWER SUPPLY VOLTAGES CONSUMPTION +24VDC 24VDC: 700mA +5VDC ENCODER 400mA 0 ..... +50 C° +5 ... +40 C° 20% ... 80% (NON-CONDENSING) 2.8 KG STORAGE TEMPERATURE OPERATING TEMPERATURE RELATIVE HUMIDITY WEIGHT 180,0 160,0 D IMENS IONS 28 0 ,0 1 1 0 ,0 8 ,0 3 0V 24 RUN X11 X8 X5 X2 105,4 4 A N A L O G O U T 1 A N A L O G I N F E X12 X9 X6 X3 M 2 X19 X13 X10 X7 X4 X1 EMERGENCY 4 3 2 1 52,7 5,0 F3 2 F A U L T C A N B U S 110,0 1 1 2 3 4 5 52,7 X20 I N P U T 6 7 8 1- 1+ 2- 2+ 3- 1 3+ 4- 4+ 2 3 4 O U T P U T X 15 F2 F1 RUBENS X 18 L 1 2 3 4 5 6 7 8 X MI 17 TI X OH M 16 E 24 0V E- E+ X14 2 8 0 ,0 13 180,0 1 5 ,0 160,0 2 5 0 ,0 1,5 1 5 ,0 RUBENS- USER’S MANUAL R UBENS PANEL FUSE VALUE F1 = 1A (encoder supply) F2 = 2,5A (+24VDC I/O) F3 = 0,5A (RUBENS supply) 14 RUBENS- USER’S MANUAL C ONNECTORS ON THE R UBENS P ANEL ANALOGUE INPUTS CAN BUS 1 5 6 9 X2 1 2 3 4 5 6 7 8 9 Pin Signal 1 2 3 4 5 6 7 8 9 CAN L COM (0V) CAN H AXIS 1 (X) DRIVER 1 I/O Pin I I I I I I I I 1 2 3 4 5 6 7 8 9 1 9-POLE MALE D-CONNECTOR Signal I/O Pin 1 2 3 4 5 6 7 8 9 AGND(AN.REF.) FLTc (F AULT) PULSEc I O AGND(AN.REF.) FLTd (F AULT) PULSEd I O GND_DRV (0V) AOc (+V OUT) ENBc(ENABLE) DIRc O O O 1 2 3 4 5 6 7 8 9 GND_DRV (0V) AOd (+V OUT) ENBd(ENABLE) DIRd O O O 1 2 3 4 5 6 7 8 9 AXIS 2 (Y) ENCODER 9-POLE FEMALE D-CONNECTOR X4 AXIS 4 (W) DRIVER 1 9-POLE MALE D-CONNECTOR I/O Pin Signal I/O AGND(AN.REF.) FLTe (F AULT) PULSEe I O AGND(AN.REF.) FLTf (F AULT) PULSEc I O GND_DRV (0V) AOe (+V OUT) ENBe(ENABLE) DIRe O O O 1 2 3 4 5 6 7 8 9 GND_DRV (0V) AOc (+V OUT) ENBc(ENABLE) DIRc O O O AXIS 4 (W) ENCODER 1 9 9-POLE FEMALE D-CONNECTOR X7 9 X12 Signal 5 6 5 6 AXIS 3 (Z) ENCODER 1 5 9 O O O O O O X9 Pin 1 AGND(AN.REF.) OUT1 (PWM ) AGND(AN.REF.) AOh (+V OUT) GND_AZN (0V) AOg (+V OUT) ENBg(ENABLE) ENBh (ENABLE) OUT2 (PWM ) 9 X6 I/O 6 I/O 1 2 3 4 5 6 7 8 9 9-POLE MALE D-CONNECTOR Signal 5 O I Signal 5 6 Pin 9 O TXI RX- 1 9-POLE MALE D-CONNECTOR AXIS 1 (X) ENCODER I O Pin AXIS 3 (Z) DRIVER 9 X3 X11 RS422 COM (0V) RTS CTS 9 9-POLE MALE D-CONNECTOR I RX+ O TX+ RX TX 5 6 RS232 5 6 X8 Signal AXIS 2 (Y) DRIVER 9 1 9 9-POLE MALE D-CONNECTOR COM AIN1 AIN2 AIN3 AIN4 AIN5 AIN6 AIN7 AIN8 5 6 ANALOGUE OUTPUTS 5 6 6 9-POLE FEMALE D-CONNECTOR X5 9-POLE MALE D-CONNECTOR Pin 1 1 5 9 SERIAL P ORT 1 5 9 6 9-POLE FEMALE D-CONNECTOR X10 6 9-POLE FEMALE D-CONNECTOR X13 Pin Signal I/O Pin Signal I/O Pin Signal I/O Pin Signal I/O 1 2 3 4 5 6 7 8 9 GND_ENC (0V) +V ENC (+5V) ZEc+ FBc+ FBc- I I I GND_ENC (0V) +V ENC (+5V) ZEd+ FBd+ FBd- I I I I I I I I I ZEdFAdFAd+ I I I ZEeFAeFAe+ I I I 1 2 3 4 5 6 7 8 9 GND_ENC (0V) +V ENC (+5V) ZEf+ FBf+ FBf- I I I 1 2 3 4 5 6 7 8 9 GND_ENC (0V) +V ENC (+5V) ZEe+ FBe+ FBe- ZEcFAcFAc+ 1 2 3 4 5 6 7 8 9 ZEfFAfFAf+ I I I 15 RUBENS- USER’S MANUAL PROXIMITY SERIAL P ORT 1 1 5 6 6 9 X1 X19 1 2 3 4 5 6 7 8 9 RS232 RX TX RS422 I RX+ O TX+ I O COM (0V) RTS CTS O TXI RX- 9 9-POLE MALE D-CONNECTOR 9-POLE MALE D-CONNECTOR Pin 5 O I Pin 1 2 3 4 5 6 7 8 9 Signal 0V +5V TAUX TASTD ALED I/O I I O 16 RUBENS- USER’S MANUAL T ERM INALS ON THE R UBENS P ANEL TERMIINALS PIN INP1 INP2 INP3 INP4 INP5 INP6 INP7 INP8 DIGITAL INPUT NO.1 DIGITAL INPUT NO.2 DIGITAL INPUT NO.3 DIGITAL INPUT NO 4 DIGITAL INPUT NO.5 DIGITAL INPUT NO.6 DIGITAL INPUT NO.7 DIGITAL INPUT NO.8 9 10 11 12 13 14 15 16 LScLSc+ LSdLSd+ LSeLSe+ LSfLSf+ LIMIT SWITCH FORWARD(-) LIMIT SWITCH REVERSE(+) LIMIT SWITCH FORWARD(-) LIMIT SWITCH REVERSE(+) LIMIT SWITCH FORWARD(-) LIMIT SWITCH REVERSE(+) LIMIT SWITCH FORWARD(-) LIMIT SWITCH REVERSE(+) 17 18 19 20 HOMEc HOMEd HOMEe HOMEf M ACHINE ZERO : M ACHINE ZERO : M ACHINE ZERO : M ACHINE ZERO : 21 22 23 24 25 26 27 28 OUT 1 OUT 2 OUT 3 OUT 4 OUT 5 OUT 6 OUT 7 OUT 8 DIGITAL OUTPUT NO.1 DIGITAL OUTPUT NO.2 DIGITAL OUTPUT NO.3 DIGITAL OUTPUT NO.4 DIGITAL OUTPUT NO.5 DIGITAL OUTPUT NO.6 DIGITAL OUTPUT NO.7 DIGITAL OUTPUT NO.8 X18 8 X17 8 1 X16 4 1 X15 8 1 X14 5 1 X20 3 DESCRIPTION 1 2 3 4 5 6 7 8 1 1 SIGNAL I/O I I I I I I I I AXIS c AXIS c AXIS d AXIS d AXIS e AXIS e AXIS f AXIS f AXIS c AXIS d AXIS e AXIS f 29 COM _24V 0REF. POWER SUPPLY INPUT (0V OF THE +24VDC) DC 30 +24VDC +24VDC POWER SUPPLY INPUT 31 GROUND 32 ENC. 0REF. ENCODER SUPPLY (0V OF THE +5/+12VDC) 33 ENC. + +5/+12VDC ENCODER SUPPLY 0V COM _24V 0REF. POWER SUPPLY INPUT (0V OF THE +24VDC) DC 24 +24VDC +24VDC POWER SUPPLY INPUT GROUND I I I I I I I I I I I I O O O O O O O O - OUTPUTS: INPUTS: TYPE TYPE PNP 24VDC / 300M A PNP 24VDC 17 RUBENS- USER’S MANUAL S ER IAL P ORT C ONNECT IONS C ONNE CTOR : X8, X19 SERIAL PORT 1 RS232 RX TX RS422 I RX+ O TX+ I O COM (0V) RTS CTS O TXI RX- 1 O I 1 2 3 4 5 6 7 8 9 Notes: (a) (b) RS232 RS422 I RX+ O TX+ I O COM (0V) RTS CTS I/O RX TX I O COM (0V) - RTS CTS O I Pin 1 2 3 4 5 6 7 8 9 Signal I/O RX+ TX+ I O COM (0V) - TXRX- O I SERIAL PORT SERIAL PORT RS232 (a) RS422 (b) 9 9-POLE MALE D-CONNECTOR X19 RX TX Signal 5 6 1 2 3 4 5 6 7 8 9 RS422 (b) Pin SERIAL PORT Pin RS232 (a) 9 9-POLE MALE D-CONNECTOR X8 1 2 3 4 5 6 7 8 9 SERIAL PORT 5 6 Pin SERIAL PORT O TXI RX- O I Pin 1 2 3 4 5 6 7 8 9 Signal I/O RX TX I O COM (0V) - RTS CTS O I Pin 1 2 3 4 5 6 7 8 9 Signal I/O RX+ TX+ I O COM (0V) - TXRX- O I Factory default configuration ( = RS232 ) Supplied when specified BAUD RATE DATA BIT PARITY STOP BIT 9600 8 ODD 1 N.B.: Use a screened cable for the connection with the screen connected to the case of the connector. 18 RUBENS- USER’S MANUAL E NCODER C ONNECT IONS C ONNE CTOR : X4, X7, X10, X13 AXIS 1 (X) ENCODER ENCODER AXIS 2 (Y) 1 5 9 1 5 9 6 9-POLE FEMALE D-CONNECTOR X4 AXIS 3 (Z) ENCODER 1 5 9 6 9-POLE FEMALE D-CONNECTOR X7 AXIS 4 (W) ENCODER 1 5 9 6 9-POLE FEMALE D-CONNECTOR X10 6 9-POLE FEMALE D-CONNECTOR X13 Pin Signal I/O Pin Signal I/O Pin Signal I/O Pin Signal I/O 1 2 3 4 5 6 7 8 9 GND_ENC (0V) +V ENC (+5V) ZEc+ FBc+ FBc- I I I GND_ENC (0V) +V ENC (+5V) ZEd+ FBd+ FBd- I I I I I I I I I ZEdFAdFAd+ I I I ZEeFAeFAe+ I I I 1 2 3 4 5 6 7 8 9 GND_ENC (0V) +V ENC (+5V) ZEf+ FBf+ FBf- I I I 1 2 3 4 5 6 7 8 9 GND_ENC (0V) +V ENC (+5V) ZEe+ FBe+ FBe- ZEcFAcFAc+ 1 2 3 4 5 6 7 8 9 ZEfFAfFAf+ I I I Notes: The factory default configuration for the encoder is: “D IFFERENTIAL” X4, X7, X10, X13 Signal ENCODER pin NO . + 9 FA~+ 8 FA~4 FB~+ B 5 F ~3 ZE~+ 7 ZE~ENC 2 +V GND_ENC (0V) 1 CONNECTOR CASE - + - + +V 0 - .. FA FB ZE “MACHINE ZERO” microswitch (HOME) It is strongly advised to use a “DIFFERENTIAL” type of encoder interface, and it is indispensable if the distance to the encoder exceeds 3 metres or if the environment in which the system operates is subject to electrical interference of any kind. Use a screened twisted pair cable for the connection to the encoder. The screen must be isolated and connected to ground only to the casing of the connector at the controller end. Furthermore, the screen connections must be made as close as possible to the connector casing. Maximum encoder input frequency for the RUBENS is of 800KHz (with internal RUBENS multiply we have 800_x_4=3200Khz real counting frequency) 19 RUBENS- USER’S MANUAL E NCODE R S UP P LY The supply for the encoder can be taken from the RUBENS power supply or supplied from an external power source. ENCODER SUPPLY: FROM THE RUBENS In this case, the supply that can be used for the encoder is +5VDC, the maximum corrent is 100mA. ENCODER SUPPLY: FROM AN EXTERNAL POWER SUPPLY In this case the encoder supply must be provided by an independent power supply, external to the PC, and connected to terminals 42 and 43 (X14 –4,5). 1 X14 5 29 30 31 GROUND 32 ENC. 33 ENC. + 0REF. ENCODER SUPPLY (0V OF THE +5/+12VDC) +5/+12/+24 VDC ENCODER SUPPLY 20 - RUBENS- USER’S MANUAL D RIVE CONNECT IONS ( ANALOGUE ) C ONNE CTORS : X3, X6, X9, X12 AXIS 1 (X) DRIVER 1 AXIS 2 (Y) DRIVER 5 6 1 9 Pin Signal 1 2 3 4 5 6 7 8 9 AGND(AN.REF.) FLTc (F AULT) Note: 5 6 9 POLE MALE D-CONNECTOR X3 AXIS 3 (Z) DRIVER 1 9 I/O Pin Signal 5 6 9 POLE MALE D-CONNECTOR X6 AXIS 4 (W) DRIVER 1 9 9 POLE MALE D-CONNECTOR X9 I/O Pin I 1 AGND(AN.REF.) 1 I 2 FLTd (F AULT) 2 3 3 4 4 GND_DRV (0V) 5 GND_DRV (0V) 5 O O AOc (+V OUT) 6 AOd (+V OUT) 6 ENBc(ENABLE) O 7 ENBd(ENABLE) O 7 O O DIRc 8 DIRd 8 9 9 The DIR~ SIGNAL must only be connected if 5 6 9 9 POLE MALE D-CONNECTOR X12 Signal I/O Pin Signal I/O AGND(AN.REF.) FLTe (F AULT) I AGND(AN.REF.) FLTf (F AULT) I GND_DRV (0V) AOe (+V OUT) ENBe(ENABLE) DIRe O O O 1 2 3 4 5 6 7 8 9 GND_DRV (0V) AOc (+V OUT) ENBc(ENABLE) DIRc O O O required RUBENS DRIVER AO~(+VOUT) 6 REF+ AGND(AN.REF.) 1 REF+_V DC DIR~ 8 DIR NPN +_V DC ENB~(ENABLE) 7 ENABLE 2 FAULT NPN +5V DC FLT~ (FAULT) NPN GND_DRV (0V) 5 0V CONNECTOR CASING Note: Note: The cable screen must be connected to the casing of the controller If the DRIVER does not have internal pull-up resistors, these must be provided externally Analogue output +VOUT is: ±10V / 16 bit resolution. 21 RUBENS- USER’S MANUAL D RIVER CONNECT IONS ( FREQUENCY ) C ONNE CTORS : X3, X6, X9, X12 AXIS 1 (X) DRIVER 1 AXIS 2 (Y) DRIVER 1 5 6 1 2 3 4 5 6 7 8 9 Signal 1 9 I/O FLTc (F AULT) PULSEc I O GND_DRV (0V) - ENBc(ENABLE) DIRc O O Pin 1 2 3 4 5 6 7 8 9 Signal AXIS 4 (W) DRIVER 5 6 9-POLE MALE D-CONNECTOR X6 9-POLE MALE D-CONNECTOR X3 Pin 5 6 9 AXIS 3 (Z) DRIVER 1 9 9-POLE MALE D-CONNECTOR X9 I/O FLTd (F AULT) PULSEd I O GND_DRV (0V) - ENBd(ENABLE) DIRd O O Pin 1 2 3 4 5 6 7 8 9 5 6 Signal 9 C9-POLE MALE D-CONNECTOR X12 I/O FLTe (F AULT) PULSEe I O GND_DRV (0V) - ENBe(ENABLE) DIRe O O Pin 1 2 3 4 5 6 7 8 9 Signal FLTf (F AULT) PULSEc I O GND_DRV (0V) - ENBc(ENABLE) DIRc O O DRIVER RUBENS +_V DC PULSE~ 3 PULSE NPN +_V DC DIR~ 8 DIR NPN +_V DC ENB~(ENABLE) 7 ENABLE 2 FAULT NPN +5V DC FLT~ (FAULT) NPN GND_DRV (0V) 5 0V CONNECTOR CASE Note: Note: Note: The cable screen must be connected to the casing of the controller If the DRIVER does not have internal pull-up resistors, these must be provided externally Frequency output Pulse is maximum 800KHz with 50% duty-cycle 22 I/O RUBENS- USER’S MANUAL D IG ITAL I NPUT C ONNECT IONS T E RMINALS : X18, X17, X16, X14 PIN TERMINALS 1 X18 8 1 X17 8 1 X16 4 SIGNAL DESCRIPTION 1 2 3 4 5 6 7 8 INP1 INP2 INP3 INP4 INP5 INP6 INP7 INP8 DIGITAL INPUT NO. DIGITAL INPUT NO. DIGITAL INPUT NO. DIGITAL INPUT NO. DIGITAL INPUT NO. DIGITAL INPUT NO. DIGITAL INPUT NO. DIGITAL INPUT NO. 9 10 11 12 13 14 15 16 LScLSc+ LSdLSd+ LSeLSe+ LSfLSf+ LIMIT SWITCH FORWARD (-) LIMIT SWITCH REVERSE (+) LIMIT SWITCH FORWARD (-) LIMIT SWITCH REVERSE (+) LIMIT SWITCH FORWARD (-) LIMIT SWITCH REVERSE (+) LIMIT SWITCH FORWARD (-) LIMIT SWITCH REVERSE (+) 17 18 19 20 HOMEc HOMEd HOMEe HOMEf M ACHINE ZERO : M ACHINE ZERO : M ACHINE ZERO : M ACHINE ZERO : 29 COM _24V 0REF. I I I I I I I I AXISc AXISc AXISd AXISd AXISe AXISe AXISf AXISf AXISc I I I I AXISd AXISe AXISf SUPPLY INPUT I I I I I I I I (0V DEL +24VDC) - DC 1 30 +24VDC 31 GROUND 32 33 X14 5 INPUT : I/O 1 2 3 4 5 6 7 8 TYPE +24VDC SUPPLY INPUT PNP 24VDC EXAMPLE OF A DIGITAL INPUT CONNECTION +24VDC (+12VDC ….+35VDC) PNP RUBENS INPUT 3K3 23 - RUBENS- USER’S MANUAL RUBENS I MAGE OF INP UTS 31….0 IMAGE OF INPUTS 31…0 Bit / Input Bit 00 01 02 03 04 05 06 07 08 09 10 11 12 13 14 15 16 17 18 19 20 21 22 23 24 25 26 27 28 29 30 31 Note: 31 30 29 28 27 26 25 24 23 22 21 20 19 18 17 16 15 14 13 12 11 10 09 08 07 06 05 04 03 02 01 00 Input INP1 INP2 INP3 INP4 INP5 INP6 INP7 INP8 LscLSc+ LSdLSd+ LSeLSe+ LSfLSf+ HOMEc HOMEd HOMEe HOMEf FLT c FLT d FLT e FLT f Description DIGITAL INPUT NO.1 DIGITAL INPUT NO.2 DIGITAL INPUT NO.3 DIGITAL INPUT NO.4 DIGITAL INPUT NO.5 DIGITAL INPUT NO.6 DIGITAL INPUT NO.7 DIGITAL INPUT NO.8 LIMIT SWITCH FORWARD (-) LIMIT SWITCH REVERSE (+) LIMIT SWITCH FORWARD (-) LIMIT SWITCH REVERSE (+) LIMIT SWITCH FORWARD (-) LIMIT SWITCH REVERSE (+) LIMIT SWITCH FORWARD (-) LIMIT SWITCH REVERSE (+) AXISc AXISd AXISe AXISf AXISc AXISd AXISe AXISf DRIVER c DRIVER d DRIVER e DRIVER f M ACHINE ZERO M ACHINE ZERO M ACHINE ZERO M ACHINE ZERO FAULT INPUT FAULT INPUT FAULT INPUT FAULT INPUT To read the inputs from the CNC program, use the instructions : G66 P0…P23 G65 P0…P23 G69 P0…P23 24 Connector / pin X18 – 1 X18 – 2 X18 – 3 X18 – 4 X18 – 5 X18 – 6 X18 – 7 X18 – 8 X17 – 9 X17 – 10 X17 – 11 X17 – 12 X17 – 13 X17 – 14 X17 – 15 X17 – 16 X16 – 17 X16 – 18 X16 – 19 X16 – 20 X3 – 2 X6 – 2 X9 – 2 X12 – 2 RUBENS- USER’S MANUAL D IG ITAL O UTPUT C ONNECT IONS T E RMINALS : X15 PIN TERMINALS 21 22 23 24 25 26 27 28 1 X15 8 SIGNAL OUT 1 OUT 2 OUT 3 OUT 4 OUT 5 OUT 6 OUT 7 OUT 8 DESCRIPTION DIGITAL OUTPUT NO.1 DIGITAL OUTPUT NO.2 DIGITAL OUTPUT NO.3 DIGITAL OUTPUT NO.4 DIGITAL OUTPUT NO.5 DIGITAL OUTPUT NO.6 DIGITAL OUTPUT NO.7 DIGITAL OUTPUT NO.8 29 COM _24V 0REF. SUPPLY INPUT I/O O O O O O O O O (0V DEL +24VDC) - DC 1 30 +24VDC 31 GROUND 32 33 X14 5 OUTPUTS: TYPE +24VDC SUPPLY INPUT PNP 24VDC / 300M A EXAMPLE OF AN OUTPUT CONNECTION RUBENS OUTPUT +24VDC (+12VDC ….+35VDC) PNP LOAD =< 300mA 25 - RUBENS- USER’S MANUAL RUBENS I MAGE OF THE OUTP UTS 31….0 IMAGE OF THE OUTPUTS 31…0 Bit / input Bit 00 01 02 03 04 05 06 07 08 09 10 11 12 13 14 15 16 17 18 19 20 21 22 23 24 25 26 27 28 29 30 31 Note: 31 30 29 28 27 26 25 24 23 22 21 20 19 18 17 16 15 14 13 12 11 10 09 08 07 06 05 04 03 02 01 00 Output OUT 1 OUT 2 OUT 3 OUT 4 OUT 5 OUT 6 OUT 7 OUT 8 DIRc ENBc DIRd ENBd DIRe ENBe DIRf ENBf ENBg ENBh Description DIGITAL OUTPUT NO. 1 DIGITAL OUTPUT NO. 2 DIGITAL OUTPUT NO. 3 DIGITAL OUTPUT NO. 4 DIGITAL OUTPUT NO. 5 DIGITAL OUTPUT NO. 6 DIGITAL OUTPUT NO. 7 DIGITAL OUTPUT NO. 8 DIRECTION OUTPUT ENABLE OUTPUT DIRECTION OUTPUT ENABLE OUTPUT DIRECTION OUTPUT ENABLE OUTPUT DIRECTION OUTPUT ENABLE OUTPUT ENABLE OUTPUT ENABLE OUTPUT DRIVERc DRIVERd DRIVERe DRIVERf DRIVERg DRIVERh To write the outputs from the CNC program use the instructions : G67 P0…P7 G68 P0…P7 26 Connector / pin X15 – 21 X15 – 22 X15 – 23 X15 – 24 X15 – 25 X15 – 26 X15 – 27 X15 – 28 X3 – 7 X3 – 8 X6 – 7 X6 – 8 X9 – 7 X9 – 8 X12 – 7 X12 – 8 X11 – 7 X11 – 8 RUBENS- USER’S MANUAL ANALOGUE I NPUT C ONNECT IONS C ONNE CTOR : X5 ANALOGUE INPUTS 1 5 9 6 9-POLE FEMALE D-CONNECTOR X5 Pin 1 2 3 4 5 6 7 8 9 Signal COM AIN1 AIN2 AIN3 AIN4 AIN5 AIN6 AIN7 AIN8 I/O I I I I I I I I EXAMPLE OF AN ANALOGUE INPUT CONNECTION RUBENS ANALOGUE INPUTS + / - 10V +12VDC AIN 10K A/D -10V…+10V 1 COM 27 -12VDC RUBENS- USER’S MANUAL ANALOGUE O UTPUT C ONNECT ION S C ONNE CTOR : X11 ANALOGUE OUTPUTS 1 5 6 9 9-POLE MALE D-CONNECTOR X11 Pin Signal I/O 1 2 3 4 5 6 7 8 9 AGND(AN.REF.) OUT1 (PWM ) AGND(AN.REF.) AOh (+V OUT) GND_DRV (0V) AOg (+V OUT) ENBc(ENABLE) ENBg (ENABLE) OUT2 (PWM ) O O O O O O RUBENS DRIVER AO~(+VOUT) 6 REF+ AGND(AN.REF.) 1 REF+_V DC ENB~(ENABLE) 8 ENABLE NPN +_V DC ENB~(ENABLE) 7 ENABLE AO~(+VOUT) 4 REF+ AGND(AN.REF.) 3 REF- GND AZN (0V) 5 NPN 0V CONNECTOR CASE 28 RUBENS- USER’S MANUAL C ONNECTION OF THE PRO X IM ITY SW ITCH PROXIMITY 1 5 6 9 9-POLE MALE D-CONNECTOR X1 Pin 1 2 3 4 5 6 7 8 9 Segnale 0V +5V TAUX TASTD ALED I/O I I O PROXIMITY SWITCH PROXIMITY SWITCH INPUT RUBENS +5V 10K . TASTD X1-4 . 10N PROXIMITY CONTACT 0 X1-1 . . +5V LED 470 ALED X1-5. . 29 RUBENS- USER’S MANUAL CAN-BUS CONNECTION REMOTE I/O REMOTE I/O MODULE MODULE REMOTE I/O MODULE C N C The termination resistances (120Ω) are placed at the beginning, in the connector to the CNC, and the end of the cable (see figure). The devices connected in intermediate positions do not require a termination resistance. Belden type 3082A or equivalent cable is recommended. The screen must be connected to the casing of the connector. I NS TAL LATION R E COM ME NDAT IONS 1. The network units must be connected in cascade. 2. Avoid completely any star or tree topography for the connections ( see the following figure). MASTER MASTER NODE NODE NODE NODE NODE NODE NODE NODE PERMITTED CONFIGURATION FORBIDDEN CONFIGURATION CAN Network Configuration 3. Use the same type of cable for the whole installation (screened, twisted pair 30