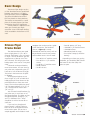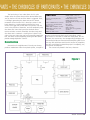
1
Vol. 10 No. 12 SERVO MAGAZINE DIGILENT CONTEST WINNERS • USING A STEPPER MOTOR WITHOUT A MICROCONTROLLER U.S. $ 5$5.50 . 5 0 U S $CANADA 7 . 0 0 C A N$7.00 4 71486 02422 0 December 2012 12 12.2012 VOL. 10 NO. 12 Columns PAGE 10 08 Robytes by Jeff Eckert Stimulating Robot Tidbits 10 Ask Mr. Roboto by Dennis Clark Your Problems Solved Here 74 Then and Now by Tom Carroll Linear Actuators, Servos, and Motion Devices The Combat Zone... 26 BUILD REPORT: Finding a Happy Balance Departments 06 Mind/Iron 14 Events the Combat Zone 29 Building the Atlanta Insect Arena 34 The History of Robot Calendar 16 20 43 64 28 Happy New Year From Combat: Robot Combat in Brazil New Products Bots in Brief Showcase SERVO Webstore 80 Robo-Links 80 Advertiser’s Index PAGE 20 SERVO Magazine (ISSN 1546-0592/CDN Pub Agree#40702530) is published monthly for $24.95 per year by T & L Publications, Inc., 430 Princeland Court, Corona, CA 92879. PERIODICALS POSTAGE PAID AT CORONA, CA AND AT ADDITIONAL ENTRY MAILING OFFICES. POSTMASTER: Send address changes to SERVO Magazine, P.O. Box 15277, North Hollywood, CA 91615 or Station A, P.O. Box 54,Windsor ON N9A 6J5; [email protected] 4 SERVO 12.2012 In This Issue ... 38 Power Beyond the Shield by John Blankenship and Samuel Mishal If you are willing to accept a few limitations, there are expansion options that can provide both convenience and power beyond what standard Arduino shields offer. 44 Build the Kronos Flyer 68 Using a Stepper Motor Without a Microcontroller by Samuel Lambert The unique DC servo design described in this article uses a stepper motor as if it were a DC motor, and can be implemented with minimal electronics. by Michael Simpson Part 2 of our quadcopter build goes over the design and parts breakdown. PAGE 38 PAGE 44 DIGILENT CONTEST WINNERS Participants chronicle the builds of their winning entries from Digilent’s most recent event. 58 SLANG - The Sign Language Assistance and Navigation Glove by Ionut-Gabriel Farcas and Radu-Florin Florea This “handy” glove can help with communication, as well as be a wireless controller in all sorts of applications. 52 Autonomous Obstacle Avoiding Robot Alarm Clock by Sergiu Stanculescu and Blenyesi Balazs This simple implementation provides a lot of functions that even beginners can sink their teeth into. SERVO 12.2012 5 Mind / Iron by Bryan Bergeron, Editor Autonomous Robots: End of Life Dilemma cience fiction authors have contemplated limiting the lifespan of autonomous robots for the good of humankind — take the replicants in Blade Runner that are engineered to have a four year lifespan and the replicators in Stargate SG-1 that have an unlimited lifespan. The conclusion seems to be that while individual autonomous beings naturally desire to live forever, such a condition is incompatible with humanity. Our resources — and eventually our autonomy — would be usurped by our robots which self-replicate themselves into superior entities. Such considerations may seem impractical today. We celebrate when a Mars rover lasts several months past the planned failure date, and most of us strive to build robots that can survive a few accidental crashes, much less outlive us. There are instances, of course, where forced death or destruction of our creations is warranted. Consider the aberrant autonomous missile that veers off course that must be destroyed with an auto-destruct instruction. I've always suspected some car manufacturers and electronics manufacturers design their products to self-destruct within a few days of the warranty expiration date. However, if you take a look at what's under development in the research labs today — self-assembling nanorobots that can be sprayed onto surfaces of enemy aircraft to render them useless or injected into patients to seek out and destroy cancer cells — you can envision a time where limiting the lifespan of a robot or colony of robots may make sense. At question is how long should our creations be allowed to live. Biological life is a cyclical balance of life and death. At the macro level, populations expand until the food supply is exhausted, populations shrink and the food supply increases, allowing the population to expand, and so on. In our bodies, normal cells have a finite lifespan, as encoded in our DNA. A red blood cell, for example, is good for about 90 days and then it begins to self-destruct. Macrophages — large white blood cells — can detect damaged red blood cells and remove them S 6 SERVO 12.2012 FOR THE ROBOT INNOVATOR ERVO Published Monthly By T & L Publications, Inc. 430 Princeland Ct., Corona, CA 92879-1300 (951) 371-8497 FAX (951) 371-3052 Webstore Only 1-800-783-4624 www.servomagazine.com Subscriptions Toll Free 1-877-525-2539 Outside US 1-818-487-4545 P.O. Box 15277, N. Hollywood, CA 91615 PUBLISHER Larry Lemieux [email protected] ASSOCIATE PUBLISHER/ VP OF SALES/MARKETING Robin Lemieux [email protected] EDITOR Bryan Bergeron [email protected] CONTRIBUTING EDITORS Jeff Eckert Jenn Eckert Tom Carroll Kevin Berry Dennis Clark R. Steven Rainwater Michael Simpson Michael Jeffries Morgan Berry Pete Smith Radu-Florin Florea Ionut-Gabriel Farcas Samuel Lambert Sergiu Stanculescu Blenyesi Balazs John Blankenship Samuel Mishal CIRCULATION DEPARTMENT [email protected] MARKETING COORDINATOR WEBSTORE Brian Kirkpatrick [email protected] WEB CONTENT Michael Kaudze [email protected] ADMINISTRATIVE ASSISTANT Debbie Stauffacher PRODUCTION/GRAPHICS Sean Lemieux Copyright 2012 by T & L Publications, Inc. All Rights Reserved All advertising is subject to publisher’s approval. We are not responsible for mistakes, misprints, or typographical errors. SERVO Magazine assumes no responsibility for the availability or condition of advertised items or for the honesty of the advertiser. The publisher makes no claims for the legality of any item advertised in SERVO.This is the sole responsibility of the advertiser.Advertisers and their agencies agree to indemnify and protect the publisher from any and all claims, action, or expense arising from advertising placed in SERVO. Please send all editorial correspondence, UPS, overnight mail, and artwork to: 430 Princeland Court, Corona, CA 92879. Printed in the USA on SFI & FSC stock. from the blood stream. However, occasionally cells in the blood or elsewhere in the body manage to defeat the encoded self-destruct instructions and grow unabated. Unfortunately, this cancer is usually at the expense of other cells and the body as a whole. So, again, to the practical implications, what's the take-home message for the typical robotics enthusiast? Well, if you're working with autonomous swarms — or even just a pair of carpet roamers — can you devise a way to let one signal the other that its systems are failing? The 'failure' could be as simple as an RTC (real time clock) chip connected to the microcontroller in one of the robots. When the time is up, the "hurt" robot transmits a signal — say an IR stream — that the other robot must intercept and decode. How the second 'helper' robot responds is up to you. If you're of the battle-bot mentality, then perhaps a quick blow by a hammer is appropriate. Or, perhaps you can devise a means of connecting the two systems together for recharging the 'sick' robot — think in-flight refueling of an aircraft or quadcopter. Now, consider how a swarm of autonomous quadcopters could remain aloft and 'stealthy' without need for intervention from ground control. The 'tanker' drone — equivalent to the macrophage in the blood — would either destroy a damaged quadcopter that's a danger to other copters in the swarm, or charge the battery of a nearly depleted copter. The signal for destruction could be generated by the microcontroller of the damaged craft or come from, say, sound sensors on the tanker drone that detect grinding in a failing motor. Such a scenario isn't as far off as you might think. Today, it's common practice for R/C controllers to have a fail-safe mechanism that's activated when there's a loss in received signal. Common options include cutting all power (sudden death) and cutting power to half (controlled crash). Of course, you can also program the microcontroller to execute a number of other options, such as circling until either the battery is depleted or you've moved closer to the craft. Can you think of other, practical scenarios in which death of a robot is necessary and beneficial? As the sci-fi movies have shown us, there's no time like the present to get a handle on self-destruct mechanisms for your robotic creations. Later, you may not have an option. SV SERVO 12.2012 7 Robytes by Jeff and Jenn Eckert Discuss this article in the SERVO Magazine forums at http://forum.servomagazine.com. New Era in Manufacturing? Whenever a new product is described as "revolutionary" and "ushering in a new era," the rational response lies somewhere between skepticism and hysterical laughter. Nevertheless, Rethink Robotics (www.rethinkrobotics.com) has introduced Baxter the bot with those terms attached. Given that he is the contrivance of Rodney Brooks — cofounder of iRobot and former director of the MIT Computer Science and Artificial Intelligence Lab — laughter may not be the appropriate option. The Baxter product line is said to offer the "world's first humanoid robots capable of applying common sense behavior to manufacturing environments," which would indeed be revolutionary. The overall objective is to offer US manufacturers a means to compete with competitors in low cost regions of the world which just might qualify as the beginning of a new era. According to Brooks, "Roboticists have been successful in designing robots capable of superhuman speed and precision. What's proven more difficult is inventing robots that can act as we do — in other words, that are able to inherently understand and adapt to their environments." For example, if Baxter drops a component, he's smart enough to grab another one before trying to complete the job. Other definitive characteristics include the ability to work safely alongside humans, the ability to be set up in an hour and trained in as little as 30 minutes, extreme task flexibility, and a price tag of only $22,000. If you happen to be in Chicago January 21-24, you can see him in person at the Automate show. He'll also be in Orlando February 20-23 at the RIA Robotics Industry Forum. Or, you can just search "rethink baxter" on YouTube and see a video. Baxter: Flexible, cheap, and easy to train. Keep Your Mind (and Hands) Out of the Gutter iRobot's Looj 300 automates gutter cleaning. 8 SERVO 12.2012 A different sort of animal is the new Looj 330 from iRobot (www.irobot.com). It isn't cute, isn't flexible, and has no common sense. However, it can save you the trouble and danger of cleaning your rain gutters. You just drop it in and a four-stage auger spins at 500 rpm to blast away clogged leaves and dirt. The Looj automatically senses and adapts to the nature of the debris for more effective cleaning, and it features interchangeable auger flaps for enhanced performance. The remote control (which is also the carrying handle when attached) works from up to 50 ft away, and Looj can change its scrub speed to adjust for tough clogs. The most obvious shortcomings are that it's not exactly a speed demon — taking an average of five minutes to clear a 30 foot section — and you can expect to clean only about 200 linear feet on a charge of the 7.2V lithium-ion battery. It is waterproof, though and can even operate in up to eight inches of water. The Looj will set you back $299, but that's a lot cheaper than setting a broken leg. www.servomagazine.com/index.php?/magazine/article/december2012_Robytes Not Being There Telepresence robots seem a little creepy. After all, they are essentially just an expensive way to combine teleconferencing with a mobile platform so the boss can keep tabs on you while he's sipping a mai tai with his "executive assistant" in Bora Bora. However, a flock of companies have entered the market, and one of the latest offerings comes from Suitable Technologies (www.suitabletech.com) — an offshoot of the research lab at Willow Garage. Their recent introduction is the Beam Remote Presence System (RPS), aimed at people who want to "be in multiple places at once; feel more like part of a team in another location; get in touch when phone, email, chat, and videoconferencing are not getting results; or travel without traveling." If that describes you and you can afford $16,000 per unit, this may be your baby. The main features are a 17 inch screen that shows your face in its actual size (unless, of course, you're John Madden or Hugo Chavez), two wide-angle HD cameras, an array of six microphones with noise reduction and echo cancellation, and a "powerful" built-in speaker so you can chew out the slackers at just slightly below the threshold of pain. It's only a little over five feet (1.5 m) tall and has no limbs capable of inflicting any kind of pain, so your nonpresence won't be all that intimidating. It has a top speed of only 3 mph (1.3 m/s) though, so you may spend a lot of time yelling, "Hey, come back here!" Suitable Tech's Beam RPS telepresence robot. Firefighting Bot Hot Ticket It's no secret that fighting fires is a dangerous activity, particularly when it involves things like boiling liquid expanding vapor explosion (BLEVE) situations, chemical fires, and fuel farm fires. To eliminate the human element in such events, Howe and Howe Technologies (www.howeandhowe.com) has come up with Thermite — a powerful bot adapted from the company's existing line of military bomb-sniffing and surveillance equipment. The diesel-powered vehicle weighs in at about 1,400 lb (635 kg), runs on tracks, and can pump up to 600 gallons of water per minute (compared to 1,500 gallons by a standard fire truck). Yet it is only 34 inches wide, so it's small enough to move into a burning room. Thermite is equipped with a video camera and an infrared camera to allow remote operation, and many different attachments can be added to the platform. For example, a hydraulic arm can be attached that is capable of pulling a human to safety, carrying a 55 gallon drum away from the fire, cutting wires, turning valves, and Howe and Howe's so on. The bot has a price tag of $96,000, but that isn't so bad when Thermite handles you consider that a new fire truck can cost more than $1 million. extreme fires. No More Reaching for Salt and Pepper Last and certainly least in this month's roundup is a pair of wind-up salt and pepper bots — perfect for people who are too lazy to reach across the table. The little guys — made of food-grade plastic — will walk right up to you. The drawbacks seem to be that neither one holds much, you'll probably need to widen the holes to actually get any pepper to flow, and the mechanisms don't seem to be very reliable. Good thing is though that even after they break, you can still use them as shakers. They seem to originate with a British vendor inexplicably called Suck UK (www.suck.uk.com), but you can also pick up a pair from Amazon for $15.58. SV The Suck UK salt and pepper bots deliver seasoning to you. SERVO 12.2012 9 Our resident expert on all things robotic is merely an email away. [email protected] Tap into the sum of all human knowledge and get your questions answered here! From software algorithms to material selection, Mr. Roboto strives to meet you where you are — and what more would you expect from a complex service droid? by Dennis Clark ow. December already. It seems like just yesterday I was worrying about actually getting to work on my robot for the MileHiCon Critter Crunch. (This is the original "Robot Wars" and is still going strong after more than two decades.) Have you made your robot Santa list yet? You know — the one that you are going to leave under your significant other's purse/wallet/ checkbook? I'm still thinking about what I'm going to put on mine … This month — for the first time — my big question and request for help comes from my 11 year old son, Brendan. He has inherited his dad's passion for robots in general, and the W Critter Crunch specifically. His critter, Munch, is a capable machine, but in the limited combat area of the CC — eight feet by eight feet — he has control problems using a standard R/C car speed controller. He has not been able to find one that didn't have a delay between switching from forward to reverse. The R/C car industry puts that delay in to save wear and tear on the gear train. Munch is an interesting combination of bits of pieces of a Tamiya Formula One car, aluminum plates, and leftover plastic bits with an R/C receiver, steering servo, and speed control. It is simple and as near as I can make out, bullet-proof. But it has one problem ... Q . Dad, I want to be able to back my critter up fast so I don’t run off the table or get hit from behind if I miss. It takes too long to back up! Can you find a way to fix my critter this year? — Brendan Figure 1. Munch, Brendan’s critter. 10 SERVO 12.2012 A . A robot dad couldn’t get a better question from his son! I went looking around for R/C speed controllers that either had no delay or were programmable. I found nothing in the price range that I thought made sense for a “critter.” So, I went looking elsewhere and found an excellent option at www.Pololu.com — their simple high-power motor controller, part number 1377 (18v15). You can find this gem at www.pololu.com/ catalog/product/1377/specs for about US$40. The 18v15 can handle motor voltages from 5.5V to 18V, and steady current up to 15 amps without a heatsink. I tested Munch and found that he maxed out at about six amps, so this left me with plenty of margin — which is a very good idea for ANY motor controller! This board isn’t a one-trick pony either; you can control it via R/C signal, TTL bi-directional serial, analog input, and even a USB connection. Since you can use the 18v15 in a variety of configurations, Pololu allows you to choose what parts you’re going to install on the board. Figure 3 shows what comes with the unassembled kit. Since I knew that I was going to be using this motor controller with an R/C receiver, I dug out a hobby servo that “survived” my last airplane crash (I’m going with nothing but new www.servomagazine.com/index.php?/magazine/article/december2012_MrRoboto 2.4 GHz radios from now on!), and cut off the cable for installation on the 18v15. I use what the R/C hobby industry tends to call Dean’s connectors for high-power battery and motor connectors, and some nice flexible battery wire to install the rest of the connectors to the board (see Figure 4). Pololu provides several useful photos and illustrations on their website for their simple high power motor controllers; Figure 5 shows all you need to know to wire your 18v15 properly. Choose your wire and connectors carefully; this board is only about 2.5 cm by 5 cm, so things will be tight! Most R/C cars and small R/C electric aircraft have a single battery that powers the motor and the electronics. They use ESCs (Electronic Speed Controllers) to provide a 5V output to power the receiver and servos. This is called the Battery Eliminator Circuit, or BEC for short. The 18v15 has a jumper-selectable BEC that can supply either 5V or 3.3V. If you were to be using this controller on a robot, you would probably use the 3.3V supply since the new powerful processors are all 3.3V. For an R/C system, you want to use 5V since those systems are designed to work with 4.8V to 6V power. Note the upper-left part of Figure 5 which shows the BEC jumper locations. Another thing to note: When the 18v15 is controlled by a single R/C channel, that channel must be R/C channel 1 on the board. Don’t worry about how you hook up the motor; you’ll probably guess wrong, but you can either flip your servo reverse on your R/C transmitter’s throttle channel, or flip the sense on the 18v15 board when you plug it into your computer’s USB port to configure it. My new R/C ESC all wired and installed in Munch is shown in Figure 6. It all just looks like it was designed to be built that way, doesn’t it? The old battery pack for Munch was a 4.8V 1,000 mAh NiCd custombuilt pack. It was all that I could fit into the Figure 4. Connector wires chosen. Figure 2. Critter guts. Figure 3. Look at what comes with the 18v15 motor controller kit. Figure 5. The 18v15 board layout picture. (Courtesy of Pololu Corporation.) SERVO 12.2012 11 Discuss this article in the SERVO Magazine forums at http://forum.servomagazine.com Figure 7. Relative battery pack sizes. Figure 6. Completed ESC board installed. critter and stay under the two pound weight limit. I decided to use lithium-ion cells this time; I went from 1,000 mAh to 1,500 mAh and cut several grams off of Munch’s overall weight. As you can see in Figure 7, the LiPo pack is even smaller! Ever being the optimist, I plugged everything in and turned on the radio, hoping that the board defaulted to R/C control. Sigh, not so much. Actually, the 18v15 defaults to one of the logic-level serial input options. Pololu has Figure 8. Motor Control Center; Input tab. 12 SERVO 12.2012 fantastic motor controller configuration utility that you use to set up the many, many options that can be selected on their simple high power motor controller series. Sadly, they only provide this utility for use on a Windows or Linux OS. (What’s up with that?) Anyway, I ran it using Parallels Desktop 7 running a WXP virtual machine and it worked just fine, so no big. You can find this utility on the Pololu site at www.pololu.com/catalog/product/1377/ resources. Grab the user manual PDF when you’re there; it is VERY thorough with lots of pictures and really good instructions for how to configure the 18v15 board — which is a good thing because there were three things that I really needed to configure: 1. R/C receiver controls. 2. LiPo battery pack shut-off limits. 3. Reducing the full range speed of the critter. You can get the install package for the Pololu utility and USB drivers on the same site as the link above. Also, this is where they keep new firmware revisions you can install on your motor controller board. There is a newer version than the 1.03 that I got with my board (1.04), but I didn’t install it since what I had worked just fine for my application. So, go get that utility and USB driver and install it. The software manual is located in the “Start” menu along with the application, which makes it easy to find and reference. As I mentioned before, R/C control was not the 18v15 default setup. After you install the configuration program and the USB drivers, then plug your 18v15 into your computer’s USB slot. Depending on your version of Windows, you may or may not have to point the “plug-n-play” wizard to the driver’s folder in the Pololu install folder. We’ve all probably done this before, so I’m not going to detail how that works here. When you first start up the program, you’ll be in the Status tab which shows all kinds of interesting things about the motor controller and your motor. I looked around and thought “cool!” and immediately went to the next tab called Input Settings. This is where I found how to tell the 18v15 to use R/C pulses to control the motor speed. Look at Figure 8 to see what I did to change to R/C servo pulse control. The only thing that I had to do on this tab was click the R/C radio button under the Quick Input Setup button. That handled requirement #1 above. To handle requirement #2 (the LiPo low battery cutoff settings), I needed to select the Advanced Settings tab. I then set the Low VIN shutoff to 5.8V which is about 2.9V per cell — a value I think is very safe while still getting the most out of the pack. This means that the 18v15 will shut down the driver if the battery voltage falls below this value. LiPo batteries will be unrecoverable if they discharge below a certain voltage. This voltage differs a bit with different manufacturers, so I’m conservative here. I also set the High VIN cutoff at 10V — safely above the 8.4V max voltage a two-cell LiPo pack can have. I wanted the controller to not work if a 11.1V or higher battery was installed; this would prevent the critter from going too fast (11 year old, remember?). See Figure 9 for this screen’s data. I’m not going to explain all of the fields here; the Pololu manual does a great job of that. The last requirement to limit the critter speed is handled in the Motor Settings tab; see Figure 10. The default max speed for a motor is 3,200. I throttled this speed back to max out at 2,000. This is the limit for either forward or backward speeds. If you want to set a different backup speed maximum than the forward speed, select the Asymmetric box. I left everything else alone. Munch is now ready for critter crunching action with a more responsive motor controller than low-end ESCs provide. At $40, the only thing the 18v15 lacks is the super high current capability (usually 30-50 amps) of the R/C commercial units. We didn’t need that kind of current — most of our robots don’t either! I recommend that you play around on all of the screens while running your motor, and see all of the knobs and buttons that Pololu provides for this motor controller series. I’ve never seen any motor controller with so many configurable features as the Pololu 18v15 simple high-power motor controller. Obviously, Figure 9. Motor Control Center; Advanced Settings tab. “simple” means it’s simple to use because it certainly does not lack for complex configurations. Last Thought Well, you’ve done it again. Read one of my columns and hopefully been educated about something, or at least inspired. Now get out there and get those robots running! If you should have a problem or a question, please don’t hesitate to drop me an email at roboto@servo magazine.com and I’ll do my best to work on it. SV Figure 10. Motor Control Center; Motor Settings. SERVO 12.2012 13 EVENTS Calendar Send updates, new listings, corrections, complaints, and suggestions to: [email protected] or FAX 972-404-0269 Know of any robot competitions I’ve missed? Is your local school or robot group planning a contest? Send an email to [email protected] and tell me about it. Be sure to include the date and location of your contest. If you have a website with contest info, send along the URL as well, so we can tell everyone else about it. For last-minute updates and changes, you can always find the most recent version of the Robot Competition FAQ at Robots.net: http://robots .net/rcfaq.html. — R. Steven Rainwater "Robot Survival," "Robot Pushing," "Robot Shoving," Racing, line following, and a robot biathlon. www.iroc.org JANUARY 3-5 Techfest Indian Institute of Technology, Bombay, India Events include an International Robotics Challenge, TechOlympics, Robotron, Dimensions, Xtreme Machines, and Code Czar. www.techfest.org 1112 FIRST LEGO League of Central Europe Obrigheim, Germany This is the big FIRST LEGO League championship event for the area. www.hands-on-technology.de/en/first legoleague 2223 Roboexotica Vienna, Austria This annual competition of cocktail robots includes events for best cocktail service, best cocktail mixing, and best bartending conversation. www.roboexotica.org Singapore Robotic Games Science Centre, Republic of Singapore The games include lots of events: picomouse, Sumo, robot soccer, wall climbing, pole balancing, underwater robots, legged robots, robot colony, humanoid competition, and the intelligent robot competition. http://guppy.mpe.nus.edu.sg/srg 2427 Robotic Arena Wroclaw, Poland Lots of events including mini Sumo, micro Sumo, nano Sumo, Micromouse, line following, and freestyle. www.roboticarena.org ION Autonomous Snowplow Competition St. Paul, MN Just what it sounds like — autonomous snowplow robots must remove snow along a designated path. www.autosnowplow.com FEBRUARY DECEMBER 1-2 6 15 1720 14 South's BEST Competition Auburn University, Auburn, AL Regional for the BEST student competition. www.southsbest.org/site IROC International Robot Olympiad Gwangju, Korea The theme of this year's contest is "Robots, caring for aged people." There are many events for different age groups and robot types, including events with names like "Prison Break," SERVO 12.2012 1-3 Quark Roboficial Goa, India Student competition for autonomous robots with a variety of events. www.bits-quark.org Cana Kit Save 10% using Coupon Code SM2012* when ordering online at www.canakit.com Electronic Kits • Modules • Parts Motor Controllers • Arduino • Arduino Kits • Arduino Shields • Robot Platforms • Parts Inventor’s Kit for Arduino Arduino Uno $29.95 ARDUINO-PRK ARDUINO-UNO Latest “R3” Version! $94.95 Includes 36-Page Printed Full-Color Manual Stepper Motor EasyDriver Stepper Motor Driver 50A Motor Speed Controller (PWM) UK1133 Optional LCD SX09402 $14.95 SX09238 7A Bi-Directional Motor Speed Controller (PWM) UK1125 $39.95 1•888•540-KITS (5487) $19.95 USB PIC Programmer (MPLAB Compatible) UK1300 [email protected] * Limit one per customer. Can not be combined with other coupons or volume discounts. Does not apply to products already on sale. Prices subject to change without notice. $69.95 $59.95 Xbee Wireless Kit XBEE-KIT $94.95 www.canakit.com NEW PRODUCTS Aluminum Beams A ll new aluminum beams now available from ServoCity are useful for lever arms, bell cranks, and for structural support. The aluminum beams are machined from 6061-T6 aluminum to create a very strong and lightweight part. These beams have .140” thru holes with a .770” spacing, which is found throughout the ServoCity product line. The aluminum beams are available in the following lengths and sold as individual beams: 1.54”, 2.31”, 3.08”, 3.85”, 4.62”, 6.16”, and 7.70”. Lengths are calculated from the center of the first hole to the center of the last hole. They are useful in robotics, R/C, animatronics, and industrial applications. component. The 1” outside diameter allows a 1” ID ball bearing to slide over the hub spacer; the 1/2” inside diameter can also be used with their 1/4” ID flanged bearings. The hub spacers are constructed of 6061-T6 aluminum which is strong yet lightweight. They utilize the 0.770” hub pattern that is standard through the ServoCity product line and have both tapped holes and thru holes for versatility. Available thickness include 1/8”, 1/4”, 3/8”, 1/2” 3/4”, or 1”. These spacers are sold individually. For further information, please contact: ServoCity Website: www.servocity.com Zumo Shield for Arduino P ololu announces the release of the Zumo Shield — an Arduino shield designed for use with the Zumo tracked chassis. The shield includes dual motor drivers, a buzzer for playing simple sounds and music, and a three-axis accelerometer and compass. It mounts directly onto the Zumo chassis, and the Arduino plugs into the shield, face down. The shield boosts the battery voltage to power the Arduino, and it breaks out the Arduino reset button, user LED, and I/O lines for convenient accessibility and to accommodate additional sensors. Aluminum Hub Spacers A lso available from ServoCity are new aluminum hub spacers which are useful for spacing a gear, sprocket, wheel, or any .770” pattern attachment off of a ServoCity With the Zumo shield and an Arduino Uno or Leonardo, the Zumo chassis becomes a low profile, Arduino-controlled tracked robot that is less than 10 cm on each side (small enough to qualify for mini Sumo 16 SERVO 12.2012 competitions). It works with a variety of micro metal gearmotors to allow for a customizable combination of torque and speed; a stainless steel Sumo blade is available for applications that involve pushing around other objects. Arduino libraries and sample sketches are available for quickly getting a Zumo robot up and running. A Zumo robot kit for Arduino which includes a Zumo shield, Zumo chassis kit, and Zumo blade is available for $42.95 (with typical motor selection, the total becomes $74.95; Arduino and 4xAA batteries not included). For those who already have a Zumo chassis, a shield is available separately for $24.95. For further information, please contact: Pololu Corp. Website: www.pololu.com/zumo Free C++ Compiler M icrochip Technology, Inc., has announced a free C++ compiler with unlimited code generation — their MPLAB® XC32++ compiler. The MPLAB XC32++ supports all of Microchip’s 32-bit PIC32 microcontrollers. This compiler enables designers to develop and re-use C++ projects by making all of Microchip’s C language extensions available in an environment that is compliant with the majority of C++98 and C++2003 ANSI standards. Additionally, the free compiler includes Dinkumware® i-limb Digits T ouch Bionics has announced the worldwide launch of its latest prosthetic innovations for people with missing fingers with their new wrist-band and digit technologies. The new additions to the i-limb digits product line include a shorter, lighter prosthetic finger and a wrist-band unit that incorporates all of the processing and power systems for the prosthesis. “The new finger development enables ilimb digits prostheses to be made smaller, lighter, and more anatomically accurate, and therefore suitable for a wider population, such as those with smaller hands, or whose amputations are closer to the base of the fingers,” explained Ian Stevens, CEO, Touch Bionics. “The wrist-band unit provides the ability to build an i-limb digits prosthesis that has full wrist mobility and with easily interchangeable and rechargeable batteries.” Partial hand amputations — where people lose one or more digits — are more common than whole hand amputations or loss. The amputee population that can benefit from i-limb digits is estimated to be over 1.2 million worldwide. For further information, please contact: Touch Bionics standard C, C++, and template libraries. The free version of the XC32++ compiler is available for download at www.microchip.com/get/10E7. It has no time or memory limits, and can be used in commercial applications. For users who demand best-in-class optimizations or a network server license, the MPLAB XC32++ PRO Workstation License and MPLAB XC32++ PRO Network Server License are also available. For further information, please contact: Microchip Technology, Inc. Website: www.microchip.com Website: www.touchbionics.com LogicBlocks Kit S parkFun Electronics has released their LogicBlocks Kit — a new educational product designed to help students and beginners explore the sometimes obscure concept of digital logic. LogicBlocks represent the first in a line of upcoming products the SparkFun Department of Education will introduce as a way of enhancing computer science education. These new products hope to enable more creativity while teaching the fundamental aspects of understanding technology. Digital logic is the basis for digital computing and is SERVO 12.2012 17 one of the driving forces behind the world of electronics. It is essential in understanding how circuits and hardware communicate within a computer. The LogicBlocks kits include various blocks (such as Input, AND, OR, and NOT blocks) that snap together to create different strings of logic. Based on how the user assembles the LogicBlocks, they can see how different choices affect the output. The kit is easy to assemble and requires no soldering. The kits include all the parts necessary to start exploring digital logic and are priced at $39.95. For further information, please contact: SparkFun Electronics Website: www.sparkfun.com/LogicBlocks Emic 2 Text-To-Speech D esigned in conjunction with Parallax and Grand Idea Studio, the Emic 2 Text-to-Speech module is a multilanguage voice synthesizer that converts a stream of digital text into natural sounding speech, thus giving projects a voice. It has a simple command-based interface that makes it simple to integrate into an embedded system. Key features include: high quality speech synthesis for English and Spanish languages; nine pre-defined voice styles comprising male, female, and child; dynamic control of speech and voice characteristics, including pitch, speaking rate, and word emphasis; and the industrystandard DECtalk text-to-speech synthesizer engine (5.0.E1). Retail price is $59.99. Propeller ASC A lso new from Parallax is the Propeller ASC+ which is an Arduino shield compatible prototyping system designed to use existing Arduino add-on boards with the 18 SERVO 12.2012 Propeller’s SPIN language, Propeller Assembly, C, and C++. Simultaneous processing with existing Arduino shields is made possible so users don’t have to start over with new boards and setups. Attach shields to the board to be able to utilize the Propeller multicore processor with Arduino shield based projects. Retail price is $49.99. Dual Relay Board Control Kit O nce properly assembled, the dual relay board kit from Parallax allows users to control two high power devices up to 8A each via the included Omron mechanical relays. The dual relay board can be used to turn lights, fans, and motors on/off while keeping them isolated from the microcontroller. Independent control of each relay is provided via a 2 x 3 header, making it friendly with servo cables and providing a convenient connection to many development boards, such as Parallax’s Board of Education, Propeller Board of Education, Professional Development Board, and Propeller Professional Development Board. LEDs indicate relay status. Retail price is $19.99. For further information on any of these products, please contact: Parallax Website: www.parallax.com Continued on page 62 bots IN BRIEF OUT ON A LIMB Some of the most interesting forms of locomotion in the animal kingdom come from creatures without bones.We're talking cephalopods — like octopi — who use their tentacles to both "walk" and move in a bunch of other ways, often while carrying objects.This has inspired researchers from the Italian Institute of Technology and Kings College London to design a new sort of quadruped robot that walks around on air-powered soft tentacles instead of legs. This quadruped is called a continuum robot which means that it's got limbs (or arms or manipulators or what have you) that are curvy and flexible.The amount of curvature in each leg can be adjusted by altering the air pressure inside the three airfilled tubes that act as muscles and bones, and by doing this rapidly and in the right sequence, the robot can wiggle its way across a variety of surfaces at a speed that's somewhere between silly and menacing. One particularly nice feature about air-filled limbs is that they're inherently compliant which is a fancy robot term for bendy.They make great shock absorbers, and you can also beat on them with stuff and they won't break — mostly because there's nothing in there to break; they're just tubes with air inside.When fully inflated, the limbs are nearly rigid; they're springy when partially inflated, and they're soft when uninflated to the point where the robot can stuff itself into small spaces. At this point, the engine (whatever is providing compressed air) isn't mounted inside the robot itself, but it looks like there's plenty of room in there for some solenoids and a gas generator or something like that.The researchers suggest that robots like these might be adaptable to a wide variety of tasks, ranging from planetary exploration to swimming to mine detection. 20 SERVO 12.2012 LEAGUE OF EXTRAORDINARY ROBOTS Usually, you think of robot swarms as consisting of lots and lots of similar robots working together, but now we’re starting to see swarms of heterogeneous robots, where you get different robots combining their powers to make each other more efficient and more capable. The focus of this type of research is communication: getting a flying robot to be able to communicate with a swarm of ground robots by relying exclusively on visual feedback from LEDs. All you need to get this to work are lights, cameras, and some mildly intelligent robots. Since the ground robots can't see very far, they rely on a quadrotor to scout ahead and estimate the parameters of upcoming obstacles.Then, the quadrotor instructs the swarm on the ground how to team up to best overcome those obstacles. bots IN BRIEF PICK UP STICKS ROBOT STYLE One way of making a simple robot more capable is to give it the capacity to modify its environment.We've seen this in practice in the last year or two with robots that have the ability to create tools, build buildings, and even manufacture other robots.This concept can be taken even farther, though, with robots that can construct large structures out of amorphous materials like glue, foam, and toothpicks. Robots are fairly decent at using prefabricated materials to build things, but when you get out into an unstructured environment (whether it’s somewhere like a forest or a city after a major disaster), it doesn't really make sense to bring anything prefabricated because you have no idea what you’re going to need.What makes more sense is to bring along building materials that can be adapted to whatever you want onsite, which means large amounts of stuff you can use to build up into exactly what you need. Researchers from Harvard University and Worcester Polytechnic Institute have taken inspiration from animals like weaver birds, termites, and beavers, and have developed robots capable of using cheap materials to build large structures. Beavers (and weaver birds), for example, build things by sticking together large amounts of sticks.This new robot can do something very similar with prefabricated sticks (toothpicks) and glue. At this point, the robot in question has a deposition mechanism with which it just “flings" individual toothpicks after adding glue to them.While it has approximately zero control over placing the toothpicks into any sort of arrangement that would make structural sense, the sheer number of toothpicks (plus a generous helping of glue) means that eventually, the bot can build ramps or anything else that is basically a random pile of wood and glue. Termites, on the other hand, build structures out of mud without any underlying framework. Robots can do something similar with urethane casting foam. By successively depositing layers of liquid that puff up as they dry, a robot can build ramps or any anything else that consists of a random blob of foam. The researchers suggest that it might be possible to build things like arches and bridges with the toothpick-flinging method, once they figure out how to get the targeting down to something a little more accurate than the aforementioned random piles. Future research also hopes to make the ramp building both autonomous and adaptive, meaning that the robots will be able to look at an obstacle, figure out on their own what sort of structure they need to create to get over it, and then build that structure by themselves. PARO TURNS 10 Paro has officially been certified “the world’s most therapeutic robot” by the Guinness Book of World Records, and is celebrating its 10th birthday this year with limited edition colors. The robot — which was modeled after a baby harp seal — has totaled about 2,200 sales in its first decade (1,800 in Japan and about 400 in 30 other countries). Only about 200 units will feature the two new colors, “Charcoal” gray and “Sakura” pink.They retail for around 350,000 JPY ($4,500 USD), or about $1,000 more if you want a three year warranty. SERVO 12.2012 21 BUZZ ABOUT ROBOBee Harvard has been working on a robotic bee for five years now. Five years is a long time in the fast-paced world of robotics, but when you're trying to design a controllable flying robot that weighs less than one tenth of one gram from scratch, getting it to work properly is a process that often has to wait for technology to catch up to the concept. The RoboBee has been able to take off under its own power for years, but roboticists have only recently figured out how to get it to both take off and go where they want it to. Or at least, they're getting very, very close. With the addition of two small control actuators underneath the wings, RoboBee has been endowed with the ability to pitch and roll which is two-thirds of what it needs to be a fully controllable robotic insect.These maneuvers are currently open-loop which means that the RoboBee isn't getting any sensor feedback; it's just been instructed to steer itself in one particular way (which it does obediently until it violently crashes into something). The reason that RoboBee hasn't learned to yaw yet is because all three axes of motion (yaw, pitch, and roll) are coupled together such that it's difficult to get a pure output with a pure input. If you try to get the robot to pitch, it's going to yaw and roll a little bit too, and isolating yaw from pitch and roll is proving to be particularly tricky. Ongoing research will develop a feedback controller that can compensate for this, which should mean that a RoboBee capable of hovering and fully controllable flight will be buzzing our way sometime soon. Coordinated agile robotic insects can be used for a variety of purposes including: autonomously pollinating a field of crops; search and rescue (e.g., in the aftermath of a natural disaster); hazardous environment exploration; military surveillance; high resolution weather and climate mapping; and traffic monitoring. IN A THEATER NEAR YOU The new movie Robot & Frank features an award winning cast including Academy Award® nominee Frank Langella, James Marsden, Liv Tyler, and Academy Award winner Susan Sarandon. Set in the near future, Frank (a retired cat burglar), has two grown kids who are concerned he can no longer live alone.They are tempted to place him in a nursing home until Frank’s son chooses a different option. Against the old man’s wishes, he buys Frank a walking, talking humanoid robot programmed to improve his physical and mental health. What follows is an often hilarious and heartwarming story about finding friends and family in the most unexpected places. 22 SERVO 12.2012 EAR-Y ROBOT DESIGN Show the world what’s really on your mind and impress your friends with some of the most advanced brainwave technology available: brainwave cat ears. Necomimi’s cat-like reactive movements show how interested or relaxed you are in real time. It’s a fun, quirky addition to parties, bachelorette weekends, and tailgating at your favorite sporting event. This easy to use, cutting-edge technology is apparently totally safe.There are only two light-touch sensors on your forehead and ear. • Be one of the first to communicate with brainwaves! • Research-Grade Technology trusted by over 400 universities. Details • Your emotions move the ears. • Easy to wear and simple to use. • Four AAA batteries (not included). • For ages 14+. • 10 oz. Focused: Ears perk up. In the zone: Ears wiggle up and down. Relaxed: Ears drop down. TURTLE TALK Naro-Tartaruga is a robotic sea turtle from ETH Zurich.The reason to go with a sea turtle, as opposed to a fish, is because sea turtles are both easier to construct and better for carrying payload. Unlike a fish, sea turtles don't have articulated bodies, but they do have big fat shells that you can fill with all kinds of cool stuff like sensors and batteries. Propulsion and steering come from flapping fins, just like the real thing and with a top speed of just over 7 kph, Naro-Tartaruga will be leaving most real sea turtles in the dust. Naro-Tartaruga will provide direct measurements on energy consumption for a flapping fin mechanism in robotics. All the actuators — three for each fin — are in the same, waterproof body but they all still actuate the fin axle independently. Common systems use serial actuation principles where one motor drives a box with another motor which again drives the fin.This concept requires multiple sealed bodies and cables going from one to another which raises the energy consumption and risk of leakage. Another purpose of Naro-Tartaruga will be the development of autonomous navigation under water.The robot will be a platform allowing the use of different sensors for various tasks. Symmetric and clearly defined mechanical interfaces at the head and tail allow the exchange of modules for future research on underwater autonomy. Cool tidbits herein provided by www.botjunkie.com, www.robotsnob.com, www.plasticpals.com, http://www.robots-dreams.com, and other places. SERVO 12.2012 23 MacGyver BOTS Robots are increasingly being used in place of humans to explore hazardous and difficult-toaccess environments, but they aren’t yet able to interact with their environments as well as humans. If today’s most sophisticated robot was trapped in a burning room by a jammed door, it would probably not know how to locate and use objects in the room to climb over any debris, pry open the door, and escape the building. A research team led by Professor Mike Stilman at the Georgia Institute of Technology hopes to change that by giving robots the ability to use objects in their environments to accomplish high level tasks.The team recently received a three year $900,000 grant from the Office of Naval Research to work on this project. “Our goal is to develop a robot that behaves like MacGyver, the television character from the 1980s who solved complex problems and escaped dangerous situations by using everyday objects and materials he found at hand,” said Stilman, an assistant professor in the School of Interactive Computing at Georgia Tech. “We want to understand the basic cognitive processes that allow humans to take advantage of arbitrary objects in their environments as tools.We will achieve this by designing algorithms for robots that make tasks that are impossible for a robot alone possible for a robot with tools.” The research will build on Stilman’s previous work on navigation among movable obstacles that enabled robots to autonomously recognize and move obstacles that were in the way of their getting from point A to point B. “This project is challenging because there is a critical difference between moving objects out of the way and using objects to make a way,” explained Stilman. “Researchers in the robot motion planning field have traditionally used computerized vision systems to locate objects in a cluttered environment to plan collision-free paths, but these systems have not provided any information about the object’s functions.” To create a robot capable of using objects in its environment to accomplish a task, Stilman plans 24 SERVO 12.2012 to develop an algorithm that will allow a robot to identify an arbitrary object in a room, determine the object’s potential function, and turn that object into a simple machine that can be used to complete an action. Actions could include using a chair to reach something high, bracing a ladder against a bookshelf, stacking boxes to climb over something, and building levers or bridges from random debris. By providing the robot with basic knowledge of rigid body mechanics and simple machines, the robot should be able to autonomously determine the mechanical force properties of an object and construct motion plans for using the object to perform high level tasks. GET A (BETTER) GRIP For all that Willow Garage contributes to the robotics community, it's not often that they release new hardware. However, they've announced a new 3D printed adaptive gripper design for the PR2: the Velo 2G. The cool thing about the Velo 2G is the fact that it can passively adapt to all sorts of objects.You don't have to do any fancy programming to get the fingers to grip around an object.The gripper design itself takes care of that for you.This works on square things, round things, thin things, irregularly shaped things, and all kinds of other stuff that robots are likely to find lying around your house. The Velo 2G is just an alpha prototype for now and it's not for sale, but given the simple design, single actuator, and 3D printability, we're hopeful it will not be cost-prohibitive once it is available. Parallel grippers are effective on a wide range of objects and tasks, executing fingertip grasps between two perfectly opposing pads. However, adding the ability to envelop objects greatly increases the stability of the grasp in many situations.The Velo has two fingers with two joints each and is tendon-driven. Aiming to reduce the complexity and potential cost,Willow used a single actuator, resulting in an underactuated design.The gripper executes fingertip or enveloping grasps by passively adapting to the shape of the grasped object. Extension is passive, provided by springs. The route of the tendons and the magnitude of the extension forces are optimized to execute both types of grasps, and to passively transition from one to the other based on the shape of the grasped object.The forces applied to the target object are also optimized to result in stable grasps in a large set of possible configurations. The tendon-driven design allows for a modular implementation with a tool-less quick-change interface between the kinematic module (composed of the palm and fingers) and the actuation module (containing the motor and the transmission).This interface allows easy experimentation with various types of kinematic components, and also enables easy replacement of the kinematic module should it become damaged. For prototyping this design,Willow explored multiple emerging 3D printing technologies.The palm and fingers are 3D printed in nylon using an SLS process.The actuator module consists of a single motor attached to a transmission built around a 3D printed recirculating ball screw. SERVO 12.2012 25 ction in the Discuss this seine forums at az SERVO Mag vomagazine.com .ser http://forum Featured This Month: BUILD REPORT: Finding a Happy Balance 26 BUILD REPORT: Finding a Happy Balance ● by Pete Smith by Pete Smith 28 Happy New Year from the Combat Zone by Kevin Berry 28 CARTOON 29 Building the Atlanta Insect Arena by Michael Jeffries T oday's Beetles and Ants have drums and beater bars that can spin in excess of 20,000 rpm. If the weapon is not properly balanced, then the severe vibrations can make driving very difficult, and damage the electronics and motors of the bot itself. R/C model aircraft have the same issues with propeller and helicopter blades, and its from 34 The History of Robot Combat: Robot Combat in Brazil by Morgan Berry FIGURE 1. Turnigy Balancer Kit. www.servomagazine.com/ index.php?/magazine/article/ december2012_CombatZone 26 SERVO 12.2012 that source that I found a simple way to minimize the problem. Balancing a beater bar has two components. First, you must design it so that it is balanced from side to side. If you have the teeth on one side of the bar at one end and on the other side at the other end, then as the bar spins it will vibrate badly as each tooth in turn throws its side of the bot up and down; there is no counteracting force to balance it out. The easy solution is to have teeth on both sides of the bar at each location. Then as each tooth is going up, it has a corresponding one going down so the forces balance each other out. I use a variation of this on my bots where I have two teeth on each side, but with two of them closer together and with the same center line between each set. This allows each tooth to get a better bite as it contacts a target. Make sure you get the design right as its very hard — and perhaps impossible — to correct this if you get it wrong. If in doubt, ask another builder. Assuming you do get the design right, then — in theory — when you make the beater or drum it should be balanced. However, manufacturing tolerances mean that it’s likely that it will still vibrate badly. The reason for this is that the weight on either side of the axle’s center axis is not exactly the same. The excess weight on one side forces the bot up and down with every rotation. Up until now, I have simply spun the beater on its axle to see which side always ends up at the bottom. I then remove a little material evenly from that side and spin it again until it no longer stops consistently in one place. This works pretty well but it’s limited by the rolling friction in the needle roller bearings commonly used. Once the weight difference is too small to overcome that friction, this method no longer works. However, I found the solution one day while looking at the "New Items" listing on the Hobby King website (www.hobbyking.com). It came in the form of the Turnigy R/C universal main blade balancer (Figure1). It’s designed for balancing props, but I saw that it could be easily adapted to help balance small beaters and drums. FIGURE 2. Assembled. It goes together easily with the three rods tying together the two carbon fiber side walls (Figure 2). The ball bearing units are already fitted for you. The device that secures the prop can be discarded because we won’t be using it. The assembled balancer is just the right size for a Weta beater bar (Figure 3), and could be easily modified to fit other sizes by replacing the rods with longer ones. The ball bearings are very free running and allow much finer balancing. The beater shown had been balanced the old way, but when placed on the ball bearings it quickly became clear that it still was out of balance and required a little extra work. You could build a similar device yourself, but at about $12 plus shipping it would be hard to do it cheaper for small bots. It could also be scaled up to work with much bigger bots. The idea could prove useful all the way up to Heavyweights. SV FIGURE 3. Balancing a Weta beater. SERVO 12.2012 27 Happy New Year from the C mbat Zone ● by Kevin Berry G rit your teeth, readers. It's what you've come to expect in December issues of magazines — the dreaded year-end retrospective. The cynical would say this is just a cheap editorial trick to fill column inches without research or original thinking. The more discerning reader would see it as a chance to review the large amount of high quality material presented in 2012. ("Whoa! I'd forgotten about that article! I'll just go to my library of SERVO back issues and re-read that.") So — cynic or civilized — torque down your set screws and get ready. Combat Zone has been a regular feature for seven years. During that time, we've tried to shift with both the trends in the sport, and with the ebb and flow of contributors. This year featured many more event reports than usual, with fewer build reports and product reviews. Looking over the 12 issues, I'm proud of our contributors for the breadth, depth, and quality of the articles they submitted. 28 SERVO 12.2012 One new feature this year was the History of Combat series by our own Morgan Berry. In five articles, she traced the sport from the murky (and surprisingly hard to uncover) origins to some of the ongoing events like Robot Battles at DragonCon and the granddaddy of the all, RoboGames. Stand by next year for more on the remaining — and pleasantly persistent — events in our sport. One thing most readers probably don't understand is how hard it is to supply a monthly publication. I call it "Feeding the Monster." The Monster demands content, month after month, with hard deadlines, without excuse for failure. Combat Zone tries to present four to seven quality articles each month. While we have a solid cadre of regular writers, we often fall short of this goal. It's not hard at all to contribute. Anyone who participates in the sport as a builder, organizer, supplier, or spectator is welcome to work with us on articles. Our editorial staff is very encouraging and tolerant for beginners, and anyone interested in submitting to the Combat Zone is more than welcome. I'm happy to kick ideas around, review draft articles, even proofread (as long as you've run spel and gramer check first!). We can talk you through taking and submitting photographs, and how to cover an event. So, next time you're building a bot, take pictures! At an event? Take a few notes. Try out a new product? Send us a couple hundred words. Seriously, one of the things I'm most impressed with is how well our young builders write. And let's face it, having internationally published articles by the time you apply for college is a HUGE resume builder. Plus, it’s not bad for us old folks when a career change is needed, either. Just drop an email to [email protected]. Thanks for a great combat year, and we look forward to our eighth season of CZ with lots of input from — and for — builders. Remember, this is YOUR section of SERVO. Help us keep it great! SV Building the Atlanta Insect Arena ● by Michael Jeffries Every year at Dragon*Con in Atlanta, GA, they host two robot combat events. On Sunday, it’s Robot Micro Battles, with one and three pound robots facing off. On Monday, it’s Robot Battles (http://robotbattles.com) where the 12 and 30 pound robots fight. For the large robots, the event takes place on an open stage with weapon limitations for audience safety. The small robots, however, fight in a full arena. During Robot Micro Battles in 2011, the arena was damaged and would need to be repaired if it was to be used again. Instead of repairing the old arena, it was decided that a new better one would be made. With the event taking place in a hotel during a massive convention, there are a few unique issues that come up. First, you need to be able to quickly unload the arena to avoid being parked too long in the loading zone near the hotel that hosts the event. Second — with limited time before and after the event to perform setup and teardown — it must be quick to assemble. Third, as there is no money coming in via registration fees, costs must be kept low to minimize the financial pain of the build and any repair costs. These issues guided the direction of the build and helped to produce a unique arena that can be put together in an astoundingly short amount of time. The build team for the arena had a wide range of skills that allowed the tasks to be split for increased efficiency. During the initial stage of the build, half the team worked on the wood portions of the structure while the other half focused on the metalworking portion of the build. One of the guiding principles for the entire build was “Use the least amount of threaded fasteners possible for non-permanent connections” which means many of the components in some way slot or slide together, and are aided by spring clamps and pinned connections. The legs of the arena are 4x4s with a cutout at the top for the roof and a few pieces of 1x4 near the lower portion of the leg to align and support the floor sections. The floor and roof are assembled perpendicular to one another to minimize arena bowing. There are also four support legs under the arena floor along the center FIGURE 1. A large portion of the metal used for the arena build. seam to provide additional support. During each major stage of the build, we performed test fits to ensure that the manufacturing tolerances weren’t causing assembly issues. One issue with the old arena was the short barriers between the robots and the expensive 1/4 inch polycarbonate walls which led to some cracked polycarbonate that was part of the motivation for the rebuild. To reduce the chances of severe damage, the walls were designed to have easily replaceable, smaller, and better protected polycarbonate walls. This was done through two design features. First, the arena has a four inch tall shock mounted steel bumper along the floor that keeps most weapons away from the polycarbonate. Second, the polycarbonate is slotted into extruded framing which means that there are no sharp corners or stress concentration areas. This also means that the SERVO 12.2012 29 FIGURE 2. This is the support structure for the arena floor. FIGURE 3. The framing for half of the two-part roof gives us four equal sized rectangles to cover with polycarbonate. polycarbonate can flex and move to an extent under a heavy impact, further reducing the chances of failure. With the walls so well protected, there weren’t many exposed surfaces that generally are hit by weapons that aren’t protected. The main area that was not covered was the arena side of each leg. In an effort to extend the life of the legs, we attached some thick steel angle bracket for the first nine inches of the leg above the arena floor. After completing the walls and adding the leg guards, we attached the aluminum flat stock that slots into the extruded channel. This mounting method retains the walls across a large surface area and helps spread any stresses out to reduce the chance of individual screws breaking during use. With things moving along quickly, it was time to focus on the aesthetic aspects of the arena build. The two layer floor allows easy replacement of damaged floor sections, but hardboard is dark and shiny which won’t turn out well on camera, so a coat of gray primer was added. After the primer dried, we added starting squares to each corner. The polycarbonate panels were attached to the roof, then the roof panels got a coat of paint. These roof panels are held in place with spring clamps during an event to prevent them from popping open during an impact. One member of the build crew insisted on adding color to the arena structure as they were sick of painting everything black, so the legs ended up getting a coating of bright red paint. At this point, the arena was nearly done. The main build left was the push-out box and installation of the lighting. Before doing that, it was time for another test fit to verify that nothing had crept up on us during the last few days of work. With everything looking good, it was time for the last few pieces to be made. The catch box was designed to hold a large number of robots since rumbles are fairly common at Micro Battles events, and with FIGURE 4. The support sections and cutouts are visible on the legs, as well as the spring clamps that hold most of the arena together. 30 SERVO 12.2012 FIGURE 5. Early assembly check to verify that there are no problems with the current components. FIGURE 6. One of the completed arena walls prior to the application of caution tape wall decorations. FIGURE 7. The steel leg guards should help keep arena damage to a minimum. Special thanks go out to Freeside Atlanta (Freesideatlanta.org) and My Inventor Club (MyInventor Club.com) who allowed us to use their space and resources for the arena build. The build team consisted of myself, Randy Farmer, Rob Dillard, Brandon Davis, Lewis Baumstark, Jon Briggs, Julie FIGURE 8. Wall retention is handled by the aluminum flat stock screwed into the floor and roof of the arena. Simancek, Michael Benedict, and Charles Guan. SERVO 12.2012 31 FIGURE 10. The hinged polycarbonate panels are visible while the arena roof dries in the sun. FIGURE 9. Nice, bright starting squares for the freshly painted arena floor. FIGURE 12. The arena looks ready for competition, but there are a few more small details left. FIGURE 11. Painted legs with unpainted leg guards. FIGURE 13. The lights are on and the push-out box is installed at Dragon*Con 2012 Robot Micro Battles. 32 SERVO 12.2012 only one pushout in the arena there would likely be a large number of robots attempting to fill it. Below floor level, the box is painted plywood. Once you reach floor level, the majority of the upper structure consists of hinged polycarbonate panels to make it easier to see what’s happening in the arena from that side. The lighting system consists of a series of LED strip lights wired together to provide even lighting in environments that aren’t bright enough for normal use. There is an element I haven’t discussed yet. You may have noticed a square cutout in the center of the arena. This is for the arena hazard. The arena hazard is the creation of Charles Guan (etotheipiplusone.net) and consists of a 12 inch spinning disk that can be raised to flush with the floor, or lowered several inches. FIGURE 14. The arena hazard during testing. When operated in the low position, robots that are unlucky enough to fall into the pit tend to get spun around and bashed against the walls. This effect is heightened by the 12” sanding pad that is stuck to the disk for events. It has been known to toss robots out of the pushout on occasion. All of the elements came together for Dragon*Con and the arena worked flawlessly. Since then, the arena has been used by Atlanta Robotic Combat for a one and three pound combat event at the Atlanta Mini Maker Faire with the intention of hosting more events in the future. SV FIGURE 15. Photo from the Atlanta Mini Maker Faire event. Also visible are the barrel bolts used to provide additional support for the arena walls. SERVO 12.2012 33 The History of Rob t Combat: Robot Combat in Brazil ● by Morgan Berry recent years, robot Ihavencombat has expanded to a large international following. Countries all over the world have adapted the sport in unique ways. Many countries currently have robot combat events, including Australia, England, Germany, and the Netherlands. One country that has a particularly active community is Brazil. Professor Marco Meggiolaro at Pontifícia Universidade Católica do Rio de Janeiro works with students at the university to build some of the most competitive robots in the FIGURE 1. The Riobotz team shows off their trophies and bots. world, including the renowned Touro series of bots. Prof. Meggiolaro also wrote the Riobotz Combots Tutorial, an incredibly helpful tool for builders. Several large events are held in Brazil every year; one of the most notable of these is RoboCore. Prof. Meggiolaro gave me all the details on RoboCore, the Riobotz Tutorial, and much more. I see your most recent event was in early November. Tell us about it. What was the same as others, what was new? Since 2005, there have been two national combat events in Brazil: Winter Challenge and the ENECA. The latter is the annual meeting of control students and engineers. However, unfortunately, the ENECA event does not include combots anymore — after 2009 — so the Summer Challenge was created last year. Same event, same rules, mostly the same competitors. 34 SERVO 12.2012 How about a little history on RoboCore. How long, how many, what's changed? [RoboCore] started with the first Winter Challenge in 2005. Their arena was a huge upgrade from the one used between 2001 and 2004 in Brazil in the ENECA event. Since then, the Winter Challenge has been held every year. They also became the main organizers of the ENECA events from 2005 to 2009, and now the Summer Challenge, in its second edition. In the beginning, there were just Middleweights. Then came the Hobbies. A few years later, the Feathers, and this year the Beetles debuted. This summer, for the first time there will also be Lightweights, and flamethrowers are now allowed. The event also includes 3 kg R/C Sumo, 3 kg auto Sumo, LEGO Sumo, 15 lb hockey, and line follower events. Is there a sponsor for this event? Paulo Lenz, who owns RoboCore, takes care of everything. The competitors must pay fees, just like at RoboGames or COMBOTs. They also have an online store, probably the only one in Brazil focused on COMBOTs. The nice thing about the event is that they choose a venue and city in such a way that the audience does not need to pay for tickets, arrange sponsorship with the local mayor, etc. This seems to have started as a student competition. Is it still for students, or have you grown a larger community? It’s a much larger community, even though most competitors are still students or alumni that previously participated as students. There are teachers competing, as well. And, of course, hobbyists and even robot companies such as the owners of Orion. You bring teams every year to RoboGames. What do your teams think about competing there, as different from Brazilian events? The competition is surely tougher in the US, even though the gap has been diminishing with time. Competing in the US is still the ultimate challenge. The events in Brazil are, however, more passionate than in the US, the rivalry is much more intense, especially when you have dozens of students from each university in the audience, cheering for their teams. But, despite the intense rivalry, most teams end up helping each other. You did an event on ice a few years back. Please tell us about that — it sounds "cool!" It was very cool and surreal. Back then, there was just one vertical spinner, so it was feasible. Nowadays, with so many powerful drumbots (there are a lot in Brazil, from other teams, probably inspired by the success of the Touro family) and vertical disk spinners FIGURE 2. Dr. Meggiolaro wrote the highly popular Riobotz Tutorial which can be downloaded for free online. here, the arena wouldn’t survive many matches. Not to mention low clearance horizontal spinners which would make the arena look like the moon surface. The main challenge was to get good traction. Several fights were won simply by outmaneuvering the opponent and hitting them while they were struggling to make turns on the ice. In the RioBotz tutorial, there’s a photo of the wheel we came up with. It was perfect for ice traction, and led Touro to its victory in the final match against the vertical disk spinner, Vingador. We simply used a Colson wheel, with flat head selfdrilling screws attached along the circumference in a single row. We would get a great traction in both forward and reverse since the screws were attached alternately with angles of plus or minus 45 degrees. A single row would sink much better into the ice than a double row (we tested several screw configurations). You produced the RioBotz Combots Tutorial, which reads like a physics book. What came first, the lessons or the bots? In other words, did you SERVO 12.2012 35 FIGURE 4. The team's solution to the problem of traction in the ice arena was a wheel that would dig into the ice to create traction. teach physics by designing bots, or did the thrill of fighting machines drive you to analyze them later? The bots came first. All knowledge was shared by oral classes and meetings with the team members. When the team grew from six (in 2003) to almost 20 students — with several of them graduated, requiring a constant influx of freshmen to replace them — I started writing down the lectures. Then, they became presentation slides, followed by several short tutorials, many of them handwritten. With time, I started to organize the book collecting all these tutorials; this is why the book itself is called a tutorial (even though it’s much longer than a traditional one!). After its release in 2006 in Portuguese for free as a PDF, quite a few foreign competitors with some Spanish skills (Spanish and Portuguese are relatively similar) told me that they liked it very much, and would really like to see someday an English version, which was released in 2009 — both as a free PDF and as a non-profit printed version. Brazil has become a hotspot for robot combat activity recently. From the standard combat events to the super cool ice arena event, there is a lot of exciting work going on down in South America. This is good news for builders everywhere, since the innovations in Brazil quickly spread to the rest of the world. In order to maintain an active and agile community, it’s important to look to other parts of the world for ideas and inspiration that can be brought back to the states. Through online communication and international travel, robot combat is quickly becoming a borderless community, with lots of communication and collaboration across the globe. SV All photos courtesy of Professor Marco Meggiolaro. FIGURE 3. Touro Maximus is the 220 lb version in Team Riobotz's Touro series. 36 SERVO 12.2012 Extreme Robot Motor Control www.robotpower.com High-Current motor control for Arduino™ Software and plug compatible with our MegaMoto shield MEGAMOTO Plus Shield 40A peak 6 30A Continuous with fan - 4 6 Current sensor outputs can be sent to any analog pin 6 Stack up to three units on one Uno or compatible 6 Independent half-bridges can control brushless/steppers too! MADE IN THE USA Scorpion XXL 6 6 6 6 6 6 7V - 28V Dual 40A+ Peak H-Bridges Current/Temp limiting R/C inputs w/mixing Optional enclosure 3.25” x 2.25” x .5” Co So min on g ! The Vyper 6 6 6 6 6 6 6 Single 120A+ H-Bridge 8V - 42V R/C inputs w/mixing (2 units req.) Analog pot input Supports 8 AWG wires! Optional enclosure 2.85” x 2.25” x 1.75” Phone: 253-843-2504 s [email protected] STEER WINNING ROBOTS WITHOUT SERVOS! erform proportional speed, direction, and steering with only two Radio/Control channels for vehicles using two separate brush-type electric motors mounted right and left with our mixing RDFR dual speed control. Used in many successful competitive robots. Single joystick operation: up goes straight ahead, down is reverse. Pure right or left twirls vehicle as motors turn opposite directions. In between stick positions completely proportional. Plugs in like a servo to your Futaba, JR, Hitec, or similar radio. Compatible with gyro steering stabilization. Various volt and amp sizes available. The RDFR47E 55V 75A per motor unit pictured above. www.vantec.com P Order at (888) 929-5055 SERVO 12.2012 37 POWER BEYOND THE SHIELD By John Blankenship and Samuel Mishal www.servomagazine.com/index.php?/magazine/article/december2012_Blankenship Discuss this article in the SERVO Magazine forums at http://forum.servomagazine.com Bryan Bergeron’s editorial comments in the October 2012 Nuts & Volts concerning Arduino shields were right on target. He explained that shields provide a convenient and nearly limitless way to expand the hardware capabilities of not only Arduino processors, but any processor offering the same form factor. If you are willing to accept some limitations though, there are expansion options that potentially can provide both convenience and power beyond that of standard shields. This article examines one alternative and provides insights that might inspire you to develop your own solutions. S hields are basically stackable daughterboards that allow a microcontroller to connect to a wide variety of hardware options without having to breadboard a solution. In fact, there are so many options available for the Arduino that the pin assignments for one shield have a reasonable chance of conflicting with other shields that you might need for a large, multi-shield project. Even if no hardware conflicts exist, it is generally up to the user to solve software conflicts involving interrupts and other timing constraints that may exist with code required for the chosen shields. An alternative solution is to create a complete subsystem in the form of a super I/O chip capable of providing not only the hardware interface for a fixed number of peripheral devices, but also the related software drivers. The requirement of a fixed number of peripherals is, of course, a major limitation when compared to standard shields. For many applications though, the lack of software complications makes this limitation an acceptable alternative. 38 SERVO 12.2012 If you have developed a number of robotic projects in the past, you can bundle motor driver and sensory subroutines from those projects to create your own selfcontained super I/O chip, making it easy to reuse your work in future projects. In order to give you a framework for how this can be accomplished, we will use the RobotBASIC Robot Operating System on a Chip (RROS) as a specific example. Although the RROS chip is designed and intended to be used over a wireless link with RobotBASIC (as discussed in the September 2012 issue of SERVO Magazine), it can also serve as a stand-alone system allowing it to be used as a super I/O peripheral. At the end of this article, we will carry this concept even further by using a PCB (printed circuit board) to create a complete, reusable I/O subsystem. Basically, the RROS chip provides the physical interface for a wide variety of motors and sensors. It also contains driver routines for controlling the supported motors and reading data from the supported sensors through a welldefined serial protocol. This means that the RROS chip Figure 1. provides all of the low-level functionality necessary to build a fairly sophisticated robot. Use Any Microcontroller Figure 1 shows how the RROS chip can be controlled by an external processor. When you have an intelligent I/O processor handling the time-sensitive details associated with controlling motors and interrogating sensors, then the intelligent portion of your robot’s programming can reside in almost any microcontroller that has the ability to communicate at 9600 baud — regardless of its speed or number of I/O pins. The processor uses this interface to tell the RROS chip what to do without having to worry about the details of how anything actually gets done. We will use specific examples to demonstrate this idea shortly. First, let’s examine how the controller communicates with the RROS chip. The protocol of the serial interface for the RROS chip is very specific. Commands to the chip are always two bytes: a command byte followed by a parameter byte which should be zero if not needed. The RROS chip can react to nearly 100 commands, but you may prefer more or less if you design your own system. Some of the commands are used during initialization to specify what types of motors and sensors are being used. Once the chip is properly initialized, other commands move the robot forward or backward, and turn it left and right. The second parameter for these commands controls how far the robot should move or turn. Each time a command is sent to the RROS, it returns exactly five bytes of sensory information. The data normally returned by the RROS assumes that the robot’s perimeter sensors have been organized into three levels. Objects around the robot’s perimeter that are detected at very close range are reported as bump data. Objects slightly further away are reported as feel data (as if the robot is reaching out to feel its way through a room). Finally, the actual distance to objects is reported as range data. The RROS also collects data from line sensors and specialized hardware (such as a compass). Time-Sensitive Data There are commands to read some of the above data such as the compass heading or the distance to objects within the robot’s view, but some sensory information (bump, feel, and line) is so time-sensitive that it is actually obtained and returned by the RROS without it being formally requested. An example of a situation needing Command Op-code Returned Bytes Initialize Forward Backward Turn Right Turn Left Read Compass 3 6 7 12 13 24 bump,feel,line,0,0 bump,feel,line,0,0 bump,feel,line,0,0 bump,feel,line,0,0 bump,feel,line,0,0 bump,feel,line,degrees Figure 2. SERVO 12.2012 39 char SenseData[5]; // used to hold returned data char BumpData, FeelData, LineData; int Range, Degrees; void SendCommand(char Command, char Parameter) { char SendData[2]; SendData[0]= Command; SendData[1]= Parameter; Serial.write(SendData,2) while(Serial.available() != 5) ; // wait for 5 bytes to arrive Serial.readBytes(SenseData,5) BumpData=SenseData[0]; FeelData=SenseData[1]; LineData=SenseData[2]; if(Command==24) // read compass Degrees=SenseData[3]*256+SenseData[4]; if(Command==192 | Command==193) Range= SenseData[3]*256+SenseData[4]; } Figure 3. #picaxe 08m2 setfreq m8 Symbol Symbol Symbol Symbol Symbol Symbol Symbol Symbol Symbol Command = b0 Parameter = b1 Bump = b2 Feel = b3 Line = b4 Temp1 = b5 Temp2 = b6 Degrees = w5 Range = w6 Figure 4. SendCommand: serout C.2,T9600_8,(Command) serout C.2,T9600_8,(Parameter) serin C.3,T9600_8,Bump,Feel,Line,Temp1,Temp2 if Command=24 then Degrees=Temp1*255+Temp2 endif if Command=192 or Command=193 then Range=Temp1*255+Temp2 endif return Main: Command = 3 Parameter = 255 gosub SendCommand Command = 138 Parameter = 0 gosub SendCommand Parameter = 1 Again: ;Move Robot Forward Command = 6 gosub SendCommand if Line=0 then ;Turn to the left Command = 13 gosub SendCommand else ;Turn to the right Command = 12 gosub SendCommand endif goto Again Figure 6. Figure 5. timely information could be a robot following a line, because the robot could lose the line if the turning decisions are not made quickly. Figure 2 shows the operational codes for a few of the RROS commands, as well as the format of the returned data. Bump, feel, and line data are byte-sized entities with each bit indicating the condition of a specific sensor. Compass and range data are two-byte parameters with the first byte being the most significant. While all this may sound complicated, controlling the RROS chip is actually very easy if you create a small subroutine that can send out two bytes of data over the serial interface, and then wait for five bytes to be returned. The exact coding for such a subroutine depends on the make and model of the processor you use, but let’s look at some code fragments to demonstrate the 40 SERVO 12.2012 void main(void) { // initialize SendCommand(3,255); SendCommand(138,0); // follow the line while(1) { SendCommand(6,1); // move forward if(Line==0) SendCommand(13,1) // turn left else SendCommand(12,1) // turn right } } basic principles involved. Arduino and PICAXE If you are using an Arduino processor, for example, the interfacing routine might look like the code shown in Figure 3. Figure 4 shows a subroutine with the same functionality for a PICAXE processor. Since many controllers use a syntax similar to one of these examples, it should not be a problem to create the routines for other processors. Once you have prepared a SendCommand routine, it is an easy task to write microcontroller programs to control the RROS chip. Let’s demonstrate this with some PICAXE code that allows a robot to follow a line on the floor as shown in Figure 5. In order to keep the example easy to follow, we will assume that a single line sensor has been Figure 7. connected to the RROS chip. Let’s also assume that the robot is powered by DC motors (also connected to the RROS chip). When the line sensor sees a line, we want the robot to turn right, away from the line. If the line is not seen, the robot should turn left, finding its way back to the line. This is certainly not a vigorous algorithm, but it is sufficient to demonstrate the principles of how to code an application. The first thing the controller must do is initialize the RROS chip. It can do that by sending the command code 3 followed by a parameter byte. Usually, the parameter for this command will be zero because it is generally not needed, but the PICAXE we used for this example is an 08M2 which is very slow and can have trouble receiving serial data arriving too quickly. We anticipated such problems when we designed the RROS and have provided a solution. We can tell the RROS chip to add a small delay between serial data bytes by using a parameter of 255. The initialization code must also inform the RROS that DC motors are being used. This is done using the command code 138 with a parameter of zero. A loop is then used to continually move the robot forward slightly, then turn left or right based on the line sensor data. Since all of these movements are very small, the parameter is set to 1 before the loop and is used throughout the loop to control the amount of movement for both forward and turning. Figure 6 shows a Arduino version of this program. This example is very basic, but it demonstrates how easy it can be to program a robot’s behavior if you have a subsystem capable of handling all of the low-level details for you. Since the low-level routines only have to be developed once, you can make them as versatile and powerful as you wish. Our RROS chip, for example, has commands that allow us to specify how quickly both DC and servo motors ramp up and down. It even manages wheel encoders if they are available. You might find that the RROS chip meets all of your needs, but even if you decide to design your own chip you can do so knowing that all the work required need only be done once. If you decide this methodology might work for you, consider designing a PCB assembly that provides mounting options for all the sensors normally used in your projects. Figure 7 shows a PCB we built that provides connections to SERVO 12.2012 41 Figure 8. the RROS chip for a wide variety of motors and sensors, as well as a Bluetooth transceiver. The board shown in Figure 7 truly represents a complete I/O subsystem since the RROS chip provides all the low-level control needed when building a robot. Because of this embedded power, the controlling software can be small and easy to write and debug as evidenced by the line following applications of Figures 5 and 6. If the supported motors and sensors as well as the command structure for the subsystem is sufficiently generalized, you should be able to use the board for many projects without having to start from scratch. Just plug in the sensors you need and begin writing the high-level command code to accomplish your goals. In order to demonstrate that this is a viable concept, we simply replaced the Bluetooth transceiver in Figure 7 with a small board containing a PICAXE processor (see Figure 8), allowing the PICAXE to completely control the entire I/O subsystem with programs like the one in Figure 5. Notice that the PICAXE board is amazingly simple. It has no components other than the processor itself. The power for the processor is obtained from the Bluetooth socket and 42 SERVO 12.2012 communication is handled over the same connections used for the adapter. Compare this concept to using standard Arduino Shields. Imagine how many shields it would take to provide the same functionality (motor controller, perimeter sensors, line sensors, a compass, battery monitoring, etc.) as the board shown in Figure 7. Instead of stacking shield after shield on a processor board, you simply add an appropriate processor board to the I/O subsystem. (Which seems easier and more cost effective to you?) Standard shields can certainly reduce development time for many situations and they are ideal for handling the interfacing for one or two types of peripherals, but we feel that using a super I/O chip or a complete I/O subsystem can have many benefits — especially for robotic applications that often require the same or similar sensory configurations. We invite you to study the commands available for the RROS chip to help you decide if this concept might work for you. SV The complete 250 page RROS manual can be downloaded from www.RobotBASIC.com. GREAT DEALS! Robotics Showcase CAN your modules talk like these? Adrenaline PWM Generate 48 PWM signals from anywhere on network Adrenaline Power Broadcast battery/charge status to entire network Adrenaline Edge Adrenaline BlueTooth Broadcast data to all nodes (keyboard, mouse, PS3 and more) (Actual products may differ from shown) 128x64 Graphic LCD CAN network 2 Light Sensors Buzzer Up to 8 RC Servos Tired of loose wires? Building your project from scratch again? - OR - Move on up to 8 DC motors 2 Sonars. 3 Lasers, Relays. LED bar Quick Adaptors for : MIDI, RS232, CAN, Wifi $159 Adrenaline Edge Just 1 cable adds a new node to the network! and more. www.beyondkinetics.com Program with the familiar Arduino dev environment Build the Kronos Flyer by Michael Simpson Part 2: Design and Parts Breakdown FIGURE 1. www.servomagazine.com/index.php?/magazine/article/december2012_Simpson \ Discuss this article in the SERVO Magazine forums at http://forum.servomagazine.com I must have built 20 variations of the Kronos Flyer in preparation for this series. Some of them flew well, but were not upgrade-friendly. Others looked very cool, but would be difficult to build without advanced machinery. I finally settled on a design (shown in Figure 1) that looks good, is easy to build, and is easy to upgrade. 44 SERVO 12.2012 Basic Design The Kronos Flyer design consists of four aluminum booms sandwiched between two pieces of 1/8" Baltic birch plywood as shown in Figure 2. The power distribution board and ESCs are placed on these platforms. The motors are mounted on a small piece of the same plywood, and are attached to the end of each boom. A third platform is added that will allow you to attach your flight controller. A set of helicopter landing skids are added to the bottom of the craft. Kronos Flyer Frame Detail The aluminum booms are made from a single piece of 1/2" x 96" CChannel. Each boom is cut to a length of 9-5/8". You will be able to get two complete sets of booms out of the 96" C-Channel. This will get you some backup parts in the case of a very bad crash. C-Channel can be purchased at most home centers. You can use a jig saw, miter saw, reciprocating saw, or hack saw to cut the booms to length. The holes in the booms are all 9/64" in diameter. All the plywood pieces are cut from a single 12" x 24" of Baltic birch hobby plywood. These sheets can be purchased online or from most craft stores. The two lower platforms are 6" x 6". The upper platform is 5-1/2" x 51/2". The four motor mounts are 11/2" x 2-1/2". You will need a small handsaw, jig saw, miter saw, or scroll saw to cut the plywood pieces. The holes cut into the plywood pieces are 9/64", 1/4", and 1" in diameter. The 1" holes should be cut with a forstner bit or scroll saw. If you can't cut the plywood pieces yourself, I will be offering a laser cut set of all the platform and motor mount parts. The set has a couple upgrades and includes a wood FIGURE 2. template that can be used as a guide to drill the booms. The hardware (shown in Figure 3) is mostly standard #6 machine screws, and can be purchased at most home centers and hardware stores. You will need: • Four #6-32 x 2" machine screws • Four #6-32 x 1-1/2" machine screws • 12 #6-32 x 1" machine screws • 50 #6 washers • 36 #6 hex nuts • • • • • Four #6 spacers 1/2" long 16 #4-40 x 1/2" machine screws 16 #4-40 locknuts 20 medium-sized tie wraps Two Velcro™ straps (to hold the battery) Depending on where you get the hardware, you should be able to build the frame for less than $50, with parts to spare. FIGURE 3. SERVO 12.2012 45 Landing Gear The landing gear shown in Figure 4 is intended for use with a TREX 500 helicopter. The set consists of a skid set, pipe set, and skid nut set. Hobby King sells these at a considerable savings, and they go by the following part numbers: • Skid Set: HK# 500-139, Align# H50122. • Skid Nut Set: HK# GT500-141, Align# H50052. • Pipe Set: HK# GT500140, Align# H50090. FIGURE 4. Note that these can only be ordered from the Hobby King international warehouse. The skid set is required, but you can use any 1/4" diameter rod for the skid pipe. While the skid pipes shown here look good and are ultra light weight, they bend very easy. If you are not an experienced flyer, you might want to consider wood or fiberglass rods. I purchased a couple driveway reflectors, as the stems were made from 1/4" fiberglass rod. I cut the stem into 9" lengths and used some rubber flex tubing to hold them in place. You will use a 1/8" drill bit to enlarge the two holes in each skid. The 1-1/2" machine screws are inserted through the platforms, booms, and then through the holes in the skids. This makes for a very secure system. ESCs You have a choice between three electronic speed controls which are shown in Figure 5: • Turnigy Plush 18 amp HK# TR_P18A FIGURE 6. FIGURE 7. Motors You have a choice between two motors: • Turnigy Aerodrive SK3 - 2826 1,130 Kv • Turnigy Aerodrive SK3 - 2826 1,240 Kv You can purchase these from both the Hobby King US or international Hobby King warehouse. 46 SERVO 12.2012 The motors are nearly identical. I am only listing both in case one or the other is out of stock. Of all the Turnigy motors, the SK3 series shown in Figure 6 are some of the best. You will need four motors. I will also be adding additional motor options on the Kronos Flyer web page after I do additional testing. Props You can use 8040 or 8045 slow fly props on the Kronos Flyer. The props shown in Figure 7 come in a four prop package. You get two lefthanded and two righthanded blades which is exactly what you need for our Flyer. The orientation of a quadcopter can be difficult to detect. By using a different color set on the front of the craft, you will always know what direction your quad is facing. Be sure to order an extra set of props, as well. Different color sets include: • Turnigy Plush 25 amp HK# TR_P25A • Turnigy Plush 30 amp HK# TR_P30A Note that these can only be ordered from the Hobby King international warehouse. The Turnigy Plush series ESCs can handle high speed flight controllers. They are programmable, so you can change the basic configuration of the ESCs. The motors that I have selected work fine with the 18 amp ESCs, but I wanted to give you options for others in case they are out of stock. Also if you want to upgrade the motors later, you might want to use the 25 or 30 amp ESCs. You will need four ESCs. In addition, be sure to pick up a programmer for the ESCs. They are only $7 and make programming very easy. The Hobby King part number is TR_PC. • 8045 green set: HK# 017000054 • 8045 blue set: HK# 017000053 • 8045 orange set: HK# 017000056 • 8045 yellow set: HK# 017000057 • 8045 black set: HK# 017000058 • 8045 red set: HK# 017000055 Note that these can only be ordered from the Hobby King international warehouse. The prop sets come with a set of inserts. These inserts allow you to use the props on various motors. The SK3 motors you will be using have a 5 mm shaft onto which you will be installing the prop. Power Distribution Board When building a multi-rotor, you need a way to distribute power to the ESCs. There are various ways to do this. Some commercial frames have PCB boards built in. While this makes The ESCs don't come with connectors, so you will have to purchase them. You will need 12 pairs of the 3.5 mm bullet connectors. They are sold in 10 pair packs, so order two. The part number is AM1001A. You will also need some 5 mm heat shrink. It's probably easier to purchase this locally as it's usually out of stock at Hobby King. As an option, I am looking into a new ESC series offered by Hobby King. They are called MultiStar and have all the connectors pre-installed. connections easy, they tend to be heavy and can reduce the range of your radio. Another way to distribute power is with a wiring harness. This is nothing more than four or more ESC connectors soldered together, then connected to a battery connector. One option that I recommend is a power distribution board like the one shown in Figure 8. This is a cross between the full-on PCB board and the harness. It contains connectors for the ESCs and a connector for the battery. It also contains a small two-pin connector for auxiliary power connections like LEDs or flight controllers. The one we will be using is available from Hobby King and costs only $4: I am in the process of testing these ESCs and will be posting the results on the Kronos Flyer web page. FIGURE 5. FIGURE 8. • Power distribution board: HK# 9171000033 This is available at both the Hobby King US and international warehouse. SERVO 12.2012 47 Battery The Kronos Flyer is sized to use a three-cell 2,200 mAh lipo battery. The battery (shown in Figure 9) is a Turnigy nano-tech battery. These give you the best bang for your buck for this size craft. The connector will plug directly into the power distribution board. FIGURE 9. • Turnigy nano-tech 2,200 mAh 3S lipo pack: HK# N2200.3S.35 • Turnigy Accucel-6 6A charger: HK# ACC6 FIGURE 10. These are available at both the Hobby King US and the international warehouse. I recommend getting these from the US warehouse as they cannot be shipped via air from the international warehouse. I also recommend you order at least three of these. To charge the batteries, you need a quality balancing charger. The Accucel six amp charger gives you a great deal for the money. You will need a 11-17V DC supply to power the charger. In addition to the batteries and charger, I recommend you purchase a battery monitor. The battery monitor shown in Figure 10 plugs into the balance port of your battery. It keeps an eye on your battery while in flight, and will flash LEDs if any cell drops too low. If you keep flying, a very loud alarm will sound, warning you to land. • Onboard lipoly low voltage alarm: HK# 067000002 Note that this can only be ordered from the Hobby King international warehouse. Flight Controller Last month, I mentioned three flight controllers I would be looking at: • Hobby King KK2 flight controller • MultiWii SE V2.0 flight controller • DJI NAZA flight controller It's time for you to decide on the flight controller you are going to use for your Kronos Flyer. Let's take a look at each in detail. MultiWii Flight Controller FIGURE 11. 48 SERVO 12.2012 I have yet to get my MultiWii board (shown in Figure 11) programmed and tuned enough to control any of my multi-rotor craft. I spent several days researching and reading several forums on this controller, and it seems I am not alone in failing to get it set up properly. That's not to say they don't work. They must because I have seen videos of them in flying craft; it's just that it’s a real bear to set up. Due to the MultiWii's complexity, I won't be featuring it in this series. Be sure to visit my website mentioned at the end of this article, as I will eventually get the MultiWii up and running once I get some time to dedicate to it. KK2 Flight Controller The KK2 flight controller shown in Figure 12 is a unique controller in that it is configured and tuned via the onboard LCD. While the LCD and buttons make it easy to change settings, the KK2 board does take a bit of care to get tuned to your craft. Mounting the KK2 can be a little problematic as the vibrations created by your props can play havoc with the sensors. I found the best way to mount the board is by attaching small pieces of flex tubing to the four holes on the board, then slipping the tubing over standoffs mounted on the craft. At $30, these controllers are hard to beat. • KK2 flight controller: HK# 9171000073 FIGURE 12. and attach it to your craft. The NAZA comes with a VU, or Versatile Unit. This module connects to your craft’s battery and provides power to the NAZA main controller. It is also equipped with a very bright LED that provides status information. The VU will monitor your main battery and if the voltage drops too low, will land your craft. The NAZA has an expansion port which allows you to connect a GPS/compass module. This upgrade will allow the craft to hold on a single position or return to home. There is also a mode that lets the craft travel in the direction of your transmitter sticks, regardless of its orientation. Note that this can only be ordered from the Hobby King international warehouse. NAZA Flight Controller The NAZA claims to be a game changer when it comes to flight controllers. They aren't too far off. The controller shown in Figure 13 is about as plug-and-play as it gets. It has two modes of operation: manual mode and attitude mode. Manual mode works much like the KK2 board, but requires little or no tuning. It’s the attitude mode that is the game changer. In this mode, the craft will pretty much hover in place without any input from the transmitter. This means that anyone can fly a multirotor controlled by a NAZA. Installing the NAZA is easy, as well. Since it has vibration dampening built in, all you need to do is apply some double-stick tape to the module FIGURE 13. SERVO 12.2012 49 This is great for beginner pilots. All these features come at a price, however. The NAZA and VU will cost you $230. The GPS upgrade is another $160. You can purchase the NAZA and GPS unit from www.hoverthings.com. So, Which Controller? The KK2 and NAZA controller represent two ends of the spectrum for the multi-rotor hobbyist. While there are definitely other controllers available, these two are a good representation of what is currently on Radio Gear The radio system you choose is mostly personal preference. There are a few things you need to keep in mind, though. The KK2 board — FIGURE 14. the market. The price tag of $30 for the KK2 will pull many Kronos Flyer builders in that direction. However, unless you already have experience flying RC helicopters, you will have less than satisfactory results with the KK2. The NAZA, on the other hand, will allow anyone to fly a multi-rotor craft. This added stability, of course, comes at a cost. At nearly $200 more than the KK2, the NAZA represents a sizable investment towards your craft. Since I started the research into multi-rotors, I have built more than 12 craft. Some of them I have yet to get into the air with the KK2 board, but the NAZA has flown them all with ease, and with little or no tuning. In this case, the old adage "you get what you pay for" is true. The bottom line is if you can already fly multi-rotors or helicopters, the KK2 board will work for you. If you are a beginner or in a situation where you need very stable flight, the NAZA controller is the way to go. With that, nothing says you can't start with a KK2 board and upgrade to the NAZA later. If you do start with the KK2 board, just remember to purchase more props, as you will be breaking them. being a less sophisticated controller with no upgrade options — will accept any four-channel radio. I have found the higher-end radios tend to stay trimmed out, and make it easier to keep the craft under control. The NAZA requires a little more in a radio. First, you need at least six channels to control a NAZA. You need at least seven channels if you want to utilize the GPS upgrade. On top of that, you need to have the ability to set the end points on each channel. Three position switches for two of the channels is a real plus. There are two radios systems I recommend. FIGURE 15. Turnigy 9X This radio can be purchased for under $60 and packs many features that are normally reserved for radios costing over $400. That said, due to its low price you will have to download the manual. The transmitter does come with a receiver, but does not come with batteries and a charger. • Turnigy 9X nine-channel transmitter kit: HK# TX-9X-M2 This radio is available at both the Hobby King US and international warehouse. Futaba 8FG Super I talked a lot 50 SERVO 12.2012 Prop Balancer about this radio in the last article. If you can swing the $450 price, this radio could be the last one you will ever own. You will need a good prop balancer to balance your props. If you don't, they will vibrate your machine apart. Be sure to check out the Kronos Flyer web page for prop balancer recommendations and instructions. • Futaba 8FG Super: Tower Hobbies# FUTK8010 Conclusion Other Items There are a few other items you will need in order to build a properly functioning multi-rotor. Thread Lock Any place you don't use lock nuts or lock washers, you will need to use a drop of thread lock. If you don’t, you can look forward to your craft falling out of the sky. I prefer to use the Locktight green. It will hold the hardware and still allows you to take things apart if you need to. Model 324 I have covered quite a few parts, and since many are in high demand they may be out of stock. I will be providing a link to each item listed, as well as more alternatives on the Kronos Flyer web page. In addition, I will be offering a laser cut platform set for those that don't want to make their own. You can find the Kronos Flyer web page at www.kronosrobotics.com/multirotor/kronosflyer. Many of the parts I have listed in this article are available via the Hobby King international warehouse. I have ordered 20 or so packages from them without incident. I have used both the EMS Express and International Air for shipping. The EMS (while more expensive) provides tracking and less hassle. You will get your package in about a week. The international system is a little cheaper but has no tracking, and can take up to three weeks to arrive. The EMS system tends to make it through customs a little more smoothly. Some of the parts are available through the Hobby King US warehouse. If at all possible, use these. The shipping will be cheaper and you will get your package faster if you choose Priority. In the next article, we will start the assembly of our Kronos Flyer, so be sure to have your parts at hand. SV World's ld s Most Most Versatile Versatile Circuit Board HOLDERS Our line of Circuit Board Holders add versatility & precision to your DIY electronics project. Solder, assemble & organize with ease. MONTHLY CONTEST TEST Visit us on Facebook® to post a photo of your creative PanaVise project for a chance to win a PanaVise prize package. Model 201 VISIT US ON N Innovative Holding Solutions 77540 75 540 Colbert Collbe bert bert r Drive Dri r ve v • Reno Reno Re no • Nevada Nev evad ada da 89511 8951 8951 89 1 (800) 759-7535 | www.PanaVise.com SERVO 12.2012 51 THE CHRONICLES OF PARTICIPANTS • THE CHRONICLES OF PARTICIP Autonomous Obstacle-Avoiding Robot Alarm Clock By Sergiu Stanculescu and Blenyesi Balazs www.servomagazine.com/index.php?/magazine/article/december2012_Stanculescu_Balazs Discuss this article in the SERVO Magazine forums at http://forum.servomagazine.com Before beginning a dream robotics project, it is always a good idea — especially if you’re a beginner — to start small, implement something simple with a lot of functions, and make it work as well as you can. That is exactly what this project is about. It presents the design of an autonomous obstacle-avoiding robot which keeps time and generates sound, acting as an alarm clock. It also detects human motion behind it and avoids being caught. By completing this project, basic 32-bit microcontroller notions, LCD inter facing, RTC (real time clock) functions, PWM (pulse width modulation), sound generation, DC and servo motor control, the usage of buttons and switches, and I2C and SPI protocols, sensor input reading and some basic filtering can be learned. 52 SERVO 12.2012 PANTS • THE CHRONICLES OF PARTICIPANTS • THE CHRONICLES OF The functioning of our robot alarm clock is quite simple. After the current time and the desired alarm time are set, the bot will wait until the alarm is triggered. Then, it will begin generating the alarm tune until it detects movement from the user. This is done by a sensor in the back, placed on a rotating platform driven by a servo motor. The trigger will set the robot into motion, lock the servo in the position of detection, and will temporarily stop the alarm tune. Once the input from the back-sensor returns to below a certain threshold, the robot stops and the alarm tune is resumed — assuring that it doesn’t lose sight of the user. Once the user has successfully caught the bot, the alarm can be stopped by pushing the OFF button, placed strategically below a sensor. Construction Construction is straightforward. The only non-factory products needed are three L-form plastic plates, a couple of PARTS LIST The parts from Digilent we used were: Cerebot 32MX4 microcontroller board with onboard PIC32 MIPS processor. PMOD AMP1 amplifier module. PMOD RTCC real time clock and calendar. PMOD CLS LCD screen. PMOD CON3 connector module for sensor cables. PMOD BTN buttons. PMOD SWT switches. 2x PMOD HB5 H-bridge circuits. Wheel kit. Base plate. Angled plate. GWS servo kit. 2x 6V/12V motor/gearbox. Speaker. Battery holder. screws, and some very basic tools (screwdriver, cutter). The chassis of the robot is made from base plates. On the bottom, the two motors, the corresponding H-bridges, and the battery holder are mounted while everything else fits on the top. We could have used four DC motors for propulsion, but this would have increased the project’s complexity, cost, and power consumption. Two sensors are placed in the front; these are Figure 1 SERVO 12.2012 53 THE CHRONICLES OF PARTICIPANTS • THE CHRONICLES OF PARTICIP responsible for detecting any obstacles which would impede the robot in movement. An important factor to take into account is the directivity angle of the sensors. Be sure to place them so that they detect any obstacle on a strip at least as wide as the robot. The third sensor — the one in the back — is situated directly above the stop button. We’ve placed this one on a servo platform to overcome the narrow directivity angle problem and to reduce costs by eliminating the need for additional sensors. The platform rotates approximately 180 degrees, so it covers the entire area from which the user can approach. The sensors are then connected to the CON3. The RTCC module — which uses the I2C protocol — has to be connected to one of the two onboard I2C connectors. The servo also has its corresponding power and control pins which can be chosen from the eight servo connector pin sets. The AMP module features a mono speaker and a headphone jack; for the purpose of this design, the speaker jack was used. Every other Pmod is connected to an onboard port, JA to JK. A detailed connection diagram is shown in Figure 1. The software we used was: • Microchip MPLab v8.83 • Microchip MPLab C32 C compiler • The appropriate driver for the programmer interface The software follows a modular approach, meaning individual parts can be extracted and used without too much modification in other projects. Let’s discuss the different parts of Figure 2. Figure 2 RTCC Control The real time clock and calendar can be considered the heart of the alarm process. It generates the alarm signal and thereby the trigger for the audio signal generation and the servo motor motion. It saves the current time and the time of the alarm. In the event of central power loss, a battery guarantees that the settings are kept. The RTCC communicates with the PIC through the I2C communication protocol which features a master-slave logic. This means that they can each independently generate interrupts based on their own events. Motor Control This functional block implements the control mechanisms for the two DC motors. It contains several predefined blocks which signify forward, reverse movement, rotations in either direction, and an algorithm designed to avoid obstacles. The motor drive principle is PWM. The idea is that by varying the duty cycle of a rectangular signal, the speed of the motors also varies. Two PmodHB5 circuits are used to drive the motors. The main.c source file contains the algorithm used to avoid obstacles. The filtered sensor data and three functions — one for each sensor — are used to set thresholds which will condition the movement of the robot. Each sensor reads data from values 0x000 to 0x3FF, so the obstacle detection thresholds have been set at 0x200 for each sensor. Also, the primary condition for motion is that the sensor on the servo detects the user. The conditions in the loops and branches within the algorithm are continuously checked. If they are fulfilled, the corresponding motion is activated. It is important to note that before every change in motor direction, it is advisable to stop the motors and introduce a few ms delay in order to avoid a possible short circuit, since the switching times of the transistors in the Hbridge are limited. PWM Audio This block implements the generation of the audio signal. This is done practically using a one-bit DAC (digitalto-analog converter). The code generates a PWM signal (the principle of pulse width modulation is the modulation of the pulse width of a rectangular signal, thereby modifying the average value of the waveform) at an audible frequency, varies it according to a predefined rule, then the signal is transmitted to the AMP1 Pmod which amplifies and conditions the signal such that it is ready to be played using the speaker. The audio is a pulse width modulated signal using timers 4 and 5 on PORTF of the board. The PWM is conditioned by the variable trigger which is set when the RTCC gives the alarm signal. The PWM is done in the Interrupt Service Routine (ISR) of timer 5, while the 54 SERVO 12.2012 PANTS • THE CHRONICLES OF PARTICIPANTS • THE CHRONICLES OF frequency variations are achieved in the ISR of timer 4. The PWM is generated by setting and complementing bit 12 of PORTF. The duty factor of the generated signal is varied by inserting the condition: TMR4<(PR4*0.75). PR4, the period register, and the scalar 0.75 is used to condition the parts of the rectangular signal for which a certain value is sent to the output: if(TMR4<(PR4*0.75)) PORTF|=(1<<12); else PORTF&=~(1<<12); In order to vary the signal a little to make it as annoying as possible, the following simple algorithm has been developed, which changes the pitch and the period of the signal by modifying the period register according to the variables x and aux: x++; if (x==1000){ if((PR4<10000)&&(aux==0)) PR4+=500; else{ aux=1; if((PR4>10)&&(aux==1)) PR4-=1000; else aux=0; } x=0; } shows a welcome message, then asks for the current time. A combination of buttons and switches is used to set and save it, as well as the alarm time. It is important to note that while either the time or the alarm is being set, the screen is stable; it doesn’t fluctuate. The LCD screen is also updated to show the current time. This is done every time the first or second digit of the minute/hour changes. If the current time reaches the alarm time, the screen shows the “ALARM!!!” message. ADC Control The purpose of the ADC (analog-to-digital converter) is to convert sensor data into a format readable and interpretable by the processor. This piece is essential since it drives the entire motion of the robot, in function of the front and back sensor input data. The ADC incorporated in the PIC32 used is a 10-bit successive approximation register. Three channels are used — one for each sensor — so the results are stored in three 16-bit buffers. Servo Control The servo control block implements the movement and locking mechanisms of the platform on which the third sensor is situated (described above). SPI Control The SPI (Serial Peripheral Interface) is a synchronous interface used for communicating with external peripherals. In our case, it’s used to control the PMOD CLS. The functioning of the SPI communication involves a buffer, SPIxBUF, which gets data from the internal data bus of the microcontroller. The data is then transmitted to two registers: SPIxRXB and SPIxTRX. The first is responsible for receiving data from the peripheral, the second is responsible for transmitting. These are FIFO (First In, First Out) buffers working in Enhanced Buffer mode. The SPI operations require that the devices involved are designated master or slave. In this case, the PIC32MX4 has been designated the master and the PMODCLS as the slave device. When started, the LCD screen SERVO 12.2012 55 THE CHRONICLES OF PARTICIPANTS • THE CHRONICLES OF The direct results of the conversions could not be used as they were because their fluctuations were of even 60-80 LSB because of the numerous noise sources. This also affected the motion of the robot since it often detected obstacles which were not there. In order to mitigate this effect, a filtering on 10 samples was implemented. The filters — one for each channel — do a median for the 10 samples, and also eliminate spikes which are far off from the median values. The sampling and filtering algorithm is: int i,aux=0; int av[10]={0,0,0,0,0,0,0,0,0,0}; for(i=0;i<=9;i++) { while(!AD1CON1bits.DONE);//wait for the previous conversion to finish AD1CON1bits.DONE=0; av[i]=ADC1BUF0; if(i>=2) if(((av[i-1]>(av[i-2]+0x05))&&(av[i1]>(av[i]+0x05)))||(((av[i-1]<(av[i2]+0x05))&&(av[i-1]<(av[i]+0x05))))) av[i1]=(av[i-2]+av[i])/2;//if a sample is with at least 0x05 higher than both the previous and the next sample, an average between the previous and the next sample is done, in order to reflect the reality as well as possible } for(i=0;i<=9;i++) aux+=av[i]; return aux/10; Problems and Testing There was one particularly troublesome problem we encountered during the work process. Because of the high amount of noise in the sensor data — even after filtering — the robot often saw phantom objects. The solution to this problem was changing the sampling frequency which was initially much higher than needed. The sensor thresholds were also set empirically. We initially agreed upon a high enough speed for the robot, then through dozens of test-runs on our improvised obstacle course we managed to set a threshold which enabled the sensors to detect any obstacle in time to avoid collision. Ideas for Future Development There are numerous possibilities for optimization and improvement on this design. One would be the elimination of the two frontal sensors. The servo motor has the 56 SERVO 12.2012 possibility to rotate 360 degrees each direction, so it is possible to achieve both the obstacle avoiding function and the user detection with a single sensor. Of course, the software has to be adapted accordingly. This would greatly decrease production costs, but would increase software complexity. Another improvement would be the implementation of a function which would allow the robot to map the room, memorize the map, and direct motion in function of its current position. Furthermore, wireless communication between the robot and a computer would give a new dimension to the user interface. A GUI could be implemented which would allow the remote setting of the alarm and current times, as well as permitting the implementation of additional functions. Also, the movement algorithm is not very efficient in its current state. An interesting and highly educative alternative to this algorithm would be the use of fuzzy logic. In addition, the RTCC functions could be expanded. The circuit has the capability to memorize the days of the week, and also has a repeat function. This can be further exploited, but only if we fit a future design with a rechargeable battery. This would mean greater autonomy for the robot, but it would require a docking station to which it could return when it sensed that the battery was running low. This implies that the robot should know at all times its current position/coordinates and the coordinates of the docking station. Conclusions This project has both educational and practical purposes. It is ideal for learning since it is relatively inexpensive and easy to work with, especially with all the free software and tutorials online. SV USEFUL LINKS All the components www.digilentinc.com A step-by-step guide to putting together the chassis www.digilentinc.com/Data/Products/ RDK-BASIC/RDK%20Basic_rm.pdf PIC32 Datasheet ww1.microchip.com/downloads/en/ DeviceDoc/61143G.pdf Code examples for the PIC32 uC www.microchip.com/CodeExamplesByFunc.aspx Imagine a complete analog circuit design lab... Without the lab! Dual Channel Oscilloscope )XOO\GLIIHUHQWLDOLQSXWVXSWR0636ELW$'& XSWR.6DFKDQQHOPHPRU\ 0S)LQSXWV±90D[ 5HDOWLPH))7V;<SORWVFRPSOH[PDWKDQG PHDVXUHPHQWVRQDOOFKDQQHOV 0+]DQDORJVLJQDOEDQGZLGWK 'XDOFKDQQHO)XQFWLRQ*HQHUDWRU 6LQJOHHQGHGRXWSXWVXSWR0636ELW'$ XSWR.6DFKDQQHOPHPRU\ $UELWUDU\DQGSUHGHILQHGZDYHVXSWR±9 6ZHHSVHQYHORSHV$0DQG)0PRGXODWLRQ %RGHSORWIHDWXUHXVLQJVWDQGDUG1\TXLVW 1LFKROVFRRUGLQDWHV &DQGULYH 7XUQ\RXU3&LQWRDSRZHUIXOFLUFXLWOHDUQLQJSODWIRUP WKDW FDQ PHDVXUH YLVXDOL]H DQDO\]H UHFRUG DQG FRQWUROPL[HGVLJQDOFLUFXLWV7KH$QDORJ'LVFRYHU\LV VPDOOHQRXJKWRILWLQ\RXUSRFNHWDQGFRVWVOHVVWKDQ D WH[WERRN EXW LW LV SRZHUIXO HQRXJK WR UHSODFH D VWDFN RI ODE HTXLSPHQW 3RZHUHG E\ D +L6SHHG 86% SRUW DQG WKH IUHH :DYH)RUPV VRIWZDUH WKH $QDORJ 'LVFRYHU\ OHWV \RX EXLOG DQG WHVW DQDORJ DQG GLJLWDO FLUFXLWVRXWVLGHRIWKHODE 'LJLWDO,2 VLJQDOV0636.6DFKDQQHOPHPRU\ $Q\VLJQDOFDQEHLQSXWORJLFDQDO\]HURURXWSXW SDWWHUQJHQHUDWRURUYLUWXDO,2 6XSSRUWVFURVVWULJJHUVZLWKVFRSHFKDQQHOV 3RZHU6XSSOLHV 7ZRIL[HG±9P$ 'HVLJQHGLQFRRSHUDWLRQZLWK /LVWSULFH THE CHRONICLES OF PARTICIPANTS • THE CHRONICLES OF PARTICIP SLANG — Sign Language Assistance and Navigation Glove By Ionut-Gabriel Farcas and Radu-Florin Florea T www.servomagazine.com/index.php?/magazine/article/ december2012_Farcas_Florea Discuss this article in the SERVO Magazine forums at http://forum.servomagazine.com 58 SERVO 12.2012 he need for communication is always increasing. Although communication and socializing through spoken and written language are the most commonly used methods, the need for other means — such as signs or visual elements — has caught up and people are adapting and finding new ways of “talking” to each other. So what could we students at the Faculty of Automation and Computer Science from the Technical University of Cluj-Napoca do to aid in this new trend? SLANG! The idea for SLANG — Sign Language Assistance and Navigation Glove — came to us when we were handed the sign language alphabet while we were enjoying a cup of coffee with some friends at a local restaurant. We took a look at it and thought "This is possible! We can make a glove that can translate these signs into letters that anyone can read and understand!" Before taking any action, we decided to complicate it and make it a universal controller. We knew this would be a challenge for us; a test of our engineering skills. After clearly defining our idea, we presented our idea to Digilent Romania and entered their 2012 Design Contest. PANTS • THE CHRONICLES OF PARTICIPANTS • THE CHRONICLES OF Digilent provided us with the crucial items: a Cerebot MX4cK board (Microchip 32-bit PIC); Cerebot Nano board (Atmel eight-bit ATMega168 microcontroller); accelerometer Pmod; gyroscope Pmod; and two 2.4 GHz RF Pmods. We used the Cerebot Nano as the control board on the glove, which transmitted all of the information obtained from the sensors on the glove to the Cerebot So, how could we translate hand gestures into readable letters? The idea was to mount the accelerometer and gyroscope — better known as an IMU (Inertia Measuring Unit) — on the back of the glove to obtain the hand's position, and then read the position of each finger. Sounds simple enough, right? Obtaining the finger positioning was easy enough. Initially, we wanted to use resistive flex sensors that changed their resistance according to the degree of the bending of the sensors. However, the time to complete the project was limited, so waiting two or three weeks for the flex sensors was too long (taking into account that the contest was going to take place in one week). In our search for a solution, we found that by just placing contactors (simple buttons, in our case) on the tip of the fingers, we could get pretty accurate results. So, we decided to use these as a temporary solution. Simple, right? Well, when it got down to obtaining angles (pitch and roll) from the IMU, it got a whole lot trickier. Even though a gyroscope is very precise, it tends to drift. On the other hand, (no pun intended), the accelerometer is a bit unstable, but it doesn't drift. By using these two combined and with the help of a Kalman filter (which basically predicts with very high accuracy the needed pitch and roll angles), we obtained the hand's position. Having all this worked out, it was easy to interpret the results obtained from the sensors and use them for whatever purpose. MX4cK board. This was connected to a computer and used for displaying the interpreted results. We needed some sort of board to distribute power and to connect all of the sensors to the Cerebot Nano, so we designed a small board in EagleCAD containing a 3.3V voltage regulator, several capacitors and resistors, and — of course — a battery. The gloves were bought at a bike shop (no knitting required). The acquisition board with the Cerebot Nano and the RF Pmod connected. SERVO 12.2012 59 THE CHRONICLES OF PARTICIPANTS • THE CHRONICLES OF PARTICIP SLANG with everything connected, the night before the contest. A Truly Handy Device SLANG is not just a translating glove for sign language. It can also be used as a wireless controller for all sorts of applications. A small size hovercraft has been wirelessly controlled with SLANG by using a simple protocol that converted data received from the glove into motor speed and direction. Also, SLANG has been used as an aerial combat simulator game controller. This was achieved through the implementation of a USB-HID mouse controller which controls the in-game plane by using the finger combinations and the roll and pitch angles — all of them received from the glove. 60 SERVO 12.2012 PANTS • THE CHRONICLES OF PARTICIPANTS • THE CHRONICLES OF SLANG in action at the Digilent Design Contest in Cluj-Napoca. In Closing SLANG was a challenging project for us and we are proud that we were able to bring it to a final state. It can be used for many different applications, from which others can benefit. Of course, SLANG can be improved but that's the idea of a prototype: to show that an idea can be brought to life. This project was a test for us, and we like to think that we passed it with flying colors. SV SERVO 12.2012 61 Wireless for the ZigBee Standard in only 10 lines of code! Continued from page18 ® Anaren’s easy-to-use AIR modules – combined with Tesla Controls’ simplified firmware solution – are the speediest path to wireless connectivity for ZigBee Standard applications! HARDWARE BENEFITS: > Tiny 11 x 19 mm SMT module > Low current consumption (under 150mA in full +17dBm output) > Low cost (under $15 in 10K+) > Proven AIR solution based on TI CC2530 (with or without CC2591 range extender) > Multiple TI-compatible dev tools (e.g: BoosterPack for LaunchPad, Eval Module (EM), MDB1, more) FIRMWARE BENEFITS: > Runs entire TI Z-stack > Module driver library & examples dramatically reduce API learning time > Over 30 examples of how to communicate with the IC > Focus on your application, not integration To learn more – or view our online presentation – visit: www.anaren.com/air Driver library examples included: Basic communications, Router, AF/ZDO; Secure communications, Coordinator; Hello world; Button interrupt; Read temp sensor; Read light sensor; Measure Supply voltage; Timer interrupt; Reset module; among many more! Design Network 800-411-6596 www.anaren.com In Europe, call +44-2392-232392 62 SERVO 12.2012 PIC Training and Development Board G ooligum Electronics has released a PIC training and development board, specially designed to complement its existing PIC programming tutorials. The tutorials use C and assembler to introduce the baseline and midrange PIC families, starting with easy-tomaster baseline devices such as the 10F200, and eventually moving on to topics such as displaying analog signals on multiplexed sevensegment displays or using mid-range PICs such as the 16F684. Each topic is illustrated via detailed and fully explained examples. The training board comes with all 40+ lessons (including source code and project files) on CD and every component — including five PIC devices — needed for each example. It provides an ICSP connector for easy connection to Microchip’s popular PICkit 2 or PICkit 3 programmers (not supplied). Keyboard-to-ASCII Converter Chip L ucid Technologies announces the availability of the KB1 — a PS/2 keyboard-to-ASCII converter chip for embedded microcontroller applications. The easy to use KB1 is based on the PIC16F1823 extended mid-range processor. The KB1 provides design flexibility with its pin selectable choice of UART, SPI, or I2C interface modes. It has a seven-character buffer and Besides including LEDs, pushbutton switches, seven-segment displays, a piezo speaker, and a number of oscillator options on board, every PIC pin is brought out to a 16-pin expansion header alongside a solderless breadboard making the training board useful as a general development board for small (six- to 14-pin) PICs, even after the course is finished. Cost is $89 fully assembled, or it is available in kit form for $69. Shipping from Australia is $10. For further information, please contact: Gooligum Electronics Website: www.gooligum. com.au generates interrupts in SPI and I2C modes. The KB1 is available as a 14-pin DIP. The data manual is available online and includes example PIC assembly language routines to communicate with the KB1 in SPI and I2C modes. Pricing for the KB1 is $6.25 for one. Lucid Technologies Website: www.lucid technologies.info Six-Axis Robot for Aseptic Environments E PSON Robots has introduced their new EPSON C3-V six-axis robots. NEW VERSION OF DIPTRACE PCB DESIGN SOFTWARE N ovarm Limited announces the availability of DipTrace 2.3 — a fully-functional package with significant improvements. Version 2.3 features Online Design Rules Check; VRML 2.0 3D export; custom nonsignal layers; as well as advances in hierarchy, file compatibility, working speed, and more. C3-V robots provide resistance to vaporized hydrogen peroxide (VHP®) gas — an aggressive chemical used in aseptic manufacturing environments. The SlimLine body and compact wrist design of C3-V robots enable them to be easily installed in sealed environments such as inside an isolator. IP67-grade water/dust proofing allows C3-V robots to be cleaned and sterilized with aggressive chemical solutions or high temperature VHP® and steam. Not only is the C3-V robot able to be thoroughly sterilized in such environments, but the robot can also be used as a handling device for presenting fixtures and components for cleaning to the VHP® misting areas from many angles, ensuring there are no neglected areas in the sterilization process. This effective utilization of the workspace allows for greater savings on cleaning consumables while eliminating potential contamination issues for consistency of quality in the aseptic space. For further information, please contact: DipTrace 2.3 is a tool aimed at small and medium businesses, incorporating a series of advanced capabilities. Version 2.3 is the culmination of collaborative relationships with many PCB designers worldwide, in the US, Europe, and Asia. DipTrace is bundled with four modules: schematic, PCB layout with high speed shape-based autorouter, pattern editor, and a component editor. Other features include: • Easy-to-learn user interface. • Multi-sheet and multi-level hierarchy. • Comfortable manual routing. • Multiple verifications with online DRC. • Smart project structure. • Wide import/export opportunities. • Manufacturing output. • Real-time 3D preview with export. DipTrace 2.3 runs on XP/Vista, Windows 7/8 (32- and 64-bit platforms), and MacOS and Linux. Current DipTrace users get the 2.3 version for free. For further information, please contact: EPSON Robots Novarm Limited Website: www.epson robots.com Website: www.novarm.com SERVO 12.2012 63 The SERVO Webstore Attention Subscribers ask about your discount on prices marked with an * CD-ROM SPECIALS NEW RELEASE O N LY $19.95! ROBOTICS Robot Builder's Bonanza, Fourth Edition by Gordon McComb Making Things Move: DIY Mechanisms for Inventors, Hobbyists, and Artists by Dustyn Roberts Robot Builder’s Bonanza, Fourth Edition includes stepby-step plans for a number of motorized platforms. The book is described as a compendium of robotics topics, containing more than 100 projects, including 10 robot designs new to the fourth edition. These modular robots are low cost, and are made to be reproduced by readers with no training in mechanical construction. $29.95* Mechanisms and Mechanical Devices Sourcebook 5th Edition by Neil Sclater Fully revised throughout, this abundantly illustrated reference describes proven mechanisms and mechanical devices. Each illustration represents a design concept that can easily be recycled for use in new or modified mechanical, electromechanical, or mechatronic products. Tutorials on the basics of mechanisms and motion control systems introduce you to those subjects or act as a refresher. Reg $89.95 Sale Price $79.95 64 SERVO 12.2012 In Making Things Move: DIY Mechanisms for Inventors, Hobbyists, and Artists, you'll learn how to successfully build moving mechanisms through non-technical explanations, examples, and do-it-yourself projects — from kinetic art installations to creative toys to energy-harvesting devices. Photographs, illustrations, screenshots, and images of 3D models are included for each project. $29.95* Build Your Own Humanoid Robots by Karl Williams GREAT 'DROIDS, INDEED! This unique guide to sophisticated robotics projects brings humanoid robot construction home to the hobbyist. Written by a well-known figure in the robotics community, Build Your Own Humanoid Robots provides step-by-step directions for six exciting projects, each costing less than $300. Together, they form the essential ingredients for making your own humanoid robot. $24.95* Robot Programmer's Bonanza by John Blankenship, Samuel Mishal The first hands-on programming guide for today's robot hobbyist! Get ready to reach into your programming toolbox and control a robot like never before! Robot Programmer's Bonanza is the one-stop guide for everyone from robot novices to advanced hobbyists who are ready to go beyond just building robots and start programming them to perform useful tasks. $29.95 Robotics Demystified by Edwin Wise YOU DON'T NEED ARTIFICIAL INTELLIGENCE TO LEARN ROBOTICS! Now anyone with an interest in robotics can gain a deeper understanding — without formal training, unlimited time, or a genius IQ. In Robotics Demystified, expert robot builder and author Edwin Wise provides an effective and totally painless way to learn about the technologies used to build robots! $19.95 We accept VISA, MC, AMEX, and DISCOVER Prices do not include shipping and may be subject to change. To order call 1-800-783-4624 SERVO Magazine Bundles S av e $1 0. 00 O nl y $5 7. 95 ! Now you can get one year’s worth of all your favorite articles from SERVO Magazine in a convenient bundle of print copies. Available for years 04, 05, 06, 07, 08, 09, 10 and 2011. RobotBASIC Projects For Beginners by John Blankenship, Samuel Mishal If you want to learn how to program, this is the book for you. Most texts on programming offer dry, boring examples that are difficult to follow. In this book, a wide variety of interesting and relevant subjects are explored using a problemsolving methodology that develops logical thinking skills while making learning fun. RobotBASIC is an easy-to-use computer language available for any Windowsbased PC and is used throughout the text. Price $14.95 Any bot builders out there? Get cool robotics stuff from my store! Call me at my order desk! Visit my online store @ www.ser v omagazine .com Linux Robotics by D. Jay Newman If you want your robot to have more brains than microcontrollers can deliver — if you want a truly intelligent, high-capability robot — everything you need is right here. Linux Robotics gives you stepby-step directions for “Zeppo,” a super-smart, single-boardpowered robot that can be built by any hobbyist. You also get complete instructions for incorporating Linux single boards into your own unique robotic designs. No programming experience is required. This book includes access to all the downloadable programs you need. $38.95 CNC Machining Handbook: Building, Programming, and Implementation by Alan Overby The CNC Machining Handbook describes the steps involved in building a CNC machine and successfully implementing it in a real world application. Helpful photos and illustrations are featured throughout. Whether you're a student, hobbyist, or business owner looking to move from a manual manufacturing process to the accuracy and repeatability of what CNC has to offer, you'll benefit from the in-depth information in this comprehensive resource. $34.95 FOR BEGINNER BOT BUILDERS N e we r L ow e ! Pric $59.95 $49.95 $39.95 The labs in this series — from GSS Tech Ed — show simple and interesting experiments and lessons, all done on a solderless circuit board. As you do each experiment, you learn how basic components work in a circuit, and continue to build your arsenal of knowledge with each successive experiment. For more info and a promotional video, please visit our webstore. SERVO 12.2012 65 Or order online www.servomagazine.com SPECIAL OFFERS Forbidden LEGO by Ulrik Pilegaard / Mike Dooley Forbidden LEGO introduces you to the type of free-style building that LEGO’s master builders do for fun in the back room. Using LEGO bricks in combination with common household materials (from rubber bands and glue to plastic spoons and ping-pong balls) along with some very unorthodox building techniques, you’ll learn to create working models that LEGO would never endorse. Reg $24.95 Sale Price $19.95 PROJECTS The SERVO Buddy Kit 3D LED Cube Kit PS2 Servomotor Controller Kit From the article “Build the 3D LED Matrix Cube” as seen in the August 2011 issue of Nuts & Volts Magazine. An inexpensive circuit you can build to control a servo without a microcontroller. For more information, please check out the May 2008 issue or go to the SERVO webstore. Includes an article reprint. Subscriber’s Price $39.55 Non-Subscriber’s Price $43.95 66 SERVO 12.2012 This kit shows you how to build a really cool 3D cube with a 4 x 4 x 4 monochromatic LED matrix which has a total of 64 LEDs. The preprogrammed microcontroller that includes 29 patterns that will automatically play with a runtime of approximately 6-1/2 minutes. Colors available: Green, Red,Yellow & Blue. Jig and plastic cases also available. Subscriber’s Price $57.95 Non-Subscriber’s Price $59.95 This kit accompanied with your own PlayStation controller will allow you to control up to six servomotors. Includes all components and instruction manual. For more information, please see the February 2011 edition of SERVO Magazine. Assembled units available! Subscriber’s Price $79.95 Non-Subscriber’s Price $84.95 USING A STEPPER MOTOR WITHOUT A MICROCONTROLLER by Samuel Lambert I became involved in a project a while back that required the precise angular positioning of a sensor that was to be accomplished using a stepper motor. Although this seemed to be a reasonable approach, upon looking into how one goes about controlling a stepper motor, I found some hardware (Figure 1) and in a short time had the stepper motor working. Although I had a solution to the problem I was facing, the control electronics were complex and rather pricey ($275). I was tied to a computer to control the motion, and was locked into the vendor’s software for the microcontroller’s position and velocity commands. This got me to thinking about another way to use the stepper motor: Create a simpler and more flexible control system, and do it cheaply (less than $40). This article describes a unique technique for implementing a servo system (Figure 2), making use of a stepper motor in an unconventional manner without the need for a microcontroller. The motivation for this unique design was to build a simple servo system that used a stepper motor without a microcontroller. The only digital logic in the design is a single dual D-type flip-flop to generate the quadrature Figure 2. Typical servo system. 68 SERVO 12.2012 www.servomagazine.com/index.php?/magazine/article/ december2012_Lambert Discuss this article in the SERVO Magazine forums at http://forum.servomagazine.com Figure 1. Commercial stepper motor control electronics. square waves to drive the stepper motor. The design can be viewed as a DC servo that just happens to employ a stepper motor. Stepper Motor Versus a DC Servo Motor Stepper motors are almost always used in an open loop configuration. If used in a closed loop, they typically become more expensive than DC servo motor implementations. The open loop nature of stepper motors is their main drawback. Position and/or velocity commands are issued to move the motor, and barring unforeseen circumstances, the motor moves accordingly. In rare cases, resonances or unexpected torques can cause a stepper motor to lose steps or position. Although rare, this is an ever-present possibility. DC servo motor resolution depends primarily on the nature of the feedback device. Since servos are usually closed loop, they are able to maintain positional accuracy utilizing a variety of devices, e.g., potentiometers, encoders, directional antennas, or video devices. The closed loop nature of the servo also allows such a system to better utilize peak torque capabilities. By nature, servo motors have a means of implementing positional feedback, and may even utilize velocity or acceleration feedback to improve response. The positional feedback is used to minimize any discrepancy between a desired and an actual position. In actuality, a simple DC motor servo loop would have been the ideal approach using a DC motor with position feedback. However, the unique servo loop in Figure 3 was implemented making use of a stepper motor in lieu of a DC motor, and vastly improved tracking performance using the same motor, was less complex, and cheaper. Figure 3. DC servo block diagram using a stepper motor. Electronic Circuitry for a DC Servo Using a Stepper Motor Figure 4 shows the electronic circuitry needed to implement the simple positioning servo using a stepper motor instead of a DC motor. Figure 5. Summing electronics. Figure 4. Circuitry required to implement the “DC Servo.” SERVO 12.2012 69 This is typically done by feeding ε to a power amplifier that drives a DC motor. Since the “DC servo” contains a stepper motor, it is necessary to convert ε to two series of pulses, such that they are 90 degrees out of phase (270 degrees out of phase implies the reverse direction) before being supplied to the motor drive electronics. In actuality, the implementation of the concept was relatively straightforward. Summing Electronics Figure 6. Absolute value circuit. The function of the summing electronics (Figure 5) is to compare the commanded position with the actual position of the motor and develop an error signal proportional to the difference. A zero adjust potentiometer was added to control any residual offset. Absolute Value Circuit Figure 7. VCO signal conditioning electronics. Figure 8. Voltage controlled oscillator. Electronic Circuits The overall electronic circuitry required to implement the DC servo using a stepper motor was shown in Figure 4. The basis for the design consisted of driving the position error signal, ε, to zero. 70 SERVO 12.2012 The absolute value circuit (Figure 6) was required to prepare the ε for controlling the frequency of the pulses that were to be generated to drive the stepper motor. Depending on the magnitude of the error signal, the larger the error signal, the higher the frequency of the pulses generated by the voltage controlled oscillator (VCO), i.e., the higher the angular velocity of the stepper motor. The VCO used (NE556) only produces a frequency proportional to positive voltage input signals. This necessitated the VCO signal conditioning circuit (Figure 7). The goal was to make the frequency of the quadrature square wave drive signals to the motor from the pulse generator (Figure 8) proportional to the magnitude of the error signal. The larger the error signal, the higher the frequency, and the higher the angular velocity of the motor. VCO Signal Conditioning Circuit Figure 9. Pulse generator. This circuit was required because the VCO integrated circuit’s characteristics were such that an input voltage close to zero volts produced the highest output frequency, and conversely, the largest input voltage produced the lowest output frequency. This was the exact opposite of how it was desired for the VCO to respond to the error signal. Essentially, the VCO signal conditioning electronics output a high voltage to the VCO when a small input voltage is input, and generates a small output voltage when a large voltage is input to the VCO signal conditioning circuit. The NTE987 is a quad, low power op-amp and can operate at supply voltages as low as 3V. Voltage Controlled Oscillator The VCO provides a square wave output signal where the frequency is a function of the input voltage. The magnitude of the C1 capacitor and the R1 variable resistor determine the frequency range of the output signal that can be commanded by the input voltage. R1 and C1 are tuned to match the stepper motor’s maximum achievable angular velocity. The output frequency is given by: f0 = 2((V+) - VINPUT) R1C1V+ Pulse Generator The function of the pulse generator circuitry (Figure 9) is to take the input square wave from the VCO (nominally around 300 Hz) and produce two square waves phaseshifted by 90 or 270 degrees, depending on which direction of rotation is desired for the stepper motor (Figure 10). The two square waves are produced by the D-type flip-flop and the 90 or 270 degree phase relationship is controlled by the ADG888 analog switch integrated circuit. The switching function is controlled by ε; see the polarity sensing circuit (Figure 11). The outputs of the pulse generator circuit are Q1, Q2, Q3, and Q4, nominally around 75 Hz. These signals control the current through the motor. Figure 10 shows the waveforms generated by the Figure 10. Waveform phase relationship depending on direction of rotation. SERVO 12.2012 71 Figure 11. Polarity sensing circuit for determining direction of rotation. Figure 12. Motor drive circuitry and motor. pulse generator for CW or CCW motor rotation. Polarity Sensing The purpose of the polarity sensing circuit is to look at the sensed error and control the analog switch such that the motor will rotate in the correct direction. Motor Drive Circuitry and Motor the pulse generator circuit to switch power transistors that control the current through the motor windings. The particular transistors used in this design are close to a three amp rating. The stepper motor tested was made by NANOTEC (part number ST5709S1208) with an indexing angle of .9 deg, two-phase, unipolar. Figure 13 shows the internal construction of the motor. Frequency Response Test Results The motor drive circuitry (Figure 12) uses the output of The stepper motor and electronics shown in Figure 4 were used to conduct a small amplitude frequency response test. Small amplitude means a peak-to-peak angular rotation of 60 degrees. The frequency was varied from 1 Hz to 6 Hz. The results of the frequency response tests are shown in Figures 14 through 20. The top waveform is the input signal and the bottom waveform is a measure of the motor’s shaft position. Conclusion The unique DC servo design described here that uses a stepper motor as if it were a DC motor can be implemented with minimal electronics, and the performance of either mechanization is very similar. The primary advantage of this unique design is that no microcontroller is required. Also, no positioning or rate calculations are required, there are no minimum update rate constraints, it uses inexpensive electronics, and its performance is equivalent to a DC motor configuration. The simplicity of the circuit is reflected in the breadboard used to test the design (Figure 21). SV Figure 13. ST5709S1208-B stepper motor internal construction. 72 SERVO 12.2012 Figure 14. 1 Hz response. Figure 15. 2 Hz response. Figure 16. 3 Hz response. Figure 17. 4 Hz response. Figure 18. 5 Hz response. Figure 19. 6 Hz response. Figure 20. Phase shift is about 120 degrees at 6 Hz. Figure 21. DC servo stepper motor breadboard layout. SERVO 12.2012 73 a n d Then N O W Linear Actuators, Servos, and Motion Devices b y T o m C a r r o l l In last month's column, I reviewed the typical rotary servos that we are so familiar with — those used as actuators for model airplane control surfaces or as drive motors for smaller tabletop robots. I also reviewed a few very large servos such as the Invenscience Torxis monster servos and a few tiny servos that weigh only a few grams each. This month, I would like to review a type of servo or actuator that not many of us ever implement into our robotic creations: linear servos and actuators. Linear Motion From a Standard Rotary Servo One might wonder why they should use a linear servo in their robot design when an inexpensive rotary servo or motor could accomplish linear motion using a cable or belt on a servo-driven pulley, or using a rod attached to a servo’s arm or ‘horn’ to push or pull the rod. In almost all instances with model airplane control, it is linear motion that is used for flight control — not rotary motion. Figure 1 depicts two of the factors to consider in using linear motion from a rotary servo. The FIGURE 1. Servo arm torque. 74 SERVO 12.2012 ‘distance’ from the center of rotation to the attachment point of a control rod determines how far the rod moves up and down. ‘Force’ is a result of the torque of the servo and the distance to where the control rod is placed on the servo arm’s set of holes. The amount of rotational capacity of the servo — whether 60º or 120º — also determines just how far the rod will move. Figure 2 depicts how changing the attachment point of the control rod on the servo arm and a controlled surface is used to increase motion or force. In this case, changing the attachment point on the control FIGURE 2. Push rod location determines force. surface results in the same movement using a servo with only a 90º rotation. Figure 3 depicts how relative motion and force can change with different positioning of the push rod angle from the radius of the servo horn to a shorter base line shown at the right. Here, ‘x’ shows the amount of motion required in the ‘x’ plane to drive the rod downward. The farther the servo arm moves from neutral to full deflection, the less the push rod moves downward. The drawing on the left shows the servo arm and push rod starting at 90º to each other, and then ending up at a shallower angle and exerting more force on the push FIGURE 3. Linkage geometry from Model Airplane News. www.servomagazine.com/index.php?/magazine/article/december2012_ThenNow rod. These arrangements work well to move model airplane surfaces such as rudders and ailerons, but relative motion and force change dramatically during the rotation of the servo. You have to remember that a standard rotary servo was primarily designed for FIGURE 4. Toy claws make good robot hands. model aircraft use or modified from an aircraft servo to serve another purpose (such platforms, move cameras, and as a boat sail winch or other similar position weapons on combat robots. applications). With that in mind, you A good robot claw design uses a can see why most manufacturers talk continuous rotation modified servo about their servo’s speed such as turning a small lead screw to move “0.23 seconds for 60º rotation.” both claw pieces inward or outward FIGURE 5. Jim Hill's Charlie uses surplus When a model airplane is flying to close or open the claw. The very linear actuators. above you, you need quick reactions popular toy robot claw and robot with rudder and aileron surfaces to hand (shown in Figure 4) have been maneuver in the air. Boats, cars, and the basis for many motorized robot He had access to car parts since even robots rarely need quick speed hand designs. he worked in a car dealer’s parts of actuation. Robots generally need As it was designed, the user department, and the linear actuators torque and a large range of motion pulled the handle back which, in turn, were from a nearby surplus store that more than rotational speed. pulled the inner parts of the claw’s both he and I made numerous trips to two fingers causing the ends to close in the ‘80s. Jim built this robot using on an object. There are cables running only hand tools, and it would be up each finger. Pulling the handle considered quite amazing even today. back retracts the cable, which pulls on each finger joint to cause them to close around an object. Inventive One of the most prevalent areas robot builders cut off the handle and within robot design that linear motion connected the rod and cable to a The scene shown in Figure 6 is is used in is arm design. Long arm linear actuator/servo to retract the from the 1972 Douglas Trumbull film, lengths applied to small rotary hand/claw. Silent Running. One of the earliest gearboxes apply a great strain to Jim Hill’s robot, Charlie, is a good movies with robots as main gears. A 10 pound weight applied to example of the use of linear actuators characters, actor Bruce Dern was the a 24 inch arm places 240 pounds of in a robot. Figure 5 is the cover of main human character on a forestforce on just a few teeth of a two the April 1984 inch output drive gear. The use of a Popular Mechanics linear actuator in a manner similar to magazine that our muscles attached to our bones shows Jim’s robot can allow a small motor to lift large and how he used masses. car seat motors and Most linear actuators use what is flexible shafts to known as a lead screw with a freely drive surplus aircraft turning ‘nut’ to ride up and down on flap linear actuators the screw. Pneumatic or hydraulic to move all the parts cylinders are also popular in robot of the robot’s arms arms, though the need for and claws. He told compressed air or hydraulic fluid me that only these complicates the whole process a bit actuators had the for smaller robots. force he needed to Linear actuators and servos are lift and move the FIGURE 6. Drones in the film Silent Running also used to raise and lower sensor arms. use linear actuators. Where Linear Actuators and Servos are Used in Robots Linear Actuators in Movie Action Props SERVO 12.2012 75 Discuss this article in the SERVO Magazine forums at http://forum.servomagazine.com FIGURE 8. Robot Johnny 5 and Ally Sheedy from the film Short Circuit. FIGURE 7. Silent Running drone arm prop. carrying space freighter with the three robot drones: Huey, Dewey, and Louie. Figure 7 shows the pneumatic cylinder used on one of the drone’s movie action prop arms. As in most motion pictures with actual moving action props, many close-up scenes of robots using arms are accomplished by robot operators holding the actual arms out of the camera’s view. When a scene was shot (such as in Figure 6) with two of the robots playing poker, the arms had to work. In many of the scenes when the robots hobbled along, “legless” actors in the robot suits accomplished the walking. The robot arm used in another scene in which Bruce Dern was being operated on by one of the drones was also “operational.” Figure 8 is from the 1986 John Badham film, Short Circuit. Though 14 FIGURE 9. One ton servo. 76 SERVO 12.2012 years later than Silent Running, the producer and director decided that an action prop was preferred over an actor in a robot suit. Again, many close-up scenes used off-scene prop operators hand-manipulating the arm’s movements. A close look at the Johnny 5’s neck shows the two orange linear actuators that gave the robot star’s head movement so much realism. To this day, this type of actuation is often preferable to using an X-Y-Z axis system when quick response motion is required. Later robot films, such as iRobot, now use computer graphics imaging to illustrate complex robot motion. Building Your Own Linear Actuators Sometimes it just seems best to build your own linear actuators/servos for your particular robot application. There are many ways to accomplish linear movement using easily obtainable items found in hardware, surplus, or even automotive stores. Figure 9 shows a homemade one ton servo from evilmadscientist .com built from a car scissor jack and a gearmotor. The builder opted to use a feedback potentiometer connected by a string to the top of the jack. Apparently, the builder used large conventional servo electronics for the jack servo. I have built similar linear actuators in previous years using a larger servo modified to continuous rotation. Rather than substituting a couple of matched resistors for a bridge to substitute for the servo’s pot, I used a 5 KΩ, 25 turn trim pot (the 1/4” x 1/4” x 1-1/4” types) connected to a small 25 turn lead screw that was attached to the output of the servo. It was a bit crude as I had difficulty in the attachment of the small trim pot and the shaft to the tiny brass slotted screw, but I had about 50 pounds of force from the setup. I later used a precision 25 turn helical pot that was larger than the servo itself, and that worked more reliably. There are many ways to give feedback to the servo’s internal electronics. You can use a linear pot from a surplus house. Some of these can be as long as four to five inches, but make sure that you select a linear taper pot rather than an audio taper pot that are found in many soundboards. If you are rummaging through bins of pots in a surplus house, take a multimeter with you to confirm that the pot you select is truly linear. A 5 or 10 KΩ pot will do nicely. Small trim Tom Carroll can be reached at [email protected]. pots tend to be a little noisy and not as linear as one may desire, especially the 3/4” turn types that are in a lot of circuitry. The 1/4” types that I mentioned previously have either three hard leads on the bottom that can be soldered to a circuit board, or one can use the three twisted wire types so the builder can position the pot where desired. FIGURE 11. SMA robot hand. FIGURE 10. Solenoid operation from Society of Robots site. Unique Linear Actuator Solutions Before I discuss linear actuators and servos that are designed around a lead-screw with a traveling nut that is attached to a gearmotor, I would like to discuss some inexpensive alternatives to these devices. Solenoids are popular as a linear movement device and are used in many applications such as valves and latches. Figure 10 from the Society of Robots site illustrates the simple technology involved. An energized wound coil pulls or pushes (usually pulls or retracts) a ferrous ‘slug’ to create linear motion. Linear motion distance is usually limited to less than an inch, and the force is very non-linear in that the beginning of the force is small and increases almost exponentially to the end of the stroke — just like a piece of metal drawn to a magnet. There are applications in robot design such as the release of a weapon or similar, but few robots use electromagnetic solenoids. A second technology uses SMA, or shape memory alloy. At first glance, this technology seems like a great way to save weight and still have linear actuation. A very special unsolderable alloy of nickel and titanium are used in one brand of SMA wire to produce Nitinol (Ni Ti nol) wire and other shapes. Another alloy combination is marketed as Flexinol and reacts the same way as Nitinol. When an electric current is applied to the wire and it heats past its ‘activation temperature’ — the point at which it was ‘trained’ — it contracts about 10% of its length. Figure 11 shows a robot hand using five of the wires to contract and cause the fingers to curl. Figure 12 shows a simple door latch application using SMA wire. A five meter length of the 0.006” diameter wire with a resistance of 1.3Ω per inch is available at RobotShop for about $22. It is a tiny (just a wire) linear actuator but applications require a lot of current (500 mA or more), have slow response times, and large hysteresis. Read more about SMA technology from an online search engine. A third device is the automotive car electric door lock shown in Figure 13. It is not a solenoid but is a motorized actuator. They are quite inexpensive at surplus houses at about FIGURE 12. SMA door lock. FIGURE 13. Inexpensive door lock actuator. SERVO 12.2012 77 FIGURE 15. Torxis large linear servo from Invenscience. FIGURE 14. Firgelli L12 miniature linear actuator. $5 and operate from 12 VDC. They draw more current than you would think, but are linear in force — unlike a solenoid — and are quite powerful. Firgelli Micro Linear Actuators and Servos Back in the August 2010 issue of SERVO, I saw a very interesting article by Fred Eady about the use of C language to control small Firgelli linear actuators. Firgelli makes several categories of small actuators/servos that are designed for robotics. I found that the L12 and L16 series best met many robot design needs. They also have several types of lower cost LEGO-specific NXT and small PQ12 actuators, as well as affordable controller boards. The basic actuators are built overseas for Firgelli. They modify each individual one that they receive, and then run them all through a series of tests before and after the modifications before selling them. The result is very few customer returns. FIGURE 16. ServoCity SPT-200 pan and tilt unit attached to a camera. 78 SERVO 12.2012 I tested three of the L12s and two L16s that drew from 300 mA to about 550 mA from six and 12 volt supply lines. Shown in Figure 14, L12 actuators weigh from 28 grams (about 1 oz) for a 10 mm stroke length unit, to twice that for a 100 mm (about 4 in) stroke length. The one in the photo is only 4-1/4” long tip-to-tip. I tested two 100:1 gear ratio actuators that had a force of 23 Newtons — a bit over five pounds. The L16 actuators had 75N (or about 17 pounds of force for a 63:1 gear ratio) and 10 mm a second speed. The “L” series ranges from 12N to 175N and almost 40 pounds, depending on gear ratios. All of the actuators are furnished with mounting hardware. I quickly made a test setup robot arm (that was not photo-worthy) to try out three of the Firgelli actuators in one application. It layed flat on a tabletop, and each of the actuators worked flawlessly to move the three axes of the arm. Firgelli has quite a few options in the L series that can make up dozens of different customordered actuators. They are available with six different gear reduction ratios, seven different stroke lengths from 10 mm to 150 mm, six and 12 VDC models, and five different controller functions from standard R/C input to internal pot feedback, basic two-wire voltage input, integrated controller, and end limit switches. Costs are from $50 to $80, plus optional add-ons. I can highly recommend these actuators for robot applications. Invenscience Torxis Linear Actuator I truly was impressed with the Invenscience monster servos that I tested last month, and their linear servo is just as impressive. Shown in Figure 15, the 14-1/4” by 2” diameter woven carbon fiber or aluminum case servo (18”-24” retracted/extended length) has up to 300 pounds of force. Operating from 12 volts at three amps max, the input control is via a standard R/C pulse train with a separate 12V power supply input. Operating at 0.3 in/sec, this was without a doubt the most robust linear servo that I have used. The IP 64 specs for environmental protection from dust or moisture allow the actuator to be used on all types of robot applications — indoors and out. The end fittings are of quality machined aluminum. This actuator has the capabilities for serious commercial robotics applications. ServoCity's Linear Servos and Motion Devices It is no secret that I am a fan of ServoCity’s line of unique robotspecific products. When I consider what it would take to design and machine these items for a robot project, it’s a no-brainer to go to FIGURE 18. Pololu generic linear actuator with feedback. FIGURE 17. ServoCity linear servo. ServoCity’s site. They make an excellent pan and tilt unit, among many other neat items. The SPT-200 shown in Figure 16 can easily maneuver a good-sized digital camera. These use either Hitec or Futaba standard servos.I have used both this model and a lighter weight SPT-100 with several applications, and have exceeded the recommended weight capacity several times. With ball bearings and tight construction, they make a great sensor platform. It is the ServoCity HDLS6-50-12V linear servo with integrated controller shown in Figure 17 that I have found to be the most useful — especially for large robots. This beefy linear servo is a major modification of their HD6-50 12 volt linear actuator with 115 pounds of force and a speed of 0.5 in/sec with a 6 in stroke. I was testing the unit for maximum current draw and had the two ends fastened by nails into a board. I was watching the current draw rising on a multimeter when it suddenly dropped. I thought I had damaged the unit until I found that it had pulled out one of the nails. Drawing 0.7 amps unloaded with almost four amps at full load, it is easily controlled with a microcontroller or laptop. Weighing in at less than three pounds and small enough to fit within the covering of an arm, this is an ideal arm servo for a human-sized robot as the quality of design and construction are evident. Final Thoughts As usual, I have only touched on a few types of actuators and some key suppliers of these products. A quick Internet search will turn up other varieties of linear movement devices such as toothed belt and drive pulleys like those found in inkjet printers and other office machines. As with all of these actuators and servos, extensive product literature and application information is available on the respective manufacturer’s websites. SV FREE Stencil with every prototype order Pololu Generic Linear Actuator Pololu handles what they call the #2337 generic linear actuator with feedback and an 8” stroke at 0.6 in/sec. The unit shown in Figure 18 operates at 12V. This inexpensive ($91) actuator has potentiometric feedback and operates with the Pololu #1394 Jrk motor controller. This $50 controller communicates via USB, logic-level serial, analog voltage, and typical PWM radio control. I have used both of these with a USB control from a laptop and the R/C PWM pulse train. It compared favorably with more expensive units in performance, though the mounts and overall construction seem a bit less sturdy. It certainly deserves a trial for those building a large robot on a budget. EAGLE order button pcb-pool.com/download-button f f! 20% o on your first order Call Tyler: 1 707 447 7744 [email protected] PCB-POOL® is a registered trademark of www.pcb-pool.com SERVO 12.2012 79 WWW . POLOLU . COM The HRLV- MaxSonar Sensors $PD]LQJPP5HVROXWLRQ 6LPXOWDQHRXV0XOWL6HQVRU2SHUDWLRQ 6XSHULRU1RLVH5HMHFWLRQ 7DUJHW6L]H&RPSHQVDWLRQ $ 34.95 (MSRP) www.MaxBotix.com 0001$%&',/2&34156 '789#:/;<+6=,#>+ ?7$@@#$+4A/=>/=2 !()#*+,-./ *+=/#4/6>#2>-BB#5+C&43D !"#$%&' Electronic Parts & Supplies Since 1967 For the finest in robots, parts, and services, go to www.servomagazine.com and click on Robo-Links. Advertiser Index All Electronics Corp. ..............43, 80 AndyMark ...............................51, 80 Anaren ...........................................62 AP Circuits .....................................37 Beyond Kinetics ............................43 Cana Kit Corp. .......................15, 80 ChiPdesign ....................................80 Digilent ..........................................57 Dongbu Robot Co. ........Back Cover 80 SERVO 12.2012 Firgelli ............................................63 HiTec ..........................................2, 80 Maxbotix .......................................80 PanaVise ........................................51 PCB Pool ..................................79, 80 Pololu Robotics & Electronics .3, 80 Rabbit Laser USA ...........................7 Robotis ..........................................82 RobotShop, Inc ......................80, 81 Robot Power .................................37 SDP/SI ...........................................43 Servo City/Robot Zone .........80, 83 Solutions Cubed ...........................19 superbrightleds.com ...................80 The Robot Marketplace ...............37 Vantec ...........................................37 Weirdstuff Warehouse .................43 *+ $ !" #$ ! "! # ! # ! $ %&'# !( !$)"! ! !!$ !" "! !!* "$% !$ % ! " $$$ ' ' Life with Robot! Not a dream anymore the masterpiece robot servo 24kgf.cm @ 7.4V >R]ILQ@ 'HYHORSHGZLWKWKHHDVHRIXVHLQPLQG+HUNXOH[6PDUW6HUYR6HULHVDUHWKHEHVWÒ*UHHQÓHQHUJ\ HIILFLHQWVPDUWVHUYRVLQWKHZRUOGZLWKORZYROWDJHKLJKRXWSXWDV\QFKURQRXVELGLUHFWLRQDO FRPPXQLFDWLRQDQGPRUHWKDQVHWXSSDUDPHWHUV 6SHFLILFDWLRQ'56'56 'LPHQVLRQVPP:;PP';PP+>LQ;LQ;LQ@ :HLJKWJ'56J'56>R]'56R]'56@ ,QSXW9ROWDJH9'&'56a9'&2SWLPL]HG9'56 6WDOO7RUTXHNJIFP#9'56NJIFP#9'56 >R]ILQ'56R]ILQ'56@ 0D[LPXP6SHHGVƉ#9'56VƉ#9'56 2SHUDWLQJ$QJOH Ɖ&RQWLQXRXV5RWDWLRQ &RPPXQLFDWLRQ)XOO'XSOH[$V\QFKURQRXV6HULDO77/0XOWL'URS,'0D[LPXP%DXG5DWH0ESV 0RWRU 0HWDO%UXVK'&&RUHG'56&RUHOHVV'&'56 *HDU 6XSHU(QJLQHHULQJ3ODVWLF'565HLQIRUFHG0HWDO'56 )HHGEDFN3RVLWLRQ6SHHG7HPSHUDWXUH/RDG9ROWDJHHWF )HDWXUHV 3,')HHGIRUZDUG7UDSH]RLGDO9HORFLW\3URILOH9HORFLW\2YHUULGH7RUTXH6DWXUDWRU2IIVHW 2YHUORDG3URWHFWLRQ1HXWUDO&DOLEUDWLRQ'HDGEDQG6HOHFWDEOH6HWWLQJ3DUDPHWHUV 6ROG6HSDUDWHO\+HUNXOH;0DQDJHU.LW +29,6/LWH +29,6*HQLH +29,6(FR +HUNXOH;0DQDJHULVDEXQGOHGVRIWZDUHWKDWXVHVWKH*8,WRPD[LPL]HWKHHDVHRIRSHUDWLRQLQVHWWLQJXSPRUHWKDQ VHUYRRSHUDWLQJSDUDPHWHUVDQGVHUYRPDLQWHQDQFHXVLQJVXFKDWRRODVWKHUHDOWLPHWUHQGJUDSK Dongbu Robot Co., Ltd. www.dongburobot.com Headquarter : 11th Floor, Bucheon Techno Park 401, Yakdae-dong, Wonmi-gu, Bucheon-city, Gyunggi-do 420-734, Korea TEL : +82-32-329-5551(ext.311), FAX : +82-32-329-5569, E-MAIL : [email protected] Factory : 27, 6 Gil, 4 Sandan, Jiksan-eup, Seobuk-gu, Cheonan-city, Chungcheongnam-do 331-814, Korea, TEL : +82-41-590-1700, FAX : +82-41-590-1701