1
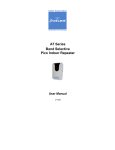
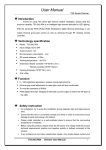
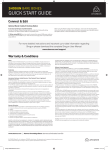
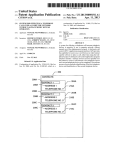
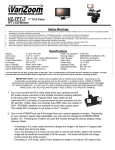
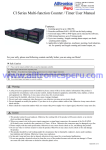
HD5
User Manual
Updated for Firmware Build 12/27/2011
Contents
Page 1----------Contents
Page 2-3-------Features & Specifications
Page 4----------Remote Control
Page 5-7------- Basic Monitor Adjustments
Page 8-11------Using Advanced Options
Page 11-------- Power Options
Page 12-------- Sun Hood Installation
Page 13-14---- Advanced Troubleshooting
Page 15-------- Warranty
1
© 2011 Manhattan LCD LLC. - All Rights Reserved
Section: Features & Specifications
LCD Screen Specifications:
Screen Size: 5.6” Diagonal
Screen Architecture: WXGA HD 720p (Native 1280X800 Pixels)
Screen Backlight: Edge Lit LED
Contrast Ratio: 500:1
Brightness: 400 nits
Viewing Angle: (LR/UD) 170/170
Screen Finish: Gloss
Video Inputs:
HDMI: 2 Input
VGA: 1 Input
Component: 1 Input
Composite Video 1 Input
Controller Specifications:
Controller Manhattan LCD PW338C
Accepts HD Video Up to 1080P 60Hz
NTSC & PAL Compatible
HDCP Compliant
Firmware Upgradable
Compatible Frame Rates 24Hz, 30Hz, 50Hz, 60Hz
Supported resolutions 1080p, 1080i, 720p, 576p, 576i, 480p, 480i
Power: 12v DC (requires regulated power supply)
Power Consumption: 1300 MA @ 12V DC
Software Features:
Screen Markers & Aspect Guides
Focus Assist (2D peaking)
False Color (exposure assist)
Under-scan / Over-scan
Canon DSLR Record & Playback Mode (EOS 5D, 7D, 60D)
Red Camera Mode (For Use with Red Cameras HDMI Port)
Adjustable Color Control
Adjustable Aspect adjustments
Color Table Presets
Picture in Picture
2
© 2011 Manhattan LCD LLC. - All Rights Reserved
Case Specifications:
7 button keypad w/ IR & status LED on front
2 standard 1/4x20 mounts Upper Back & Bottom
Case: 0.125" thick Black ABS Polymer- Matte Finish
Case Dimensions: 6.4” Wide, 4.8”High, 1.3” Deep
Weight: Approx 1 LBS
Standard Accessories:
IR Remote
12V Power Adapter
Optional Accessories:
ABS Sunhood
Sony Battery Plate
Canon Battery Plate
Panasonic Battery Plate
Firmware Upgrade Kit
3
© 2011 Manhattan LCD LLC. - All Rights Reserved
Section: Remote Control
The remote requires 2 AAA batteries (not included)
Sections Highlighted in Red are new features added 4/1/2010.
Quick access menu appears on the lower right side of the screen.
Use the recall button to go up a menu level in the quick menu.
***NOTE*** The remote is required to access the quick menu & Factory Menu if you need to
access the factory menu you must contact the support department.
[email protected]
4
© 2011 Manhattan LCD LLC. - All Rights Reserved
Section: Basic Monitor Adjustments
Powering on the Monitor:
Insert 12V regulated power source via connector into the 12V DC socket. A RED LED will indicate
power is reaching the monitor. If RED LED fails to light, trouble shoot the power adapter or battery.
The screen will be BLACK until you press the POWER button on the monitor or the remote. When the
monitor is powered on the LED status indicator should be green and the monitor will display the
Manhattan LCD logo for 1 second and then switch to a solid blue screen. (May display a black screen
on certain firmware revisions)
Selecting an Input:
Using the Control console located on the left
side of the monitor press the INPUT button.
Use the ^ v buttons located just under the
POWER button and scroll to the appropriate
input. Press the INPUT button to select and
activate the input.
Using the remote control unit with two AAA
batteries installed, point the remote at the Monitor Console’s IR
port (beneath LED indicator) and press the Source Button use the
Up & Down arrows to scroll to the appropriate input and the
enter key to select the input.
Navigating the menu system:
***NOTE*** you must be on an input that is receiving a video
signal to make any changes to any options.
Using the Control console located on the left side of the monitor press the Menu button. To scroll
between Picture, Img.Adj, & Setup tabs use the >< buttons located above the MENU key.
Use the ^ v buttons located just under the POWER button to scroll within a menu tab. To adjust a
specific field use the >< buttons located above the MENU key to apply your changes and go up a level
press the MENU button again to save your changes and go up a level and MENU button once more to
exit the menu.
Using the I/R remote control unit with two AAA batteries installed, point the remote at the Monitor
Console’s IR port (beneath LED indicator) and press the MENU Button use the up & down arrows to
scroll to the appropriate input and the enter key to select the input. To scroll between Picture,
Img.Adj, & Setup tabs use the Left & Right arrow buttons located under the MENU key. Use the Up &
Down arrow buttons located just under the Menu button to scroll within a menu tab. To adjust a
specific field use the Left & Right arrow buttons located below the MENU key to make changes to a
certain field. Press the MENU button again to save your changes and go up a level Use the UP arrow
to get back to the menu tabs and MENU button once more to exit the menu.
5
© 2011 Manhattan LCD LLC. - All Rights Reserved
These monitors are equipped with 4 external inputs; VGA, Component, Composite, and HDMI port.
The HD089B model has a second HDMI port which is only accessible from inside the monitor there is
no external connector. Each input has its own set of menu items and are stored separately from each
other adjusting an input will have no effect on another.
Picture Tab:
The adjustments you can make in the Picture Tab of the menu system are:
Preset: Allows the user to make Preset color tables for different cameras
Brightness: Adjusts the amount of white in the picture.
Contrast: Adjusts the contrast between the colors.
Phase: Modifies the Clock/ Phase of the input (VGA & Component only)
Frequency: Changes the frequency at which the panel is running (VGA only).
Sharpness: Adjusts the sharpness filter allowing you to go for a sharp look or smooth look.
Color: Allows you to adjust the Color Saturation level.
Tint: Allows you to adjust the Hue of the image.
Gamma: Allows you to set the monitor to a predefined gamma table.
Color Temp: Allows you to adjust the Red, Green and Blue channel gains individually.
Img.Adj Tab:
The image Adjust tab will allow the user to adjust the images position and aspect ratio on the
monitor.
Image Size: Adjusts aspect ratio. Fill All, 1:1, Fill Aspect, 4:3, 16:10, 15:9, 16:9, 1.85:1, 2.35:1, Red
Camera, & Canon 7D, HDSLR Record, HDSLR Playback, Zoom 1, 2, 3 & 4.
H position: Horizontal position of the picture.
V position: Vertical position of the picture.
Overscan: allows the operator to zoom in or out on a
specific image.
Auto: Auto centers the position the picture on the screen.
Freeze Frame: Freezes a specific image on the screen.
Setup Tab:
The setup tab allows the user to customize Picture in Picture as well as OSD settings.
Picture in Picture: You can select 1 Digital & 1 Analog input and display them Side By Side.
Transparency: Sets how visible the background of the OSD menu system.
OSD Timeout: sets the length of time for the OSD to be displayed after the last keystroke.
Sleep Timer: Sets how long the monitor will stay on with no video input.
Source Enable: Enables or disables video Inputs.
Factory Reset: Resets all user adjustments to factory defaults.
Advanced Tab:
Blue Gun: Turns off red & green channels for use when calibrating monitor.
False Color: Displays colors representing different IRE Levels (helps with setting correct exposure)
6
© 2011 Manhattan LCD LLC. - All Rights Reserved
Focus Assist: Assists the operator achieve a fine focus on a desired object by adding white lines
around objects that are in focus.
Color Bars: Displays NTSC color bars on the screen helpful while calibrating.
Monochrome: Displays the picture in black and white.
HDMI Video Color Space: Changes the color space for the HDMI input (HDMI ONLY)
Guides Tab:
Aspect Guides: Displays lines on the screen which correspond to different aspect ratios.
Screen Markers: Displays lines on the screen which correspond to different markers.
7
© 2011 Manhattan LCD LLC. - All Rights Reserved
Section: Using Advanced Features
False Color:
aaaaaaaaaaaaa
False color is used for setting the correct exposure level or ISO
setting on your camera. It is important to use false color when
you are shooting in low light and direct light situations because if
your shot is severely under/overexposed you may not have to reshoot an entire scene of your video. This is how you use this
feature.
To activate False Color press MENU scroll to the Advanced Tab
and turn the False Color slider to the ON position hit MENU again
to activate it. To deactivate it follow the reverse procedure. If you
have a HD089BV2 or HD089CV2 you can assign a hotkey to this
feature under the setup tab.
Completely underexposed or completely pitch black objects will
be totally white (0-2 IRE).
The very dark shadows, black colored objects and barely visible
objects in shadows will be Blue & Light Blue (2-20 IRE).
Lighter shadows & dark colors such as a dark grey or a shadow on
the side of a face or object will show up as Dark Grey & Bright
Purple (21-48 IRE)
.
The object of your video such as an object or persons face should
be, Medium Grey, Green & Light Grey (48-78 IRE).
Heavily lit areas ones where it appears to be in direct contact with
light will display as Dark Yellow & Yellow (78-84 IRE)
Overexposed areas ones which will appear white or near white in
your video will display as Orange & Red (85-108 IRE)
A video detailing how to use False Color can be viewed online
www.YouTube.com/ManhattanLCD
8
© 2011 Manhattan LCD LLC. - All Rights Reserved
Focus Assist:
The focus assist function will allow users to focus the camera with great precision. This feature is very
similar to a peaking function on other brand monitors. When enabled the object in focus will be
highlighted in white and everything else will be darkened or grayed out.
To activate Focus Assist press MENU scroll to the Advanced Tab and turn the Focus Assist slider to the
ON position hit MENU again to activate it. To deactivate it follow the reverse procedure. If you have a
HD089BV2 or HD089CV2 you can assign a hotkey to this feature under the setup tab.
A video detailing how to use Focus Assist can be viewed online www.YouTube.com/ManhattanLCD
User Presets:
User presets are a useful tool when you are shooting with multiple camera rigs and want to use the
same monitor. There are 3 user presets per input for a total of up to 15 user defined presets. What
you can do with each preset is set up the correct color and aspect ratio in the preset. So next time you
use that camera with the monitor all you need to do is choose the preset and you are ready to go.
Each preset will remember all of the settings inputted into the Picture tab and the image adjust tabs
of the monitor.
To activate a preset select preset from the picture tab use the Left/ Right arrows to scroll through
them and select the one you want.
A video detailing how to use the Presets feature can be viewed online
www.YouTube.com/ManhattanLCD
Image Size Feature:
The Image size feature will allow the user to select a specific aspect size such as 4:3, 16:9, and 16:10
among others. Our monitors have some camera specific modes for Cannon DSLR cameras and The
Red Cameras which use a proprietary resolution different from the norm.
Fill to Aspect
This is a very handy feature when shooting on most cameras. It will allow you to let the monitor
adjust the image to whatever aspect ratio you are filming.
HDSLR Record Mode:
This Mode will allow you to correctly view the image on a Canon DSLR camera such a 5D or T2i it will
automatically switch the resolution between preview and record modes and will display the image in
full screen.
HDSLR Playback Mode:
This Mode will allow you to correctly view the image on a Canon DSLR camera such a 5D or T2i it will
automatically display the correct resolution when you play back a clip[ from the camera and will
display the image in full screen.
9
© 2011 Manhattan LCD LLC. - All Rights Reserved
Red Camera Mode:
This Mode will allow you to correctly view the image on a Red Camera such as a Red One. Red
cameras use a proprietary resolution coming from their HDMI output that normally only worked with
their brand of monitors. Our Monitor can automatically adjust to their proprietary and display the
image in full screen without cutting off the camera info.
Zoom 1, 2, 3&4:
These modes will allow you to Zoom in Digitally up to 4X on an image to check the focus and
exposure. This feature will work with low resolution but works best with digital High resolution inputs
such as HDMI or SDI 1080P.
A video detailing how to use the Image Size feature can be viewed online
www.YouTube.com/ManhattanLCD
Blue Gun Calibrating:
This feature will allow you to calibrate the monitor to your particular camera by only allowing the
monitor to display information from the blue channel of the standard RGB color scheme. There are
many ways to accomplish this task and the monitor is usually very
close to perfect right out of the box so usually only minor
adjustments are required. Please follow these steps:
1. Send the Monitor SMTP Color Bars from the Camera or
signal generator. (Picture To Right)
2. Activate the Blue Gun feature of the monitor. Press MENU
scroll to the Advanced Tab and turn the Blue Gun slider to
the ON position hit MENU again to activate it. If you have a
HD089BV2 or HD089CV2 you can assign a hotkey to this feature under the setup tab.
3. Use the menu system or Quick Access Button on remote to set Brightness Up/ Down until the
plunge bar is displayed correctly. It will be correct when only 1 grey bar is visible. (Left Picture
Below)
4. Set the Color Up /Down until the far Left/ Right blue columns are the same color. (Middle
Picture Below)
5. Set the Tint/ Hue Up / Down until the middle Left/ Right blue columns are the same color.
(Right Picture Below)
A
video detailing how to use the Blue Gun feature can be viewed online
www.YouTube.com/ManhattanLCD
10
© 2011 Manhattan LCD LLC. - All Rights Reserved
Aspect Guides & Screen Markers:
The Aspect Guides and Screen Markers Features will assist you in correctly framing your shot.
Activating an Aspect Guide or Screen marker will display a rectangle box representing a specific
aspect ratio. For example if you are filming in 4:3 and you will be editing the video in post production
to 16:9 the aspect guides will show you if you will be cutting off the top of someone’s head in the
video. Within the aspect guides you have several options for line style and % safe. Choosing a line
style will allow you to select between a rectangle line black or partially grey bars in the inactive area.
% Safe will allow you to make the aspect area smaller in 5% increments which will give you a safe area
for the shot.
To activate a preset scroll to the Guides tab and select which screen marker you want to use. To
deactivate it follow the reverse procedure. If you have a HD089BV2 or HD089CV2 you can assign a
hotkey to this feature under the setup tab.
Section: Power Options:
Our monitors may use any 12V regulated power source. All monitors ship with a supplied 12V
regulated AC adapter. The input connector is a standard 2.1x5.5mm barrel connector the center pin
being + positive outer shell is - negative. You may use any power source as long as it is regulated. If
the polarity is reversed it will void your warranty, if you overpower the monitor with a higher voltage
than 12.5 volts it will blow a fuse and void the warranty. We currently offer optional battery packs
with Velcro strips for mounting & battery plates for Panasonic Cannon & Sony Batteries that include a
built in power regulator to ensure proper operation.
The Battery plates are mounted to the monitor at
the factory and are mounted in a sideways position
to allow the monitor to be flipped upside-down on
cameras with 35mm lens adapters. Note the green
status indicator it will turn on when the battery is
charged and flash when the battery is low. The
power wire connects to the 12V dc
jack when the monitor is being
powered by the plate.
11
© 2011 Manhattan LCD LLC. - All Rights Reserved
Section: Sun-Hood Installation
There are 8 treaded holes on the monitor 2 on each side the sun hood is a 2 piece design 1 piece fits
on the top the second on the bottom they are made to fit on either side. The sun hood mounts to the
monitor with supplied thumbscrews in 2 easy steps.
1. Thread in the thumbscrews about half way
2. Then slide the groves in the sun hood around the shaft of the thumbscrews and Snug the
thumbscrews.
12
© 2011 Manhattan LCD LLC. - All Rights Reserved
Section: Advanced Troubleshooting
Section A - Your monitor turns on but the screen is locked up or non responsive.
1. Make sure the monitor is powered off press and hold the Up & Down arrows Press Power and
hold all 3 for 5 seconds. This clears NV Ram and sets the controller to Factory default settings.
2. HD089BX, HD071AX skip this step; all others press and hold Menu and Input press and release
Up Arrow until you see something on the screen.
3. Verify settings are correct press MENU 9-1-1 MENU on remote or by pressing Up-Up-DownDown-Left-Left-Right-Right Menu on the Keypad make sure you pause between pressing each
button added in build (12/27/2011) and go to factory menu to setup the controller for your
model monitor:
HD089B, HD071A panel select 000, keypad & HDMI Rename is 000
HD089B2, HD071A2 panel select 000, keypad & HDMI Rename is 001
HD089C panel select 001, keypad & HDMI Rename is 000
HD089C2 panel select 004, keypad & HDMI Rename is 001
HD5 panel select 002, keypad & HDMI Rename is 000
4. If your monitor continues to have trouble it may be in need of a firmware upgrade or repairs.
Please contact Manhattan LCD support. [email protected]
Section B - Your monitor turns on but stays on a blue screen.
1. Verify the monitor is on the correct input. On the monitors control panel: press INPUT button
and use the Up & Down arrows to scroll to the selected input and hit INPUT again to select.
2. Check the Firmware Version: Hit MENU and check the date of the firmware. If your firmware is
before July 6 2010 there are some known issues with the HDMI using newer cameras. You can
get a firmware upgrade kit from our online store.
3. Check the input cables for loose or reversed connections. If they check out try displaying an
image from a DVD player using the same cables. If there is no signal from a DVD player try a
different signal cable.
4. If the DVD player & cable works there may be something wrong with the cameras output
signal.
A. Composite and Component require 1V to operate properly. Check with a volt meter or
oscilloscope
B. If you are using HDMI make sure the HDMI cable is a certified 1.1 or higher.
5. If the DVD player does not work, first check with another set of cables. If it still does not show
an image the monitor may have a loose connection or bad connector.
A. HDMI: Open the monitor up there are 2 HDMI ports on the controller, check both HDMI
inputs. You can plug a HDMI cord into either one of the HDMI Ports directly. If you have an
HD5, HD071A both HDMI ports are accessible from the outside. If neither works there may
be something wrong with the controller board send it in for repair.
B. Component / Composite: none of the PW338 based monitors support sync on green do not
plug the yellow Composite video into the Green Y port on the monitor it will not work. Use
the yellow composite connector. With the component connector the Y signal is the most
important. If the y (green plug) is plugged in you should see a monochrome image the Pb &
13
© 2011 Manhattan LCD LLC. - All Rights Reserved
Pr carry the color information reversing them will inverse the blue and red colors on the
image make sure they all carry around 1V with a volt meter.
C. 3G HDSDI: On certain model monitors there is an option for 3G HDSDI. The SDI signal
requires a 75 OHM coax cable. If you are unable to see a signal from your camera using SDI
check the cable first. The SDI status light should be solid green when it is receiving a signal
and flash when there is no signal. If the status light does not light up at all the power
connector inside the monitor that goes to the 3G board may have come loose. If the status
led is solid green but no video the HDMI adapter plug may have come loose from the
controller you may need to open the case and check the connections.
D. VGA: there are a few cameras on the market with VGA out. You can check the monitor with
a computer just attach the other end of the cable to a laptop or desktop computer and
enable the computer’s VGA Port.
Section C - Your monitor turns on but the screen is solid black or solid white.
1. Solid Black: Usually indicates a bad connection with the backlight ballast. Or a bad backlight
inverter or bad LCD panel.
A. Power on monitor in a well lit area press menu if you can see the menu but very faint then
backlight is not working. Troubleshoot the LED Driver & Cables.
B. If you do not see a faint image then there may be a problem with the LVDS Settings or loose
or broken LVDS Cable
2. Solid White usually indicates a problem with the LVDS signal.
A. Check the panel select. (See Section 1-2 & 3)
B. Try a factory reset. (See Section1-1,2 & 3)
C. Open up case and look for loose broken LVDS Cable *(between controller and LCD panel).
Section D - Your monitor is not powering on.
1. Plug the supplied 120-240V AC to 12V DC power supply into the monitor. If the Red Status LED
comes on go to Step 2. If it does not come on troubleshoot the power supply. Our monitors use
12v regulated power either from the supplied power supply or from a battery pack. With a volt
meter make sure the power connector is showing 12V DC the center pin is positive (+) the
outer shell is negative (–). If the power supply is good go to step 2
2. Open the monitor up and check inside for loose connections.
A. If the red power light is not coming on check the large cable that carries power from one
side of the board to the other.
B. Also check these pins for 12V and 5V.
C. If red power light comes on and pressing the power button does not make the green led
come on try removing the LVDS cable from the controller.
Section E – Sending your monitor in for repair.
1. If your monitor is new (less than 2 weeks old) it can be exchanged for a new one if available
(excluding clearance or refurbished items). Have your Manhattan LCD order number or retail
invoice ready and send us an email [email protected] or call us (407) 362-1818.
14
© 2011 Manhattan LCD LLC. - All Rights Reserved
2. If your monitor is covered under warranty but older than 2 weeks, is a clearance or refurbished
item, we will repair your monitor free of charge just contact us for an RMA. Have your order
number or invoice handy.
3. If your monitor is out of warranty you can repair it yourself with parts available on our website
or we can repair it for you. All applicable parts, labor & return shipping charges will apply.
Section: Warranty Statement
Warranty:
Manhattan LCD monitors are under warrantee and are guaranteed to be free from manufacturing
defects for a period of 12 Months from the date of purchase to the original owner unless otherwise
specified.
Disclaimers:
Manhattan LCD Shall be indemnified and held harmless for any and all injury or death resulting from
the improper use of their products. Warranty is null and void if there is any evidence of tampering, or
abuse or if the case has been opened or modified in any way unless otherwise specified.
Claims:
Claims for damages must be preceded by a Return Merchandise Authorization (RMA). RMA’s may be
requested directly from the manufacturer or authorized distributors. Manhattan LCD reserves the
right to refuse to repair or replace any monitor that it deems is in need of repair due to customer
negligence or damage was caused by use other than the normal intended purpose of the product.
Contact:
Manhattan LCD
High Definition Monitors
Contact Info:
John Reed - Sales / Engineering, [email protected]
Tel: 407-247-8338
Vincent Falcone - Tech Support / Shipping, [email protected]
Tel: 407-362-1818
Sales [email protected]
Support [email protected]
Address:
Manhattan LCD
1007 Brielle Avenue
Oviedo, FL 32765 USA
15
© 2011 Manhattan LCD LLC. - All Rights Reserved