1
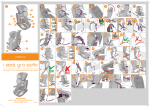
WBE 4140
de Originalbetriebsanleitung
Radwuchtmaschine
es Manual original
Máquina de equilibrado de ruedas
nl Oorspronkelijke gebruiksaanwijzing
wielbalanceermachine
cs Původní návod k používání
Stroj pro vyvažování kol
en Original instructions
Wheel Balancing Machine
it Istruzioni originali
Equilibratrice per ruote
pt Manual original
Máquina de balanceamento de rodas
tr Orijinal işletme talimatı
Tekerlek balans makinesi
fr Notice originale
Banc d‘équilibrage de roues
sv Bruksanvisning i original
Hjulbalanseringsmaskin
pl Instrukcją oryginalną
Wyważarka
zh ॳྟⱘᣛफ
䔺䕂ࡼᑇ㸵ᴎ
en
28 | WBE 4140 |
Contents
1.
1.1
1.2
Symbols used
Documentation
WBE 4140
29
29
29
2.
2.1
2.2
2.3
User information
Important notes
Safety instructions
Electromagnetic compatibility (EMC)
30
30
30
30
3.
3.1
3.2
3.3
3.4
3.5
Product description
Intended use
Prerequisites
Scope of delivery
Special accessories
WBE 4140
30
30
30
30
30
31
4.
4.1
4.2
4.3
4.4
4.5
4.6
4.7
Commissioning
Unpacking
Setting up
Fitting the wheel guard
Fitting the wheel guard
Electrical connection
Checking the direction of rotation
Calibration of WBE 4140
32
32
32
33
33
34
34
34
5.
5.1
5.2
Fitting and removing the flange
Removing flange
Fitting flange
35
35
35
6.
6.1
6.2
Fitting and removing the wheel
Securing the wheel
Removing the wheel
36
36
36
7.
7.1
7.2
Operation
Start page
Monitor display
7.2.1 Status bar
7.2.2 Display field
7.2.3 Soft key bar
7.2.4 EXIT key
Control panel
37
37
37
37
37
37
37
37
7.3
1 695 655 743
|
2010-07-04
8.
8.1
8.2
8.3
Program structure
Wheel balancing
Rim data
Settings and service
8.3.1 Calibration
8.3.2 Settings
8.3.3 User-defined settings
38
38
38
39
39
39
39
9.
9.1
40
9.6
Wheel balancing
Selection of vehicle type and balancing
program
Entering rim data
Measuring unbalance
Attaching balance weights
9.4.1 Splitting balance weights
9.4.2 Without Easyfix®
9.4.3 With Easyfix®
Manual vernier caliper
9.5.1 Determining rim width
9.5.2 Attaching balance weights
Gauge arm (accessory)
40
40
41
41
41
41
41
42
42
42
42
10.
Unbalance minimization
43
11.
Faults
44
12.
12.1
12.2
12.3
Maintenance
Cleaning and servicing
Spare and wearing parts
Calibration
12.3.1 Call-up of calibration menu
12.3.2 Flange calibration
12.3.3 Calibration of electronic vernier
caliper/gauge arm
12.3.4 Calibration of WBE 4140
12.3.5 Reference measurement
46
46
46
46
46
46
13.
13.1
13.2
13.3
Decommissioning
Temporary shutdown
Change of location
Disposal and scrapping
13.3.1 Substances hazardous to water
13.3.2 WBE 4140 and accessories
49
49
49
49
49
49
14.
14.1
14.2
14.3
Technical data
WBE 4140
Dimensions and weights
Operating range
49
49
49
49
9.2
9.3
9.4
9.5
47
48
48
Robert Bosch GmbH
Symbols used | WBE 4140 | 29
1.
Symbols used
1.1
Documentation
Pictograms linked with the key words Danger, Warning
and Caution are warnings and always indicate an immediate or potential hazard to the user.
Danger!
Immediate danger that could cause serious
personal injury or death.
1.2
en
WBE 4140
Disposal
Old electrical and electronic devices, including
cables and accessories or batteries must be
disposed of separate to household waste.
! Heed all the safety instructions and hazard warnings
on the products and make sure these are always
complete and clearly legible!
Warning!
Potentially dangerous situation that could
cause serious personal injury or death.
Attention – mains voltage applied
Do not open the WBE 4140 when energized.
Do not touch live parts.
Caution!
Potentially dangerous situation that could
cause personal injury or damage to property.
Direction of wheel rotation
Wheel must turn in direction indicated.
(see chapter 4.6)
! Important – warns of a potentially hazardous situation in which the WBE 4140, the test sample or other
object in the vicinity could be damaged.
In addition to these warnings, the following symbols are
also used:
i Info – Details for the application and further useful
information.
Single-step procedure – instructions for a procedure
that can be completed in just one step.
Intermediate result – an intermediate result is displayed during a procedure.
" Final result – the final result is displayed at the end
of the procedure.
Robert Bosch GmbH
1 695 655 743
|
2010-07-04
en
30 | WBE 4140 | User information
2.
User information
3.
Product description
2.1
Important notes
3.1
Intended use
Important information on copyright, liability and warranty
provisions, as well as on equipment users and company
obligations, can be found in the separate manual "Important
notes on and safety instructions for Bosch Tire Equipment".
These instructions must be carefully studied prior to startup, connection and operation of the WBE 4140 and must
always be heeded.
2.2
Safety instructions
All the pertinent safety instructions can be found in the
separate manual "Important notes on and safety instructions for Bosch Tire Equipment". These instructions must
be carefully studied prior to start-up, connection and
operation of the WBE 4140 and must always be heeded.
2.3
Electromagnetic compatibility (EMC)
The WBE 4140 is a wheel balancing machine with mechanical attachment for the balancing of passenger
vehicle and motorcycle wheels with a rim diameter of
12" – 22" and a rim width of 1" – 13". The WBE 4140
is to be used exclusively for this purpose and solely
for the range of applications specified in these instructions. Any other purpose is not consistent with the intended use and is therefore not permissible.
i The manufacturer cannot accept any liability for possible damage arising from improper use.
3.2
Prerequisites
The WBE 4140 must be installed on a flat surface
made of concrete or similar material and anchored in
position.
The WBE 4140 satisfies the requirements of the EMC
directive 2004/108/EG.
i An uneven or vibrating surface can lead to inaccurate
i The WBE 4140 is a class/category B product as
3.3
defined by EN 61 326. The WBE 4140 may cause
high-frequency household interference (radio interference) so that interference suppression may be
necessary. In such cases the user may be required to
take the appropriate action.
unbalance measurements.
Scope of delivery
Designation
Order number
WBE 4140
Refer to rating
plate
Quick-action clamping nut
1 695 616 200
Centering flange
1 695 602 400
Centering cones (3x) and adapters
Manual vernier caliper
1 695 629 400
Weight pliers
1 695 606 500
Measuring compasses
1 695 652 870
Calibrating weight
1 695 654 377
3.4
Special accessories
Designation
Order number
Wheel lift
1 695 900 004
Set of quick-action clamping cones M10x1.25 1 695 612 100
1 695 655 743
|
2010-07-04
Third centering cone dia. 89 to 132 mm
1 695 653 449
Fourth centering cone dia. 120 to 174 mm
1 695 606 300
Spacer ring for rims (large rim offset)
1 695 606 200
Three-arm flange for light commercial
vehicles
1 695 653 420
Clamping kit for swinging arms (dia. 19 mm)
1 695 654 060
Infinitely variable universal flange for cars
(3-4-5 hole)
1 695 654 043
Motorcycle flange
1 695 654 039
Shaft kit, dia. 10 mm
1 695 653 430
Calibration weight (calibrated)
1 695 654 376
Gauge arm
1 695 655 678
Robert Bosch GmbH
Product description | WBE 4140 | 31
3.5
en
WBE 4140
1
11
2
4
7
8
3
12
65
13
5
14
Mi
1_
-0
46
10
15
9 10
6
Fig. 1:
WBE 4140
Item
Designation
Function/purpose
1
TFT monitor
Software display (measured values and operating instructions)
2
Wheel guard
Protection of operator against flying particles (e. g. dirt, water).
Starting and stopping measurement, refer to Section 8.3.3.
3
Gauge arm (accessory)
Determination of rim width
4
Vernier caliper (electronic)
Recording of rim distance and rim diameter.
Determination of positions for attachment of adhesive weights.
5
Cone of drive shaft
Flange mounting.
6
Pedal
Locking of shaft / wheel.
7
Control panel
Operation of WBE 4140, refer to Section 7.3
8
Tray
For storing balance weights and accessories.
9
Mains socket
Connection for power cord.
10
On/off switch
Switching WBE 4140 on and off.
11
Centering flange
Wheel attachment.
12
Quick-action clamping nut
Centering and attachment of wheel on cone.
13
Manual vernier caliper
Can be used as substitute if the electronic vernier caliper is defective.
14
Measuring compasses
Can be used as substitute if the rim width and rim diameter cannot be recorded
electronically.
15
Clamping tool holders
For storing accessories.
Robert Bosch GmbH
1 695 655 743
|
2010-07-04
en
32 | WBE 4140 | Commissioning
4.
Commissioning
4.1
Unpacking
1. Remove the steel bands and fasteners.
2. Carefully lift off the packaging.
3. Extract the wheel guard, accessories and packaging
material from the packaging unit.
i Check that the WBE 4140 and the accessories are in
Danger of tilting!
The center of gravity of the WBE 4140 is not
in the middle.
The WBE 4140 must be lifted slowly.
3. Hoist the WBE 4140 with a crane. Erect in the intended area, taking care to comply with the specified
minimum distances.
proper working order and that there are no visible
signs of component damage. In case of doubt, do
not start up the unit and consult customer service.
i Remove the accessories and packaging material from
the packaging unit.
Setting up
1450
4.2
2. Attach slings of the same length and sufficient load bearing capacity (min. 100 kg) as shown in the drawing.
Mi
Warning of damages!
The slings can damage the attachments of the
WBE 4140.
Position the slings with care.
Lift the WBE 4140 carefully.
3_
-0
46
10
65
1. Unscrew the screws that secure the WBE 4140 to
the pallet.
500
0
50
108
5
5
85
i To ensure reliable, ergonomic use of the WBE 4140,
we advise setting it up at a distance of 500 mm from
the nearest wall.
Danger of tilting!
High forces occur during wheel balancing.
The WBE 4140 must be attached to at least
3 points on the floor.
Use the screw holes.
4. Secure the WBE 4140 to at least 3 points on the
floor.
i Install the machine in an appropriately lit work place,
respecting the Standards in force on this subject.
65
Mi
2_
-0
46
10
1 695 655 743
|
2010-07-04
Robert Bosch GmbH
Commissioning | WBE 4140 | 33
4.3
Fitting the wheel guard
4.4
i The back of the WBE 4140 contains 4 blind rivet nuts
countersunk in the housing wall.
1. Fasten the supporting arm to the WBE 4140. To do
so, screw the 4 supplied Allen screws and 4 washers
into the blind rivet nuts and tighten (width A/F 6).
046
Fitting the wheel guard
i The back of the WBE 4140 contains 4 blind rivet nuts
countersunk in the housing wall.
651
en
1. Fasten the supporting arm to the WBE 4140. To do
so, screw the 4 supplied Allen screws and 4 washers
into the blind rivet nuts and tighten (width A/F 6).
-04
651046-06_Mi
_Mi
1
3
2
1
Fig. 2:
1
2
3
Fastening the supporting arm to the WBE 4140.
Supporting arm
Allen screw
Washer
2
2. Screw the wheel guard loosely to the supporting
journal with 2 screws and 2 washers (width A/F 6).
i Make sure that the open wheel guard is lying on the
Fig. 4:
1
2
3
3
Fastening the supporting arm to the WBE 4140.
Supporting arm
Allen screw
Washer
supporting arm (rubber buffer).
2. Attach the monitor to the support arm, tightening
the bracket using the 4 screws
4
3
651
046
-05_
Mi
1
Fig. 3:
1
2
3
4
651046-07_Mi
2
1
Securing the wheel guard
Screw
Washer
Supporting arm
Wheel guard
Fig. 5:
3. Firmly tighten the screws.
Robert Bosch GmbH
Fitting monitor
1 Allen screw
1 695 655 743
|
2010-07-04
en
34 | WBE 4140 | Commissioning
3. Plug in the monitor power cord (Item 1) at the monitor.
4. Connect the monitor and the WBE 4140 with the
VGA connecting cable (Item 2).
5. Fix the two cables to the monitor bracket with the 4
clamps included.
2
4.6
Checking the direction of rotation
1. Check that the WBE 4140 is correctly connected to
the mains power supply.
2. Switch on the WBE 4140 with the On/Off switch.
3. Close the wheel guard or press the < I > button.
The shaft rotates.
4. Check the direction of rotation of the shaft.
i The correct direction of rotation is indicated by a yel-
651046-10_Mi
low arrow on the WBE 4140. This arrow is situated
to the right of the flange.
i If the direction of rotation is incorrect, the
WBE 4140 comes to an immediate stop and displays
the error message Error 3 (see section 11).
1
4.7
Fig. 6:
! Calibration must be performed after initial commis-
Monitor attachment
sioning.
1 Monitor power cord
2 Monitor VGA connecting cable
6. Orientate the monitor in the desired position.
4.5
Calibration of WBE 4140
Electrical connection
! The WBE 4140 is only to be connected to the power
1.
2.
3.
4.
Flange calibration.
Vernier caliper and gauge arm calibration.
WBE 4140 calibration.
Perform reference measurement.
i Calibration is described in Section 12.3 .
supply if the mains voltage available corresponds to
the rated voltage given on the rating plate.
6510
1. Check whether the mains voltage corresponds to the
rated voltage given on the rating plate.
2. Provide fuse protection for the WBE 4140 mains connection in line with locally applicable standards. The
customer is responsible for providing fuse protection
for the mains connection.
3. Connect the power cord to the WBE 4140.
2
3
1
Fig. 7:
1
2
3
Electrical connection
On/off switch
Mains connection
Power cord
1 695 655 743
|
2010-07-04
Robert Bosch GmbH
Fitting and removing the flange | WBE 4140 | 35
5.
Fitting and removing the
flange
Fitting of the flange is necessary in the following situations:
Commissioning
When changing the type of flange
(universal - 3/4/5 hole)
When changing the type of wheel
(passenger car - motorcycle)
5.2
en
Fitting flange
i Clean and degrease the cone of the shaft and the
flange opening.
1. Press the pedal.
This blocks the shaft.
2. Slide the flange onto the shaft.
-05
002
651
_Rf
! Balancing accuracy will be impaired if the flange has
not been properly fitted to the shaft.Before fitting the
flange, clean and degrease (remove corrosion protection) the cone of the shaft and the flange opening.
5.1
Removing flange
1. Press the pedal.
This blocks the shaft.
2. Slacken off the hexagon socket head bolt.
-04
002
651
_Rf
3. Tighten the hexagon socket head bolt.
-03
002
651
_Rf
3. Unfasten the flange by tapping with a rubber-headed
hammer on the cone end.
4. Pull the flange off the cone.
-06
002
651
_Rf
" Flange fitted.
" Flange detached.
Robert Bosch GmbH
1 695 655 743
|
2010-07-04
en
36 | WBE 4140 | Fitting and removing the wheel
6.
Fitting and removing the
wheel
4. Push the unlocked quick-action clamping nut onto
the shaft and press firmly against the wheel.
Risk of trapping!
There is a danger of getting fingers and other
body parts trapped while fitting and removing the wheel.
Wear protective boots and gloves.
Heavy wheels must always be mounted by
two people.
Do not place fingers between the wheel
and the shaft.
6.1
2
Securing the wheel
Incorrect or inaccurate measurement
results!
An incorrectly or improperly secured wheel
adversely affects the accuracy of wheel
balancing and therefore the handling of the
vehicle.
Use the correct flange.
Use the specified accessories
(cone, spacer rings).
The rim must make precise contact with the
flange. Use a wire brush to remove any dirt.
3
651002-08 _Rf
1
5. Release the lock and turn the quick-action clamping
nut clockwise until the wheel is firmly braced.
1. Switch on the WBE 4140 with the On/Off switch.
2. Position a suitable cone on the shaft (flange).
65
10
02
-0
7
_R
f
3. Place the wheel on the shaft against the cone.
651002-09 _Rf
" The wheel is secure.
6.2
Removing the wheel
1. Turn the quick-action clamping nut anti-clockwise
and release the wheel.
2. Unlock and take off the quick-action clamping nut.
3. Remove the wheel.
1 695 655 743
|
2010-07-04
Robert Bosch GmbH
Operation | WBE 4140 | 37
7.
Operation
7.1
Start page
i The initialization of the software is displayed approx.
20 seconds after switching on the WBE 4140. The
start page is displayed after a further 40 seconds.
en
Vehicle selected.
Balancing program selected.
Number of wheel spokes selected in "Split program".
7.2.2
Display field
The following information is displayed here:
Rim data and positioning of vernier caliper/gauge
arm.
Information on positioning and mass of the balance
weights.
7.2.3
Soft key bar
The soft key bar indicates the functions available in the
corresponding menu. The functions are started by pressing the function keys.
7.2.4
EXIT key
Symbol
Description
Press < I > to return to the previous
page.
i If the image does not appear correctly, carry out selfcalibration of the monitor (making reference to the
monitor user manual).
The following menus can be selected on the start page:
Symbol Designation
7.2
Access to menu
Wheel Balancing
Balancing program
Settings and
service
Personal settings, calibration and customer service.
Pressing this key terminates the menu selected and returns to the previous page.
i Values are only confirmed with < I >.
7.3
Control panel
The WBE 4140 is operated by way of the < I > key and
the arrow keys. The corresponding functions are described in Table 1.
Monitor display
Key
Description
Arrow keys
Navigation in the menus and alteration of the
rim data values.
<I>
Confirmation of settings.
Starts measurement.
Ends measurement.
o v u z
Tab. 1:
Fig. 8:
1
2
3
Control key functions
Balancing main page
Status bar
Display field
Soft key bar
7.2.1
Status bar
The following information is displayed depending on
the menu selected:
Current user.
Robert Bosch GmbH
1 695 655 743
|
2010-07-04
en
38 | WBE 4140 | Program structure
8.
Program structure
8.1
Wheel balancing
8.2
Rim data
Rim diameter input by way of o / u keys
Selection of user 1, 2 or 3. The last settings and rim data
selected are assigned to the current user and stored.
Rim width input by way of o / u keys
Selection of type of vehicle (passenger car or motorcycle); the type of vehicle selected is displayed in the status bar.
Input of distance between WBE 4140 and rim by way
of o / u keys
Press < I > to return to the previous page.
Call-up of the "Enter rim data" menu.
Selection of balancing program; 11 passenger car programs, 5 motorcycle programs; the program selected is
displayed in the status bar.
Starts measurement.
Ends measurement.
Display of the exact, non-rounded unbalance measured
value.
Selection of balancing program; 11 passenger car programs, 5 motorcycle programs; the program selected is
displayed in the status bar.
Switching of units (mm / inch)
Selection of user 1, 2 or 3. The last settings and rim data
selected are assigned to the current user and stored.
Selection of number of spokes.
The weight can be distributed behind the spokes after
measuring the unbalance.
Call-up of the "Unbalance minimization" program
(refer to Section 10).
Press < I > to return to the previous page.
1 695 655 743
|
2010-07-04
Robert Bosch GmbH
Program structure | WBE 4140 | 39
8.3
Settings and service
8.3.2
en
Settings
Activates or deactivates the vernier caliper
and the gauge arm.
Press <OK> to return to the previous page.
Positioning of adhesive weight (electronic vernier caliper, manual vernier caliper (3, 6 or 12 o'clock).
8.3.3
User-defined settings
Call-up of service menu (customer service only)
Call-up of calibration menu
Press < I > to return to the previous page.
Settings (customer service only)
User-defined settings
i The following symbols are used in the selection
menus:
Automatic transfer (e.g. time)
Manual transfer (e.g. via pedal)
Function deactivated
8.3.1
Calibration
Activates or deactivates
the screen saver
Activates or deactivates
acoustic acknowledgement signal
Language selection.
Activates or deactivates automatic start (start of measurement by closing wheel guard)
Press < I > to return to the previous page.
Selection of weight display
grams (g) or ounces (oz)
Selection of weight resolution
1 g / 0.05 oz or 5 g / 0.25 oz
Residual value suppression:
Entry of weight value below which the
value "0" is to be displayed.
Calibration with "Go" wheel.
(Refer to Section 12.3.4).
Flange calibration.
(Refer to Section 12.3.2).
Press < I > to return to the previous page.
Vernier caliper and gauge arm calibration.
(Refer to Section 12.3.3).
Robert Bosch GmbH
1 695 655 743
|
2010-07-04
en
9.
40 | WBE 4140 | Wheel balancing
Wheel balancing
1. Switch on the WBE 4140 at the on/off switch.
The "Start page" is opened.
2. Open the "wheel balancing main page" with < I >.
9.2
Entering rim data
i If electronic wheel data recording is not possible,
the wheel data can also be entered manually.
i The electronic gauge arm is not required for the
balancing programs Alu2, Alu3 and Pax2 (Easyfix®).
Both measurement locations are recorded with the
vernier caliper.
1. Apply the electronic vernier caliper for rim distance
and rim diameter to the rim.
9.1
Selection of vehicle type and balancing program
i Static balancing is recommended for wheels with
The measurement location is indicated on the monitor in accordance with the balancing program
selected.
Storage of the position is confirmed by an acoustic signal and the position data are displayed.
a width of less than 3.5": In this case only the rim
diameter value is entered. The values for distance
and width of the rim can be set arbitrarily in inches
or mm.
1. Check the currently selected type of vehicle (passenger car or motorcycle) in the status bar, alter if
necessary and confirm with < I >.
i The rim width can be read off the rim or determined
with the measuring compasses.
2. Check the currently selected balancing program in the
status bar, alter if necessary and confirm with < I >.
11
4
Static balancing on plane 3
Static balancing on plane 2
Static balancing on plane 1
Pax2: Pax rim for concealed adhesive weights
2
Alu5: Adhesive weights on inside /
clip-on weights on outside
Fig. 9:
Alu4: Clip-on weights on inside /
adhesive weights on outside*
Alu3: Clip-on weights on inside /
concealed adhesive weights on outside
Alu2: Concealed adhesive weights
Alu1: Standard program for adhesive weights*
Standard program for clip-on weights
*
3
Pax1: Pax rim with adhesive weights
1
2
3
4
2
651012-11_Sr
Determining rim data with measuring compasses
Rim diameter scale
Outer tip for rim diameter
Inner tip for rim width
Rim width scale
2. Apply the inner tips of the measuring compasses to
the rim flange.
3. Read the value off the rim width scale.
4. Enter the rim width determined.
The weight must be raised slightly if the adhesive weight cannot be attached in the vicinity of the outer edge of the rim (rim
flange) on account of the design of the rim.
1 695 655 743
|
2010-07-04
Robert Bosch GmbH
Wheel balancing | WBE 4140 | 41
9.3
Measuring unbalance
i A wheel can only be correctly balanced if all the settings correspond to the mounted wheel.
i Measurement can be stopped at any time:
$ Press the <STOP> key.
$ Open the wheel guard.
1. Close the wheel guard.
The unbalance measurement commences automatically.
On completion of measurement the values of the
balance weights required are shown on the display.
On left of display inner balancing plane,
on right of display outer balancing plane.
2. Open the wheel guard.
en
9.4.2
Without Easyfix®
1. Turn the wheel by hand.
As soon as the correct position for attachment
of a balance weight has been reached, a green
square appears on the monitor.
i Blue squares on either side of the tyre on the
monitor indicate the direction in which the wheel
has to be turned to move it to the correct position
for the next balance weight.
2. Select a balance weight of the required value
(next to the green square).
3. Attach the balance weight at the highest vertical
position (12 o'clock) of the wheel.
i The position depends on the setting selected for the
attachment location (refer to Section 8.3.2)
4. Repeat the procedure for the 2nd balance weight.
9.4
Attaching balance weights
i If the unbalance measured at the wheel is extremely
high (e. g. static unbalance >50 g) it is advisable
to perform "Unbalance minimization"
(refer to Section 10).
9.4.1
Splitting balance weights
i The "split program" is called up after measurement
if the balance weights have to be attached at a certain position (e.g. behind the spoke or spokes). We
recommend attachment using Easyfix®.
1. Select the split program and the number of spokes.
i After attaching the balance weights, the unbalance
must be measured again for an exact check of the
balance.
9.4.3
With Easyfix®
i Only the 3 programs Alu2, Alu3 and Pax2 support the
attachment of the adhesive weights with Easyfix®.
1. Turn the wheel by hand.
As soon as the correct position for attachment
of a balance weight has been reached, the wheel
is locked in position and a green square appears
on the monitor.
i Blue squares on either side of the tyre on the
monitor indicate the direction in which the wheel
has to be turned to move it to the correct position
for the next balance weight.
2. Move the required position (e.g. a spoke) to the
12 o'clock position.
3. Confirm with < I >.
" The split weights and positions are indicated.
2. Select an adhesive weight of the required value (next
to the green square).
3. Insert the adhesive weight in the vernier caliper.
4. Move the vernier caliper into the rim.
The attachment location of the adhesive weight is
indicated.
The vernier caliper is locked at this position
(the colour of the square changes from yellow to
green).
5. Attach the adhesive weights with the aid of the vernier
caliper.
6. Repeat the procedure for the 2nd balance weight.
i After attaching the balance weights, the unbalance
must be measured again for an exact check of the
balance.
Robert Bosch GmbH
1 695 655 743
|
2010-07-04
en
42 | WBE 4140 | Wheel balancing
9.5
Manual vernier caliper
In the balancing programs Alu2, Alu3 and Pax2 the manual vernier caliper permits determination of the rim
width as well as simple positioning and attachment of
the adhesive weights.
1
9.5.2
Attaching balance weights
1. Move the wheel to the corresponding position 12, 3
or 6 o'clock (refer to Section 8.3.2).
2. Insert the adhesive weight required in the outer
weight pliers.
3. Position the slider at the edge of the rim.
4. Place the adhesive weight with the ejector at the
corresponding position and press on.
2
8
3
6
7
65
10
11
-03
_M
i
5
Fig. 10:
1
2
3
4.
5
6
7
8
4
Manual vernier caliper
Vernier caliper grip
Vernier caliper head
Inner weight pliers
Ejector
Outer weight pliers
Scale
Knurled screw
Slider with stop
651007-05_Sr
5. Insert the second adhesive weight required in the
inner weight pliers.
6. Position the slider at the edge of the rim.
7. Position the adhesive weight with the ejector and
press on.
9.5.1
Determining rim width
1. Position the manual vernier caliper with the slider at
the inner rim edge.
i The clip-on weight is positioned and secured in the
balancing program Alu3.
9.6
Gauge arm (accessory)
1. Apply the electronic gauge arm for rim width to the
rim.
651007-06_Sr
2. Move the outer weight pliers to the position at which
the balance weights are to be attached.
3. Secure the slider with the knurled screw.
4. Read off the dimension and enter as rim width
in "mm".
5. Start measurement "Balancing wheel".
6. Measurement evaluation:
The value for the adhesive weight to be attached
by way of the inner weight pliers (Alu2 and Pax2)
or as clip-on weight (Alu3) appears in the lefthand display.
The value for the adhesive weight to be attached
by way of the outer weight pliers appears in the
right-hand display.
1 695 655 743
|
2010-07-04
651012-32_Sr
The measurement location is indicated on the monitor
in accordance with the balancing program selected.
Storage of the position is confirmed by an acoustic signal and the position data are displayed.
" The individual values have now been read in and are
displayed on the monitor.
Robert Bosch GmbH
Unbalance minimization | WBE 4140 | 43
10. Unbalance minimization
If the unbalance measured at the wheel is extremely
high (e.g. static unbalance >50 g) it is advisable to
perform "Unbalance minimization".
The program permits minimization of the total unbalance by providing compensation for the static unbalance of the tyre by way of that of the rim.
en
Values obtained:
$ Rim unbalance
$ Current unbalance
$ Tyre unbalance
$ Minimum possible unbalance
i After studying the values, further unbalance minimization is required (PHASE 5 to 7).
PHASE 5 to PHASE 7:
1. Turn the wheel until the arrows on the monitor are
centered.
2. Mark the tyre at the 12 o'clock position.
3. Press < I >.
4. Detach the wheel from the flange.
5. Turn the tyre on the rim until the mark coincides
with the position of the valve.
6. Clamp the wheel.
7. Turn the valve to the 12 o'clock position.
8. Press < I >.
The new position of the wheel on the flange is
stored.
From the "wheel balancing main page" press r r
r and < I >.
"Unbalance minimization" is opened.
! Work as accurately as possible throughout the entire
procedure. Follow the instructions shown on the
monitor.
PHASE 1 to PHASE 4:
1. Close the wheel guard.
Measurement commences.
2. Turn the wheel until the valve is in the 12 o'clock
position.
3. Press < I >.
The reference position of the wheel on initial starting is stored.
4. Make a reference mark on the tyre (corresponding to
the position of the valve).
5. Detach the wheel from the flange.
6. Turn the tyre on the rim through 180 degrees.
i The mark previously made provides a guide.
7. Clamp the wheel.
8. Turn the valve to the 12 o'clock position.
9. Press < I >.
The new position of the wheel on the flange is
stored.
10. Close the wheel guard.
i To turn the tyre on the rim it may be necessary to
deflate the tyre, unseat it again and re-inflate after
turning.
9. Close the wheel guard.
The test run commences.
i If the test run is to be repeated, the monitor displays
an appropriate message. In this case, continue again
with minimization (PHASE 5 onwards).
" On completion of the test run, the unbalance is automatically compared to the minimum residual unbalance
value. If the difference between these two values is
below the maximum permissible level, the tyre and
rim are optimally matched.
10. Press < I >.
Return to "main page".
i If the test run is not properly completed, the entire
procedure (as of PHASE 1) must be repeated.
11. Press < I >.
" Return to "main page".
" Measurement commences.
Robert Bosch GmbH
1 695 655 743
|
2010-07-04
en
44 | WBE 4140 | Faults
11. Faults
i Other possible malfunctions are primarily of a technical nature and are to be checked and if necessary rectified
by a qualified engineer. Always contact the customer service of your authorized Bosch equipment dealer.
i To enable action to be taken quickly, it is important to inform customer service of the specifications on the rating plate (label on the flange end of the WBE 4140) and the nature of the problem.
Faults
Causes
Remedy
The displays
do not light on
switch-on
1. Defective fuse or missing phase
2. Damaged fuse in electrical connection
3. Damaged fuse in control/display panel
1. Check the mains connection.
2. Replace the fuse in the electrical connection.
3. Replace the fuse in the control/display panel. Inform customer service.
Caution: Repeated fuse damage is an indication of a
malfunction.
1
1. Setting and calibration data lost from PCB memory
2. One or more calibration operations (setting, calibration of electronic vernier caliper/gauge arm) not performed
Check and correct calibration and settings.
2
Wheel guard raised prior to completion of measurement
Wait for end of measurement before raising wheel
guard.
3
1. Backward rotation of wheel on start of measurement
2. Incorrect connection of motor
1. Check that wheel is stationary on starting and stop
it turning backwards on starting.
2. Check proper connection of motor.
4
1. No motor operation, motor does not attain the necessary speed
2. Fault in electrical connection
3. Fault in PCB
1. Check mains voltage (probably too low).
2. Check electrical connection or power cord.
3. Replace the PCB.
5
1. Balance weight not attached to wheel
2. Measurement sensors not correctly connected
1. Repeat calibration from the start and attach balance weight as specified by the process.
(refer to 12.3).
2. Check the connection of the measurement sensors.
6
1. Wheel guard not lowered
2. Damage to wheel guard safety switch
1. Lower wheel guard with wheel attached.
2. Replace wheel guard switch.
7
Excessive phase difference between the 2 measurement
sensors
1. Check for correct attachment of calibration weight.
2. Check machine connection; WBE 4140 probably
not stable and vibrating excessively.
3. Check contact between measurement sensor and
PCB.
4. Replace measurement sensor.
5. Replace PCB.
8
Inner measurement sensor not correctly connected, defective or open circuit in wire
1. Check connection of left measurement sensor.
2. Replace measurement sensor.
9
Outer measurement sensor not correctly connected, defective or open circuit in wire
1. Check connection of right measurement sensor.
2. Replace measurement sensor.
10
1. Measurement sensor for position recognition defective 1. Check connection of light barrier PCB.
2. No motor operation
2. Check that the light barrier PCB is protected
against light and provide a cover if necessary.
3. If the fault persists, check and if necessary replace
the light barrier PCB.
4. Check the mains connection.
11
1. Measurement sensor for phase recognition defective
2. No motor operation
1. Check connection of light barrier PCB.
2. Make sure the light barrier PCB is protected
against light and provide a cover if necessary.
3. Check and if necessary replace the light barrier
PCB.
4. Check the mains connection.
17
Weight outside setting range (weight required for balancing is more than 250 g)
1. Check whether the wheel is correctly attached to
the flange.
2. Determine the outer weight position (nevertheless), attach a 100 g weight and start a different
measurement.
18
Wheel data not entered
Enter wheel data before performing measurement.
19
Input signal of right measurement sensor
lower than that of left sensor
Interchange the connections of the two measurement sensors.
1 695 655 743
|
2010-07-04
Robert Bosch GmbH
Faults | WBE 4140 | 45
en
Faults
Causes
Remedy
20
1. Pedal pressed during measurement
2. Irregular rotational speed of motor
3. Wheel speed below minimum value
1. Do not press pedal whilst motor is in operation.
2. Make sure the WBE 4140 is not subjected to any
impact during measurement.
3. Check mains voltage (probably too low).
21
The PCB has detected an excessively high wheel speed
with the wheel guard open (shaft rotating at high speed
although the machine has not been started): Power supply unit is deactivated
1. Switch off the WBE 4140 .
2. Lower the wheel guard, switch the WBE 4140 on
again without moving the wheel.
3. If the error message persists, contact customer
service.
22
Irregular measurement sensor signals
1. Check that the light barrier PCB is protected
against light and provide a cover if necessary.
2. Check and if necessary replace the light barrier
PCB.
3. Check and if necessary replace the display PCB.
29
ATTENTION: One vernier caliper not in rest position.
1. Set vernier caliper to rest position.
2. Repeat calibration of electronic vernier caliper.
30
Gauge arms deactivated.
Perform calibration prior to reactivation.
31
Pedal being pressed. Deactivation takes place.
32
Pedal has been pressed.
33
Incorrect operating system
Robert Bosch GmbH
Use a different PCB.
1 695 655 743
|
2010-07-04
en
46 | WBE 4140 | Maintenance
12. Maintenance
12.3
12.1
i As part of service and upkeep (every six months),
Cleaning and servicing
on flange replacement or in the event of measurement inaccuracies, it is advisable to calibrate the
WBE 4140 in the following sequence:
Before performing cleaning and servicing
work, always switch off the WBE 4140 at the
on/off switch and unplug the mains connector.
! Do not use any solvent-based cleaning agents. Use
alcohol or similar cleaning agents for plastic parts.
The following work is essential to ensure proper operation and high performance of the WBE 4140:
Calibration
1.
2.
3.
4.
Flange calibration.
Vernier caliper and gauge arm calibration.
WBE 4140 calibration.
Perform reference measurement.
12.3.1
Call-up of calibration menu
Weekly
1. Call up the "Settings and service" menu.
Servicing
Clean moving mechanical parts, treat with spray oil
or kerosene and lubricate with engine oil or a suitable
grease.
12.2
x
Spare and wearing parts
The manufacturer cannot accept any liability for
damage arising from the use of non-genuine replacement parts.
Designation
Order number
Standard centering flange
1 695 602 400
Quick-action clamping nut
1 695 616 200
Centering cone 42 - 64,5 mm
1 695 632 500
Centering cone 54 - 79,5 mm
1 695 652 862
Centering cone 74 - 111,5 mm
1 695 605 600
Weight pliers
1 695 606 500
Manual vernier caliper
1 695 629 400
Test clip
1 695 652 870
Calibration weight
1 695 654 377
Calibration weight (calibrated)
1 695 654 376
Voltage sticker
1 695 100 789
Direction of wheel rotation sticker
1 695 653 878
Tab. 2:
2. Enter the password: <r> <r> <o>.
" The calibration menu is displayed.
Spare and wearing parts
Calibration with "Go" wheel
Flange calibration
Return to main page.
Vernier caliper and gauge arm calibration
12.3.2
Flange calibration
i Follow the instructions shown on the monitor.
1. Fit the flange (refer to Section 5).
i Do not clamp the wheel, do not use any clamping
tools.
2. Select flange calibration and confirm with < I >.
Calibration is started.
3. Close the wheel guard.
Measurement commences.
" Flange calibration completed.
" Unbalance set to "0".
1 695 655 743
|
2010-07-04
Robert Bosch GmbH
Maintenance | WBE 4140 | 47
12.3.3
en
Calibration of electronic vernier caliper/
gauge arm
i Follow the instructions shown on the monitor.
1. Select calibration of the slide calliper and of the
angular width gauge and confirm using < I >.
Calibration begins.
651046-13_Mi
6. Assemble the width calibration pin on the external
part of the flange. Move the width cursor against the
end of the pin and press < I >.
2. Move the slides with distance A and width B to
standby position and press < I >.
65
B
10
46
-11
_M
i
i
M
4_
-1
46
10
65
A
7. Remove the pin and assemble a 14'' or 15'' steel
sample wheel using the relevant hold-down nut.
3. Move the reading cursor of distance 0 mm. Set the
value read and press < I >.
4. Move the cursor of distance A against the interior of
the flange. Measure and set the value read and press
< I >.
65
10
i
2_M
6-1
04
1
65
46
-15
_M
i
8. Set the wheel measurements and, with the distance
reading cursor resting on the wheel itself, press < I
>.
5. Keeping the distance A cursor in standby, move the
cursor of width B width against the external part of
the flange and press < I >.
651046-16_Mi
Procedure completed.
Robert Bosch GmbH
1 695 655 743
|
2010-07-04
en
48 | WBE 4140 | Maintenance
Calibration of the electronic slide calliper/ angular
width gauge without external gauge
1. Select calibration of the slide calliper and the angular width gauge and confirm using < I >.
" This completes calibration.
i The calibration made is permanently stored automatically.
12.3.5 Reference measurement
i Exact centering of the wheel is a basic prerequisite
for this reference measurement and for all balancing operations.
2. Move the distance cursor to standby position and
press < I >.
3. Move the distance reading cursor to 0 mm. Set the
value read and press < I >.
4. Move the distance reading cursor to 200 mm. Set the
value read and press < I >.
5. Assemble a 14'' or 15'' steel sample wheel. Set the
value read and press < I >.
6. Set the wheel measurements and, with the distance
reading cursor resting on the wheel itself, press < I
>.
" Procedure completed.
12.3.4
Calibration of WBE 4140
i Follow the instructions shown on the monitor.
1. Attach a motor vehicle wheel of medium size (e.g.
width 5.5", diameter 14") and in very good condition to the flange.
i Sound and automatic start are active in the following
description (refer to Section 8.3.3 ).
1. Attach a motor vehicle wheel of medium size (e. g.
width 5.5", diameter 14") and in very good condition
to the flange.
2. Enter the wheel data (refer to Section 8.2).
3. Close the wheel guard.
Measurement commences.
4. Create an artificial unbalance by attaching a test
weight of e. g. 60 g to one of the two sides.
5. Close the wheel guard.
Measurement commences.
The WBE 4140 must display precisely this unbalance
(value and position) on this side. The value indicated
for the other side must not exceed 5 g.
i To check the position of the unbalance, turn the
wheel until the position recommended for attachment of the balance weights is attained. The test
weight attached must be vertically beneath the axis
of rotation (6 o'clock position).
2. Select WBE 4140 calibration and confirm with < I >.
Calibration is started.
3. Enter the rim data and confirm with < I >.
4. Press <I >.
Measurement commences.
5. Enter any balance weight between 40 g and 120 g
and confirm with < I >.
6. Attach a balance weight of the value entered to the
inner side of the wheel.
7. Press <I >.
Measurement commences.
8. Turn the wheel until the balance weight is in the
12 o'clock position.
9. Remove the balance weight from the inner side
of the wheel and attach it to the outer side
(12 o'clock).
10. Press <I >.
Measurement commences.
11. Turn the wheel such that the weight is in the 6
o'clock position.
12. Press < I >.
1 695 655 743
|
2010-07-04
! Calibration must be repeated in the following cases:
$ Deviation from specified unbalance value
$
6.
7.
8.
9.
(greater than 1 g on test weight side, more than
5 g on other side).
Deviation from specified unbalance position (test
weight not between 5:30 and 6:30 position).
Remove the test weight.
Release the wheel and turn it through approx. 35°.
Re-attach the wheel.
Close the wheel guard.
Measurement commences.
" On completion of this reference measurement, the
display must not exceed a maximum unbalance of 10 g
per side (15 g for particularly heavy wheels). This error
may be caused by the rim centering tolerances. If this
reference measurement indicates greater unbalance,
the components used for centering the wheel must be
checked for wear, play and contamination.
Robert Bosch GmbH
Decommissioning | WBE 4140 | 49
13. Decommissioning
14. Technical data
13.1
14.1
Temporary shutdown
In the event of lengthy periods of non-use:
Unplug the electrical connection.
13.2
Change of location
If the WBE 4140 is passed on, all the documentation
included in the scope of delivery must be handed over
together with the unit.
The WBE 4140 is only ever to be transported in the
original or equivalent packaging.
Unplug the electrical connection.
Heed the notes on initial commissioning.
Bolt the WBE 4140 back onto the pallet.
Disposal and scrapping
13.3.1
Substances hazardous to water
WBE 4140
Function
Specification
Balancing speed
210 U/min 50 Hz /
250 U/min 60 Hz
Measurement resolution
1/5 g (0.01/0.25 oz)
Noise level
< 70 dB
Power
0,7 kW
Voltage
(depending on version ordered)
115
115
230
230
Degree of protection
IP 22
14.2
13.3
en
V
V
V
V
1~
1~
1~
1~
(60
(50
(50
(60
Hz) /
Hz) /
Hz) /
Hz)
Dimensions and weights
Function
Specification
WBE 4140 (H x W x D) max.
1450 x 1085 x 855 mm
Weight
97 kg
! Oils and greases as well as refuse containing oil and
grease (e.g. filters) represent a hazard to water.
Mi
3_
-0
46
10
65
13.3.2 WBE 4140 and accessories
1. Disconnect the WBE 4140 from the mains and detach the power cord.
2. Dismantle the WBE 4140 and sort out and dispose
of the different materials in accordance with the applicable regulations.
1450
1. Substances hazardous to water must not be allowed
to enter the sewage system.
2. Substances hazardous to water must be disposed of
in accordance with the applicable regulations.
500
The WBE 4140 is subject to the European
directive 2002/96/EC (WEEE).
Dispose of used electrical and electronic
devices, including cables, accessories and
batteries, separately from household waste.
Make use of the local return and collection
systems for disposal.
Proper disposal of the WBE 4140 prevents
environmental pollution and possible
health hazards.
Robert Bosch GmbH
108
5
14.3
0
50
5
85
Operating range
Function
min – max
Rim width
1" – 13"
Rim diameter
12" – 22"
Maximum wheel diameter
820 mm
Maximum wheel weight
60 kg
1 695 655 743
|
2010-07-04
fr
50 | WBE 4140 |
Sommaire
1.
1.1
1.2
Symboles utilisés
Documentation
WBE 4140
51
51
51
2.
2.1
2.2
2.3
Consignes d'utilisation
Remarques importantes
Consignes de sécurité
Compatibilité électromagnétique (CEM)
52
52
52
52
3.
3.1
3.2
3.3
3.4
3.5
Description du produit
Utilisation conforme
Conditions préalables
Fournitures
Accessoires spéciaux
WBE 4140
52
52
52
52
52
53
4.
4.1
4.2
4.3
4.4
4.5
4.6
4.7
Première mise en service
Déballage
Mise en place
Monter le capot de protection
Monter l’écran
Raccordement électrique
Contrôler le sens de rotation
Calibrer le WBE 4140
54
54
54
55
55
56
56
56
5.
5.1
5.2
Monter et démonter la bride
Démonter la bride
Monter la bride
57
57
57
6.
6.1
6.2
Fixer e retirer la roue
Fixer la roue
Retirer la roue
58
58
58
7.
7.1
7.2
Utilisation
Page de démarrage
Affichage
7.2.1 Barre d’état
7.2.2 Zone d’affichage
7.2.3 Barre de touches programmables
7.2.4 Touche EXIT
Panneau de commande
59
59
59
59
59
59
59
59
7.3
1 695 655 743
|
2010-07-04
8.
8.1
8.2
8.3
Structure du programme
Equilibrer une roue
Données de la jante
Réglages et entretien
8.3.1 Calibrage
8.3.2 Réglages
8.3.3 Réglages personnalisés
60
60
60
61
61
61
61
9.
9.1
62
9.6
Equilibrer une roue
Sélectionner le type de véhicule et le
programme d'équilibrage
Entrer les données de la jante
Mesurer le déséquilibre
Fixer les masselottes d'équilibrage
9.4.1 Répartir les masselottes d’équilibrage
(splitter)
9.4.2 Sans Easyfix®
9.4.3 Avec Easyfix®
Coulisseau de mesure manuel
9.5.1 Détermination de la largeur de jante
9.5.2 Mise en place des masselottes
d'équilibrage
Bras de mesure (optionnel)
10.
Réduire le déséquilibre
65
11.
Défauts
66
12.
12.1
12.2
12.3
Maintenance
Nettoyage et entretien
Pièces de rechange et d'usure
Calibrage
12.3.1 Appel du menu de calibrage
12.3.2 Calibrer la bride
12.3.3 Calibrage du coulisseau de mesure
électronique/jauge largeur angulaire
12.3.4 Calibrage du WBE 4140
12.3.5 Mesure de contrôle
68
68
68
68
68
68
9.2
9.3
9.4
9.5
62
62
63
63
63
63
63
64
64
64
64
69
70
70
13.
13.1
13.2
13.3
Mise hors service
71
Mise hors service provisoire
71
Déplacement
71
Elimination et mise au rebut
71
13.3.1 Substances dangereuses pour les eaux71
13.3.2 WBE 4140 et accessoires
71
14.
14.1
14.2
14.3
Caractéristiques techniques
WBE 4140
Dimensions et poids
Domaine d'application
71
71
71
71
Robert Bosch GmbH