1
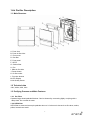
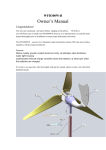
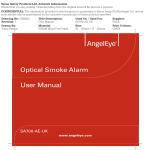
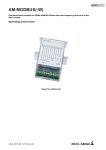
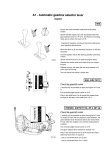
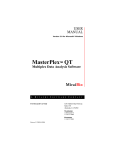
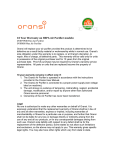
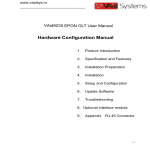
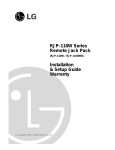
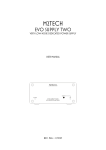
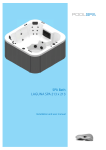
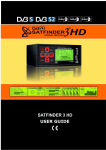
OVHM80
Air Purifier
Index
Important Safeguards………………………………………….. 2
Air purifier Description…………………………………………..3
Function Description……………………………………………. 4
How to use………………………………………………………..5
Maintenance………………………………………………………6
Troubleshooting…………………………………………………..7
1
Important Safeguards!
READ ALL INSTRUCTIONS BEFORE USING THIS APPLIANCE.
WARNING: RISK OF ELECTRICAL SHOCK
•
•
Safety precautions should always be used when operating this or any electrical appliance.
Decrease the risk of electrocution, electric shock, injury or fire by reading and following all
of the warnings below.
•
To reduce the risk of ele ctric shock, do not attempt to service the air purifier in any way
other than to replace or clean the air filter.
•
To reduce the risk of elec tric shock, this equipment has a polarized plug (one blade is
wider than the other). This pl ug will fit in a polarized outlet only one way. If the plug does
not fit fully in the outlet,reverse the plug. If it still does not fit, contact qualified personnel to
install the proper outlet. Do not alter the plug in any way.
•
•
•
•
•
Read all instructions before operating the air purifier.
This product operates at 120V AC, 60Hz only.
Do not run the power cord under carpets, and do not cover with throw rugs.
This product is not intended to filter oil or grease from air.
Always unplug the power cord from the electrical outlet when the air purifier is not in use or
when changing the filter.
•
•
•
•
•
Never run the air purifier unless it is fully assembled.
Do not alter the plug in any way.
Always turn off the air purifier before unplugging the air purifier from outlet.
Do not place the cord near a heated surface.
Never operate the air purifier if the pl ug or cord is damaged o r appears damaged. Only
qualified service personnel should ever repl ace or attempt to r eplace a da maged power
cord.
•
Never use the power cord to pick up, carry, drag, pull, or lift the air purifier. Do not pull the
cord against or around sharp corners and edges.
•
Always remove the plug from its power out let by holding onto the plug itself and pulling
gently.
•
•
Never pull on the cord itself to unplug it from its power outlet.
Use care when operating the air purifier by keeping all foreign objects, fingers, body parts,
hair, loose clothing and jewelry away from openings.
•
•
Never touch the air purifier or its plug when your hands are wet.
CAUTION: THIS EQUI PMENT SHOULD BE I NSPECTED, AND COLLECTOR CELLS
SHOULD BE CLEANED IN ACCORDANCE WITH MANUFACTURER’S INSTRUCTIONS,
ON A REG ULAR BASIS TO PREVENT EXCESSIVE ACCUMULATION OF DUST
PARTICLES THAT CAN RESULT IN FLASHOVER OR A RISK OF FIRE
Note:
Before operating the air purifier, make sure the air filters inside the air purifier are not
wrapped in plastic. When the air purifier is plugged in you should hear a beep. Press
the Power button to turn it on. If the air purifier does not power on, ensure the front
cover is installed correctly.
Save these instructions!
2
1.Air Purifier Description
1.1 Main Structure
A. Front view
B. Front air flow inlet
C. Front cover
D. Pre-filter
E. Front panel
F. HEPA
G. Carbon filter
H. Fan
I. Side air flow inlet
J. Power button
K. Air flow outlet
L. Function buttons
M.LED Display
N.Air Quality sensor
1.2 Technical data
120V, 60Hz, 90W, 0.8A
1.3 Purifying Process and Main Features
1.3.1 Pre-Filter
Captures larger sized particles like dust. Can be cleaned by vacuuming lightly or wiping with a
damp cloth. Do not soak in water.
1.3.2 HEPA filter
HEPA filter to remove microscopic particles down to 0.3 microns in size such as fine dust, smoke,
pollen, bacteria and mold.
3
1.3.3 Activated carbon filter
The activated carbon filter consists of a vast system of highly adsorbent molecular sized pores to
remove gases, light odors and VOC s(volatile organic compounds).
1.3.4 Anion generator
Low level and ozone safe negative ionizer to freshen and balance the air(ie neutralize a surplus of
positive charges from TV’s and computer monitors).
1.3.5 Air Quality Sensor (AQS)
Measures and displays th e air quality. In Auto mode, the unit a utomatically adjusts its fan speed
based upon the air quality readin g. The sensor needs about 10 minutes to warm up to reach it s
maximum sensitivity. The display will flash AQS to indicate it is warming up and will stop flashing
and display AQS when ready.
1.4 Placement
In order to get better p erformance in cleaning, it is recommende d to pla ce the purifier on the
ground or a stable surface around 2 feet high. Since the air is drawn in through the front of the air
purifier it can be placed near a wall.
2. Function Description
2.1 Standby
In standby mode, the standby indicator illuminates in red to show the air purifier has been plugged
in and has power but is not operating.
2.2 Refresh
Anions are generated under this mode (low level negative ions).
2.3 Fan Speed
There are four different fan speeds with Silent the lowest and Turbo the highest fan speeds.
2.4 Air Quality Indicator
There are five levels of air quality as indicated below:
Note: the air quality reading is located above the “AQS”. Since the air quality sensor is located on
the air purifi er the reading will be in the area of the air purifier . In many cases it will have a
reading of Excellent or Very Good.
2.5 Auto
In auto mode, the fan speed of the air purifier will be set aut omatically based on the air quality
detected by the sensor . W e suggest setting the fan speed where you would like it before
pressing Auto. Once pressed, the fan will stay at the same speed but the fan speed display will
reflect the air quality reading as in the table below and not the current fan speed. For example, if
4
you are on the Strong fan speed and the air qualit y is very good the display on the air purifier will
show Silent even though the fan speed is operating on Strong (speed 3).
The Refresh icon will be illuminated on the panel when the anion feature is activated.
can turn this off by pressing the Anion button.
You
In auto mode, the fan will st ay on the speed that you select to run in normal operating mode
but will automatically increase speed when the sensor detects extra particulates in the air.
2.6 Check Filter
When the purifier has run for a tot al time of 3,000 hours, the maintenance indicator illuminates to
remind the u ser to check the pre- filter and activat ed carbon filter. The HEPA filter ha s a color
shade on the frame to see whether it is time to be replaced.
After maintenance, press “Fan Speed” and “Anion” buttons simultaneously for 3 seconds to reset
the counter. Please note that whenever the “Fan Speed” and “Anion” buttons are pressed at the
same time, the counter will be reset.
If users do n ot reset the counter after checking the filter or forget to chec k the filter af ter 3,000
hours, “Check Filter” will blink after 3,500 hours as a reminder.
3. How to Use
3.1 Buttons and Display
3.1.1 Buttons
ON/OFF, Fan Speed, Timer, AUTO, Refresh
3.1.2 LED Display
3.2 Operation Guide
3.2.1 On/Off
When plugged in, the unit will beep and illuminate the icons on the display.
5
Press the ON/OFF
button and the unit will start on the Strong fan speed. Any time the unit is rest arted, it will
remember its last working status.
Night Mode – By pressing the Power button for 3 seconds you can turn off the light around the
power button. This will not turn off the icons on the display.
3.2.2 Fan Speed
The fan speed cycles in the following order:
Strong ---Turbo --- Silent --- Middle
The lighted indicator around the power button indicates the fan speed with different colors.
is green, Middle is blue, Strong is orange and Turbo is red.
Silent
3.2.3 Refresh
Press this button and the ionizer starts generating anions (negative ions). Press this button agai n
to turn off. The refresh icon will be illuminated when the anion feature is activated.
3.2.4 Countdown Timer
Press the Timer button to set the number of hours the air purifier will run before turning of f. With
each press of this button, the time will increase 1 hour and max at 12 hours. Pressing again after
12 hours will turn off the timer.
4. Maintenance
4.1 Cover and Housing
4.1.1 Power off the unit and unplug before any maintenance.
4.1.2 Clean the unit only when necessary. If the unit is used in a dirty en vironment it may ne ed
cleaning more frequently.
4.1.3 Wipe any dust away with a soft cloth (can be dry or damp).
4.1.4 Do not use any cleaners or chemicals on the air purifier.
4.2 Sensors
4.2.1 Clean out the dust blocking the sensors’ air inlet
4.2.2 If the sensor is giving a false reading, vacuum around the sensor to remove any dust have
may have accumulated there.
4.3 Filters
The filters should be cleaned or replaced regularly.
Prefilter: It’s recommended to clean with a damp cloth or lightly vacuum every 3 months and replace
after 1 year.
HEPA filter and Carbon filter: When the purifier has run for 3,000 hours, the maintenance indicator
illuminates to remind the user to check the HEPA and carbon filters. The HEPA filter has a color
shade on the frame to see whether it is necessary to repl ace. Please replace it when the color is
dark. After maintenance, press “Fan Speed” and “Anion” buttons simultaneously for 3 seconds to
reset the filter replacement indicator.
4.3.1 Disassembly
1. Front cover: Press in on the fro nt cover at t he top two corners to unlatch the interlo ck switch.
Then pull the whole cover upwards to take it off.
6
2. Pre-filter: Turn the 4 locks per the direction of the arrows to release the pre-filter.
3. HEPA filter: Hold the small ribbon and pull the filter out.
4. Carbon filter: Hold the small ribbon and pull the filter out.
1
2
3
4
4.3.2 Assembly
1. Carbon filter: Put the filter in place from the bottom and then push it into the cabinet.
2. HEPA filter: Put the filter in place from the bottom and then push it into the cabinet.
3. Pre-filter: Place in the pre-filter and turn the locks to secure it.
4. Front cover: Secure the interlock at the bottom first and push the whole cover inwards at the top
two corners to secure it.
1
2
3
4
5. Troubleshooting
Problems
Cause
Solution
Air
Quality indicato r
constantly shows poor air
quality.
Lens inside the sensor
dirty.
is
Turn off and vacuum the
sensor (to the right of t he
power button). W ait a few
seconds and power b ack
on.
Unit will not turn on.
Cover is not fully closed,
may be blocked by filters.
This occurs sometimes in
shipment.
Remove the front cover a nd
all of the filters. Re-install
the filters and ensure e ach
is fully inst alled. Re-install
the front cov er with the
bottom edge fir st and th en
rotate to sn ap the top two
corners in place.
7
Oransi LLC 13492 Research Blvd Ste 120‐507 Austin, TX 78750 www.oransi.com
8