1
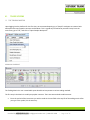
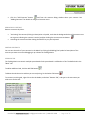
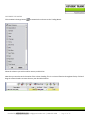
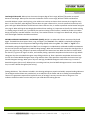
FIRETIP USER MANUAL
All rights reserved. This document is confidential and intended solely for the use of the individual or entity to which they are addressed. It may only be used in accordance with the terms and agreements established by Generic Trade. No part of this document may be modified, reproduced, stored in a retrieval system, or transmitted, in any form or by any means, electronic, mechanical, recording, or otherwise, without the prior written permission of Generic Trade. TABLE OF CONTENTS
I. OVERVIEW ........................................................................................................................................................... 4
II. SYSTEM REQUIREMENTS...................................................................................................................................... 4
III. FEATURES ............................................................................................................................................................ 4
Firetip Features ........................................................................................................................................... 4
IV. GETTING STARTED................................................................................................................................................ 5
I. INSTALLING .................................................................................................................................................. 5
Select the Installation Folder ........................................................................................................................ 5
Customize the Installation Location of Firetip……………………………………………………… ............................................... 6 II. CHECKING FOR UPDATES ............................................................................................................................... 7
III. LOGGING INTO FIRETIP …………………………………………………………………………………………………………………….. ................. 7
IV. MAIN MENU ……………………………………………………………………………………………………………………………………………. ................. 8
Confirm Whether You Are Logged Into a Demo or Real Account……………………………………………………………………………….8
The FILE Menu ...............................................................................................................................................................9
V. SETTINGS ........................................................................................................................................................................10 I. GENERAL SETTINGS .................................................................................................................................................10
User Info ......................................................................................................................................................................11
Alerts ...........................................................................................................................................................................12
VI. TRADE SCREENS ……………………………………………………………………………………............................................. .......... 13 I. THE TRADING MATRIX ………………………………………………………………………………………………… ...................................... 13
Adding a Contract.........................................................................................................................................................13 Removing a Contract ...................................................................................................................................................14 Sorting Contracts ........................................................................................................................................................14 Adding a Tab................................................................................................................................................................14 Customize the Matrix .................................................................................................................................................15
II. TRADE WITH THE MATRIX ....................................................................................................................................16
Using Place Order........................................................................................................................................................16
Matrix Pre‐Order Fields...............................................................................................................................................17
Provided by GENERIC TRADE| [email protected] | 1.800.707.2006 ‐‐ Page 2 of 35
Trading Directly from the Matrix.................................................................................................................................17
One Click Trading and the Trading Matrix................................................................................................................... 18
III. THE ORDER BOOK .........................................................................................................................................……..19
Change Orders Directly on the Book............................................................................................................................20
IV. FILLS WINDOW………………………………………………………………………………………………………………………………………………….20
V. ACCOUNT DETAIL..................................................................................................................................................21
VI. NEWS………………………………………………………………………………………………………………………………………………………………..22
VII. STATEMENTS............................................................................................................................................. 23
VIII. ALERTS ................................................................................................................................................................. 24
Adding an Alert ......................................................................................................................................... 25
Alert Notifications ..................................................................................................................................... 25
VII. CHARTS ............................................................................................................................................................ 26
I. INTRODUCTION TO CHARTS .......................................................................................................................... 26
Adding a Chart .......................................................................................................................................... 26
Chart Features .......................................................................................................................................... 27
II. CHART TOOLS .............................................................................................................................................. 27
III. INDICATORS ............................................................................................................................................... 28
VIII. DEPTH TRADER ................................................................................................................................................ 31
I. UNDERSTANDING THE DEPTH TRADER .......................................................................................................... 31
IX. ADVANCED TRADER ........................................................................................................................................... 33
I. USING THE ADVANCED TRADER .................................................................................................................... 33
Advanced Trader Features .......................................................................................................................................... 34
Managing Orders from the Advanced Trader .............................................................................................................. 35
Provided by GENERIC TRADE| [email protected] | 1.800.707.2006 ‐‐ Page 3 of 35
I.
OVERVIEW
Firetip is a high‐speed, trader intuitive trading platform. Firetip is your gateway to open‐access electronic markets with coverage of over 100,000 trading instruments at any point in time.
II.
SYSTEM REQUIREMENTS
Windows
•
•
•
•
•
•
Intel Pentium III or better Microsoft Windows Vista, Windows XP, Windows 2003, and Windows 2000. All versions (32‐bit, 64‐bit, Home, Professional, Server) of these operating systems are supported. 512MB of RAM (1GB recommended) 100MB of available hard‐disk space High speed internet connection is recommended but not required 1024x768 minimum screen resolution; higher recommended Mac
•
•
•
•
•
III.
PowerPC G3, G4, G5 or Intel Processor Mac OS X v10.4.3 to v10.4.9, v10.5.0 and v10.5.1 512MB of RAM (1GB recommended) 50MB of available hard‐disk space High speed internet connection is recommended but not required FEATURES FIRETIP FEATURES
Firetip offers you, the trader, a number of distinct trading advantages:
•
•
•
•
•
•
•
•
Enter trades via an order entry form or "One Click" trading Instant access to numerous exchange gateways Trade using the "Trading Matrix", "Advanced Trader", or "Depth of Market" Monitor real‐time P&L and open positions Real‐time charting with multiple indicators Dynamically updating trade and account information Reliable network infrastructure Direct news feed Provided by GENERIC TRADE| [email protected] | 1.800.707.2006 ‐‐ Page 4 of 35
•
•
IV.
Always on, fully reliable, ready to trade, 24 hours a day Operational for most operating systems: Windows, Mac, and Linux GETTING STARTED
INSTALLING
Firetip can be installed on Windows, Mac, Linux, and Linux variants. The installation process for the various operating systems is similar, with some slight differences. The example below depicts Windows installations.
After downloading Firetip, run the downloaded file:
After the installation starts, click "Next" to begin the configuration process. For most users, you can simply select the default configuration properties.
SELECT THE INSTALLATION FOLDER
The defaults vary according to the location of your Program Files directory. You can accept the defaults or specify your own directory:
Provided by GENERIC TRADE| [email protected] | 1.800.707.2006 ‐‐ Page 5 of 35
CUSTTOMIZE THE IINSTALLATIO
ON LOCATION
N OF FIRETIP
By deefault, it will iinstall under a new prograam group called "Firetip". TThis is the reccommended installation lo
ocation.
P
Provided by G
GENERIC TR
RADE| info@
@generictrade
e.com | 1.800
0.707.2006 ‐‐ Page 6 o
of 35
After selecting the program group, click "Install" to begin the installation process. After the installation has completed, click "Done" and Firetip will automatically launch.
CHECKING FOR UPDATES
Each time you launch Firetip, it will automatically check if you have the latest update. This process normally takes just a few seconds. If an update is not available, this checking will generally happen quickly and it is normal for the "Checking for updates" window to flicker by.
If a new update is available, it is automatically downloaded and installed. This process is fast and efficient ensuring that you always have the latest version of the software.
LOGGING INTO FIRETIP
To log into Firetip, simply enter your account number and password.
If you have difficulty logging into the system, you may receive one of the following error messages:
Provided by GENERIC TRADE| [email protected] | 1.800.707.2006 ‐‐ Page 7 of 35
•
Invalid Account / Password Please re‐enter your account number and password and try again. •
Login Failed! Connection to host failed. Your computer is unable to connect with the Firetip server. Please check your internet connection to make sure it is still running. If your internet connection is fully functional, please note that Firetip utilizes TCP Port 443. If you are attempting to use the trading platform behind a corporate or personal firewall, you must open up TCP Port 443 to continue. Please contact your system Administrator and request that this port be opened so that you may proceed. MAIN MENU The Firetip Main menu:
CONFIRM WHETHER YOU ARE LOGGED INTO A DEMO OR REAL ACCOUNT
If you are logged into a demo account, you can easily identify this by the application title:
The Firetip account title will be "Firetip ‐‐ Demo Account" for demonstration accounts, and simply "Firetip" for real (live) trading accounts
Provided by GENERIC TRADE| [email protected] | 1.800.707.2006 ‐‐ Page 8 of 35
THE FILE MENU
From the "File" menu are the following functions:
Open Workspace: This will bring up a dialog of all of your saved workspaces. Select one of your previously saved workspaces that you wish to open.
Open Simple Workspace: The simple workspace comprises of the Trading Matrix and the Order Book. You will start with a "fresh slate", with no contract subscriptions or market data.
Open Sample Workspace: The sample workspace is a preconfigured workspace with subscriptions to popular contracts along with charts and indicators. Opening the sample workspace is an easy way to see Firetip in action.
Save Workspace As '(workspace name)': This will allow you to save your current workspace
Save Workspace As...: To save your current workspace with a new name
Delete Workspace: To delete a previously saved workspace
Reset Demo Account: This option is only available for demonstration accounts. This option will remove all of your current fills, trades, and positions. It will reset your cash balance to $50,000.
Provided by GENERIC TRADE| [email protected] | 1.800.707.2006 ‐‐ Page 9 of 35
V.
SETTINGS GENERAL SETTINGS From the main menu, select "Settings", and then the sub‐menu "Settings". It will bring up the Firetip general settings page:
There are three pages. On this page, the "General" setting page, are the following options:
Display System Status: If this is checked, it will open and display the status of your Firetip connection on the footer of your desktop. This will always be visible when the application is opened.
Pop‐up Fill Notification: This will pop‐up a window on your screen when one of your orders is filled. Disable this feature if you do not want a window to pop‐up every time you are filled.
Enable 'One Click' Trading: Firetip allows you to place orders literally at a click of your mouse. We recommend that you become familiar with Firetip before enabling this feature. At its default setting (disabled), you will always be prompted with an order dialog window when attempting to place an order. Therefore, the risk of accidentally placing an order (in the default state) is remote. However, if you enable One Click trading, your trading screen becomes an active order enter window, and you can enter and exit markets by simply clicking your mouse, without being presented with a confirmation dialog window.
Display Depth Trader Histogram: When opening the depth trader, with this box enabled, it will automatically open up with a histogram of market depth.
Provided by GENERIC TRADE| [email protected] | 1.800.707.2006 ‐‐ Page 10 of 35
USER INFO
The "User Info" settings page:
On this page, you can enter or update your Primary and Secondary email addresses. You can use these email addresses to alert you to various events, for example, if price alerts are triggered.
SMS text messages:
Note that most wireless carriers allow you to send a text message to your cell phone by simply inputting your phone number as an email address. Since Firetip's alerts are less than 160 bytes in length, our notification services will support virtually all wireless vendors. Please contact your wireless vendor for details on the SMS text messaging email address you must use. This is a popular method to set up email notification and to be notified if the markets move to certain price levels.
Provided by GENERIC TRADE| [email protected] | 1.800.707.2006 ‐‐ Page 11 of 35
ALERTS
The "Alerts" settings page:
This page is where you configure how you desire to be notified if an "Alert" that you can configured has been triggered. Please see the section "Alerts" for details on how to set‐up a price alert.
Alert via Popup: If your alert is triggered, a pop‐up dialog will appear on your desktop
Alert via Email: You can receive alerts via email. Select the email address (primary or secondary) that you wish to alerts to be sent to
Alert via Sound: Your computer will play the selected sound if one of your alerts is triggered
Provided by GENERIC TRADE| [email protected] | 1.800.707.2006 ‐‐ Page 12 of 35
VI.
TRADE SCREENS
THE TRADING MATRIX
Upon logging into the platform for the first time, we recommend opening up a "Sample" workspace to create a basic workspace with some popular contracts and windows. This is a good way to familiarize you with Firetip. From the main menu, go to "File", and click on "Open Sample Workspace":
ADDING A CONTRACT
The Trading Matrix is a user customizable quote board that incorporates a various trading methods.
The first step in the Matrix is to add your popular contracts. There are two methods to add contracts:
•
Enter the symbol of the instrument you wish to trade in the text field at the top left of the trading matrix. After you type in the symbol, hit the enter key. Provided by GENERIC TRADE| [email protected] | 1.800.707.2006 ‐‐ Page 13 of 35
•
Click the "Add Contract" button and from the contract dialog window select your contract. See "Adding Contracts" for details on using the Contracts menu. REMOVING A CONTRACT
Remove a contract by either:
•
"Activating" the contract (clicking its Description or Symbol, such that the background color of the contract row •
turns green indicating the contract is active) and then clicking the remove contract button: Activating the contract and then hitting the DELETE key on your keyboard SORTING CONTRACTS
You can sort the order of your contracts in the Matrix by clicking (and holding) the Symbol or Description of the contract you want to move and dragging it up or down the Trading Matrix.
ADDING A TAB
The Trading Matrix can contain multiple quote boards. Each quote board is a defined as a Tab. The default tab is the "Main" tab.
To add an additional tab, click the Add Tab button
.
To delete the tab the active tab that you currently using, hit the Delete Tab button
.
To rename an existing tab, right‐click on the tab header, and select "Rename Tab", and type in the new name you wish to use for the tab:
Provided by GENERIC TRADE| [email protected] | 1.800.707.2006 ‐‐ Page 14 of 35
CUSTOMIZE THE MATRIX
Click the Matrix Settings button to customize the columns on the Trading Matrix:
Select the columns you wish to add or remove, and click OK.
Note that you can also sort the location of the column heading. This is a universal function throughout Firetip. Click and drag the column headers to move them to your desirable location:
Provided by GENERIC TRADE| [email protected] | 1.800.707.2006 ‐‐ Page 15 of 35
TRADE WITH THE MATRIX
Note: If you intend to follow along with this documentation while using the Firetip, please ensure that you have DISABLED 'One Click' Trading from the Settings page (From the main menu: "Settings" ‐> "Settings" and then disable "One Click Trading"). It is also suggested that you set the initial quantity to zero.
There are a number of methods to place orders with Firetip, and in particular, with the Trading Matrix.
USING PLACE ORDER
To trade using the "Place Order" button you need to first select an active contract.
To select an active contract, simply click "Symbol" or "Description" of the contract you wish to trade. For example, if we wanted to trade the September 2008 Euro Currency contract, we would click the description for that contract:
This will "activate" the contract. Notice that the background of the contract you selected has turned green. If you click the contract description again, it will deactivate it. If you click "Place Order", you will be prompted by the standard Order Entry screen:
Provided by GENERIC TRADE| [email protected] | 1.800.707.2006 ‐‐ Page 16 of 35
You can modify the SIDE (Buy or Sell), Quantity, Price, Type, and Duration. Since this order has defaulted to a MARKET order, we must change the Type to LIMIT or STOP before we can input a valid PRICE.
If you SUBMIT the order, the order will be routed and processed. Select CANCEL to cancel this order.
MATRIX PRE‐ORDER FIELDS
At the bottom of the Trading Matrix are four pre‐order fields:
You can set up your desired quantity, order type (Limit, Market, or Stop), and with an "active" contract (the contract background is highlighted green), you can click Buy or Sell to pre‐process your order. This will bring up an order entry dialog window from which you can fine tune the order or submit it.
NOTE: If you have ENABLED 'One Click Trading' and are pre‐processing a MARKET order, it will automatically be sent without an order entry confirmation window. LIMITs and STOPs will always bring up an order entry dialog window (since you must specify an exact price), but MARKET orders will be submitted without further review if you have ENABLED 'One Click Trading'.
TRADING DIRECTLY FROM THE MATRIX
One of Firetip's greatest assets is being able to trade directly from the Trading Matrix quote board. You can trade by clicking the field values for any of the five following values: Last, Bid, Bid Size, Ask, and Ask Size.
For example, you can click the Last price for the Mini Dow Jones:
This will bring up a standard order entry dialog for the Mini Dow Jones.
If you click any of the four other fields, the following actions will occur:
Bid: Sells your default quantity at the Bid price (Limit order)
Bid Size: Sells your default quantity at the Market
Ask: Buys your default quantity at the Ask price (Limit order)
Ask Size: Buys your default quantity at the Market
Provided by GENERIC TRADE| [email protected] | 1.800.707.2006 ‐‐ Page 17 of 35
Firetip takes an "aggressive" trader point of view when it comes to trading. Therefore, as you click the Bid and Ask prices and sizes, we are "hitting the bids" and "lifting the offers". Since Firetip is designed to quickly and efficiently place your orders, we believe that when you desire to "sell the bid" or "buy the ask", the time it takes to place your order is most critical ‐‐ since the price you are willing to trade at is the current market price and it can change in any second. This is why Firetip takes an aggressor point of view when it comes to placing trades.
ONE CLICK TRADING AND THE TRADING MATRIX
'One click' trading provides a mechanism for traders to quickly and efficiently enter and exit the markets. If you have enabled 'One Click' trading, then you can bid the BID, BID SIZE, ASK, or ASK SIZE of any contract WHILE HOLDING THE SHIFT KEY and your order will be submitted WITHOUT a confirmation order screen.
You must HOLD THE SHIFT KEY for the order to be sent without confirmation. This feature, unique to Firetip, is incorporated for two reasons:
•
It prevents you from accidentally placing an order from clicking your mouse. Since most traders are clicking the mouse with one hand and holding the shift key with the other, it does not impact the order placement time compared to other "non protected" one‐click trading systems. •
If you press and hold the SHIFT key and during the time you pressed the shift key the market price of the cell you ultimately click has changed for a worse price (lower price when selling or higher when buying), then an order entry dialog window will pop‐up. This applies to BID and ASK cells only. This is to protect you from seeing a price on the screen, going to "grab it", and a microsecond before you hit the mouse button, the price changes, and you inadvertently obtain a price that you did not want. This feature is unique to Firetip and protects you from those rare occurrences when markets are moving so rapidly that before you can click the mouse, the market has changed for a worse price and you did not intend to trade at that price. Note that these protections apply only to BID and ASK. If you click BID SIZE or ASK SIZE (market orders) then you are placing market orders no matter if the market has changed while you are holding the SHIFT key.
Provided by GENERIC TRADE| [email protected] | 1.800.707.2006 ‐‐ Page 18 of 35
THE ORDER BOOK
From the "Trading" main menu, select "Order Book" to bring up the Order Book.
The order book will display:
1. Transmitting orders: orders that are pending delivery to the exchange 2. Working orders: orders that are currently working at the exchange 3. Cancelled Orders: canceled orders will show as CANCEL ORDER. Please note that this indicates a cancel request. If the exchange sends "confirmed out" messages for cancelled orders, then that cancel order will disappear the instant the order is "confirmed out". 4. Filled orders: filled orders will stay in the order book for 30 seconds after the order is filled. You will receive a pop‐up window when an order is filled (unless you turn that setting off under the "Settings" main menu) and all filled orders will remain in the Fill Window From the order book, you can manage your existing orders. The action buttons for each order are under the "Action" column. In our example above, we can CANCEL (CXL) or MODIFY (MOD) the two orders.
CANCEL (CXL): If you cancel an order, the order status will immediately change to PENDING CXL. When the cancel request has been received by the exchange, the status will change to CANCEL ORDER. The exchange will then confirm whether the order was successfully removed from the exchange's book. Once the exchange confirms that the order is no longer working, the order will disappear from your order book. Generally, this entire process will happen in less than a second, so in most cases, you will cancel and order and it will quickly disappear from your order book indicating that the order is no longer working. Please note that some exchanges do not send out confirmation cancels and in those situations, the order will remain in a CANCEL ORDER state.
MODIFY (MOD): To cancel/replace or modify an order, click the MOD button for the particular order. An order entry window will pop‐up from which you can change the parameters of an order. Please note that you cannot change an order from BUY or SELL or vice versa using the MODIFY action. You can only change the quantity, price, and order type.
Provided by GENERIC TRADE| [email protected] | 1.800.707.2006 ‐‐ Page 19 of 35
CHANGE ORDERS DIRECTLY ON THE BOOK
You can change your order Quantity and Prices directly on the Order book. To do this, click the PRICE or QUANTITY of the order you desire to change and then click the checkmark to accept the changes.
In this example, we clicked the price of 1275.25 to bring up the change price control functions:
We can change the price up or down, hit the checkmark, and the order will be changed accordingly. This is a convenient method to add or remove quantity and move the price up or down a few ticks without having to bring up an order entry screen.
FILLS WINDOW
The top portion of the Fills Window displays your orders that were filled today. The bottom pane shows your Positions for your day's trades and includes a P/L based upon your current day's trades.
Only contracts that you have actually traded during the day will show up in the lower pane of the Fills Window. For those contracts that you have traded, you will get a total number of Buys (for the current day), Sells, and a Net position that reflects your Buys/Sells for the day adjusted against any open positions in your account from the previous day (a true Net position for your account).
For a detailed list of all open positions, see documentation on the "Account Detail" window.
Provided by GENERIC TRADE| [email protected] | 1.800.707.2006 ‐‐ Page 20 of 35
ACCOUNT DETAIL
The account detail window shows all of your current account balances and positions. This screen will reflect all of your trading activity for the day, updating dynamically as the market changes.
The Account Detail window allows you to see either a composite detail of your account or you can drill‐down to various sub‐accounts if you are trading on contracts in foreign markets or contracts that settle in different currencies:
Note that if you have no cash balances or positions in the foreign markets, then you will not see the sub‐account as a selection option. If you only have U.S. dollars and trades on U.S. exchanges, then generally you will only see "Combined Futures" and "U.S. Dollar (Regulated)" which will have the same information. Only if you delve into the foreign markets will you see the other sub‐account selections. Firetip supports dozens of sub‐accounts in numerous foreign currency denominations.
Provided by GENERIC TRADE| [email protected] | 1.800.707.2006 ‐‐ Page 21 of 35
NEWS
Firetip comes complete with a rich news feed. You will have instant access to thousands of stories and immediate access to time sensitive information, such as economic numbers. Watch the release of major economic numbers on the same screen as the market. See the market's reaction to GDP, CPI/PPI, Unemployment, and FOMC reactions real‐time at your fingertips.
Provided by GENERIC TRADE| [email protected] | 1.800.707.2006 ‐‐ Page 22 of 35
STATEMENTS
Access all of your account statements right on Firetip.
Firetip provides access to every single account statement for your account from the first day you opened the account. Every business day, regardless of the activity in your account, a statement is generated and archived forever on Firetip.
By default, the statements window will open up with your most recent account statement.
Select a new date to view a different statement:
Provided by GENERIC TRADE| [email protected] | 1.800.707.2006 ‐‐ Page 23 of 35
ALERTS
Configure alerts to let you know when the following values have traded above or below your predefined values:
•
•
•
•
•
•
•
•
Last price has traded above or below your predetermined price value Last trade size (quantity traded) Time of Last Trade Change for the day Daily high or low Bid or Ask price Bid or Ask sizes The current time of day Here are some examples of how you can use alerts:
•
•
•
•
•
Alert you when the market has traded above the weekly high For thinly traded markets, it can beep you anytime a trade occurs Maybe you are interested only in large quantity trades (300 contracts or more at a time), set up an alert to monitor those Perhaps you are interested in selling if the Bid price reaches a certain level. Place an alert on the Bid price field and Firetip will notify you If you are a day trader and want to exit a position before the close, set up a "current time of day" alert for 2 minutes before the market close. Firetip will alert you that the market is about the close. Provided by GENERIC TRADE| [email protected] | 1.800.707.2006 ‐‐ Page 24 of 35
ADDING AN ALERT
1. Bring up the alert dialog window. You can access this by clicking the Alert icon on the main menu bar or the similar icon from the Trading Matrix symbol rows (if you have it configured in the column settings ‐‐ it is configured by default). 2. Enter a trading instrument. You can type in the symbol if you know it or click the Find Symbol button 3. Select the Field for the Alert. 4. Select the operation. If you wish to be alerted if the market trades greater than or equal to (>=) or less than or equal to (<=) 5. Enter the trigger. For a field price (for example, Last price), this would be the market price. For Bid or Ask sizes, this would be a quantity 6. Identify if you would like an Alert to keep repeating. If you select "Repeat", then the alert will continue to notify you each time the condition has been met. Be careful how you set up the repeat condition because in an active market, you could trigger dozens of alerts per second if you do not set up the alert properly. 7. If you have selected for the Alert to repeat, enter an applicable Repeat value. For example, if you wish to be notified if the September E‐Mini S&P 500's Last Price goes above 1300.00 and then you wish for the alert to repeat such that every time it increments by another 5.00, you would enter the alert as follows: With this alert, you will be notified when the Sept E‐Mini S&P 500 trades at 1300.00. The alert will then adjust to 1305.00, so if the Last prices trades at or above 1305.00, it will notify you again and it will continue to increase by 5.00 until you disable or delete the alert. 8. There is a checkbox if you wish to be notified via e‐mail if the alert is triggered. You setup your e‐mail address under the "Settings" tab of the Firetip's main menu. For E‐Mail notification to work, you must enable the general "Alert via Email" setting (Firetip main menu: "Settings", sub‐menu "Settings", and then sub‐menu "Alerts") and then you can individually set‐up E‐Mail notification on Alerts. This way if you want to turn off all E‐
mail notification, you can turn off the global "Alert via Email" setting. 9. Finally, you must "Enable" the alert if you wish for it to function. You can also "Disable" alerts if you wish to keep them in your workspace but do not necessarily want to delete them. ALERT NOTIFICATIONS
You will be notified of Alert activities based upon your setting in the "Alert" tab of the Firetip "Settings" main menu option. You can be alerted:
•
•
•
Via a pop‐up window By e‐mail With audio notification (playing a sound) If you are notified of an Alert, and the Alert is non‐repeating, then it will need to be Enabled again if you desire further notifications.
Provided by GENERIC TRADE| [email protected] | 1.800.707.2006 ‐‐ Page 25 of 35
VII.
CHARTS
INTRODUCTION TO CHARTS
Firetip's charts are powerful, providing numerous indicators and charting capabilities, along with the ability to trade and monitor your positions from the charts.
ADDING A CHART
You can open a new chart in two forms:
1. You can highlight a contract in the Matrix and click the Chart button 2. You can select the Chart button from the Main Menu and select or input the symbol you want to chart. Provided by GENERIC TRADE| [email protected] | 1.800.707.2006 ‐‐ Page 26 of 35
CHART FEATURES
After opening a chart, there are a number of features:
•
•
•
•
•
•
Add a new Chart Tab: This will create a new chart and a correspond tab to access the chart Add a new Chart Panel: Add another chart on the current tab. This way you can look at two (or more) charts in the same window Create a spread chart: Compare the relationship of two instruments. You can specify spread ratios or use the default of 1 to 1 Time Period: Select any time period of a minute bar chart. If you want a time period other than those available in the drop‐down, then simply type in the time period you want to view. You can also view Daily charts or a "Tick charts". A tick chart creates a new bar every "x ticks". So if you desired an 11 tick bar chart, every 11 ticks (every 11 trades) a new bar chart will be created. Chart Type: You can change the type of chart you wish to view. Available choices are: Line, Bar, T‐Chart, and Candlestick. A line chart will connect a line at the closing value of each time period. A bar chart will create a bar representing the high and low for the session. It will also show the open (if "Open Ticks" is checked) and closing prices. This, of course, assumes that there is enough space between the bars to show these values. You may need to zoom‐in or increase the size of your window if you wish to see the open/close on the bars. A T‐Chart will show the closing price of the bar, but will not show the opening price. Customize Colors: You can customize all aspects of your charts, from the background, bar color, indicator color, text, and pointers. Any changes that you make will be saved for future charts if the "Make Default" option is selected. CHART TOOLS Firetip has a number of charting tools:
•
Pointer: Select the pointer icon •
Trendline: Grab the pencil and draw trendlines on the chart to help identify market movements, support, resistance, and various trends. You can change the color of the trendline and decide whether you wish to "auto •
and choose your favorite mouse pointer extend" it to the end of the window by modifying its properties by using the Edit Chart icon
. From the Edit Chart window, select the "Line" indicator that you added and modify its properties. You can also readjust trendlines by clicking at either end of the line, holding the mouse button, and dragging the end of the line to a new location. Retracements: Graphically display market retracement values. For example, it is widely believed that the amount of movement the market has retraced before making new highs or lows would indicate the strength of the move. If a market rallies, retraces only 25%, and then proceeds to make a new high, that may indicate much more strength than a market that has retraced 50% or more before making new highs. To draw a retracement, grab the retracement tool pencil and click at your first point on the chart, hold the mouse button, and drag to the second (and final) point on the chart. The retracement tool will populate with popular retracement Provided by GENERIC TRADE| [email protected] | 1.800.707.2006 ‐‐ Page 27 of 35
•
•
values (commonly known as "Fibonacci" numbers). You can modify these values as well as the color of the retracements the same way you would do with when drawing Trendlines.
Print Charts: You can print the active chart tab or all chart tabs. Click the down‐arrow next to the printer to see the option of "Print All Chart Tabs" Indicators: Click the Indicator Icon to see a list of indicators you can add to your charts. All Indicators are fully customizable. You provide as defaults the popular commonly‐accepted settings for the indicators, but you are free to custom the settings however you desire. INDICATORS The charting package allows unlimited indicators to be placed on the chart itself.
Firetip charts do not lock you into any proprietary settings. While we have provided the most popular inputs as defaults, you are free to enter any value you wish.
MOVING AVERAGES: There are two basic types of moving averages (MA): Simple and Exponential. Simple MAs show the average price for the selected time window. The value of the MA depends on two factors: the value that is being averaged (the open, high, low, or last/closing price) and the length or time period of the MA (9 bars, 50 bars, etc.)
Exponential Moving Averages (EMA) are similar to simple MAs except they give more weight to the latest data and respond to changes faster than a simple MA. The major advantage of the EMA is that it assigns greater weight to the last trading bar and less weight to the oldest data. As a trader, you are generally more interested in the latest input from the markets since what has transpired recently is usually more valuable than what happened 50 bars ago.
BOLLINGER BANDS: Bollinger Bands, popularized by analyst John Bollinger are standard deviation channels. The center line of the Bollinger Band is a moving average. The top and bottom lines are calculated based upon the standard deviation of the moving average. Both inputs are required: The length of the moving average, and the number of standard deviations you wish to display the channels.
STOCHASTICS: Stochastic is an oscillator popularized by George Lane. Stochastic consists of two lines: a fast line called %K and a slow line called %D. Slow Stochastics and Fast Stochastics incorporate both %K and %D. The Fast Stochastic is very sensitive to market turns but leads to many whipsaws. Some traders therefore prefer the Slow Stochastic which is a little less sensitive to identify market turns, but results in less market noise and whipsaws. Stochastic is designed to fluctuate between 0 and 100. Popular reference lines are drawn at 20 and 80 with the center line at 50. Stochastic shows when bulls or bears become stronger or weaker. This information helps you decide whether bulls or bears are likely to win the current "fight" in the market.
Provided by GENERIC TRADE| [email protected] | 1.800.707.2006 ‐‐ Page 28 of 35
There are generally three types of Stochastic trading signals: Stochastic‐Divergences: A bullish divergence occurs when prices for a particular market fall to a new low but Stochastic traces a higher bottom than during the previous decline. When a bullish divergence occurs, this is sign that the sellers are losing the upper hand and it may be time to buy. Vice versa, a bearish divergence occurs when prices rally to a new swing high, but Stochastic traces a lower top than during its previous rally. This is a sign that the buyers may be thinning out and it is time to sell. Stochastic‐Overbought & Oversold: When Stochastic rallies above its upper reference line (80), it shows that the market is overbought. Overbought means too high, ready to turn down. When stochastic falls below its lower reference line, it shows that the market is oversold. Oversold means too low, ready to turn up. It is very important to note that the Overbought & Oversold conditions for Stochastics only work well when you have a firm feeling that the market is in a trading range. If the market is in a trend or establishing a new trend, the Stochastic can be overbought or oversold for a significant period of time. You do not want to trade against the trend in these situations.\n\nStochastic: Line Direction\nWhen both Stochastic lines (%K and %D) are headed in the same direction, they confirm the short‐term trend. When prices rise and both Stochastic lines rise, the uptrend is likely to continue. When prices slide and both Stochastic lines fall, the short‐term downtrend is likely to continue.
RELATIVE STRENGTH: Relative Strength Index (RSI) is an oscillator developed by J. Welles Wilder, Jr. RSI measures the strength of the market by monitoring changes in closing prices. It is generally regarded as a leading or coincident indicator ‐‐ never a laggard. RSI fluctuates between 0 and 100. When RSI reaches a peak and turns down, it identifies a top. When RSI falls and then turns up, it identifies a bottom. These turns come at different levels in different markets or even in the same market, during bull and bear periods. Overbought and Oversold levels vary from market to market and from time to time. There are no magical levels marking all tops and bottoms ‐‐ the best way to gauge the RSI is to watch it closely and come up with what you feel are the popular levels where RSI tends to peak or bottom.
WILLIAMS %R: Williams %R is a simple but effective oscillator developed by Larry Williams. It measures the capacity of bulls and bears to close prices each day near the edge of the recent price range. Williams %R confirms trends and warns of their upcoming reversals. Williams %R is designed to fluctuate between 0 and 100 percent. It equals 0 when bulls reach the peak of their power and close prices at the top of the range. It reaches 100 percent when bears are at the peak of their power and close prices at the bottom of the recent range. There are three types of trading signals to be used with Williams %R: (1) Williams %R‐Divergences: When Williams %R rises above its upper reference line, falls, and then cannot rise above that line during the next rally, it creates a bearish divergence (time to sell). It shows that the bulls are losing their power and the market is likely to fall. A bullish divergence occurs when Williams %R falls below its lower reference line, rallies, and then cannot decline below that line when prices slide again. It shows that bears are losing power and a rally is in the offing (time to buy). (2) Williams %R‐Failure Swings: Williams %R seldom reverses in the middle of its range. Failure swings occur when the Williams %R fails to rise above its upper reference line during a rally or fall below its lower reference line during a decline. When Williams %R stops rising in the middle of a rally and turns down without reaching its upper reference line, it produces a failure swing. This shows that bulls are especially weak and gives a sell signal. When Williams %R stops falling in the middle of a decline and turns up without reaching its lower reference line, that is a failure swing. It shows that bears are very weak and gives a buy signal. (3) Williams %R:
Provided by GENERIC TRADE| [email protected] | 1.800.707.2006 ‐‐ Page 29 of 35
Overbought & Oversold: When prices close near the upper edge of their range, Williams %R reaches its top and becomes overbought. When prices close near the bottom of their recent range, Williams %R falls and becomes oversold. Without a major trend in place, prices seldom can continue to close at their extreme price range for many bars in a row. Therefore, when Williams %R rises above its upper reference line, it marks a potential market top and gives a sell signal. When Williams %R falls below its lower reference line, it markets a potential market bottom and gives a buy signal. When utilizing the overbought/oversold oscillator readings, it is important to identify the market as being in a trading range. Or better yet, if you identify the market as being in a bull market, it would be prudent to consider buying a temporary oversold condition. Vice versa, if the market has been in a longer term downtrend, selling a short‐
term overbought condition should be considered.
MOVING AVERAGE CONVERGENCE ‐ DIVERGENCE (MACD): MACD is an advanced indicator constructed by Gerald Appel. The MACD has three inputs: Short, Long, and Signal. The "Fast Line" of the MACD is calculated by taking the difference between the short Exponential Moving Average (EMA) and the long EMA. The "slow" or "signal" line is calculated by taking the Signal EMA of the "fast" line. A histogram is included which calculated the difference between the two lines (the fast and signal line). MACD Trading Strategy: When the fast MACD line crosses the slow Signal line, it gives a buy signal. Go long, and place a protective stop below the latest minor low. When the fast line crosses below the slow line, it gives a sell signal. Go short, and consider placing a protective stop above the latest minor high. MACD Histogram: Buy when the MACD‐Histogram stops falling and ticks up. Place a protective stop below the latest minor low. Sell short when MACD‐Histogram stops rising and ticks down. Place protective stop above the latest minor high. Second Histogram Strategy: When prices rally to a new high, but MACD‐Histogram traces a lower top, it creates a bearish divergence (time to sell). When prices are making new lows, but the MACD‐Histogram traces a more shallow low, it creates a bullish divergence (time to buy).
Strategy Disclaimer: The indicators included in this charting package are popular and widely accepted trading indicators. The strategies outlined above are provided only as an education to the reader and not as trading recommendations. There are no guarantees expressed or implied as to any of strategy's accuracy over the short or long‐term. The indicators should be used as a tool to aid you in your trade decision making process.
Provided by GENERIC TRADE| [email protected] | 1.800.707.2006 ‐‐ Page 30 of 35
VIII.
DEPTH TRADER
UNDERSTANDING THE DEPTH TRADER
You can access the Depth Trader by clicking the Depth Trade icon from the main menu.
Below is an example of a Depth Trader for the E‐Mini S&P 500:
The depth trader on Firetip will show you the entire trading book provided by the exchange. Currently, most electronic exchanges offer five levels of Bid/Ask prices, while Eurex provides 10 levels of Bid/Ask prices.
The columns of the Depth Trader can be re‐arranged to best suit your trading needs. The Cum. Bid and Cum. Ask show the cumulative bid and ask size totals. In this example, from 1251.75 to 1252.50 on the Bid Size, there is a total of 509 contracts being bid. From 1253.00 to 1254.00 on the Ask side, there are 528 being offered. Note the "Histogram" that graphically represents the Bid/Ask sizes. If the histogram is blue, that means that the cumulative size at that level is biased towards the Bid side. If the histogram row is red, then the cumulative bid at that level is biased towards the Ask side.
Of interest will be the first few levels that show the immediate bid size and ask size. These are represented by the Blue and Red columns. If you click the Blue column (Bid Size), an order entry dialog will pop‐up:
Provided by GENERIC TRADE| [email protected] | 1.800.707.2006 ‐‐ Page 31 of 35
If you
u click the Bid
d Size, your order is placed
d as a "SELL M
MARKET" ordeer. If you clickk the Ask Size, your order iis placed as a "BUYY MARKET" orrder. The defaault quantity on the order entry screen
n is obtained ffrom the Quaantity value on the Tradingg Matrrix. Thereforee, you can adjust the Tradin
ng Matrix deffault quantityy to set the deefault for you
ur Depth Trad
der. Clicking witho
out holding any other keyss only works o
on the first ro
ows.
If you
u are clicking the 2nd level and on, you should use the SHIFT key. The assump
ption here is that you will w
want to BUY on th
he Bid when h
holding the SH
HIFT key and SELL on the A
Ask when holding the SHIFFT key. This is the oppositee action of when
n you do not hold the shiftt key.
P
Provided by G
GENERIC TR
RADE| info@ggenerictrade
e.com | 1.800
0.707.2006 ‐‐ Page 32 o
of 35
IX.
ADVANCED TRADER
USING THE ADVANCED TRADER
The Advanced Trader enables you to watch the market dynamics and trade with our customized "One Click Trading" technology.
Provided by GENERIC TRADE| [email protected] | 1.800.707.2006 ‐‐ Page 33 of 35
ADVANCED TRADER FEATURES
You can get quotes, watch market movement, trade, and view your positions for individual markets from the Advanced Trader window. Firetip's technological advanced is encompassed in the Advanced Trader window.
NOTE: The Advanced Trader incorporates One‐Click Trading Features. Please confirm that One‐Click Trading is disabled before educating yourself on the order entry process.
To Trade with "One Click", you must first Enable "One Click Trading" from the Settings panel on the Main Menu. By default, the One‐Click Trading is disabled. It is recommended that you only enable it when you are familiar with how the Advanced Trader and the rest of the Firetip windows work. You can double‐check this setting by going to the Settings Main menu, select the Settings Panel, and confirm that "Enable One Click Trading" is un‐checked on the General tab.
To place orders on the Advanced Trader, it is similar to the rest of Firetip:
•
•
•
•
Click the first level of the Bid Price to place a SELL order at the Bid price or click the first level of the Ask Price to place a BUY order at the Ask price Hold the shift key, and click on any price on the Bid side, and you represent that you want to place a BUY LIMIT order. Hold the shift key, and click on any price on the Ask side, and you represent that you desire to place a SELL LIMIT order Hold the CTRL key and by default, it will place a STOP order The default order quantity can be selected directly from the Advanced Trader window If you place an order, the order will show up automatically in the "Orders" column of the Advanced Trader. This column will represent LIMIT and STOP orders. To determine if the order is a limit or stop:
BLUE quantities in the Order column represent BUYs. RED quantities represent SELLs. Therefore, it is generally logical to assume that if the BLUE quantity is at a price that is at or below the market, it is a BUY LIMIT. If it is above the market price, then it is generally a BUY STOP. You should always refer to the "Order Book" if you have any questions on the specific order that you have placed.
Provided by GENERIC TRADE| [email protected] | 1.800.707.2006 ‐‐ Page 34 of 35
MANAGING ORDERS FROM THE ADVANCED TRADER
Once you have an order "WORKING" and the order is represented in the Orders column, you can click, hold the click button, and drag the order up and down the advanced trader column. Let's say, for example, you have a buy order for 3 contracts at 1.5824 on the Euro Currency and an order to buy 5 at 1.5826:
You can drag the quantity of 3 buys at 1.5824 to 1.5826 and the orders column will update to represent that you now have 8 contracts working. You can move your orders up and down the Advanced Trader to modify their prices. To add more quantity, simply trade at that price. If we wanted to add 5 more contracts to 1.5826, we could hold the SHIFT key and click the price field of 1.5826.
To cancel an order, double‐click the Order that is represented in the Orders column.
Provided by GENERIC TRADE| [email protected] | 1.800.707.2006 ‐‐ Page 35 of 35