1
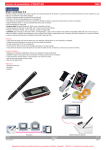
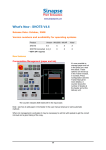
xn DIGITAL PEN QUICK START GUIDE For detail instructions on how to use the Digital Pen, see the User Manual stored in the CD. This manual may not reflect your actual device’s operation. All information is subject to change without prior notification. Please follow your actual device’s operational procedures. Base unit USB Cable Digital Pen 2xPen Batteries Package Content Ink refill Refill Extractor Software CD Quick Start Guide Step by Step to Get Started Step1 Charge the Battery For initial use, your base unit needs to be charged for about 3 hours. Connect your base unit to your PC using the USB cable for charging. Step2 Installing Pen Batteries a. b. c. Remove the battery compartment cover. Install two SR41 batteries, with the positive poles facing up as shown (Use the enclosed SR41 batteries). Replace battery compartment cover. WARNING: Do not attempt to open the pen. This may cause the pen to malfunction. Step3 Installing Ink Refill To insert a new refill, 1. Slide the new refill into the tip of the pen. 2. Gently press the new refill until it is lodged securely in place. -1- To replace the ink refill, 1.Detach the cap from the digital pen. 2.Clamp the ink refill with the refill extractor. Hold the pen firmly, and apply pressure with the extractor against it. 3.Pull the used refill out. Step4 Turn On the Base Unit Press and hold the Power button on the base unit. Step5 Clip your Base unit on a Paper Your base unit can be mounted in 3 positions on top of the paper. The following images illustrate the way you can mount your base unit, according to the recommended positioning. A. Mounting your base unit at the top center of the paper is recommended for a single paper usage: B. Mounting your base unit at the top left corner of a paper block is recommended for right hand Users. C. Mounting your base unit at the top right corner of a paper block is recommended for left hand Users. Step6 Start writing When you pick up the pen, find a position that is comfortable for you. Be careful to hold the pen in a way that does not block the signals sent from the tip of the pen to the memory unit receivers. When you are writing with the pen, make sure its inclination to the paper surface is between 45°and 90°. Hold the pen firmly and write normally. -2- Note: Make sure the pen point is 1.5cm away from the unit. Otherwise, the unit sensor may not work. Buttons & Ports b a c e a. b. c. d. e. d USB port –connect to computer through the USB cable Paper Clipper – clip the unit to paper LCD display Power button –Press and hold for about 5 seconds to turn on the unit. Press shortly to create a new note. Reset hole –When the unit does not respond, stab into this hole to reset it and then press and hold the Top button to restart the unit. Memory Unit LCD Use the LCD to view status indications. Name The Digital Pen is Connected Memory FULL Off When Unit is NOT connected to PC Less than 90% capacity used Blinks When Data is uploaded to PC Never Full Pen Battery good Unit is Off Low Pen battery Charging Pen down/Pen move Mouse Mode Mouse Mode Pen down/Pen move Pen Mode Number of saved notes in memory Always Unit is Off Pen down/Pen move Pen down/Pen move Memory full Or Error Pen Low Battery Base unit Low battery Note Mode On when Unit is connected to PC The base unit memory is 90% full. It is highly recommended to upload your files to your PC and delete them from memory! Low Pen battery -3- Create Note in Mobile Mode To take handwritten note when you are away from computer, (1) Press and hold the ON/OFF button to power on the unit. (2) Hold the base unit and gently press the paper clipper. (3) Slide the base unit into the paper’ s upper edge and make sure the base unit is in the center. (4) Pick up the pen and start writing. (NOTE: Be careful to hold the pen in a way that does not block signals sent from the tip of the pen to the receiver unit.) (5) Once you’ ve completed one page, shortly press the ON/OFF button to save current page and start a new page. On the base unit screen, you can see the page number added by one. (6) All notes are stored in the base unit. You can upload them to a PC for viewing, editing, or email. Create Note in On line Mode Connecting your Digital Pen to your computer and drawing with your Digital Pen in Note mode can create a new note. Everything you write is being captured automatically. Before doing so, make sure the Note Manager is installed and run on your computer. Once you have finished with your note, you can use the Note Manager to save your note to a picture file, email it, print it, or simply save it to your Note Manager for later use. Use your Digital Pen as a Mouse The device can behave as a mouse, performing the click and hovering function. Make sure you have connected the base unit to your PC before using the Mouse function Changing to Mouse mode can be done in 3 ways: Start your Note Manager application > right click the application tray icon > select “Mouse Mode”. Press the top button (ON/OFF button) on the base unit. Click the virtual area using your pen. -4- In Mouse mode, your Digital Pen behaves as a mouse, having the following functionality: To move your mouse cursor you can hover with the pen. To start Hovering you can press the side button or tip the pen on the paper. The pen will now hover even with no press for about 30 Side button seconds. To Click an object, point your mouse cursor on that object. Now tip the pen on the paper or click the side button. To Double-Click an object, point your mouse cursor on that object. Now tip the pen twice on the paper or click the side button twice. To Right-Click an object, point your mouse cursor on that object. Now press the tip of the pen a bit longer on the paper. A special ‘ Right Click’cursor will appear. Lift the pen from the paper, and the context menu (Right Click menu) appears. Using your Digital Pen in Window XP/2000 1. Installing the Note Manager One of the provided CDs contains the Note Manager software which is required. Simply insert the CD and then follow the wizard's instructions. 2. Connecting your Digital Pen to your Computer. 3. Uploading your Mobile Notes First make sure your Note Manager is running. Now simply connect your base unit to your USB port. The Note Manager application will detect your unit and will prompt you to upload your notes. Select “Yes”to start transferring your notes. 4. Using the Note Manager The Note Manager can be used for storing, viewing, searching, copying and exporting notes. It is set up in Windows Explorer format, which allows you to browse through your files in the left pane and view them in the right pane. -5- The Note Manager contains buttons that give you access to the most commonly used menu commands. The following table contains a list of each button in the toolbox together with a description of its function. Button + Description UPLOAD –When in Connected Mode, you can upload all your notes from the mobile unit to your PC using the Digital Pen application Note To Text - Convert handwritten note to texts. (only available in Windows Vista or 7) Convert your note to text using MyScript® Notes. (Only available if the recognition software is installed.) Joint multiple notes into one. CUT –Cuts the selected note and saves it to the clipboard COPY –Copies the selected note and saves it to the clipboard PASTE –Pastes whatever was last copied or cut to the clipboard DELETE –Deletes the selected note/notes EDIT NOTE –Allows you to edit a selected note PRINT -- Prints the selected note/notes SHOW AS STICKY NOTE –Make your Note as Sticky Note SHOW AS PAPER HOLDER –Make your Note as a paper holder SMALL THUMB – Displays small thumbnails in the Note Manager view MEDIUM THUMB - Displays medium sized of thumbnails in the Note Manager view LARGE THUMB - Displays large thumbnails in the Note Manager view NOTE MODE MOUSE MODE – TURNS YOUR PEN INTO A MOUSE ABOUT –Provides you with your Digital Pen software version information -6- Using the Digital Pen in Windows Vista/7 Windows Vista and 7 provides rich inking features & utilities which enable users to take handwritten notes, convert handwriting to text, annotate documents, add electronic signatures and send handwritten emails. With integrated Pen-Tablet support, digital ink technologies and handwriting recognition technologies your Digital Pen turns into a Tablet PC compatible device that’s practical, comfortable, intuitive and easy to use while you are on the go and it also works well when you are at your desk. Getting Started To start inking in windows Vista, just plug-in your Digital Pen to any available USB port, place the receiver unit at the top of the page in the middle. Writing on your Tablet PC Input Panel In Windows Vista or 7, the Tablet PC Input Panel allows users to insert text into website forms, word processing and e e-mail applications, web browsers, and more. Tap the Input Panel icon , which appears when you place the pointer in a text entry area, such as the Address bar in a web browser or a text box in a dialog box, and then start writing with your Digital Pen. The Input Panel icon does not appear on the taskbar by default. To make it appear, right-click the taskbar, tap Toolbars, and then tap Tablet PC Input Panel. Annotations in Office 2007 In Windows Vista or 7, Microsoft Office 2007 and Digital Pen offer new capabilities that allow you to work more naturally and efficiently. Within Office 2007, numerous applications support digital mark-up with Digital Pen and provide easy access to digital inking tools for intuitive collaboration in Word, Excel, Outlook, PowerPoint and OneNote. Writing with a pen is a particularly efficient and natural way to comment on an existing document and to capture rough thoughts that are emerging in real time. Word, PowerPoint and Excel have a Review tab with a Start Inking button that provides an Ink Tools menu. This menu includes tools such as: felt tip pen, ballpoint pen, highlighter, and eraser, as well as options to select the Ink Color. Selected examples for using digital ink in Office 2007 Applications Signatures, Ink Comments and annotation in Word 2007 -7- Inking Excel 2007 Drawing in Outlook 2007 Using the Digital Pen in MAC Installing the Note Manager for Mac software Simply insert the Note Manager CD and follow the wizard's instructions. Setting Preferences with the NoteTaker Preference Tool Before you can start transferring your text from the Digital Pen, you first need to decide where on your Mac’ s hard drive you want to save your uploaded notes from the Digital Pen. Click on the NoteTaker Preferences icon to open the preference tool, and then specify the path to the location on your Mac’ s hard drive where TIFF images from the Digital Pen will be saved. -8- Digital Pen operation with Mac (1) Use the Digital Pen to capture and save your notes while you are away from your Mac, in meetings or lectures. (2) Connect the Digital Pen to your Mac to upload the saved notes. The notes are saved in TIFF format in the directory that you have specified. Double click on the desired TIFF file in order to view the note. (3) While being connected to the Mac via the USB port, the Digital Pen can be used as a Mouse and as a Tablet input device for Mac ink applications. To use the Digital Pen as a Tablet Input device, you first need to enable this mode by clicking the Ink icon at the top bar of the MAC desktop and then selecting “Write Anywhere”. If you deselect “Write Anywhere”, your Digital Pen will work as a mouse only. (4) Use the digital pen in applications such as iWork”08. You can write handwritten letters on-line, and the Mac will convert it into text. The feature is available iWork Pages (word processor), iWork Keynote (presentations) and iWork Numbers (spreadsheets). Note: The Digital Pen can be also used for drawings inside applications such as Adobe Illustrator, Photoshop, etc. -9- Using the Vision Objects MyScript® Notes MyScript® Notes is a well known character recognition engine. It can covert the notes in your Digital Pen to texts. You can purchase the software from its vendor if you want. (1) Installing MyScript® Notes. Follow the installation instructions in the software manual. (2) Operating MyScript® Notes. To use the MyScript® Notes recognition engine, please make sure you have installed Digital Pen software Suite. Then, you can select a note, Notes, or a Sticky Note, and export them to the MyScript® Notes recognition engine. Exportable objects from the Digital Pen to MyScript® Notes: A New Note A single Note from “Note Manager” Multi pages Note from “Note Manager” Sticky Note from “Note Manager” (3) Exporting objects. Use the following methods for each type of object in order to export it to MyScript® . a. For a New Note, Click the “Convert to Text” toolbar button . b. For a single/multi page Note from “Note Manager”, right click the Note in the thumbnails area. c. Right click the Note in the tree area. d. Select a note and select “File --> Convert to Text”menu. e. For sticky Note from ‘ Note Manager’ , right click the “Sticky Note”and select “Convert to Text”menu. - 10 - (4) Your Note will be exported to MyScript® Notes application. MyScript® Notes will be opened with your Note in the “Conversion”area. Using the Photo Sketcher Photo Sketcher gives you the ability to sketch on top of any jpeg picture file. You can add annotations on top of any picture. Then, you can save it and share it. Connection Indicator Close Open a picture Save picture Change pen preference Send picture Eraser/Pen Redo Undo Installing Photo Sketcher Insert the Note Manager application CD into your PC, select “Photo Sketcher”and then install it following the wizard’ s instruction. A desktop icon will be added once installation complete. Using Photo Sketcher Run the Photo Sketcher by clicking the desktop icon. 1) Connect the Digital Pen Before you can use the ‘ Photo Sketcher’ , your Digital Pen must be connected to your computer properly. A connection icon will be Green , indicating the Digital Pen is properly connected. (2) Load a picture file by clicking the application ‘ File’icon . Browse to the file you would like to edit and select ‘ Open’ . (3) Sketch on a picture file Once a picture is loaded, use your Digital Pen to sketch anywhere you like on the picture. Use the Pen, while hovering, to get to the point in which you’ d like to sketch. Then, simply use the Pen as you usually use a Pen, and sketch. (4) Save a file To save a picture, press the select ‘ Save’ . icon. Now select a path and a name for your file and - 11 -