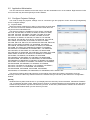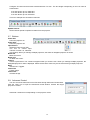
1
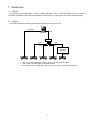
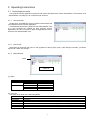
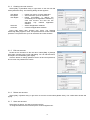
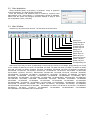
Projector Control Application Ver.4.20 Instruction Guide Hitachi Maxell, Ltd. Contents 1. 2. 3. INTRODUCTION ............................................................................................................................................ 3 1.1. OUTLINE .................................................................................................................................................... 3 1.2. SYSTEM..................................................................................................................................................... 3 INSTALLATION .............................................................................................................................................. 4 2.1. SYSTEM REQUIREMENTS ........................................................................................................................... 4 2.2. PROJECTOR CONTROL INSTALLATION ........................................................................................................ 5 OPERATING INSTRUCTIONS ...................................................................................................................... 7 3.1. CREATE LOGIN ACCOUNTS ......................................................................................................................... 7 3.2. START APPLICATION .................................................................................................................................. 9 3.3. MAIN WINDOW ........................................................................................................................................... 9 3.4. EXIT APPLICATION ................................................................................................................................... 10 3.5. APPLICATION MINIMIZATION ..................................................................................................................... 11 3.6. CONFIGURE PROJECTOR SETTINGS ......................................................................................................... 11 3.7. BUTTONS ................................................................................................................................................ 14 3.8. ADVANCED CONTROL .............................................................................................................................. 14 3.9. IMAGE SEND TO PROJECTOR ................................................................................................................... 15 3.10. MY IMAGE (E-SHOT) ........................................................................................................................... 15 3.11. SOFTWARE VERSION ............................................................................................................................ 16 ・ Microsoft and Windows is the registered trademark of Microsoft Corporation in the US and other countries. ・ Pentium is the registered trademark of Intel Corporation in the US and other countries. ・ All other trademarks are the property of their respected owners. Warning ・ This software is free via download. The manufacturer has no responsibility for any errors that may occur while using this software. ・ This software, or any product used with this software may not be used for any act which obstructs the Maintenance of the International Peace and Safety. 2 1. Introduction 1.1. Outline The Projector Control Application, PJCtrl is software that allows you to control the projectors on the network or connected via RS232C cable. With this application, the Computer can control projectors on the network remotely. 1.2. System The following diagram shows a typical network diagram for the Projector Tool. RS-232C LAN HUB LAN LAN LAN LAN Ethernet / RS-232C Converter RS-232C Use a UTP cable category 5 or higher for a Local Area Network cable. Use a cross type cable when using a serial cable. The Projector Control Application can control up to 5 of the same model projectors. 3 2. Installation 2.1. System Requirements The minimum System requirements for the Projector Control Application are shown below. (1) Operating System Windows 2000 Professional Windows XP Home Edition / Professional Windows Vista Home Basic / Home Premium / Business / Ultimate / Enterprise Windows 7 Starter / Home Basic / Home Premium / Professional / Ultimate / Enterprise Windows 8 / Windows 8 Pro / Windows 8 Enterprise Windows 8.1 / Windows 8.1 Pro / Windows 8.1 Enterprise (2) CPU Pentium3 500MHz or higher (3) Memory 128MB or higher (4) Hard disc Minimum 20MB free space for installation (5) Serial port This port is required to control projectors by RS-232C (6) LAN port This port is required to control projectors through a network 4 2.2. Projector Control Installation Please follow next steps to install the software into your computer. (1) Double click the file “InstForPJCtrl_v4.20.exe”. (2) Select the language (English, Japanese or Chinese [Simplified]) during the installation process. And then click [OK]. (3) Click [Next] (4) Read “License Agreement” and select “I accept the terms of the license agreement” and click [Next] if you agree the license agreement. Otherwise, click [Cancel] and stop the installation. (5) Confirm the program folder, and then click [Next]. 5 (6) Confirm the install folder and program folder again, and then click [Next]. (7) Click [Finish] to complete the Projector Control Application setup wizard. 6 3. Operating Instructions 3.1. Create login accounts The Projector Control Application requires a login name and password to launch the software. The Projector User Administration Tool helps you to create new user accounts. 3.1.1. How to launch Double Click “PJUsrEdit.exe” that is located on same folder that you installed Projector Control Application. It automatically launches the Projector User Administration Tool, if no user accounts are created yet. Also Projector Control Application has a short cut [File] [User Configuration] to launch Projector User Administration Tool. 3.1.2. How to exit Select [File] [Exit] from the menu or click [x] bottom of the top right corner. If the changes are made, you will be required to confirm the changes. 3.1.3. Main Window Menu User List (1) Menu Menu File Edit Sub Menu Save Exit Add New User Change User Delete User Description Save user data Exit Create new user Edit user account Delete user account (2) User List The status in the User List is described below. Row name Description User Name Username (ID) Description Comment Man “●” shows that the user can access to the PJMan (Projector Management Tool) Ctrl “●” shows that the user can access to the PJCtrl (Projector Control Tool) Img ”●” shows that the user can access to the PJImg (Projector Image Tool). FTP “●” shows that the user can access to the PJTransfer (Projector File Transfer Tool). 7 3.1.4. Creating new user account Select [Edit] [Add New User] or right clicks on the user list and select [Add New User]. The following dialog window appears. User Name Description User Rights Select All UnSel All --- Define user name, up to 20 characters --- Add comments, up to 50 characters --- Define accessibility. It defines the accessibility for the application software by each user account. The user can use allocation only marked application software. --- Select all application software. --- Unselect all application software. Press [OK] button after entering user name. The [Change Password] dialog appears. Enter new password and confirm entered password. The password is up to 20 characters and case sensitive. 3.1.5. Edit user account Double click a username on the user list or select [Edit] [Change User] after choosing user to open edit dialog. You can edit username, description and accessibility (user rights). Click the button to change password. Enter old and new password, and re-enter new password to confirm. 3.1.6. Delete user account Select [Edit] [Delete User] or right click on the user list and select [Delete User]. The confirmation window will popup. 3.1.7. Save user account Select [File] [Save]. The date is stored in the file, “C:\Program Files\Common Files\Projector Tools\config\UserList”. 8 3.2. Start Application Select Windows [Start] [Program] [Projector Tools] [Projector Control Application]. The login window is appeared. Enter the username and password that is created by “Projector User Administration Tool”. After logged in, a “Configuration” window is appeared. Please refer the section 3.6 Configure Projector Settings on page 9. Once the configuration is done, click [OK]. 3.3. Main Window Click the icon to perform each function. The functions are shown below. [About] icon [Image Send] icon [Advanced] icon [Freeze Off] icon [Freeze On] icon [Mute] icon [Volume] icon [Blank Off] icon [Blank On] icon [Input Source] icon [Power Off] icon [Power On] icon [Configuration] icon Note: Some icons may not show up depending on the model you choose. For example, [Image Send] icon is only for the models CP-DW10N, CP-A100, CP-AW100N, CP-X205, CP-X206, CP-S245, CP-X255, CP-X256, CP-X265, CP-X305, CP-X306, CP-X505, CP-X605, CP-X615, CP-WX625, CP-SX635, CP-X705, CP-X2010N, CP-X2011N, CP-X2510N, CP-X2511N, CP-X3010N, CP-X3011N, CP-WX3011N, CP-X4011N, CP-X10000, CP-WX11000, CP-SX12000, ED-A100, ED-A110, ED-AW100N, ED-AW110N, ED-D10N, ED-D11N, ED-X45N, ED-X8255, CP-WUX645N, CP-X4021N, CP-X5021N, CP-WX4021N, CP-A220N, CP-A221N, CP-A222WN, CP-A300N, CP-A301N, CP-A302WN, ED-A220N, CP-AW250N, CP-AW251N, CP-AW252WN, iPJ-AW250N, BZ-1, CP-AW2519N, CP-X2514WN, CP-X3014WN, CP-X4014WN, CP-WX3014WN, CP-X2021WN, CP-X2521WN, CP-X3021WN, CPX10WN, CPX11WN, CPWX12WN, CP-X8150, CP-X8160, CP-WX8240, CP-WX8255, CP-SX8350, CP-WU8240, CP-WU8250, CP-X2015WN, CP-X2515WN, CP-X3015WN, CP-X4015WN, CP-WX2515WN, CP-WX3015, CP-A352WN, CP-AW312WN, CP-AW3019WN, CP-DW25WN, CP-DW30WN, CP-D27WN, CP-D32WN, CP-AX2503, CP-AX3003, CP-AX3503, CP-AW2503, CP-AW3003, CP-X4022WN, CP-WX4022WN, CP-X5022WN, CP-WU8460, CP-WX8265, CP-X8170, CP-WU9410, CP-WU9411, CP-WX9210, CP-WX9211, CP-X9110, CP-X9111, CP-X3030WN, CP-X2530WN, CP-WX3030WN, CP-CX300WN, CP-CW250WN, CP-CW300WN, MS-1 and MS-1WL. 9 3.4. Exit Application Right click the PJCtrl icon on the task tray at the right-bottom corner and select [exit]. And click [Yes] on the confirmation window. Also you can click the [x] icon on the right top corner of main window to exit application. 10 3.5. Application Minimization You can hide the main window into the task tray to click the minimization icon on the window. Right click the PJCtrl icon on the task tray and select [Show] to restore window. 3.6. Configure Projector Settings You need to setup the projector settings such as connection type and projector model. Click the [Configuration] icon to configure settings. (1) Projector Model Select a projector model that you want to control from the drop down list. The icons on the main window and Advanced Control items are vary due to the model differences. The discovery feature is available on CPX2, CPX4, CP-DW10N, CP-A100, CP-AW100N, CP-X205, CP-X206, CP-S245, CP-X255, CP-X256, CP-X265, CP-X268A, CP-X305, CP-X306, CP-X308, CP-X417, CP-X467, CP-X505, CP-X605, CP-X608, CP-X615, CP-WX625, CP-SX635, CP-X2010N, CP-X2011N, CP-X2510N, CP-X2511N, CP-X3010N, CP-X3011N, CP-WX3011N, CP-X4011N, CP-X10000, CP-WX11000, CP-X12000, CP-X705, CP-X807, CP-X809, ED-A100, ED-A110, ED-AW100N, ED-AW110N, ED-D10N, ED-D11N, ED-X45N, ED-X8255, CP-WUX645N, CP-X4021N, CP-X5021N, CP-WX4021N, CP-A220N, CP-A221N, CP-A222WN, CP-A300N, CP-A301N, CP-A302WN, ED-A220N, CP-AW250N, CP-AW251N, CP-AW252WN, iPJ-AW250N, BZ-1, CP-AW2519N, CP-X2514WN, CP-X3014WN, CP-X4014WN, CP-WX3014WN, CP-X2021WN, CP-X2521WN, CP-X3021WN, CPX10WN, CPX11WN, CPWX12WN, CP-X8150, CP-X8160, CP-WX8240, CP-WX8255, CP-SX8350, CP-WU8240, CP-WU8250, CP-X2015WN, CP-X2515WN, CP-X3015WN, CP-X4015WN, CP-WX2515WN, CP-WX3015WN, CP-A352WN, CP-AW312WN, CP-AW3019WN, CP-DW25WN, CP-DW30WN, CP-D27WN, CP-D32WN, CP-AX2503, CP-AX3003, CP-AX3503, CP-AW2503, CP-AW3003, CP-X4022WN, CP-WX4022WN, CP-X5022WN, CP-WU8460, CP-WX8265, CP-X8170, CP-WU9410, CP-WU9411, CP-WX9210, CP-WX9211, CP-X9110, CP-X9111, CP-X3030WN, CP-X2530WN, CP-WX3030WN, CP-EX250N, CP-EX300N, CP-EW250N, CP-EW300N, CP-CX300WN, CP-CW250WN, CP-CW300WN, MS-1 and MS-1WL. The discovery feature will find all projectors on the network if the discovery feature is supported. Once the discovery is done, the discovery result is stored in the software and you can look up this result from “Configuration” window. [NOTE] Windows Security Alert will be shown on your display when the discovery function activates, if Windows Firewall is “On” on Windows XP SP2 or later. Please choose “Unblock” to add the software onto the exception list. Also other firewall security software may block the discovery function. In that case, please add the software to the safe list or disable firewall software when you use discovery function. 11 (2) Connection Setting RS-232C --- NETWORK --- Check the radio button and choose COM port number for serial connection. Check the radio button for network connection. Please enter the IP address of projector and port number. You can choose the projector from the discovered list if the discovery function is already run. The default port number of CP-X1250, CP-X1230, CP-X1200, CP-SX1350, CP-X445 and CP-X443 is 23. The default of CPX2, CPX4, CP-DW10N, CP-A100, CP-AW100N, CP-X205, CP-X206, CP-S245, CP-X255, CP-X256, CP-X265, CP-X268A, CP-X305, CP-X306, CP-X308, CP-X417, CP-X467, CP-X505, CP-X605, CP-X608, CP-X615, CP-WX625, CP-SX635, CP-X705, CP-X807, CP-X809, CP-X2010N, CP-X2011N, CP-X2510N, CP-X2511N, CP-X3010N, CP-X3011N, CP-WX3011N, CP-X4011N, CP-X10000, CP-WX11000, CP-SX12000, ED-A100, ED-A110, ED-AW100N, ED-AW110N, ED-D10N, ED-D11N, ED-X45N, ED-X8255, CP-WUX645N, CP-X4021N, CP-X5021N, CP-WX4021N, CP-A220N, CP-A221N, CP-A222WN, CP-A300N, CP-A301N, CP-A302WN, ED-A220N, CP-AW250N, CP-AW251N, CP-AW252WN, iPJ-AW250N, BZ-1, CP-AW2519N, CP-X2514WN, CP-X3014WN, CP-X4014WN, CP-WX3014WN, CP-X2021WN, CP-X2521WN, CP-X3021WN, CPX10WN, CPX11WN, CPWX12WN, CP-X8150, CP-X8160, CP-WX8240, CP-WX8255, CP-SX8350, CP-WU8440, CP-WU8450, CP-X2015WN, CP-X2515WN, CP-X3015WN, CP-X4015WN, CP-WX2515WN, CP-WX3015WN, CP-A352WN, CP-AW312WN, CP-AW3019WN, CP-DW25WN, CP-DW30WN, CP-D27WN, CP-D32WN, CP-AX2503, CP-AX3003, CP-AX3503, CP-AW2503, CP-AW3003, CP-X4022WN, CP-WX4022WN, CP-X5022WN, CP-WU8460, CP-WX8265, CP-X8170, CP-WU9410, CP-WU9411, CP-WX9210, CP-WX9211, CP-X9110, CP-X9111, CP-X3030WN, CP-X2530WN, CP-WX3030WN, CP-EX250N, CP-EX300N, CP-EW250N, CP-EW300N, CP-CX300WN, CP-CW250WN, CP-CW300WN, MS-1 and MS-1WL is 23 or 9715. 12 Projector List --- The list shows the projectors that you register. [Insert] : Insert new projector into the projector list. [Update] : Update selected projector setting and save changes. [Delete] : Delete selected projector from the projector list. When you manage multiple projectors at the same time, you need to pick one projector and select a checkbox in order to be a delegate for displaying CH selection and volume level. Please rarify IP settings to make sure the PJCtrl is able to communicate with the projector by ping command. (3) Configure Bottoms Click the Show Buttons TAB to configure which bottoms you want to use. Check the checkbox that you want to show as the button. The configuration window can be displayed if you make a right click on the task tray icon. Icon Size: Also you can choose icon size from 24, 36 or 48 dots. Always on top: “Always on top” option allows that the PJCtrl application always show up foreground. (4) Option Skip user check: Check “skip user check” option if you don’t need the user login process at application launch. If you need to check user account at each time, uncheck this option. Skip configuration dialog: Check “skip configuration dialog” option if you don’t need to show the configuration window at application launch. User Configuration: Launch Projector User Administration Tool. Edit CH Label: Display Edit CH Label window. 13 Configure CH label text that shows underneath each CH icon. The text length is depending on the icon size as shown below. Icon size 24x24: up to 4 characters Icon size 36x36: up to 6 characters Icon size 48x48: up to 8 characters This is an example how CH label is looks like. Update Interval: Set the interval period to update CH status from the projector. 3.7. Buttons Power ON: Power the projector on. Power OFF: Power the projector off. Input Source: Switch the input source (CH). The icon of current input channel is shown as “selected” icon (hollow). When you manage multiple projectors, the status of delegated projector is shown. Blank ON: Blank the screen. Blank OFF: Un-blank the screen. Volume: Volume up and down. The control bar appears when you click the icon. When you manage multiple projectors, the delegated projector’s value is displayed. Please note that the value may not the same among multiple projectors. Mute: Sound mute. Toggled. Freeze ON: Freeze image. Freeze OFF: Unfreeze image. 3.8. Advanced Control You can access the advanced control functions through Advanced Control Menu. Click the “ADV” icon to open the advanced control window. Choose the target projector to control. Advanced control items are depending on the projector model. 14 3.9. Image Send to Projector If the projector supports My Image (e-SHOT) feature, you can select My Image (e-SHOT) function. Click [Image Send] icon, the window [Send Image File to projector(s)] will be appeared. 3.10. My Image (e-SHOT) Mark projectors that you will transfer an image. Select the image file that should be transferred and stored number. The compatible image file is only PJ1 format file that can be created by Projector Image Tool (PJImg). And then, click the Send button to transfer image. The progress bar is shown during transfer. The status will change “OK” if it succeeds. [Note] - This feature is only available for CP-DW10N, CP-A100, CP-AW100N, CP-X205, CP-X206, CP-S245, CP-X255, CP-X256, CP-X265, CP-X305, CP-X306, CP-X505, CP-X605, CP-X615, CP-WX625, CP-SX635, CP-X705, CP-X2010N, CP-X2011N, CP-X2510N, CP-X2511N, CP-X3010N, CP-X3011N, CP-WX3011N, CP-X4011N, CP-X10000, CP-WX11000, CP-SX12000, ED-A100, ED-A110, ED-AW100N, ED-AW110N, ED-D10N, ED-D11N, ED-X45N, ED-X8255, CP-WUX645N, CP-X4021N, CP-X5021N, CP-WX4021N, CP-A220N, CP-A221N, CP-A222WN, CP-A300N, CP-A301N, CP-A302WN, ED-A220N, CP-AW250N, CP-AW251N, CP-AW252WN, iPJ-AW250N, BZ-1, CP-AW2519N, CP-X2514WN, CP-X3014WN, CP-X4014WN, CP-WX3014WN, CP-X2021WN, CP-X2521WN, CP-X3021WN, CPX10WN, CPX11WN, CPWX12WN, CP-X8150, CP-X8160, CP-WX8240, CP-WX8255, CP-SX8350, CP-WU8440, CP-WU8450, CP-X2015WN, CP-X2515WN, CP-X3015WN, CP-X4015WN, CP-WX2515WN, CP-WX3015WN, CP-A352WN, CP-AW312WN, CP-AW3019WN, CP-DW25WN, CP-DW30WN, CP-D27WN, CP-D32WN, CP-AX2503, CP-AX3003, CP-AX3503, CP-AW2503, CP-AW3003, CP-X4022WN, CP-WX4022WN, CP-X5022WN, CP-WU8460, CP-WX8265, CP-X8170, CP-WU9410, CP-WU9411, CP-WX9210, CP-WX9211, CP-X9110, CP-X9111, CP-X3030WN, CP-X2530WN, CP-WX3030WN, CP-CX300WN, CP-CW250WN, CP-CW300WN, MS-1 and MS-1WL. - Please verify the port setting on the projector and the port / authentication setting on the application. Once you select the image file and store location number, the “Send” button becomes available. The compatible image file is only PJ1 format file that can be created by Projector Image Tool (PJImg).And then, click the Send button to transfer image. The maximum size of transferred file is depending on the model. Please check the following list. 15 PJ1 format file CP-S245 / CP-X255 / ED-X8255 Less than equal 65, 280 byte CP-DW10N / CP-A100 / CP-AW100N / CP-X205 / CP-X206 / CP-X256 / CP-X265 / CP-X305 / CP-X306 / CP-X505 / CP-X605 / CP-X615 / CP-WX625 / CP-SX635 / CP-X705 / CP-X2010N / CP-X2011N / CP-X2510N / CP-X2511N / CP-X3010N / CP-X3011N / CP-WX3011N / CP-X4011N / CP-X10000 / CP-WX11000 / CP-SX12000 / ED-A100 / ED-A110 / ED-AW100N / ED-AW110N / ED-D10N / ED-D11N / ED-X45N / CP-WUX645N / CP-X4021N / CP-X5021N / CP-WX4021N / CP-A220N / CP-A221N / CP-A222WN / CP-A300N / CP-A301N / CP-A302WN / ED-A220N / CP-AW250N / CP-AW251N / CP-AW252WN / iPJ-AW250N / BZ-1 / CP-AW2519N / CP-X2514WN / CP-X3014WN / CP-X4014WN / CP-WX3014WN / CP-X2021WN / CP-X2521WN / CP-X3021WN / CPX10WN / CPX11WN / CPWX12WN / CP-X8150 / CP-X8160 / CP-WX8240 / CP-WX8255 / CP-SX8350 / CP-WU8440 / CP-WU8450 / CP-X2015WN / CP-X2515WN / CP-X3015WN / CP-X4015WN / CP-WX2515WN / CP-WX3015WN / CP-A352WN / CP-AW312WN / CP-AW3019WN / CP-DW25WN / CP-DW30WN / CP-D27WN / CP-D32WN / CP-AX2503 / CP-AX3003 / CP-AX3503 / CP-AW2503 / CP-AW3003 / CP-X4022WN / CP-WX4022WN / CP-X5022WN / CP-WU8460 / CP-WX8265 / CP-X8170 / CP-WU9410 / CP-WU9411 / CP-WX9210 / CP-WX9211 / CP-X9110 / CP-X9111 / CP-X3030WN / CP-X2530WN / CP-WX3030WN / CP-CX300WN / CP-CW250WN / CP-CW300WN / MS-1 / MS-1WL Less than equal 130,816byte JPEG file CP-X2011N / CP-X2511N / CP-X3011N / CP-WX3011N / CP-X4011N / ED-X45N / CP-WUX645N / CP-X4021N / CP-X5021N / CP-WX4021N / CP-A220N / CP-A221N / CP-A222WN / CP-A300N / CP-A301N / CP-A302WN / ED-A220N / CP-AW250N / CP-AW251N / CP-AW252WN / iPJ-AW250N / BZ-1 / CP-AW2519N / CP-X2514WN / CP-X3014WN / CP-X4014WN / CP-WX3014WN / CP-X2021WN / CP-X2521WN / CP-X3021WN / CPX10WN / CPX11WN / CPWX12WN / CP-X8150 / CP-X8160 / CP-WX8240 / CP-WX8255 / CP-SX8350 / CP-WU8440 / CP-WU8450 / CP-X2015WN / CP-X2515WN / CP-X3015WN / CP-X4015WN / CP-WX2515WN / CP-WX3015WN / CP-A352WN / CP-AW312WN / CP-AW3019WN / CP-DW25WN / CP-DW30WN / CP-D27WN / CP-D32WN / CP-AX2503 / CP-AX3003 / CP-AX3503 / CP-AW2503 / CP-AW3003 / CP-X4022WN / CP-WX4022WN / CP-X5022WN / CP-WU8460 / CP-WX8265 / CP-X8170 / CP-WU9410 / CP-WU9411 / CP-WX9210 / CP-WX9211 / CP-X9110 / CP-X9111 / CP-X3030WN / CP-X2530WN / CP-WX3030WN / CP-CX300WN / CP-CW250WN / CP-CW300WN / MS-1 / MS-1WL Less than equal 262,144byte 3.11. Software Version You can check the software version information to click “About” icon, or choose “About Projector Control Application” on the menu. 16