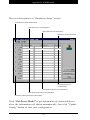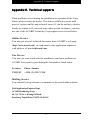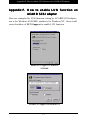
1
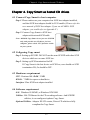
CONTENTS
Chapter 1. Introduction of Copy Smart ............................................................. 2
1.1 Overview ...................................................................................................... 2
1.2 Feature and specifications ........................................................................... 4
Chapter 2. Copy Smart hardware installation ................................................... 6
2.1 Verify your package contents ...................................................................... 6
2.2 Preparing for installation .............................................................................. 7
2.3 Installtion of CD-R/RW dirve ....................................................................... 8
2.4 Installation of CD-ROM dirve ..................................................................... 11
2.5 Installation of Copy Smart Cabinet ............................................................. 14
Chapter 3. Copy Smart as a stand-alone CD Duper .......................................... 17
3.1 Copy Smart control panel ........................................................................... 17
3.2 Operation of control panel .......................................................................... 18
Chapter 4. Copy Smart as hosted CD drives ..................................................... 21
4.1 Connect Copy Smart to host computer ....................................................... 21
4.2 Cofigruing Copy smart ................................................................................ 21
4.3 Hardware requirement ................................................................................. 21
4.4 Software requirement .................................................................................. 21
4.5 Copy Smart DIP switch adjustment ............................................................ 22
Chapter 5. Copy Smart Monitor ....................................................................... 23
5.1 Copy Smart Monitor utility ......................................................................... 23
Appendix A. CD drives fully supported by CopySmart .................................................... 2 5
Appendix
Appendix
Appendix
Appendix
Appendix
Appendix
B. How to avoid failure on duplication .............................................................. 2 6
C. SCSIDE in brief .................................................................................................... 2 7
D. SCSIDE utility ...................................................................................................... 2 8
E. Technical supports ............................................................................................... 3 1
F. How to enable LUN function on ACARD SCSI adapter .......................... 3 2
G. Benchmark of Copy Smart ............................................................................... 3 3
1
Chapter 1. Introduction of Copy Smart
Cha
pter 1. Intr
oduction of ARS-2020 Cop
y Smar
Chapter
Introduction
Copy
Smartt
1.1 Overview
PC users who want to backup their CD normally have go through
many steps by turning on their computer, launching the software,
setting up various parameters, and tiding up their computer sometimes up to one hour to get a CD backup. Obviously, a standalone
CD-ROM duplicator will easily resolve the little inconvenience and
drawback mentioned above.
There are some standalone SCSI type CD copier on the market, but
for those PC user who already have an IDE CD-ROM drive and an
IDE CD-R/RW drive, the only solution of having the standalone CD
duplicator is buy a new set of SCSI CD-ROM drive and the CD-R/
RW drive to assemble one.
ACARD Technology wants to help the PC users to protect their IDE
investment(s) by introducing the first standalone IDE CD duplicator
ARS-2020 Copy Smart, which allow the PC users putting their IDE
CD-ROM drive and CD-R/RW drive into a smart standalone
machine.
The ARS-2020 Copy Smart have its own switching power supply
(AC 110V~230V) which are special designed to provide the steady
power which required by the laser burning operation of the CD-R/
RW drive. Four simple pushbuttons panel is designed to provide copy
modes selection and one button easy copy operation.
And ARS-2020 Copy Smart have special designed, a very powerful
2
Chapter 1. Introduction of Copy Smart
fan installed which can keep it cool to protect your CD drives.
ACARD technology further add more values to PC users by making
the ARS-2020 Copy Smart connectable to a PC host computer, this
allow the PC users copy their valuable data from their PC to ARS2020 Copy Smart. A bonus Ultra SCSI add-on adapter, an ARS2020 SCSI interface extension and two duplication software are
provided by ACARD technology without additional cost. With the
optional True-50 50X (or 56X) CD-ROM drive, the ARS-2020 Copy
Smart users now have a 50X-plus Ultra SCSI CD-ROM, this will
make the ARS-2020 Copy Smart users a world class 50X Ultra
SCSI CD-ROM club member with just a minimum cost.
All this can be only possible by the ACARD continuous development
of both IDE and SCSI RISC chip and the patented SCSIDE
technology. The SCSIDE technology is a highly integrated System
On Chip (SOC) design based on a RISC IDE, a RISC SCSI and high
speed RISC CPU for two way SCSI-IDE command and data
translation. The RISC CPU command set is further implemented by
a flash ROM which provide the plug-and-play ATAPI drive function.
3
Chapter 1. Introduction of Copy Smart
1.2 Feature & Specificaions
1. Dedicated power supply and powerful fan for high precision steady CD
burning requirement.
2. Dimension: 180mm (W) x 165mm (H) x 290mm (D)
3. Pushbutton for copy mode selection which including:
-Test
-Test & copy
-Copy
-1X Copy
-Quick erase of CD-RW
4. Pushbutton for Write Speed selection which including:
-Auto
-16X/14X
-12X/10X
-8X/6X
-4X/2X
5. One pushbutton start
6. One pushbutton stop
7. Self diagnostics when power on
8. Progress light indication
9. Plug and Play ATAPI IDE CD-ROM support
10. Standalone IDE to IDE CD COPY controller
11. Standalone SCSI to Dual IDE command/data conversion controller
12. Build-in ACARD SCSIDE SOC (system on chip)
13. Standard Ultra-SCSI (20MB/sec) interface to host computer
14. Single SCSI ID selection with two SCSI LUN support
15. One PCI Ultra SCSI adapter for PC
16. Flash ROM for future drive support upgrade
17. CD format supported: All format
-DATA CD
4
Chapter 1. Introduction of Copy Smart
-Audio CD
-VCD, and other CD format
18. OS support:
-Win 95/98/ME
-Win NT/2000
-Linux
19. Software Bundle:
-Ha! CD Burner Copy Software
-Copy Smart Monitor
-SCSIDE utility
20. Optional: True-50 50X SCSI CD-ROM-Auto
5
Chapter 2. Copy Smart hardware installation
Cha
pter 2. Cop
y Smar
dwar
e installa
tion
Chapter
Copy
Smartt har
hard
are
installation
2.1 Verify your package content
When you open the ARS-2020 box, you should find the following items:
1. MALARS2020X010-0
2. AEC6710S2P22C00
Operation manual (x1)
Ultra-SCSI PCI adapter (x1)
3. CBL50HPM50HPMR-0
4. CBL40X3X40C00F-0
50 pins Ultra-SCSI external cable (x1)
IDE internal cable (x2)
5. CASARS20200000-0
6. CDD5X74X6801X2
ARS-2020 main system (x1)
CD Software (x1)
7. STDCDRX50XI00I-0
8. STDCDRWXXXI00I-0
True-50 50X CD-ROM drive(optional)
CD-R/RW drive (optional)
9. POWCODXUS00000-0
Power cord
If your system come with the optional CD-ROM drive and CD-R/RW drive,
all you have to do is connect the power cord to the ARS-2020 and turn on
the power on the back plane. And after the about 45 second self
diagnostics, you are ready to go.
If your system come with the optional CD-ROM drive, you may have to
install your own CD-R or CD-RW drive. Please follow the following procedure of installation.
Ultra-SCSI PCI adapter ( x 1 )
Power cord ( x 1 )
ARS-2020 main system ( x 1 )
CD software ( x 1 )
50-pin Ultra-SCSI
external cable ( x 1 )
Operation manual ( x 2 )
IDE internal cable ( x 2 )
* CD-ROM and CD-R/RW drives are optional
6
Chapter 2. Copy Smart hardware installation
2.2 Preparing for installation
Step 1: Remove the back cover of Copy Smart.
Step 2: Remove the metal sleeve of Copy Smart.
7
Chapter 2. Copy Smart hardware installation
2.3 Installation of CD-R/RW dirve
Step 1: Adjust your CD-R/RW drive to master drive. (Please refer to your
CD-R/RW drive user’s manual)
Step 2: Place your CD-R/RW drive into lower drive bay of Copy Smart.
(Please Note!! CD-R/RW drive must be installed to lower drive bay only!!)
8
Chapter 2. Copy Smart hardware installation
Step 3: Connect IDE cable from Copy Smart controller board to 40-pin IDE
interface connector of CD-R/RW drive.
Step 4: Connect one of 4-pin DC power cords to the DC input connector of
CD-R/RW drive.
9
Chapter 2. Copy Smart hardware installation
Step 5: Screw up the device from sliding.
10
Chapter 2. Copy Smart hardware installation
2.4 Installation of CD-ROM dirve
Step 1: Adjust your CD-ROM drive to master drive. (Please refer to your
CD-ROM drive user’s manual)
Step 2: Place your CD-ROM drive into upper device bay of Copy Smart.
(Please note: CD-ROM drive must be installed to upper drive bay only!!)
11
Chapter 2. Copy Smart hardware installation
Step 3: Connect IDE cable from Copy Smart controller board to 40-pin IDE
interface connector of CD-R/RW drive.
Step 4: Connect the other DC power cord to the CD-ROM drive DC input
connector.
12
Chapter 2. Copy Smart hardware installation
Step 5: Connect audio cable to CD-R/RW drive audio port.
Step 6: Screw up the device.
13
Chapter 2. Copy Smart hardware installation
2.5. Installation of Copy Smart Cabinet
Step 1: Slide Copy Smart into sleeve.
Step 2: Screw up to fix sleeve.
14
Chapter 2. Copy Smart hardware installation
Step 3: Place back cover onto backside of Copy Smart, and fix it.
Step 4: Done!
15
Chapter 2. Copy Smart hardware installation
Step 5: Plug power cord into power connector of backside. (Copy Smart is
designed for AC 110V~230V of Power Supply)
16
Chapter 3. Copy Smart as a stand-alone CD duper
Cha
pter 3. Cop
y Smar
Chapter
Copy
Smartt as a stand-alone CD Duper
3.1 Copy Smart control panel
While Copy Smart works a stand-alone CD-Duper, its control panel is
especially user-friendly for CD duplication. With this control panel, you can
make your works more easily and increase productivites.
Control panel, and its descriptions of LEDs, and buttons.
Function mode LED
Power on LED
OK/Busy LED
Write Speed LED
(Writing progress in percentage
LED while CD duplication)
Function selection button
Failed LED
Hosted LED
Writes CD button
Write speed selection button
17
Stop process button
Chapter 3. Copy Smart as a stand-alone CD duper
3.2 Operation of control panel
FUNCTION selection:
Press Function selection button to choose function
mode, and LED lighted up to indicate which has
selected. Here are all of function mode description
below:
TEST - Emulates CD duplication only.
TEST & COPY - Emulates CD duplication first. when
it done, copy CD automatically.
COPY - Duplicate CD disc.
1X COPY - Write CD disc with less speed.
QUICK ERASE - Erase CD-RW disk contents. This
function is only for CD-RW diskettes and for CD-RW drives.
WRITE SPEED selection:
Press Write speed selection button to choose one of
writing speeds, and LED lighted up to indicate which
has selected. (It just depends on the ability of CD-R/
RW drive which has mounted in Copy Smart and CDR/RW disk which you use, if writing speed that user
selected is over mounted drive or disc ability, Copy
Smart may indicate lower speed in accordance with
the speed limit of CD-R/RW drive.) Normally, the LED
lighted up to indicate which the left sign speed has
selected (16X, 12X, 8X, or 4X). However, press write
speed selection button with 0.5 second then release it,
the LED lighted up with flash in 2 times/sec to indicate
which the right sign speed has selected (14X, 10X, 6X,
or 2X).
While AUTO mode has choosen, Copy Smart will select optimized speed for writing.
18
Chapter 3. Copy Smart as a stand-alone CD duper
WRITING PROGRESS INDICATION:
The same row with writing speed LED lights, those also
indicated writing job progress while Copy Smart duplicating CD.
During the writing CD progress, press write speed selection button will change the LED lights indication of
meaning. This row of LED lights are as indicators for CD
duplication progress in percentage. User could know how
much progress has done.
GO button
Press “GO” button to start the process you selected. To
avoid the mis-touch, user should press this button for at
least 0.5 sec to work.
STOP button
Press “STOP” button to cancel processing job. To avoid
mis-touch, user should press this button for at least one
sec. to work. (Please note, this button becomes invalid
while Copy Smart works on “QUICK ERASE” mode.)
19
Chapter 3. Copy Smart as a stand-alone CD duper
Other LED lights indication:
POWER - Power is on when LED lighted up.
OK/BUSY - Process is completed when LED
lighted up. While LED blink light
indicates that Copy Smart is on
working.
FAIL - LED lighted up indicates that duplication process is failed.
HOST - LED lighted up indicates that Copy
Smart is controlled by host computer.
20
Chapter 4. Copy Smart as hosted CD drives
Cha
pter 4. Cop
y Smar
Chapter
Copy
Smartt as hosted CD dri
drivves
4.1 Connect Copy Smart to host computer
Step 1: Please make sure your computer has SCSI host adapter installed,
and that SCSI host adapter should be LUN enable. (Please refer the
user manual of SCSI host adapter. If you use ACARD’s SCSI
adapter, you could refer to Appendix F.)
Step 2: Connect Copy Smart to SCSI host
adapter with external SCSI cable.
Note: ARS2020 Copy Smart is use just one SCSI ID
only, and provides two CD drives for host
computer, please check LUN function enable
on your system.
Adjust SCSI ID
4.2 Cofigruing Copy smart
Step 1: Setting up SCSI ID. DO NOT use the same SCSI ID with other SCSI
devices which are on same SCSI bus.
Step 2: Setting up SCSI termination On/Off.
If Copy Smart is the last device on SCSI bus, user should set SCSI
termination ON, Or should be OFF.
4.3 Hardware requirement
CPU: Pentium-100 / RAM: 32MB
H.D.D.: 75MB free space on hard drive.
Interface: Ultra SCSI host adapter installed
4.4 Software requirement
O.S.: Windows 95/98/ME, or Windows NT4/2000
Utilities: Ha! CD Burner for the CD recording software. And SCSIDE
utilities, it can configures/updates Copy Smart.
Optional Utilities: Adaptec EZ-CD creator, Direct-CD which are fully
compliant for Copy Smart.
21
Chapter 4. Copy Smart as hosted CD drives
4.5 Copy Smart DIP switch adjustment
switch 1: turn on is for SCSI ID 4
switch 2: turn on is for SCSI ID 2
switch 3: turn on is for SCSI ID 1
switch 7: turn on is for SCSI termination on
other switches: Reserve
ON
1
1
2
3
7
4, 5,
2
3
4
6
7
8
=====> ON - SCSI ID 4
=====> ON - SCSI ID 2
=====> ON - SCSI ID 1
=====> ON - Terminator On
6, 8 =====> Reserve
DIP switch adjustment
22
5
Chapter 6. CopySmart Monitor
Cha
pter 5. Cop
y Smar
Chapter
Copy
Smartt Monitor
5.1 Copy Smart Monitor utility
Copy Smart monitor is a utility for Copy Smart operations. It is the
same as Copy Smart control panel which has embeded on Cabinet.
This software also provides “Source” and “Destination” CD drives
for your reference.
And you don’t need click “GO” and “STOP” for seconds, just click
that with your mouse button, they will work.
23
Chapter 6. CopySmart Monitor
Copy Smart monitor utility provides more information than control
panel on cabinet. You may find quantities of installed SCSI host
adapters on your workstation, and also you may find quantities of
Copy Smart machines connected to your workstation.
This example shown that your workstation has 2 SCSI
host adapters, and 1 Copy Smart machine is connected.
You may click the button to choose SCSI adapter or Copy
Smart which you want.
This example shown that your workstation has 1 SCSI
host adapter, and 2 Copy Smart machines are connected.
You may click the button to choose SCSI adapter or Copy
Smart which you want.
24
Appendix A. CD drives fully supported by Copy Smart
Appendix A. CD dri
y suppor
ted b
y Cop
ySmar
drivves full
fully
supported
by
CopySmar
ySmartt
A.1 List of IDE CD-ROM drives that supported by Copy Smart
We recommend the following IDE CD-ROM drives that can work
with Copy Smart properly.
AOpen 40X, AOpen 48X, AFREEY 40X, AFREEY 45X, AFREEY 50X,
ASUS 34X, ASUS 40X, ASUS 50X, BTC 48X, BTC 50X, TEAC 40X
A.2 List of IDE CD-R/RW drives that supported by Copy Smart
The following IDE CD-R/RW drives can work with Copy Smart
properly.
PLEXTOR PX-W8432T, PLEXTOR PX-W1210TA, AOpen 9420, AOpen
9624, BTC 621E, BTC 4424, CREATIVE 4424, HP 8100i, HP 8200i,
HP 9100, HP 9200, HP 9300, JVC 4424, PANASONIC 7582,
PANASONIC 7585, PANASONIC 7586, PHILIPS PCA460RW,
PHILIPS PCRW804K, RICOH 7040A, RICOH 7060A, RICOH 7080A,
SONY CRX100E, SONY CRX120E, SONY CRX140E, SONY CRX145E,
SONY CRX160, YAMAHA 4416E, YAMAHA 8424E, YAMAHA 2100E,
TEAC 4432
A.3 Professional Recommendation
CD-ROM
CD-R/RW
-- AFREEY 50X
-- High speed: SONY 160, 145E
Low speed: YAMAHA 4416, 8424, RICOH 7080A
Please visit our web site to get the newest list (http://www.acard.com)
or E-Mail to [email protected]
25
Appendix B. How to avoid failure on duplication??
Appendix B. How to avoid failure on duplication??
To avoid failure on CD duplication, you must pay attention to following
suggestions.
1. Because process can not be interrupted during CD duplication, buffer
is needed on CD dupe process. if “reading speed” is not to keep up
with “writing speed”, “Buffer underrun” will occurs, and job will be
failed. To prevent that, you may:
a. Choose lower writing speed.
b. Writes CD to image file first, then wirtes to CD-R/RW disc from this file.
c. Defrag hard drives on your system before CD recording.
d. Do not run another program while CD duplicating.
e. Make Copy Smart ventilative, keep it cool.
2. Clean source CD disc befrore you do CD duplication.
3. Choose nice quality CD-R/RW disc for duplication.
4. Keep sustained power supply, you may consider to select UPS as a
power supplier.
5. Let Copy Smart takes a rest occasionally.
26
Appendix C. SCSIDE in brief
Appendix C. SCSIDE in brief
SCSIDE is a revolutionary invention developed by ACARD Technology
Corp. It offers the unbelievable function that convert IDE data flow into
SCSI bus. It will make your desktop, workstation, or even server more
smarter.
Refer to the diagram below to see how SCSIDE works. No matter
what type of IDE device you have, ATA hard drives or ATAPI CD
drives, you could easily plug it on our ready kit to start your SCSI
adventure.
Please note, different from other devices, you don’t have to install driver
to active SCSIDE series of products. With simple Plug-and-Play
function, you’ll operate your IDE devices just like SCSI devices.
27
Appendix D. SCSIDE utility
Appendix D. SCSIDE utility
ACARD Technology Corp. provides “SCSIDE utility” which has
bundled with Copy Smart. User can use this utility to update, backup
firmware in Copy Smart, and use this utility to emulate device models
for some applications.
At first, launch the “SCSIDE utility” program as following shown
picture.
Then, the main screen of SCSIDE utility (SCSIDE Setup) will
appears. You may choose SCSI host adapter and connected device
which you want on this setup screen.
28
Appendix D. SCSIDE utility
You may backup SCSIDE firmware to file, or may update newer
SCSIDE firmware, just by clicking “Advance>>” on SCSIDE Setup
screen.
Because some applications need real model name of devices, such
as some CD recording programs do recognize CD-R/RW drive
model, or it can not to work if it don’t know the CD-R/RW device.
SCSIDE utility just provides emulation program to solve this
problem, you may use it to emulate connected CD-R/RW device as
any model name which you like, or you need.
By clicking “Modify Emulation Config” button on setup screen, you
can do this job.
29
Appendix D. SCSIDE utility
Here are descriptions of “Emulation Setup” screen:
Cross this box to enable emulation mode.
Real vendor name of connected device.
Real model name of connected device.
Real revision of connected device.
User-defined revision of
connected device.
User-defined model name of connected device.
User-defined vendor name of connected device.
Cross box to enable devices which to be emulated.
Click “Get Device Model” to get information of connected device
drive, the information will shown automatically. Just click “Update
Config” button to save your configuration.
30
Appendix E. Technical supports
Appendix E. Tec
hnical suppor
ts
echnical
supports
If any problems occure during the installation or operation of the Copy
Smart, please contact the dealer. The dealer could help you out with
most of system conflict and technical issues. If you do not have a dealer
nearby to contact or if you need some other special assistance, you may
use one of the ACARD Technoloy Corp support service listed below.
Online Service
You may get most of technical document from ACARD’s web page
(http://www.acard.com), or send email to our application engineers
with address of [email protected].
Fax Service
You may use your touch-tone fax machine to send your problems to
ACARD fax system by just dialing the fax numbers listed below.
Location
Phone Number
TAIWAN
+ 886 (2) 8512 2548
Mailing Service
You can mail your questions or comments to the postal address below.
Field Application Engineer Dept.
ACARD Technology Corp.
6F, No. 78, Sec 1, Kwang Fu Road,
Sanchung, Taipei Hsien, TAIWAN, R.O.C.
31
Appendix F. How to enable LUN function on ACARD SCSI adapter
Appendix F. How to enable LUN function on
ACARD SCSI adapter
Here are examples for LUN function setting by ACARD SCSI adapter,
one is for Windows 95/98/ME, another is for Windows NT. Users could
cross checkbox of LUN Support to enable LUN function.
Enable LUN support on Windows
95/98/ME.
Enable LUN support on Windows NT
32
Appendix G. Benchmark of Copy Smart
Appendix G. Benc
hmar
k of Cop
y Smar
Benchmar
hmark
Copy
Smartt
ASTAR True-50
50X IDE CD-ROM
ASTAR True-50
50X IDE CD-ROM
w ith
ARS-2020 Copy Smart
Plextor 40X SCSI CD-ROM
WinBench 98 Overall
(KBytes/Sec.)
2200
2750
1920
Overall Playback
(KBytes/Sec.)
2200
2750
1920
Access Time
(Milliseconds)
73.9
80.7
97.1
CPU Utilization
(Percent Used)
96.5
8.21
6.5
Transfer Rate/Inside
(KBytes/Sec.)
3520
3940
3100
Transfer Rate/Outside
(KBytes/Sec.)
3150
7630
5810
33
MALARS2020X011-0