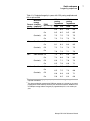
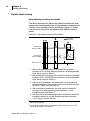
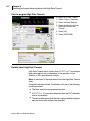
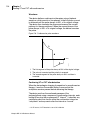
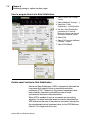
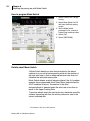
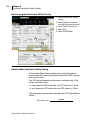
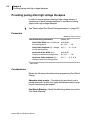
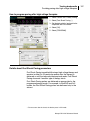
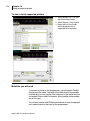
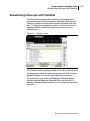
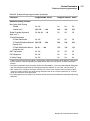
1
/C/Documents and Settings/xurvet1/Desktop/198482001B_view.pdf MARQUIS™ DR 7274 Dual Chamber Implantable Cardioverter Defibrillator Reference Manual Caution: Federal law (USA) restricts this device to sale by or on the order of a physician or properly licensed practitioner. MARQUIS DR 7274 Reference Manual A guide to the operation and programming of the Model 7274 Marquis DR Dual Chamber Implantable Cardioverter Defibrillator 0 0 The following are trademarks of Medtronic: Active Can®, Cardiac Compass, Checklist, Decision Channel, Flashback®, GEM®, Leadless™ ECG, Marker Channel, MARQUIS, Patient Alert, PR Logic, Quick Look, QuickLink, RapidRead, T-Shock Table of contents Introduction xv Using this manual xv Contacting technical support Customer education xv References xvi Notice xvi Abbreviations and acronyms Part I xv xvii Quick overview 1 Quick reference 3 Physical characteristics 4 Magnet application 5 Longevity projections 6 Replacement indicators Typical charge times 8 10 High voltage therapy energy 10 Stored data and diagnostics 11 New and enhanced features 14 Patient management 14 Tachyarrhythmia detection 15 Tachyarrhythmia therapy 16 Bradycardia pacing 16 EP studies 17 2 The Marquis DR system 19 System overview 20 Detecting and treating tachyarrhythmias 21 Treating bradycardia 22 Monitoring for real-time and stored data 22 Conducting electrophysiologic tests 22 Alerting the patient to system events 22 Indications and usage 23 Contraindications 23 Patient screening 23 Marquis DR 7274 Reference Manual iv Table of contents 3 Emergency therapy 25 Delivering emergency therapies 26 Effect on system operation 26 Aborting an emergency therapy 26 On-screen and display panel buttons 27 Temporary parameter values 27 How to deliver emergency 30 joule defibrillation 28 How to deliver emergency cardioversion 28 How to deliver emergency fixed burst pacing 29 How to deliver emergency VVI pacing 30 Part II Device implant and patient follow-up procedures 4 Implanting the ICD 33 Overview 34 Preparing for an implant 34 Equipment for an implant 34 Sterile supplies 35 How to prepare for implanting 35 Replacing an ICD 36 How to explant and replace an ICD 37 Positioning the leads 37 Using transvenous leads 37 Using epicardial leads 38 Surgical incisions 39 Testing sensing and pacing thresholds Parameters 40 Considerations 40 39 Connecting the leads to the ICD 40 How to connect the lead to the device 41 Testing defibrillation operation and effectiveness 42 High voltage implant values 42 Binary search protocol 43 How to prepare for defibrillation threshold testing 44 How to perform defibrillation threshold testing 45 Positioning and securing the ICD 46 How to position and secure the device 46 Completing the implant procedure 47 Marquis DR 7274 Reference Manual Table of contents How to complete programming the device 47 5 Conducting a patient follow-up session 49 Patient follow-up guidelines 50 Verifying the status of the implanted system 50 Verifying accurate detection and appropriate therapy 51 Considerations 51 Verifying effective bradycardia pacing Considerations 53 Part III 52 Configuring the ICD for the patient 6 Detecting tachyarrhythmias 57 Detection overview 58 Suspending tachyarrhythmia detection 60 Setting up sensing 61 Parameters 61 Considerations 61 How to program sensitivity 63 Details about sensing 64 Detecting VF episodes 66 Parameters 66 Considerations 67 Restrictions 68 How to program VF detection 68 Details about VF detection 68 Detecting VT episodes 70 Parameters 70 Considerations 70 Restrictions 71 How to program VT detection 72 Details about VT detection 72 Detecting FVT episodes 76 Parameters 76 Considerations 76 Restrictions 77 How to program FVT detection 78 Details about FVT detection 78 Detecting tachyarrhythmia episodes with Combined Count 81 Marquis DR 7274 Reference Manual v vi Table of contents Details about Combined Count detection 81 Monitoring episodes for termination or redetection 84 Parameters 84 Considerations 84 How to program redetection parameters 85 Details about episode termination and redetection 85 Enhancing detection with PR Logic criteria 88 Parameters 88 Considerations 89 Restrictions 90 How to program the PR Logic detection criteria 91 Details about PR Logic pattern and rate analysis 91 Details about the PR Logic detection criteria 95 Enhancing VT detection with the Stability criterion 97 Parameters 97 Considerations 97 How to program Stability 98 Details about Stability 98 Detecting double tachycardias 100 Details about double tachycardia detection 100 Detecting prolonged tachyarrhythmias with High Rate Timeout Parameters 101 Considerations 101 How to program High Rate Timeout 102 Details about High Rate Timeout 102 Key terms 7 103 Treating tachyarrhythmia episodes 109 Treating VF with defibrillation 110 Parameters 110 Considerations 111 Restrictions 112 How to program VF therapies 112 Details about VF therapy 112 Treating VT and FVT with antitachycardia pacing Parameters for all ATP therapies 120 Parameters for Burst therapy 121 Parameters for Ramp therapy 121 Parameters for Ramp+ therapy 122 Marquis DR 7274 Reference Manual 120 101 Table of contents Considerations 122 Restrictions 123 How to program ATP therapies 123 Details about ATP therapies 124 Treating VT and FVT with cardioversion 130 Parameters 130 Considerations 131 Restrictions 132 How to program cardioversion therapies 132 Details about cardioversion therapy 133 Optimizing therapy with Smart Mode and Progressive Episode Therapies 139 Parameters 139 Considerations 139 Restrictions 140 How to program Smart Mode 140 Details about Smart Mode 141 How to program Progressive Episode Therapies 142 Details about Progressive Episode Therapies 142 Key terms 8 143 Treating bradycardia 147 Providing basic pacing therapy 148 Parameters 148 Considerations 149 Restrictions 151 How to program bradycardia pacing parameters Details about basic bradycardia pacing 152 151 Dual-chamber pacing 154 Parameters 154 Considerations 156 Details about dual-chamber pacing 156 Programming considerations for atrial rates 161 Single chamber pacing 164 Parameters 164 Considerations 164 Details about single chamber pacing 165 Enhancing pacing for optimal cardiac output 167 Parameters 167 Marquis DR 7274 Reference Manual vii viii Table of contents Considerations 169 Restrictions 170 How to program Rate Response 170 Details about Rate Responsive Pacing 171 How to program Rate Adaptive AV 175 Details about Rate Adaptive AV 175 How to program Single Chamber Hysteresis 176 Details about Single Chamber Hysteresis 177 How to program Ventricular Rate Stabilization 178 Details about Ventricular Rate Stabilization 178 Adjusting the pacing rate with Mode Switch Parameters 180 Considerations 180 Restrictions 181 How to program Mode Switch 182 Details about Mode Switch 182 180 Preventing competitive atrial pacing 184 Parameters 184 Considerations 184 How to program Non-Competitive Atrial Pacing 185 Details about Non-Competitive Atrial Pacing 185 Detecting and preventing pacemaker-mediated tachycardia 189 Parameters 189 How to Program PVC Response and PMT Intervention 190 Details about PVC Response 190 Details about PMT Intervention 191 Providing Ventricular Safety Pacing 193 Parameters 193 Restrictions 193 How to program Ventricular Safety Pacing 194 Details about Ventricular Safety Pacing 194 Providing pacing after high voltage therapies 196 Parameters 196 Considerations 196 How to program pacing after high voltage therapies 197 Details about Post Shock Pacing parameters 197 Key terms Marquis DR 7274 Reference Manual 198 Table of contents 9 Optimizing charge time and device longevity 203 Optimizing charge time 204 Parameters 204 Considerations 204 How to evaluate charging performance 205 Details about managing charge time 205 Optimizing device longevity Considerations 207 Key terms Part IV 207 208 Evaluating and managing patient treatment 10 Using the programmer 211 Connecting the programmer hardware 212 Using an external printer 213 To view a list of supported printers 214 Materials you will need 214 To connect the printer to your programmer 216 Using the programming head 218 During an episode in progress 218 During marker transmissions 218 How capacitor charging affects the light array 219 Alternative program and interrogate buttons 219 Display screen features 219 Programmer status bar display 220 Live Rhythm Monitor window 221 Task area 222 Command bar 224 Tool palette 224 Buttons 226 Setting programmer preferences 226 How to set the programmer time and date 227 How to set audio preferences 227 How to select a different language 228 How to check the software version number 229 How to set printing preferences 229 How to set reports preferences 230 Starting and ending patient sessions 230 Marquis DR 7274 Reference Manual ix x Table of contents How to start a patient session 231 How to end a patient session 232 Automatic interrogation 232 Viewing live waveforms 233 Parameters 233 How to use the Adjust window 234 How to use the waveform adjustment button bar Details about the live rhythm monitor 235 Recording live waveforms 240 Printing a report while recording live ECG 241 Saving and retrieving device data 242 Considerations 242 How to save ICD data to a disk 243 How to read ICD data from a disk 243 Saving data to a disk 245 Data file names 245 Reading device data from diskette 245 Printing reports 246 How to print a report Print Queue 247 Key terms 11 247 248 Using system evaluation tools 249 A summary of system evaluation tools 250 Automatic daily measurements 250 Taking a quick look at device activity 251 How to use Quick Look 251 Quick Look observations 252 Using the Patient Alert feature 253 Parameters 253 Considerations 255 How to program the Patient Alert feature 258 Instructing the patient 258 Viewing the Patient Alert events 259 How to view the Patient Alert events 260 Streamlining follow-ups with Checklist 261 How to select and use a checklist 262 How to create, edit, and delete a checklist 263 Marquis DR 7274 Reference Manual 235 Table of contents Key terms 12 264 Setting up and viewing collected data 265 A summary of data collection 266 Setting up data collection 267 Parameters 267 Considerations 268 How to set up data collection 269 Details about data collection parameters 269 How to clear collected data 273 Collecting lead performance data 274 Daily lead impedance and EGM amplitude measurements Sensing integrity counter 275 274 Viewing the episode and therapy efficacy counters 275 How to view and print counter data 276 Details about the episode and therapy efficacy counters 277 Therapy counters 279 Viewing episode data 280 How to view episode data 281 Details about episode data 282 How to view an Interval Plot 284 How to view an EGM Strip 285 How to display the episode text information 287 Viewing Flashback Memory 288 How to view the Flashback Memory 289 Viewing battery and lead status data 290 How to view battery and lead status data 292 Viewing lead performance trends 292 How to view lead performance trend graphs 293 Using Cardiac Compass to view long term clinical trends 294 How to print a Cardiac Compass report 296 Details on Cardiac Compass trend data 296 Viewing and entering patient information 301 How to view and enter new patient information 303 Displaying and printing patient information 303 Automatic device status monitoring 304 Device status indicator warnings 304 How to respond to an electrical reset 305 Marquis DR 7274 Reference Manual xi xii Table of contents Key terms 13 306 Testing the system 311 Testing overview 312 Evaluating the underlying rhythm 312 Considerations 312 How to Perform an Underlying Rhythm test 313 Measuring pacing thresholds 313 Parameters 314 Considerations 315 How to perform a Pacing Threshold Test Measuring lead impedance 316 Considerations 316 How to perform a Lead Impedance test Details about the Lead Impedance test 315 316 317 Measuring EGM Amplitude 318 Parameters 318 Considerations 318 Restrictions 319 How to perform an EGM Amplitude test 320 Testing the device capacitors 320 Considerations 320 How to perform a Charge/Dump test Key terms 14 321 322 Conducting Electrophysiologic Studies EP Study overview 323 324 Inducing VF with T-Shock 326 Parameters 326 Considerations 327 Restrictions 327 How to deliver a T-Shock induction 328 Details about T-Shock induction 328 Inducing VF with 50 Hz Burst 329 Parameters 329 Considerations 330 How to deliver a 50 Hz Burst induction 331 Details about 50 Hz Burst induction 332 Inducing an arrhythmia with Manual Burst 332 Marquis DR 7274 Reference Manual Table of contents Parameters 332 Considerations 333 How to deliver a Manual Burst induction 334 Details about Manual Burst induction 334 Inducing an arrhythmia with PES 335 Parameters 335 Considerations 336 How to deliver a PES induction 337 Details about PES induction 337 Delivering a manual therapy 338 Parameters for manual defibrillation and cardioversion Parameters for manual ATP therapies 338 Considerations 340 How to deliver a manual therapy 340 Details about manual therapies 340 Key terms 15 338 341 Solving system problems 343 Overview 344 Solving sensing problems 345 Solving tachyarrhythmia detection problems Solving tachyarrhythmia therapy problems 347 348 Solving bradycardia pacing problems 349 Responding to device status indicators 351 Key terms Part V 352 Appendices A Warnings and precautions General warnings 357 358 Storage and handling 358 Resterilization 359 Device implantation and ICD programming 359 Lead evaluation and lead connection 361 Follow-up testing 362 Explant and disposal 363 Medical therapy hazards 363 Marquis DR 7274 Reference Manual xiii xiv Table of contents Home and occupational environments 365 B Device Parameters 367 Emergency settings 368 Detection parameters Therapy parameters 369 371 Bradycardia pacing parameters 373 System maintenance parameters Data collection parameters 376 377 System test and EP study parameters Fixed parameters 381 Patient information parameters 383 Programmer symbols 384 Parameter Interactions Window Parameter interlocks 386 Index 387 Marquis DR 7274 Reference Manual 378 385 Introduction Introduction Using this manual Before implanting the ICD, it is strongly recommended that you: ■ Refer to the product literature packaged with the ICD for information about prescribing the ICD. ■ Thoroughly read this manual and the technical manuals for the leads used with the device. ■ Discuss the procedure and the ICD system with the patient and any other interested parties, and provide them with any patient information packaged with the ICD. Contacting technical support Medtronic employs highly trained representatives and engineers located throughout the world to serve you and, upon request, to provide training to qualified hospital personnel in the use of Medtronic products. In addition, Medtronic maintains a professional staff of consultants to provide technical consultation to product users. For medical consultation, Medtronic can often refer product users to outside medical consultants with appropriate expertise. For more information, contact your local Medtronic representative, or call or write Medtronic at the appropriate address or telephone number listed on the back cover. Customer education Medtronic invites physicians to attend an education seminar on the complete ICD system. The course includes indications for use, an overview of ICD system functions, implant procedures, and patient management. Marquis DR 7274 Reference Manual xv xvi Introduction References The primary reference for background information is Zacouto FI, Guize LJ. Fundamentals of Orthorhythmic Pacing. In: Luderitz B, ed. Cardiac Pacing Diagnostic and Therapeutic Tools. New York: Springer-Verlag; 1976: 212-218. See these additional references for more background information: ■ Singer I, Ed. Implantable Cardioverter-Defibrillator. Armonk, NY: Futura Publishing Co. 1994. ■ Singer I, Barold SS, Camm AJ, Eds. Nonpharmacological Therapy of Arrhythmias for the 21st Century: The State of the Art. Armonk, NY: Futura Publishing Co. 1998. ■ Estes M, Manolis AS, Wang P, Eds. Implantable Cardioverter-Defibrillators. New York, NY: Marcel Dekker, Inc. 1994. ■ Kroll MW, Lehmann MH, Eds. Implantable Cardioverter-Defibrillator Therapy: The Engineering-Clinical Interface. Norwell, MA: Kluwer Academic Publishers 1996. Notice This software is provided as an informational tool for the end user. The user is responsible for accurate input of patient information into the software. Medtronic makes no representation as to the accuracy or completeness of the data input into the software. MEDTRONIC SHALL NOT BE LIABLE FOR ANY DIRECT, INDIRECT, INCIDENTIAL OR CONSEQUENTIAL DAMAGES TO ANY THIRD PARTY WHICH RESULTS FROM THE USE OF THE INFORMATION PROVIDED IN THE SOFTWARE. Marquis DR 7274 Reference Manual Abbreviations and acronyms Abbreviations and acronyms A- Atrial AF Atrial Fibrillation AFib/AFlutter Atrial Fibrillation and/or Atrial Flutter ARP Atrial Refractory Period ATP Antitachycardia Pacing AVP Atrial Vulnerable Period BOL Beginning of Life bpm beats per minute CNID Combined (VT and VF) Number of Intervals to Detect CV Cardioversion DF/Defib Defibrillation ECG Electrocardiogram EGM Electrogram EOL End of Life ERI Elective Replacement Indicator FDI Fibrillation Detection Interval FTI Fast Ventricular Tachycardia Detection Interval FVT Fast Ventricular Tachycardia ICD Implantable Cardioverter Defibrillator J joules min-1 reciprocal minutes; for example, pacing pulses per minute ms milliseconds mV millivolts NCAP Non-Competitive Atrial Pacing NID Number of Intervals to Detect NST Non-sustained Tachycardia Marquis DR 7274 Reference Manual xvii xviii Abbreviations and acronyms PAC Premature Atrial Contraction PAV Paced A-V Delay PES Programmed Electrical Stimulation PMT Pacemaker-Mediated Tachycardia P-P an atrial interval ppm paces or pulses per minute P-R an interval between a P-wave and the subsequent R-wave PVAB Post Ventricular Atrial Blanking period PVARP Post Ventricular Atrial Refractory Period PVC Premature Ventricular Contraction RAAV Rate Adaptive A-V delay RNID Number of Intervals to Redetect R-P an interval between an R-wave and the subsequent P-wave R-R a ventricular interval SAV Sensed A-V Delay ST/Sinus Tach Sinus Tachycardia SVT Supraventricular Tachycardia TDI Tachycardia Detection Interval V volts V- Ventricular VF Ventricular Fibrillation VF NID VF Number of Intervals to Detect VRS Ventricular Rate Stabilization VSP Ventricular Safety Pacing VT Ventricular Tachycardia VT NID VT Number of Intervals to Detect Marquis DR 7274 Reference Manual Part I Quick overview Marquis DR 7274 Reference Manual Quick reference 1 Physical characteristics Magnet application 4 5 Longevity projections 6 Replacement indicators Typical charge times 8 10 High voltage therapy energy 10 Stored data and diagnostics 11 New and enhanced features 14 Marquis DR 7274 Reference Manual 1 Chapter 1 Physical characteristics Physical characteristics Table 1-1. ICD physical characteristicsa Volume 36 cc Mass 75 g H x W x Db 68.3 mm x 50.8 mm x 13.9 mm Surface area of device can 66 cm2 Radiopaque IDc PKC Materials in contact with human tissued Titanium / polyurethane / silicone rubber Battery Lithium silver vanadium oxide Connectors Two IS-1 connectors for pacing and sensing, Two DF-1 connectors for high voltage therapy, Active Can electrode (programmable) Device Port Connector Type Software Name HVX SVC DF-1 A SVC RV DF-1 HVB V RV Can n/a HVA, Can V IS-1 bipolar A IS-1 bipolar Can 74lead.eps Suture holes 74Suture.eps 4 a b c d Measurements are nominal values based on CAD (computer aided design) model measurements and are rounded to the nearest unit. Grommets may protrude slightly beyond the can surface. Engineering series number follows the radiopaque code. These materials have been successfully tested for the ability to avoid biological incompatibility. The device does not produce an injurious temperature in the surrounding tissue. Marquis DR 7274 Reference Manual Quick reference Magnet application Magnet application Bringing a magnet close to the device triggers changes in device operation as shown in Table 1-2. When the magnet is removed, the device returns to its programmed operations. Table 1-2. Effects of magnet application on the device Pacing mode as programmed Pacing rate and interval as programmeda VF, VT, and FVT detection suspendedb Patient Alert audible tones with programmable alert(s) enabled: (20 seconds or less) ■ continuous tone (Test)c ■ on/off intermittent tone (seek follow-up) ■ high/low dual tone (urgent follow-up) with programmable alerts disabled: ■ no tone ■ high/low dual tone (urgent follow-up) a b c Rate response adjustments are suspended while a Patient Alert tone sounds. Detection resumes if telemetry is established and the application software is running, or it resumes after the application software has started. The Test tone does not sound if “VF Detection/Therapy Off” is the only alert enabled. Marquis DR 7274 Reference Manual 5 6 Chapter 1 Longevity projections Longevity projections Longevity estimates are based on accelerated battery discharge data and device modeling at 60 ppm (min-1) pacing rate, with: ■ 2.5 V pacing pulse amplitude, 0.4 ms pacing pulse width, and 30 J delivered therapy energy (see Table 1-3) ■ 3 V pacing pulse amplitude, 0.4 ms pacing pulse width, and 30 J delivered therapy energy (see Table 1-4) This model assumes default automatic capacitor formation setting. As a guideline, each full energy charge decreases device longevity by approximately 24 days. Device longevity is affected by how certain features are programmed, such as EGM pre-storage. For more information, see “Optimizing device longevity” on page 207. Considerations for using EGM pre-storage When the EGM pre-storage feature is programmed off, the device starts to store EGM following the third tachyarrhythmia event and also provides up to 20 seconds of information before the onset of the tachyarrhythmia, including: ■ AA and VV intervals ■ Marker Channel ■ interval plot Flashback When the EGM pre-storage feature is programmed on, the device also collects up to 20 seconds of EGM information before the onset of the arrhythmia. In a patient who uniformly repeats the same onset mechanisms, the greatest clinical benefit of pre-onset EGM storage is achieved after a few episodes are captured.To maximize the effectiveness of the EGM pre-storage feature and optimize device longevity, consider these programming options: ■ Turn pre-storage on to capture possible changes in the onset mechanism following significant clinical adjustments, for example, device implant, medication changes, and surgical procedures. ■ Turn pre-storage off once you have successfully captured the information of interest. Marquis DR 7274 Reference Manual Quick reference Longevity projections Table 1-3. Projected longevity in years with 2.5V pacing amplitude and 0.4 ms pulse width 500 ohm 900 ohm Maximum pacing pacing energy impedance impedance EGM Percent charging b pacing frequencya pre-storage DDD VVI DDD VVI 0% Semi-Annual Off 8.6 8.6 8.6 8.6 On 8.5 8.5 8.5 8.5 Off 7.5 7.5 7.5 7.5 On 7.3 7.3 7.3 7.3 Semi-Annual Off 8.3 8.5 8.5 8.6 On 8.1 8.4 8.3 8.5 Off 7.2 7.4 7.3 7.5 On 7.0 7.3 7.1 7.3 Semi-Annual Off 7.5 8.2 8.0 8.5 On 7.4 8.0 7.9 8.2 Off 6.6 7.1 7.0 7.3 On 6.5 7.0 6.8 7.1 Semi-Annual Off 6.7 7.7 7.5 8.1 On 6.5 7.5 7.3 8.0 Off 6.0 6.8 6.6 7.1 On 5.8 6.5 6.4 6.9 Quarterly 15% Quarterly 50% Quarterly 100% Quarterly a b Maximum energy charging frequency may include full energy therapy shocks or capacitor formations. The data provided for programming EGM pre-storage on is based on a 6 month period (two 3-month follow-up intervals) over the life of the device. Additional use of EGM pre-storage reduces longevity by approximately 25% or 3 months per year. Marquis DR 7274 Reference Manual 7 8 Chapter 1 Replacement indicators Table 1-4. Projected longevity in years with 3V pacing amplitude and 0.4 ms pulse width 500 ohm 900 ohm Maximum pacing pacing energy impedance impedance EGM Percent charging b pacing frequencya pre-storage DDD VVI DDD VVI 0% Semi-Annual Off 8.5 8.5 8.5 8.5 7.5 7.5 7.5 On 7.3 7.3 7.3 7.3 Semi-Annual Off 8.1 8.5 8.4 8.6 On 8.0 8.3 8.2 8.4 Off 7.1 7.3 7.3 7.5 On 6.9 7.2 7.1 7.3 Semi-Annual Off 7.2 8.0 7.8 8.3 On 7.0 7.8 7.6 8.1 Off 6.4 7.0 6.8 7.2 On 6.2 6.8 6.7 7.0 Semi-Annual Off 6.2 7.3 7.1 8.0 Quarterly a b 8.6 7.5 Quarterly 100% 8.6 On Quarterly 50% 8.6 Off Quarterly 15% 8.6 On 6.0 7.1 7.0 7.7 Off 5.5 6.5 6.3 6.9 On 5.4 6.3 6.1 6.8 Maximum energy charging frequency may include full energy therapy shocks or capacitor formations. The data provided for programming ECG pre-storage on is based on a 6 month period (two 3-month follow-up intervals) over the life of the device. Additional use of EGM pre-storage reduces longevity by approximately 25% or 3 months per year. Replacement indicators Battery voltage and messages about replacement status appear on the programmer display and on printed reports. Table 1-5 lists the Elective Replacement Indicator (ERI) and the End of Life (EOL) conditions. Marquis DR 7274 Reference Manual Quick reference Replacement indicators Table 1-5. Replacement indicators Elective Replacement (ERI) ≤ 2.62 V End of Life (EOL) 3 months after ERI ERI date – The programmer displays the date when the battery reached ERI on the Quick Look and Battery and Lead Measurements screens. Temporary voltage decrease – The battery voltage temporarily decreases following a high voltage charge. If a battery measurement is taken immediately after a high voltage charge, the ERI or EOL indicator may be displayed. However, this is a temporary status which will return to normal when the battery has recovered from the charge. EOL indication – If the programmer indicates that the device is at EOL, replace the device immediately. Post-ERI conditions – EOL device status is defined as three months following an ERI indication assuming the following post-ERI conditions: 100% DDD pacing at 60 ppm (min-1), 3 V, 0.4 ms; 500 Ω pacing load; and six 30 J charges. EOL may be indicated before the end of three months if the device exceeds these conditions. Marquis DR 7274 Reference Manual 9 10 Chapter 1 Typical charge times Typical charge times The most recent capacitor charge time appears on the programmer display and on printed reports and can be evaluated using the Charge/Dump test (see Table 1-6). Table 1-6. Typicala full energy charge times At Beginning of Life (BOL) 5.9 seconds At Elective Replacement (ERI) 7.5 seconds a These charge times are typical when the capacitors are fully formed. High voltage therapy energy The stored energy of the device is derived from the peak capacitor voltage and is always greater than the energy delivered by the device. Table 1-7 compares the programmed energy levels delivered by the device to the energy levels stored in the capacitors before delivery. Marquis DR 7274 Reference Manual Quick reference Stored data and diagnostics Table 1-7. Comparing delivereda (programmed) and storedb energy levels Energy (J) Delivered a/ Programmed a b c Energy (J) Stored b Charge Timec (sec) 30 35 5.9 28 33 26 31 24 Delivered a/ Programmed Storedb Charge Timec (sec) 8 9.4 1.6 5.6 7 8.3 1.4 5.2 6 7.1 1.2 28 4.7 5 5.9 1.0 22 26 4.4 4 4.7 0.8 20 24 4.0 3 3.6 0.6 18 21 3.5 2 2.4 0.4 16 19 3.2 1.8 2.2 0.4 15 18 3.0 1.6 2.0 0.3 14 16 2.7 1.4 1.7 0.3 13 15 2.5 1.2 1.5 0.3 12 14 2.4 1.0 1.2 0.2 11 13 2.2 0.8 1.0 0.2 10 12 2.0 0.6 0.8 0.1 9 11 1.9 0.4 0.5 0.1 Energy delivered at connector block into a 75 ohm load. Energy stored at end of charge on capacitor. Typical charge time at Beginning of Life (BOL) with fully formed capacitors, rounded to the nearest tenth of a second. Stored data and diagnostics Table 1-8. Stored data and diagnostics Episode data Tachy episodes 150 VF/VT/FVT episodes: intervals, text, EGM EGM capacity for tachy episodes 14 minutes of dual-channel EGM, or 23.5 minutes of single-channel EGM SVT/NST episodes 50 SVT/NST episodes: intervals, text, EGM (the device does not usually store detailed episode records for NST episodes) Marquis DR 7274 Reference Manual 11 12 Chapter 1 Stored data and diagnostics Table 1-8. Stored data and diagnostics (continued) EGM capacity for SVT/NST episodes 2 minutes of dual-channel EGM, or 3.6 minutes of single-channel EGM Brady episodes 53 mode switch episodes EGM sources 9 options: atrial / ventricular / far-field EGM options Store before onset; Store during charging Flashback memory 2000 intervals (containing both A-A and V-V): before latest VF, before latest VT, and before interrogation Counter data Detection counters Lifetime total, since cleared, and since last session Episode counters Episodes: ■ VF, FVT, and VT ■ Atrial Fibrillation / Atrial Flutter episodes ■ Sinus Tach episodes ■ Other 1:1 SVT episodes ■ NST episodes ■ Mode switch episodes Percentage pacing: ■ AS-VS, AS-VP, AP-VS, AP-VP percentages Additional counters: ■ Single PVCs and PVC runs ■ Rate stabilization pulses and runs Therapy efficacy counters Counts for each VF, FVT, VT Therapy: ■ Delivered ■ Successful ■ Unsuccessful ■ Intervention (manually aborted) Total number of aborted shocks Other stored data Patient Alert events Up to 10 log entries: text and date for the first time an alert is triggered between interrogations Battery and lead measurements Battery voltage, last capacitor formation, last charge, lead impedance, EGM amplitude measurements, last high voltage therapy, and sensing integrity counter Marquis DR 7274 Reference Manual Quick reference Stored data and diagnostics Table 1-8. Stored data and diagnostics (continued) Lead performance trends 14 days of daily measurements plus 80 weeks of weekly minimum and maximum measurements: ■ Lead impedance: atrial pacing, ventricular pacing, defibrillation pathway, and SVC lead (if used) ■ EGM amplitude: atrial (P-waves), ventricular (R-waves) Cardiac Compass trends 14 months of measurement trends: ■ VT and VF episodes per day ■ High voltage therapies delivered per day ■ Ventricular rate during VT or VF ■ Episodes of non-sustained tachycardia per day ■ Heart rate variability ■ Total daily time in AF or AT ■ Ventricular rate during AF or AT ■ Percent pacing per day ■ Patient activity ■ Average day and night ventricular heart rate Marquis DR 7274 Reference Manual 13 14 Chapter 1 New and enhanced features New and enhanced features The following features are new or changed from the 7275 GEM III DR ICD. Patient management RapidRead telemetry – Communication between the device and programmer is approximately 20 times faster than telemetry in previous Medtronic ICD devices. The magnitude of improvement depends on the amount and type of data that is interrogated. RapidRead telemetry is more reliable and has an increased range that makes placing the programming head easier. Cardiac Compass trends report – This report displays up to 14 months of trend data related to tachyarrhythmia episodes, heart rate, and patient activity. See “Using Cardiac Compass to view long term clinical trends” on page 294. Patient Alert – The alert duration when a magnet is applied to the device is now 20 seconds. The device also provides several new alerts: ■ SVC (HVX) lead impedance out of range ■ Active Can off without SVC ■ DOO/VOO mode programmed ■ VF Detection programmed off, or fewer than four VF therapies enabled for at least six hours ■ charge circuit timeout occurred ■ excessive charge time ERI For more information, see “Using the Patient Alert feature” on page 253. EGM amplitude trends – The device automatically measures R-wave and P-wave EGM amplitudes every day. These daily measurements are included in the data displayed on the Lead Performance Trends screen. See “Setting up data collection” on page 267. Marquis DR 7274 Reference Manual Quick reference New and enhanced features EGM amplitude test – You can use the EGM Amplitude test to measure R-wave and P-wave EGM amplitudes. The results are reported on the EGM Amplitude Test screen. See “Measuring EGM Amplitude” on page 318. Lead impedance measurement for SVC (HVX) – Along with other lead impedance measurements, the device provides an independent SVC (HVX) measurement to check the integrity of the supplementary high voltage electrode. See “Measuring lead impedance” on page 316. Leadless ECG signal – If a supplementary high voltage electrode is placed in the SVC, the device provides the Leadless ECG signal through either the Can to SVC (HVX) or RV (HVB) to SVC (HVX) EGM source. See “Setting up data collection” on page 267. Expanded pre-onset EGM storage – The device can now store up to 20 seconds of EGM before a tachycardia starts. See “Setting up data collection” on page 267. Smart Auto Cap Formation – When the Auto Cap Formation Interval is set to Auto, the formation interval automatically adjusts to optimize device longevity and charge times. See “Smart Auto Cap” on page 206. Ending a patient session – The device audits the programmed parameter settings when you end a patient session and alerts you if any of the settings are atypical. See “Starting and ending patient sessions” on page 230. Tachyarrhythmia detection VT Monitoring – VT detection can be set to Monitor, which allows the device to detect and record VT episodes without delivering therapy or influencing VF detection. See “Monitoring episodes for termination or redetection” on page 84. Marquis DR 7274 Reference Manual 15 16 Chapter 1 New and enhanced features High Rate Timeout – High Rate Timeout can turn off detection enhancements (Stability, PR Logic criteria) if a high rate episode is longer than a programmed duration. See “Details about High Rate Timeout” on page 102. Tachyarrhythmia therapy Episode confirmation during and after charging – The device continually monitors the ventricular rhythm during and after charging for cardioversion or defibrillation (when VF confirmation is active) to ensure the arrhythmia is present before delivering the high voltage shock. See “Confirming VF after initial detection” on page 115 and “Confirming VT or FVT after detection” on page 134. Programmable Active Can – If a supplementary electrode is connected to the SVC (HVX) port, you can deselect the device Can as a high voltage electrode. See “Delivery pathway electrodes” on page 113. Bradycardia pacing Accelerometer-based rate response – The device uses an accelerometer to provide rate responsive pacing. Additional bradycardia pacing modes – The device provides asynchronous pacing in the DOO and VOO pacing modes and provides the ODO mode to disable pacing. See Chapter 8, "Treating bradycardia" on page 147. Enhanced AT-style Mode Switch – Mode Switch episodes are detected using a combination of the median atrial rate and the AF evidence criterion. See “Details about Mode Switch” on page 182. Marquis DR 7274 Reference Manual Quick reference New and enhanced features EP studies Defibrillation threshold testing support – The T-Shock and 50 Hz Burst induction screens allow you to monitor time between inductions, program ventricular sensing and VF therapy settings, adjust induction settings, select manual therapies, and retrieve episode records after therapy. See “How to perform defibrillation threshold testing” on page 45. Backup VVI pacing during atrial inductions – You can choose to have the device deliver backup ventricular pacing during Manual Burst and PES inductions that are delivered to the atrium. See “EP Study overview” on page 324. Marquis DR 7274 Reference Manual 17 18 Chapter 1 New and enhanced features Marquis DR 7274 Reference Manual The Marquis DR system 2 System overview 20 Indications and usage Contraindications 23 Patient screening 23 23 Marquis DR 7274 Reference Manual 2 20 Chapter 2 System overview System overview The 7274 Marquis DR Dual Chamber Implantable Cardioverter Defibrillator (ICD) system is an implantable medical device system that automatically detects and treats episodes of ventricular fibrillation, ventricular tachycardia, fast ventricular tachycardia, and bradyarrhythmia. The ICD system includes three major components: ■ ICD The ICD senses the electrical activity of the patient’s heart via the sensing electrodes of the implanted atrial and ventricular leads. It then analyzes the heart rhythm based on selectable sensing and detection parameters. If the ICD detects a tachyarrhythmia, it delivers defibrillation, cardioversion, or antitachycardia pacing therapy to the patient’s heart. If the ICD identifies a bradyarrhythmia, it delivers bradycardia pacing therapy to the patient’s heart. ■ Leads The ICD can be used with transvenous or epicardial defibrillation leads. The lead system should consist of bipolar or paired unipolar1 pacing/sensing leads in each chamber of the heart and one or two high voltage cardioversion/ defibrillation electrodes. You can program the Active Can device case as a high voltage electrode. The pacing and sensing electrodes in each chamber sense cardiac activity and deliver pacing stimuli. ■ Programmer and software The Medtronic 9790C2 programmer and 9966 application software allow you to 1 2 ■ configure the detection, therapy, and bradycardia features for your patient ■ perform electrophysiological studies and system tests ■ monitor, display, or print patient cardiac activity information With an appropriate unipolar to bipolar adapter kit. With the model 9767 or 9767L programming head Marquis DR 7274 Reference Manual The Marquis DR system System overview For information about: ■ indications, contraindications, lead compatibility, warnings and precautions, and patient selection, see the Marquis DR 7274 Implant Manual, which accompanies each device. ■ basic programmer and software desktop functions that are not included in Chapter 10, "Using the programmer" on page 211, see the manual accompanying the programmer. ■ installing the 9767 or 9767L programming head, see the manual accompanying the programming head. ■ implanting leads, refer to the manuals accompanying the leads. Detecting and treating tachyarrhythmias The ICD monitors the cardiac rhythm for short ventricular intervals that may indicate the presence of VF, VT, or FVT. ■ Upon detection of VF, the ICD delivers a biphasic defibrillation shock of up to 30 joules. If the VF episode persists, up to five more individually programmed defibrillation shocks can be delivered. ■ Upon detection of VT, the ICD delivers either a Ramp, Ramp+, or Burst antitachycardia pacing therapy or a biphasic cardioversion shock of up to 30 joules synchronized to a ventricular depolarization. If the VT episode persists, up to five more individually programmed VT therapies can be delivered. You can also program the ICD to monitor the VT episode without delivering therapy. ■ Upon detection of FVT, the ICD delivers either a Ramp, Ramp+, or Burst antitachycardia pacing therapy or a biphasic cardioversion shock of up to 30 joules synchronized to a ventricular depolarization. If the FVT episode persists, up to five more individually programmed FVT therapies can be delivered. You can program the ICD to distinguish between true ventricular arrhythmias and rapidly conducted supraventricular tachycardia (SVT) and withhold therapy for SVT. You can also program the ICD to detect a double tachycardia (an unrelated ventricular arrhythmia occurring simultaneously with an SVT), so that therapy is not withheld for a ventricular arrhythmia in the presence of an SVT. Marquis DR 7274 Reference Manual 21 22 Chapter 2 System overview Treating bradycardia The ICD provides dual chamber rate responsive bradycardia pacing to optimize hemodynamics. An internal accelerometer senses the patient’s physical activity, allowing the ICD to increase and decrease the pacing rate in response to changes in the level of activity. Monitoring for real-time and stored data The ICD and programmer provide real-time information on detection and therapy parameters and status during a patient session. The ICD also provides accumulated data on device operation, including stored electrograms, detected and treated tachyarrhythmia episodes, bradycardia interventions, and the efficacy of therapy. The Cardiac Compass report provides up to 14 months of clinically significant data, including arrhythmia episodes, therapies delivered, physical activity, heart rate, and bradycardia pacing activities. All of this information can be printed and retained in the patient’s file or saved in electronic format on a floppy diskette. Conducting electrophysiologic tests You can use the system to conduct non-invasive electrophysiologic studies including manual delivery of any of the ICD therapies to manage an induced or spontaneous tachyarrhythmia. Alerting the patient to system events You can use the programmable Patient Alert monitoring feature to notify the patient with audible tones if certain conditions related to the leads, battery, charge time, and therapies occur. The patient can then respond based on your prescribed instructions. Marquis DR 7274 Reference Manual The Marquis DR system Indications and usage Indications and usage The implantable cardioverter defibrillator is intended to provide ventricular antitachycardia pacing and ventricular defibrillation for automated treatment of life threatening ventricular arrhythmias. Contraindications The Marquis DR system is contraindicated for ■ patients whose tachyarrhythmias may have transient or reversible causes, such as acute myocardial infarction, digitalis intoxication, drowning, electrocution, electrolyte imbalance, hypoxia, or sepsis. ■ patients with incessant VT or VF ■ patient who have a unipolar pacemaker ■ patients whose primary disorder is bradyarrhythmias or atrial arrhythmias Patient screening Other optional screening procedures could include exercise stress testing to determine the patient’s maximum sinus rate, and cardiac catheterization to determine if there is a need for concomitant surgery and/or medical therapy. Marquis DR 7274 Reference Manual 23 24 Chapter 2 Patient screening Marquis DR 7274 Reference Manual Emergency therapy 3 Delivering emergency therapies 26 How to deliver emergency 30 joule defibrillation How to deliver emergency cardioversion 28 How to deliver emergency fixed burst pacing How to deliver emergency VVI pacing 28 29 30 Marquis DR 7274 Reference Manual 3 26 Chapter 3 Delivering emergency therapies Delivering emergency therapies The device provides the following emergency therapies: ■ defibrillation ■ cardioversion ■ fixed burst pacing ■ emergency VVI pacing The default emergency therapy is 30 joule defibrillation. When you select [Emergency] and [DELIVER], the device charges and delivers a biphasic 30 joule shock along the AX>B pathway1. The programmer resets the emergency defibrillation energy to 30 joules each time you select [Emergency]. Emergency cardioversion and fixed burst values remain as selected for the duration of the session. To return to other programming functions from an Emergency screen, select [Exit Emergency]. Effect on system operation The device suspends the automatic detection features when emergency defibrillation, cardioversion, or fixed burst pacing therapies are delivered. Detection is not suspended during emergency VVI pacing. Removing the programming head or pressing [Resume] turns detection on again. Aborting an emergency therapy As a safety precaution, the programmer also displays an [ABORT] button which immediately terminates any emergency therapy in progress. 1 If Active Can is turned off, the defibrillation is delivered between the HVX and HVB electrodes. Marquis DR 7274 Reference Manual Emergency therapy Delivering emergency therapies On-screen and display panel buttons The on-screen [Emergency] button and the red mechanical Emergency button by the programmer display panel function the same at all times. Red Emergency Button Functions the same as on-screen [Emergency] button. The on-screen [DELIVER] button and the yellow-on-blue mechanical Deliver button by the programmer display panel function the same during emergency operations only. The mechanical Deliver button operates only during emergency operations. Yellow-on-blue Deliver Button Functions the same as on-screen [DELIVER], but only during Emergency functions. Temporary parameter values Emergency tachyarrhythmia therapies use temporary values that do not change the programmed parameters of the device.1 These values are not in effect until you select [DELIVER]. After the tachyarrhythmia therapy is complete, the device reverts to its programmed values. 1 Delivery of Emergency VVI Pacing changes the programmed bradycardia pacing values to the emergency values (see page 30). Marquis DR 7274 Reference Manual 27 28 Chapter 3 Delivering emergency therapies How to deliver emergency 30 joule defibrillation 1. Position the programming head over the device. 2. Select [Emergency]. 3. Accept the defibrillation energy shown on the screen, or select Energy and select a new value from the window. 4. Select [DELIVER]. If delivery is not confirmed, verify that the programming head is properly positioned and select [Retry] or [Cancel]. 3 4 2 How to deliver emergency cardioversion 1. Position the programming head over the device. 2. Select [Emergency]. 3. Select [Cardioversion]. 4. Accept the cardioversion energy shown on the screen, or select Energy and select a new value from the window. 3 4 5 2 Marquis DR 7274 Reference Manual 5. Select [DELIVER]. If delivery is not confirmed, verify that the programming head is properly positioned and select [Retry] or [Cancel]. Emergency therapy Delivering emergency therapies How to deliver emergency fixed burst pacing 1. Position the programming head over the device. 2. Select [Emergency]. 3. Select [Fixed Burst]. 4. Accept the pacing interval shown on the screen, or select Interval for a new interval value. 3 4 5 2 5. Select [BURST Press and Hold]. If delivery is not confirmed, the programmer displays an error window. Verify that the programming head is properly positioned. Select [OK] from the window and reselect [BURST Press and Hold]. Marquis DR 7274 Reference Manual 29 30 Chapter 3 Delivering emergency therapies How to deliver emergency VVI pacing 1. Position the programming head over the device. 2. Select [Emergency]. 3. Select [VVI Pacing]. 3 4 2 4. Select [PROGRAM]. A successful programming sets the device to the following maximum output bradycardia pacing values. ■ Pacing Mode: VVI ■ Lower Rate: 70 ppm (70 min-1) ■ V. Amplitude: 6 V ■ V. Width: 1.6 ms ■ V. Pace Blanking: 240 ms ■ Hysteresis: Off ■ Ventricular Rate Stabilization: Off If programming is not confirmed, verify that the programming head is properly positioned and select [Retry] or [Cancel]. Marquis DR 7274 Reference Manual Part II Device implant and patient follow-up procedures Marquis DR 7274 Reference Manual Implanting the ICD 4 Overview 34 Preparing for an implant Replacing an ICD 34 36 Positioning the leads 37 Testing sensing and pacing thresholds Connecting the leads to the ICD 39 40 Testing defibrillation operation and effectiveness Positioning and securing the ICD Completing the implant procedure 42 46 47 Marquis DR 7274 Reference Manual 4 34 Chapter 4 Overview Overview The tasks for implanting an ICD include 1. Preparing for an implant 2. Replacing an ICD 3. Positioning the leads 4. Testing sensing and pacing thresholds 5. Connecting the leads to the ICD 6. Testing defibrillation operation and effectiveness 7. Positioning and securing the ICD 8. Completing the implant procedure These tasks are described in the sections that follow. Preparing for an implant Warning: Keep a back-up external defibrillator available during the implant for transthoracic rescue when arrhythmias are induced. Equipment for an implant ■ Model 9790c programmer and Model 9767 or 9767L programming head ■ 9966 software application ■ 8090 Analyzer lead analysis device or equivalent pacing system analyzer ■ external defibrillator ■ 5358 Defibrillator Implant Support Device and software application (optional) Marquis DR 7274 Reference Manual Implanting the ICD Preparing for an implant Sterile supplies ■ Marquis DR ICD and lead system components ■ Programming head sleeve or programming head ■ Analyzer cables ■ Lead introducers appropriate for the lead system ■ Extra stylets of appropriate length and shape How to prepare for implanting Set up the implant support instrument When using an implant support instrument such as the 5358 Defibrillator Implant Support Device: 1. Calibrate any monitoring or recording equipment while recording the EGM and marker outputs of the support instrument. 2. Verify the high energy output of the support instrument by delivering a high energy defibrillation shock into the test load. Set up the programmer and start the application 1. Set up the programmer as described in the instructions provided with the programmer. 2. Install the Marquis DR Model 9966 software on the programmer, if it is not already installed. 3. Place the programming head over the device and start the application. Select the device model or select [Auto identify]. Note: The programmer automatically interrogates the device when the application starts. Marquis DR 7274 Reference Manual 35 Chapter 4 Replacing an ICD 36 Preprogram the device Before opening the sterile package, prepare the ICD for implant as follows: 1. Check the “use by” date printed on the package. Do not implant the device after the “use by” date because the battery’s longevity could be reduced. 2. Interrogate the ICD, and print a full summary report. 3. Confirm that the battery voltage is at least 3.0 V at room temperature.a If the device has been exposed to lower temperatures or has delivered a recent high voltage charge, the battery voltage will be temporarily lower. 4. Set up data collection parameters and the ICD internal clock (see page 269). 5. Perform a manual capacitor formation (see page 320). 6. Program the therapy and pacing parameters to values appropriate for the patient (see page 151). Ensure that all tachyarrhythmia detection is programmed Off (see page 58). a Use the Quick Look screen to verify the voltage, see page 251. Replacing an ICD If you are replacing a previously implanted ICD, turn off ICD detection and therapies before explanting. When implanting the ICD with a chronic lead system, perform the following evaluations to ensure appropriate detection and therapy: ■ Check the integrity of the chronic high voltage leads with a test shock, chest X-ray, and inspection. ■ Perform chronic pacing and sensing measurements. ■ Measure high voltage lead impedances. ■ Test defibrillation efficacy. ■ Confirm adequate sensing during VF. ■ Ensure proper fit of the lead connectors in the ICD connector block. Marquis DR 7274 Reference Manual Implanting the ICD Positioning the leads Notes: ■ To meet the implant requirements, it may be necessary to reposition or replace the chronic leads or to add a third high voltage electrode. ■ Any unused leads that remain implanted must be capped. How to explant and replace an ICD 1. Program all tachyarrhythmia detection Off. 2. Dissect the leads and the ICD free from the surrounding tissues in the surgical pocket. Be careful not to nick or breach the lead insulation during the process of exposing the system. 3. Loosen each setscrew, and gently retract the lead from the connector block. 4. Remove the ICD from the surgical pocket. 5. If the connector pin of any implanted lead shows signs of pitting or corrosion, replace the implanted lead with a new lead. The damaged lead should be discarded and replaced to assure the integrity of the device system. 6. Measure sensing, pacing, and defibrillation efficacy using the replacement ICD or an implant support instrument. 7. Evaluate the defibrillation efficacy of the replacement system. Positioning the leads Implant endocardial leads according to the supplied instructions, unless suitable chronic leads are already in place. Do not use any lead with this device without first verifying connector compatibility (refer to the Marquis DR 7274 Implant Manual). Transvenous or epicardial leads may be used. A bipolar atrial lead with closely spaced pacing and sensing electrodes is recommended. Using transvenous leads Use standard transvenous implant techniques to position the ventricular lead tip in the right ventricular apex and the atrial pacing lead tip high on the right atrial appendage. Follow the general guidelines below for initial positioning of other transvenous leads (the final positions are determined by defibrillation efficacy tests): Marquis DR 7274 Reference Manual 37 38 Chapter 4 Positioning the leads ■ SVC (HVX) lead: Place the lead tip high in the innominate vein, approximately 5 cm proximal to the right atrium (RA) and SVC junction. ■ SQ patch: Place the patch along the left mid-axillary, centered over the fourth-to-fifth intercostal space. ■ CS lead: Advance the lead tip to just under the left atrial appendage, if possible. If using a subclavian approach, position the lead laterally to avoid pinching the lead body between the clavicle and the first rib. Warning: Pinching the lead can damage the lead conductor or insulation, which may cause unwanted high voltage therapies or result in the loss of sensing or pacing therapy. Using epicardial leads A variety of surgical approaches can be used to implant epicardial leads, including a limited left thoracotomy or median sternotomy. A typical placement may use an anterior right ventricular patch as the RV (HVB) and a posterolateral left ventricular patch as SVC (HVX). Follow the general guidelines below for positioning epicardial leads: ■ If unipolar epicardial pacing leads are used, position the electrodes about 1 to 2 cm apart to reduce electromagnetic interference, and route the leads together with several loose twists. ■ Suture the smooth face of each patch lead against the epicardium or pericardium in locations that produce optimal defibrillation. ■ Place the patches so that they encompass the maximum amount of cardiac mass and they have approximately equal amounts of mass between them. ■ Ensure that the patches do not overlap and the electrode portions do not touch. ■ Avoid placing extra-pericardial patches over the phrenic nerve. Marquis DR 7274 Reference Manual Implanting the ICD Testing sensing and pacing thresholds Surgical incisions A single-incision submuscular or subcutaneous approach is recommended when the ICD is implanted in the pectoral region. Make the implant pocket about 1.5 times the size of the ICD. Submuscular implant – An incision extending over the deltoid-pectoral groove typically provides access to the cephalic and subclavian veins as well as the implant pocket. Place the ICD sufficiently medial to the humeral head to avoid interference with shoulder motion. Subcutaneous implant – A transverse incision typically permits isolation of the cephalic vein. Place the ICD far medially to keep the leads away from the axilla. Make sure that the upper edge of the ICD remains inferior to the incision. Testing sensing and pacing thresholds Sensing and pacing tests include the following measurements: ■ EGM amplitude ■ slew rate ■ pacing threshold ■ pacing lead impedance Medtronic recommends that you use an 8090 Analyzer lead analysis device to perform sensing and pacing measurements. If you use a Pacing System Analyzer (PSA), perform both atrial and ventricular measurements via the ventricular channel of the PSA. Refer to the technical manual for the Analyzer you use to find details on performing sensing and pacing measurements. Marquis DR 7274 Reference Manual 39 40 Chapter 4 Connecting the leads to the ICD Parameters Measured sensing and pacing values must meet the following specific requirements at implant. Table 4-1. Sensing and pacing values at implant Measurement Acute Transvenous Leads Chronic Leads R- wave amplitude ≥ 5 mV ≥ 3 mV P- wave amplitude ≥ 2 mV ≥ 1 mV atrial ≥ 0.5 V/s ≥ 0.3 V/s ventricular ≥ 0.75 V/s ≥ 0.5 V/s Slew rate: Capture a thresholda: atrial ≤ 1.5 V ≤ 3.0 V ventricular ≤ 1.0 V ≤ 3.0 V At 0.5 ms pulse width Considerations When measuring sensing and pacing values, measure between the tip (cathode) and ring or coil (anode) of each bipolar pacing/sensing lead. For unipolar epicardial pacing leads, either electrode can be the cathode; use the configuration that yields the lower pacing threshold. Note: Do not measure the intracardiac EGM telemetered from the ICD to assess sensing. Connecting the leads to the ICD For more detailed information about lead/connector compatibility, see the Marquis DR 7274 Implant Manual, or contact Medtronic Technical Services at 1-800-723-4636. Marquis DR 7274 Reference Manual Implanting the ICD Connecting the leads to the ICD Table 4-2. Lead connections SVC V RV 74lead.eps A Can Device Port Connector Type Software Name SVC DF-1 HVX RV DF-1 HVB Can n/a HVA, Can V IS-1 bipolar A IS-1 bipolar Warning: Loose lead connections may result in inappropriate sensing and failure to deliver necessary arrhythmia therapy. Caution: Use only the torque wrench supplied with the device. It is designed to prevent damage to the device from overtightening a setscrew. For easier lead insertion, insert the ventricular IS-1 leg before the other legs. How to connect the lead to the device 1 b 74SetScrew.eps a 2 1. Insert the torque wrench into the appropriate setscrew. a. If the port is obstructed, retract the setscrew to clear it. Take care not to disengage the setscrew from the connector block. b. Leave the torque wrench in the setscrew until the lead is secure. This allows a pathway for venting trapped air when the lead is inserted. 2. Push the lead or plug into the connector port until the lead pin is clearly visible in the pin viewing area. No sealant is required, but sterile water may be used as a lubricant. 74LeadTIp.eps 3. Tighten the setscrew by turning clockwise until the torque wrench clicks. 4. Tug gently on the lead to confirm a secure fit. Do not pull on the lead until all setscrews have been tightened. 5. Repeat these steps for each lead. Marquis DR 7274 Reference Manual 41 42 Chapter 4 Testing defibrillation operation and effectiveness Testing defibrillation operation and effectiveness To demonstrate reliable defibrillation effectiveness with the implanted lead system, use the ICD to complete one of the following tests: ■ Terminate two consecutively induced VF episodes using a delivered energy of 20 joules or less. ■ Use the binary search procedure to establish a defibrillation threshold (DFT) of 18 joules or less. Note: An external defibrillation implant support instrument can also be used to test defibrillation effectiveness. For instructions, see the applicable documentation for the specific support instrument. High voltage implant values Measured values must meet the following requirements at implant. Table 4-3. High voltage therapy values at implant Measurement Acute or Chronic Leads V. Defib impedance 20 - 200 ohms SVC (HVX) impedance (if applicable) 20 - 200 ohms Defibrillation threshold ≤ 20 J (two consecutive) or ≤ 18 J (binary search) Warning: Ensure that an external defibrillator is charged for a rescue shock. Marquis DR 7274 Reference Manual Implanting the ICD Testing defibrillation operation and effectiveness 43 Binary search protocol By testing defibrillation efficacy at successively lower energy levels, the binary search protocol provides an accurate threshold measurement. However, it generally requires more inductions and more time. Also, cumulative charging of the ICD capacitor affects the device longevity. For most reliable defibrillation efficacy testing, allow at least five minutes between VF inductions. The ICD software provides an on-screen timer to record elapsed time since the last induction.1 If a two-electrode system fails to meet the implant criterion, consider implanting a third electrode and connecting it to the SVC (HVX) port. You can also evaluate the efficacy of ventricular tachycardia and atrial arrhythmia therapies after successfully completing ventricular defibrillation testing. Figure 4-1. Binary search protocol Start Success First induced episode Third induced episode Failure 6J 3J Success 9J 18 J Failure 15 J Success Failure Success Failure Success Failure <=3 J 6J 9J 12 J 15 J 18 J Implant Criterion Met Success 74binary.eps Success Second induced episode Defibrillation Threshold Failure 12 J Try to meet 2 at 20 J Failure Reprogram polarity, reposition the lead, or try a different lead 1 The timer appears on the 50 Hz Burst and T-Shock induction screens. Marquis DR 7274 Reference Manual Chapter 4 Testing defibrillation operation and effectiveness 44 How to prepare for defibrillation threshold testing 1. Place the programming head over the ICD, start a patient session, and interrogate the device, if you have not already done so. 2. Observe the Marker Channel telemetry annotations and the programmer ECG display to verify that the ICD is sensing properly. 3. Conduct a manual Lead Impedance Testa to verify the defibrillation lead connections. Perform this test with the ICD in the surgical pocket and keep the pocket very moist. If the impedance is out of range, perform one or more of the following tasks: ■ Recheck lead connections and electrode placement. ■ Repeat the measurement. ■ Inspect the bipolar EGM for abnormalities. ■ Measure the defibrillation impedance with a manual test shock. 4. Program the ICD or support instrument to properly detect VF with an adequate safety margin (1.2 mV sensitivity). a See “Measuring lead impedance” on page 316. Marquis DR 7274 Reference Manual Implanting the ICD Testing defibrillation operation and effectiveness How to perform defibrillation threshold testing 1. Select Tests > EP Study. 2. Select either 50 Hz BURST or T-shock induction. 3. Select [Resume at BURST] or [Resume at DELIVER]. 4. Select [Adjust Permanent...]. 3 2 1 4 5. Program VF Enable On. 6 6. Program the automatic therapy energy settings. Therapies 2-6 should be set to the maximum energy. 5 7. Select [Program]. 7 8 8. Select [Close]. Marquis DR 7274 Reference Manual 45 Chapter 4 Positioning and securing the ICD 9. If performing a T-Shock induction, select the [Enable] checkbox. 11 9 10. Select [DELIVER], or [50 Hz BURST Press and Hold]. If necessary, you can abort an induction or therapy in progress by pressing [ABORT]. 10 14 11. Observe the live rhythm monitor for proper post-shock sensing. 12. If using the binary search protocol, use the [Adjust Permanent...] button to program the next appropriate energy level (see Figure 4-1). 12 13 13. Wait until the on-screen timer reaches 5 minutes, then repeat steps 9 through 12 as needed. 14. Select Params > Detection and program VF, FVT, and VT detection Off before closing. Positioning and securing the ICD Cautions: If no SVC electrode is implanted, the pin plug provided with the device must be secured in the SVC port. Program tachyarrhythmia detection Off before closing. How to position and secure the device 1. Ensure that each lead pin or plug is fully inserted into the connector block and that all setscrews are tight. Suture Hole Locations 2. Coil any excess lead length beneath the device. Avoid kinks in the lead conductors. 74Suture.eps 46 Marquis DR 7274 Reference Manual 3. Implant the device within 5 cm of the skin. This position optimizes the ambulatory monitoring operations. 4. Suture the device securely within the pocket to minimize post-implant rotation and migration of the device. Use a surgical needle to penetrate the suture holes. Implanting the ICD Completing the implant procedure Completing the implant procedure After implanting the device, X-ray the patient to verify the device and leads placement. To complete programming the device, select parameters that are appropriate for the patient. How to complete programming the device 1. After closing the pocket, program detection On. Program ventricular tachyarrhythmia therapies On as desired. 2. Do not enable the Other 1:1 SVTs PR Logic detection criterion until the atrial lead has matured (approximately one month post implant). 3. If external equipment was used to conduct the defibrillation efficacy tests, perform a final VF induction, and allow the implanted system to detect and treat the arrhythmia. 4. Monitor the patient after the implant, and take X-rays as soon as possible to document and assess the location of the leads. 5. Program patient information. See “How to view and enter new patient information” on page 303. 6. Configure the Patient Alert feature. See “Using the Patient Alert feature” on page 253. 7. Set up data collection parameters. See “Setting up data collection” on page 267. 8. Interrogate the device after any spontaneous episodes to evaluate the detection and therapy parameter settings. 9. If the patient has not experienced spontaneous episodes, you may induce the clinical tachyarrhythmias using the non-invasive EP Study features to further assess the performance of the system. See Chapter 14, "Conducting Electrophysiologic Studies" on page 323. 10. Recheck pacing and sensing values, and adjust if necessary. Marquis DR 7274 Reference Manual 47 48 Chapter 4 Completing the implant procedure Marquis DR 7274 Reference Manual Conducting a patient follow-up session 5 Patient follow-up guidelines 50 Verifying the status of the implanted system 50 Verifying accurate detection and appropriate therapy Verifying effective bradycardia pacing 51 52 Marquis DR 7274 Reference Manual 5 50 Chapter 5 Patient follow-up guidelines Patient follow-up guidelines Schedule regular patient follow-up sessions to monitor the condition of the ICD and leads and to verify that the ICD is configured appropriately for your patient. During the first few months after receiving a new device, the patient may require close monitoring. Schedule an office visit at least every three months. The Quick Look screen, which is displayed after you interrogate the device, provides a good beginning for the follow-up review. Using this screen you can ■ verify that the device is functioning correctly. ■ review the clinical performance and long term trends. ■ print appropriate reports1 to compare the results to the patient’s history and to retain for future reference. Note: The Checklist feature provides a standard list of tasks to perform at a complete follow-up visit. You can also customize your own checklists if you wish. See “Streamlining follow-ups with Checklist” on page 261 for more information. Verifying the status of the implanted system To verify that the ICD and leads are functioning correctly, review the following information from the Quick Look screen and perform follow-up tests as indicated: ■ ■ Review the displayed battery voltage for comparison to the Elective Replacement Indicator value (see page 8). Remember that battery voltage may be low if high voltage charging has occurred within 24 hours. Review the last full energy charge. – For information about adjusting the capacitor formation interval, see “Optimizing charge time” on page 204. – If the programmer displays an Excessive Charge Time ERI, the ICD should be replaced immediately. 1 See “Using Cardiac Compass to view long term clinical trends” on page 294 for information on this new report. Marquis DR 7274 Reference Manual Conducting a patient follow-up session Verifying accurate detection and appropriate therapy ■ Review the defibrillation and pacing lead impedance values for inappropriate values or large changes since the last follow-up. See “Measuring lead impedance” on page 316. ■ Perform an EGM Amplitude test in each chamber for comparison to previous EGM Amplitude measurements. See “How to perform an EGM Amplitude test” on page 320. ■ To review longer term trends in sensing and impedance measurements, select the [>>] button from the lead impedance area of the Quick Look screen. The programmer displays a detailed history of automatic sensing and impedance measurements. See “Taking a quick look at device activity” on page 251. Verifying accurate detection and appropriate therapy To verify that the ICD is providing effective tachyarrhythmia detection and therapy, review the following information from the Quick Look screen and investigate as indicated: ■ Review Quick Look Observations that relate to patient history and device operation. To display more detailed information about any observation, select the observation and then select the [>>] button. ■ Review any Patient alerts listed in the Observations of the Quick Look screen. For the most detailed information about Patient Alerts, select Patient Alert from the Data icon and select [Events]. ■ Check stored episode records for appropriate sensing and detection of arrhythmias. See “Viewing episode data” on page 280. ■ Check stored SVT episode records for appropriate identification of SVTs. Considerations Review the following information before verifying detection and therapy. Flashback memory – In addition to the episode text and stored electrograms, use Flashback memory and interval plots to help investigate the accuracy and specificity of ventricular detection. Marquis DR 7274 Reference Manual 51 52 Chapter 5 Verifying effective bradycardia pacing Episode misidentification – If the episode records indicate that false detections have occurred, the Sensing Integrity counter may help in determining the prevalence of oversensing. For more information, see “Sensing integrity counter” on page 275. If the ICD is oversensing, consider these programming options: ■ Increase the Pace Blanking value. ■ Increase the sensitivity threshold. Caution: Do not re-program the ICD to decrease oversensing without assuring that appropriate sensing is maintained. See “Setting up sensing” on page 61. If the episode records reveal that a stable monomorphic VT has been identified and treated as VF, consider these options to improve the detection accuracy: ■ Review the Interval Plot for the episode, and adjust VF Interval, if necessary. Use caution when reprogramming the VF Interval, because changes to this value can adversely affect VF detection. ■ Consider enabling FVT via VF detection. See “Detecting FVT episodes” on page 76. If the SVT episode records include episodes of true VT, review the SVT episode record to identify the SVT detection criterion that withheld detection. Adjust the SVT detection criteria parameters as necessary. See “Enhancing detection with PR Logic criteria” on page 88, and “Enhancing VT detection with the Stability criterion” on page 97. Verifying effective bradycardia pacing To verify that the ICD is sensing and pacing appropriately, review the following information from the Quick Look screen and investigate as indicated: ■ Confirm that the patient is receiving adequate cardiac support for daily living activities. ■ Review the pacing conduction history for comparison to the patient history. A sharp increase in the paced beats percentage may indicate a need for investigation and analysis. Marquis DR 7274 Reference Manual Conducting a patient follow-up session Verifying effective bradycardia pacing ■ Review the recorded Mode Switch episodes for comparison to the patient’s atrial arrhythmia history. A dramatic increase in frequency or duration of atrial episodes may indicate a need for investigation and analysis. To display more detailed information about the Mode Switch episodes, perform these steps: select Episodes and Counters from the Data icon; select the Mode Switch episodes from the listed episode counters; then select the [Open Data] button. ■ Review the Cardiac Compass report for comparison to patient history (see page 294). ■ Conduct pacing threshold tests (see page 313) to verify that the programmed pacing outputs provide a sufficient safety margin. Considerations Review the following information before verifying bradycardia pacing. Atrial Pacing – If the conduction history shows a predominance of atrial pacing despite a healthy sinus response, consider these options to decrease the atrial pacing burden: ■ Decrease the Lower Rate. ■ Decrease the rate response or increase the activity threshold. Ventricular Pacing – If the ventricle is predominantly paced and the patient exhibits adequate ventricular response, consider these options: ■ Decrease the Lower Rate. ■ Increase the AV delays. Conduction History – If the reported percentages in the conduction history do not add up to 100, the percentages may be rounded. Frequent premature contractions or A:V dissociation may also be the cause. Consider any of the following options: ■ Program the pacing mode to DDD or DDDR to promote A-V synchrony. (If appropriate, enable Mode Switch to keep the benefits of DDIR pacing during atrial high rate episodes.) ■ Enable Ventricular Rate Stabilization to smooth the heart rate following premature ventricular beats. Marquis DR 7274 Reference Manual 53 54 Chapter 5 Verifying effective bradycardia pacing Marquis DR 7274 Reference Manual Part III Configuring the ICD for the patient Marquis DR 7274 Reference Manual Detecting tachyarrhythmias 6 Detection overview 58 Setting up sensing 61 Detecting VF episodes 66 Detecting VT episodes 70 Detecting FVT episodes 76 Detecting tachyarrhythmia episodes with Combined Count Monitoring episodes for termination or redetection Enhancing detection with PR Logic criteria 84 88 Enhancing VT detection with the Stability criterion Detecting double tachycardias 81 97 100 Detecting prolonged tachyarrhythmias with High Rate Timeout Key terms 101 103 Marquis DR 7274 Reference Manual 6 58 Chapter 6 Detection overview Detection overview The device detects ventricular tachyarrhythmias (VF, VT, and FVT) by comparing the time intervals between sensed ventricular events to a set of programmable detection intervals. If enough intervals occur that are shorter than the programmed intervals, the device detects a tachyarrhythmia, and responds automatically with a programmed therapy. After delivering the therapy, the device either redetects the arrhythmia and delivers the next programmed therapy or detects episode termination. To avoid detecting rapidly conducted SVTs (for example, sinus tachycardia or atrial fibrillation) as ventricular tachyarrhythmias, the device provides several detection enhancements, including PR Logic and Stability detection criteria. Figure 6-1 shows how all of these detection features interact during initial detection. During redetection, the device does not apply the PR Logic detection criteria. Note: Detection functions can be turned off by programming the VF Enable, FVT Enable, and VT Enable parameters to Off. For an example, see “How to program VF detection” on page 68. Marquis DR 7274 Reference Manual Detecting tachyarrhythmias Detection overview Figure 6-1. How detection features interact during initial detection Ventricular Event Update counts and pattern information Is the interval in the VF, FVT, or VT detection zone? No Yes Has High Rate Timeout suspended detection enhancements? Yes No Does Stability reset the VT event count? (VT and FVT via VT detection only) Yes No Has a tachyarrhythmia event count reached an NID? No Yes No / suspended by High Rate Timeout Are one or more PR Logic criteria on? Yes Is the median ventricular interval less than the SVT Limit? Yes No Is there a double tachycardia in progress? Yes No Tachy Episode Detected No Are one or more PR Logic criteria withholding detection? Yes Marquis DR 7274 Reference Manual 59 60 Chapter 6 Detection overview Suspending tachyarrhythmia detection When detection is suspended, the device temporarily stops classifying and counting tachyarrhythmia intervals. Sensing and bradycardia pacing remain active, and the programmed detection settings are not modified. Detection is suspended ■ when the device senses the presence of a strong magnet. The programmer head contains a magnet which suspends detection, but once telemetry between the device and programmer is established, detection resumes. ■ while performing any of the manual system tests, including Underlying Rhythm, Pacing Threshold, Lead Impedance, EGM Amplitude, and Charge/Dump. Detection automatically resumes once the test is complete. ■ while performing a T-Shock, 50 Hz Burst, Manual Burst, or PES Induction. You can choose to have the device automatically resume detection after delivering the induction. ■ when you deliver a Manual or Emergency therapy. You can resume detection by selecting the [Resume] button or removing the programming head from the device. ■ when you select the on-screen [Suspend] button. You can resume detection by selecting the [Resume] button or by removing the programming head from the device. ■ during the automatic daily lead impedance measurements. Detection resumes when the measurements are complete. ■ while the device is delivering an automatic tachyarrhythmia therapy (including capacitor charging for defibrillation and cardioversion). However, the device does continue to confirm the detected episode during charging. Detection resumes when the therapy is complete. Note: The device suspends VT detection (and Combined Count detection; see page 81) for 17 events following a defibrillation therapy delivered in response to a detected VF.1 ■ 1 during charging for Automatic Capacitor Formation. Detection resumes when charging is complete. If the defibrillation therapy is delivered as a result of a High Rate Timeout Therapy operation, VT detection is not suspended (see page 103). Marquis DR 7274 Reference Manual Detecting tachyarrhythmias Setting up sensing Setting up sensing The device provides bipolar sensing in both the atrium and ventricle via the sensing electrodes of the implanted atrial and ventricular leads. You can adjust the sensitivity to intracardiac signals using independent atrial and ventricular sensitivity settings. These settings define the minimum electrical amplitude recognized by the device as an atrial or ventricular sensed event. Proper sensing is essential for the safe and effective use of the device. To provide appropriate sensing, the device uses: ■ auto-adjusting atrial and ventricular sensing thresholds ■ short (30 ms) cross-chamber blanking after paced events ■ no cross-chamber blanking after sensed events See details about sensing on page 64. Parameters * Medtronic nominal setting V. Sensitivity (mV) – Minimum amplitude of electrical signal that registers as a sensed ventricular event. 0.15, 0.3*, 0.45, 0.6, 0.9, 1.2 A. Sensitivity (mV) – Minimum amplitude of electrical signal that registers as a sensed atrial event. 0.15, 0.3*, 0.45, 0.6, 0.9, 1.2, 1.5, 2.1 Considerations Review the following information before programming sensing parameters. Dual chamber sensing and bradycardia pacing modes – The device senses in both the atrium and the ventricle at all times, except when the programmed bradycardia pacing mode is DOO or VOO. When the pacing mode is programmed to DOO or VOO mode, there is no sensing in the ventricle. In order to program either DOO or VOO mode, you must first disable detection. Sensitivity thresholds – The programmed atrial and ventricular sensitivity thresholds apply to all features related to sensing, including detection and bradycardia pacing. Marquis DR 7274 Reference Manual 61 62 Chapter 6 Setting up sensing Bradycardia pacing and sensing – A combination of high pacing pulse width or high amplitude with a low sensitivity threshold may cause inappropriate sensing across chambers or in the same chamber. Programming a lower pulse width, lower amplitude, longer pace blanking, or a higher sensitivity threshold may eliminate this inappropriate sensing. Recommended ventricular sensitivity threshold – A ventricular sensitivity threshold of 0.3 mV is recommended to maximize the probability of detecting VF and to limit the possibility of oversensing and cross-chamber sensing. High ventricular sensitivity threshold – Setting V. Sensitivity to a value greater than 0.6 mV is not recommended except for testing. Doing this may cause undersensing, which can cause any of the following situations: ■ delayed or aborted cardioversion therapy ■ delayed defibrillation therapy (when VF confirmation is active) ■ asynchronous pacing ■ underdetection of tachyarrhythmias Low ventricular sensitivity threshold – If you set V. Sensitivity to its most sensitive value of 0.15 mV, the device will be more susceptible to EMI, cross-chamber sensing, and oversensing. Recommended atrial sensitivity threshold – An atrial sensitivity threshold of 0.3 mV is recommended to optimize the effectiveness of PR Logic detection criteria and atrial pacing operations, while limiting the possibility of oversensing and cross-chamber sensing. High atrial sensitivity threshold – If you set the A. Sensitivity value too high, the device may not provide reliable sensing of P-waves during SVTs and sinus rhythm. Low atrial sensitivity threshold – If you set the A. Sensitivity value to its most sensitive value of 0.15 mV, the device will be more susceptible to EMI, far-field R-wave sensing, and oversensing. Marquis DR 7274 Reference Manual Detecting tachyarrhythmias Setting up sensing Testing sensitivity after reprogramming – If you change the ventricular sensitivity threshold, evaluate for proper sensing and detection by inducing VF and allowing the device to automatically detect and treat the arrhythmia. Atrial pacing and ventricular sensing – If you program the device to an atrial pacing mode, make sure that it does not sense atrial pacing pulses as ventricular events. Sensing during VF – Always verify that the device senses properly during VF. If the device is not sensing or detecting properly, program detection and therapies off, and evaluate the system (making sure to monitor the patient for life-threatening arrhythmias until you enable detection and therapies again). You may need to reposition or replace the ventricular sensing lead to achieve proper sensing. Atrial lead selection – Atrial leads with minimal tip-to-ring spacing may reduce far-field R-wave sensing. Repositioning the atrial lead – You may need to reposition or replace the atrial sensing lead if reprogramming the atrial sensitivity threshold does not provide reliable atrial sensing during SVTs and sinus rhythm. How to program sensitivity 1. Select Params > Detection. 2. Select the desired A. Sensitivity and V. Sensitivity parameters. 3. Select [PROGRAM]. 1 2 3 Marquis DR 7274 Reference Manual 63 Chapter 6 Setting up sensing Details about sensing Auto-adjusting sensitivity thresholds The device automatically adjusts the sensitivity thresholds after certain paced and sensed events to help reduce oversensing from T-waves, cross-chamber events, and pacing. Figure 6-2 shows how sensitivity thresholds are adjusted after different types of events. Figure 6-2. Auto-adjusting sensitivity thresholds Sensitivity Threshold 3 1 2 4 Rectified and Filtered A. EGM 5 Rectified and Filtered V. EGM A P A S 74Autoadjust.eps 64 A S Marker Channel V S V S V P 1 After an atrial sensed event, the atrial sensitivity threshold increases to 75% of the EGM peak (maximum: 8x the programmed value, decay constant: 200 ms). 2 After a ventricular sensed event, the ventricular sensitivity threshold increases to 75% of the EGM peak (maximum: 8x the programmed value, decay constant: 450 ms).a 3 After an atrial paced event, the device does not adjust the atrial sensitivity threshold. The ventricular sensitivity threshold increases by 0.45 mV (decay constant: 60 ms).b 4 After a ventricular paced event, the atrial sensitivity threshold increases to 4x the programmed value (maximum: 1.8 mV, immediate return after 60 ms).b 5 After the ventricular pace blanking period is finished, the ventricular threshold increases to 4.5x the programmed value (maximum: 1.8 mV, decay constant: 450 ms). a b The exponential decay continues through a subsequent ventricular pacing pulse and its blanking period. If the programmed sensitivity value exceeds 0.3 mV (ventricular) or 1.2 mV (atrial), the threshold is not adjusted. Marquis DR 7274 Reference Manual Detecting tachyarrhythmias Setting up sensing Blanking periods During a blanking period, the device does not sense electrical signals. This helps prevent sensing of device pacing, cardioversion and defibrillation pulses, post-pacing depolarization, T-waves, and multiple sensing of the same event. The blanking periods following paced events are longer than those following sensed events to avoid sensing the atrial and ventricular depolarizations. Notes: ■ To enhance sensing and detection during tachyarrhythmias, the device does not apply cross-chamber blanking (blank sensing in the opposite chamber) after a sensed event. ■ Atrial sensing is still active during the Post-Ventricular Atrial Blanking (PVAB) period (see “Post-Ventricular Atrial Blanking Period” on page 160). Table 6-1 shows the duration of the fixed blanking periods. For information on programmable pace blanking periods, see page 148. Table 6-1. Fixed blanking periods Cross-chamber blanking after atrial or ventricular pacing pulse 30 ms Atrial blanking after sensed atrial event 100 ms Ventricular blanking after sensed ventricular event 120 ms Atrial and ventricular blanking after delivered cardioversion or defibrillation therapy 520 ms Marquis DR 7274 Reference Manual 65 66 Chapter 6 Detecting VF episodes Refractory periods During a refractory period, the device senses normally, but classifies sensed events as refractory and limits its response to these events. Pacing refractory periods prevent inappropriately sensed signals, such as far-field R-waves (ventricular events sensed in the atrium) or electrical noise, from triggering certain pacing timing intervals. Synchronization refractory periods help prevent the device from delivering cardioversion and defibrillation therapies at inappropriate times. See “Synchronizing defibrillation without confirming VF” on page 114 and “Synchronizing cardioversion after charging” on page 135. Note: Refractory periods do not affect tachyarrhythmia detection. Detecting VF episodes The device detects VF episodes by examining the cardiac rhythm for short ventricular intervals. If a predetermined number of intervals occurs that are short enough to be considered VF events, the device detects VF and delivers the first programmed VF therapy. After therapy, the device continues to evaluate the ventricular rhythm to determine if the episode is ongoing. See details about VF detection on page 68. Parameters * Medtronic nominal setting VF Detection Enable – Turns VF detection on or off. On*, Off 240, 250, . . ., 320*, . . .,400 VF Interval (ms) – V-V intervals shorter than this value are counted as VF events. VF Initial NID – Number of Intervals to Detect: number of VF events the device must count to detect a VF episode. 12/16, 18/24*, 24/32, 30/40, 45/60, 60/80, 75/100, 90/120, 105/140, 120/160 VF Redetect NID – Number of Intervals to Redetect: number of VF events the device must count to redetect a continuing VF after a therapy. 6/8, 9/12, 12/16*, 18/24, 21/28, 24/32, 27/36, 30/40 Marquis DR 7274 Reference Manual Detecting tachyarrhythmias Detecting VF episodes Considerations Review the following information before programming VF Detection parameters. VF Interval minimum setting – To ensure proper VF detection, you should not program the VF Interval less than 300 ms. VF Interval maximum setting – Programming the VF Interval to a value greater than 350 ms may cause inappropriate detection of rapidly conducted atrial fibrillation as VF or FVT via VF. Intervals shorter than the VF Interval are counted using the VF event counter, which is more sensitive than the consecutive VT event counter. VF, FVT, and VT Intervals – To allow for normal variations in the patient’s tachycardia interval, you should program the VF, FVT, and VT intervals at least 40 ms apart. Episode redetection – You can expedite redetection by programming the VF and VT Redetect NIDs lower than the Initial NIDs. Enabling VF detection – When VF Detection Enable is programmed On for the first time, the device ■ enables Automatic Capacitor Formation ■ starts recording Cardiac Compass data ■ starts recording lead performance trends (starting at 3:00 AM, by the device clock) ■ clears all brady pacing counters VF detection and PR Logic criteria – You can program the device to exclude rapidly conducted SVTs from VF Detection by enabling the PR Logic detection criteria. Note that the SVT Limit must be programmed shorter than the VF Interval in order for the PR Logic criteria to affect VF detection. See “Enhancing detection with PR Logic criteria” on page 88. Double tachycardia detection – When any PR Logic detection criteria are enabled, the device also enables double tachycardia detection (VF, VT, or FVT in the presence of an SVT). See “Detecting double tachycardias” on page 100. Marquis DR 7274 Reference Manual 67 68 Chapter 6 Detecting VF episodes Restrictions Review the following information before programming VF Detection parameters. Tachyarrhythmia detection and bradycardia pacing – To ensure reliable ventricular tachyarrhythmia detection, the programmer regulates the values available for bradycardia pacing and tachyarrhythmia detection. See “Parameter interlocks” on page 386. VF detection backup – To ensure VF Detection backup during VT and FVT episodes, if VF Detection is off, both VT Detection and FVT Detection must also be off. How to program VF detection To program VF detection: 1. Select Params > Detection. 2. Select the desired values for VF Enable, VF Initial NID, VF Redetect NID, and VF Interval. 2 3. Select [PROGRAM]. 1 3 Details about VF detection The device detects VF by counting the number of VF events, which are V-V intervals shorter than the programmed VF Interval. On each event, the device counts the number of recent VF events. The number of recent events examined is called the VF detection window. The size of the VF detection window is the second number in the programmed VF NID (for example, 24 events if the VF Initial NID is 18/24). Marquis DR 7274 Reference Manual Detecting tachyarrhythmias Detecting VF episodes 69 The threshold for detecting VF is the first number in the programmed VF NID (for example, 18 events if the VF Initial NID is 18/24). This threshold is always 75% of the VF detection window. That is, if 75% of the events in the VF detection window are VF events, the device detects a VF episode (see Figure 6-3). After the device detects VF, it delivers the first programmed VF therapy. Following the therapy, if the number of VF events reaches the programmed VF Redetect NID, the device redetects VF and delivers the next programmed VF therapy. Note: The device can also detect VF Episodes via the Combined Count detection criterion (see page 81). Figure 6-3. Device detects VF 1 2 3 ECG A S A R A R A R A R A R Marker Channel V S VF Event Count V S V S F S F S F S F F S S F S V F S S F S F S F S F S F S F S 1 2 3 4 5 6 6 8 9 10 11 12 13 14 15 16 17 7 F F F S S S F S F D V S V V S S 74VFDetection.eps A S 18 VF Interval 200 ms 1 VF starts, and the device begins counting VF events (intervals less than the programmed VF Interval). 2 A ventricular interval occurs outside the VF detection zone. The VF event count is not incremented. 3 The VF event count reaches the programmed VF NID value of 18 events out of 24, and the device detects VF. Marquis DR 7274 Reference Manual 70 Chapter 6 Detecting VT episodes Detecting VT episodes The device detects VT episodes by examining the cardiac rhythm for short ventricular intervals. If enough intervals occur that are short enough to be considered VT events (but are not VF or FVT events), the device detects VT and delivers the first programmed VT therapy. After therapy, the device continues to evaluate the ventricular rhythm to determine if the episode is ongoing. You can program the device to detect and record VT episodes without treating them with VT therapies by setting VT Detection Enable to Monitor. If a patient’s VT episodes are well-tolerated, this feature allows you to collect data about these episodes without delivering therapy or affecting VF detection. See details about VT detection on page 72. Parameters * Medtronic nominal setting VT Detection Enable – Turns VT detection on or off, or enables VT monitoring. On, Off*, or Monitor VT Interval (Rate) (ms) – V-V intervals shorter than this value are counted as VT events. 280, 290, . . ., 400*, . . ., 600 VT Initial NID – Number of Intervals to Detect: number of VT events the device must count to detect a VT episode. 12, 16*, . . ., 52, 76, 100 VT Redetect NID – Number of Intervals to Redetect: number of VT events the device must count to redetect a continuing VT after a therapy. 4, 8, 12*, . . ., 52 Considerations Review the following information before programming VT Detection parameters. VF, FVT, and VT Intervals – To allow for normal variations in the patient’s tachycardia interval, you should program the VF, FVT, and VT intervals at least 40 ms apart. Marquis DR 7274 Reference Manual Detecting tachyarrhythmias Detecting VT episodes Episode redetection – You can expedite redetection by programming the VF and VT Redetect NIDs lower than the Initial NIDs. VT Detection Enable, AFib/AFlutter, and Sinus Tach – When you set VT Detection Enable to On or Monitor, the AFib/AFlutter and Sinus Tach parameters are also automatically set to On. VT detection and Combined Count detection – When VT Detection is On, the device applies the Combined Count detection criterion to help speed detection of rhythms that fluctuate between detection zones. Combined Count detection is disabled if VT Detection is set to Off or Monitor. See “Detecting tachyarrhythmia episodes with Combined Count” on page 81. VT detection and rapidly conducted SVTs – You can program the device to exclude rapidly conducted SVTs from VT detection by enabling the PR Logic or Stability detection criteria. See “Enhancing VT detection with the Stability criterion” on page 97, and “Enhancing detection with PR Logic criteria” on page 88. Double tachycardia detection – When any PR Logic detection criteria are enabled, the device also enables double tachycardia detection (VF, VT, or FVT in the presence of an SVT; see page 100). Restrictions Review the following information before programming VT detection parameters. Tachyarrhythmia detection and bradycardia pacing – To ensure reliable ventricular tachyarrhythmia detection, the programmer regulates the values available for bradycardia pacing and tachyarrhythmia detection. See “Parameter interlocks” on page 386. VF detection backup – To ensure VF detection backup during VT and FVT episodes, if VF Detection is off, both VT Detection and FVT Detection must also be off. Marquis DR 7274 Reference Manual 71 72 Chapter 6 Detecting VT episodes How to program VT detection To program VT detection: 1. Select Params > Detection. 2. Select the desired values for VT Enable, VT Initial NID, VT Redetect NID, and VT Interval. 2 3. Select [PROGRAM]. 1 3 Details about VT detection The device detects VT by counting the number of consecutive VT events. A VT event is a V-V interval shorter than the programmed VT Interval but greater than or equal to the VF Interval. If the number of consecutive VT events reaches the programmed VT Initial NID, the device detects VT (see Figure 6-4). The VT event count resets to zero whenever an interval occurs that is greater than or equal to the programmed VT Interval. The count remains at the current value if an interval is shorter than the programmed VF Interval. After the device detects VT, it delivers the first programmed VT therapy. Following the therapy, if the VT event counter reaches the VT Redetect NID, the device redetects VT and delivers the next programmed therapy. Note: The device can also detect VT Episodes via the Combined Count detection criterion (see page 81). Marquis DR 7274 Reference Manual Detecting tachyarrhythmias Detecting VT episodes Figure 6-4. Device detects VT 1 2 ECG A S A S A R A R A R A R A R A R A R Marker Channel V S V S V S VT Event Count T S V S T S T S T S T S T S T S 1 0 1 2 3 4 5 6 VT Interval 3 ECG A R A R A R A R A R A R A R A R A R A R A R Marker Channel VT Event Count T S T S T S T S T S T S T S T S T S T D 7 8 9 10 11 12 13 14 15 16 V S 74VTDetection.eps A R VT Interval 200 ms 1 VT starts, and the device begins counting VT events (intervals less than the programmed VT Interval, but greater than or equal to the VF Interval). 2 A ventricular interval occurs outside VT detection zone. The VT event count resets to zero. 3 The VT event count reaches the programmed VT NID of 16 events, and the device detects VT. Marquis DR 7274 Reference Manual 73 74 Chapter 6 Detecting VT episodes VT monitoring You can program the device to record VT episodes without delivering VT therapy by setting VT Detection to Monitor. When VT monitoring is enabled, the device detects VT episodes but does not deliver VT therapy (see Figure 6-5). Instead, it records VT episodes, labeling them as “monitored,” and waits for episode termination to occur. When VT Detection is set to Monitor, several detection operations work differently. VT event counting – Before the device detects an episode, it counts VT events normally. However, once the VT Initial NID is reached, the device sets the VT event count to zero and suspends VT event counting for the rest of the episode. VF and FVT detection – VF and FVT detection operate as if VT detection is off. Specifically, Combined Count detection is disabled, and FVT via VT detection is not selectable. If a monitored VT episode accelerates into the FVT or VF detection zone, the device applies the VF Initial NID to detect the new tachyarrhythmia. Once an episode is in progress, VT event counting doesn’t resume until the episode ends. Caution: Programming the VF Interval greater than 350 ms may result in inappropriate detection of rapidly conducted atrial fibrillation as VF or FVT via VF. Intervals shorter than the VF Interval are counted using the VF event counter, which is more sensitive than the consecutive VT event counter. PR Logic and Stability criteria – Before the device detects a tachyarrhythmia episode, the PR Logic and Stability criteria, if turned on, are applied. If a monitored VT episode accelerates into the FVT or VF detection zone, the device continues to apply PR Logic criteria as initial VF or FVT detection begins. However, because the Stability feature does not affect VF detection or FVT via VF detection, it is not applied. Episode termination – The device compares ventricular intervals to the VT Interval to identify when a VT monitored episode has ended. However, if a VF episode or FVT via VF episode occurs when VT monitoring is enabled, the device compares ventricular intervals to the VF Interval to identify episode termination. Marquis DR 7274 Reference Manual Detecting tachyarrhythmias Detecting VT episodes Figure 6-5. Device detects and monitors VT 1 2 3 ECG A S A R A R A R A R A R A R A R A R A R A R A R V S VT Event Count V S T S T S T S T S T S T S T S T D T S T S T S 1 2 3 4 13 14 15 16 0 0 0 74VTmonitor.eps Marker Channel VT Interval 200 ms 1 VT starts, and the device begins counting VT events (intervals less than the programmed VT Interval but greater than or equal to the VF Interval). 2 The VT event count reaches the programmed VT NID of 16 events, and the device detects VT. 3 After detecting the VT episode, the device resets the VT event count to zero and monitors the episode until termination. Marquis DR 7274 Reference Manual 75 76 Chapter 6 Detecting FVT episodes Detecting FVT episodes The device detects episodes of Fast Ventricular Tachycardia (FVT) by examining the cardiac rhythm for short ventricular intervals. If enough intervals occur in the programmed FVT detection zone, the device detects FVT and delivers the first programmed FVT therapy. After therapy, the device continues to evaluate the ventricular rhythm to determine if the episode is ongoing. To make sure it delivers sufficiently aggressive therapies, the device can merge the programmed detection zones during redetection to increase sensitivity. See details about FVT detection on page 78. Parameters * Medtronic nominal setting FVT Detection Enable – Enables FVT Off*, via VF, or via VT detection via the VF or the VT detection algorithm. FVT Interval (Rate) (ms) – V-V intervals between this value and the programmed VF Interval are marked as FVT events. 200, 210, . . ., 600 Considerations Review the following information before programming FVT Detection parameters. VF, FVT, and VT Intervals – To allow for normal variations in the patient’s tachycardia interval, you should program the VF, FVT, and VT intervals at least 40 ms apart. Episode redetection – You can expedite redetection by programming the VF and VT Redetect NIDs lower than the Initial NIDs. Marquis DR 7274 Reference Manual Detecting tachyarrhythmias Detecting FVT episodes FVT detection enable – Your choice for an appropriate setting for FVT Detection should depend on the patient’s VF and VT cycle lengths. After determining a reliably sensitive VF Interval, consider the following suggestions: ■ If the patient presents with a clinical VT interval in the VF zone, select via VF to ensure reliable detection of VF. (VT Detection need not be enabled at all.) ■ If the patient presents with two clinical VTs, both outside the VF zone, select via VT to allow for correct classification of the faster VT and to offer a separate therapy regimen for each VT. ■ If the patient presents with only one clinical VT which is outside the VF zone, select VF and VT Detection only, and set FVT Enable to Off. FVT detection and PR Logic criteria – You can program the device to exclude rapidly conducted SVTs from FVT Detection by enabling the PR Logic detection criteria. Note that the SVT Limit must be programmed shorter than the VF Interval for the PR Logic criteria to affect FVT via VF detection. Double tachycardia detection – When any PR Logic detection criteria is enabled, the device also enables double tachycardia detection (VF, VT, or FVT in the presence of an SVT, see page 100). Restrictions Review the following information before programming FVT Detection parameters. Tachyarrhythmia detection and bradycardia pacing – To ensure reliable ventricular tachyarrhythmia detection, the programmer regulates the values available for bradycardia pacing and tachyarrhythmia detection. See “Parameter interlocks” on page 386. VF detection backup – To ensure VF Detection backup during VT and FVT episodes, VT and FVT Detection cannot be on unless VF Detection is also on. Marquis DR 7274 Reference Manual 77 78 Chapter 6 Detecting FVT episodes FVT detection – To ensure reliable ventricular tachyarrhythmia detection, the programmer regulates the values available for the FVT parameter as follows: ■ VT Detection must be set to On if FVT Detection is set to via VT. ■ If FVT Detection is set to via VF, the FVT Interval must be programmed to a value shorter than the VF Interval. ■ If FVT Detection is set to via VT, the FVT Interval must be programmed to a value greater than the VF Interval and less than or equal to the VT Interval. How to program FVT detection To program FVT detection: 1. Select Params > Detection. 2. Select the desired values for FVT Enable and FVT Interval. 3. Select [PROGRAM]. 2 1 3 Details about FVT detection You can program the device to detect FVT episodes via the VF or VT detection zone and NID. When FVT Detection is set to via VF, a V-V interval within the FVT detection zone is marked as an “FVT via VF” event. When the VF NID is reached, the device reviews the last eight intervals: ■ If any of the last eight intervals are in the VF zone, it detects the episode as VF. ■ If all of the last eight intervals are outside the VF zone, it detects the episode as FVT (see Figure 6-6). Marquis DR 7274 Reference Manual Detecting tachyarrhythmias Detecting FVT episodes 79 When FVT Detection is set to via VT, a V-V interval within the FVT detection zone is marked as an “FVT via VT” event. When the VT NID is reached, the device reviews the last eight intervals: ■ If any of the last eight intervals are in the VF or FVT zones, it detects the episode as FVT. ■ If all of the last eight intervals are outside the FVT and VF zones, it detects the episode as VT. Note: The device can also detect FVT episodes via the Combined Count detection criterion (see page 81). Figure 6-6. Device detects FVT via VF 1 2 3 ECG A S A S A R A R A R A R A R A R A R A R A R A R A R A R A R V S VF Event Count V S V S T F T S T F T F T F T T F F T F T F T F T F T F T F 1 1 2 3 4 5 13 14 15 16 17 18 V S 74FvtDetect.eps Marker Channel VF and FVT Intervals 200 ms 1 A fast ventricular tachycardia starts, and the first event falls into the FVT detection zone. 2 The second event of the FVT episode has an interval that falls into the VT zone. The VF event count is not incremented. 3 The device detects FVT after the VF event count reaches the VF Initial NID. Marquis DR 7274 Reference Manual Chapter 6 Detecting FVT episodes Zone merging after detection To ensure the device delivers sufficiently aggressive therapies during an extended or highly variable tachyarrhythmia episode, the device merges detection zones during redetection in some instances, as shown in Figure 6-7. The merged zone configuration uses the event counting and therapies for the faster arrhythmia and remains in effect until episode termination. Figure 6-7. FVT zone merging VF VF FVT FVT VT VT After VF detection: VF and FVT zones merge, leaving a larger VF zone. VF FVT VT and FVT zones merge, leaving a larger FVT zone. VF FVT VT VT After FVT detection: All zones remain unchanged. VT and FVT zones merge, leaving a larger FVT zone. VF VF FVT VT FVT VT Detection Intervals: VF Interval: 320 ms, FVT Interval: 280 ms / 360 ms , VT Interval: 400 ms Marquis DR 7274 Reference Manual FVT1.eps Before detection: FVT set to “via VT” FVT2.eps FVT set to “via VF” FVT3.eps 80 Detecting tachyarrhythmias Detecting tachyarrhythmia episodes with Combined Count Detecting tachyarrhythmia episodes with Combined Count Because the device counts VF and VT events separately, rhythms with variable cycle lengths can cause both event counts to increment during an episode. To prevent these rhythms from delaying detection, the device automatically enables the Combined Count detection criterion if both VF and VT detection are programmed On. The Combined Count criterion compares the sum of the VF and VT event counts to the Combined Number of Intervals to Detect (CNID), which the device calculates automatically from the programmed VF NID values. If the CNID is met, the device reviews the recent intervals to determine if the episode should be treated as a VF, FVT, or VT episode. The Combined Count criterion applies during both initial detection and redetection. Details about Combined Count detection The Combined Count detection algorithm expedites detection or redetection of ventricular tachyarrhythmias with ventricular intervals that fluctuate between the VF and VT detection zones. When VT detection is on, the device applies Combined Count detection, which tracks the combined number of VT and VF events counted. If this sum reaches the Combined Number of Intervals to Detect (CNID), the device detects VF, FVT, or VT. Combined Count detection also applies to redetected episodes. Note: Combined Count detection is off when VT detection is set to Monitor or Off. If the VF event counter reaches six, the device automatically applies the Combined Number of Intervals to Detect (CNID). The CNID is calculated by multiplying the current VF NID (Initial or Redetect) by 7/6 and rounding down. Table 6-2 shows the CNID values that correspond to each VF NID value. Marquis DR 7274 Reference Manual 81 82 Chapter 6 Detecting tachyarrhythmia episodes with Combined Count Table 6-2. CNID values for each initial or redetect VF NID value VF NID CNID VF NID CNID VF NID CNID 6/8 7 24/32 28 75/100 87 9/12 10 27/36 31 90/120 105 12/16 14 30/40 35 105/140 122 18/24 21 45/60 52 120/160 140 21/28 24 60/80 70 Combined Count detection is fulfilled when the sum of the VF and VT event counts equals or exceeds the CNID. The device then reviews the last eight intervals and classifies the episode as ■ VF, if any of the last eight were in the VF zone. ■ FVT, if FVT Detection is enabled and none of the last eight was in the VF zone, but one or more was in the FVT zone. ■ VT, if all eight were outside the VF zone (and FVT zone, if FVT detection is enabled). Marquis DR 7274 Reference Manual Detecting tachyarrhythmias Detecting tachyarrhythmia episodes with Combined Count 83 Figure 6-8. Device detects VF with the Combined Count criterion 1 2 3 ECG A R A R A R A R A R A R A R A R A R A R A R A R A R A R A R A R A R A R A R A R A R Marker Channel V S F S VF Event Count VT Event Count 1 Combined Count 1 V S F S F S F S F S F S F S 2 3 4 5 6 7 T S F S F S F S F S 8 9 10 11 F S F S 12 13 F S F S 14 15 F S 3 4 5 6 7 8 9 10 11 12 13 14 15 16 T S 2 3 18 19 16 1 2 T S 17 F S F D V S 74Combined.eps A S 17 4 20 21 VF and VT Interval 200 ms 1 A slow VF episode starts, with a ventricular cycle length that varies between the VF and VT detection zones. 2 When a VT event occurs, the device increments the VT event count and the Combined Count. 3 The device detects VF even though the VF event count hasn’t yet reached the VF Initial NID (18/24 in this example). The Combined Count reaches the CNID value of 21 first. Marquis DR 7274 Reference Manual 84 Chapter 6 Monitoring episodes for termination or redetection Monitoring episodes for termination or redetection Once the device detects an arrhythmia, it considers the episode ongoing until it detects that the episode has ended. After delivering therapy, it monitors the ventricular rhythm using the programmed Redetect NIDs. If one of these NIDs is met, the device delivers the next programmed therapy for the detected arrhythmia. See details about episode termination and redetection on page 85. Parameters * Medtronic nominal setting VF Redetect NID – Number of Intervals to Redetect: number of VF events the device must count to redetect a continuing VF after a therapy. 6/8, 9/12, 12/16*, 18/24, 21/28, 24/32, 27/36, 30/40 VT Redetect NID – Number of Intervals to Redetect: number of VT events the device must count to redetect a continuing VT after a therapy. 4, 8, 12*, . . . 52 Considerations Review the following information before programming redetection parameters. Initial and Redetect NIDs – You can expedite redetection by programming the VF and VT Redetect NIDs lower than the Initial NIDs. Marquis DR 7274 Reference Manual Detecting tachyarrhythmias Monitoring episodes for termination or redetection How to program redetection parameters 1. Select Params > Detection. 2. Select the desired values for VT Redetect NID and VF Redetect NID. 2 3. Select [PROGRAM]. 1 3 Details about episode termination and redetection After a therapy is delivered, the device evaluates the ventricular rhythm to determine if the episode has terminated, is continuing, or has changed to a different arrhythmia. Episode termination The device determines that the episode has terminated if one of the following conditions occurs: ■ eight consecutive ventricular intervals are greater than or equal to the programmed VT interval.1 ■ 20 seconds elapse with no ventricular intervals shorter than the programmed VT interval.1 After antitachycardia pacing therapy, the device begins evaluating intervals for episode termination on the first ventricular cycle. After cardioversion or defibrillation, the device begins evaluating intervals for episode termination on the second ventricular event. (Due to the extended post shock blanking, this event may be the third event on the electrogram.) Note: Any subsequent detection after the end of the episode marks the start of a new episode. 1 VF interval if VT Detection is set to Off or Monitor, and the episode is a VF or an FVT via VF episode. Marquis DR 7274 Reference Manual 85 Chapter 6 Monitoring episodes for termination or redetection Episode redetection After the device detects a tachyarrhythmia episode and delivers a therapy, the device redetects an arrhythmia if the VF or VT event count reaches the Redetect NID or if the combined VF and VT event count reaches the Redetect CNID (see “Detecting tachyarrhythmia episodes with Combined Count” on page 81). The device then delivers the next programmed therapy for the current arrhythmia and resumes monitoring for the outcome of that therapy. Figure 6-9 shows an example of redetection. Figure 6-9. VT episode redetected after therapy 1 2 3 ECG A R A S A S A S A S A S A R A R A R A R A R A R A R A R A R A R A R A R A R Marker Channel VT Event Count T D T P 16 0 T P T P T P T P 74Redetect.eps 86 T P T S T S T S T S T S T S T S T S T S T S T S T D 0 1 2 3 4 5 6 7 8 9 10 11 12 VT Interval 200 ms 1 A VT episode is detected, and the device delivers a Burst ATP therapy. 2 After therapy, the device continues to detect events in the VT zone. 3 When the VT event count reaches the VT Redetect NID, the device redetects the VT. Notes: 1 ■ The device suspends VT detection (and Combined Count detection) for 17 events following a defibrillation therapy delivered in response to a detected VF.1 Suspending VT detection helps avoid detecting transient VTs that can follow high voltage therapies. ■ The PR Logic criteria are not applied during redetection. However, the Stability criterion may withhold detection or redetection of VT throughout an episode. If the defibrillation therapy is delivered as a result of a High Rate Timeout Therapy operation, VT detection is not suspended (see page 103). Marquis DR 7274 Reference Manual Detecting tachyarrhythmias Monitoring episodes for termination or redetection VT acceleration If the device redetects VT, it classifies the rhythm as accelerated if the average of the four intervals before redetection is at least 60 ms less than the average of the four intervals before initial VT detection. The most recent interval average is used to identify VT acceleration if VT is redetected again during the episode. If the device redetects VF or an accelerated VT after an antitachycardia pacing sequence delivery, it skips the subsequent pacing therapy sequences for the duration of the episode and delivers the next therapy programmed for the current arrhythmia. Marquis DR 7274 Reference Manual 87 88 Chapter 6 Enhancing detection with PR Logic criteria Enhancing detection with PR Logic criteria The PR Logic detection criteria are designed to withhold inappropriate ventricular detection during episodes of rapidly conducted supraventricular tachycardia (SVT). The device analyzes the activation patterns and timing in both chambers using PR Logic pattern and rate analysis. This information helps identify evidence of atrial fibrillation, atrial flutter, sinus tachycardia, and other 1:1 SVTs. If this analysis indicates the presence of one or more of these rhythms, the device withholds detection. For more information, see ■ “Details about PR Logic pattern and rate analysis” on page 91 ■ “Details about the PR Logic detection criteria” on page 95 Parameters t * Medtronic nominal setting AFib/AFlutter – Identifies rapidly conducted Ona, Off* atrial fibrillation, atrial flutter, or atrial tachycardia. Sinus Tach – Identifies sinus tachycardia. Ona, Off* 1:1 VT-ST Boundary (%) – Threshold between 35, 50*, 66, 75, 85 the retrograde and antegrade zones used by A-V pattern analysis. Allows customizing of the Sinus Tach criterion for patients with slow one-to-one conduction. Other 1:1 SVTs – Identifies other one-to-one SVTs where the atrial and ventricular activation are roughly simultaneous. On, Off* SVT Limit (ms) – Defines the minimum ventricular interval at which the device applies the PR Logic criteria. 240, 250, . . ., 320*, 330, 340, . . ., 600 a When you set VT Detection Enable to On or Monitor, the AFib/AFlutter and Sinus Tach parameters are also automatically set to On. Marquis DR 7274 Reference Manual Detecting tachyarrhythmias Enhancing detection with PR Logic criteria Considerations Review the following information before programming PR Logic parameters. Cautions: ■ Before enabling the Other 1:1 SVTs criterion, ensure that the atrial lead has matured. This criterion could inappropriately withhold therapy if atrial sensing is compromised by an unstable or dislodged atrial lead. ■ Use caution when programming the Other 1:1 SVTs criterion in patients who exhibit slow 1:1 retrograde conduction during VF or VT. This criterion could inappropriately withhold VF/VT therapy in such patients. See “Pattern analysis of A-V and V-A intervals” on page 92. ■ Use caution when programming the 1:1 VT-ST Boundary. Incorrect programming of this parameter can result in inappropriate therapies or underdetection of tachyarrhythmias. PR Logic criteria and double tachycardia detection – When any of the PR Logic criteria are enabled, the device also enables double tachycardia detection (VF, VT, or FVT in the presence of an SVT; see page 100). Sinus Tach and 1:1 VT-ST Boundary – When enabling the Sinus Tach criterion in patients who exhibit slow 1:1 retrograde conduction during VF or VT or slow antegrade conduction during SVTs, make sure to set the 1:1 VT-ST Boundary parameter appropriately. See “Customizing PR Logic for patients with slow conduction” on page 90. VT Detection Enable, AFib/AFlutter and Sinus Tach – When you set VT Detection Enable to On or Monitor, the AFib/AFlutter and Sinus Tach parameters also automatically set to On. SVT Limit – To ensure that therapy is delivered for hemodynamically compromising rates of any origin, the device always delivers therapy when the median ventricular interval is less than the programmed SVT Limit (nominally 320 ms) if VT, VF, or FVT detection criteria are satisfied. Marquis DR 7274 Reference Manual 89 90 Chapter 6 Enhancing detection with PR Logic criteria VF Interval and SVT Limit – If you program an SVT Limit greater than the VF Interval, you are effectively disabling the PR Logic criteria for VF detection. Customizing PR Logic for patients with slow conduction Slow antegrade conduction during an SVT or slow 1:1 retrograde conduction during VT can adversely affect the accuracy of the Sinus Tach and Other 1:1 SVTs criteria. The 1:1 VT-ST Boundary parameter allows you to customize the Sinus Tach criterion for patients who exhibit slow conduction. Note: Changing the 1:1 VT-ST Boundary parameter does not affect the operation of the Other 1:1 SVTs criterion. Use caution when enabling this criterion in patients who exhibit slow antegrade or retrograde conduction. The 1:1 VT-ST Boundary parameter represents an A-V interval that is a percentage of a V-V interval. This value separates the retrograde and antegrade zones used by PR Logic pattern analysis operations. See “Pattern analysis of A-V and V-A intervals” on page 92. If slow retrograde or antegrade conduction causes events to occur in the incorrect zone, you can use the 1:1 VT-ST Boundary parameter to increase the size of the appropriate zone. See Figure 6-10 on page 92. If a patient exhibits slow antegrade or retrograde conduction and could benefit from a different 1:1 VT-ST Boundary setting, choose a new setting as follows: ■ If the patient exhibits long V-A intervals during VT with 1:1 retrograde conduction, select 35%. ■ If the patient exhibits long A-V intervals during an SVT, select a value that exceeds the A-V / V-V ratio observed during stored VT/VF or SVT episodes. See “EGM Strip” on page 285. Restrictions Review the following information before programming PR Logic parameters. Sinus Tach and 1:1 VT-ST Boundary – The Sinus Tach criterion must be on before 1:1 VT-ST Boundary can be selected. Marquis DR 7274 Reference Manual Detecting tachyarrhythmias Enhancing detection with PR Logic criteria VT Detection Enable and SVT Limit – The SVT Limit must be shorter than the VT Interval (or VF Interval if VT Detection is off). How to program the PR Logic detection criteria 1. Select Params > Detection. 2. Select the desired values for AFib/AFlutter, Sinus Tach, Other 1:1 SVTs, and SVT Limit. 2 1 3. If you need to adjust the 1:1 VT-ST Boundary for your patient, select Additional Settings.... 4. Select the desired value for the 1:1 VT-ST Boundary. 5. Select [OK]. 6 3 4 6. Select [PROGRAM]. 5 Details about PR Logic pattern and rate analysis PR Logic pattern and rate analysis is based on the following aspects of atrial and ventricular activation: ■ A-V and V-A interval patterns ■ atrial and ventricular rate ■ AF evidence ■ far-field R-wave sensing ■ A:V dissociation ■ V-V regularity The information collected by PR Logic pattern and rate analysis is used by the PR Logic detection criteria to identify the presence of SVTs and withhold detection. Marquis DR 7274 Reference Manual 91 Chapter 6 Enhancing detection with PR Logic criteria Pattern analysis of A-V and V-A intervals The device uses pattern analysis to identify sinus tachycardia, atrial flutter, and other 1:1 SVTs. Within each V-V interval, the device categorizes the atrial rhythm according to the number of intervening atrial events and the zones in which those atrial events occur (see Figure 6-10). From this information, the device assigns pattern codes to the intervals, and interprets the pattern codes to identify SVTs. Figure 6-10. Zones used during A-V pattern analysis 1 2 Junctional Zone 50 ms 3 Retrograde Zone 4 5 Antegrade (Normal) Zone Junctional Zone 80 ms 35% 66% 6 75% 85% 74PRLogic-zones.eps 92 1 Atrial events in the first junctional zone indicate PAC, PVC, junctional rhythms, atrial fibrillation, or atrial flutter. 2 Atrial events in the retrograde zone indicate retrograde conduction of ventricular events. 3 The 1:1 VT-ST Boundary separates the retrograde and antegrade zones. The nominal value of this boundary is 50%. 4 Atrial events in the antegrade zone indicate normal conduction (sinus rhythm, sinus tachycardia). 5 Atrial events in the second junctional zone indicate PAC, PVC, junctional rhythms, atrial fibrillation, or atrial flutter. 6 The 1:1 VT-ST Boundary can be programmed to different values, changing the relative size of the antegrade and retrograde zones. Marquis DR 7274 Reference Manual Detecting tachyarrhythmias Enhancing detection with PR Logic criteria AF Evidence AF Evidence is provided by a counter that accrues evidence to help identify atrial fibrillation or detect a double tachycardia (VF, VT, or FVT in the presence of an SVT; see page 100). For each ventricular event, the device increments a running AF evidence count if it identifies all of the following conditions: ■ A-V pattern information for a high atrial rate ■ timing consistent with an atrial tachyarrhythmia (see Figure 6-10) ■ greater than 1:1 conduction If the A-V pattern is inconclusive, inconsistent, or if the device detects far-field R-wave sensing, the AF Evidence count is unchanged. If no atrial event occurs within the current V-V interval or a consistent 1:1 pattern is present, the device subtracts one from the count. The AF Evidence criterion is satisfied when the AF Evidence count is greater than or equal to six. Once the criterion is met, it remains satisfied for as long as the AF Evidence count is greater than or equal to five. Far-field R-wave sensing The device identifies far-field R-wave oversensing in the atrium in order to exclude far-field R-waves from SVT classification. If there are two atrial events within a ventricular interval, one atrial event may actually be a far-field R-wave (see Figure 6-11). The device identifies a sensed far-field R-wave if it detects both of the following conditions: ■ a short-long pattern of A-A intervals ■ a short A-V interval (< 60 ms) or a short V-A interval (< 160 ms) The device uses far-field R-wave sensing for the Sinus Tach and AFib/AFlutter criteria as follows: ■ To identify sinus tachycardia with far-field R-wave sensing, the device requires a far-field R-wave on at least four of the most recent 12 ventricular intervals. ■ To identify atrial fibrillation or atrial flutter with far-field R-wave sensing, the device requires a far-field R-wave on at least 10 of the most recent 12 ventricular intervals. Marquis DR 7274 Reference Manual 93 94 Chapter 6 Enhancing detection with PR Logic criteria Figure 6-11. Intervals measured for far-field R-wave detection A1 A AA1 A2 A1A2 AV VA 1 V V 1 Far-field R-wave. A:V Dissociation A:V Dissociation provides cumulative evidence that there is no direct relationship between sensed atrial and ventricular events. The device identifies a rhythm as A:V dissociated if at least four of the most recent eight ventricular intervals exhibit either ■ no atrial events in the ventricular interval ■ an A-V interval that differs from the average of the previous eight A-V intervals by more than 40 ms The device uses this count to help identify a double tachycardia (VF, VT, or FVT in the presence of an SVT). Ventricular cycle length regularity The device uses ventricular cycle length regularity or irregularity to evaluate atrial fibrillation, double tachycardia (VF, VT, or FVT in the presence of an SVT), and other 1:1 SVTs. The device continuously measures the regularity of the ventricular intervals. The regularity count indicates how often the two most commonly occurring intervals (of at least 240 ms) occurred among the last 18 ventricular intervals. For example, Figure 6-12 illustrates the 18 most recent intervals. The two most frequently occurring intervals are 330 ms (five intervals) and 320 ms (three intervals). Together these account for eight of the 18 most recent intervals, for a regularity count of 44%. Figure 6-12. Regularity of ventricular cycle length 5 3 2 1 0 240 0 1 0 260 Marquis DR 7274 Reference Manual 2 1 1 0 280 1 0 300 320 340 360 1 0 0 380 400 0 0 420 0 0 440 0 0 460 Detecting tachyarrhythmias Enhancing detection with PR Logic criteria ■ For a double tachycardia to be detected, the regularity count must be at least 75%. ■ To withhold detection under the atrial fibrillation rule of the AFib/AFlutter criterion, the regularity count must be 50% or less. Atrial fibrillation that exhibits greater regularity (between 50% and 75%) may be identified by the atrial flutter rule, which does not require the regularity count. ■ To withhold detection for Other 1:1 SVTs, the regularity count must be at least 25%. Details about the PR Logic detection criteria The PR Logic detection criteria are applied to initial detection of VT, FVT, or VF. They are not applied during redetection. The device withholds episode detection if all of the following conditions occur: ■ An initial NID is met (VT, VF, or Combined). ■ One or more of the PR Logic detection criteria is met. ■ The V-V median interval equals or exceeds the SVT Limit. AFib/AFlutter criterion The AFib/AFlutter criterion consists of two independent rules: the atrial fibrillation rule and the atrial flutter rule. If either rule is satisfied, the AFib/AFlutter criterion is met, and the device withholds ventricular detection and therapy. The atrial fibrillation rule requires that all the following conditions occur: ■ The AF Evidence counter indicates atrial fibrillation, without far-field R-wave sensing. ■ The A-A median interval is 94% or less of the V-V median interval. ■ The ventricular cycle length is not regular (regularity of 50% or less). The atrial flutter rule is satisfied if A-V pattern information indicates atrial flutter, without far-field R-wave sensing. Marquis DR 7274 Reference Manual 95 96 Chapter 6 Enhancing detection with PR Logic criteria Sinus Tach criterion The Sinus Tach criterion is met if A-V pattern analysis indicates a 1:1 sinus tachycardia without far-field R-wave sensing (with atrial events primarily in the antegrade zone shown; see Figure 6-10 on page 92). The size and timing of the antegrade zone is dependent on the 1:1 VT-ST Boundary parameter. See “Customizing PR Logic for patients with slow conduction” on page 90. The Sinus Tach criterion also recognizes and withholds inappropriate detection for a 1:1 sinus tachycardia when far-field R-wave oversensing occurs consistently. Other 1:1 SVTs criterion The Other 1:1 SVTs criterion is satisfied when A-V pattern information indicates a 1:1 SVT in which the atria and ventricles are activated at approximately the same time, as in a junctional tachycardia (consistent atrial sensing in a junctional zone). See Figure 6-10 on page 92. Marquis DR 7274 Reference Manual Detecting tachyarrhythmias Enhancing VT detection with the Stability criterion Enhancing VT detection with the Stability criterion Stability is designed to prevent detection of unstable ventricular rhythms such as VT because rapidly conducted atrial fibrillation episodes often cause irregular ventricular rhythms. The device resets the VT count if a ventricular interval is unstable. See details about the Stability criterion on page 98. Parameters * Medtronic nominal setting Stability (ms) – interval threshold used to identify unstable ventricular intervals Off*, 30, 40, . . ., 100 Considerations Review the following information before programming Stability parameters. Stability interval – A small Stability value may not allow for normal VT interval variation and may decrease the sensitivity of the device to detect VT. Stability and interval rounding – The Stability criterion compares intervals that have been shortened to multiples of 10 ms, permitting a rounding difference of up to +10 ms from the programmed Stability value. Marquis DR 7274 Reference Manual 97 98 Chapter 6 Enhancing VT detection with the Stability criterion How to program Stability To program Stability: 1. Select Params > Detection. 2. Select the desired value for Stability. 3. Select [PROGRAM]. 1 2 3 Details about Stability The Stability criterion checks all ventricular intervals in the VT or FVT via VT detection zones for stability. An interval is unstable if the difference between it and any of the three previous intervals is greater than the programmed Stability interval. The device does not apply the Stability option until the VT event count reaches at least three. If the device classifies an event as unstable, it is marked as a normal sensed event, and the VT event count resets to zero (see Figure 6-13). Note: Stability applies throughout initial detection and redetection of VT and FVT via VT. Marquis DR 7274 Reference Manual Detecting tachyarrhythmias Enhancing VT detection with the Stability criterion 99 Figure 6-13. Stability resets the VT event count during atrial fibrillation 1 2 ECG A S A S A S A S A S A A S S A A S S A S A S A A S S A A S S A S A S A S A S A A A S S S A S A A S S V S T S A S A S V S V-V Interval VT Event Count V S 8 0 0 V S 7 2 0 V S 7 2 0 T S 3 6 0 T S 3 6 0 1 F S 2 9 0 2 T S 3 3 0 2 V S 3 6 0 3 T S 3 3 0 0 T S 3 4 0 1 V S 4 1 0 2 4 4 0 0 3 3 0 0 T S 74Stabiliy.eps Marker Channel 3 3 0 1 2 VT Interval 200 ms 1 Atrial fibrillation starts, which is conducted into the ventricle at a rapid rate. 2 After the VT event count reaches 3, the device applies the Stability criterion. Because the 360 ms interval differs from the 290 ms interval by more than the programmed Stability interval (50 ms, in this case), the Stability criterion resets the VT event count. Marquis DR 7274 Reference Manual 100 Chapter 6 Detecting double tachycardias Detecting double tachycardias To ensure proper detection and therapy during double tachycardia episodes (VT, FVT, or VF in the presence of SVT), the device provides double tachycardia detection whenever PR Logic detection criteria are enabled. The device detects double tachycardia episodes using both rate and PR Logic pattern and rate analysis information. Details about double tachycardia detection If PR Logic pattern and rate analysis identifies a double tachycardia, the device delivers the programmed therapies for the ventricular arrhythmia. The device detects VF or FVT via VF in the presence of SVT if all of the following occur: ■ The AF Evidence counter indicates atrial fibrillation, exclusive of far-field R-wave sensing. ■ Ventricular detection occurs via the Interval or Combined Count criterion. ■ The V-V median interval is greater than or equal to the SVT Limit. ■ The rhythm is A:V dissociated. The device detects VT or FVT via VT in the presence of SVT if these criteria are met and ■ the ventricular cycle length is very regular (regularity of at least 75%). Marquis DR 7274 Reference Manual Detecting tachyarrhythmias Detecting prolonged tachyarrhythmias with High Rate Timeout Detecting prolonged tachyarrhythmias with High Rate Timeout To ensure that fast ventricular rates are treated, the device provides High Rate Timeout. If a fast rhythm occurs, and the device withholds detection due to the PR Logic or Stability criteria, High Rate Timeout waits a programmable length of time and then suspends these criteria until the episode terminates. High Rate Timeout also includes the option to skip directly to VF therapies during sustained high rate episodes. See details about High Rate Timeout on page 102. Parameters * Medtronic nominal setting High Rate Timeout (min) – Disables supplementary SVT detection criteria when high rate episode continues longer than the programmed time limit. Off*, 0.75, 1, 1.25, 1.5, 2, 2.5, . . ., 5, 6, 7, . . ., 20, 22, 24, . . ., 30 High Rate Timeout Therapy – Option to treat Zone Appropriate*, sustained high rate episodes with the therapies Skip to VF Therapy for the detected episode type or to treat all high rate timeout episodes with VF defibrillation therapy (with no VF confirmation). Considerations Review the following information before programming High Rate Timeout parameters. High Rate Timeout and inappropriate therapies – Because High Rate Timeout can disable the PR Logic and Stability detection criteria, it may cause the device to deliver tachyarrhythmia therapies inappropriately (for example, during sinus tachycardia or atrial fibrillation). Marquis DR 7274 Reference Manual 101 102 Chapter 6 Detecting prolonged tachyarrhythmias with High Rate Timeout How to program High Rate Timeout To program High Rate Timeout: 1. Select Params > Detection. 2. Select Additional Settings... . 3. Select the desired values for High Rate Timeout and Therapy. 4. Select [OK]. 1 5. Select [PROGRAM]. 5 2 3 4 Details about High Rate Timeout High Rate Timeout starts a timer when VF, FVT, or VT would have been detected but was not because of the operation of the Stability or PR Logic detection criteria. Note: A monitored VT episode cannot start the High Rate Timeout timer. Once the timer has started, it continues until one of the following conditions occurs: ■ The timer meets the programmed duration. ■ A VF, FVT, or VT episode is detected while the SVT detection criteria are enabled. ■ The device determines that the high rate has ended (using the episode termination criteria; see page 85). Marquis DR 7274 Reference Manual Detecting tachyarrhythmias Key terms If the high rate timer reaches the programmed duration, the ICD disables all SVT detection criteria. These criteria remain disabled until one of the following conditions occurs: ■ A VF, FVT, or VT episode is detected and terminates. ■ The device determines that the high rate has ended (using the episode termination criteria; see page 85). High Rate Timeout Therapy If the High Rate Timeout Therapy parameter is set to Skip to VF Therapy, the device delivers only VF defibrillation therapies (with VF Confirmation disabled) for sustained high rate episodes, whether detected as VT, FVT, or VF. If set to Zone Appropriate, the device delivers the VT, FVT, or VF therapy for the detected rhythm, and VF Confirmation remains active for the first VF therapy if it is enabled. Note: The device does not suspend VT detection for 17 events following a defibrillation therapy that is delivered as a result of the High Rate Timeout “Skip to VF Therapy” operation. Key terms 1:1 VT-ST Boundary – programmable percentage of a V-V interval that indicates the division between the Retrograde and Antegrade zones used by PR Logic pattern and rate analysis operations. auto-adjusting sensitivity – after each sensed or paced event, the sensitivity thresholds briefly assume less sensitive settings to prevent sensing of T-waves and pacing artifacts. blanking period – time interval after each pacing pulse, sensed event, or shock, when no sensing can occur. CNID (combined number of intervals to detect) – number of events counted on both the VT and VF event counters required for Combined Count detection. The device calculates the CNID by multiplying the VF NID by 7/6 and rounding down. Marquis DR 7274 Reference Manual 103 104 Chapter 6 Key terms detection – condition occurring when the device identifies the presence of a tachyarrhythmia episode. double tachycardia – VF, VT, or FVT in the presence of an SVT. Double tachycardia detection ensures that the PR Logic criteria do not compromise ventricular detection in the presence of a double tachycardia. electromagnetic interference (EMI) – radiated or conducted energy, either electrical or magnetic, that can interfere with the device sensing operation in some circumstances. episode – period of time between tachyarrhythmia detection and termination. event – a sensed or paced beat. FVT detection via VF – condition occurring when the device identifies the presence of a fast ventricular tachycardia using the VF event counter and an FVT Interval less than the VF interval. FVT detection via VT – condition occurring when the device identifies the presence of a fast ventricular tachycardia using the VT event counter and an FVT Interval greater than the VF interval. FVT episode – period of time between FVT detection and termination. FVT event – a sensed beat that falls within the FVT detection zone between the programmed FVT Interval and VF Interval. FVT Interval – (also called FTI) programmable interval used to define the FVT detection zone. FVT via VF detection requires that the FVT Interval be shorter than the VF Interval. FVT via VT detection requires that the FVT Interval be longer than the VF Interval, but not greater than the VT Interval. FVT plus SVT – see “double tachycardia”. Marquis DR 7274 Reference Manual Detecting tachyarrhythmias Key terms High Rate Timeout – feature that ensures fast ventricular rates are treated by limiting the time that SVT Detection criteria (Stability or PR Logic) can withhold detection. Episodes detected after the High Rate Timeout timer expires can be treated with zone appropriate therapies or with VF therapies (with VF confirmation disabled). median interval – (atrial or ventricular) the seventh in a numerically ordered list of the 12 most recent A-A or V-V intervals. NID (number of intervals to detect) – number of arrhythmic intervals required for the device to detect or redetect a tachyarrhythmia. Pace Blanking – parameter that disables sensing for a programmable number of milliseconds after each pacing output to avoid inappropriate sensing of artifacts or T-waves. PR Logic criteria – (AFib/AFlutter, Sinus Tach, and Other 1:1 SVTs) optional detection criteria that analyze both atrial and ventricular rhythms to discriminate between ventricular and supraventricular arrhythmias. redetection – condition occurring when the device identifies the continued presence of a tachyarrhythmia after therapy. During redetection the device applies the VF Redetect NID and VT Redetect NID. refractory period – time interval during which the device senses events, but marks them as refractory, and responds to them in a limited way. Refractory periods affect bradycardia pacing and synchronization of high voltage therapies, but not tachyarrhythmia detection. sensed event – electrical activity across the sensing electrodes that exceeds the programmed sensitivity threshold. sensitivity – degree to which the sensing circuitry is responsive to intracardiac signals. Marquis DR 7274 Reference Manual 105 106 Chapter 6 Key terms Stability criterion – programmable VT detection criterion that allows the device to screen out irregular ventricular rhythms or unstable VTs (for example, those caused by the conduction of atrial fibrillation or flutter). termination – condition occurring when the device determines that an episode has ended. The device detects episode termination when either eight consecutive V-V intervals occur or 20 seconds elapse with no V-V intervals shorter than any of the programmed detection intervals. VF detection – condition occurring when the device identifies the presence of ventricular fibrillation. VF episode – period of time between VF detection and termination. VF event – a sensed beat that is shorter than the programmed VF Interval. VF Interval – (also called FDI) programmable interval used to define the VF detection zone. V-V intervals shorter than the VF Interval are counted as VF events. VF NID (number of intervals to detect) – (also called VF Initial NID) number of VF events required for initial VF detection to occur. VF plus SVT – see “double tachycardia”. VF Redetect NID (number of intervals to redetect) – number of VF events required for a VF episode to be redetected after therapy. VT acceleration – redetection in the VT zone with an average cycle length at least 60 ms shorter than at initial detection. VT detection – condition in which the device identifies the presence of ventricular tachycardia. Marquis DR 7274 Reference Manual Detecting tachyarrhythmias Key terms VT episode – period of time between VT detection and termination. VT event – a sensed beat that falls within the VT detection zone. That is, an interval that is shorter than the programmed VT Interval, but greater than or equal to the programmed VF Interval and/or FVT Interval. VT Interval – (also called TDI) programmable interval used to define the VT detection zone. V-V intervals shorter than the VT Interval but greater than or equal to the VF and/or FVT Interval are counted as VT events. VT monitoring – A programmable option that allows the device to detect fast rhythms as VT and record episode data without delivering VT therapy. VT NID (number of intervals to detect VT) – (also called VT Initial NID) programmable number of consecutive VT events required for initial VT detection to occur. VT plus SVT – see “double tachycardia”. VT Redetect NID (number of intervals to redetect VT) – number of consecutive VT events required for a VT episode to be redetected after therapy. zone merging – feature that merges an FVT detection zone with its parent detection zone after detection (for example, a FVT via VF detection zone merges into the VF zone). The merged zone uses the event counting and therapies designated for the faster arrhythmia. Marquis DR 7274 Reference Manual 107 108 Chapter 6 Key terms Marquis DR 7274 Reference Manual Treating tachyarrhythmia episodes Treating VF with defibrillation 7 110 Treating VT and FVT with antitachycardia pacing Treating VT and FVT with cardioversion 120 130 Optimizing therapy with Smart Mode and Progressive Episode Therapies 139 Key terms 143 Marquis DR 7274 Reference Manual 7 110 Chapter 7 Treating VF with defibrillation Treating VF with defibrillation The device can respond to a VF episode by delivering defibrillation therapy to the patient’s heart. The defibrillation therapy is intended to terminate the VF episode by simultaneously depolarizing the heart tissue and restoring the patient’s normal sinus rhythm. You can program the device to deliver a sequence of up to six defibrillation therapies, each with specific energy and pathway settings. If the first therapy is unsuccessful and the device redetects VF, it delivers the next programmed defibrillation therapy. See details about VF therapy on page 112. Parameters * Medtronic nominal setting VF Therapy Status – Turns a specific VF Therapy on or off. On*, Off Energy (J) – Amount of energy delivered to the heart by the therapy. 0.4, 0.6, . . ., 1.8, 2, 3, . . ., 16, 18, 20, . . ., 30* Pathway – Direction the electrical current flows through the heart. AX>B*, B<AX Confirm VF after initial detection? – Option that requires the device to confirm the presence of the VF rhythm during and after charging before delivering the first programmed VF therapy. Yes*, No Active Can – Option to select the device can as an On*, Off active electrode for delivering defibrillation and cardioversion therapies. Notes: ■ VF Therapy Status, Energy, and Pathway are programmed separately for each VF therapy. ■ For VF therapies 3 - 6, energy settings below 10 J are not available. Marquis DR 7274 Reference Manual Treating tachyarrhythmia episodes Treating VF with defibrillation Considerations Review the following information before programming VF Therapy parameters. Caution: If the Active Can feature is turned off, the device delivers defibrillation and cardioversion therapies between the RV (HVB) and SVC (HVX) electrodes only. To ensure the device can deliver defibrillation and cardioversion therapies, make sure a supplementary HVX electrode is implanted and connected to the device before turning Active Can off. Active Can – The programmed setting for Active Can applies to the following high voltage operations: ■ automatic, manual, and emergency cardioversion ■ automatic, manual, and emergency defibrillation ■ T-shock inductions. Energy – Programming the first VF therapy to an optimized value (for example, the defibrillation threshold plus 10 J) can expedite delivery and help extend battery longevity. All other VF therapies should be programmed to 30 J. Confirm VF after initial detection – When Confirm VF after initial detection is set to Yes, the device verifies that a VF episode is in progress before delivering the first programmed defibrillation therapy. However, subsequent therapies for that episode, and re-applications of an aborted first therapy, are always delivered without confirmation. Progressive Episode Therapies – If Progressive Episode Therapies is turned on, the device may deliver a high voltage therapy at a higher energy level than is programmed. This ensures that each therapy delivered during an ongoing episode is at least as aggressive as the previous therapy (see page 139). Marquis DR 7274 Reference Manual 111 112 Chapter 7 Treating VF with defibrillation Restrictions Review the following information before programming VF Therapy parameters. Energy – The energy settings for VF therapies 3 - 6 must be programmed to 10 J or greater. In addition, VF therapies must be programmed to be at least equal to the energy of the previous therapy or increasingly aggressive. That is, one VF therapy cannot be followed by another with a lower energy setting. How to program VF therapies To program VF therapies: 1. Select Params > Therapies. 2. Select [VF]. 3 2 3. For each therapy (Rx1 - Rx6), select the desired values for VF Therapy Status, Energy, and Pathway. 4 1 5 4. Select a value for “Confirm VF after initial detection?” 5. To change the Active Can parameter value, select Shared Settings... . a. Select a value for Active Can. b. Select [OK]. 6. Select [PROGRAM]. 6 a b Details about VF therapy The device provides up to six defibrillation therapies to treat VF episodes. If a VF episode is detected, the device begins charging its high voltage capacitors. Once the capacitors are charged to the programmed energy, the device attempts to deliver the defibrillation pulse simultaneously with a sensed ventricular event. If the therapy cannot be synchronized to a sensed ventricular event, the device delivers the therapy asynchronously. Marquis DR 7274 Reference Manual Treating tachyarrhythmia episodes Treating VF with defibrillation If the device is set to confirm VF after initial detection, the device attempts to confirm the continued presence of the VF episode during and after charging for the first programmed therapy. If the rhythm stops, the device cancels the therapy. Otherwise, the device delivers the defibrillation therapy synchronized to a ventricular event. Capacitor charging period To deliver a defibrillation therapy, the device must first charge its high voltage capacitors to the programmed energy. The length of time required to charge the capacitors depends on the programmed energy, battery depletion, and the time since the last capacitor formation. Table 1-6 on page 10 shows typical full energy capacitor charging periods. Delivery pathway electrodes The device can deliver defibrillation therapies via the following high voltage electrodes: ■ Can (HVA) – device can ■ RV (HVB) – RV coil ■ SVC (HVX) – optional electrode (for example, an SVC coil) If an optional electrode is used, you can disable the Active Can feature. If you do so, the device delivers defibrillation therapies between the RV (HVB) and SVC (HVX) electrodes only. Energy The device can deliver up to 30 joules,1 which corresponds to a stored energy of 35 joules.2 For a comparison of delivered and stored energy levels, see Table 1-7 on page 11. The defibrillation energy level is programmed independently for each VF therapy. 1 2 Delivered energy of biphasic waveform into 75 ohms. Derived from the peak capacitor voltage, which is always greater than the energy delivered by the device. Marquis DR 7274 Reference Manual 113 Chapter 7 Treating VF with defibrillation Waveform The device delivers defibrillation therapies using a biphasic waveform, which consists of two phases. In the first phase, current is delivered until the pulse decays to 50% of its original voltage. The device then truncates the phase and reverses the current pathway for the second phase.When the second phase of the pulse decays to 50% of its original voltage, the device truncates the pulse. Figure 7-1. Defibrillation pulse waveform Voltage 1 2 Time 3 74Biphasic.eps 114 1 The first segment of the pulse decays to 50% of the original voltage. 2 The pulse is truncated and the polarity is reversed. 3 The second segment of the pulse decays to 50% and then is truncated. Synchronizing defibrillation without confirming VF If the device is not set to confirm VF after initial detection or has already delivered the first VF therapy for an episode, the device attempts to synchronize the defibrillation therapy to a ventricular event, but delivers the therapy asynchronously if necessary. Once the capacitors are charged to the programmed energy, the device starts the synchronization process with a 900 ms delivery timer. If a qualified ventricular sensed event occurs during this period, the device delivers the defibrillation therapy synchronized to the event. Otherwise, the device delivers the therapy asynchronously when the timer expires (see Figure 7-2). Marquis DR 7274 Reference Manual Treating tachyarrhythmia episodes Treating VF with defibrillation Any sensed ventricular event qualifies for therapy delivery unless it is a refractory event or an AVP event. If a refractory event occurs, the device ignores it and continues to attempt to synchronize. If an AVP event occurs, the device resets the delivery timer to 500 ms and continues to attempt to synchronize. Figure 7-2. Defibrillation delivered asynchronously 1 2 3 ECG A R A R A R A S A S V S V S V S V V V V V S S S S S V S V S V S V V V V S S S S CV ER C D 74Defib-async.eps Marker Channel V S Synchronization Interval 900 ms Refractory 100 ms 200 ms 1 After detecting VF, the device completes charging and starts a 100 ms refractory period and a 900 ms synchronization interval. The device does not deliver the charge synchronized to the refractory event. 2 Several low-amplitude VF events go unsensed. 3 After 900 ms pass, the device delivers the defibrillation therapy asynchronously. Confirming VF after initial detection If the device is set to confirm VF after initial detection, and the device begins charging its capacitors for the first VF therapy, the device monitors the cardiac rhythm during and after charging to confirm that the VF remains present before delivering the therapy. The device confirms the continued presence of VF using a sequence of confirmation intervals, each lasting 60 ms plus the programmed VT Interval.1 It classifies any ventricular event that occurs within the confirmation interval as “arrhythmic” and any events after the interval as “normal.” 1 Or VF Interval, if VT Detection is set to Off or Monitor. Marquis DR 7274 Reference Manual 115 Chapter 7 Treating VF with defibrillation On each ventricular event, the device reviews the last five events since charging started. If four of the last five ventricular events were normal, the device stops charging and cancels the therapy (see Figure 7-3). Figure 7-3. Defibrillation therapy cancelled during charging when VF terminates spontaneously 1 2 3 ECG A R A R A S A S A S A S A S Marker Channel F D V S V S V V S S V S V S V S V S V S V S V S 74VF-abort.eps 116 V S Confirmation Interval Normal Event Ratio 1 5 2 5 3 5 4 5 200 ms 1 The device detects VF and begins confirmation, using a confirmation interval of 460 ms (VT Interval + 60 ms). 2 The VF spontaneously terminates, and normal sinus rhythm resumes. 3 Once four of five events occur that are greater than the confirmation interval, the device cancels the therapy and stops charging. Marquis DR 7274 Reference Manual Treating tachyarrhythmia episodes Treating VF with defibrillation 117 Once charging ends, the device attempts to synchronize the defibrillation therapy to a qualified ventricular event but also continues to confirm the presence of VF. An event qualifies for delivery if it is non-refractory and qualifies as one of the following events: ■ the second arrhythmic ventricular event and is outside an AVP interval ■ the third arrhythmic ventricular event The device continues to attempt to synchronize until it delivers the defibrillation therapy (see Figure 7-4) or it fails to confirm the presence of VF and cancels the therapy. Figure 7-4. VF confirmed and defibrillation synchronized to an arrhythmic event 1 2 3 ECG A R A R A R A S A S A P Marker Channel V S V S V S V S V V V S S S V V S S V S V S V S V V V S S S V S V S V CV S ER V S C D V S V S 74defib-confirm.eps A R Confirmation Interval Refractory 100 ms 200 ms 1 The device has detected VF, is charging its capacitors for defibrillation, and is confirming VF using a confirmation interval of 460 ms (VT Interval + 60 ms). 2 The device completes charging and starts a 100 ms refractory period while continuing VF confirmation. A refractory event occurs, and the device starts a new confirmation interval. 3 On the second arrhythmic event after charging, the device delivers the defibrillation therapy. Marquis DR 7274 Reference Manual 118 Chapter 7 Treating VF with defibrillation Refractory events During the synchronization process, the device classifies events as refractory if they occur during any of the following refractory periods: ■ 400 ms after charging starts ■ 400 ms after a ventricular or atrial paced event ■ 100 ms after charging ends AVP events The device postpones a defibrillation scheduled to be delivered during an Atrial Vulnerable Period (AVP) until the next qualifying event. The AVP is a 250 ms interval, starting 150 ms after a sensed atrial event, during which a high voltage pulse might induce an atrial tachyarrhythmia. AVP operation can only postpone the therapy for one event during synchronization. Bradycardia pacing during defibrillation On the first ventricular event after charging, the device changes the pacing mode to VVI and sets the pacing interval as shown in Table 7-1. Table 7-1. Pacing interval used during defibrillation VF confirmation Programmed Pacing mode Pacing interval Active ODO 2000 ms (30 ppm) Active DDD, DDI, VVI, AAI, DDDR, Pacing interval used DDIR, VVIR, or AAIR before charging started Inactive Any 1200 ms (50 ppm) After delivering the defibrillation therapy Immediately after delivering a defibrillation therapy, the device starts both of these operations: ■ a post shock blanking period of 520 ms in each chamber ■ a VVI pacing cycle at 50 ppm (1200 ms pacing interval) After the first ventricular event, the programmed bradycardia pacing mode resumes using the Post Shock pacing parameters. See “Providing pacing after high voltage therapies” on page 196. Marquis DR 7274 Reference Manual Treating tachyarrhythmia episodes Treating VF with defibrillation The device monitors for either the end of the episode or redetection. The device suspends VT detection (and Combined Count detection; see page 81) for 17 events following a defibrillation therapy delivered in response to a detected VF. Suspending VT detection helps avoid detecting transient VTs that can follow high voltage therapies.1 After a cancelled defibrillation therapy If the device cancels a defibrillation therapy, it reverts immediately to the programmed bradycardia pacing settings (not the Post-Shock pacing parameters). The device resumes monitoring for arrhythmias after the next paced or sensed ventricular event. If the device detects the same arrhythmia again, it attempts to synchronize and deliver the same therapy. However, if the episode ends, it resumes normal detection. Note: If the device cancels the defibrillation therapy leaving energy stored on the capacitors, the delivered energy of the next high voltage therapy may be higher than the programmed value. 1 If the defibrillation therapy is delivered as a result of a High Rate Timeout therapy operation, VT detection is not suspended (see page 103). Marquis DR 7274 Reference Manual 119 120 Chapter 7 Treating VT and FVT with antitachycardia pacing Treating VT and FVT with antitachycardia pacing The device can respond to a VT or FVT episode by delivering antitachycardia pacing (ATP) or cardioversion therapy to the patient’s heart. ATP therapies are designed to interrupt the reentrant activation pattern of a VT or FVT with pacing stimuli, restoring the patient’s normal sinus rhythm. Because ATP therapies use pacing-level stimulation instead of high voltage shocks, they are much less painful for the patient than cardioversion therapy. You can program the device to deliver a sequence of up to six VT therapies and six FVT therapies and can program a portion of these as ATP therapies. You can select Burst, Ramp, or Ramp+ ATP therapy and can set the parameters for each enabled therapy separately. See details about ATP therapies on page 124. Parameters for all ATP therapies * Medtronic nominal setting VT (or FVT) Therapy Status – Enables or disables On*, Off a VT Therapy or FVT Therapy. Therapy Type – Cardioversion or ATP therapy to treat VT or FVT episodes (choose Burst, Ramp, or Ramp+ to enable ATP therapy). CV, Burst, Ramp, Ramp+ Anti-Tachy Pacing Minimum Interval (ms) – Minimum pacing interval for all ATP therapies. 150, 160, . . ., 200*, . . ., 400 V. Amplitude (V) – Voltage of the ventricular pacing pulses delivered during all ATP pacing pulses. 0.5, 1, . . ., 4, 5, 6, 8* V. Pulse Width (ms) – Duration of the ventricular pacing pulses delivered during all ATP therapies. 0.03, 0.06, 0.1, 0.2, . . ., 1.6* V. Pace Blanking (ms) – Ventricular blanking 150, 160, . . ., period following the pacing pulses delivered during 240*, . . ., 440 all ATP therapies. Marquis DR 7274 Reference Manual Treating tachyarrhythmia episodes Treating VT and FVT with antitachycardia pacing Parameters for Burst therapy * Medtronic nominal setting VT therapies FVT therapies Initial # Pulses – Number of pulses in all Burst therapy sequences. 1, 2, . . ., 6*, . . ., 15 1, 2, . . ., 8*, . . ., 15 R-S1 Interval (%) – Pacing interval of the first Burst therapy sequence as a percentage of the tachycardia cycle length. 50, 53, 56, 59, 63, 66, . . ., 84*, 88, 91, 94, 97 50, 53, 56, 59, 63, 66, . . ., 84, 88*, 91, 94, 97 Interval Decrement (ms) – Pacing interval decrement per sequence for the remaining Burst sequences. 0, 10*, . . ., 40 0, 10*, . . ., 40 # Sequences – Number of sequences in the Burst therapy. 1, 2, 3*, . . ., 10 1*, 2, 3, . . ., 10 Parameters for Ramp therapy * Medtronic nominal setting Initial # Pulses – Number of pulses in first Ramp sequence. 1, 2, . . ., 8*, . . ., 15 R-S1 Interval (%) – Pacing interval of the first Ramp pulse as a percentage of the tachycardia cycle length. 50, 53, 56, 59, 63, 66, . . ., 84, 88, 91*, 94, 97 Interval Decrement (ms) – Pacing interval decrement per pulse during a Ramp sequence. 0, 10*, . . ., 40 # Sequences – Number of sequences in the Ramp 1, 2, 3*, . . ., 10 therapy. Marquis DR 7274 Reference Manual 121 122 Chapter 7 Treating VT and FVT with antitachycardia pacing Parameters for Ramp+ therapy * Medtronic nominal setting Initial # Pulses – Number of pulses in first Ramp+ sequence. 1, 2, 3*, . . ., 15 R-S1 Interval (%) – Pacing interval of the first Ramp+ pulse as a percentage of the tachycardia cycle length. 50, 53, 56, 59, 63, 66, . . ., 75*, . . ., 84, 88, 91, 94, 97 S1-S2 Interval (%) – Pacing interval of the second Ramp+ pulse as a percentage of the tachycardia cycle length. 50, 53, 56, 59, 63, 66, 69*, . . ., 84, 88, 91, 94, 97 S2-SN Interval (%) – Pacing interval of the 50, 53, 56, 59, remaining Ramp+ pulses as a percentage of the 63, 66*, . . ., 84, tachycardia cycle length. 88, 91, 94, 97 # Sequences – Number of sequences in the Ramp+ therapy. 1, 2, . . ., 5*, . . ., 10 Considerations Review the following information before programming ATP therapy parameters. VT and FVT therapies – You should not use ATP therapies exclusively to treat VT or FVT episodes. At least one VT therapy and one FVT therapy should be programmed to a maximum energy cardioversion. Progressive Episode Therapies – If Progressive Episode Therapies is turned on, the device may skip programmed ATP therapies and deliver cardioversion to ensure that each therapy delivered during an ongoing episode is at least as aggressive as the previous (see page 139). Marquis DR 7274 Reference Manual Treating tachyarrhythmia episodes Treating VT and FVT with antitachycardia pacing Restrictions Review the following information before programming ATP therapy parameters. Cardioversion therapies for FVT – You cannot program all FVT therapies as ATP therapies. If any FVT therapies are on, then at least one of them must be programmed to cardioversion (any energy). Therapy aggressiveness – VT and FVT therapies must be programmed to be increasingly aggressive. For example, you cannot program one VT therapy to cardioversion and a subsequent VT therapy to an ATP therapy. Likewise, a VT cardioversion therapy cannot be followed by another VT cardioversion therapy with a lower energy setting. How to program ATP therapies 1. Select Params > Therapies. 2 2. Select [VT] or [FVT]. 3. For each ATP therapy, set Therapy Type to Burst, Ramp, or Ramp+ and set the therapy parameters as desired. 4. Select the desired value for the Anti-Tachy Pacing Minimum Interval. 3 1 5. Select Shared Settings... . 6. Select the desired values for V. Amplitude, V. Pulse Width, and V. Pace Blanking. 4 8 5 7. Select [OK]. 8. Select [PROGRAM]. 6 7 Marquis DR 7274 Reference Manual 123 124 Chapter 7 Treating VT and FVT with antitachycardia pacing Details about ATP therapies All antitachycardia pacing (ATP) therapies have the following characteristics: ■ The pulse width, amplitude, and post-pace blanking period for antitachycardia pacing pulses are the same for all ATP therapies but are programmed separately from the bradycardia pacing pulse widths, amplitudes, and pace blanking periods. ATP pacing parameters are programmed from the Shared Settings parameter screen. ■ The ATP pacing interval is rate adaptive to the average of the last four intervals prior to FVT and VT detection or redetection. However, ATP pulses are never delivered at less than the programmed minimum pacing interval. If the calculated interval is shorter than the programmed minimum, the pulses are delivered at the programmed minimum interval. ■ ATP therapies cannot be delivered as programmed if the tachycardia is too fast. See “Rate limited ATP therapies” on page 125. ■ If the device redetects the original arrhythmia after an ATP sequence, it delivers the next ATP sequence. If a different arrhythmia is redetected, the therapy is designated unsuccessful, and the device delivers the next programmed therapy for the current arrhythmia. Marquis DR 7274 Reference Manual Treating tachyarrhythmia episodes Treating VT and FVT with antitachycardia pacing Rate limited ATP therapies Antitachycardia pacing pulses are never delivered at less than the programmed minimum pacing interval. If the tachycardia rate is too fast, the device uses the following two algorithms: ■ If the intrinsic tachycardia interval is less than or equal to the programmed minimum pacing interval, it is impossible for the device to deliver an ATP therapy that is faster than the intrinsic rate. The device cancels the rest of the ATP therapy and skips to the next programmed cardioversion therapy. If no cardioversion therapy is programmed, no therapy is delivered. ■ If all the intervals of an ATP therapy sequence are delivered at the minimum interval, the therapy is fully rate limited. The device cancels the rest of the ATP therapy and skips to the next programmed therapy (or the next programmed cardioversion therapy, if FVT was detected). Tachycardia accelerated by an ATP therapy After delivering each ATP therapy sequence, the device monitors for an outcome. If the tachycardia accelerates to a faster arrhythmia, or if VT Acceleration occurs,1 the remaining sequences of the pacing therapy are not delivered. Instead, the device delivers the next programmed therapy for the new arrhythmia. Burst pacing therapy The pacing interval for the first Burst sequence is a calculated percentage of the tachycardia cycle length. Each pulse in the sequence is delivered at the same interval. Each time the tachycardia is redetected after an unsuccessful sequence, the device applies the programmed Burst percentage to the new cycle length, and then subtracts the programmed interval decrement (once per sequence) to calculate the pacing interval for the next Burst sequence. Note: The Burst pacing therapy is delivered in VOO pacing mode. In Figure 7-5, two Burst therapy sequences are delivered. The second therapy sequence terminates the VT. 1 See “VT acceleration” on page 87. Marquis DR 7274 Reference Manual 125 Chapter 7 Treating VT and FVT with antitachycardia pacing Figure 7-5. Device delivers two sequences of Burst pacing therapy 1 2 ECG A R A R A S A S A S A S A S A R A R A R A R A R A R A R A R A R Marker Channel T D T S V-V Interval 3 5 0 T P 2 9 0 T P 2 9 0 T P 2 9 0 T P 2 9 0 T P 2 9 0 T P T S 3 8 0 2 9 0 T S 3 5 0 3 T S 3 5 0 T S 3 5 0 T S T S 3 5 0 3 5 0 A R A R T S 3 5 0 T S 3 5 0 T S 3 5 0 4 ECG A R A R A R A R A S A S A S A S A S A R A P Marker Channel T S V-V Interval 3 5 0 T D T S 3 5 0 3 5 0 T P 2 8 0 T P 2 8 0 T P 2 8 0 T P 2 8 0 T P 2 8 0 T P 2 8 0 T S 3 7 0 74burst.eps 126 V S 9 2 0 200 ms 1 The device detects VT. 2 The first Burst sequence is delivered with a pacing interval of 290 ms but fails to terminate the VT. 3 The device redetects VT. 4 The second Burst sequence is delivered with a pacing interval of 280 ms (the Interval Decrement is set to 10 ms per sequence) and terminates the VT. Marquis DR 7274 Reference Manual Treating tachyarrhythmia episodes Treating VT and FVT with antitachycardia pacing Ramp pacing therapy The first pulse of each Ramp sequence is delivered at a calculated percentage of the current tachycardia cycle length. Each remaining pulse in that sequence is then delivered at progressively shorter intervals by subtracting, per pulse, the programmed interval decrement. Each time the tachycardia is redetected after an unsuccessful sequence, the device applies the programmed Ramp percentage to the new cycle length to calculate the initial pacing interval for the next sequence. Each sequence adds one pacing pulse per sequence. Sensed ventricular events are counted as individual pulses of the Ramp sequence, even though they are not output pulses. Whenever a sensed event inhibits the scheduled Ramp Pacing VVI pulse, the next pulse is scheduled at the calculated or minimum interval. In Figure 7-6, two Ramp therapy sequences are delivered. The second therapy sequence terminates the VT. Marquis DR 7274 Reference Manual 127 Chapter 7 Treating VT and FVT with antitachycardia pacing Figure 7-6. Device delivers two sequences of Ramp pacing therapy 1 2 ECG A R A S A S A S A S A S A S A S A R A R A R A R A R A R A R A R Marker Channel T D V-V Interval 3 5 0 T P T P 3 1 0 3 0 0 T P T P 2 9 0 2 8 0 T P T P 2 7 0 T P 2 6 0 2 5 0 T S T P 2 4 0 3 8 0 T S T S 3 5 0 T S 3 5 0 3 3 5 0 T S 3 5 0 T S 3 5 0 T S 3 5 0 T S 3 5 0 4 ECG A R A R A R A R A R A R A S A S A S A S A S A S A S A S A R A R A P Marker Channel T S V-V Interval 3 5 0 T S 3 5 0 T D T S 3 5 0 3 5 0 T P 3 1 0 T P 3 0 0 T P 2 9 0 T P 2 8 0 T P 2 7 0 T P 2 6 0 T P 2 5 0 T P 2 4 0 V S T P 2 3 0 9 1 0 200 ms 1 The device detects VT. 2 The first Ramp sequence is delivered with an initial pacing interval of 310 ms, and decrements 10 ms per pulse, but fails to terminate the VT after eight pulses. 3 The device redetects VT. 4 The second Ramp sequence is delivered with an initial pacing interval 310 ms, decrements the pacing interval 10 ms per pulse, and terminates the VT after nine pulses. Marquis DR 7274 Reference Manual 74Ramp.eps 128 Treating tachyarrhythmia episodes Treating VT and FVT with antitachycardia pacing 129 Ramp+ pacing therapy The first pulse of each Ramp+ sequence occurs at a programmed percentage of the tachycardia cycle length, timed from the sensed event that fulfills tachycardia detection. The second pulse interval is calculated using the S1-S2 percentage. Any remaining pulses in the sequence are delivered at the S2-SN percentage.1 If the tachycardia is redetected, the device applies the programmed percentages to the new cycle length to calculate the pacing intervals for the next Ramp+ sequence. Each sequence adds one pacing pulse per sequence. In Figure 7-7, two Ramp+ therapy sequences are delivered. The second therapy sequence terminates the VT. Figure 7-7. Device delivers two sequences of Ramp+ pacing therapy 4 3 2 1 ECG A R A R A R A R A R A R A R A R A R A R A R A R A R A R A R A S A S A P A R A R A S A S A S T D T S V-V Interval 3 5 0 2 6 0 T P T P T P 2 3 0 2 2 0 3 8 0 3 5 0 3 5 0 3 5 0 3 5 0 3 5 0 3 5 0 3 5 0 3 5 0 3 5 0 T D T S T S T S T S T S T S T S T S T S T S T S 3 5 0 3 5 0 2 6 0 2 3 0 T P T P T P T P 2 2 0 2 2 0 T S 3 7 0 74Rampp.eps Marker Channel V S 6 4 0 200 ms 1 The device detects VT. 2 The first Ramp+ sequence consists of three pacing pulses with intervals of 260, 230, and 220 ms. The VT is not terminated. 3 The device redetects VT. 4 The second Ramp+ therapy repeats the first three intervals and adds another pulse with a 220 ms interval, which terminates the VT. 1 Ramp + pacing therapy is delivered in VOO mode. Marquis DR 7274 Reference Manual 130 Chapter 7 Treating VT and FVT with cardioversion Treating VT and FVT with cardioversion The device can respond to a VT or FVT episode by delivering antitachycardia pacing or cardioversion therapy to the patient’s heart. Cardioversion, like defibrillation, is intended to terminate the episode by simultaneously depolarizing the heart tissue and restoring the patient’s normal sinus rhythm. However, cardioversion requires that the device synchronize the therapy to an arrhythmic ventricular event. You can program the device to deliver a sequence of up to six VT therapies and six FVT therapies, and you can select cardioversion for some or all of these therapies. You can set the energy and pathway parameters individually for each cardioversion therapy. See details about cardioversion therapy on page 133. Parameters * Medtronic nominal setting VT (or FVT) Therapy Status – Turns a specific VT On* or Off or FVT therapy on or off. Therapy Type – Cardioversion or ATP therapy to treat VT or FVT episodes (choose CV to enable cardioversion). CV, Burst, Ramp, Ramp+ Energy (J) – Amount of energy delivered to the heart by the therapy. 0.4, 0.6, . . ., 1.8, 2, 3, . . ., 16, 18, 20, . . ., 30* Pathway – Direction the electrical current flows through the heart. AX>B* or B>AX Active Can – Option to select the device case as an active electrode for delivering defibrillation and cardioversion therapies. On*, Off Marquis DR 7274 Reference Manual Treating tachyarrhythmia episodes Treating VT and FVT with cardioversion Considerations Review the following information before programming cardioversion parameters. Caution: If the Active Can feature is turned off, the device delivers defibrillation and cardioversion therapies between the RV (HVB) and SVC (HVX) electrodes only. To ensure the device can deliver defibrillation and cardioversion therapies, make sure a supplementary HVX electrode is implanted and connected to the device before turning Active Can off. Active Can – The programmed setting for Active Can applies to the following high voltage operations: ■ automatic, manual, and emergency cardioversion ■ automatic, manual, and emergency defibrillation ■ T-shock inductions Energy – Programming the cardioversion therapy energy to an optimized value (lower than the maximum energy but high enough to terminate VT) can expedite delivery and help preserve battery longevity. However, at least one VT therapy and one FVT therapy should be programmed to a maximum energy cardioversion. Progressive Episode Therapies – If Progressive Episode Therapies is turned on, the device may deliver a high voltage therapy at a higher energy level than is programmed. This ensures that each therapy delivered during an ongoing episode is at least as aggressive as the previous therapy (see page 139). Marquis DR 7274 Reference Manual 131 132 Chapter 7 Treating VT and FVT with cardioversion Restrictions Review the following information before programming cardioversion parameters. Cardioversion therapies for FVT – If FVT therapies are on, then at least one must be programmed to cardioversion (at any energy). Therapy aggressiveness – VT and FVT therapies must be programmed to be increasingly aggressive. For example, you cannot program one VT therapy to cardioversion and a subsequent VT therapy to an ATP therapy. Likewise, a VT cardioversion therapy cannot be followed by another VT cardioversion therapy with a lower energy setting. How to program cardioversion therapies 1. Select Params > Therapies. 2 2. Select [VT] or [FVT]. 3. For each cardioversion therapy, set Therapy Type to CV and set Energy and Pathway values as desired. 3 1 5 4 a b Marquis DR 7274 Reference Manual 4. To change the Active Can parameter value, select Shared Settings... . a. Select a value for Active Can. b. Select [OK]. 5. Select [PROGRAM]. Treating tachyarrhythmia episodes Treating VT and FVT with cardioversion Details about cardioversion therapy When a VT or FVT episode is detected and the next programmed therapy is a cardioversion, the device begins charging its high voltage capacitors and attempts to confirm the continued presence of the tachyarrhythmia. If the arrhythmia terminates, the device cancels the therapy. If the arrhythmia is still present when the capacitors are charged to the programmed energy, the device delivers the cardioversion pulse synchronized to a sensed ventricular event. If synchronization is not possible, the device cancels the therapy. Capacitor charging period To deliver a cardioversion therapy, the device must first charge its high voltage capacitors to the programmed energy. The length of time required to charge the capacitors depends on the programmed energy, battery depletion, and the length of time since the last capacitor formation. See Table 1-6 on page 10 for typical full energy capacitor charging periods. Delivery pathway electrodes The device can deliver cardioversion therapies via the following high voltage electrodes: ■ Can (HVA) – device can ■ RV (HVB) – RV coil ■ SVC (HVX) – optional electrode (for example, an SVC coil) If an optional electrode is used, you can disable the Active Can feature. If you do so, the device delivers cardioversion therapies between the RV (HVB) and SVC (HVX) electrodes only. Energy The device can deliver up to 30 joules,1 which corresponds to a stored energy of 35 joules.2 For a comparison of delivered and stored energy levels, see Table 1-7 on page 11. The energy level is programmed independently for each cardioversion therapy. 1 2 Delivered energy of biphasic waveform into 75 ohms. Derived from the peak capacitor voltage, which is always greater than the energy delivered by the device. Marquis DR 7274 Reference Manual 133 Chapter 7 Treating VT and FVT with cardioversion Waveform The device delivers cardioversion therapies using a biphasic waveform, which consists of two phases. In the first phase, current is delivered until the pulse decays to 50% of its original voltage. The device then truncates the phase and reverses the current pathway for the second phase. When the second phase of the pulse decays to 50% of its original voltage, the device truncates the pulse. Figure 7-8. Cardioversion pulse waveform Voltage 1 2 Time 3 74Biphasic.eps 134 1 The first segment of the pulse decays to 50% of the original voltage. 2 The pulse is truncated and the polarity is reversed. 3 The second segment of the pulse decays to 50% and then is truncated. Confirming VT or FVT after detection When the device begins charging its capacitors for a cardioversion therapy, it monitors the cardiac rhythm to ensure that the arrhythmia remains present before delivering the therapy. The device confirms the continued presence of the tachyarrhythmia using a sequence of confirmation intervals, each lasting 60 ms plus the programmed VT Interval.1 It classifies any ventricular event that occurs within the confirmation interval as “arrhythmic” and any events after the interval as “normal.” 1 Or VF Interval, if VT Detection is set to Off or Monitor. Marquis DR 7274 Reference Manual Treating tachyarrhythmia episodes Treating VT and FVT with cardioversion 135 On each ventricular event during charging, the device reviews the last five events since charging started. If four of the last five ventricular events were normal, the device stops charging and cancels the therapy (see Figure 7-9). Figure 7-9. Cardioversion therapy cancelled when VT terminates spontaneously 1 2 3 4 ECG A R A R A R A R A R A P A P A S A S A S V S V S V S V S V S V C S E 1 2 V P V P 74CV-abort.eps Marker Channel V S Confirmation Interval Refractory 100 ms Normal Event Ratio 5 400 ms 5 200 ms 1 The device has detected VT, is charging its capacitors for cardioversion, and is confirming the arrhythmia using a confirmation interval of 460 ms (VT Interval + 60 ms). 2 The VT spontaneously terminates, and normal sinus rhythm resumes. 3 The charging period ends, and synchronization starts. At this point, the device stops the confirmation process and disregards the normal event ratio. Any normal event after charging will abort the cardioversion therapy. 4 The cardioversion therapy aborts when a normal event occurs during synchronization. Synchronizing cardioversion after charging Once charging ends, the device attempts to synchronize the cardioversion therapy to a qualified ventricular event but also continues to confirm the presence of the arrhythmia. An event qualifies for delivery if it is non-refractory and meets one of the following conditions: ■ the second arrhythmic ventricular event and is outside an AVP interval ■ the third arrhythmic ventricular event Marquis DR 7274 Reference Manual Chapter 7 Treating VT and FVT with cardioversion The device confirms the presence of the detected arrhythmia differently after charging than it does during charging. After charging, the device aborts the cardioversion therapy if one of the following events occur: ■ a normal ventricular event ■ three consecutive V-V intervals less than 200 ms The device continues to attempt to synchronize until it delivers the cardioversion therapy or it fails to confirm the presence of the arrhythmia and cancels the therapy. Figure 7-10. VT confirmed and cardioversion synchronized to an arrhythmic event 1 2 3 4 ECG A R A R A R A R A R A R A R A R A R A R A S A S A R Marker Channel V S V S V S V S V S V S V S V S V S CV ER V S 100 ms 200 ms C D 74CV-confirm.eps 136 V P Confirmation Interval Refractory 200 ms 1 The device has detected VT, is charging its capacitors for cardioversion, and is confirming the arrhythmia using a confirmation interval of 460 ms (VT Interval + 60 ms). 2 The device completes charging and starts a 100 ms refractory period, while continuing confirmation. A refractory event occurs, and the device starts a new confirmation interval. 3 An arrhythmic ventricular event occurs, and the device starts a 200 ms refractory period. 4 On the second arrhythmic event after charging, the device delivers the cardioversion therapy. Marquis DR 7274 Reference Manual Treating tachyarrhythmia episodes Treating VT and FVT with cardioversion Refractory events – During the synchronization process, the device classifies events as refractory if they occur during any of the following refractory periods: ■ 400 ms after charging starts ■ 400 ms after a ventricular or atrial paced event ■ 200 ms after a ventricular sensed event ■ 100 ms after charging ends (if the ventricular interval is shorter than the confirmation interval) AVP events – The device postpones a defibrillation or cardioversion therapy scheduled to be delivered during an Atrial Vulnerable Period (AVP) until the next qualifying event. The AVP is a 250 ms interval, starting 150 ms after a sensed atrial event, during which a high voltage pulse might induce an atrial tachyarrhythmia. AVP operation can postpone the therapy for only one event during synchronization. Bradycardia pacing during cardioversion On the first ventricular event after charging, the device changes the pacing mode to VVI and sets the pacing interval as follows: ■ If the programmed pacing mode is ODO, the device uses a 2000 ms (30 ppm) pacing interval. ■ If the programmed pacing mode is DDD, DDI, VVI, AAI, DDDR, DDIR, VVIR, or AAIR, the device uses the pacing interval that was in effect before charging. After a cardioversion therapy Immediately after delivering a cardioversion therapy, the device starts both of the following operations: ■ a post shock blanking period of 520 ms in each chamber ■ a VVI pacing cycle at 50 ppm (escape interval of 1200 ms) After the first ventricular event, the programmed bradycardia pacing mode resumes, using the Post Shock Pacing parameters. See “Providing pacing after high voltage therapies” on page 196. The device monitors for either the end of the episode or redetection. Marquis DR 7274 Reference Manual 137 138 Chapter 7 Treating VT and FVT with cardioversion After a cancelled cardioversion therapy If the device cancels a cardioversion therapy, it reverts immediately to the programmed bradycardia pacing settings (not the Post-Shock pacing parameters). The device resumes monitoring for arrhythmias after the next paced or sensed ventricular event. If the device detects the same arrhythmia again, it attempts to synchronize and deliver the same therapy. However, if the episode ends, it resumes normal detection. Note: If the device cancels the cardioversion therapy, leaving energy stored on the capacitors, the delivered energy of the next high voltage therapy may be higher than the programmed value. Marquis DR 7274 Reference Manual Treating tachyarrhythmia episodes Optimizing therapy with Smart Mode and Progressive Episode Therapies Optimizing therapy with Smart Mode and Progressive Episode Therapies Smart Mode disables an ATP therapy that has been unsuccessful in four consecutive episodes so that the device can treat subsequent episodes more quickly with therapies that have been effective. Therapies disabled by Smart Mode are displayed on the therapy parameters screens with the Off-SM indicator. Progressive Episode Therapies skips therapies or modifies high voltage energy levels to ensure that each therapy delivered during an episode is at least as aggressive as the previous therapy. For more information, see ■ “Details about Smart Mode” on page 141 ■ “Details about Progressive Episode Therapies” on page 142 Parameters * Medtronic nominal setting Smart Mode – Disables a programmed ATP therapy if it has been unsuccessful in terminating tachyarrhythmias. On or Off* Progressive Episode Therapies – Ensures each therapy delivered during an episode is at least as aggressive as the previous therapy. On or Off* Considerations Review the following information before programming the Smart Mode and Progressive Episode Therapies parameters. Smart Mode and therapy selection – If Smart Mode disables an ATP therapy, either select a different therapy or modify the current therapy settings to improve its effectiveness. Smart Mode unsuccessful therapy count – The device resets its count of unsuccessful therapies if any parameter of any automatic therapy is reprogrammed (including ATP, VF, FVT, or VT therapies). Marquis DR 7274 Reference Manual 139 140 Chapter 7 Optimizing therapy with Smart Mode and Progressive Episode Therapies Progressive Episode Therapies – If Progressive Episode Therapies is on, the device may skip programmed ATP therapies and deliver cardioversion, or it may deliver a high voltage therapy at a higher energy level than is programmed. This ensures that each therapy delivered during an ongoing episode is at least as aggressive as the previous therapy. Restrictions Review the following information before programming Smart Mode. Smart Mode – You can turn on Smart Mode for only the first four VT or FVT therapies for which an ATP therapy is selected. How to program Smart Mode 1. Select Params > Therapies. 2 2. Select [VT] or [FVT]. 3. For each enabled ATP therapy, choose a value for the Smart Mode parameter. 4. Select [PROGRAM]. 1 3 4 Marquis DR 7274 Reference Manual Treating tachyarrhythmia episodes Optimizing therapy with Smart Mode and Progressive Episode Therapies Details about Smart Mode When Smart Mode is on for an ATP therapy, the device monitors the success of that therapy. If there are four consecutive episodes in which all sequences of the ATP therapy are delivered but are unsuccessful, the device disables that ATP therapy. Table 7-2 shows an example of Smart Mode operation. An ATP therapy disabled by Smart Mode is designated by “Off-SM” in the counter data and parameter screens and reports. You can re-enable a therapy disabled by Smart Mode by setting the Therapy Status parameter for that therapy to On. Table 7-2. Smart Mode operation example Episode Therapy sequence Comments 1. VT VT Rx 1 → VT Rx 2 VT Rx 1 unsuccessful. 2. VT → VF VT Rx 1 → VF Rx 1 VT Rx 1 unsuccessful in second consecutive episode. 3. VT VT Rx 1 → VT Rx 2 VT Rx 1 unsuccessful in third consecutive episode. 4. VT VT Rx 1 → VT Rx 2 VT Rx 1 unsuccessful in fourth consecutive episode: Smart Mode disables VT Rx 1. 5. VT VT Rx 2 Device delivers VT Rx 2 (skipping the disabled VT Rx 1). Note: The device resets the count of unsuccessful therapy attempts for an ATP therapy if any of the following situations occur: ■ The ATP therapy successfully treats an arrhythmia. ■ Any parameter of any automatic therapy is re-programmed (including ATP, VF, FVT, or VT therapies). ■ A VT, FVT, or VF episode occurs during which the therapy is not delivered. Marquis DR 7274 Reference Manual 141 142 Chapter 7 Optimizing therapy with Smart Mode and Progressive Episode Therapies How to program Progressive Episode Therapies To program Progressive Episode Therapies: 1. Select Params > Therapies. 2. Select Shared Settings... . 3. Select a value for the Progressive Episode Therapies parameter. 4. Select [OK]. 1 5. Select [PROGRAM]. 5 2 3 4 Details about Progressive Episode Therapies Progressive Episode Therapies ensures that, if a therapy is unsuccessful, all subsequent therapies in an ongoing episode are at least as aggressive as preceding therapies. Therapies are ranked by aggressiveness as follows: ■ Defibrillation therapies are considered more aggressive than cardioversion therapies and are ranked by energy level. ■ Cardioversion therapies are considered more aggressive than ATP therapies and are ranked by energy level. ■ ATP therapies are considered least aggressive and are ranked equally in aggressiveness. Marquis DR 7274 Reference Manual Treating tachyarrhythmia episodes Key terms When a therapy is delivered, Progressive Episode Therapies makes therapies in the slower detection zones unavailable for the remainder of the episode. For example, if a VF defibrillation therapy is delivered, only VF therapies are available for the remainder of the episode. If a defibrillation or cardioversion therapy is delivered, Progressive Episode Therapies makes any ATP therapies unavailable for the remainder of the episode. For example, if a VT cardioversion therapy is delivered, and the FVT therapies contain an ATP therapy, that ATP therapy is skipped if the arrhythmia is redetected as FVT. If a defibrillation or cardioversion therapy is unsuccessful, and the next scheduled therapy is a lower energy therapy, Progressive Episode Therapies does not skip that therapy. Instead, it resets the energy value for the next therapy to that of the last delivered therapy. Note: The device does not suspend VT detection for 17 events following a defibrillation therapy that is delivered as a result of Progressive Episode Therapies operation. Key terms Active Can – option to select the device case as an active electrode for delivering defibrillation and cardioversion therapies. Antitachycardia Pacing (ATP) – therapies for VT or FVT that deliver rapid sequences of pacing pulses to terminate the VT. See also Burst, Ramp, and Ramp+. Atrial Vulnerable Period (AVP) – 250 ms synchronization interval, starting 150 ms after a sensed atrial event, when a ventricular shock could trigger an atrial tachyarrhythmia. biphasic – high voltage therapy waveform in which most of the energy is delivered from anode to cathode, and the remaining energy is delivered from cathode to anode. Marquis DR 7274 Reference Manual 143 144 Chapter 7 Key terms Burst pacing – ATP therapy that delivers sequences of pacing pulses with an interval that is a programmable percentage of the tachycardia cycle length. With each sequence of Burst pacing delivered, the device shortens the pacing interval by a programmable interval. cardioversion – therapy designed to treat VT and FVT episodes with a programmable energy shock, which must be synchronized to an arrhythmic ventricular event. charging period – time for the device to store the programmed energy (charge) in its high voltage capacitors. Confirm VF after initial detection – see VF confirmation. current pathway – electrical route across which defibrillation and cardioversion therapies are delivered. A therapy can be separately programmed to be delivered from the Can (HVA) electrode and/or SVC (HVX) electrode (depending on the implanted system and the Active Can setting) to the RV (HVB) electrode, or vice versa. defibrillation – therapy designed to treat VF episodes with a programmable energy shock. Unless VF confirmation is active, the device delivers a defibrillation therapy even if it cannot synchronize to a ventricular event. HVA/HVB/HVX – high voltage electrode identifiers. In a standard lead configuration, HVA is the titanium body of the device; HVB is the RV electrode; and HVX is the SVC electrode. Progressive Episode Therapies – skips therapies or modifies high voltage energy levels to ensure that each therapy delivered during an episode is at least as aggressive as the previous therapy. Ramp pacing – ATP therapy that delivers pacing pulses with progressively shorter pacing interval per pulse. Each sequence of Ramp pacing delivered during a therapy includes an additional pacing pulse. Marquis DR 7274 Reference Manual Treating tachyarrhythmia episodes Key terms Ramp+ pacing – ATP therapy that delivers pacing pulses at programmable intervals that are based on percentages of the tachycardia cycle length. Each sequence of Ramp+ pacing delivered during a therapy includes an additional pacing pulse. sequence – one programmable set of Burst, Ramp, or Ramp+ pacing pulses. Smart Mode – disables an ATP therapy that has been unsuccessful in four consecutive episodes so that the device can treat subsequent episodes more quickly with therapies that have been effective. synchronization – period during defibrillation and cardioversion therapies when the device attempts to deliver the therapy shock simultaneously with a sensed ventricular event. therapy – treatment for a detected arrhythmia. A therapy consists of a cardioversion or defibrillation shock or a series of ATP sequences. VF confirmation – programmable option that causes the device, for the first defibrillation therapy during a VF episode, to confirm the presence of VF during and after charging and to synchronize the therapy to an arrhythmic ventricular event. Marquis DR 7274 Reference Manual 145 146 Chapter 7 Key terms Marquis DR 7274 Reference Manual Treating bradycardia 8 Providing basic pacing therapy Dual-chamber pacing Single chamber pacing 148 154 164 Enhancing pacing for optimal cardiac output Adjusting the pacing rate with Mode Switch Preventing competitive atrial pacing 167 180 184 Detecting and preventing pacemaker-mediated tachycardia Providing Ventricular Safety Pacing 193 Providing pacing after high voltage therapies Key terms 189 196 198 Marquis DR 7274 Reference Manual 8 148 Chapter 8 Providing basic pacing therapy Providing basic pacing therapy The device provides pacing therapies to support pacemaker dependent patients, to correct certain arrhythmias, and to ease the heart back into an intrinsic rhythm after high voltage therapy. Basic pacing is programmed by selecting a pacing mode and pacing rates. Additional parameters are also used to control and enhance pacing based on the pacing mode selected. See details about basic pacing modes on page 152. Parameters * Medtronic nominal setting Atrial Lead Ventricular Lead Amplitude (V) – Voltage setting for pacing pulse. 0.5, 1, . . ., 3*, 3.5, 4, 5, 6 Modes: DDDR, DDD, DDIR, DDI, AAIR, AAI, DOO 0.5, 1, . . ., 3*, 3.5, 4, 5, 6 Modes: DDDR, DDD, DDIR, DDI, VVIR, VVI, DOO, VOO Pace Blanking (ms) – Time interval during which sensing is disabled after a pacing pulse. This value is also used during post-shock blanking. 150, 160, . . ., 200*, . . ., 250 Modes: DDDR, DDD, DDIR, DDI, AAIR, AAI 150, 160, . . ., 200*, . . ., 440 Modes: DDDR, DDD, DDIR, DDI, VVIR, VVI Pulse Width (ms) – duration setting for pacing pulse. 0.03, 0.06, 0.1, 0.2, 0.3, 0.4*, . . ., 1.6 Modes: DDDR, DDD, DDIR, DDI, AAIR, AAI, DOO 0.03, 0.06, 0.1, 0.2, 0.3, 0.4*, . . ., 1.6 Modes: DDDR, DDD, DDIR, DDI, VVIR, VVI, DOO, VOO Sensitivity (mV) – setting for the minimum electrical signal sensed as an intrinsic event. 0.15, 0.3*, 0.45, 0.6, 0.15, 0.3*, 0.45, 0.6, 0.9, 1.2, 1.5, 2.1 0.9, 1.2 Modes: All Modes: All Mode – NBG Codea describes device functionality by indicating chamber paced, chamber sensed, response to sensed event, and rate response capability. Marquis DR 7274 Reference Manual DDD, DDI, DDDR*, DDIR, AAIR, AAI, VVIR, VVI, ODO, DOO, VOO Treating bradycardia Providing basic pacing therapy (continued) * Medtronic nominal setting Lower Rate (ppm, – Minimum pacing rate 30, 35, . . ., 60*, 70, to maintain adequate heart rate during periods of 75, . . ., 150 inactivity. Modes: all except ODO min-1) Upper Sensor Rate (ppm, min-1) – Maximum upper limit for the sensor-indicated rate during physical activity. a b 80, 85, . . ., 120*, . . ., 150 Modes: DDD,b DDDR, DDIR, AAIR, VVIR N=North American Society of Pacing and Electrophysiology (NASPE), B=British Pacing and Electrophysiology Group (BPEG), G=Generic Pacemaker Code Available in DDD mode only when Mode switch is programmed On. Considerations Review the following information before programming basic bradycardia parameters. Sensitivity – The programmed sensitivity values apply to both tachyarrhythmia detection and bradycardia pacing. Always verify that the device senses properly during VF. If the device is not sensing or detecting properly, program detection and therapies off, and evaluate the system (making sure to monitor the patient for life-threatening arrhythmias until you enable detection and therapies again). You may need to reposition or replace the ventricular sensing lead to achieve proper sensing. See “Setting up sensing” on page 61. Pulse Width and Amplitude – To help maintain consistent capture, these parameters are independently programmable for atrial and ventricular pacing and post-shock pacing. Consider the following information when programming pulse width and amplitude parameters: ■ Pacing pulses must be delivered at an adequate safety margin above the stimulation thresholds. ■ The pulse width and amplitude settings affect the longevity of the device, particularly if the patient requires a high percentage of bradycardia pacing therapy. ■ Pulse width and amplitude settings can affect cross-chamber sensing. If you set the pulse width and amplitude values too high, pacing in one chamber may be sensed in the other chamber, which could cause inappropriate inhibition of pacing. Marquis DR 7274 Reference Manual 149 150 Chapter 8 Providing basic pacing therapy ■ A separately programmable set of pacing parameters is used after delivery of a high voltage therapy. See “Providing pacing after high voltage therapies” on page 196. Pacing Mode – Determine the appropriate pacing mode based on the patient’s current cardiac condition (see Table 8-1). Table 8-1. Determining the appropriate pacing mode Reliable pacing and sensing in atrium? Adequate AV conduction? Adequate SA Suggested node function? mode NO a VVIR, VVI b YES NO NO DDDR YES NO b YES DDDR, DDD YES YES NO DDDR, DDIR YES YES YES DDDR, DDD, DDIR, DDI a b Example: persistent atrial fibrillation or unexcitable atrium Example: complete or transient AV block Pace Blanking – Pace blanking can affect same chamber pacing. If you program the pace blanking periods too short, pacing output artifacts may be sensed which could cause inappropriate inhibition of pacing. Programming the atrial pace blanking period to a value greater than 240 ms increases the risk for atrial competition and under-sensing at high rates. Upper Sensor Rate in DDD mode – The Upper Sensor Rate is used in DDD mode only if Mode Switch is on. However, the Upper Sensor Rate must be programmed to a value less than or equal to the Upper Tracking Rate. Note: Upper Sensor Rate can be programmed higher, lower, or equal to the Upper Tracking Rate when in DDDR mode, except when Mode Switch is programmed On. Upper rates and refractory periods – A combination of high Upper Sensor Rate, high Upper Tracking Rate, and a long refractory period may result in competitive atrial pacing if Non-Competitive Atrial pacing is not enabled. See “Preventing competitive atrial pacing” on page 184. Marquis DR 7274 Reference Manual Treating bradycardia Providing basic pacing therapy Restrictions Review these programming restrictions before programming basic bradycardia parameters. Bradycardia pacing and tachyarrhythmia detection – To ensure reliable ventricular tachyarrhythmia detection, the device software regulates the programmable values available for bradycardia pacing and tachyarrhythmia detection. See “Parameter interlocks” on page 386. How to program bradycardia pacing parameters 1. Select Params icon > Brady Pacing. 2. Select the pacing Mode. 2 3. Set the A-V interval settings for Paced AV and Sensed AV, if available for the selected mode. 4 1 3 5 6 4. Set the desired atrial and ventricular Amplitude, Pulse Width, Sensitivity, and Pace Blanking for pacing, if available for the selected mode. 5. Set the PVARP and PVAB settings, if available for the selected mode. 6. Select [PROGRAM]. For additional Brady pacing programming instructions, refer to the following sections in this chapter. Marquis DR 7274 Reference Manual 151 152 Chapter 8 Providing basic pacing therapy Details about basic bradycardia pacing Table 8-2 lists pacing parameters and features available based on the selected pacing mode. Table 8-2. Bradycardia pacing parameters available for selected pacing modes DDDR DDD DDIR DDI AAIR AAI VVIR VVI DOO VOO ODOa atrial amplitude/ post-shock atrial amplitude DDDR DDD DDIR DDI AAIR AAI atrial pace blankingb DDDR DDD DDIR DDI AAIR AAI atrial pulse width/ post-shock atrial pulse width DDDR DDD DDIR DDI AAIR AAI atrial refractory period AAIR AAI DOO DOO atrial sensitivity DDDR DDD DDIR DDI AAIR AAI VVIR VVI DOOc VOO ODO lower rate DDDR DDD DDIR DDI AAIR AAI VVIR VVI DOO VOO mode switch DDDR DDD non-competitive atrial pacing DDDR DDD paced AV interval DDDR DDD DDIR DDI PMT intervention DDDR DDD PVAB DDDR DDD DDIR DDI PVARP DDDR DDD DDIR DDI PVC response DDDR DDD DDIR DDI rate adaptive AV DDDR DDD DDIR DDId rate response DDDR DDDe DDIR sensed AV interval DDDR DDD sensor-varied PVARP setting DDDR DOO AAIR VVIR DDIR DDId single chamber hysteresis AAI VVI upper sensor rate DDDR DDDe DDIR upper tracking rate DDDR DDD ventricular amplitude/post-shock ventricular amplitude DDDR DDD DDIR DDI AAIR AAI VVIR VVI DOO VOO ODO ventricular pace blankingb DDDR DDD DDIR DDI Marquis DR 7274 Reference Manual AAIR VVIR VVIR VVI Treating bradycardia Providing basic pacing therapy Table 8-2. Bradycardia pacing parameters available for selected pacing modes (continued) DDDR DDD DDIR DDI AAIR AAI VVIR VVI DOO VOO ODOa ventricular pulse width/ post-shock ventricular pulse width DDDR DDD DDIR DDI AAIR AAI VVIR VVI DOO VOO ODO ventricular rate stabilization DDDR DDD DDIR DDI VVIR VVI ventricular safety pacing DDDR DDD DDIR DDI ventricular sensitivity a b c d e DDDR DDD DDIR DDI AAIR AAI VVIR VVI DOOc VOOc ODO Brady pacing is disabled in ODO mode. The programmed value is also used for post-shock blanking. Parameter can be selected, but is not pertinent in this mode. When VRS is on. When Mode Switch is on. For more information about ■ Rate Response, Rate Adaptive AV, and Ventricular Rate Stabilization, see “Enhancing pacing for optimal cardiac output” on page 167. ■ Mode switch, see “Adjusting the pacing rate with Mode Switch” on page 180. ■ Non-Competitive Atrial Pacing, see “Preventing competitive atrial pacing” on page 184. ■ PVC Response and PMT Intervention, see “Detecting and preventing pacemaker-mediated tachycardia” on page 189. ■ Ventricular Safety Pacing, see “Providing Ventricular Safety Pacing” on page 193. Marquis DR 7274 Reference Manual 153 154 Chapter 8 Dual-chamber pacing Dual-chamber pacing Dual chamber pacing modes rely on the basic pacing parameters and several additional atrial parameters. See details about dual-chamber pacing on page 156. Parameters * Medtronic nominal setting Mode Switch – automatically switches the pacing mode to DDIR during an atrial tachyarrhythmia. Modes: DDDR, DDD Enable On, Off* A. Detect Rate (bpm, min-1) 120, 125, . . ., 175* Non-Competitive Atrial Pacing (NCAP) – Modes: DDDR, DDD delays an atrial pace scheduled to fall within the relative atrial refractory period to prevent triggering an atrial tachyarrhythmia. Enable On*, Off Interval (ms) 200, 250, 300*, 350, 400 Paced AV (ms) – time interval between a paced atrial event and the following paced ventricular event. 30, 40, . . ., 180*, . . ., 350 Modes: DDDR, DDD, DDIR, DDI, DOO PMT Intervention – automatically detects PMT and responds by interrupting atrial tracking for one cycle. Modes: DDDR, DDD Enable On, Off* Post-Ventricular Atrial Blanking (PVAB) (ms) – sets the interval during which sensed atrial events are ignored by bradycardia pacing features. 100, 110, . . ., 150*, . . ., 310 Modes: DDDR, DDD, DDIR, DDI Post Ventricular Atrial Refractory Period (PVARP) (ms) – prevents sensing of retrograde P-waves in DDD and DDDR modes. In DDIR and DDI modes PVARP prevents atrial inhibition from retrograde P-waves. Varied,a 150, 160, . . ., 310*, . . ., 500 Modes: DDDR, DDD, DDIR, DDI Marquis DR 7274 Reference Manual Treating bradycardia Dual-chamber pacing (continued) * Medtronic nominal setting PVC Response – detects a PVC and Modes: DDDR, DDD, responds by extending the PVARP to 400 DDIR, DDI ms (if the currently programmed or Sensor-Varied PVARP is less than 400 ms) Enable On*, Off Modes: DDDR, DDD, Rate Adaptive AV – shortens the AV DDIR, DDIb intervals at high atrial rates, imitating a normal heart’s physiologic response by shortening AV conduction time as the heart rate increases and lengthening conduction as the heart rate decreases. Enable On*, Off Start Rate (bpm, min-1) Stop Rate (bpm, min-1) 50, 55, 60*, . . ., 145 55, 60, . . ., 120*, . . ., 150 Minimum PAV (ms) 30, 40, . . ., 140*, . . ., 350 Minimum SAV (ms) 30, 40, . . ., 110*, . . ., 350 Sensed AV (ms) – Time interval between a 30, 40, . . ., 150*, . . ., 350 sensed atrial event and the following paced Modes: DDDR, DDD ventricular event. Upper Tracking Rate (ppm, min-1) – Maximum ventricular pacing rate in response to sensed atrial events. 80, 85, . . ., 120*, . . ., 150 Modes: DDDR, DDD Ventricular Safety Pacing – prevents Modes: DDDR, DDD, inappropriate inhibition of ventricular pacing DDIR, DDI due to cross chamber sensing of an atrial pace. Enable a b On,* Off The Varied setting for PVARP is not available in DDD mode. RAAV applies when VRS is programmed On. Marquis DR 7274 Reference Manual 155 156 Chapter 8 Dual-chamber pacing Considerations Review the following information before programming dual chamber pacing parameters. Paced AV and Sensed AV – The Sensed AV should usually be programmed to a shorter duration than the Paced AV (typically 30 to 50 ms shorter). In patients with normal AV nodal conduction, AV intervals should be programmed to promote intrinsic AV conduction and ventricular depolarization. Upper Tracking Rate – The Upper Tracking Rate should be programmed to a value less than the 2:1 block rate. See “Programming considerations for atrial rates” on page 161. Details about dual-chamber pacing In dual chamber modes, sensing and pacing occur in both chambers. The dual chamber pacing modes provided by the device include DDDR, DDD, DDIR, and DDI. In the DDD mode, pacing occurs at the lower rate in the absence of intrinsic atrial activity. In the DDI pacing mode, pacing always occurs at the lower rate. In the DDDR and DDIR modes, pacing occurs at the sensor-indicated rate. See “Details about Rate Responsive Pacing” on page 171. DDDR and DDD modes DDDR and DDD are atrial tracking pacing modes. Atrial tracking means that when the device senses an intrinsic atrial event, it schedules a ventricular pace in response. The delay between the sensed atrial event and the corresponding ventricular pace is the programmed Sensed AV interval. If the current pacing interval ends before the device senses an atrial event, the device paces the atrium and then schedules a ventricular pace after the Paced AV interval. If a ventricular sensed event occurs during the Sensed AV or the Paced AV interval, ventricular pacing is inhibited. Note: A sensed atrial event that occurs during the Post-Ventricular Atrial Refractory Period (PVARP) is classified as refractory, does not inhibit atrial pacing, and is not tracked (see Figure 8-1). Marquis DR 7274 Reference Manual Treating bradycardia Dual-chamber pacing Figure 8-1. Example of dual chamber pacing: DDDR mode 1 2 3 A P A S A R ECG A P A P A S V P V S V S V P DDDR.eps Marker Channel V P Sensor-indicated pacing interval A-V interval PVARP 200 ms 1 Atrial paced event starts a Paced AV interval. 2 Atrial sensed event starts a Sensed AV interval. 3 Atrial event that is sensed during PVARP is not tracked. DDIR and DDI modes In the DDIR and DDI modes, sensed atrial events are not tracked. When an atrial event is sensed, atrial pacing is inhibited, but a Sensed AV is not started. Instead, ventricular pacing is delivered at the current pacing rate (for example, at the lower rate or sensor-indicated rate). If the current pacing interval ends before the device senses an atrial event, the device paces the atrium and then schedules a ventricular pace after the Paced AV interval. If a ventricular sensed event occurs during the Paced AV interval, ventricular pacing is inhibited. Note: A sensed atrial event that occurs during the Post-Ventricular Atrial Refractory Period (PVARP) is classified as refractory and does not inhibit atrial pacing (see Figure 8-2). Marquis DR 7274 Reference Manual 157 Chapter 8 Dual-chamber pacing Figure 8-2. Example of dual chamber pacing: DDIR mode 1 2 3 A P A S A R ECG A P A P Marker Channel V P V P V P DDIR.eps 158 V P Sensor-indicated V-V interval A-V interval PAV PAV PAV PVARP 200 ms 1 Atrial paced event starts a Paced AV interval. 2 Atrial sensed event inhibits the scheduled atrial pace but does not start a Sensed AV interval (is not tracked). 3 Atrial event that is sensed during PVARP does not inhibit the scheduled atrial pace. Paced AV interval The programmable Paced AV interval is the time between a paced atrial event and the following paced ventricular event. The ventricle is paced at the end of the Paced AV interval unless a ventricular event is sensed. Note: The Paced AV interval is programmable only for dual chamber pacing modes. The programmed duration for the Paced AV interval may change, depending on how the following parameters are programmed: ■ Rate Adaptive AV changes the Paced AV interval as the overall pacing rate changes. ■ Non-Competitive Atrial Pacing may shorten the Paced AV interval while maintaining a stable ventricular rate. ■ Ventricular Safety Pacing may shorten the Paced AV interval. Marquis DR 7274 Reference Manual Treating bradycardia Dual-chamber pacing Sensed AV interval The Sensed AV interval is the time between a sensed atrial event and the following paced ventricular event. The ventricle is paced at the end of the Sensed AV interval unless a ventricular event is sensed. Note: The Sensed AV interval setting is programmable only for DDDR and DDD pacing modes. The programmed duration for the Sensed AV interval may change depending on either of the following conditions: ■ Wenckebach operation, which extends the Sensed AV while tracking a fast intrinsic atrial rate ■ Rate Adaptive AV, which changes the Sensed AV interval as the overall atrial rate changes Post-Ventricular Atrial Refractory Period The Post-Ventricular Atrial Refractory Period (PVARP) follows a paced, sensed, or refractory sensed ventricular event. An atrial event sensed during this interval is classified as refractory and does not inhibit a scheduled atrial pace or start a Sensed AV interval. The PVARP setting is only programmable for dual chamber pacing modes (except DOO mode). ■ In the DDDR and DDD modes, the PVARP setting prevents the sensing of retrograde P-waves that could initiate a pacemaker mediated tachycardia. ■ In the DDDR and DDD modes, the PVARP setting prevents the inhibition of atrial pacing based on sensed retrograde P-waves. PVARP should be programmed to a value longer than the VA interval (retrograde) conduction time. How PVARP interacts with other features – The PVARP setting ■ does not affect PR Logic criteria ■ may be extended by the PVC Response feature or the PMT Intervention feature Marquis DR 7274 Reference Manual 159 160 Chapter 8 Dual-chamber pacing Using the Varied setting – If the PVARP parameter is set to Varied, the duration of the PVARP is based on the current pacing rate. As the pacing rate increases, the PVARP becomes shorter. The Varied setting provides different uses depending on the programmed pacing mode: ■ In the DDDR mode, the sensor-varied PVARP setting provides – enhanced protection against PMT at lower rates by providing longer PVARPs at low sensor-indicated rates – tracking of higher atrial rates (providing a higher 2:1 block rate) by shortening the PVARP at high sensor-indicated rates In the DDDR mode, the sensor-varied PVARP ranges from the minimum PVARP (PVAB value) at high rates to a maximum of 400 ms at low rates. ■ In the DDIR and DDI modes, the sensor-varied PVARP setting provides – improved AV synchrony by preventing inhibition of atrial pacing by an atrial sense early in the VA interval – reduced likelihood of competitive atrial pacing at high sensor-indicated rates and when the pacing rate increases because of Ventricular Rate Stabilization In DDIR and DDI modes, the sensor-varied PVARP is limited only by the PVAB value. Within the minimum and maximum boundaries for any dual chamber mode, the PVARP is automatically adjusted to maintain 300 ms between the end of PVARP and the next scheduled atrial pace. Post-Ventricular Atrial Blanking Period The Post-Ventricular Atrial Blanking (PVAB) period is a programmable interval during which sensed atrial events are ignored by the bradycardia pacing features. However, the atrial events sensed during PVAB are still used by the PR Logic Criteria. Interactions with other features – Atrial events falling within the PVAB do not affect Rate Adaptive AV, NCAP, PVC Response, or PMT Intervention.1 When Sensor-Varied PVARP is enabled, the programmable PVAB value acts as the minimum PVARP value. 1 PVAB does not affect Mode Switch. Marquis DR 7274 Reference Manual Treating bradycardia Dual-chamber pacing Programming considerations for atrial rates In DDDR and DDD modes, the fastest atrial rate the device can track is determined by the sum of the Sensed AV and the Post-Ventricular Atrial Refractory Period. This is referred to as the Total Atrial Refractory Period (TARP). Device behavior at high atrial rates in these modes is determined by the relationship between the TARP and the Upper Tracking Rate interval and/or Upper Sensor Rate interval. In the DDDR mode, the Upper Sensor Rate interval also must be considered. Note: The upper sensor rate also applies to DDD mode with Mode Switch on. 2:1 Block Rate – If the intrinsic atrial interval is shorter than the TARP, some atrial events occur during the PVARP. These refractory events are not tracked and do not start a Sensed AV interval. At the rate where this first occurs, ventricular tracking occurs only on alternate beats resulting in 2:1 block (see Figure 8-3). Because only half of the atrial events are tracked, the ventricular rate drops significantly during 2:1 block. Marquis DR 7274 Reference Manual 161 Chapter 8 Dual-chamber pacing Figure 8-3. Example of the atrial rate exceeding 2:1 block rate 1 ECG A S A R A S A R A S A R Marker Channel V P V P V P 2to1.eps 162 Lower rate interval A-V interval PVARP 200 ms 1 One of every two atrial events occurs during PVARP and is not tracked. You can cause 2:1 block to occur at a higher rate by programming PVARP to Varied, which shortens PVARP, or by turning Rate Adaptive AV on. Both these features shorten the TARP and raise the 2:1 block rate. Rate responsive pacing in the DDDR mode and the Ventricular Rate Stabilization operation can prevent a precipitous rate drop at the 2:1 block point. Notes: When the 2:1 block rate is less than the Upper Tracking Rate, the Upper Tracking Rate cannot be achieved. In the DDDR mode, atrial competition may occur if Upper Sensor Rate exceeds the 2:1 block rate. Wenckebach operation – If the 2:1 block rate is higher than the programmed upper tracking rate, Wenckebach operation may occur. When the intrinsic atrial rate exceeds the upper tracking rate, the device cannot pace the ventricle after the SAV because this would cause the pacing rate to be faster than the upper tracking rate. Marquis DR 7274 Reference Manual Treating bradycardia Dual-chamber pacing In order to maintain the upper tracking rate, Sensed AV extends until the upper tracking rate interval expires. Subsequent Sensed AV intervals require greater extension, until an atrial event falls within the PVARP and is not tracked, as shown in Figure 8-4. In the DDDR and DDD modes, the normal result is a ratio between atrial and ventricular events (3:2, 4:3, and so forth). Figure 8-4. Atrial events in PVARP are not tracked during Wenckebach 1 2 3 ECG A S A S A S A R A P V P V P V P Wenke.eps Marker Channel V P Lower rate interval A-V interval SAV SAV SAV PAV PVARP 200 ms 1 Sensed AV intervals extend so that ventricular paces will not violate Upper Tracking Rate. 2 Atrial event occurs during PVARP and is not tracked. 3 Lower Rate interval expires and the device paces the atrium. The Wenckebach rate can be smoothed by sensor-driven ventricular pacing (in the DDDR mode) or by using VRS to minimize the rate variation. See “Details about Ventricular Rate Stabilization” on page 178. Marquis DR 7274 Reference Manual 163 164 Chapter 8 Single chamber pacing Single chamber pacing Single chamber pacing modes are used to pace either the atrium or the ventricle. In addition to the basic pacing parameters defined on page 148, two programmable parameters are available specifically for single chamber pacing modes. See details about single chamber pacing on page 165. Parameters * Medtronic nominal setting min-1) Single Chamber Hysteresis (bpm, – enables tracking of intrinsic heart rate below programmed Lower Rate to prevent pacing during extended periods of inactivity, such as when a patient is sleeping.a Off*, 30, 40, 50, 60, 70, 80 Modes: AAI, VVI ARP (ms) – Atrial Refractory Period, which prevents atrial inhibition due to sensed far-field R-waves or noise. 150, 160, . . ., 310*, 320, 330, . . ., 500 Modes: AAIR, AAI a See “Enhancing pacing for optimal cardiac output” on page 167. Considerations Review these programming considerations before programming single chamber pacing parameters. Warning: Do not use the AAIR or AAI mode in patients with impaired AV nodal conduction because paced atrial events may not trigger intrinsic ventricular events. Ventricular parameters – Some ventricular parameters are used even when using atrial pacing modes. For example, ventricular sensitivity is used even when the pacing mode is AAIR or AAI because ventricular events are used to detect tachyarrhythmias. Marquis DR 7274 Reference Manual Treating bradycardia Single chamber pacing Single-chamber atrial pacing and tachycardia detection – In the AAIR and AAI modes, atrial timing is not based on ventricular events. Thus, if there is a loss of A-V synchrony, atrial pacing pulses can affect detection accuracy by ■ causing crosstalk1 ■ masking arrhythmic ventricular events with cross-chamber blanking Note: If cross-chamber blanking affects the detection of ventricular events, then the Stability Criterion is also affected. For information about the Stability criterion, see “Enhancing VT detection with the Stability criterion” on page 97. Details about single chamber pacing In the AAI and AAIR modes, the atrium is paced if no intrinsic events are sensed. Pacing occurs at the programmed lower rate in the AAI mode and the sensor-indicated rate in the AAIR mode (see Figure 8-5). Note: During single chamber atrial pacing modes, the device continues sensing ventricular events for tachyarrhythmia detection purposes. Figure 8-5. Example of single-chamber atrial pacing: AAIR Mode 1 ECG A P A R A P A S A P V S V S V S AAIR.eps Marker Channel V S Sensor-indicated A-A interval Atrial Refractory Period 200 ms 1 An atrial event during the Atrial Refractory Period does not restart the A-A pacing interval. 1 Crosstalk is the sensing of a pacing stimulus delivered in the opposite chamber. Marquis DR 7274 Reference Manual 165 Chapter 8 Single chamber pacing In the VVIR and VVI modes, the ventricle is paced if no intrinsic events are sensed. Pacing occurs at the programmed lower rate in the VVI mode and at the sensor-indicated rate in VVIR mode (see Figure 8-6). Note: Atrial sensing and PR Logic criteria operate during single-chamber ventricular pacing. Figure 8-6. Example of single-chamber ventricular pacing: VVIR mode ECG A S A S Marker Channel V P V P V S V P VVIR.eps 166 V P Sensor-indicated V-V interval 200 ms Atrial Refractory Period The Atrial Refractory Period setting is only programmable for the AAI and AAIR single chamber pacing modes. The Atrial Refractory Period (ARP) prevents the inhibition of atrial pacing due to sensed far-field R-waves or noise and occurs after paced and non-refractory sensed atrial events in the AAIR and AAI modes only. Marquis DR 7274 Reference Manual Treating bradycardia Enhancing pacing for optimal cardiac output Enhancing pacing for optimal cardiac output Several pacing features can be used to adjust the pacing rate to maximize cardiac output during fluctuations in the patient’s intrinsic heart rate and level of physical activity. These features are available based on the selected pacing mode. See details about these features: ■ Rate Responsive Pacing, page 171 ■ Rate Adaptive AV (RAAV), page 175 ■ Single Chamber Hysteresis, page 177 ■ Ventricular Rate Stabilization (VRS), page 178 Parameters * Medtronic nominal setting Modes: DDDR, DDD,a DDIR, AAIR, VVIR Rate Responsive Pacing – varies the pacing rate in response to a patient’s physical activity. Rate Response – level of rate 1, 2, . . ., 7*, . . ., 10 response; higher numbers indicate a more aggressive increase in rate for a given level of sensed physical activity. Activity Threshold – minimum physical activity level detected. Low, Medium Low*, Medium High, High Activity Acceleration (sec.) – acceleration time for increasing the pacing rate, measured in seconds. 15, 30*, 60 Activity Deceleration (min.) – deceleration time for decreasing the pacing rate, measured in minutes. Exercise, 2.5, 5*, 10 Rate Adaptive AV – shortens the AV intervals at high atrial rates. Modes: DDDR, DDD, DDIR, DDIb Enable On, Off* Start Rate (bpm, min-1) – sensed rate value that starts the Rate Adaptive AV operation. 50, 55, 60*, . . ., 145 Marquis DR 7274 Reference Manual 167 168 Chapter 8 Enhancing pacing for optimal cardiac output (continued) * Medtronic nominal setting Stop Rate (bpm, min-1) – sensed rate value that stops the Rate Adaptive AV operation. 55, 60, . . ., 120*, . . ., 150 Minimum PAV (ms) – shortest allowable Paced AV interval; used at or above the Stop Rate. 30, 40, . . ., 140*, . . ., 350 Minimum Sensed AV (ms) – shortest allowable Sensed AV interval; used at or above the Stop Rate. 30, 40, . . ., 110*, . . ., 350 Single Chamber Hysteresis (bpm, Off*, 30, 40, 50, 60, 70, 80 min-1) – enables tracking of patient’s Modes: AAI, VVI intrinsic rhythm below programmed Lower Rate to prevent pacing during extended periods of inactivity, such as when a patient is sleeping. Ventricular Rate Stabilization – eliminates the long pause that typically follows a premature ventricular contraction. Modes: DDDR, DDD, DDIR, DDI, VVIR, VVI Enable On, Off* Interval Increment (ms) – value added to the previous V-V interval to determine the current VRS interval. 50, 60, . . ., 150*, . . ., 400 Minimum Interval (ms) – shortest allowable interval. 500*, 550, . . ., 900 a When Mode Switch is on. b When VRS is on. Marquis DR 7274 Reference Manual Treating bradycardia Enhancing pacing for optimal cardiac output Considerations Review these programming considerations before programming Single Chamber Hysteresis, Rate Responsive Pacing, or Rate Adaptive AV. Verify Adequate Cardiac Support – Before programming Single Chamber Hysteresis, verify that the selected hysteresis rate is adequate to support the patient’s cardiac condition. Rate Responsive Pacing ■ When pacing in DDD mode, the Rate Responsive Pacing parameters apply only if Mode Switch is programmed on. ■ If the patient has minimal rate response during exercise, you may need to program the Activity Threshold to a lower setting. ■ The device may pace at higher rates in response to strong environmental vibrations. Such rates are limited by the Upper Sensor Rate. To control this response, program the Upper Sensor Rate to a value that is appropriate to the patient’s condition and/or adjust the Activity Threshold to a less sensitive setting. ■ The sensor-indicated rate does not change during – automatic tachyarrhythmia therapies – system tests – EP study inductions and manual therapies – a patient alert alarm Rate Adaptive AV ■ For patients with normal A-V conduction, configure Rate Adaptive AV parameters to allow intrinsic A-V conduction at rates below 90 ppm (min-1). ■ In DDD mode, Rate Adaptive AV adjusts only the PAV interval during Mode Switch (see page 182) and VRS (see page 178) operations. ■ Rate Adaptive AV is suspended during automatic therapies, system tests, and EP Study operations. Rate Adaptive AV operation resumes once these functions are complete. Marquis DR 7274 Reference Manual 169 170 Chapter 8 Enhancing pacing for optimal cardiac output Restrictions Review the following information before programming Single Chamber Hysteresis or Ventricular Rate Stabilization (VRS). Compatibility – Single Chamber Hysteresis and Ventricular Rate Stabilization cannot be programmed on at the same time. For a complete list of restrictions, see “Parameter interlocks” on page 386. How to program Rate Response 1. Select Params icon > Brady Pacing. 2. Select [Rate Response...]. 3. Set Rate Response, Activity Threshold, Activity Acceleration, and Activity Deceleration to desired values. 1 2 4. Select [OK]. 5. Select [PROGRAM]. 5 3 4 Marquis DR 7274 Reference Manual Treating bradycardia Enhancing pacing for optimal cardiac output Details about Rate Responsive Pacing Rate Responsive Pacing can be used to vary the pacing rate in response to detected physical activity. The device accelerometer provides sensed activity information by detecting body movement. When a rate responsive pacing mode is enabled, pacing is delivered at a sensor-indicated rate. The sensor-indicated rate is determined by the sensed activity and the Rate Response parameter setting and can range between the programmed lower rate and the upper sensor rate. The Rate Response parameter is set to a number between one and ten. The larger the setting number, the more aggressive the indicated pacing rate for a given level of detected activity.1 ■ If the sensor-indicated rate is greater than the current pacing rate, then the pacing rate is accelerated toward the sensor-indicated rate. The speed of this increase is determined by the Activity Acceleration parameter setting. ■ If the sensor-indicated rate decreases, the pacing rate decelerates to the sensor-indicated rate. The rate of deceleration is determined by the programmed Activity Deceleration rate. Figure 8-7. Rate Response setting depends on the programmed Upper Sensor and Lower Rate (nominal setting = 7) pacing rate (ppm) 140 130 Upper Sensor Rate 120 10 9 8 7 6 5 4 3 2 1 110 100 90 80 Lower Rate RateResp.eps 70 60 increasing activity 1 The actual beat-to-beat change is also influenced by the Rate Response Activity Acceleration setting and the sensed level of activity. Marquis DR 7274 Reference Manual 171 Chapter 8 Enhancing pacing for optimal cardiac output Activity Acceleration and Deceleration settings – Activity Acceleration and Deceleration settings determine the amount of time required to reach 90% of the new pacing interval. Figure 8-8 illustrates the acceleration curves at the onset of strenuous exercise and Figure 8-9 illustrates the deceleration curves when exercise is abruptly ended. Figure 8-8. Rate Response Activity Acceleration curves influence how quickly the device responds to increased activity Rate change Upper Sensor Rate Activity Acceleration programmable settings 15 seconds 30 seconds 60 seconds Lower Rate 0 Marquis DR 7274 Reference Manual 1 2 3 Time (minutes) 4 5 74RateAccel.eps 172 Treating bradycardia Enhancing pacing for optimal cardiac output Figure 8-9. Rate Response Activity deceleration curves influence how quickly the device responds to decreased activity Rate change Upper Sensor Rate Activity Deceleration programmable settings 2.5 minutes 5 minutes 10 minutes 0 1 2 3 4 5 6 Time (minutes) 7 8 9 10 74RateDecel.eps Lower Rate Marquis DR 7274 Reference Manual 173 Chapter 8 Enhancing pacing for optimal cardiac output Exercise Deceleration option – If the Activity Deceleration parameter is set to Exercise, the device extends the rate-slowing period following an exercise episode, providing up to 20 minutes of rate deceleration, as illustrated in Figure 8-10. Figure 8-10. Exercise Deceleration option Rate change Upper Sensor Rate 1 2 3 4 Lower Rate 0 2 4 6 8 10 12 14 Time (minutes) 1 5 minute deceleration. 2 20 minute deceleration begins. 3 20 minute deceleration ends. 4 5 minute deceleration curve. Marquis DR 7274 Reference Manual 16 18 20 22 74RateExercise.eps 174 Treating bradycardia Enhancing pacing for optimal cardiac output How to program Rate Adaptive AV 1. Select Params icon > Brady Pacing. 2. Select [Rate Adaptive...]. 3. Set the Rate Adaptive AV parameter to On and select values for Start Rate, Stop Rate, Minimum Paced AV, and Minimum Sensed AV. 1 4. Select [OK]. 5. Select [PROGRAM]. 5 2 3 4 Details about Rate Adaptive AV Rate Adaptive AV can be used to mimic the natural AV conduction time in response to heart rate. Normally, as the heart rate increases, the AV conduction time decreases, and as the heart rate decreases, the AV conduction time increases. Rate Adaptive AV shortens the Sensed AV interval in response to the V-V Median1 and the Paced AV interval in response to the current pacing rate (for example, the lower rate or sensor-indicated rate). Figure 8-11 shows how Rate Adaptive AV parameters interact to shorten the AV intervals in response to higher rates. 1 The median of the last 12 V-V intervals. Marquis DR 7274 Reference Manual 175 Chapter 8 Enhancing pacing for optimal cardiac output Figure 8-11. Rate Adaptive AV operation in DDDR mode Programmed Rate Adaptive Minimum 200 180 160 PAV 140 Stop rate 100 80 0 20 40 60 80 Adaptive.eps SAV 120 Start rate AV Interval (ms) 176 100 120 140 Rate (bpm, min-1) How to program Single Chamber Hysteresis 1. Select Params icon > Brady Pacing. 2. Program pacing mode to VVI or AAI. 3. Select [Additional Features ...]. 2 4. Set the Single Chamber Hysteresis parameter to the desired value. 1 6. Select [PROGRAM]. 3 6 4 5 Marquis DR 7274 Reference Manual 5. Select [OK]. Treating bradycardia Enhancing pacing for optimal cardiac output Details about Single Chamber Hysteresis Single Chamber Hysteresis allows intrinsic heart rates to fall below the programmed lower rate during extended periods of patient inactivity, such as when the patient is sleeping. Hysteresis is programmed to a rate below the lower rate in order to support slow but appropriate intrinsic rhythms. Single Chamber Hysteresis temporarily provides a new lower rate when the intrinsic rate is below the programmed lower rate. The hysteresis rate is applied if it is slower than the intrinsic rate. If the intrinsic rate drops below the hysteresis rate, then pacing is reestablished at the programmed lower rate. Note: The difference between the Hysteresis Rate and the programmed Lower Rate is typically not greater than 30 ppm. If a tachyarrhythmia episode is detected, hysteresis is suspended. Hysteresis remains suspended until the episode terminates. Figure 8-12. Single Chamber Hysteresis supports a slower rate than the programmed lower rate 1 2 3 4 5 ECG A S A S A S A S A S V P V P V S V S V P 74hysteresis.eps Marker Channel V P Lower Rate Interval 200 ms 1 The devices paces in VVI mode at the programmed Lower Rate. 2 After a ventricular sensed event, the device applies the hysteresis interval (shaded bar). 3 A sensed event occurs before the hysteresis interval expires, so hysteresis operation continues. 4 The hysteresis interval expires, and the device paces the ventricle and reapplies the lower rate interval. 5 The ventricle is paced at the lower rate. Marquis DR 7274 Reference Manual 177 178 Chapter 8 Enhancing pacing for optimal cardiac output How to program Ventricular Rate Stabilization 1. Select Params icon > Brady Pacing. 2. Select [Additional Features …]. 3. Select the V. Rate Stabilization... [On/Off] button. 1 4. Set the V. Rate Stabilization parameter to On and set Minimum Interval and Interval Increment to desired values. 5. Select [OK]. 2 6. Select [OK] from the Additional Features... screen. 7 7. Select [PROGRAM]. 3 6 4 5 Details about Ventricular Rate Stabilization Ventricular Rate Stabilization (VRS) is designed to eliminate the long pause that typically follows a premature ventricular contraction (PVC). These short-long interval sequences have been clinically observed to precede the onset of some spontaneous ventricular tachyarrhythmias. When VRS is enabled, it acts as a constant rate-smoothing algorithm. On each ventricular event, the device calculates the VRS interval as the sum of the previous ventricular interval plus the programmed interval increment value (or the VRS Minimum Interval, if it is larger than this sum). Marquis DR 7274 Reference Manual Treating bradycardia Enhancing pacing for optimal cardiac output If the VRS interval is shorter than the current pacing interval and no intrinsic ventricular event occurs, the device delivers a ventricular pace at the end of the VRS interval. The VRS interval is then recalculated based on the last ventricular interval. The VRS interval lengthens, from beat to beat, by a value equal to the programmable VRS Interval Increment. Once the rate generated by VRS operation slows to the intrinsic, sensor-indicated, or lower rate, the device returns to normal pacing operation. Note: In dual-chamber pacing modes, VRS automatically shortens the atrial pacing interval so the ventricular pacing pulse is delivered at the required VRS escape interval. Figure 8-13 shows an example of VRS smoothing the ventricular rate after a PVC. Figure 8-13. Example of Ventricular Rate Stabilization 1 2 3 ECG A S A S A P A P A P A P A P V P V P V S V P V P V P V P 74VRS.eps Marker Channel V P Pacing Interval 200 ms 1 A PVC occurs, causing a short V-V interval. 2 VRS paces the ventricle at the previous V-V interval plus the programmed Interval Increment (and schedules the atrial pace early, to maintain AV synchrony). 3 With each successive VRS pace, the pacing interval increases by the programmed Interval Increment. Marquis DR 7274 Reference Manual 179 180 Chapter 8 Adjusting the pacing rate with Mode Switch Adjusting the pacing rate with Mode Switch Use Mode Switch to avoid tracking sensed atrial events during atrial arrhythmias. If an atrial tachyarrhythmia is detected and Mode Switch is on, the device temporarily switches the pacing mode to DDIR until the arrhythmia terminates. Mode switch is available when the selected pacing mode is either DDD or DDDR. See “Details about Mode Switch” on page 182. Parameters * Medtronic nominal setting Mode Switch – automatically Modes: DDDR, DDD switches the pacing mode to DDIR during an atrial tachyarrhythmia. Enable On, Off* min-1) A. Detect Rate (bpm, – 120, 125, . . ., 175* rate threshold which indicates atrial tachyarrhythmia. Considerations Review the following information before programming Mode Switch. Caution: Mode Switch is not recommended for patients with chronic, refractory atrial tachyarrhythmias. Interactions with other Pacing Features – The Mode Switch feature temporarily suspends NCAP, PMT Intervention, and PVC Response features. During Mode Switch episodes, the PVARP Varied setting is used temporarily. Marquis DR 7274 Reference Manual Treating bradycardia Adjusting the pacing rate with Mode Switch After high voltage therapy and T-Shock induction – Mode Switch remains active during charging but is suspended when charging ends. Mode Switch remains suspended until the high voltage shock is delivered or aborted. After the high voltage shock is delivered or aborted, Mode Switch remains active or ends: ■ If the current pacing mode is DDIR or DDI, the Mode Switch episode remains active after therapy, pacing in the DDIR mode. ■ If the current pacing mode is not DDIR or DDI, the Mode Switch episode ends, and the device resumes atrial tachyarrhythmia detection. After non-high voltage therapies and tests – If Mode Switch is active, the pacing mode automatically changes to DDIR after the delivery of ATP, defibrillation, and cardioversion therapies or tests. The device then resumes normal Mode Switch operation. Restrictions Review the following information before programming Mode Switch On. Upper Sensor Rate – To ensure appropriate atrial tachyarrhythmia detection when Mode Switch is on, the Upper Sensor Rate must be less than or equal to the Upper Tracking Rate. Marquis DR 7274 Reference Manual 181 182 Chapter 8 Adjusting the pacing rate with Mode Switch How to program Mode Switch 1. Select Params icon > Brady Pacing. 2. Select Mode Switch On/Off field from the Brady pacing screen. 3. Set the Mode Switch parameter to On, and set A. Detect Rate to desired value. 2 1 4. Select [OK]. 5. Select [PROGRAM]. 5 3 4 Details about Mode Switch If Mode Switch detects an atrial tachyarrhythmia, the device switches to a non-atrial tracking pacing mode for the duration of the high atrial rate so that an inappropriate atrial rate does not influence the ventricular pacing rate. Mode Switch detects an atrial tachyarrhythmia if the A-A median1 exceeds the programmable Atrial Detect Rate (and satisfies the AF/AT evidence criterion). Termination of the atrial tachyarrhythmia is detected when the atrial rate is less than or equal to the Upper Tracking Rate. To avoid an abrupt drop in the ventricular rate, the device smoothly reduces the pacing rate from the atrial synchronous rate to the sensor-indicated rate. 1 The median of the last 12 A-A intervals. Marquis DR 7274 Reference Manual Treating bradycardia Adjusting the pacing rate with Mode Switch Once the atrial tachyarrhythmia ends, the device returns to the programmed atrial-tracking pacing mode, gradually adjusting the pacing rate toward the lower rate (DDD mode) or the sensor-indicated rate (DDDR mode); see Figure 8-14. Figure 8-14. When an atrial tachyarrhythmia is detected, Mode Switch changes to non-atrial tracking mode 1 2 3 ECG A S A S A R A A S R A R A S A R A R A M S S A S A R A R A S A R A R A S A R A R A S A A A R R R V P V P V P V P V P V P V P V P 74modeswitch.eps Marker Channel V P 200 ms 1 An atrial tachyarrhythmia starts, causing rapid ventricular pacing in response. 2 The atrial tachyarrhythmia is detected, and Mode Switch changes the pacing mode to DDIR. 3 The device gradually changes from the high atrial tracking pacing rate to the slower sensor-indicated rate. Marquis DR 7274 Reference Manual 183 184 Chapter 8 Preventing competitive atrial pacing Preventing competitive atrial pacing Non-Competitive Atrial Pacing (NCAP) is designed to prevent triggering of atrial tachycardias by delaying an atrial pace that is scheduled to fall within the relative atrial refractory period. NCAP may be enabled in the DDDR and DDD mode. See details about the Non-competitive Atrial Pacing (NCAP) on page 185. Parameters * Medtronic nominal setting Non-Competitive Atrial Pacing (NCAP) – delays an atrial pace scheduled to fall within the relative atrial refractory period to prevent triggering an atrial tachyarrhythmia. Modes: DDDR, DDD Enable On*, Off Interval (ms) 200, 250, 300*, 350, 400 Considerations Review the following information before programming Non-Competitive Atrial Pacing. Ventricular pacing – When a relatively high lower rate and long PVARP are programmed, NCAP operation may result in ventricular pacing slightly below the lower rate. Marquis DR 7274 Reference Manual Treating bradycardia Preventing competitive atrial pacing How to program Non-Competitive Atrial Pacing 1. Select Params > Brady Pacing. 2. Select [Additional Features...]. 3. Set Non-Competitive Atrial Pacing to On. 1 2 4. Set the interval and select [OK]. 5. Select [OK] from the Additional Features screen. 6. Select [PROGRAM]. 6 3 5 4 Details about Non-Competitive Atrial Pacing Non-Competitive Atrial Pacing (NCAP) delays an atrial pace scheduled to fall within the relative atrial refractory period to prevent triggering an atrial tachyarrhythmia. Using the NCAP Interval parameter, you can program how long to delay an atrial pace if a refractory atrial event is sensed within the PVARP.1 1 ■ If an atrial pace is scheduled to occur during the NCAP interval, the atrial pace is delayed until the NCAP interval expires. ■ If no atrial pace is scheduled to occur during the NCAP interval, timing is unaffected. Atrial refractory senses that occur within the programmable PVAB period do not start an NCAP interval (see page 160). Marquis DR 7274 Reference Manual 185 Chapter 8 Preventing competitive atrial pacing If another atrial refractory sensed event occurs during the NCAP interval, a new NCAP interval begins. When an atrial pace is delayed by the NCAP feature, the Paced AV interval decreases to maintain a stable ventricular rate. The Paced AV interval will not decrease to less than 30 ms. Figure 8-15. Non-Competitive Atrial Pacing operation 1 2 3 ECG A P A P A P A R A P A P A P Marker Channel V P V P V P V P V P 74ncap.eps 186 V P Sensor-indicated pacing Interval A-V interval PAV PAV PAV PAV PAV PAV PVARP 200 ms 1 The device is pacing at the Upper Sensor Rate of 120 ppm (min-1). 2 An atrial refractory event occurs, starting an NCAP interval (300 ms in this case). 3 After the NCAP interval expires, the device paces the atrium and then paces the ventricle after a shortened Paced AV interval. Other methods of preventing competitive atrial pacing Because the device does not respond to atrial events during an atrial refractory period, an atrial pace may fall immediately after a refractory event and cause competitive atrial pacing. The bradycardia pacing parameters should be programmed to provide 300 ms between the end of the atrial refractory period and the next scheduled atrial pace. Figure 8-16 shows such an adjustment in the DDDR mode: Lowering the Upper Sensor Rate, shortening the PAV, and shortening the PVARP provides a 300 ms interval with no atrial pacing after the PVARP. Marquis DR 7274 Reference Manual Treating bradycardia Preventing competitive atrial pacing Figure 8-16. Preventing competitive atrial pacing by reprogramming pacing parameters 1 2 ECG A P A P A P A P A P A A R P A R A S A R A S A R A S Marker Channel V P V P V P V P V P V P V P V P V P PAV PAV PAV PAV PAV PAV SAV SAV SAV Upper Sensor Rate Interval (500 ms) A-V interval (180 ms) PVARP (310 ms) 3 4 ECG A P A P A S A P A P A P A P Marker Channel V P V P V P V P V P V P V P PAV PAV SAV PAV PAV PAV V P 74PreventCAP.eps A P Upper Sensor Rate Interval (600 ms) A-V interval (100 ms) PAV PAV PVARP (200 ms) 200 ms 1 With pacing occurring at the Upper Sensor Rate of 120 ppm (min-1), A-V intervals = 180 ms, and PVARP = 310 ms, the minimum interval between the end of PVARP and the next atrial pace is 10 ms. 2 An atrial pace is delivered immediately after an atrial refractory event, causing competitive atrial pacing, which triggers an atrial tachyarrhythmia. 3 With pacing occurring at the Upper Sensor Rate of 100 ppm (min-1), A-V intervals = 100 ms, and PVARP = 200 ms, the minimum interval between the end of PVARP and the next atrial pace is 300 ms. 4 An intrinsic atrial event occurs after the shorter PVARP interval and is sensed. Marquis DR 7274 Reference Manual 187 188 Chapter 8 Preventing competitive atrial pacing Table 8-3 lists some suggestions for modifying parameters to avoid competitive atrial pacing, depending on the selected pacing mode. Table 8-3. Preventing competitive atrial pacing by reprogramming Pacing mode Pacing parameter AAIR and AAI Pacing interval DDDR, DDD, DDIR, and DDI Possible reprogramming ■ Reduce Upper Sensor Rate (AAIR only) Reduce Lower Rate Atrial Refractory Period ■ Reduce ARP Pacing escape interval ■ Reduce Upper Sensor Rate Reduce Lower Rate Increase VRS Minimum Interval if VRS is on Disable VRS ■ ■ ■ ■ PAV ■ ■ ■ PVARP ■ ■ ■ ■ Marquis DR 7274 Reference Manual Reduce PAV Enable RAAV Reduce Minimum PAV if RAAV is on Reduce PVARP Set PVARP to Varied Reduce PVAB if PVARP is Varied Disable PVC Response Treating bradycardia Detecting and preventing pacemaker-mediated tachycardia Detecting and preventing pacemaker-mediated tachycardia A pacemaker-mediated tachycardia (PMT) may occur when retrograde P-waves are sensed and tracked in an atrial tracking mode (due to a loss of AV synchrony). Since premature ventricular contractions (PVCs) are known to initiate PMT, one way to prevent PMT is to detect PVC events and extend the PVARP by enabling PVC Response. PMT intervention can be used to detect and interrupt PMT automatically. Caution: Some PMTs may require intervention such as device reprogramming, drug therapy, or lead evaluation. See details about PVC response and PMT intervention on page 190 and on page 191. Parameters * Medtronic nominal setting Modes: DDDR, DDD, DDIR, PVC Response – detects a PVC event and responds by extending the PVARP to DDI 400 ms (if the currently programmed or Sensor-Varied PVARP is less than 400 ms). Enable On, Off* PMT Intervention – automatically Modes: DDDR, DDD detects and interrupts device atrial tracking for one cycle in response to PMT. Enable On, Off* Marquis DR 7274 Reference Manual 189 190 Chapter 8 Detecting and preventing pacemaker-mediated tachycardia How to Program PVC Response and PMT Intervention 1. Select Params icon > Brady Pacing. 2. Select [Additional Features...] from the Brady pacing screen. 3. Set PVC Response to On and PMT Intervention to On. 4. Select [OK]. 1 5. Select [PROGRAM]. 2 5 3 4 Details about PVC Response The device defines a PVC as any ventricular sensed event that follows a ventricular event without an intervening atrial event.1 When PVC Response is on, a PVC starts an extended PVARP of 400 ms if the current PVARP (either the programmed or Sensor-Varied PVARP value) is less than 400 ms. This extended PVARP causes retrograde P-waves occurring within 400 ms to fall into the refractory period. PVC Response is suspended during automatic tachyarrhythmia therapies, system tests, EP Study inductions, and manual therapies. 1 Atrial refractory events falling within the programmable PVAB period are ignored by PVC detection. Marquis DR 7274 Reference Manual Treating bradycardia Detecting and preventing pacemaker-mediated tachycardia Figure 8-17. PVC Response starts an extended PVARP 1 2 ECG A S A S A R A P 74PVCResponse.eps A S Marker Channel V P V P V P SAV SAV V S V P Sensor-indicated pacing interval A-V interval SAV PAV PVARP 200 ms 1 A PVC occurs. 2 The device extends PVARP to 400 ms, and the subsequent atrial event is classified as refractory. Details about PMT Intervention The device detects a PMT after sensing eight V-A intervals that ■ are less than 400 ms ■ start with a ventricular pace ■ end with a non-refractory atrial sense PMT Intervention forces a 400 ms PVARP after the ninth paced ventricular event. This ensures that the next atrial sensed event within 400 ms will occur within the refractory period. Because this refractory event is not tracked to the ventricle for one cycle, the PMT is interrupted. PMT Intervention is suspended for 90 seconds following an intervention in order to prevent unnecessary intervention in the presence of fast intrinsic atrial rates. PMT Intervention is also suspended during automatic tachyarrhythmia therapies, system tests, EP Study inductions, and manual therapies. Note: A sinus tachycardia may initiate a PMT intervention, causing a single P-wave to fall in the PVARP where it is not tracked by the device. Marquis DR 7274 Reference Manual 191 Chapter 8 Detecting and preventing pacemaker-mediated tachycardia Figure 8-18. PMT Intervention extends PVARP 1 2 3 ECG A S A S A S A S A S A S A S A S A S A S A R A P 74PMTIntervention.eps 192 Marker Channel V P V S V P V P V P V P V P V P V P V P V P SAV SAV SAV SAV SAV SAV SAV V S Sensor-indicated pacing interval A-V interval SAV SAV SAV PAV PVARP 200 ms 1 A PVC occurs and is conducted from the ventricle into the atria. 2 The device senses the atrial depolarization cased by the retrograde event, and a PMT is triggered. 3 The device detects the PMT after eight VP-AS intervals occur that are shorter than 400 ms. After the ninth ventricular paced event, it extends PVARP to 400 ms for one event. The atrial event is not tracked, and the PMT terminates. Marquis DR 7274 Reference Manual Treating bradycardia Providing Ventricular Safety Pacing Providing Ventricular Safety Pacing Ventricular Safety Pacing (VSP) prevents inappropriate inhibition of ventricular pacing due to cross-chamber sensing of atrial paced events. If an atrial paced event is followed by a ventricular sensed event that occurs during the VSP interval, the device delivers a backup ventricular pace. Caution: For pacemaker-dependent patients, always program Ventricular Safety Pacing on. See details about Ventricular Safety Pacing on page 194. Parameters * Medtronic nominal setting Ventricular Safety Pacing – prevents inappropriate inhibition of ventricular pacing due to ventricular oversensing. Enable Modes: DDDR, DDD, DDIR, DDI On*, Off Restrictions Review the following information before programming Ventricular Safety pacing. Programmable parameters – In order to ensure reliable ventricular tachyarrhythmia detection when Ventricular Safety Pacing is on, the programmable values for Lower Rate, Upper Sensor Rate, and Ventricular Pace Blanking are limited. Marquis DR 7274 Reference Manual 193 194 Chapter 8 Providing Ventricular Safety Pacing How to program Ventricular Safety Pacing 1. Select Params icon > Brady Pacing. 2. Select [Additional Features...] from the Brady pacing screen. 3. Set V. Safety Pacing to On. 4. Select [OK]. 5. Select [PROGRAM]. 1 2 5 3 4 Details about Ventricular Safety Pacing A Ventricular Safety Pace is delivered if a ventricular event is sensed within the current Ventricular Safety Pace (VSP) interval after an atrial pace. The VSP interval depends on the current ventricular rate. If the current ventricular rate is ■ lower than the VSP switch rate, the VSP interval is 110 ms ■ at or above the VSP switch rate, the VSP interval is 70 ms The programmer automatically calculates the VSP Switch Rate as follows: VSP switch rate = Marquis DR 7274 Reference Manual 60,000 2* (V. pace blanking + 110 ms) Treating bradycardia Providing Ventricular Safety Pacing 195 The delivery timing of Ventricular Safety Pace depends on the length of the Paced AV. The ventricle is paced at the end of the Paced AV or at the end of the current VSP Interval, whichever occurs first. Figure 8-19. Ventricular Safety Pacing below and above switch rate 1 2 ECG A P A P A P A P Marker Channel V S V S V S V S Sensor-indicated pacing interval pace blanking= 200 ms 3 4 ECG A P A P A P A P A P A P A P V S V S V S V S V S V S V S Sensor-indicated pacing interval 74VSP.eps Marker Channel pace blanking= 200 ms 200 ms 1 The pacing rate is 60 ppm (min-1), which is below the VSP switch rate, so the VSP Interval is 110 ms. 2 An atrial pace is followed by a ventricular sense that falls within the VSP interval, so the device delivers a ventricular safety pace synchronized with the sensed event. 3 The pacing rate is 115 ppm (min-1), which is above the VSP switch rate, so the VSP Interval is 70 ms. 4 For two beats, an atrial pace is followed by a ventricular sense that falls within the VSP interval, so the device delivers a ventricular safety pace at the end of the VSP interval. Marquis DR 7274 Reference Manual 196 Chapter 8 Providing pacing after high voltage therapies Providing pacing after high voltage therapies In order to ensure capture following a high voltage therapy, a separate set of basic pacing parameters is available for pacing support after high voltage therapies. See “Details about Post Shock Pacing parameters” on page 197. Parameters * Medtronic nominal setting Post Shock Pacing Parameters a Modes: Alla Atrial Pulse Width (ms) – Duration of atrial pacing pulses. 0.03, 0.06, 0.1, 0.2, . . ., 1.6* Atrial Pulse Amplitude (V) – Voltage of atrial pacing pulses. 0.5, 1, . . ., 4*, 5, 6, 8 Ventricular Pulse Width (ms) – Duration of ventricular pacing pulses. 0.03, 0.06, 0.1, 0.2, . . ., 1.6* Ventricular Pulse Amplitude (V) – Voltage of ventricular pacing pulses. 0.5, 1, . . ., 4, 5, 6*, 8 Atrial Pulse Width and Amplitude parameters are not available for VVIR, VVI, or ODO modes. Considerations Review the following information before programming Post Shock Pacing. Adequate safety margin – Considering the post-shock rise in pacing thresholds, be sure to program an adequate safety margin for post shock pacing parameters. Post Shock Blanking – Brady Pace Blanking values are used for Post Shock Blanking. Marquis DR 7274 Reference Manual Treating bradycardia Providing pacing after high voltage therapies How to program pacing after high voltage therapies 1. Select Params icon > Brady Pacing. 2. Select [Post Shock Pacing...]. 3. Set the desired atrial and ventricular Amplitude and Pulse Width. 4. Select [OK]. 5. Select [PROGRAM]. 1 2 5 3 4 Details about Post Shock Pacing parameters Post Shock Pacing is enabled following a high voltage therapy and remains in effect for 25 ventricular events after the therapy is delivered or until the tachyarrhythmia episode ends. Post Shock Pacing also ends if another type of therapy starts. Post Shock Pacing pulses are delivered as appropriate for the programmed pacing mode. For example, in the AAIR and AAI modes, the Post Shock Pacing pulses are delivered only to the atrium.1 1 For one event after the shock, the device paces in VVI mode. Marquis DR 7274 Reference Manual 197 198 Chapter 8 Key terms Key terms 2:1 block rate – lowest atrial rate at which every second atrial event occurs during TARP. The operation results in a ventricular rate one half as fast as the atrial rate. activity acceleration – programmable time which controls how quickly the device pacing rate responds to increased activity (in rate responsive pacing modes). activity deceleration – programmable time which controls how quickly the device pacing rate responds to decreased activity (in rate responsive pacing modes). activity sensor – accelerometer within the device that measures the patient’s body motion in rate responsive pacing modes. activity threshold – programmable rate responsive pacing parameter that defines the minimum level of patient body motion that evokes a rate change. Atrial Refractory Period (ARP) – programmable refractory period following an atrial paced or sensed event. atrial tracking – dual chamber pacing operation that paces the ventricle in synchrony with sensed atrial events. auto-adjusting sensitivity – after each sensed or paced event, the sensitivity thresholds briefly assume less sensitive settings to prevent sensing of T-waves and pacing artifacts. blanking period – time interval after each pacing pulse, sensed event, or shock, when no sensing can occur. crosstalk – sensing of a pacing stimulus delivered in the opposite chamber. escape interval – scheduled time, in milliseconds, between a sensed or paced event and the subsequent pacing output. Marquis DR 7274 Reference Manual Treating bradycardia Key terms event – a sensed or paced beat. nominal – default programmable parameter value that appears when a feature is first programmed On. Non-Competitive Atrial Pacing (NCAP) – programmable pacing feature that prohibits atrial pacing within a programmable interval after a refractory atrial event. Pace Blanking – parameter that disables sensing for a programmable number of milliseconds after each pacing output to avoid inappropriate sensing of artifacts or T-waves. Paced AV (PAV) interval – programmable delay following an atrial pace that schedules a corresponding ventricular pace. paced events – output pulses at pacing energy levels from the device. Pacemaker-Mediated Tachycardia (PMT) – paced rhythm that results when the device senses and tracks retrograde P-waves in DDD or DDDR mode. This retrograde conduction and atrial tracking repeats itself to produce an inappropriately rapid paced rhythm. pacemaker Wenckebach – see Wenckebach operation. pacing threshold – minimum programmable pacing output that consistently captures the heart. PVAB (Post-Ventricular Atrial Blanking) – sets the interval during which sensed atrial events are ignored by bradycardia pacing features. PVARP (Post-ventricular Atrial Refractory Period) – programmable refractory period used to prevent inappropriate inhibition or PMTs in dual chamber pacing modes. PVC (premature ventricular contraction) – a sensed ventricular event that directly follows any other ventricular event, with no atrial event between them. Marquis DR 7274 Reference Manual 199 200 Chapter 8 Key terms PVC Response – detects a PVC and responds by extending the PVARP to 400 ms (if the currently programmed or Sensor-Varied PVARP is less than 400 ms). Rate Adaptive AV (RAAV) – dual chamber pacing feature that shortens the AV interval as the heart rate increases. refractory period – designated period during which the device inhibits its response to a sensed event. Refractory periods help to optimize cardiac efficiency by preventing the disruption of other operations in progress. retrograde – electrical conduction from the ventricles to the atria. Sensed AV (SAV) Interval – programmable delay following an atrial sensed event that schedules a corresponding ventricular pace. sensed event – electrical activity across the sensing electrodes that exceeds the programmed sensitivity threshold. sensitivity – degree to which a device sense amplifiers are responsive to intra-cardiac voltages. sensor-indicated rate – pacing rate determined by the patient’s level of physical activity and the rate response parameters. sensor-varied PVARP – a setting for PVARP that is based on the sensor-indicated rate. Single Chamber Hysteresis – device feature which enables tracking of the patient’s intrinsic rhythm below programmed Lower Rate to prevent pacing during extended periods of inactivity, such as when a patient is sleeping. synchrony – coordinated contraction of the atria and ventricles for most effective cardiac output. Marquis DR 7274 Reference Manual Treating bradycardia Key terms TARP (Total Atrial Refractory Period) – sum of SAV and PVARP in dual chamber pacing modes. When the atrial cycle length is shorter than TARP, every other atrial event occurs in the PVARP and is not tracked. tracking – see “atrial tracking.” undersensing – failure to sense the P-wave or R-wave. Undersensing can cause inappropriate bradycardia pacing or a failure to detect tachyarrhythmia. Wenckebach operation – a dual chamber pacing operation that exhibits dynamic variations in the Sensed AV interval and A:V synchrony. When the atrial rate exceeds the programmed Upper Tracking Rate, it is too fast to be tracked 1:1. The device applies increasing Sensed AV intervals on each atrial cycle, until an atrial event occurs in the PVARP and is not tracked. See also 2:1 block. Marquis DR 7274 Reference Manual 201 202 Chapter 8 Key terms Marquis DR 7274 Reference Manual Optimizing charge time and device longevity 9 Optimizing charge time 204 Optimizing device longevity Key terms 207 208 Marquis DR 7274 Reference Manual 9 204 Chapter 9 Optimizing charge time Optimizing charge time The high voltage capacitors must be formed (or conditioned) periodically to maintain quick charging for high voltage therapy. You can use the Automatic Capacitor Formation feature to ensure they are formed regularly. The device can be programmed to automatically adjust the capacitor formation interval for interactive management of charge time and device longevity. See details about managing charge time on page 205. Parameters * Medtronic nominal setting Minimum Auto Cap Formation Interval Auto*, 1 – 6 months Considerations Formation interval and longevity – A shorter formation interval provides faster charge times by optimizing the efficiency of the capacitors. However, each capacitor formation includes a full energy charge, reducing the longevity of the device. Assess the patient’s requirements for faster therapy delivery relative to the effect on device longevity. Each full energy charge decreases the longevity by approximately 24 days. When you program a new automatic formation interval, always confirm that the charge time is adequate at present. Either perform a manual capacitor formation or evaluate a recent full energy charge time recorded in the Battery and Lead Measurements display. You can use the Patient Alert monitoring feature to receive prompt notice if a long charge time has occurred. Marquis DR 7274 Reference Manual Optimizing charge time and device longevity Optimizing charge time How to evaluate charging performance 1. Perform a Charge/Dump test, and review the charge time (see page 321). 2. Allow the charge to dissipate for ten minutes. 3. Select [DUMP Capacitors]. 1 3 4 4. Perform another Charge Time test, and review the second charge time. ■ If the second charge time is clinically acceptable, consider reducing the Automatic Capacitor Formation interval. ■ If the second charge time is not clinically acceptable, please contact your Medtronic representative. Details about managing charge time The device provides the fastest charging and most prompt therapy delivery just following a capacitor formation. During the time between formations, the capacitors gradually lose their efficiency. This results in longer charge times until the next formation. The charge time also gradually increases over the life of the device as the battery is depleted. This occurs independent of capacitor formation. Capacitor formation consists of two steps: 1) The capacitors are charged to their full energy. 2) The charge is allowed to dissipate for at least ten minutes. The device records a timestamp (in the Battery/Lead Status Report) when a full energy charge dissipates for ten minutes without interruption. Marquis DR 7274 Reference Manual 205 206 Chapter 9 Optimizing charge time Smart Auto Cap Therapeutic charging can also contribute to the efficiency of the capacitors. This occurs because the capacitors are partially conditioned each time they are charged (for example, during a full energy defibrillation). In these situations, there is less need for the next scheduled capacitor formation. More frequent formations would decrease the device longevity, with little benefit to the charge time. To optimize the effectiveness of the automatic capacitor formations, the device postpones the schedule when full energy charging has occurred: ■ Whenever the capacitor formation interval is reprogrammed, the device resets the automatic capacitor formation interval clock. ■ After a manual capacitor formation, the device resets the automatic capacitor formation interval clock. ■ After an incidental capacitor formation (a full energy charge that dissipates for 10 minutes), the device resets the automatic capacitor formation interval clock. ■ After a full energy charge is delivered or dumped, the device extends the automatic capacitor formation interval clock by up to two months. The total of these extensions will not exceed the programmed automatic capacitor formation interval. Parameter set to “Auto” – When the capacitor formation interval parameter is programmed to Auto, the device maintains a six month schedule for capacitor formation until the battery is close to end of life. If a charging period for therapy or capacitor formation exceeds 16 seconds, the device changes to a one month schedule for capacitor formation. If a second charging period exceeds 16 seconds, the device sets the ERI status message, ensuring that the change is reported upon interrogation. The rules for postponing the scheduled automatic formation after a full energy charge remain in effect if the device changes to a one month schedule. Marquis DR 7274 Reference Manual Optimizing charge time and device longevity Optimizing device longevity Optimizing device longevity The following factors can decrease the longevity of the device: ■ a greater number of high voltage charges, either for therapy or for capacitor formation ■ higher programmed cardioversion or defibrillation energies ■ a greater number of bradycardia paced events, for example, an increase in the pacing rate or use of the Ventricular Rate Stabilization feature ■ higher programmed pacing amplitude or pulse width ■ a decrease in pacing or HV lead impedance when pacing outputs or stored energy must be increased to compensate ■ use of the pre-onset EGM storage or Holter telemetry features ■ two-channel EGM storage For device longevity information, see “Longevity projections” on page 6. Considerations Shock energy – If the defibrillation threshold of the patient allows for an appropriate safety margin (at least 10 joules, after the acute implant period), consider programming the first shock energy below the maximum value. Always program all subsequent shocks to the full available energy. Pacing outputs – If the patient’s pacing threshold allows for an appropriate safety margin (at least a factor of two, after the acute implant period), consider decreasing the pacing outputs. Always consider the patient’s access to regular follow-up care in selecting a safety margin for chronic pacing. Pacing mode – If the patient’s intrinsic rhythm allows for appropriate rate support, you can decrease the pacing burden by programming the pacing mode, rate response, and AV interval(s) to promote intrinsic activation and/or conduction. Marquis DR 7274 Reference Manual 207 208 Chapter 9 Key terms Pre-onset EGM storage – In a patient who uniformly repeats the same onset mechanisms, the greatest clinical benefit of pre-onset EGM storage is achieved after a few episodes are captured. To maximize the effectiveness of the pre-storage feature and optimize device longevity, consider these programming options: ■ Turn pre-storage on to capture possible changes in the onset mechanism following significant clinical adjustments, for example, device implant, medication changes, and surgical procedures. ■ Turn pre-storage off once you have successfully captured the information of interest. Using pre-onset EGM storage reduces longevity by approximately 25% or by 3 months per year.1 Key terms capacitor – electrical component in the device that stores electrical energy, so that a high voltage can be delivered from a relatively small battery. capacitor formation – any charge to maximum programmed energy that dissipates off the capacitors (is not dumped) for at least ten minutes. charging period – time required for the device to store the programmed energy (charge) in its capacitors so that it can rapidly deliver a cardioversion or defibrillation therapy. longevity – number of years before the device battery is depleted. 1 Based on device modeling at 15% pacing and quarterly full energy charges. Marquis DR 7274 Reference Manual Part IV Evaluating and managing patient treatment Marquis DR 7274 Reference Manual Using the programmer Connecting the programmer hardware Using an external printer 218 219 Setting programmer preferences 226 Starting and ending patient sessions Viewing live waveforms Recording live waveforms Key terms 230 233 240 Saving and retrieving device data Printing reports 212 213 Using the programming head Display screen features 10 242 246 248 Marquis DR 7274 Reference Manual 10 212 Chapter 10 Connecting the programmer hardware Connecting the programmer hardware The following sections summarize the basic steps for setting up the 9790c programmer. For more complete information, refer to the manual supplied with the programmer. Figure 10-1 shows the main components of the 9790c programmer system. Figure 10-1. Programmer hardware components 1 2 3 4 1 9790c Programmer 2 Touch pen (stylus) Note: Do not disconnect the touch pen. 3 9767/9767L programming heada 4 ECG Cable a For information about installing the 9767 or 9767L programming head, see the manual accompanying the programming head. Marquis DR 7274 Reference Manual Using the programmer Using an external printer Input/Output ports: keyboard, parallel, serial, and VGA – ■ Keyboard, used by Medtronic personnel when servicing the programmer. ■ Parallel Port, used with an external printer. ■ Serial Port, for future use. ■ VGA port, can be used to port the screen image of the programmer to an external VGA monitor or for conversion of the output signal to NTSC/PAL format for presentation on a television monitor. Please contact Medtronic Technical Services at 1-800-328-2518 for technical guidance. Caution: To protect against interference or surge/leak currents, the use of a secondary VGA monitor that meets an applicable safety standard such as UL 1950 or IEC 950 is strongly recommended. Using an external printer Connecting a compatible printer to the programmer allows you to print full, page-size reports of session data when available. This section describes how to connect a printer to your programmer. Note: All printers listed by this software are certified to IEC 950 except for the Canon Bubble Jet™ 230 (used in the United States). Only printers listed by this software may be connected to the programmer. It is the responsibility of the user to keep the printer at least two meters away from the patient. The programmer is compatible with many printers. A list of compatible printers can be accessed from the Print Queue screen. Marquis DR 7274 Reference Manual 213 214 Chapter 10 Using an external printer To view a list of supported printers 1. Select Marquis DR 7274 from the Select Model screen. 2. Select Reports > Print Queue. 3. Select the Full-Size Printer field to display the list of supported full-size printers. 1 2 3 Materials you will need To connect a printer to the programmer, you will need a Parallel Interface printer cable. One end of the cable must fit the parallel interface port on your printer. The other end of the cable must be a standard 25-pin male D connector. Most parallel printer cables are of this type. You will also need a small Phillips screw driver to open the parallel port access panel on the back of the programmer. Marquis DR 7274 Reference Manual Using the programmer Using an external printer Figure 10-2. Printer Connection Diagram 2 1 3 4 1 Parallel printer cable 2 Printer power cord 3 Printer 4 Programmer Marquis DR 7274 Reference Manual 215 216 Chapter 10 Using an external printer To connect the printer to your programmer 1. Exit the patient session and turn the programmer off. 2. Locate the parallel port access panel on the back of the programmer. 2 3. Remove the small Phillips head screw in the upper right corner of the access panel. 3 Marquis DR 7274 Reference Manual Using the programmer Using an external printer 4. Open the access panel by pushing downward on the small latch at the top center of the panel. 4 5. Connect the printer cable to the parallel port on the programmer. 5 6. Connect the other end of the cable to the printer. Connect the printer power cord to an appropriate power outlet and turn the printer on. Make sure that the printer has been loaded with paper. Note: Refer to the technical information provided with your printer for information about connecting and operating the printer. 7. Turn the programmer on and select the Print Queue icon. Marquis DR 7274 Reference Manual 217 218 Chapter 10 Using the programming head Using the programming head When the programming head is placed over the device and telemetry is established, the amber light on the programming head turns off, and one or more of the green indicator lights turn on. You can find the optimum position for the programming head by moving it around the implanted device until the greatest number of green lights turn on. To ensure proper telemetry, make sure to position the programming head so at least two of the green lights are on. If the programming head slides off the patient, the session is not terminated. Place the programming head back over the device to resume programming or interrogating the device. Notes: ■ Any successful interrogation or programming verifies proper communication between the device and the programmer. ■ The programming head contains a magnet that can suspend tachyarrhythmia detection. However, if telemetry between the device and programmer is established, detection is not suspended. During an episode in progress If you position the programming head over the device when a detected arrhythmia episode is in progress, the device detects and treats the arrhythmia normally, provided telemetry between the device and the programmer can be established. If telemetry cannot be established, the magnet inside the programmer head causes the device to suspend detection. During marker transmissions The device continuously transmits Marker Channel and Marker Supplement data via telemetry while the programming head is positioned over the device.The device stops these transmissions when you lift the programming head unless the Holter Telemetry feature is programmed on. (If Holter Telemetry is programmed on, the device transmits telemetry regardless of the position of the programming head.) Marquis DR 7274 Reference Manual Using the programmer Display screen features How capacitor charging affects the light array The programming head indicator lights may turn off during high voltage capacitor charging periods. This results from interference generated by the charging circuit and is normal. Alternative program and interrogate buttons The programming head provides two buttons that you can use to program [P] or interrogate [I] the device (see Figure 10-3). These buttons are active only when [PROGRAM] and [Interrogate] are displayed as active buttons on the display screen. Note: The programming head [P] and [I] buttons are disabled during EP study inductions. Figure 10-3. Programming head 2 1 3 1 Interrogate button 2 Telemetry light array 3 Program button Display screen features The programmer display screen is an interactive device that displays text and graphics. It is also a control panel that displays buttons and menu options that you can select using the touch pen. This section provides an overview of the features of the display screen. Figure 10-4 shows the main elements of a typical display screen. Marquis DR 7274 Reference Manual 219 220 Chapter 10 Display screen features Figure 10-4. Main elements of a display screen 1 2 5 3 4 1 Status Bar 4 Command Bar 2 Live Rhythm Monitor Window 5 Tool Palette 3 Task Area Note: For information on changing the language (for example, from English to German), see page 228. Programmer status bar display Once the device has been interrogated, the status bar at the top of the displayed screen provides some basic functions and current status of the device. Marquis DR 7274 Reference Manual Using the programmer Display screen features Figure 10-5. Status bar display 1 2 3 5 4 6 1 Currently active brady pacing mode 2 Programmed detection and therapy configuration 3 Buttons used to Resume or Suspend detection 4 Automatic detection status 5 Indicates that an episode is in progress 6 Current episode, therapy, or manual operation status Live Rhythm Monitor window The Live Rhythm Monitor window is a partial view of the full-screen display of ECG, Marker Channel, and telemetered EGM waveform traces. You can expand this window to its full size by selecting the small square button in the upper-right corner of the window or by selecting the [Adjust...] button. ■ Heart rate and rate interval are displayed if the programming head is positioned over the ICD. ■ Annotations above the waveform trace show the point of programmed parameter changes. For more information about the Live Rhythm Monitor, see “Viewing live waveforms” on page 233. Marquis DR 7274 Reference Manual 221 222 Chapter 10 Display screen features Figure 10-6. Live Rhythm Monitor window The waveform trace or traces displayed in this window depend on the selected task screen and how traces have been arranged in the full-screen view. Task area The portion of screen between the live rhythm monitor window (top of screen) and the command bar (bottom of screen) changes according to the task or function you select. The example in Figure 10-4 shows the Detection screen, which is used to program detection parameters. The task area would be different for a Parameters screen or Tests screen, for example. Active fields Unshaded areas, or boxes, appearing in the task area are “active fields” that respond to the stylus. Figure 10-7. Active fields displayed as unshaded areas on the screen Selecting a value, word, name, or phrase that appears in an active field opens a menu or window of alternative options for whatever is represented in that field. Marquis DR 7274 Reference Manual Using the programmer Display screen features For example, touching the pulse width value 0.4 ms in the Ventricular Lead field with the tip of the stylus opens a window of pulse width value options. Selecting any one of these options replaces the original value with the selected one. Selecting some fields (those with terms ending in an ellipsis, such as Rate Response...) opens a window displaying additional fields. Figure 10-8. Selecting an active field 1 1 Selecting the Pulse Width field opens a window of alternative parameter values. Marquis DR 7274 Reference Manual 223 224 Chapter 10 Display screen features Command bar The bar at the bottom of the screen always shows the buttons for programming Emergency parameters, interrogating the ICD, and ending the patient session. Note: The [Interrogate] and [End Session] buttons do not appear on the Emergency screen. Tool palette The buttons and icons along the right edge of the screen are referred to as the “tool palette.” Use these tools to display a task or function screen. After starting a patient session, the tool palette is displayed on all but the Emergency or Live Rhythm Monitor Adjust... screens, making it quick and easy to move to the desired task or function. Each of the icons acts like a button. To select an icon, touch the icon with the stylus. Figure 10-9 describes each option in the tool palette. Marquis DR 7274 Reference Manual Using the programmer Display screen features Figure 10-9. Tool palette options 1 2 3 4 5 6 7 8 9 1 [Adjust...] button: opens a window of options for adjusting the Live Rhythm Monitor display (see page 233). 2 Checklist icon: opens the Checklist screen for simplified navigation through a set of programmer related tasks (see page 261). 3 Checklist double-arrow button: navigates to the next programmer screen in the active Checklist (see page 261). 4 Data icon: displays options for retrieving information about the device and for setting up the data collection and Patient Alert functions. 5 Params icon: displays options for programming device parameters. 6 Tests icon: displays options for performing system tests. 7 Reports icon: displays options for printing reports (see page 246). 8 Patient icon: displays the Patient Information screen (see page 301). 9 Session icon: displays options for ending the session, saving interrogated data, and viewing changes made during the session. Marquis DR 7274 Reference Manual 225 226 Chapter 10 Setting programmer preferences Buttons Buttons like those shown below let you operate the programmer using the stylus. You can “press” a button by touching it with the tip of the stylus. Figure 10-10. Display screen buttons 1 1 1 Buttons having a less distinct shaded label are not presently active Buttons may directly execute a command, such as the [Program] button, or they may open a window that prompts another action. Usually such buttons have a label ending with an ellipsis, such as the [Interrogate...] or [End Session...] buttons shown above. A procedure may instruct you to “press and hold” a button. In such cases you should touch the tip of the stylus to the button and continue to maintain pressure against the button until it is time to “release” the button. Setting programmer preferences Before you start a patient session, you can set the programmer time and date, set audio preferences, select a different language for the software display, and check the software version number. Once you have started a patient session, you can also set printing preferences and reports preferences. Marquis DR 7274 Reference Manual Using the programmer Setting programmer preferences How to set the programmer time and date 1. Select Programmer > Time and Date. 2. Select the or button to increase or decrease the value for the unit of time you want to change. 3. When all fields show the correct time and date, select [Apply]. 2 3 1 How to set audio preferences 1. Select Programmer > Preferences. 2. Select [Audio ON] or [Audio OFF] button as desired. 2 1 Marquis DR 7274 Reference Manual 227 228 Chapter 10 Setting programmer preferences Certain events in the operation of the programmer result in an audible signal. The following tones alert the user to the success or failure of an action. ■ A two-tone beep (low-to-high) indicates confirmation of an Interrogate or a Program command. ■ A double low-tone beep indicates that an Interrogate, Program, or Emergency command was not confirmed. It can also indicate that the selected command cannot be executed. ■ A single, short beep coincides with pressing the Interrogate or the Program button. It also occurs upon automatic identification of the ICD. How to select a different language 1. Select Programmer > Preferences. 2. Select a value for the Language parameter. 2 1 Marquis DR 7274 Reference Manual Using the programmer Setting programmer preferences How to check the software version number 1. Select Programmer > Software. 2. Scroll through the software applications listed on the Software on This Programmer screen. For each software application loaded on the programmer, the screen displays the software version number next to the model number. 2 1 How to set printing preferences 1. After you’ve started a patient session, select Session > Preferences. 2 2. From the Index selection box, select the Printing option. 3 3. Set the printing preferences as desired. 4. Select [OK]. 4 1 The Printing preferences allow you to select the number of copies, default printer, and whether to print now or later. If you deselect the checkbox next to “Pop up these options when any Print button is selected,” the programmer automatically applies these default print preferences each time you select [Print] during a patient session. Marquis DR 7274 Reference Manual 229 230 Chapter 10 Starting and ending patient sessions How to set reports preferences 1. After you’ve started a patient session, select Session > Preferences. 2 2. From the Index selection box, select the Reports option. 3 3. Set the reports preferences as desired. 4. Select [OK]. 4 1 The Reports preferences let you enable or disable the automatic printing of an Initial Report after the first interrogation of a patient session. The contents of the Initial Report are not selectable, but are listed on the Reports preferences screen. Starting and ending patient sessions Because the programmer collects and stores data on a session-by-session basis, it is important to correctly start and end each session. You should not begin using the programmer with a different patient until you have completed this procedure. If the programmer detects a device serial number that is different from the one acquired during the initial interrogation, it automatically requests that you end the current session. Note: Connect the programmer skin electrodes to the patient if you would like to display a surface ECG signal from the programmer. See the user manual for your programmer for more information. Marquis DR 7274 Reference Manual Using the programmer Starting and ending patient sessions How to start a patient session 1. Display the Select Model screen: If the programmer is on, but the Select Model screen is not displayed, you need to end the current session before starting a new one. 2. Position the programming head over the patient’s device, and hold it steady. The best position for telemetry is when the greatest number of green indicator lights are on. 3 3. Select the [Auto-Identify] button at the bottom of the screen or press the [I] programming head button. The programmer loads the appropriate software application and displays the Quick Look screen and immediately begins to interrogate the device. Marquis DR 7274 Reference Manual 231 Chapter 10 Starting and ending patient sessions 232 How to end a patient session Ending a Patient Session b c 1 d 1. Select the Session icon > End Session. a. If you want to review or print a list of changes made during the last session, select Session icon > Changes This Session. b. Review the programming changes made during the patient session. c. Select [Print] to print a record of the changes or select [Cancel]. d. Select [End Session]. 2. Select [Save To Disk...] to save session data to a disk.a 3. To end the session and return to the Select Model screen, select the [End Now] button. 2 a 3 For information about saving data to a disk, see page 242. Automatic interrogation After starting the programmer and placing the programming head over the device, select [Auto Identify] or select the device from the displayed list and select [Start]. The programmer automatically starts the software application and interrogates the device. All non-emergency programmer functions are unavailable during an interrogation. Marquis DR 7274 Reference Manual Using the programmer Viewing live waveforms Viewing live waveforms The live rhythm monitor window normally displays a live ECG waveform at the top of most programmer screens.1 This waveform display can be adjusted and customized using the Adjust window and the waveform adjustment button bar. For details about live waveforms, see page 235. Parameters ) * Medtronic nominal setting Clipping – truncates the tops and bottoms of waveform traces at a 22 mm boundary. enable*, disable Sweep speed – sets sweep speed. (mm./sec.) 12.5, 25*, 50, 100 ECG Filter – changes the bandwidth of waveform to improve the clarity of the displayed ECG in the presence of interference. (check box) disable 0.05 to 100 Hz enable* 0.5 to 40 Hz Show Artifacts – displays pacing enable, disable* artifacts superimposed over waveforms. (check box) Normalize – equalizes the spacing between the traces and adjusts the size of each trace to the default setting. 1 When ECG inputs are connected to the programmer. Marquis DR 7274 Reference Manual 233 234 Chapter 10 Viewing live waveforms How to use the Adjust window 1 2 1. Select [Adjust] to display the full screen Live Rhythm Monitor and the Adjust window. 2. Adjust the size, source, or print selection options for each waveform trace using the waveform adjustment bar. 3 3. Select the color field in the waveform trace area to change the color of a waveform. 4 4. Select [Clipping], [ECG Filter] and [Show Artifacts] to enable or disable these options as desired. 5 6 7 5. Select the Sweep Speed if desired. 6. Select [Normalize] to equalize the trace spacing and adjust the size of each trace to the default setting. 7. When you are finished making adjustments, select [OK]. Marquis DR 7274 Reference Manual Using the programmer Viewing live waveforms How to use the waveform adjustment button bar 1 2 3 4 5 1. Select the up arrow button to increase the size of the waveform. 2. Select the Normalize button to restore the waveform to its default size. 4 3. Select the down arrow button to decrease the size of the waveform. 4. Select the Waveform Source button to select the source of the waveform to be displayed. 5 5. Select the Waveform print selection button to enable or disable the waveform for printing. Up to two waveforms can be selected. 5 Details about the live rhythm monitor This live rhythm monitor can display up to six different waveforms during a patient session:1 ■ ECG leads I, II, and III are available when you attach ECG leads to the patient’s skin and connect them to the programmer. ■ Marker annotations showing device operations are telemetered from the device to the programmer when the programming head is over the device. ■ EGM1 and EGM2 signals are telemetered from the device and are based on the two programmable EGM sources. See “EGM source” on page 269. The programmer cannot display (or record) an EGM trace until the current EGM Range setting has been interrogated from the device. 1 To adjust the size of this display and arrange the traces displayed, see page 235. Marquis DR 7274 Reference Manual 235 236 Chapter 10 Viewing live waveforms Table 10-1. Waveform trace information Trace Description ECG Lead I ECG Lead II ECG Lead III ECG signals are detected via skin electrodes attached to the patient. The programmer must be connected to these electrodes with the ECG cable. Marker Annotations Marker annotations indicate triggered events such as pacing, sensing, detection, and delivered therapies. EGM1 EGM2 EGM signals are telemetered from the device and are based on the two programmable EGM sources. Note: A single waveform is displayed for most windows. A dual-waveform window is displayed for EP Study, System Test, and Emergency screens.1 Marker Channel telemetry annotations Marker Channel telemetry annotations appear as two characters above or below the Marker Channel trace of the waveform display.2 These annotations indicate events such as pacing, sensing, detection, and delivered therapies (see Figure 10-11). In addition to annotations, the Marker Channel trace uses symbols to indicate specific events. Marker channel symbols appear only on real-time waveform recordings, not on screens or in episode recordings. These symbols sometimes appear compressed, depending on the printout speed of the programmer strip chart recorder. Note: Since the displayed waveforms depend on telemetry received from the device, marker annotations are not displayed unless the programming head is positioned over the device. Therefore, any interruption in telemetry may result in missing markers on the trace display. 1 2 The single trace display provides the trace from the top of the live rhythm monitor sources; the dual display shows the top two traces. By default, Marker Channel annotations are superimposed over the ECG trace displayed at the top of most programmer screens. Marquis DR 7274 Reference Manual Using the programmer Viewing live waveforms Figure 10-11. Marker Channel symbols and annotations A P A S A R Atrial pace Atrial sense Atrial refractory sense V P T P V S V R Ventricular pace VT pace Ventricular sense Ventricular refractory sense T S T F T F F S VT sense FVT sense via VT FVT sense via VF VF sense T D T F F D V S VT detection FVT detection VF detection Ventricular safety pace E R C D C E Charge end MarkerChannel.eps M S Mode switch Cardioversion/ defibrillation pulse Marker buffer full Marquis DR 7274 Reference Manual 237 238 Chapter 10 Viewing live waveforms Decision Channel annotations Decision Channel annotations provide supplementary information about the operation of device detection algorithms, as shown in Figure 10-12. Decision Channel annotations are saved with the EGM data for episode records and printed on real time recordings (see Table 10-2). Table 10-2. Decision Channel annotations Situation Episode record / Real time recording VF detected or redetected VF FVT detected or redetected FVT VT detected or redetected VT VF+SVT double tachycardia detected VF+SVT FVT+SVT double tachycardia detected FVT+SVT VT+SVT double tachycardia detected VT+SVT High rate timeout HT / High Rate Timeout VT Monitor VTM / VT Monitor Stability Criterion reset VT NID Reset: Stability A.Fib/A.Flutter rule withholds detection AF Sinus Tachycardia rule withholds detection ST Other 1:1 SVTs rule withholds detection SV A PR Logic criterion is active but the NID criterion is no longer met, or a PR Logic criterion becomes inactive. none/-- Marquis DR 7274 Reference Manual Using the programmer Viewing live waveforms 239 Figure 10-12. Decision Channel annotations on a real-time recording 1 ST A R T S A R T S A R T S A R T S A R T S A R T S A R T S A R T S A R T S A R A R T S T S A R T S A R T S A R A R T S T S A R T S A R T S A R T S A A R R T S T T S S A R T S A R A R A A R R T S T S T S A A A A A A S S S S R R T T T D P P T T T P P P T P T S A R A P A S V S A S V S V S 74decchan.eps T S A R 2 VT 200 ms Decision Channel annotations indicating: 1 Sinus Tach SVT detection criterion is active 2 VT detected PR Logic criteria annotations – PR Logic criteria annotations (AF, ST, and SV) are displayed if either the VTNID or the VFNID criterion is met, and detection occurs or is withheld by a PR Logic criterion. These annotations are displayed differently on the real time recording than they are in the stored episode record data. ■ On the real time recording, PR Logic criteria annotations are printed when one of the following is true: – detection is first withheld by a criterion – real time recording is initiated when a criterion is already withholding detection – if a criterion currently withholding detection changes ■ In the stored episode record, PR Logic criteria annotations are recorded and displayed under every event during which a rule is active. If more than one PR Logic criteria is withholding detection, only annotations for the highest priority criteria are printed. The order of priority from highest to lowest is A.Fib/A.Flutter, Sinus Tachycardia, Other 1:1 SVTs. Marquis DR 7274 Reference Manual 240 Chapter 10 Recording live waveforms Recording live waveforms At any time during a patient session, you can start a continuous, live recording of the patient’s ECG and EGM1 from the programmer strip chart recorder. Note: Because the printed recording provides a higher resolution, it may show artifacts and events that do not appear on the programmer display. A printout of the live ECG includes 1 ■ ECG and EGM traces ■ an indication of an executed command when confirmation of the command is received ■ test values during a Pacing Threshold test ■ EGM Amplitude Test ■ transmission markers that show active transmissions between the device and the programmer ■ any change in EGM source range setting, which is marked with a vertical dotted line and the new gain setting ■ Decision Channel annotations The programmer cannot record an EGM trace until the device been interrogated. Marquis DR 7274 Reference Manual Using the programmer Recording live waveforms Figure 10-13. An example of a live waveform recording Apr 29, 2001 13:18:29 CHART SPEED 12.5 mm/s Programming Successful 7274 1 5 6 ECG LEAD II Ø.Ø5 mV/mm 2 A MARKERAS S A CHANNEL S A S A S A S A S A S A S A S A S A S A S 3 V S V S V S V S V S V S V S V S V S V S V S V S V S EGM2: Vtip/Vring Ø.5 mV/mm recording.eps 4 1 Annotations 2 ECG trace 3 Marker Telemetry 4 EGM telemetry 5 Telemetry from programmer to device 6 Telemetry from device to programmer Printing a report while recording live ECG If you select an option from the Print menu while recording a live ECG, the report goes to the print queue. Alternatively, if you start a live ECG recording while the programmer is printing a report, the report stops printing and is sent to wait in the print queue. Note: This applies only to reports printed on the programmer strip chart recorder. Printing to a full-size printer is not affected. Automatic telemetry attempts If telemetry between the programmer and device is not successful, the programmer automatically retries an attempted transmission up to two times. This may result in multiple sets of programming and confirmation indicators being recorded. Marquis DR 7274 Reference Manual 241 242 Chapter 10 Saving and retrieving device data EGM and Marker Channel telemetry The programmer cannot record an EGM trace until the current EGM Range setting has been interrogated from the device. If you program an EGM Range setting during a recording, the programmer marks the change with a vertical dotted line on the paper recording and annotates it with the new gain setting. EGM and Marker Channel telemetry can be momentarily interrupted during an interrogation or programming or during capacitor charging. Saving and retrieving device data The programmer allows you to copy interrogated data to a diskette. Data saved on a disk can be accessed by the programmer via the Read From Disk application. Considerations Review the following information before saving data to a disk: Warning: The Read From Disk Application is designed for viewing saved data only. You cannot program the device or deliver Emergency therapies from the Read From Disk Application. Emergency functions while saving – During the save operation, the [Emergency] button remains displayed, and all Emergency functions are available. If a disk error occurs during a save, there may be a delay in initiating the Emergency screens. Therefore, it is suggested that you not save to disk during EP studies or when a possibility exists that Emergency functions might be needed immediately. Emergency functions while reading – You cannot perform emergency operations from the programmer while in a Read from Disk session. Marquis DR 7274 Reference Manual Using the programmer Saving and retrieving device data Interrogate first – Make sure to interrogate the device before saving data to a diskette, because the programmer saves only the data it has interrogated. If you wish to save all of the information from the device, select the All option from the interrogation window. Ejecting disk – Do not eject the diskette from the drive while a save is in progress. This can cause a disk error to occur. How to save ICD data to a disk 1. After interrogating the device, select the Session icon > Save to Disk... . 2. Insert a diskette into the programmer floppy disk drive. 3. Select [Save]. Note: You also have the option to Save to Disk when you select [End Session...]. 3 How to read ICD data from a disk 1. Insert a diskette that contains previously saved information. 2 2. From the Select Model screen, select Tachyarrhythmia Devices. 3. Select Marquis DR 7274 Read From Disk. 4. Select [Start]. 3 4 Marquis DR 7274 Reference Manual 243 244 Chapter 10 Saving and retrieving device data 5. Select [OK] from the warning message. 6. Select [Open File]. Caution: Do not remove the diskette from the drive while the Please Wait... message is displayed. Doing so will disable the programmer disk drive. To restore disk drive function, you must restart the programmer by turning it off and back on again. 5 7. Select the data record that displays the desired device serial number, date and time. 6 8. Select [Open File]. Notice the differences between a patient session and a read from disk session: a. Status bar displays device serial number of data file. b. No live rhythm monitor is displayed. c. Icons indicate disk session. 7 8 a b c Marquis DR 7274 Reference Manual Using the programmer Saving and retrieving device data Saving data to a disk The disk you use for saving data from the programmer must be ■ a formatted, IBM-compatible, 3.5 inch diskette ■ 720 KB (DS, DD) or 1.44 MB (DS, HD) If you save data to a disk that is corrupt or is not IBM-formatted, the programmer could become unresponsive. If this occurs, turn the programmer off and then on again. Normal operation should resume. Please inform your Medtronic representative of this occurrence. Data file names Saved files are automatically named with a file name representing the date and time the file was saved, for example, filename: DDHHMMSS.PDD where DD represents the day of the month (01 to 31) HH represents hours (24 hour clock) MM represents minutes SS represents seconds PDD is the extension for the programmer data file Reading device data from diskette When reading data from a diskette, information is presented using the same user interface as programming a device. You can view the saved data, print reports, and display all programmed parameter values. You cannot program the device or perform tests on the device when reading data from a diskette. Marquis DR 7274 Reference Manual 245 246 Chapter 10 Printing reports Printing reports Information collected by the device is available in several report options. You can print either a Full Summary report or a Custom report. Select [Full Summary] from the Reports icon to print a report that includes all the following information: ■ Parameter Summary Report ■ Parameter Settings Report ■ Status Report ■ Counters Report ■ Episode Lists Report ■ Cardiac Compass Report If you would like to choose which information categories to include in the printed report, select [Custom ...] from the Reports icon. Other reports can be printed from individual programmer screens by selecting [Print] from the displayed screen, including but not limited to the following reports: ■ Quick Look ■ Counters ■ Battery/Lead Status ■ Parameter Summary ■ Parameter Settings ■ Changes This Session ■ Last VT/VF Episode ■ VT/VF Episode List ■ SVT/NST Episode List ■ Mode Switch Episode List ■ Ventricular Interval Stability List For more information about setting up an external printer, see the user guide for your Medtronic programmer. Marquis DR 7274 Reference Manual Using the programmer Printing reports How to print a report 1. To print a report from the displayed screen, select [Print...]. 2. To print a report, select the Reports icon and select Full Summary... or Custom.... Print Options: 1. Select the Number of Copies. 2. Select the Printer. The default printer is the Programmer. 3. If you want to print to a connected full size printer, select Full Size and select a print driver. Note: You can only print to a full-size printer only during a patient session. 4. Select [Print Now] for immediate printing, or select [Print Later] to add the print request to the Print Queue. Print Queue When printing, if you select [Print Later], the print job is held in the Print Queue. Select the Reports icon to display the Print Queue window. From this window you can check the status of a print job and either print or delete a print job from the queue. A report cannot be deleted if its status is “printing” or “waiting.” The print queue Status column lists the print status for each report: ■ Printing: Indicates that a report is currently printing. ■ Deleting: Indicates that report is currently being deleted (via the [Delete] button). ■ Waiting: Indicates that a report is waiting for another report to finish printing. ■ Hold-Later: Indicates that a report is on hold until you request that it be printed (via the [Print] button). A Hold-Later status could also mean that a report was interrupted by the start of a recording or the printer is not operational (because it is out of paper, for example). ■ Done: Indicates the status of print job. Marquis DR 7274 Reference Manual 247 248 Chapter 10 Key terms Key terms Decision Channel telemetry – annotations displayed on stored EGMs and telemetered waveforms which document certain details of dual chamber tachyarrhythmia detection. EGM strip – stored recording of the intracardiac waveforms from a detected arrhythmia episode. Interrogate – command to transmit the device parameters and stored data to the programmer. Last Session – most recent time the ICD was successfully interrogated. A session ends eight hours after the last interrogation. live rhythm monitor – programmer display of telemetered ECG, Marker Channel, and EGM waveforms on one screen or a partial-screen window. Marker Channel telemetry – telemetered symbols that annotate the ICD sensing, pacing, detection, and therapy operations. waveform – graphic plot of electrical activity, for example, intracardiac EGM or surface ECG trace. Marquis DR 7274 Reference Manual Using system evaluation tools A summary of system evaluation tools Taking a quick look at device activity Using the Patient Alert feature 250 251 253 Streamlining follow-ups with Checklist Key terms 11 261 264 Marquis DR 7274 Reference Manual 11 250 Chapter 11 A summary of system evaluation tools A summary of system evaluation tools Several software features are available to evaluate the ICD system performance and monitor the interaction between the patient and device. During patient follow-up visits, these features provide feedback on the patient’s cardiac activity and device operation. Table 11-1. Evaluation tools Automatically set up Quick Look - a summary of patient and system information since the last patient session. Episodes and counters - a set of screens that provide a count of detected episodes and therapy results. Battery and lead measurements - display of automatic battery, lead, and capacitor measurements. These results are also used in reports. Reports - screen display and printable reports for recording device data. Changes this session - screen display of parameter changes between the start of a patient session and currently interrogated values. Requires initial set up Patient Alert - an audible device alert that alerts the patient that one or more specific events have occurred. The patient is instructed to contact their physician or clinic if they hear a patient alert. Checklist - an organized list of programmer screens used to perform standard or customized tasks. The checklist can be used as a reference list or as a means to track which steps have been completed for a specific task. Patient information - a screen used to collect and display information about the patient’s cardiac medical background, device leads, and physician. Automatic daily measurements Automatic daily measurements are performed to measure EGM amplitudes, lead impedance, and battery voltage. See “Daily lead impedance and EGM amplitude measurements” on page 274 for more information on these daily measurements. Marquis DR 7274 Reference Manual Using system evaluation tools Taking a quick look at device activity Taking a quick look at device activity The Quick Look screen provides a summary of the episode data and battery/lead status information gathered since the last patient session. Note: The Quick Look screen is automatically displayed after an initial device interrogation. To display changes during a session, re-interrogate the device, and select Quick Look from the Data icon. The observations section of the Quick Look screen highlights questionable parameter programming, device status issues, and atypical episode data. How to use Quick Look Displaying episode data or observations 1. If Quick Look is not already displayed, select Quick Look from the Data icon. 2 1 3 4 2. Highlight an episode, and select [>>] to display specific episode data. 3. Highlight a specific observation. If available, select [>>] to display the selected observation. 4. Select the Lead Performance [>>] button to view lead performance trends. Marquis DR 7274 Reference Manual 251 252 Chapter 11 Taking a quick look at device activity Quick Look observations Observations provided by Quick Look are based on an analysis of interrogated data and programmed parameters. Three types of observations are provided: parameter, device status, and episode data. Parameter observations – Example observations include: ■ cautionary messages about the programmed detection and therapy configuration ■ pending parameter values ■ an ATP therapy that has been disabled by the Smart Mode feature Device status observations – Example observations include: ■ Active Device Status Indicators ■ replacement indicator warnings (ERI and EOL) ■ a pacing lead impedance of greater than 3000 ohms or less than 200 ohms ■ a high voltage lead impedance of greater than 200 ohms or less than 20 ohms ■ Patient Alert messages Episode data observations – Example observations include: ■ For each programmed detection zone, the following types of episodes are listed: – episodes with unsuccessful therapies, in which more than one therapy was attempted – episodes longer than 30 seconds – episodes that accelerated to VF – monitored episodes – episodes where High Rate Timeout occurred ■ If more than one episode has occurred for a particular type, the Episode Data Observations section highlights the most recent episode and the total number of episodes of that type. Marquis DR 7274 Reference Manual Using system evaluation tools Using the Patient Alert feature Using the Patient Alert feature The Patient Alert monitoring feature is designed to alert the patient if their implanted device meets certain pre-programmed status conditions. The patient should be instructed to notify their physician if an alert sounds. The alerts are programmed to sound at a specific time of the day when the patient or a companion will hear them. There are three types of alerts: ■ High urgency alerts emit a dual, high-low tone. ■ Low urgency alerts emit an intermittent on-off tone. ■ Test alerts emit a steady tone when the Patient Magnet1 or programming head is applied to the device to verify that the device alerts are operational and that no alert conditions are met. Select [Demonstrate Tones...] from the Patient Alert screen to listen to the various alert tones. High urgency alerts are always on, while others can be set to use either high or low alert tones or programmed completely off. High urgency alerts indicate there is a serious problem with the device that needs urgent attention. Parameters * Medtronic nominal setting PROGRAMMABLE PARAMETERS Alert Time – time of day (24 hour) when Patient Alerts are programmed to respond. Hour Minute 1 0, 1, 2, . . ., 8*, . . . 23 0*, 10, . . ., 50 Refer to the Patient Magnet user manual for more information. Marquis DR 7274 Reference Manual 253 254 Chapter 11 Using the Patient Alert feature (continued) * Medtronic nominal setting Lead Impedance Out of Range – indicates that the daily impedance measurement is out of range; could be triggered by a dislodged or improperly connected lead. Alert Urgency A. Pacing, V. Pacing Impedance (ohms) Enable Minimum Threshold (Less than) Maximum Threshold (Greater than) Defibrillation and SVC (HVX) defibrillation (ohms) Enable Minimum Threshold (Less than) Maximum Threshold (Greater than) Low*, High On, Off 200*, 300, 400, 500, 1000, 1500, 2000, 3000* On, Off 20*, 30, 40, 50 100, 130, 160, 200* Low Battery Voltage ERI – indicates that the daily automatic battery voltage measurement has been at or below the 2.62 V (the Elective Replacement Indicator voltage level) on three consecutive days. Alert Enable - Urgency Off, On-Low*, On-High Battery Voltage Threshold (V) 2.62 (ERI) (fixed) Excessive Charge Time ERI – indicates that the charging period equals or exceeds the Charge Time Threshold. Alert Enable - Urgency Off, On-Low*, On-High Charge Time Threshold (seconds) 16 (fixed) Number Of Shocks Delivered in an Episode – indicates that the number of shocks delivered in an episode is greater than or equal to the programmed Number of Shocks Threshold.a Alert Enable - Urgency Off, On-Low*, On-High Number of Shocks Threshold 1, 2, 3*, 4, 5, 6 All Therapies in a Zone Exhausted for an Episode – indicates that a specific arrhythmic episode was re-detected after all programmed therapies for that type of episode were delivered. Alert Enable - Urgency Off, On-Low*, On-High VF Detection/Therapy Off – indicates that VF detection or more than two VF therapies have been turned off for at least six hours. This alert is programed on in the shipped device and sounds with a High urgency alert tone.b Alert Enable - Urgency Marquis DR 7274 Reference Manual Off, On-High* Using system evaluation tools Using the Patient Alert feature (continued) * Medtronic nominal setting NON-PROGRAMMABLE PARAMETERS Electrical Resetc – indicates that the device has been reset and may require reprogramming. The device immediately sounds a High urgency alert tone that repeats every 20 hours or every 9 hours, depending on the type of electrical reset.d Pacing Mode DOO or VOO – indicates that the DOO or VOO pacing mode is turned on. The device sounds a High urgency alert tone daily at the programmed time. Active Can Off without SVC – indicates that the Active Can feature is turned off without an SVC lead in place. The device sounds a High urgency alert tone daily at the programmed time. Charge Circuit Timeout – indicates that a charging period has exceeded the maximum time allowed for circuit charging. The device immediately sounds a High urgency alert tone that repeats every 20 hours. a b c d Note that VF, VT, and/or FVT therapies could be delivered during a single episode (from initial detection until episode termination). This alert can be turned off if necessary. When the alert is turned on, it does not sound when a magnet is applied, unless VF detection or more than two VF therapies are turned off. Contact your Medtronic representative if the device has been reset. In some cases, an electrical reset may disable tachyarrhythmia detection and therapy. If this occurs, the electrical reset patient alert sounds every 9 hours, and the device operates as a simple bradycardia pacing device (in VVI mode, 65 ppm). Considerations Review the following information before programming the Patient Alert feature. Electrical Reset – This alert indicates that the device has been electrically reset. Stored data is cleared, and Programmable parameters may have changed to Reset settings. See Appendix B, "Device Parameters" on page 367 for Reset values. For details about Reset conditions, see “Automatic device status monitoring” on page 304. Rate Response is suspended – When the Patient Alert sounds, the Rate Response feature is suspended. Any pacing that occurred just before the alert sounds is maintained at the same rate. Marquis DR 7274 Reference Manual 255 256 Chapter 11 Using the Patient Alert feature Low Battery Alert – This alert is based only on the daily automatic voltage measurements performed by the device. Other voltage measurements do not trigger a Patient Alert. Multiple alerts – If more than one alert condition has occurred, the most urgent alert is announced at the programmed alert time. Lead Impedance alerts – These alerts are based on the automatic daily impedance measurements. Impedance measurements recorded during a manual test or high voltage therapy do not trigger a Patient Alert. ■ All enabled lead impedance alerts are programmed to the same urgency. ■ The atrial lead impedance alert can be enabled if the device is programmed to the VVI or VVIR bradycardia pacing mode. ■ A lead impedance alert can be triggered by a dislodged or improperly connected lead. Condition at the time of alert – The alert condition need not be present when the alert is announced. The alert tone continues to announce each day at the programmed alert time until the device is interrogated. Alert tone description – The alert tone is designed to be slightly louder than typical living room noise. The alert duration continues for several seconds, up to a maximum of 30 seconds. However, the test alert duration is 20 seconds. Programming the Alert Time – The programmed Alert Time is based on the device internal clock. Select an Alert Time when the patient can clearly recognize the alert, taking into consideration: ■ predictably quiet setting ■ daily schedule, e.g., medication routines ■ hearing acuity ■ presence or absence of companions Alert frequency – alerts are set to sound at specific intervals depending on the urgency of the alert condition. Marquis DR 7274 Reference Manual Using system evaluation tools Using the Patient Alert feature Table 11-2. Alert Frequency Alerts that sound Alerts that sound Immediately every 6 hours Alerts that sound daily at programmed time Charge Circuita Time-out Pacing Lead Impedance Electrical Resetb VF Detection/ Therapy Off Defibrillation and SVC Lead Impedance Low Battery Voltage Excessive Charge Time Number Of Shocks Delivered in an Episode All Therapies in a Zone Exhausted for an Episode Active Can Off without SVC Pacing Mode DOO or VOO a b A Charge Circuit Time-out alert sounds immediately and then every 20 hours. Contact your Medtronic representative if this alert sounds. An electrical reset alert sounds immediately and then every 20 hours. However, if the electrical reset disables tachyarrhythmia detection and therapy, the alert sounds every 9 hours. Contact your Medtronic representative if an electrical reset alert sounds. Note: If a programmable Patient Alert is triggered so often that it loses its clinical value, adjust the alert threshold, improve therapy efficacy, or program the alert to off. Marquis DR 7274 Reference Manual 257 258 Chapter 11 Using the Patient Alert feature How to program the Patient Alert feature 1. Select Data icon > Patient Alert. 2. On the Patient Alert Setup screen, select the alert enable button for the desired alert and set the appropriate thresholds. 2 1 3. Select Alert Time... and set the time in 24-hour format. 4. Select [Demonstrate Tones...] and demonstrate the alert tones to the patient. If the patient cannot hear the tones, repeat the demonstration in a quieter environment. 3 4 Instructing the patient The patient should understand the alert tones and what to do if they hear them. Advise the patient ■ what time of day the alerts will be announced and that the alert will be announced at the same time each day until the device is interrogated during an office visit ■ to contact their physician immediately if they hear tones coming from the device ■ that the Alert Time does not adjust for time zone changes ■ that the “Test” tone may announce if the device is near a strong electromagnetic field, such as store theft detector. This indicates that the device operation is temporarily impaired1 and that the patient should move away from the interference source to restore normal operation The patient should understand what the patient magnet is used for and when to use it. Advise the patient that when the patient magnet is placed over the device, any current alert conditions will be announced. Demonstrate to the patient how to place the patient magnet over the device to replay the alert tones, and review the patient magnet manual. 1 For a description of this temporary state, see Table 1-2, “Effects of magnet application on the device,” on page 5. Marquis DR 7274 Reference Manual Using system evaluation tools Using the Patient Alert feature Note: The patient can use the Patient Magnet Instructions as a folded reference card. Table 11-3. Responding to Patient Alert tones Tones Alert Status Action Dual high / low tone High urgency Patient: Arrange urgent follow-up. Clinician: Interrogate device and evaluate alert condition. Intermittent on / off tone Low urgency Patient: Arrange follow-up. Clinician: Interrogate device and evaluate alert condition. Steady tone Test No Patient Alert condition has occurred (sounds only when in the presence of a strong magnet). Warning: Be sure the patient understands that they must not carry, store, or leave the magnet positioned over their device. Viewing the Patient Alert events The device stores up to ten Patient Alert events as log entries. To avoid redundant log entries, an entry is recorded only the first time each Patient Alert condition is met. Each log entry includes the date and time of the alert event, a description of the alert event, and the programmable threshold that was exceeded, if applicable. The log is also annotated with the date of the last session. Interrogating the device resets the audible alert tone but does not clear Patient Alert events from the log. You must manually clear the Patient Alert event log. Note: The Patient Alert Events screen reports “Open Circuit” if an open circuit interferes with the automatic daily measurement. Check lead connections and lead integrity, and reconnect or replace leads as necessary. See “Measuring lead impedance” on page 316. Marquis DR 7274 Reference Manual 259 Chapter 11 Using the Patient Alert feature 260 How to view the Patient Alert events 1. Select Data >> Patient Alert. 2. Select [Events]. 3. To print the event log, select [Print]. 2 To clear the Event Log data 1 4 3 4. Select Data icon > Clear Data. 5. Select [Clear Data]. Caution: Do not clear the Patient Alert event log unless you are willing to erase all the stored device and programmer data (counters, episode records, Flashback Memory, and stored EGMs).a You may wish to print the episode data before clearing it. All data stored in the device and programmer is cleared and the date of last session is reset to the current date. 5 a Clearing the device data does not clear the lead performance or Cardiac Compass trends. Marquis DR 7274 Reference Manual Using system evaluation tools Streamlining follow-ups with Checklist Streamlining follow-ups with Checklist The Checklist feature provides a method of cataloging tasks performed during routine procedures. Selecting a task from the Checklist displays the programmer screen associated with that task. To display the programmer screen for the next task in the selected checklist, select the double-arrow icon next to the Checklist icon. Figure 11-1. Checklist screen The Checklist screen displays a check mark next to the names of any programmer screens visited during a session. This provides a general indication of the tasks performed during a session. Two checklists are provided: the Medtronic Standard Implant checklist and the Medtronic Standard Follow-up checklist. In addition to these standard checklists, you can create customized checklists. Marquis DR 7274 Reference Manual 261 Chapter 11 Streamlining follow-ups with Checklist 262 How to select and use a checklist 1. Select the Checklist icon and review the tasks displayed for that list.a 2 1 3 5 4 2. Select the Checklist field to choose a checklist. 3. To start using the checklist, select either [Go To Task] or the double-arrow icon. 4. Perform the selected task and continue to the next task by selecting the double-arrow icon. To perform a task out of order or repeat a task from the selected Checklist, select the Checklist icon, select the task, then choose [Go To task] or the double-arrow icon.b 5. Select [Print] from the Checklist screen. a b When starting a new session, the checklist used during the last programming session becomes the active checklist. You can select a task whether it is marked with a checkmark or not. When you select the last task in a checklist, the double-arrow icon and the [Go To Task] button are disabled. To re-enable these functions, select a different task or a checklist from the Checklist screen. Marquis DR 7274 Reference Manual Using system evaluation tools Streamlining follow-ups with Checklist How to create, edit, and delete a checklist To create or edit a checklist 1. To create a new checklist, select [New] from the checklist screen. To edit a checklist, select an existing checklist to edit.a 1 4 7 2. Enter a name for the list or modify the existing name (if desired). 3. Assemble a new list with up to 100 tasks by tapping the name of a task in the “Select from these tasks” box. The selected task appears in the new checklist box. (Tasks can be added more than once to a new checklist.) 4. Edit a checklist by selecting it, then selecting [Edit].a To change the order of tasks, highlight the task in the checklist that should precede the task you are moving. Tap the new task to be inserted, and it appears below the highlighted task. 2 3 5. Delete a task by selecting it, then selecting [Delete Task]. 5 6 6. Select [Save] to save the new or edited checklist. To delete a checklist 7. Select the checklist to be deleted from the checklist menu, and select [Delete]. a The Medtronic Standard Follow-up and Medtronic Standard Implant checklists cannot be edited or deleted, so the [Edit...] and [Delete] buttons are unavailable when these checklists are selected. Marquis DR 7274 Reference Manual 263 264 Chapter 11 Key terms Key terms Checklist – interactive display of the programmer screens in a standard order, to help operate the programmer more efficiently. Clinicians can set up their own checklists or use a Medtronic standard checklist supplied with the programmer. electrical reset – automatic device operation to recover from a disruption in device memory and control circuitry. Programmed parameters may be set to electrical reset values.1 This operation triggers a device status indicator and an automatic Patient Alert tone. Observations – programmer messages in the Quick Look screen that identify possible issues of concern in the programming or status of the device. Patient Alert monitoring system – audible alerts that notify the patient when any of the programmable alert conditions have occurred so that the patient can schedule an appointment. QuickLink software design – navigation feature that provides easy, direct access between related programmer screens. Quick Look software display – programmer screen that provides a summary of device status, notable events since the last interrogation, counters, and programming observations. 1 See Appendix B, "Device Parameters" on page 367 for reset settings. Marquis DR 7274 Reference Manual Setting up and viewing collected data 12 A summary of data collection Setting up data collection 266 267 Collecting lead performance data 274 Viewing the episode and therapy efficacy counters Viewing episode data 275 280 Viewing Flashback Memory 288 Viewing battery and lead status data Viewing lead performance trends 290 292 Using Cardiac Compass to view long term clinical trends Viewing and entering patient information Automatic device status monitoring Key terms 294 301 304 306 Marquis DR 7274 Reference Manual 12 266 Chapter 12 A summary of data collection A summary of data collection The device collects and stores various types of data and provides a range of diagnostic tools to manage the care of your patient.1 The table below summarizes the data and diagnostic tools, which are described in detail in the rest of the chapter. Quick Look Summarizes patient and system information since last session that may merit further investigation (see page 251) Patient Alert Logs up to ten Patient Alert events (see page 253) Episodes and counters Counter data: ■ Episode counts for VF, FVT, VT, AFib/AFlutter, Sinus Tach, Other 1:1 SVT, NST, Mode Switch episodes ■ Percent pacing and VRS pacing counts ■ PVC counts ■ Therapy efficacy counts for delivered, successful, unsuccessful, intervention, and total aborted therapies Episode data: ■ Interval plot, EGM strip, and episode text ■ 150 VF, FVT, and VT episodes 50 SVT and NST episodes 53 mode switch episodes ■ Flashback memory – 2000 A-A and V-V intervals prior to last interrogation, most recent VF episode, and most recent VT episode Cardiac Compass trends Graphical report showing up to 14 months of episodes and therapies, ventricular rates, percent pacing, and patient activity (see page 294) Battery and lead measurements Battery voltage, last capacitor formation, last charge, lead impedance, last high voltage therapy, and sensing integrity information (see page 290) Lead performance View lead impedance and EGM amplitude graphs trends for up to 80 weeks (accessed via Quick Look, Battery and Lead Measurements, and Lead Impedance Test screens) (see page 290) 1 If three question marks appear in place of device data, this indicates that the data is invalid or unavailable. Marquis DR 7274 Reference Manual Setting up and viewing collected data Setting up data collection Setting up data collection Although data collection is automatic, some parameters related to data collection are selectable. The device allows you to ■ select the EGM source and amplifier range ■ specify EGM storage before the start of a tachycardia or during capacitor charging ■ set the device date and time ■ turn on the Holter Telemetry feature ■ define the Premature Event Threshold For details about data collection parameters, see page 269. Parameters * Medtronic nominal setting EGM Source – Electrodes between which the device records the EGM signal for each EGM channel. EGM Range (± mV) – EGM amplifier signal range. Smaller settings result in higher resolution telemetered and stored EGM waveforms. EGM 1 (A or V) EGM 2 (V) Can to HVB Can to Vring Can to Aring Vtip to HVB Vtip to Vring Atip to Vring Atip to Aring* Can to HVXa HVB to HVXa Can to HVB Can to Vring Vtip to HVB Vtip to Vring* Can to HVXa HVB to HVXa 2, 4, 8*, 16 2, 4, 8*, 16 Store this channel? – Selects Yes* or No whether EGM 1 is stored in addition to EGM 2. Store EGM during charging? – Specifies EGM storage during charging for automatic cardioversion and defibrillation therapies. Yes* or No Marquis DR 7274 Reference Manual 267 268 Chapter 12 Setting up data collection (continued) * Medtronic nominal setting Yes or No* Store EGM before tachycardia starts? – Specifies EGM storage for 20 seconds of EGM prior to the start of an episode. EGM data from both channels is stored if EGM 1 storage is enabled. Device Date/Time – Sets the date and time of the device internal clock. Holter Telemetry (hours) – Transmits EGM and Marker Channel data continuously for a selectable number of hours, regardless of whether the programming head is positioned over the device. Off*, 0.5, 1, 2, 4, 8, 16, 24, 36, 46 Premature Event Threshold (%) – 56, 59, 62, 66, 69*, . . ., 84, 88, Specifies the percentage of the 91, 94, 97 average intrinsic rate used to classify a sensed event as premature. a An SVC lead must be present for this configuration. Considerations Review these programming considerations before programming data collection parameters. Effect on device longevity – Using some EGM storage features decreases the longevity of the device. To maximize longevity, turn off EGM channel 1 storage, storage before the start of a tachycardia, and storage during charging. Using the Holter Telemetry also decreases the longevity of the device. Memory conservation – To conserve as much EGM storage capacity as possible for additional episodes, consider turning off EGM storage during charging and before the start of a tachycardia. Marquis DR 7274 Reference Manual Setting up and viewing collected data Setting up data collection How to set up data collection Set data collection 1. Select Data > Collection Setup. 2. Set the EGM Source, EGM Range, and EGM storage options. 2 1 3. Select a percentage for the Premature Event Threshold. 4. Select [Program]. 5 Set the device clock 8 5. Select Device Date/Time. 3 4 6. Use the up and down arrow buttons to select hour, minute, and date settings. Use 24-hour notation: midnight is 00:00; noon is 12:00. 6 7. Select [OK] and select [PROGRAM]. Set Holter Telemetry 7 8. Select Holter Telemetry and choose a value. 9. Select [PROGRAM]. Details about data collection parameters EGM source The device has two programmable EGM channels (EGM 1 and EGM 2) that define the lead pathways used for real-time (telemetered) and stored EGM. ■ EGM 1 and EGM 2 channels are displayed in real-time. ■ EGM 1 storage can be programmed on or off and is available for atrial or ventricular lead and high voltage pathways. ■ EGM 2 storage is always on and is available for only ventricular and high voltage pathways. Marquis DR 7274 Reference Manual 269 270 Chapter 12 Setting up data collection With EGM 1 storage on, the device stores up to 14 minutes of dual channel VT/VF EGM and up to 2 minutes of dual channel SVT/NST EGM, along with the associated intervals and markers. With EGM 1 storage off, the device stores up to 23.5 minutes of single channel VT/VF EGM and up to 3.6 minutes of single channel SVT/NST EGM, along with the associated intervals and markers. Note: The cardiac interval measurements of the ICD are always based on the signals sensed through the tip and ring electrodes of the ventricular lead. Therefore, tachyarrhythmia interval criteria, synchronization, and therapy are not affected by your selection of EGM sources. Table 12-1. EGM Source Options EGM 1 EGM 2 Near-Field Atip to Aring (nominal) Vtip to Vring Vtip to Vring (nominal) Far-Field Can to HVBa Can to Vring Can to Aring Vtip to HVBb Atip to Vring HVB to HVXc Can to HVXc Can to HVBa Can to Vring Vtip to HVBb Can to HVXc HVB to HVXc a b c HVB = high voltage coil Far-field if using true bipolar lead, near-field if using integrated bipolar lead. HVX = SVC electrode Marquis DR 7274 Reference Manual Setting up and viewing collected data Setting up data collection 271 Leadless ECG signal – If a supplementary high voltage electrode is placed in the SVC, the device provides the Leadless ECG signal through the Can to SVC (HVX). This EGM source approximates an ECG signal, displaying both P- and R-waves. Figure 12-1. An example of Leadless ECG (CAN-HVX EGM) ECG Lead I A S A S A S A S A S Marker Channel V S V S V S V S 74LeadlessECG.eps V S EGM 1: Can/HVX Figure 12-2. An example of Leadless ECG (CAN-HVX EGM) during a short run of VT ECG Lead I Leadless ECG EGM 1: (Can/HVX EGM) A S A S A R A R A R A S Marker Channel EGM 2: Atip/Aring EGM V S V S T S T S V S V S 74ATipECG.eps V S Marquis DR 7274 Reference Manual 272 Chapter 12 Setting up data collection Premature event threshold The premature event threshold is the interval threshold that defines a premature event, such as a premature ventricular contraction (PVC). A cardiac beat is classified as premature if its interval is less than the programmed premature event threshold. The event threshold is a percentage of the most recent four intervals. For more information about PVCs, see “Detecting and preventing pacemaker-mediated tachycardia” on page 189. Device clock The device uses an internal clock, separate from the programmer clock, to mark the date and time of significant events throughout the life of the device. It stores these date and time stamps in memory along with other event data. The device clock should be set during the implant procedure and under other circumstances such as if the patient changes time zones for a length of time. Holter Telemetry The Holter Telemetry feature transmits EGM and Marker Channel data continuously for a selectable number of hours, regardless of whether the programming head is positioned over the device. The EGM and Marker Channel data transmitted using Holter Telemetry is not stored in device memory. Additional equipment is required to record the data. Please contact your Medtronic representative for more information about the use of the Holter Telemetry. Marquis DR 7274 Reference Manual Setting up and viewing collected data Setting up data collection How to clear collected data i 1. Select the Data icon. 2. Choose [Clear Data...]. 3. Select [Clear Data] to clear data in device and programmer memory and reset the Last Session date. Note: Selecting [Clear Data] does not clear lead performance or Cardiac Compass trends. Cleared information includes counters, episode records, Flashback Memory, Patient Alert event log. Marquis DR 7274 Reference Manual 273 274 Chapter 12 Collecting lead performance data Collecting lead performance data The device collects electrical data about the lead system that allows you to assess lead integrity over the time between patient sessions. This data is collected automatically (with no setup required) and can be viewed or printed during a patient session. Daily lead impedance and EGM amplitude measurements The device automatically measures lead impedances and EGM amplitudes each day starting at 3:00 am.1 Lead impedances – The device measures the atrial and ventricular pacing and high voltage lead impedances using sub-threshold electrical pulses that are synchronized to sensed or paced events but do not capture the heart. If the patient is experiencing a tachyarrhythmia episode (or undergoing programmer-initiated inductions, therapies, or tests) during a scheduled measurement, the device defers the measurement until the next day and logs the value as “not taken.” EGM amplitudes – Starting at 3:00 am, the device attempts to measure the EGM amplitudes for five normal intrinsic atrial and ventricular sensed events. When a complete set of five atrial and five ventricular sensed events has been measured, the device calculates the median atrial and ventricular amplitudes in the set. If no sensed events can be measured, the device defers the measurement until the next day and logs the value as “not taken.” The lead impedance and EGM amplitude values are stored in device memory and may be viewed during a patient session via lead performance trends and various displays and reports. Lead impedance values are also used by the Patient Alert feature to notify the patient in the event that an impedance value is out of range. 1 Based on the internal device clock. Marquis DR 7274 Reference Manual Setting up and viewing collected data Viewing the episode and therapy efficacy counters Sensing integrity counter A sensing integrity counter records the number of short ventricular intervals that occur between patient sessions1. The sensing integrity counter records any sensed ventricular event with a V-V interval shorter than 140 ms (unless the previous ventricular event was paced) since the last session. Note: If the number of short intervals displayed exceeds 300, the programmer displays a Quick Look observation. A large number of short ventricular intervals may indicate situations like oversensing, lead fracture, or a loose set screw. Viewing the episode and therapy efficacy counters The device continuously stores significant events such as detected episodes and therapy deliveries as counter data in memory. There are two types of counters: Episode and Therapy Efficacy. The programmer allows you to view the counters on the screen and print the counter data out in several ways. 1 Defined as intervals since stored data was cleared or the last session ended. Marquis DR 7274 Reference Manual 275 276 Chapter 12 Viewing the episode and therapy efficacy counters How to view and print counter data Interrogate the device if you have not already done so. 1. Select Data > Episodes and Counters. 2. Highlight Counters in the Data Type list. 2 1 3. Select [Open Data]. 3 4. Select either Episode Counters or Therapy Efficacy Counters. 4 5. Select [Print] to print the displayed counters. 6. Select [Close] to return to the Episodes and Counters screen. 6 5 Marquis DR 7274 Reference Manual Setting up and viewing collected data Viewing the episode and therapy efficacy counters Details about the episode and therapy efficacy counters Episode Counters The device maintains cumulative counters of the number of tachyarrhythmias, supraventricular tachycardias (SVT), and non-sustained episodes (NST) since the last patient session, since data was last cleared, and for the lifetime of the device. Figure 12-3. Episode Counters VF, FVT, and VT – report the number of episodes of each arrhythmia, based on the initial detection. Atrial Fib/Atrial Flutter, Sinus Tach, and Other 1:1 SVTs – reports the number of episodes where a PR Logic Criterion was met, causing detection and therapy to be withheld. NST and Others – reports the number of non-sustained tachyarrhythmias and other high rate episodes. Mode Switch – reports episodes where Mode Switch switched the pacing mode to DDIR during an atrial tachyarrhythmia. Marquis DR 7274 Reference Manual 277 278 Chapter 12 Viewing the episode and therapy efficacy counters % Pacing1 – reports the patient’s A-V conduction history (atrial sense with ventricular sense, atrial sense with ventricular pace, etc.) as percentage of the total time during the reporting period. These counters do not count refractory senses, VRS pacing pulses, or events immediately preceded by Charge End. Due to rounding and dissociation, percentages might not add to 100%. Single PVCs1 – reports premature events with intervals less than the Premature Event Threshold. Runs of PVCs1 – reports “runs” of PVCs in which two, three, or four consecutive ventricular events are premature. V. Rate Stabilization Paces1 – reports VRS pacing pulses (VRS escape interval timeouts). Runs of V. Rate Stab. Paces1 – reports “runs” of VRS pacing pulses in which one or more consecutive ventricular events are VRS pacing pulses. 1 These counters do not increment during a detected tachyarrhythmia episode. Marquis DR 7274 Reference Manual Setting up and viewing collected data Viewing the episode and therapy efficacy counters Therapy counters Therapy counters include delivered, successful, unsuccessful, intervention, and total aborted high voltage therapies. The intervention counter indicates the number of times that therapy success could not be determined because of physician intervention such as a manual therapy delivery. The saved episode information is provided since the last patient session, since data was last cleared, and for the lifetime of the device. Figure 12-4. Therapy efficacy counters Marquis DR 7274 Reference Manual 279 280 Chapter 12 Viewing episode data Viewing episode data The Episode Data recorded by the device is summarized below. Episode Logs (see page 282) Summary episode information for up to: 150 VF, FVT, and VT episodes, 50 SVT and NST (non-sustained) episodes, and 53 mode switch episodes Episode Records (see page 283) Detailed episode data for VF, FVT, and VT episodes (and some SVT and NST episodes): Interval Plot V-V and A-A intervals plotted versus time, point of detection, and therapy delivery EGM Strip 1 or 2 channels of stored EGM, Interval data, Marker Channel, and Decision Channel Episode Text Episode summary in textual format Flashback Memory (see page 288) Plots of up to 2000 intervals (containing both A-A and V-V): prior to last interrogation prior to most recent VF episode prior to most recent VT episode Marquis DR 7274 Reference Manual Setting up and viewing collected data Viewing episode data How to view episode data 1. Interrogate the device if you have not already done so. 2. Select Data > Episodes and Counters. 3 2 3. Highlight VT and VF Episodes or SVT and NST Episodes or Mode Switch Episodes in the Data Type list. 4. Select [Open Data]. 5. Select an episode from the episode log. The shaded row indicates which episode is displayed. 4 6. Choose [Interval Plot], [Strip], or [Episode Text] to display more detailsa. 7. To print a report based on the displayed episode information, select [Print] and choose from the available print options. 5 6 8. Select [Close] to display the Episodes and Counters screen. 7 a 8 Mode Switch episodes are only displayed in the Episode Log area. Episode record information is not stored. Marquis DR 7274 Reference Manual 281 282 Chapter 12 Viewing episode data Details about episode data Episode log Episode log storage capacities are shown in Table 12-2. For each type of episode, when the log capacity is filled, newly detected episode information overwrites the oldest episode information in the log. Note: Use the scroll buttons on the right side of the log area to scroll through the list of stored episodes. Table 12-2. Episode Log Capacity Episode Log Storage Capacity VF, VT, and FVT Up to 150 of the most recent episodes SVT and NST Up to 50 of the most recent episodes Mode Switch Up to 53 episodes, including the 50 most recent, the first, the fastest rate, and the longest (no graphs) Figure 12-5. Example VT and VF episode log Figure 12-6. Example SVT and NST episode log Figure 12-7. Example Mode Switch Episode Log Marquis DR 7274 Reference Manual Setting up and viewing collected data Viewing episode data Episode records The episode record displays detailed information about the episode selected in the log. Episode records are available only for VT, VF, FVT, SVT, and some NSTs. For a particular episode, you can display the episode record data in one of the following formats: ■ an interval plot ■ a strip chart of the stored EGM ■ a text summary Note: Episode data is not fully updated in device memory until the episode terminates. Episode records are stored in the order the episodes occur, with new data overwriting the oldest data when the storage capacity is filled. Storing SVT and NST episodes – SVT and NST episodes are high-rate episodes that do not fulfill VF, VT, or FVT episode detection. Generally, episode record data are stored only for SVT episodes. An SVT/NST event is counted when the ventricular interval is less than the VT Interval,1 and the count resets to zero when an interval is greater than or equal to the VT Interval. This counter differs from the VT event counter in that it advances for intervals in the VF and FVT zones, and it does not reset for intervals rejected by the VT Stability criterion. If an episode terminates before the SVT/NST counter reaches the VT NID,1 the episode is classified as non-sustained, and episode data are not stored. Episode data are stored if the SVT/NST counter reaches the VT NID, but VF/VT/FVT detection does not occur. Usually this means the episode was rejected by the PR Logic or Stability criteria; however, EGM may be stored for certain NSTs (such as when the VT NID is programmed lower than the VF NID). 1 VF Interval and VF NID, if VT detection is off. Marquis DR 7274 Reference Manual 283 284 Chapter 12 Viewing episode data Interval Plot When you first select an episode from an episode log, the programmer displays a graph which plots the V-V and A-A intervals versus time, and indicates: ■ the programmed detection intervals ■ point of detection ■ point of therapy delivery The time value for each interval is plotted along the x-axis; the interval value is plotted in milliseconds along the y-axis. In plots of VF, VT, and FVT episodes, zero marks the episode detection. In plots of SVT episodes, zero marks the start of data collection. Note: If the device truncates data storage during an episode, the programmer displays time labels following the truncation on the interval plot as asterisks. See “EGM Strip memory” on page 286. How to view an Interval Plot 1. Select an episode from the log. The shaded row indicates which episode is displayed. 1 2. Select [Interval Plot]. 4 2 5 3 6 7 3. Compare the recorded intervals to the programmed detection intervals. 4. Select the Maximize/Minimize buttons to adjust the size of the graph if desired. 5. Select the interval types to display. 6. Move the magnification window with the arrow buttons to select an area for the EGM Strip display. 7. Select [Print] to print the displayed information. Marquis DR 7274 Reference Manual Setting up and viewing collected data Viewing episode data EGM Strip When the VT or VF interval count reaches three, the device starts storing EGM data. If pre-onset EGM storage is on, the device stores up to 20 seconds of EGM data from before detection of the VT, FVT, or VF episode. If pre-onset EGM storage is off, the device stores only interval data (up to 12 ventricular intervals) from before the onset of the episode. Note: To view all of the EGM strip data, use the scroll bars on the right side and bottom of the screen. SVT and NST episodes – The device stores up to 20 seconds of EGM data for each SVT episode. Generally, EGM strips are not stored for NST episodes. Atrial interval display options – The EGM Strip screen provides four options for displaying atrial intervals. These include A-A intervals, A-V intervals, V-A intervals, and A-V / V-V percentage values. Decision Channel annotations – Decision Channel annotations appear below the ventricular intervals as appropriate (see Figure 12-8). How to view an EGM Strip 1. Select an episode from the log; note the EGM column indicating if an EGM strip is available for that episode. 1 2. Select [Strip]. 2 4 3. Select the interval display area to select an interval to display. 3 5 4. Select the Maximize/Minimize buttons to adjust size of display if desired. 5. Scroll display with scroll bars. 6 6. Select [Print] to print the displayed information. Marquis DR 7274 Reference Manual 285 286 Chapter 12 Viewing episode data Figure 12-8. EGM Strip Screen (SVT episode) 2 1 1 Decision channel shows sinus tach criterion satisfied. 2 End of EGM strip storage. EGM Strip memory – Conserving storage space for EGM information is automatically performed by ■ truncating EGM storage for single, unusually long episodes, so that no more than three minutes of VT/FVT/VF EGM is stored for a single episode and 20 seconds stored for each SVT/NST episode. ■ recording up to 25 seconds of EGM between therapy deliveries or between the last therapy delivery and episode termination. If more than 25 seconds elapse between these events, 5 seconds of EGM is stored after the therapy before recording is suspended, then 20 seconds of EGM is stored before the next therapy (or episode termination). The amount of time that recording was suspended is displayed (see Figure 12-9). Figure 12-9. Suspended EGM recording Marquis DR 7274 Reference Manual Setting up and viewing collected data Viewing episode data Episode Text The Episode Text screen provides a summary of the episode, including the therapy sequence (VF, FVT, and VT episodes only), parameter settings, and notation of SVT criterion met. To view all of the episode text, use the scroll bar on the right side of the screen. How to display the episode text information 1. Select an episode from the log. The shaded row indicates which episode is displayed. 1 2. Select [Episode Text]. 3. Scroll display with scroll bar. 2 4. Select [Print] to print the displayed information. 3 4 Marquis DR 7274 Reference Manual 287 288 Chapter 12 Viewing Flashback Memory Viewing Flashback Memory Flashback Memory is available from the episode record screens. This feature allows you to analyze a patient’s heart rate leading up to a VF or VT episode and compare the pre-VF and pre-VT rhythms to the patient’s normal sinus rhythm and to other episodes. Flashback Memory automatically records up to a total of 6000 intervals in the following combination: ■ prior to the most recent VF episode (up to 2000, A-A and V-V combined) ■ prior to the most recent VT episode (up to 2000, A-A and V-V combined) ■ prior to the most recent interrogation (up to 2000, A-A and V-V combined) Flashback Memory is not programmable and is always turned on. Note: If FVT Detection is on while recording, it records an FVT episode as either a VT episode (if detected via the VT zone) or a VF episode (if detected via the VF zone). Interval storage is suspended when a VF, FVT, or VT episode is in progress. Marquis DR 7274 Reference Manual Setting up and viewing collected data Viewing Flashback Memory How to view the Flashback Memory 1. Select the Flashback Memory data type from the Episodes and Counters screena and then select [Open Data]. 2. Select an episode to display. 3. Select the interval plots to display. 4. View programmed detection intervals, shown as horizontal lines in graph area. 1 5. Note the zoom window. 6. Resize zoom window if desired. 7. Move zoom window if desired. 8. Magnify zoom window if desired. 2 3 9. Select [Print] to print displayed information. 5 4 6 a 7 8 9 You can also display the Flashback Memory screen by selecting [Flashback] from the most recent VT, VF, or FVT record detail screens. Marquis DR 7274 Reference Manual 289 290 Chapter 12 Viewing battery and lead status data Viewing battery and lead status data The device automatically and continuously monitors its battery and lead status throughout the life of the device. After you interrogate the device, the programmer allows you to display and print the following data: ■ current battery voltage ■ most recent capacitor formation ■ most recent capacitor charge ■ sensing integrity counter data ■ most recent lead impedance ■ most recent EGM amplitudes ■ most recent high voltage therapy The device measures the battery voltage when telemetry is initiated or a magnet is applied, when a lead impedance test is performed, and as part of the automatic measurements at 3:00 am daily.1 The values displayed may be either actual measurements or calculations based on actual measurements. If the device has been reset, certain measurements may not be available, and the message “No measurement since reset” is displayed until a new measurement is taken. For information on lead impedance measurements and the sensing integrity counter, see page 275. For information about optimizing capacitor charge time and device longevity, see page 203. 1 Based on the device clock, see “Device clock” on page 272. Marquis DR 7274 Reference Manual Setting up and viewing collected data Viewing battery and lead status data Replacement indicators If the battery voltage is less than or equal to the Elective Replacement Indicator (ERI) value, the programmer displays ■ a message recommending that you replace the device ■ an ERI symbol on the Quick Look and the Battery and Lead Measurements screen ■ a date on the Quick Look and Battery and Lead Measurements screen indicating when the battery reached ERI When the device reaches ERI, contact your Medtronic representative and schedule an appointment to replace the device. If three months have passed since the device reached ERI, the device is at End of Life (EOL)1 and the programmer displays ■ a message recommending immediate replacement of the device ■ an EOL symbol on the Quick Look and Battery and Lead Measurements screen Warning: If the programmer indicates that the device is at EOL, replace the device immediately. 1 EOL may be indicated before the end of three months if actual battery usage exceeds the post-ERI operating conditions. See “Post-ERI conditions” on page 9. Marquis DR 7274 Reference Manual 291 292 Chapter 12 Viewing lead performance trends How to view battery and lead status data Interrogate the device if you have not already done so. 1. Select Data > Battery and Lead Measurements. 1 Viewing lead performance trends The automatic daily lead impedance and EGM amplitude measurements (see page 274) are used to generate lead performance graphs based on up to 80 weeks of measurements.1 A separate graph is provided for each of the following measurements: ■ atrial pacing lead impedance ■ ventricular pacing lead impedance ■ defibrillation lead impedance ■ SVC lead (if used) impedance ■ P-wave EGM amplitude ■ R-wave EGM amplitude Each graph displays values above the graph area for the measurement at implant, the last measured value, the highest value collected for the measurement, and the lowest value collected for the measurement. The impedance information that is graphed includes: 1 The graphs are based on the weekly minimum and maximum impedance values for up to 80 weeks and the most recent 14 days of daily measurements. Marquis DR 7274 Reference Manual Setting up and viewing collected data Viewing lead performance trends ■ the weekly minimum and maximum values for up to 80 weeks ■ the last 14 days of measured values Every seventh day after the device is implanted, weekly minimum and maximum measurements are recorded, and the lifetime minimum and maximum values are updated. How to view lead performance trend graphs 1 2 1. Select the [>>] button next to the lead impedance or EGM amplitude data displayed on the Battery and Lead Measurements screen, Quick Look screen, Lead Impedance Test screen, or EGM Amplitude Test. 2. To change to another graph, select a graph from the pull-down menu in the top left corner of graph. The previous 14 days of recorded data is displayed in a series of daily actual impedance values. Historical data is displayed as weekly minimum and maximum values. Marquis DR 7274 Reference Manual 293 294 Chapter 12 Using Cardiac Compass to view long term clinical trends Using Cardiac Compass to view long term clinical trends The Cardiac Compass report provides up to 14 months of clinically significant data including arrhythmia episodes, therapies delivered, physical activity, heart rate, and bradycardia pacing activity (see Figure 12-10). The report can be useful, for example, in correlating changes in data trends to changes in programmed parameters, drug regimen, or patient condition. The Cardiac Compass report provides an overall view based on the following daily checks or measurements: ■ programming and interrogation annotations ■ VT/VF episodes ■ indication of a cardioversion or defibrillation therapy delivered ■ ventricular rate during VF, FVT, VT episodes ■ number of NST episodes per day ■ total time in AT or AF ■ ventricular rate during AT or AF ■ percent atrial and ventricular pacing ■ average day and night ventricular rate ■ overall patient activity ■ heart rate variability Data storage for the Cardiac Compass report is automatic. No setup is required. The device begins storing data when VF Detection is programmed On at implant. Each day thereafter, the device stores a set of Cardiac Compass data. Storage continues until the 14-month storage capacity is filled. At that point, the oldest stored data is overwritten with new data. The times displayed on the report are based on the device clock. You can print the report from either a full size printer connected to the programmer or from the programmer strip chart recorder. ■ A report printed from the strip chart includes all 11 trends on several printer pages. ■ A report printed on a full size printer includes only 10 trends on one page. When printing to a full size printer, you can select to include either the Heart Rate Variability trend or the NST trend in the report. Marquis DR 7274 Reference Manual Setting up and viewing collected data Using Cardiac Compass to view long term clinical trends Figure 12-10. Cardiac Compass Report example Cardiac Compass Report ICD Model: Marquis DR 7274 Serial Number: PKC100186R Apr 2000 Jun 2000 P = Program I = Interrogate VT/VF episodes/day Aug 2000 I Date of Visit: Jan 15, 2001 Oct 2000 P 1 Dec 2000 I 2 Feb 2001 Apr 2001 I >5 4 3 2 1 0 3 One or more shocks/day V. rate during VT/VF >250 (bpm) 200 VF 150 FVT VT Non-sustained VT episodes/day AT/AF total hours/day <100 >10 8 6 4 2 0 24 20 16 12 8 4 0 V. rate during AT/AF >200 (bpm) 150 max/day avg/day 100 <50 % Pacing/day Atrial Ventricular Avg V. rate (bpm) Day Night Patient activity hours/day 100 75 50 25 0 >120 100 80 60 <40 >8 6 4 2 0 Apr 2000 Jun 2000 Aug 2000 Oct 2000 Dec 2000 9966 Software Version 1.0 Copyright Medtonic, Inc. 2001 Feb 2001 Apr 2001 Jan 15, 2001 11:32:15 Page 1 Heart rate variablity >200 160 (ms) 120 80 <40 Jun 2000 Aug 2000 9966 Software Version 1.0 Copyright Medtonic, Inc. 2001 Oct 2000 Dec 2000 Feb 2001 Apr 2001 Jan 15, 2001 11:32:15 Page 1 CardiacCReport.eps Apr 2000 1 Last session indicator 2 Current session indicator 3 High voltage therapy indicator Marquis DR 7274 Reference Manual 295 296 Chapter 12 Using Cardiac Compass to view long term clinical trends How to print a Cardiac Compass report Interrogate the device if you have not already done so. 1. Select Data icon > Cardiac Compass Trends ... . 1 2. Select print options for ■ number of copies ■ printer type 3. Select [Print Now] or [Print Later] to print the Cardiac Compass report. 2 3 Details on Cardiac Compass trend data Programming and interrogation annotations The programming and interrogation annotations provide all of the following indications: ■ when the patient has been seen ■ when device parameters have been changed ■ possible cause and effect correlations between device parameter changes and other clinical trends The report records an “I” value for a day on which the device is interrogated and a “P” value for a day on which any programmable parameter is changed (except for temporary changes such as changes to test parameters). If both “I” and “P” values are recorded for a day, only the “P” is displayed on the report. Marquis DR 7274 Reference Manual Setting up and viewing collected data Using Cardiac Compass to view long term clinical trends VT/VF episodes per day The VT/VF episodes per day trend provides a history of ventricular tachyarrhythmias and may be helpful in revealing correlations between clusters of episodes and other clinical trends. Each day, the device records the total number of spontaneous VT and VF episodes. The episode counts are provided in histogram format on the report. One or more shocks per day The device records a high voltage therapy indicator for any day on which it delivers an automatic defibrillation or cardioversion therapy. The Cardiac Compass report displays a “|” annotation for the day on which a defibrillation or cardioversion therapy was delivered. Ventricular rate during VT, FVT, and VF The Cardiac Compass report displays a graph of the daily median ventricular rate for spontaneous VF, FVT, and VT episodes which may have occurred. This may provide an indication of the effects of anti-arrhythmic drugs on VF, FVT, and VT rates and a better understanding of the safety margins for detection. Every day, the device stores each unique ventricular median interval occurring on that day. The stored median interval values are converted to ventricular rate and displayed on the report as points on the graph. The report also plots the programmed VF, FVT, and VT interval values for each day. Non-sustained VT episodes per day The non-sustained VT episodes trend may help correlate patient symptoms (such as palpitations) to NST episodes and may indicate a need for further investigation of the status of the patient. Each day, the device records the total number of spontaneous NST episodes. The episode counts are provided in histogram format on the report. Episodes during which detection is withheld due to SVT Criteria are not counted as NSTs. Marquis DR 7274 Reference Manual 297 298 Chapter 12 Using Cardiac Compass to view long term clinical trends AT/AF total hours per day The AT/AF total hours per day trend may help to assess the need for anti-arrhythmic drugs to reduce AF/AT episode occurrences or for anti-coagulant drugs to reduce the risk of stroke. The device records a daily total for the time the patient spent in AT or AF. It defines AT or AF episodes using the same detection criteria as the Mode Switch feature. The time (in hours) is provided in histogram format on the report. This trend may be reported in minutes (1-60) per day depending on the episode frequency. Ventricular rate during AT/AF The ventricular rate during AT/AF trend can be used to do one of the following: ■ correlate patient symptoms to rapid ventricular responses to AT/AF ■ assess VT/VF detection safety margins and modify programming to avoid treating AT/AF as VT/VF ■ prescribe or titrate anti-arrhythmic and rate control drugs ■ assess the efficacy of an AV node ablation procedure The device records average and maximum ventricular rates during episodes of AT and AF each day. The values are plotted on the Cardiac Compass report along with the average ventricular rates. Percent pacing per day The percent pacing per day graph provides a view of pacing over time that can help identify pacing changes and trends. It displays the percentage of events occurring during each day that were atrial paces and ventricular paces. These percentages are calculated from the stored daily totals of the AS-VS, AS-VP, AP-VS, and AP-VP counters. Marquis DR 7274 Reference Manual Setting up and viewing collected data Using Cardiac Compass to view long term clinical trends Patient activity The patient activity trend can be used in these ways: ■ as an early indicator of symptoms due to progressive diseases like heart failure, which cause fatigue and a consequent reduction in patient activity ■ as an objective measurement of patient response to changes in therapy ■ to study outcomes in ICD patients (along with measures like quality of life) ■ to monitor a patient’s exercise regimen The device uses activity count data derived from the rate response accelerometer signal to determine patient activity. It stores activity values daily, and for each seven days of stored data, it calculates a seven-day average, which is plotted for the Cardiac Compass report. Day and night heart rates The day and night heart rates trend may be clinically useful by ■ showing gradual increases in heart rate, which indicate decompensation, a symptom of heart failure ■ providing objective data to correlate with patient symptoms ■ indicating autonomic dysfunction or heart failure ■ providing information regarding diurnal variations ■ showing the patient’s true heart rate, independent of effects like “white coat syndrome” For this trend, the device defines “day” as the 12-hour period between 8:00 AM and 8:00 PM and “night” as the 4-hour period between midnight and 4:00 AM (as indicated by the device clock). Marquis DR 7274 Reference Manual 299 300 Chapter 12 Using Cardiac Compass to view long term clinical trends The device calculates the daytime and night-time averages of interval length from the stored data and converts these values to rates for graphing. The values exclude any ventricular intervals that ■ occur during a manual temporary operation ■ are identified by the device as VF, FVT, or VT events ■ occur during a detected episode (between detection and episode termination) ■ occur during a Mode Switch or AF/AT episode Heart rate variability The device measures the median atrial interval value every five minutes and calculates a variability value each day. The variability value (in milliseconds) is plotted on the Cardiac Compass report. Marquis DR 7274 Reference Manual Setting up and viewing collected data Viewing and entering patient information Viewing and entering patient information Patient information is typically entered at the time of initial implant, and it can be revised at any time. This information is stored in the device and can be accessed by the programmer. Patient information includes ■ patient name, ID number, date of birth, medical history, and physician and hospital name ■ ICD and lead system identification and implant information ■ implant testing data Figure 12-11. Patient Information screen Note: The Patient Information screen should not be used in the place of the patient’s medical chart (see the legal notice on page xvi). Marquis DR 7274 Reference Manual 301 302 Chapter 12 Viewing and entering patient information Table 12-3. Description of Patient Information parameters Information field Description and required action Patient Enter the patient name (up to 30 characters). ID Enter the patient ID (up to 15 characters). Date of Birth Select patient’s date of birth. ICD Number (Not selectable) Displays serial number for implanted device after interrogation. Lead 1 . . . Lead 2 . . . Lead 3 . . . Enter detailed information for leads 1, 2, and 3: Model; Position: pick from list of positions, or enter position; Serial Number; Manufacturer; and Implant date. Implant Enter measured values from implant. Using the displayed submenu, enter new information including lead data from the Analyzer. Notes Enter notes about patient or other information. History (2 fields) Select medical history from list box. If necessary, you can indicate that more information is located in the Notes field. EF, on Select the ejection fraction from a table of values. Then enter the date in the following field. Physician Select or add the name of the physician. You can also enter the physician’s phone number at the same time. Phone Enter the phone number of the physician. Hospital Select or add the hospital information. Last Update (Not selectable) Displays the date of the last Patient Information update. Note: The ICD serial number and patient name and ID number are printed on each page of all full-size and strip chart reports. Marquis DR 7274 Reference Manual Setting up and viewing collected data Viewing and entering patient information How to view and enter new patient information 1. Select the Patient icon. The Patient Information screen is displayed. 2 3 1 2. Select the data field you want to change, and enter the text for the field, or if a display list appears, do one of the following: a. Select an option from the display list, or b. Select [Modify List] and [Add]. Then type in your addition and select [OK]. 3. When all the information has been entered, select [PROGRAM]. Displaying and printing patient information If you make an entry that does not fit in the parameter display area, the entry is truncated on the display, but the entry is visible if printed from the Patient Information screen. When displayed or printed from the Changed Parameters screen, information may be truncated, which is indicated by an ellipsis (...) following the last character. Interlock markers are displayed if patient information has not been entered. However, programming patient information is not required. You can print current patient information from the Patient Information screen or the Reports icon: ■ From the Patient Information screen, select [Print...]. Choose the number of copies and printer (Full Size or Programmer), and then select [Print Now] or [Print Later]. ■ Select the Reports icon and select [Custom...]. Select [All Settings] under the Parameters heading. Select [Print Options] to choose the number of copies and the printer (Full Size or Programmer), then select [Print Now] or [Print Later]. Note: The ICD serial number, patient, and ID number fields are printed on all full-size and strip chart reports. Marquis DR 7274 Reference Manual 303 304 Chapter 12 Automatic device status monitoring Automatic device status monitoring During each interrogation, the device is monitored for adequate charge time performance and possible electrical reset conditions. If a condition is detected that requires attention, the programmer displays a Device Status Indicator warning in a pop-up window and on the Quick Look screen. Device status indicator warnings Warning: The Device Status Indicators are important. Please inform your Medtronic representative if any of the indicators are displayed after interrogating a device. The Device Status Indicators are defined below: Warning - Charge Circuit Timeout – Indicates that the charging period has exceeded 30 seconds. The charge circuit is still active. Please inform your Medtronic representative if this Device Status Indicator occurs. Immediate replacement is recommended. Warning - Charge Circuit Inactive – Indicates that three consecutive charging periods have each exceeded 30 seconds. The charge circuit is inactive, and all automatic therapy functions and manual operations are disabled except for Emergency VVI pacing. Please inform your Medtronic representative if this Device Status Indicator occurs. Immediate replacement is recommended. Warning - ICD Electrical Reset – Indicates that an electrical reset has occurred. Programmed parameters may have been set to electrical reset values.1 Read the message accompanying the indicator, and follow the screen instructions carefully. If the error message does not indicate that parameters have been reprogrammed, then the reset did not affect any programmed parameters. In some cases, an electrical reset may disable tachyarrhythmia detection and therapy. If this occurs, the electrical reset patient alert sounds every 9 hours, and the device operates as a simple bradycardia pacing device (in VVI mode, 65 ppm). 1 See Appendix B, "Device Parameters" on page 367 for reset settings. Marquis DR 7274 Reference Manual Setting up and viewing collected data Automatic device status monitoring Warning - SERIOUS ICD ERROR – Indicates an error has occurred from which the device cannot recover. If this message is displayed, immediate replacement is recommended. Clearing displayed status indicators To clear the displayed status indicator, select [Clear] from the pop-up window displaying the Device Status Indicator message. How to respond to an electrical reset If the programmer reports that an electrical reset occurred, follow these steps: 1. Notify your Medtronic representative. 2. Remove any sources of electromagnetic interference (EMI). 3. Select [Clear] in the pop-up window to clear the reset indicator and the Patient Alert alarm. A confirmation window appears indicating that all previously interrogated data in the programmer will be cleared. 4. Select Continue. 5. Interrogate the device. a. Note the time and date when counter data was last cleared, because this indicates when the electrical reset occurred. b. Determine, if possible, what the patient was doing at that time and date. c. Save your session data to disk. You should give this saved data file to your Medtronic representative; it will be helpful in determining the events leading up to the reset. 6. Verify the programmed device parameters. Depending on the type of reset that occurred, you may need to reprogram the device parameters. If the electrical reset did reprogram certain parameters, the reprogrammed values are displayed in the error message. After this type of reset, the device operates as a simple defibrillator (in VOE-VVI mode), until reprogrammed. For a list of electrical reset parameter settings, see Appendix B, "Device Parameters" on page 367. 7. Verify the correct Device Date/Time. If necessary, reprogram the date and time. 8. Perform a manual capacitor formation to reset the capacitor formation timer and ensure that the capacitor formation schedule is not compromised. 9. Interrogate the device again. Check the Battery and Lead Measurements screen to verify that the battery voltage and charge time are acceptable. 10. Conduct Lead Impedance and Pacing Threshold tests as desired. Marquis DR 7274 Reference Manual 305 306 Chapter 12 Key terms Key terms Cardiac Compass report – printed plot of up to 14 months of daily measurements, used to identify and document long-term clinical trends. Charge Circuit Timeout – indicates that the charging period has exceeded 30 seconds. The charge circuit is still active. Please inform your Medtronic representative if this Device Status Indicator occurs. Immediate replacement is recommended. Charge Circuit Inactive – indicates that three consecutive charging periods have each exceeded 30 seconds. The charge circuit is inactive, and all automatic therapy functions and manual operations are disabled except for Emergency VVI pacing. Please inform your Medtronic representative if this Device Status Indicator occurs. Immediate replacement is recommended. charging period – time required for the device to store the programmed energy (charge) in its capacitors so that it can rapidly deliver a cardioversion or defibrillation therapy. counter data – stored data including numbers of episodes, delivered therapies, and therapy outcomes. This data is displayed via the Data icon. Decision Channel annotations – annotations to stored and telemetered EGMs, documenting some details of dual chamber tachyarrhythmia detection. device status indicators – programmer messages describing the device memory, capacitor, and electrical reset status. EGM range – maximum magnitude of EGM amplifier signal, in millivolts. Smaller settings result in a higher resolution for displayed and recorded EGM waveforms. EGM source – the pair of implanted electrodes selected as the sensing pathway for stored and telemetered EGM signals. Marquis DR 7274 Reference Manual Setting up and viewing collected data Key terms EGM strip – stored recording of the intracardiac waveforms from a detected arrhythmia episode. Elective Replacement Indicator – see “ERI.” electrical reset – automatic device operation to recover from a disruption in device memory and control circuitry. Programmed parameters may be set to electrical reset values.1 This operation triggers a device status indicator and an automatic Patient Alert tone. EOL (End of Life) – battery status indicator for when immediate replacement of the device is recommended. The programmer displays the EOL symbol to indicate that the device is at End of Life and may not operate per specifications. episode record – stored information about the cardiac rhythm and device behavior during a detected tachyarrhythmia episode. ERI (Elective Replacement Indicator) – battery voltage or charge time at which replacement of the device is recommended; ERI does not alter the device operation in any way. far-field EGM – the EGM signal sensed between distant electrodes, for example, the EGM sensed between the device can and the ventricular lead ring. This term can also refer to the far-field sensing of R-waves by an atrial lead or sensing of P-waves by a ventricular lead. Flashback memory – programmer display of the A-A and V-V intervals that preceded recent episodes or that preceded the last interrogation of the device. Holter Telemetry – telemetry feature that transmits EGM and Marker Channel data continuously for a programmable number of hours, regardless of whether the programming head is positioned over the device. impedance – total opposition that a circuit presents to electrical current flow. The impedance on the leads connected to the device can be measured to assess the lead system’s integrity. 1 See Appendix B, "Device Parameters" on page 367 for reset settings. Marquis DR 7274 Reference Manual 307 308 Chapter 12 Key terms interlock – safety restriction in the programmer software that aids in the choice of proper parameter values, usually by displaying a screen message. Last Session – the most recent time the device was successfully interrogated. Lead Performance Trends – displays lead impedance and EGM amplitude graphs for up to 80 weeks (accessed via Quick Look, Battery and Lead Measurements, and Lead Impedance Test screens). Marker Channel telemetry – telemetered symbols that annotate the device sensing, pacing, detection, and therapy operations. near-field EGM – the EGM signal sensed across two closely spaced electrodes, for example, the EGM sensed between the tip and ring of an atrial or ventricular lead. Sometimes referred to as a bipolar EGM. Non-Sustained Tachycardia (NST) – ventricular rhythm that is fast enough to fall within the programmed VT and VF zones for at least five beats, but does not meet any episode detection criteria. PR Logic criteria – (A.Fib/A.Flutter, Sinus Tach, and Other 1:1 SVTs) optional detection criteria that analyze both atrial and ventricular rhythms to discriminate between ventricular and supraventricular arrhythmias. Pre-Onset EGM Storage – (also called EGM pre-storage) programmable option to record EGM continuously. If a tachyarrhythmia episode occurs, the pre-onset EGM is added to the episode record to document the rhythm at onset. QuickLink software design – navigation feature that provides easy, direct access between related programmer screens. Quick Look software display – programmer screen that provides a summary of device status, notable events since the last interrogation, counters, and programming observations. Marquis DR 7274 Reference Manual Setting up and viewing collected data Key terms Sensing integrity counter – records the number of short ventricular intervals that occur between patient sessions1. The sensing integrity counter records any sensed ventricular event with a V-V interval shorter than 140 ms (unless the previous ventricular event was paced) since the last session. successful – therapy counter that indicates how many times the therapy’s outcome was episode termination. telemetry – communication between the device and the programming head by radio waves. Programming commands, status messages, and stored episode records are all transmitted by telemetry. unsuccessful – therapy counter that records how many times this therapy resulted in redetection, rather than episode termination. 1 Defined as intervals since stored data was cleared or the last session ended. Marquis DR 7274 Reference Manual 309 310 Chapter 12 Key terms Marquis DR 7274 Reference Manual Testing the system Testing overview 312 Evaluating the underlying rhythm Measuring pacing thresholds 316 Measuring EGM Amplitude 318 Testing the device capacitors 312 313 Measuring lead impedance Key terms 13 320 322 Marquis DR 7274 Reference Manual 13 312 Chapter 13 Testing overview Testing overview You can use the manual tests provided by the device to evaluate system performance and integrity. The device offers five options for testing the system, which are available from the Tests icon: ■ Underlying Rhythm test ■ Pacing Threshold test ■ Lead Impedance test ■ EGM Amplitude test ■ Charge/Dump test For more information about EP Study operations, which are also available via the Tests icon, see Chapter 14, "Conducting Electrophysiologic Studies" on page 323. Caution: During system tests, tachyarrhythmia detection and therapies are suspended. Evaluating the underlying rhythm Using the Underlying Rhythm Test, you can inhibit the pacing output of the device to evaluate the patient's natural heart rhythm. Considerations Review the following information before performing the Underlying Rhythm test. Caution: Use caution when performing the Underlying Rhythm test on patients who depend on pacing for adequate cardiac output. The device delivers no pacing as long as you press and hold the [INHIBIT Press and Hold] button. Marquis DR 7274 Reference Manual Testing the system Measuring pacing thresholds How to Perform an Underlying Rhythm test 1. Select Tests > Underlying Rhythm. 2. Select [INHIBIT Press and Hold]. A message indicates that the test is inhibiting pacing. 2 1 3. To obtain a recording of the patient’s natural rhythm, press the desired paper speed key on the printer/recorder. The ECG trace should not show any pacing stimuli. Measuring pacing thresholds You can determine the patient’s atrial and ventricular pacing stimulation thresholds using the Pacing Threshold test. The test consists of three parts: ■ selecting temporary pacing parameters for the test ■ delivering pacing pulses that capture the heart ■ gradually decreasing the pulse width, automatically or manually, until pacing capture is lost After performing a Pacing Threshold test, make sure that the permanently programmed pulse width and amplitude parameters provide an adequate safety margin above the measured pacing threshold value. You can choose to decrease the pacing pulse width manually (Manual) or have the device decrease the pacing pulse width automatically (Pulse Width - Auto Decrement). Note: Interrogate the device before performing a Pacing Threshold Test to ensure that the temporary pacing parameters it applies correspond to those programmed for the patient. Marquis DR 7274 Reference Manual 313 314 Chapter 13 Measuring pacing thresholds Parameters * Medtronic nominal setting Test Type – Method to use for modifying Manual, Pulse Width - Auto the pacing outputs (manual or automatic). Decrement* Chamber – The chamber of the heart where the pacing threshold is tested. Ventricle*, Atrium Modea – Pacing mode used during the test. Atrial test: AAI, DDI, DDD* Vent. test: VVI*, DDI, DDD Lower Ratea – (ppm, min-1) Minimum pacing rate used during the test. 30, 35, . . . 60, 70, 75, . . ., 90*, . . ., 150b AV Delaya (ms) – Interval between an atrial event and a following ventricular pace. 30, 40, . . ., 150*, . . ., 350 V. Amplitudea (V) – Voltage setting for 0.5, 1, . . ., 3*, 3.5, 4, 5, 6 ventricular pacing pulses delivered during the test. V. Pulse Widtha (ms) – Duration of the 0.03, 0.06, ventricular pacing pulses delivered during 0.1, 0.2, 0.3, 0.4*, . . ., 1.6 the test. A. Amplitudea (V) – Voltage setting for atrial pacing pulses delivered during the test. 0.5, 1, . . ., 3*, 3.5, 4, 5, 6 A. Pulse Widtha (ms) – Duration of the atrial pacing pulses delivered during the test. 0.03, 0.06, 0.1, 0.2, 0.3, 0.4*, . . ., 1.6 V. Pace Blankinga (ms) – Time interval during which sensing is disabled after a ventricular pacing pulse. 150, 160, . . ., 200*, . . ., 440 A. Pace Blankinga (ms) – Time interval during which sensing is disabled after an atrial pulse. 150, 160, . . ., 200*, . . ., 250 PVARPa (ms) – Atrial refractory period following ventricular events which prevents atrial oversensing. 150, 160, . . ., 310*, . . ., 500 a b The default value for this parameter is set according to the permanently programmed settings for bradycardia pacing if the device has been interrogated. Otherwise it defaults to the indicated nominal value. The maximum range value is dependant on the programmed pacing mode. Marquis DR 7274 Reference Manual Testing the system Measuring pacing thresholds Note: The selectable and default values provided by the Pacing Threshold test depend on the programmed values for bradycardia pacing therapy. Considerations Review the following information before performing the Pacing Threshold test. Decreasing the pulse width – You can choose to decrease the pacing pulse width manually or have the device decrease the pacing pulse width automatically. How to perform a Pacing Threshold Test 1. Interrogate the device by selecting the [Interrogate] button. 5 2. Select Tests > Pacing Threshold. 3. Select Test Type, Chamber, and starting test values, or accept the values displayed. 4 3 4. Press and hold [TEST Press and Hold]. 2 1 5. Observe the ECG for loss of capture. If consistent capture is verified ■ In a Manual test: adjust the Pulse Width setting and repeat the test. ■ In an Auto Decrement test: verify the test has decreased the pulse width. 6. When capture is lost, immediately release [TEST Press and Hold]. The device resumes its pre-test pacing values and the final test values remain displayed. Marquis DR 7274 Reference Manual 315 316 Chapter 13 Measuring lead impedance Measuring lead impedance You can test the integrity of the implanted lead system by measuring the impedance across the ventricular pacing, atrial pacing, and high voltage electrodes with the Lead Impedance test. These measurements are made without delivering a high voltage shock or pacing pulses that capture the heart. Instead, the device uses low voltage, sub-threshold pulses, resulting in painless testing for the patient. Considerations Review the following information before performing the Lead Impedance test. Sensing measurement pulses – When the device performs a lead impedance measurement, it may sense the sub-threshold test pulses as atrial refractory events (or atrial sensed events in VVI mode). These pulses may also cause very small variations on one or more of the EGM channels. However, pulses delivered by a Lead Impedance test do not capture the heart or affect tachyarrhythmia detection. How to perform a Lead Impedance test 1. Select Tests > Lead Impedance. 2. Select [START Measurement]. Wait for programming confirmation and an in-progress message and graphic display. 2 3. If necessary, you can abort the test by selecting [STOP]. Lead impedance measurements are not updated from an aborted test. 3 1 Marquis DR 7274 Reference Manual Testing the system Measuring lead impedance Details about the Lead Impedance test The Lead Impedance test delivers small sub-threshold pulses between several electrode combinations and then measures any changes in voltage. The electrical current is measured across the electrodes and converted to an impedance value. Impedance measurement synchronization When performing a Lead Impedance test, measurements across the ventricular pacing lead and the high voltage electrodes are synchronized to ventricular paced or sensed events, and measurements across the atrial pacing lead are synchronized to atrial paced or sensed events. The device cannot synchronize lead impedance measurements to the following events: ■ atrial sensed events that occur during the PVAB ■ ventricular sensed events that occur during a VSP interval For each measurement, the Lead Impedance test waits up to three seconds for an event that qualifies for synchronization. If no qualifying event occurs, the measurement is delivered asynchronously. Automatic lead impedance testing In addition to manually-initiated impedance measurements, the device performs daily automatic lead impedance measurements. High voltage therapy impedance When a high voltage therapy is delivered, the high voltage lead impedance is measured based on the energy of the shock rather than sub-threshold pulses. This measurement is displayed under the Last High Voltage Therapy category on the Battery and Lead Measurements screen. Marquis DR 7274 Reference Manual 317 318 Chapter 13 Measuring EGM Amplitude Measuring EGM Amplitude You can assess lead integrity and sensing performance using the EGM Amplitude test. During this test, the device measures the base-to-peak voltage of sensed atrial and ventricular events. To increase the likelihood that sensed events will occur, you can select temporary pacing settings that evoke the patient’s intrinsic rhythm. Caution: Use caution when selecting temporary pacing settings for pacemaker dependant patients. You can determine if the sensing performance of the device has changed by comparing the measured values to those reported on the Lead Performance Trends screen and those measured at previous follow-ups. Parameters * Medtronic nominal setting Mode – Pacing mode used during the test. AAI, DDD, DDI, VVI, ODO AV Delay (ms) – Interval between an atrial event and a following ventricular pace. 30, 40, . . . , 350 Lower Rate (ppm, min-1) – Minimum pacing rate used during the test. 30, 35, . . ., 60, 70, 75, . . ., 120a a The maximum range value is dependant on the programmed pacing mode. Considerations Review the following information before performing the EGM Amplitude test. Selecting sensitivity values – Do not adjust the values for A. Sensitivity and V. Sensitivity based on the results of this test. See “How to program sensitivity” on page 63. Patient comfort – Reducing the pacing rate gradually may help minimize symptoms associated with abrupt changes in heart rate. Marquis DR 7274 Reference Manual Testing the system Measuring EGM Amplitude Pacing modes – Available modes depend on the permanently programmed pacing mode, including DDD, DDI, VVI, and AAI. Automatic time-out – The test ends automatically after a few seconds and restores the programmed settings if no intrinsic events occur and you make no changes to the pacing rate. Maximum measured values – When the sensitivity is set to between 0.3 mV and 2.1 mV, the maximum amplitude values that the EGM Amplitude test can measure are 10.7 mV for atrial (P-wave) and 18.8 mV for ventricular (R-wave) measurements. However, if the sensitivity setting is set to 0.15 mV, the maximum amplitude values that the EGM Amplitude test can measure are 5.35 mV for atrial (P-wave) and 9.4 mV ventricular (R-wave) measurements. Restrictions Review the following information before performing the EGM Amplitude test. DOO and VOO pacing modes – The EGM Amplitude test cannot be performed if the programmed pacing mode is DOO or VOO. Marquis DR 7274 Reference Manual 319 320 Chapter 13 Testing the device capacitors How to perform an EGM Amplitude test 1. Interrogate the device by selecting the [Interrogate] button. 5 2. Select Tests > EGM Amplitude. 4 3. Set the pacing Mode and AV Delay (when available) for the test, or accept the values displayed. 6 3 2 4. Select [START Measurement]. The parameter values that you selected are enabled. 5. Observe the Live Rhythm Monitor for intrinsic rhythm. If consistent pacing is still occurring, decrease the Lower Rate. 1 6. If necessary, you can abort the test by selecting [STOP and Restore]. Pacing settings will return to the programmed values. Testing the device capacitors The Charge/Dump test allows you to test charge time, manually form the device capacitors, and dump any charge remaining on the capacitors. After a test charge, the charge remains on the capacitors until it is dumped, delivered by a cardioversion or defibrillation therapy, or dissipates (after about 10 minutes). For more information about using the Charge/Dump test to manually form the capacitors, see “Details about managing charge time” on page 205. Considerations Review the following information before performing the Charge/Dump test. Marquis DR 7274 Reference Manual Testing the system Testing the device capacitors Manual capacitor formation – If you allow a test charge to dissipate for 10 minutes, the device records it as a capacitor formation and resets the automatic capacitor formation interval. How to perform a Charge/Dump test 1. Select Tests > Charge/Dump. 2. Select [DUMP Capacitors] to remove any charge from the capacitors. 3. Select [CHARGE Capacitors]. The message “Manual operation charging” appears on the Device Status Line. 2 3 1 4. When charging has completed, the Charge End symbol (CE) appears on the Marker Channel display and the Manual Operation Charging message disappears from the screen heading. 5. Select [RETRIEVE Data] to collect the charge time data from the device. 6. If necessary, you can abort the test charge by selecting [ABORT Test]. 4 5 6 Marquis DR 7274 Reference Manual 321 322 Chapter 13 Key terms Key terms capacitor – electrical component in the device that stores electrical energy so that a high voltage can be delivered from a relatively small battery. capacitor formation – any charge to maximum programmed energy that dissipates off the capacitors (is not dumped or delivered) for at least ten minutes. charging period – time required for the device to store the programmed energy (charge) in its capacitors so that it can rapidly deliver a cardioversion or defibrillation therapy. impedance – total opposition that a circuit presents to electrical current flow; the device lead impedances can be measured to assess the lead system’s integrity. Inhibit – temporary function that prevents pacing output pulses. pacing threshold – minimum programmable pacing output that consistently captures the heart. Quick Look software display – programmer screen that provides a summary of device status, notable events since the last interrogation, counters, and programming observations. sensitivity – degree to which the device sensing circuitry is responsive to intracardiac voltages. test values – temporary parameters used during system test and EP study operations. Permanent settings are restored automatically once the operation has ended, the programming head is removed, or the telemetry link is broken. undersensing – failure to sense the P-wave or R-wave; can cause failure to detect a tachyarrhythmia or inappropriate bradycardia pacing. Marquis DR 7274 Reference Manual Conducting Electrophysiologic Studies 14 EP Study overview 324 Inducing VF with T-Shock 326 Inducing VF with 50 Hz Burst 329 Inducing an arrhythmia with Manual Burst Inducing an arrhythmia with PES Delivering a manual therapy Key terms 332 335 338 341 Marquis DR 7274 Reference Manual 14 324 Chapter 14 EP Study overview EP Study overview Warning: Perform EP Study functions only under careful patient monitoring and control. Keep an external defibrillator immediately available and on standby during EP Study operations. An induced ventricular tachycardia may degenerate to ventricular fibrillation. The device provides electrophysiologic study (EP Study) functions via the Tests icon. EP Study functions include cardiac stimulation protocols that induce VF, VT, and AT/AF: ■ T-Shock VF induction ■ 50 Hz Burst pacing ■ atrial and ventricular Manual Burst pacing ■ atrial and ventricular Programmed Electrical Stimulation (PES) EP Study also provides each of the tachyarrhythmia therapies, executed manually via a telemetry command from the programmer: ■ Defibrillation ■ Cardioversion ■ Burst pacing ■ Ramp pacing ■ Ramp+ pacing Each manual therapy performs in the same way as the automatic therapy with additional temporary settings for timing and output. Detection suspended during manual therapy – Delivering a manual therapy suspends tachyarrhythmia detection. To resume detection, press the on-screen [Resume] button, or remove the programming head from the implanted device. Auto resume after induction – All of the EP Study inductions provide the option to automatically resume detection after the induction is delivered. Select the [Resume at BURST] or [Resume at DELIVER] checkbox to enable auto resume. Marquis DR 7274 Reference Manual Conducting Electrophysiologic Studies EP Study overview Temporary parameter values – EP Study operations use test values that do not change the programmed parameters of the device. Test values are not in effect until you begin the induction or therapy. After the induction or therapy, the device reverts to its programmed parameter values for bradycardia pacing and tachyarrhythmia therapy. Pacing operations – The following bradycardia operations are suspended during an EP Study operation: Non-Competitive Atrial Pacing, PMT Intervention, Hysteresis, Sensor-Varied PVARP, Rate Adaptive AV, Rate Response calculations, Ventricular Rate Stabilization, and Mode Switch. Programmed parameters check – Before displaying the EP Study screen, the system checks to verify that the device is programmed to detect and treat an induced arrhythmia. If the detection or therapy features are not programmed appropriately, a warning message appears on screen. Programming head buttons – The Program and Interrogate buttons on the programming head are disabled during EP Study inductions. Use the appropriate on-screen delivery button to perform an induction. Marquis DR 7274 Reference Manual 325 326 Chapter 14 Inducing VF with T-Shock Inducing VF with T-Shock The T-Shock induction is designed to induce VF by delivering a shock simultaneously with a T-wave, the vulnerable period of the cardiac cycle. You can use T-Shock inductions to test the effectiveness of the programmed detection and therapy parameters, for example, during defibrillation threshold (DFT) testing. To simplify DFT testing, the following tasks can all be performed using the T-Shock screen: ■ monitor the time between inductions ■ reprogram sensing and VF therapy settings ■ adjust the induction settings ■ retrieve episode records after therapy See details about T-Shock induction on page 328. Parameters * Medtronic nominal setting #S1 – Number of pulses in the VOO pacing sequence. 2, 3, . . ., 8* S1S1 (ms) – Pacing interval of the VOO pacing sequence. 300, 310, . . ., 400*, . . ., 2000 Delay (ms) – Maximum interval between the final VOO pulse and the T-Shock.a 50, 60, . . ., 310*, . . ., 600 Energy (J) – Energy delivered by the T-Shock induction. 0.4, 0.6*, . . ., 1.8, 2, 3, . . ., 16, 18, 20, . . ., 30 Waveform – Voltage pattern of the delivered shock. Monophasic*, Biphasic Pathway – Direction that current travels through the heart. AX>B*, B>AX Amplitude (V) – Voltage of each pulse in the pacing sequence. 8 V (fixed) Pulse Width (ms) – Duration of each pulse in the pacing sequence. 1.6 ms (fixed) Marquis DR 7274 Reference Manual Conducting Electrophysiologic Studies Inducing VF with T-Shock (continued) * Medtronic nominal setting Enable – (checkbox) Safety lock that enables T-Shock induction. Enabled, Disabled* Resume at DELIVER – (checkbox) Option to resume detection automatically when the induction is delivered. Enabled*, Disabled a The T-Shock is delivered on a ventricular sensed event or at the end of the selected Delay interval, whichever comes first. Considerations Review the following information before performing the T-Shock induction. Warning: Keep an external defibrillator immediately available and on standby. Detection and auto resume option – If the [Resume at DELIVER] option is selected, the device automatically resumes tachyarrhythmia detection after the induction. To deliver an induction with automatic detection suspended, select the on-screen [Suspend] button and de-select the [Resume at DELIVER] checkbox. Aborting an induction or therapy – As a safety precaution, the programmer displays an [ABORT] button that immediately terminates any induction, manual therapy, or automatic therapy in progress. When you deliver a manual therapy, the device automatically aborts any induction or therapy already in progress. Restrictions Review the following information before performing the T-Shock induction. [Enable] checkbox – As a safety measure, you cannot select the [DELIVER T-Shock] button until you have selected the T-Shock [Enable] checkbox. After you deliver a shock or exit the T-Shock screen, you must re-select the [Enable] checkbox before delivering another T-Shock induction. Marquis DR 7274 Reference Manual 327 328 Chapter 14 Inducing VF with T-Shock How to deliver a T-Shock induction 1. Select Tests > EP Study. 3 4 2 2. Select T-shock from the Inductions/Therapies box. 7 8 5 3. If you wish to treat the induced episode with a manual therapy, select [Suspend] to prevent automatic detection. 4. Confirm that the [Resume at DELIVER] checkbox is selected (for automatic detection and therapy) or is deselected (for manual therapy). 9 1 5. Accept the test values displayed on the screen, or choose new test values. 6 a b c 6. Accept the sensing and VF therapy values displayed on the screen, or select [Adjust Permanent...] a. Select new sensing and VF therapy values if desired. b. Select [PROGRAM]. c. Select [Close]. 7. Select the [Enable] checkbox. 8. Select [DELIVER T-Shock]. 9. If necessary, you can use the [ABORT] button to terminate the induction or any therapy in progress. Details about T-Shock induction A T-Shock VF induction delivers two to eight VOO pacing stimuli, then delivers a shock. The shock is delivered on a ventricular sensed event or at the end of the selected Delay interval, whichever comes first. The intent of this protocol is to force the ventricular cycle into a predictable rhythm and then deliver the shock simultaneously with a T-wave, the vulnerable period of the cardiac cycle, in order to induce VF. Marquis DR 7274 Reference Manual Conducting Electrophysiologic Studies Inducing VF with 50 Hz Burst If the stored energy on the capacitors is higher than the energy level you selected, the programmer displays a warning when you select the [DELIVER T-Shock] button. To clear this warning from the screen, select either [DUMP] or [CANCEL]. Inducing VF with 50 Hz Burst The 50 Hz Burst induction is designed to induce VF by delivering a rapid burst of pacing pulses. The amplitude and pulse width of these pulses are selectable, but the pacing interval is fixed at 20 ms. You can use 50 Hz Burst inductions to test the effectiveness of the programmed detection and therapy parameters, for example, during defibrillation threshold (DFT) testing (see page 42). To simplify DFT testing, the following tasks can all be performed using the 50 Hz Burst screen: ■ monitor the time between inductions ■ reprogram sensing and VF therapy settings ■ adjust the induction settings ■ retrieve episode records after therapy See details about 50 Hz Burst induction on page 332. Parameters * Medtronic nominal setting Interval (ms) – Pacing interval of the 50 Hz Burst induction. 20 ms (fixed) Amplitude (V) – Voltage of each pulse in 0.5, 1, . . ., 4, 5, 6, 8* the pacing sequence. Pulse Width (ms) – Duration of each pulse in the pacing sequence. 0.03, 0.06, 0.1, 0.2, . . ., 1.6* Resume at BURST (checkbox) – Option to resume detection automatically when the induction is delivered. Enabled*, Disabled Marquis DR 7274 Reference Manual 329 330 Chapter 14 Inducing VF with 50 Hz Burst Considerations Review the following information before performing the 50 Hz Burst induction. Warning: Keep an external defibrillator immediately available and on standby. Detection and auto resume option – If the [Resume at BURST] option is selected, the device automatically resumes tachyarrhythmia detection after the induction. To deliver an induction with automatic detection suspended, select the on-screen [Suspend] button, and de-select the [Resume at BURST] checkbox. Aborting an induction or therapy – As a safety precaution, the programmer displays an [ABORT] button that immediately terminates any induction, manual therapy, or automatic therapy in progress. When you deliver a manual therapy, the device automatically aborts any induction or therapy already in progress. Marquis DR 7274 Reference Manual Conducting Electrophysiologic Studies Inducing VF with 50 Hz Burst How to deliver a 50 Hz Burst induction 1. Select Tests > EP Study. 3 2. Select 50 Hz Burst from the Inductions/Therapies box. NEED 50 Hz Burst Screen 3. If you wish to treat the induced episode with a manual therapy, select [Suspend] to prevent automatic detection. 4 7 8 4. Confirm that the [Resume at BURST] checkbox is selected (for automatic detection and therapy) or is deselected (for manual therapy). 2 5 1 5. Accept the test values displayed on the screen, or choose new test values. 6 a b c 6. Accept the sensing and VF therapy values displayed on the screen, or select [Adjust Permanent...] a. Select new sensing and VF therapy values if desired. b. Select [PROGRAM]. c. Select [Close]. 7. Press and hold the [50 Hz BURST Press and Hold] button. Release the button to end the induction. 8. If necessary, you can use the [ABORT] button to terminate a therapy in progress. Marquis DR 7274 Reference Manual 331 332 Chapter 14 Inducing an arrhythmia with Manual Burst Details about 50 Hz Burst induction The 50 Hz Burst pacing protocol is designed to induce VF by delivering VOO pacing pulses to the ventricle with an interval of 20 ms. As long as you press and hold the [50 Hz BURST Press and Hold] button on the programmer screen, the device continues delivering the induction (up to a maximum of 10 seconds). Because so many paced events are delivered during a 50 Hz Burst induction, the programmer screen or real-time recording strip may display a Marker Buffer Full (ER) symbol. This is normal behavior and should be expected during 50 Hz Burst delivery. Inducing an arrhythmia with Manual Burst The Manual Burst induction is designed to induce atrial and ventricular tachyarrhythmias by delivering a set of pacing pulses at a uniform, selectable interval to either the ventricle or the atrium. The amplitude and pulse width of the pulses are also selectable. When performing an atrial Manual Burst induction, you can choose to have the device deliver backup ventricular pacing. See details about Manual Burst induction on page 334. Parameters * Medtronic nominal setting Chamber – Chamber of the heart where the pacing burst is delivered. Ventricle*, Atrium Interval (ms) – Pacing interval of the Manual Burst induction. 100, 110, . . ., 600* Amplitude (V) – Voltage of each pulse in the pacing sequence. 0.5, 1, . . ., 4*, 5, 6, 8 Pulse Width (ms) – Duration of each pulse in the pacing sequence. 0.03, 0.06, 0.1, 0.2, . . ., 0.5*, 0.6, 0.7, . . ., 1.6 VVI Backup – Enables backup ventricular On, Off* pacing during an atrial induction. VVI Backup Pacing Rate (ppm, min-1) – Pacing rate for backup pacing. Marquis DR 7274 Reference Manual 30, 35, . . ., 60*, . . ., 120 Conducting Electrophysiologic Studies Inducing an arrhythmia with Manual Burst (continued) * Medtronic nominal setting VVI Backup Amplitude (V) – Voltage of each backup pacing pulse.a 0.5, 1, . . ., 4*, 5, 6 VVI Backup Pulse Width (ms) – Duration 0.03, 0.06, of each backup pacing pulse.a 0.1, 0.2, . . ., 0.5*, . . ., 1.6 Resume at BURST – (checkbox) Option to resume detection automatically when the induction is delivered. a Enabled*, Disabled The default value for this parameter is set according to the permanently programmed settings for bradycardia pacing if the device has been interrogated. Otherwise it defaults to the indicated nominal value. Considerations Review the following information before performing the Manual Burst induction. Warning: Keep an external defibrillator immediately available and on standby. Detection and auto resume option – If the [Resume at BURST] option is selected, the device automatically resumes tachyarrhythmia detection after the induction. To deliver an induction with automatic detection suspended, select the on-screen [Suspend] button, and de-select the [Resume at BURST] checkbox. Aborting an induction or therapy – As a safety precaution, the programmer displays an [ABORT] button that immediately terminates any induction, manual therapy, or automatic therapy in progress. When you deliver a manual therapy, the device automatically aborts any induction or therapy already in progress. Marquis DR 7274 Reference Manual 333 334 Chapter 14 Inducing an arrhythmia with Manual Burst How to deliver a Manual Burst induction 1. Select Tests > EP Study. 3 2. Select Manual Burst from the Inductions/Therapies box. 4 6 3. If you wish to treat the induced episode with a manual therapy, select [Suspend] to prevent automatic detection. 7 2 5 1 4. Confirm that the [Resume at BURST] checkbox is selected (for automatic detection and therapy) or is deselected (for manual therapy). 5. Accept the test values displayed on the screen, or choose new test values. 6. Press and hold the [Manual BURST Press and Hold] button. Release the button to end the induction. 7. If necessary, you can use the [ABORT] button to terminate a therapy in progress. Details about Manual Burst induction The Manual Burst induction is designed to induce arrhythmias by delivering AOO or VOO pacing pulses to the atrium or ventricle at a uniform, selectable interval. The amplitude and pulse width of the pulses are also selectable. As long as you press and hold the [Manual BURST Press and Hold] button on the programmer screen, the device continues delivering the induction. When delivering a Manual Burst induction to the atrium, you can choose to enable VVI Backup pacing, which provides VVI mode pacing to the ventricle during the atrial induction. VVI Backup pacing has separately selectable amplitude, pulse width, and interval values. Marquis DR 7274 Reference Manual Conducting Electrophysiologic Studies Inducing an arrhythmia with PES Inducing an arrhythmia with PES Programmed Electrical Stimulation (PES) delivers sequences of premature stimuli to induce atrial and ventricular tachyarrhythmias. The chamber, amplitude, pulse width, and pacing intervals for the induction are all selectable. When performing an atrial PES induction, you can also choose to have the device deliver backup ventricular pacing. See details about PES induction on page 337. Parameters * Medtronic nominal setting Chamber – Chamber of the heart where Ventricle*, Atrium the pacing burst is delivered. #S1 – Number of paced or sensed beats 1, 2, . . . , 8*, . . ., 15 in the initial AAI/VVI sequence. S1S1 (ms) – Pacing interval of the initial 100, 110, . . ., 600*, . . ., AAI/VVI sequence. 2000 S1S2 (ms) – Pacing interval of the first AOO/VOO pulse. Off, 100, 110, . . ., 400*, . . ., 600 S2S3 (ms) – Pacing interval of the second AOO/VOO pulse. Off*, 100, 110, . . ., 600 S3S4 (ms) – Pacing interval of the third Off*, 100, 110, . . ., 600 AOO/VOO pulse. Amplitude (V) – Voltage of each pulse in the pacing sequence. 0.5, 1, . . ., 4*, 5, 6, 8 Pulse Width (ms) – Duration of each pulse in the pacing sequence. 0.03, 0.06, 0.1, 0.2, . . ., 0.5*, 0.6, 0.7, . . ., 1.6 VVI Backup – Enables backup ventricular pacing during an atrial induction. On, Off* VVI Backup Pacing Rate (ppm, min-1) – Pacing rate for backup pacing. 30, 35, . . ., 60*, . . ., 120 VVI Backup Amplitude (V) – Voltage of 0.5, 1, . . ., 4*, 5, 6 each backup pacing pulse.a Marquis DR 7274 Reference Manual 335 336 Chapter 14 Inducing an arrhythmia with PES (continued) * Medtronic nominal setting VVI Backup Pulse Width (ms) – 0.03, 0.06, Duration of each backup pacing pulse.a 0.1, 0.2, . . ., 0.5*, . . ., 1.6 Resume at DELIVER (checkbox) – Option to resume detection automatically when the induction is delivered. a Enabled*, Disabled The default value for this parameter is set according to the permanently programmed settings for bradycardia pacing if the device has been interrogated. Otherwise it defaults to the indicated nominal value. Considerations Review the following information before performing the PES induction. Warning: Keep an external defibrillator immediately available and on standby. Detection and auto resume option – If the [Resume at DELIVER] option is selected, the device automatically resumes tachyarrhythmia detection after the induction. To deliver an induction with automatic detection suspended, select the on-screen [Suspend] button, and de-select the [Resume at DELIVER] checkbox. Aborting an induction or therapy – As a safety precaution, the programmer displays an [ABORT] button that immediately terminates any induction, manual therapy, or automatic therapy in progress. When you deliver a manual therapy, the device automatically aborts any induction or therapy already in progress. Marquis DR 7274 Reference Manual Conducting Electrophysiologic Studies Inducing an arrhythmia with PES How to deliver a PES induction 1. Select Tests > EP Study. 3 2. Select PES from the Inductions/Therapies box. NEED PES Induction Screen 3. If you wish to treat the induced episode with a manual therapy, select [Suspend] to prevent automatic detection. 4 6 2 7 1 5 4. Confirm that the [Resume at DELIVER] checkbox is selected (for automatic detection and therapy) or is deselected (for manual therapy). 5. Accept the test values displayed on the screen, or choose new test values. 6. Select the [DELIVER PES] button. 7. If necessary, you can use the [ABORT] button to terminate the induction or any therapy in progress. Details about PES induction The PES induction is designed to induce arrhythmias by delivering a selectable number of paced or sensed events in the VVI or AAI pacing mode, followed by up to three premature VOO or AOO paced events. The pulse amplitude and pulse width are programmed in common for all the pulses. When delivering a PES induction to the atrium, you can choose to enable VVI Backup pacing, which provides VVI mode pacing to the ventricle during the atrial induction. VVI Backup pacing has separately selectable amplitude, pulse width, and interval values. Marquis DR 7274 Reference Manual 337 338 Chapter 14 Delivering a manual therapy Delivering a manual therapy During defibrillation threshold testing at implant, the EP Study screen can provide backup therapy for the induced VF episodes (in addition to the external defibrillator). At follow-up, manual therapies can be used to assess or manipulate therapy effectiveness as part of chronic care. See details about manual therapies on page 340. Parameters for manual defibrillation and cardioversion * Medtronic nominal setting Energy (J) – Amount of energy delivered to the heart by the therapy. 0.4, 0.6, . . ., 1.8, 2, 3, . . ., 16, 18,20, . . ., 30* Pathway – Direction the electrical current flows through the heart. AX>B* or B>AX Parameters for manual ATP therapies * Medtronic nominal setting General ATP therapy parameters Anti-Tachy Pacing Minimum Interval (ms) – Minimum pacing interval for all ATP therapies. 150, 160, . . ., 200*, . . ., 400 V. Amplitude (V) – Voltage of the ventricular pacing pulses delivered during all ATP pacing pulses. 0.5, 1, . . ., 4, 5, 6, 8* V. Pulse Width (ms) – Duration of the ventricular pacing pulses delivered during all ATP therapies. 0.03, 0.06, 0.1, 0.2, . . ., 1.6* Ramp therapy parameters # Pulses – Number of pulses in the Ramp 1, 2, . . ., 6*, . . ., 15 pacing therapy. %RR Interval – Pacing interval of the first Ramp pulse as a percentage of the tachycardia cycle length. Marquis DR 7274 Reference Manual 50, 53, 56, 59, 63, 66, . . ., 84, 88, 91, 94, 97* Conducting Electrophysiologic Studies Delivering a manual therapy (continued) * Medtronic nominal setting Dec/Pulse (ms) – Pacing interval decrement (in milliseconds) per pulse during a Ramp sequence. 0, 10*, . . ., 40 Burst therapy parameters # Pulses – Number of pulses in the Burst pacing therapy. 1, 2, . . ., 6*, . . ., 15 %RR Interval – Pacing interval of the Burst pacing therapy as a percentage of the tachycardia cycle length. 50, 53, 56, 59, 63, 66, . . ., 84*, 88, 91, 94, 97 Ramp+ therapy parameters # Pulses – Number of pulses in the Ramp+ pacing therapy. 1, 2, 3*, . . ., 15 R-S1 (%RR) – Pacing interval of the first Ramp+ pulse as a percentage of the tachycardia cycle length. 50, 53, 56, 59, 63, 66, . . ., 75*, . . ., 84, 88, 91, 94, 97 S1-S2 (%RR) – Pacing interval of the second Ramp+ pulse as a percentage of the tachycardia cycle length. 50, 53, 56, 59, 63, 66, 69*, . . ., 84, 88, 91, 94, 97 S2-SN (%RR) – Pacing interval of the remaining Ramp+ pulses as a percentage of the tachycardia cycle length. 50, 53, 56, 59, 63, 66*, . . ., 84, 88, 91, 94, 97 Marquis DR 7274 Reference Manual 339 340 Chapter 14 Delivering a manual therapy Considerations Review the following information before delivering a manual therapy. Warning: Keep an external defibrillator immediately available and on standby. Aborting an induction or therapy – As a safety precaution, the programmer displays an [ABORT] button that immediately terminates any induction, manual therapy, or automatic therapy in progress. When you deliver a manual therapy, the device automatically aborts any induction or therapy already in progress. How to deliver a manual therapy 1. Select Tests > EP Study. 2. Select the desired manual therapy from the Inductions/Therapies box. 3. Accept the test values displayed on the screen, or choose new test values. 4 5 4. Select [DELIVER Defibrillation]. 2 1 3 5. If necessary, you can abort the manual therapy by pressing [ABORT]. Details about manual therapies Defibrillation Manual defibrillation therapy charges the device capacitors and delivers a biphasic shock. The device does not attempt to confirm the presence of VF before delivering the shock, which is synchronized to a sensed R-wave if possible. See “Synchronizing defibrillation without confirming VF” on page 114. Marquis DR 7274 Reference Manual Conducting Electrophysiologic Studies Key terms Cardioversion Manual cardioversion therapy charges the capacitors and attempts to synchronize the shock to an arrhythmic ventricular event. If the cardioversion therapy cannot be synchronized, the device aborts the therapy. See “Synchronizing cardioversion after charging” on page 135. Antitachycardia pacing therapies (ATP) Manual Ramp, Burst, and Ramp+ therapies deliver one sequence of the selected antitachycardia pacing therapy. For more information about the timing, operation, and programming of ATP therapies, see “Treating VT and FVT with antitachycardia pacing” on page 120. Key terms 50 Hz Burst – VF induction protocol that delivers a train of pacing pulses into the patient’s heart at 20 millisecond intervals. antitachycardia pacing (ATP) – therapies for VT or FVT that deliver rapid sequences of pacing pulses to terminate the VT. auto resume – when the [Resume At DELIVER] or [Resume at BURST] feature is selected, the device automatically resumes detection after delivering an induction. Manual Burst – tachyarrhythmia induction protocol that delivers a train of pacing pulses at a uniform, programmed interval. Programmed Electrical Stimulation (PES) – tachyarrhythmia induction protocol that paces the patient’s heart during vulnerable periods in the cardiac cycle to induce atrial or ventricular tachyarrhythmias. sequence – a set of pacing pulses (for example, in a Burst, Ramp, or Ramp+ ATP therapy). Marquis DR 7274 Reference Manual 341 342 Chapter 14 Key terms Suspend – programming command that temporarily deactivates the device detection and therapy functions. Pacing operations are not affected by the [Suspend] command. telemetry – transmission of data between the device and the programmer by radio waves. test values – temporary parameters used during EP study operations. Permanent settings are restored automatically once an EP Study operation has ended, the programming head is removed, or the telemetry link is broken. T-Shock induction – VF induction protocol that delivers a shock synchronized with the ventricular repolarization or T-wave. The device delivers a brief series of rapid paced beats to entrain the heart rhythm, followed by a programmable shock. Marquis DR 7274 Reference Manual Solving system problems 15 Overview 344 Solving sensing problems 345 Solving tachyarrhythmia detection problems Solving tachyarrhythmia therapy problems Solving bradycardia pacing problems Responding to device status indicators Key terms 347 348 349 351 352 Marquis DR 7274 Reference Manual 15 344 Chapter 15 Overview Overview This chapter describes problems that can occur with the system and suggests some corrective actions. These problems are classified into five different categories: ■ Sensing ■ Tachyarrhythmia detection ■ Tachyarrhythmia therapy ■ Bradycardia pacing ■ Device status To solve a system problem, you must follow these steps: 1. Define the problem. 2. Identify the cause of the problem. 3. Perform a corrective action. The system provides a set of diagnostic tools to help you accomplish these tasks. For more information about the available tools, see Chapter 11, "Using system evaluation tools" on page 249. Note: The following information is not intended to be an all-inclusive list of system problems. Rather, it is presented as an aid to use in an overall problem-solving strategy. Marquis DR 7274 Reference Manual Solving system problems Solving sensing problems Solving sensing problems Sensing is a vital component of nearly all device operations. Problems with detection, therapy, and bradycardia pacing may often be traced to a problem with sensing. Table 15-1 lists some potential problems with sensing, their probable causes, and some corrective actions that may solve those problems. Table 15-1. Sensing problems Observed problem Possible cause Suggested corrective action No, or too few normal sense markers displayed in the Live Rhythm Monitor Lead disconnected from the device connector port Verify all connections, especially the setscrew contact Lead dislodgement Reposition the lead Lead fracture or insulation defect Replace the lead Telemetry link between the device and programmer lost Reposition the programming head Remove any sources of EMI Double-sensing of ventricular events Current leakage in the device connector port Verify that all connections are dry T-wave sensing after intrinsic events Increase sensitivity threshold Reposition the lead Sensing T-wave or R-wave after paced events Increase V. Pace Blanking value Extra ventricular sensed events Crosstalk from atrial pacing after atrial pacing Decrease atrial pacing output Increase V. Sensitivity threshold Reposition atrial or ventricular lead Extra atrial sensed events after Far-field R-wave sensing or ventricular pace or sense crosstalk from ventricular pacing Decrease ventricular pacing output Increase A. Sensitivity threshold Reposition atrial or ventricular lead Increase A. Pace Blanking Marquis DR 7274 Reference Manual 345 346 Chapter 15 Solving sensing problems Table 15-1. Sensing problems (continued) Observed problem Possible cause Suggested corrective action Atrial sensed events occur Atrial lead dislodged into the simultaneously with ventricular ventricle events and are not synchronized with ECG Reposition the atrial lead Extra ventricular sensed events, especially when the patient moves or the device/lead is manipulated Poor connection to the device connector port Verify all connections, especially the setscrew contact Lead fracture or insulation defect Replace the lead Stored episode shows extra Temporary exposure to an EMI ventricular sensed events, but source the Live Rhythm Monitor shows Poor connection to the device normal sensing connector port Lead fracture or insulation defect Marquis DR 7274 Reference Manual Counsel the patient to keep away from sources of EMI Verify all connections, especially the setscrew contact Replace the lead Solving system problems Solving tachyarrhythmia detection problems Solving tachyarrhythmia detection problems Table 15-2 lists some potential problems with tachyarrhythmia detection, their probable causes, and some corrective actions that may solve those problems. Table 15-2. Tachyarrhythmia detection problems Observed problem Possible cause Suggested corrective action During a VF episode, VT sense VF Interval is too short (VF or normal ventricular sensed intervals fall into the VT events occur instead of VF Detection zone) events Undersensing of VF due to decreased amplitude Increase the VF Interval During a VF episode, no VF events are detected VF Detection is off Turn VF Detection on Detection is suspended Select [Resume] on the programmer screen Decrease the V. Sensitivity threshold The VF Interval is shorter than Increase the VF Interval the VF cycle length After a VF therapy, a VT episode occurs, but no VT events are detected VT Detection is suspended for None. This is normal operation 17 events after VF therapy During a VT episode, no VT events are detected VT Detection is off Turn VT detection on Detection is suspended Select [Resume] on the programmer screen The VT Interval is shorter than Increase the VT Interval the VT cycle length Occasional normal sensed event markers occur during a VT episode Small margin between the VT Increase the VT Interval cycle length; slight variations in the interval result in normal senses Stability criterion is on and is too sensitive Turn Stability off Choose a larger Stability interval Marquis DR 7274 Reference Manual 347 348 Chapter 15 Solving tachyarrhythmia therapy problems Solving tachyarrhythmia therapy problems Table 15-3 lists some common problems with therapy, their probable causes, and some corrective actions that may solve those problems. Table 15-3. Tachyarrhythmia therapy problems Observed problem Possible cause Suggested corrective action More than one high voltage therapy required, or rescue shock required Increased DFT due to change in patient’s status (new medications, myocardial infarction) Set the therapy energy level higher, if possible Change pathway polarity Add a supplementary high voltage electrode Titrate drugs, if possible High voltage therapy reported with high impedance (> 200 ohms) and low delivered energy Lead dislodgement Reposition the lead Lead fracture or insulation defect Replace the lead The lead system has a short circuit, but the short circuit protection feature interrupted high voltage therapy delivery Correct short circuit condition, replacing leads as necessary Lead disconnected from the device connector port Verify all connections, especially the setscrew contact Lead fracture Replace the lead Active Can is turned off and no Turn Active Can on, or implant lead is connected to the a supplementary high voltage SVC (HVX) port lead and connect it to the SVC (HVX) port Programmed ATP therapies not Smart Mode is on and has delivered disabled an unsuccessful ATP therapy Choose a different therapy Reprogram ATP therapy parameters ATP pacing inhibited because Decrease ATP Minimum the VT cycle length is less than Interval the programmed ATP Minimum interval Marquis DR 7274 Reference Manual Solving system problems Solving bradycardia pacing problems Solving bradycardia pacing problems Table 15-4 lists some potential problems with bradycardia pacing, their probable causes, and some corrective actions that may solve those problems. Table 15-4. Bradycardia pacing problems Observed problem Possible cause Suggested corrective action Pacing fails to capture after cardioversion or defibrillation therapy Temporary increase in pacing threshold after shock Increase Post-Shock Pacing Amplitude and Pulse Width High rate pacing without patient activity Pacemaker-mediated tachycardia (PMT) Turn PMT Intervention on Turn PVC Response on Set PVARP to a larger value Rate response parameters are Select a less sensitive value for too sensitive Activity Threshold Decrease the Rate Response value Choose a pacing mode without rate response AAI or AAIR paced events sensed as VT or VF events Loss of A-V synchrony and crosstalk High intrinsic atrial rate but slow ventricular pacing in response The atrial rate is faster than the Decrease PVARP 2:1 block rate Choose a different pacing mode Decrease SAV Enable Rate Adaptive AV Set PVARP to Varied The atrial rate is faster than the Increase Upper Tracking Rate Upper Tracking Rate Marquis DR 7274 Reference Manual 349 350 Chapter 15 Solving bradycardia pacing problems Table 15-4. Bradycardia pacing problems (continued) Observed problem Possible cause Suggested corrective action High ventricular pacing rate during atrial fibrillation or flutter The device is pacing the ventricle in response to atrial events Turn Mode Switch on Ventricular pacing is inhibited Atrial paced events are by crosstalk from atrial pacing followed immediately by ventricular sense markers (but ECG shows a slow ventricular rate) Set the pacing mode to DDIR or DDI Turn V. Safety Pacing on Decrease atrial pacing output Increase V. Sensitivity threshold Reposition atrial or ventricular lead Marquis DR 7274 Reference Manual Solving system problems Responding to device status indicators Responding to device status indicators The device performs self-diagnostics to identify problems with its critical functions. If it detects a problem, it sets a device status indicator, which appears on the programmer screen during interrogation. Table 15-5 lists the device status indicators, their probable causes, and some suggested actions to take. Table 15-5. Device status indicators Device Status Indicator Possible cause Electrical Reset occurred Device memory was corrupted Perform the Electrical Reset recovery procedure by EMI, electrocautery, external defibrillation, or some other environmental effect Charge Circuit Timeout A single long charging period has occurred Replace the device immediately Charge Circuit Inactive Three consecutive long charging periods have occurred. Replace the device immediately Quick Look screen displays an The device battery voltage is ERI indicator lower than the ERI threshold (2.62 V) Suggested corrective action Schedule an appointment to replace the device A long charging period (> 16 s) Replace the device has triggered the ERI indicator immediately Quick Look screen displays an Three months have passed Replace the device EOL indicator since the device reached ERIa immediately a EOL may be indicated before the end of three months if actual battery usage exceeds the post-ERI operating conditions (see “Post-ERI conditions” on page 9). Marquis DR 7274 Reference Manual 351 352 Chapter 15 Key terms Key terms activity threshold – programmable parameter that defines the minimum level of patient body motion that causes a rate response in rate responsive pacing modes. blanking period – time interval after each pacing pulse, sensed event, or shock, when no sensing can occur. crosstalk – the sensing of a pacing stimulus delivered in the opposite chamber. Decision Channel telemetry – annotations to stored and telemetered EGMs, documenting some details of dual chamber tachyarrhythmia detection. electromagnetic interference (EMI) – radiated or conducted energy, either electrical or magnetic, that can interfere with the device sensing operation in some circumstances. electrical reset – automatic device operation to recover from a disruption in device memory and control circuitry. Programmed parameters may be set to electrical reset values.1 This operation triggers a device status indicator and an automatic Patient Alert tone. Live Rhythm Monitor – configurable programmer display of telemetered ECG, Marker Channel, and EGM waveforms on one screen or a partial-screen window. pacemaker-mediated tachycardia (PMT) – paced rhythm that results when the device senses and tracks retrograde P-waves in DDD or DDDR mode. This retrograde conduction and atrial tracking repeats itself to produce an inappropriately rapid paced rhythm. PVC (premature ventricular contraction) – a sensed ventricular event that directly follows any other ventricular event, with no atrial event between them. 1 See Appendix B, "Device Parameters" on page 367 for reset settings. Marquis DR 7274 Reference Manual Solving system problems Key terms PVC Response – detects a PVC and responds by extending the PVARP to 400 ms (if the currently programmed or Sensor-Varied PVARP is less than 400 ms). Rate Adaptive AV – dual chamber pacing feature that shortens the AV interval as the heart rate increases. Resume – programming command that reinstates automatic tachyarrhythmia detection. sensed event – electrical activity across the sensing electrodes that exceeds the programmed sensitivity threshold. sensitivity – degree to which the sensing circuitry is responsive to intracardiac signals. Smart Mode – optional feature available for the first four VT and FVT therapies that disables an ATP therapy if it is unsuccessful in four consecutive episodes. Stability criterion – programmable VT detection criterion that allows the device to screen out irregular ventricular rhythms or unstable VTs (for example, those caused by the conduction of atrial fibrillation or flutter). Suspend – programming command that temporarily deactivates the tachyarrhythmia detection functions. undersensing – failure to sense the P-wave or R-wave. Undersensing can cause inappropriate bradycardia pacing or a failure to detect tachyarrhythmia. VF Interval – (also called FDI) programmable interval used to define the VF detection zone. V-V intervals shorter than the VF Interval are counted as VF events. VT Interval – (also called TDI) programmable interval used to define the VT detection zone. V-V intervals shorter than the VT Interval but greater than or equal to the VF and/or FVT Interval are counted as VT events. Marquis DR 7274 Reference Manual 353 354 Chapter 15 Key terms Marquis DR 7274 Reference Manual Part V Appendices Marquis DR 7274 Reference Manual Warnings and precautions A General warnings 358 Storage and handling Resterilization 358 359 Device implantation and ICD programming Lead evaluation and lead connection Follow-up testing 359 361 362 Explant and disposal 363 Medical therapy hazards 363 Home and occupational environments 365 Marquis DR 7274 Reference Manual A 358 Appendix A General warnings General warnings Avoiding shock during handling – Program tachyarrhythmia detection Off during surgical implant and explant or post-mortem procedures because the ICD can deliver a serious shock if you touch the defibrillation terminals while the ICD is charged. Electrical isolation during implantation – Do not permit the patient to contact grounded equipment, which could produce hazardous leakage current during implantation. Resulting arrhythmia induction could result in the patient’s death. Lead system – Do not use another manufacturer’s lead system without demonstrated compatibility, as undersensing of cardiac activity and failure to deliver necessary therapy could result. Resuscitation availability – Do not perform ICD testing unless an external defibrillator and medical personnel skilled in cardiopulmonary resuscitation (CPR) are readily available. Storage and handling Checking and opening the package – Before opening the sterile package tray, visually check for any signs of damage that might invalidate the sterility of its contents. Return damaged packages to the manufacturer. For instructions on opening the sterile package, see the diagram inside the lid of the shelf box. Device storage – Store the device in a clean area, away from magnets, kits containing magnets, and sources of electromagnetic interference to avoid device damage. Dropped device – Do not implant the device if it has been dropped on a hard surface from a height of 30 cm (12 inches) or more after removal from its packaging. Equilibration – Allow the device to reach room temperature before programming or implanting because rapid temperature changes could affect initial device function. Marquis DR 7274 Reference Manual Warnings and precautions Resterilization Temperature limits – Store and transport the package between -18 °C and 55 °C (0 °F to 131 °F). “Use By” Date – Do not implant the device after the “Use By” date because the battery longevity could be reduced. Resterilization Medtronic has sterilized the package contents with ethylene oxide prior to shipment. Resterilization is necessary only if the seal on the sterile package is broken. (Resterilization does not affect the “Use By” date.) If necessary, resterilize with ethylene oxide using a validated sterilization process, observing the following precautions: ■ Do not resterilize using an autoclave, gamma radiation, organic cleaning agents (such as alcohol, acetone, etc.), or ultrasonic cleaners. ■ Do not exceed 55 °C (131 °F) or 103 kPa (15 psi) when sterilizing. ■ Do not resterilize the device more than twice. Device implantation and ICD programming Accessories – The device may be used only with accessories, parts subject to wear and disposable items, of which the completely safe use on safety and technical grounds has been demonstrated by a testing agency approved for the testing of the device. Use only Medtronic programmers and application software to communicate with the device. Battery depletion – Battery depletion will eventually cause the device to cease functioning and should be carefully monitored. Cardioversion and defibrillation are high energy therapies and may quickly deplete the battery and shorten the device longevity. An excessive number of charging cycles will also shorten the longevity. Marquis DR 7274 Reference Manual 359 360 Appendix A Device implantation and ICD programming Charge Circuit Timeout or Charge Circuit Inactive – Replace the device immediately if the programmer displays a Charge Circuit Timeout or Charge Circuit Inactive message. Concurrent pacemaker use – If a pacemaker is used concurrently with the ICD, verify that the ICD will not sense the pacemaker output pulses. Program the pacemaker so that pacing pulses are delivered at intervals longer than the ICD tachyarrhythmia detection intervals. End of Life (EOL) indicator – Replace the device immediately if the programmer displays an End of Life (EOL) symbol. Higher energy on the output capacitor – A higher than programmed energy can be delivered to the patient when the device has been previously charged to a higher energy and the energy is still present on the output capacitors. Lead compatibility – Do not use another manufacturer’s lead system without demonstrated compatibility as undersensing of cardiac activity and failure to deliver necessary therapy could result. Medical treatment influencing device operation – The electrophysiological characteristics of a patient’s heart can alter over time and the programmed therapies may become ineffective and even dangerous to the patient. This is especially to be considered when the patient’s drug treatment has changed. Pacemaker dependent patients – Always program Ventricular Safety Pacing (VSP) On for pacemaker dependent patients. Programmers – Use only Medtronic programers, application software, and accessories to communicate with the device. Use of a magnet – Positioning a magnet over the device suspends detection and treatment but does not alter bradycardia therapy. The programming head contains a magnet that can suspend detection, but if telemetry between the device and programmer is established, detection is not suspended. Marquis DR 7274 Reference Manual Warnings and precautions Lead evaluation and lead connection Lead evaluation and lead connection ■ Use only ethylene oxide for lead resterilization. Do not resterilize more than one time. ■ Do not tie a ligature directly to the lead body, tie it too tightly, or otherwise create excessive strain at the insertion site as this can damage the lead. ■ Do not immerse leads in mineral oil, silicone oil, or any other liquid. ■ Do not grip the lead with surgical instruments. ■ Do not use excessive force or surgical instruments to insert a stylet into a lead. ■ Use the same polarity evaluated during testing when connecting the leads to the ICD to ensure defibrillation effectiveness. ■ Do not fold, alter, or remove any portion of the patch because doing so could compromise electrode function or longevity. ■ Do not use ventricular transvenous leads in patients with tricuspid valve disease or a mechanical prosthetic tricuspid valve. Use with caution in patients with a bioprosthetic valve. ■ Use the correct suture sleeve (when needed) for each lead to immobilize the lead and protect it against damage from ligatures. ■ Ensure that the defibrillation lead impedance is greater than 20 ohms. An impedance below 20 ohms could damage the ICD. ■ Do not kink the leads. Kinking leads can cause additional stress on the leads, possibly resulting in lead fracture. ■ Do not suture directly over the lead body as this may cause structural damage. Use the lead anchoring sleeve to secure the lead lateral to the venous entry site. Marquis DR 7274 Reference Manual 361 362 Appendix A Follow-up testing ■ Lead or Active Can electrodes in electrical contact during a high voltage therapy could cause current to bypass the heart, possibly damaging the ICD and leads. While the ICD is connected to the leads, make sure that no therapeutic electrodes, stylets, or guidewires are touching or connected by an accessory low impedance conductive pathway. Move objects made from conductive materials (e.g., an implanted guidewire) well away from all electrodes before a high voltage shock is delivered. ■ Make sure to cap any pacing lead that is abandoned rather than removed to ensure that the lead does not become a pathway for currents to or from the heart. ■ Make sure to plug any unused lead port in the device to protect the ICD. ■ Refer to the lead technical manuals for specific instructions and precautions about lead handling. Follow-up testing ■ Ensure that an external defibrillator and medical personnel skilled in cardiopulmonary resuscitation (CPR) are present during post-implant ICD testing should the patient require external rescue. ■ Be aware that changes in the patient’s condition, drug regimen, and other factors may change the defibrillation threshold (DFT), which may result in nonconversion of the arrhythmia post-operatively. Successful conversion of ventricular fibrillation or ventricular tachycardia during testing is no assurance that conversion will occur post-operatively. Marquis DR 7274 Reference Manual Warnings and precautions Explant and disposal Explant and disposal ■ Interrogate the ICD, program VF and VT Detection Off, and disable ICD functions prior to explanting, cleaning, or shipping the ICD to prevent unwanted shocks. ■ Explant the ICD postmortem. In some countries, explanting battery-operated implantable devices is mandatory because of environmental concerns; please check your local regulations. In addition, if subjected to incineration or cremation temperatures, the device could explode. ■ Medtronic implantable devices are intended for single use only. Do not resterilize and re-implant explanted devices. ■ Please return explanted devices to Medtronic for analysis and disposal. See the back cover for mailing addresses. Medical therapy hazards Diathermy – People with metal implants such as pacemakers, implantable cardioverter defibrillators (ICDs), and accompanying leads should not receive diathermy treatment. The interaction between the implant and diathermy can cause tissue damage, fibrillation, or damage to the device components, which could result in serious injury, loss of therapy, and/or the need to reprogram or replace the device. Electrosurgical cautery – Electrosurgical cautery could induce ventricular arrhythmias and/or fibrillation or may cause implanted device malfunction or damage. If electrocautery cannot be avoided, observe the following precautions to minimize complications: ■ Have temporary pacing and defibrillation equipment available. ■ Program the implanted device to the DOO mode. ■ Suspend tachyarrhythmia detection using a magnet, or turn detection Off using the programmer. ■ Avoid direct contact with the implanted device or leads. If unipolar cautery is used, position the ground plate so that the current pathway does not pass through or near the implanted device system (minimum of 15 cm [six inches]). Marquis DR 7274 Reference Manual 363 364 Appendix A Medical therapy hazards ■ Use short, intermittent, and irregular bursts at the lowest feasible energy levels. ■ Use a bipolar electrocautery system, where possible. External defibrillation – External defibrillation may damage the implanted device or may result in temporary and/or permanent myocardial damage at the electrode tissue interface as well as temporary or permanent elevated pacing thresholds. Attempt to minimize the voltage potential across the device and leads by following these precautions: ■ Use the lowest clinically appropriate energy output. ■ Position defibrillation patches or paddles as far from the device as possible (minimum of 15 cm [6 inches]) and perpendicular to the implanted device-lead system. If an external defibrillation was delivered within 15 cm (6 inches) of the device, contact your Medtronic representative. High-energy radiation – Diagnostic X-ray and fluoroscopic radiation should not affect the device; however, high-energy radiation sources such as cobalt 60 or gamma radiation should not be directed at the device. If a patient requires radiation therapy in the vicinity of the device, place lead shielding over the implant site as a precaution against radiation damage. Lithotripsy – Lithotripsy may permanently damage the implanted device if it is at the focal point of the lithotripsy beam. If lithotripsy must be used, keep the focal point of the lithotripsy beam at least 2.5 to 5 cm (one to two inches) from the implanted device and temporarily turn off ICD therapies during the lithotripsy procedure. Magnetic resonance imaging (MRI) – Magnetic resonance imaging (MRI) should not be used on patients who have an implanted cardiac device because of the potential damage to the implanted device. Radio frequency (RF) ablation – Radio frequency ablation procedure in a patient with an implanted cardiac device could cause implanted device malfunction or damage. To minimize the risks from radio frequency ablation, follow these guidelines: ■ Have temporary pacing and defibrillation equipment available. Marquis DR 7274 Reference Manual Warnings and precautions Home and occupational environments ■ Program the implanted device to the DOO mode. ■ Suspend tachyarrhythmia detection using a magnet, or turn detection Off using the programmer. ■ Avoid direct contact between the ablation catheter and the implanted lead or device. ■ Position the ground plate so that the current pathway does not pass through or near the implanted device system (minimum of 15 cm [six inches]). Therapeutic ultrasound – Exposure of the device to therapeutic ultrasound is not recommended as it may permanently damage the device. Damage to the device may affect therapy. Home and occupational environments Cellular phones – Marquis DR ICDs contain a filter that prevents most cellular phone transmissions from interacting with device operation. To further minimize the possibility of interaction, observe the following cautions: ■ Maintain a minimum separation of 15 cm (six inches) between the device and the hand-held telephone handset. ■ Maintain a minimum separation of 30 cm (twelve inches) between the device and any antenna transmitting above three watts. ■ Hold the handset to the ear furthest from the implanted device. ■ Do not carry the handset within 15 cm (six inches) of the implanted device (even if the handset is not on). The Marquis DR has been tested using the ANSI/AAMI PC-69 standard to ensure compatibility with hand-held wireless and PCS phones and other similar power hand-held transmitters. These transmission technologies represent the majority of the cellular telephones in use worldwide. The circuitry of this device, when operating under nominal conditions, has been designed to eliminate any significant effects from the cellular telephones. Marquis DR 7274 Reference Manual 365 366 Appendix A Home and occupational environments Commercial electrical equipment – Commercial electrical equipment such as arc welders, induction furnaces, or resistance welders could generate enough EMI to interfere with device operation if approached too closely. Communication equipment – Communication equipment such as microwave transmitters, line power amplifiers, or high power amateur transmitters could generate enough EMI to interfere with device operation if approached too closely. Electric or magnetic interference (EMI) – Patients should be directed to avoid devices that generate strong electric or magnetic interference (EMI). EMI could cause malfunction or damage resulting in prevention of proper programming, or confirmation, non-detection or delivery of unneeded therapy. Moving away from the interference source, or turning it off, usually allows the device to return to its normal mode of operation. Electronic Article Surveillance – Electronic Article Surveillance equipment such as retail theft prevention systems may interact with the implanted device. Patients should be advised to walk directly through and not to remain near an EAS system longer than is necessary. High voltage lines – High voltage power transmission lines could generate enough EMI to interfere with device operation if approached too closely. Home appliances – Home appliances that are in good working order and properly grounded do not usually produce enough EMI to interfere with device operation. There are reports of ICD disturbances caused by electrical hand tools or electric razors used directly over the implant site. Static magnetic fields – Patients should avoid equipment or situations where they would be exposed to static magnetic fields (greater than 10 gauss or 1 millitesla). Such magnetic fields could suspend detection of arrhythmias. Examples of magnetic sources that could interfere with normal device operation include stereo speakers, bingo wand, extractor wand, magnetic badges, or magnetic therapy products. Marquis DR 7274 Reference Manual Device Parameters Emergency settings 368 Detection parameters Therapy parameters 369 371 Bradycardia pacing parameters System maintenance parameters Data collection parameters 373 376 377 System test and EP study parameters Fixed parameters B 378 381 Patient information parameters Programmer symbols Parameter interlocks 383 384 386 Marquis DR 7274 Reference Manual B 368 Appendix B Emergency settings Emergency settings Table B-1 Emergency settings Parameter Selectable values Default Energy (J) 10, 11, . . ., 16,18, 20, . . ., 30 30 Pathwaya AX>B --- Energy (J) 0.4, 0.6, . . ., 2, 3, 4, . . ., 16, 18, 20, . . ., 30 30 Pathwaya AX>B --- 100, 110, . . ., 600 350 8 --- 1.6 --- VVI --- 70 --- V. Sensitivity/A.Sensitivity As programmed --- V. Pulse Amplitudeb (V) 6V --- V. Pulse Width (ms) 1.6 ms --- V. Pace Blanking (ms) 240 ms --- Defibrillation Cardioversion Fixed burst Pacing Interval (ms) V. Pulse Amplitudeb (V) V. Pulse Width (ms) VVI Pacing Pacing Mode Lower Rate (ppm, min-1) Hysteresis Off --- V. Rate Stabilization Off --- a b If Active Can is Off, the HVA (Can) electrode is not used as part of the high voltage delivery pathway. Peak pacing amplitude. When tested per Cenelec standard 45502-2-1, the measured amplitude A depends upon the programmed amplitude Ap and programmed pulse width Wp:A=Ap x [0.9 - (Wp x 0.145 ms-1)]. Marquis DR 7274 Reference Manual Device Parameters Detection parameters Detection parameters Table B-2 Tachyarrhythmia detection parameters Parameter Programmable values Shipped Nominal Reset VF Detection Enable On, Off Off On On VF Interval (ms)a 240, 250, . . . , 400 320 320 320 VF Initial NID 18/24 18/24 18/24 VF Redetect NID 6/8, 9/12, 12/16, 18/24, 12/16 21/28, 24/32, 27/36, 30/40 12/16 12/16 FVT Detection Enable Off, via VF, via VT Off Off Off FVT Interval (ms)a 200, 210, . . ., 600 --- --- --- VT Detection Enable On, Off, Monitor Off Off Off 12/16, 18/24, 24/32, 30/40, 45/60, 60/80, 75/100, 90/120, 105/140, 120/160 VT Interval (ms)a 280, 290, . . ., 600 VT Initial NID 400 400 400 16 16 12 12 12 Off, 30, 40, . . ., 100 Off Off Off 12, 16, . . ., 52, 76, 100 16 VT Redetect NID 4, 8, 12, . . ., 52 Stability (ms)a AFlutterb,c On, Off Off Off Off Sinus Tachb,c On, Off Off Off Off 1:1 VT-ST Boundary (%) 35, 50, 66, 75, 85 50 50 50 Other 1:1 SVTsb On, Off Off Off Off SVT Limit (ms)a 240, 250, . . ., 600 320 320 320 High Rate Timeout (min) Off, 0.75, 1, 1.25, 1.5, Off 2, 2.5, . . ., 5, 6, 7, . . ., 20, 22, 24, . . ., 30 Off Off AFib / High Rate Zone Appropriate, Skip Timeout Therapy to VF Therapy Zone Appropriate Marquis DR 7274 Reference Manual 369 370 Appendix B Detection parameters Table B-2 Tachyarrhythmia detection parameters (continued) Parameter Programmable values Shipped Nominal Reset A. Sensitivity (mV)d,e 0.15, 0.3, 0.45, 0.6, 0.9, 1.2, 1.5, 2.1 0.3 0.3 0.3 V. Sensitivity (mV)d,e 0.15, 0.3, 0.45, 0.6, 0.9, 1.2 0.3 0.3 0.3 a b c d e The measured intervals are truncated to a 10 ms multiple (e.g., 457 ms becomes 450 ms). The device uses this truncated interval value when applying the programmed criteria and calculating interval averages. Double tachycardia (i.e. “VF/FVT/VT plus SVT”) detection is automatically enabled when any Dual Chamber SVT criterion is enabled. The device is shipped with the Sinus Tach and A.Fib / A.Flutter criteria off. However, when VT Detection is set to On or Monitor, these parameters are set to On. With a 40 ms sine2 waveform (ventricular sensitivity) or a 20 ms sine2 waveform (atrial sensitivity). When using the Cenelec waveform, the rated sensing threshold value will be 1.5 times (ventricular) or 1.4 times (atrial) the rated sine2 sensing threshold. This setting applies to all sensing in this chamber for both tachyarrhythmia detection and bradycardia pacing operations. Marquis DR 7274 Reference Manual Device Parameters Therapy parameters Therapy parameters Table B-3 Tachyarrhythmia therapy parameters Parameter Programmable values Shipped Nominal Reset VF Therapy Statusa On, Off On On On VT Therapy Statusa On, Off None On None CV, Burst, Ramp, Ramp+ --- --- --- On, Off None On None CV, Burst, Ramp, Ramp+ --- --- --- VT Therapy Typea FVT Therapy Statusa FVT Therapy Typea VF therapy (defibrillation) parameters Energy (J)b,c 0.4, 0.6, . . ., 1.8, 2, 3, . . ., 16, 18, 20, . . ., 30 30 30 30 Pathway AX>B, B>AX AX>B AX>B AX>B Confirm VF after initial detection?a,d Yes, No Yes Yes Yes Energy (J)c 0.4, 0.6, . . ., 1.8, 2, 3, . . ., 16, 18, 20, . . ., 30 --- 30 --- Pathway AX>B, B>AX --- AX>B --- Initial # Pulses 1, 2, . . ., 15 --- 6e --- R-S1 Interval (% R-R) 50, 53, 56, 59, 63, 66, . . ., 84, 88, 91, 94, 97 --- 84e --- Cardioversion parameters Burst therapy parameters Interval Decrementa (ms) 0, 10, . . ., 40 --- 10 --- # Sequencesa 1, 2, 3, . . ., 10 --- 3e --- Smart Modea,f On, Off --- Off --- Initial # Pulses 1, 2, . . ., 15 --- 8g --- R-S1 Interval (% R-R) 50, 53, 56, 59, 63, 66, . . ., 84, 88, 91, 94, 97 --- 91h --- Ramp therapy parameters Interval Decrement (ms) 0, 10, . . ., 40 --- 10 --- # Sequencesa 1, 2, . . ., 10 --- 3 --- Smart Modea,f On, Off --- Off --- Marquis DR 7274 Reference Manual 371 Appendix B Therapy parameters 372 Table B-3 Tachyarrhythmia therapy parameters (continued) Parameter Programmable values Shipped Nominal Reset Initial # Pulses 1, 2, . . ., 15 --- 3 --- R-S1 Interval (% R-R) 50, 53, 56, 59, 63, 66, . . ., 84, 88, 91, 94, 97 --- 75 --- S1-S2 Interval (% R-R) 50, 53, 56, 59, 63, 66, . . ., 84, 88, 91, 94, 97 --- 69 --- S2-SN Interval (% R-R) 50, 53, 56, 59, 63, 66, . . ., 84, 88, 91, 94, 97 --- 66 --- # Sequencesa 1, 2, . . ., 10 --- 5 --- On, Off --- Off --- Progressive Episode Therapiesa On, Off Off Off Off Active Can On, Off On On On V. Pulse Width (ms) 0.03, 0.06, 0.1, 0.2, . . ., 1.6 1.6 1.6 1.6 V. Amplitude (V)i 0.5, 1, . . ., 4, 5, 6, 8 8 8 8 V. Pace Blanking (ms) 150, 160, . . ., 440 240 240 240 ATP Minimum Interval (ms) 150, 160, . . ., 400 200 200 200 Ramp+ therapy parameters Smart Modea,f Shared therapy parameters a b c d e f g h i This parameter does not apply to manual therapies. For automatic therapy 3, 4, 5, or 6, energy must be at least 10 joules. Delivered energy based on a biphasic pulse into a 75 ohm load. For energy less than 1 joule, tolerance is ± 0.25 J. Applies only to the first VF therapy that is programmed On. FVT Burst therapies have the following Medtronic nominal values: Initial # Pulses is 8, R-S1 Interval is 88%, and # Sequences is 1. Smart Mode is only available for Therapies 1, 2, 3, and 4. The nominal Initial # of Pulses for manual ramp therapy is 6. The nominal R-S1 Interval for manual ramp therapy is 97%. Peak pacing amplitude. When tested per Cenelec standard 45502-2-1, the measured amplitude A depends upon the programmed amplitude Ap and programmed pulse width Wp:A=Ap x [0.9 - (Wp x 0.145 ms-1)]. Marquis DR 7274 Reference Manual Device Parameters Bradycardia pacing parameters Bradycardia pacing parameters Table B-4 Bradycardia pacing parameters Parameter Programmable values Shipped Nominal Reset Pacing Mode DDDR, DDD, DDIR, DDI, AAIR, AAI, VVIR, VVI, DOO, VOO, ODO DDD DDDR VVI Lower Rate (ppm, min-1) 30, 35, 40, . . ., 60, 70, 75, . . ., 150 60 60 65 Upper Tracking Rate (ppm, min-1) 80, 85, . . ., 150 120 120 120 Upper Sensor Rate (ppm, min-1) 80, 85, . . ., 150 120 120 120 Paced AV (ms) 30, 40, . . ., 350 180 180 180 Sensed AV (ms) 30, 40, . . ., 350 150 150 150 PVARP (ms) Varied, 150, 160, . . ., 500 310 310 310 A. Refractory (ms) 150, 160, . . ., 500 310 310 310 (ms)a 100, 110, . . ., 310 150 150 150 PVAB (V)b 0.5, 1, . . ., 3, 3.5, 4, 5, 6 3 3 4 A. Pulse Width (ms) 0.03, 0.06, 0.1, 0.2, . . ., 1.6 0.4 0.4 0.4 A. Sensitivity (mV)c,d 0.15, 0.3, 0.45, 0.6, 0.9, 1.2, 1.5, 2.1 0.3 0.3 0.3 A. Pace Blanking (ms) 150, 160, . . ., 250 200 200 240 V. Amplitude (V)b 0.5, 1, . . ., 3, 3.5, 4, 5, 6 3 3 6 V. Pulse Width (ms) 0.03, 0.06, 0.1, 0.2, . . ., 1.6 0.4 0.4 1.6 V. Sensitivity (mV)c,d 0.15, 0.3, 0.45, 0.6, 0.9, 1.2 0.3 0.3 0.3 V. Pace Blanking (ms) 150, 160, . . ., 440 200 200 240 A. Amplitude (V)b 0.5, 1, 1.5, . . ., 4, 5, 6, 8 4 4 4 A. Pulse Width (ms) 0.03, 0.06, 0.1, 0.2, . . ., 1.6 1.6 1.6 1.6 V. Amplitude (V)b 0.5, 1, 1.5, . . ., 4, 5, 6, 8 6 6 6 V. Pulse Width (ms) 0.03, 0.06, 0.1, 0.2, . . ., 1.6 1.6 1.6 1.6 A. Amplitude Post-Shock Pacing Parameters Marquis DR 7274 Reference Manual 373 374 Appendix B Bradycardia pacing parameters Table B-4 Bradycardia pacing parameters (continued) Parameter Programmable values Shipped Nominal Reset Enable On, Off Off On Off A. Detect Rate (bpm, min-1) 120, 125, . . ., 175 175 175 175 7 7 Mode Switch Parameters Rate Response Pacing Parameters Rate Response 1, 2, . . ., 10 7 Activity Threshold Low, Medium Low, Medium High, High Medium Medium Low Low Medium Low Activity Acceleration (sec.) 15, 30, 60 30 30 30 Activity Deceleration (min.) Exercise, 2.5, 5, 10 5 5 5 On, Off On On On Start Rate (bpm, min-1) 50, 55, . . ., 145 60 60 60 min-1) 55, 60, . . ., 150 120 120 120 Minimum PAV (ms) 30, 40, . . ., 350 140 140 140 Minimum SAV (ms) 30, 40, . . ., 350 110 110 110 Rate Adaptive AV Parameters Enable Stop Rate (bpm, Marquis DR 7274 Reference Manual Device Parameters Bradycardia pacing parameters Table B-4 Bradycardia pacing parameters (continued) Parameter Programmable values Shipped Nominal Reset Enable On, Off On On On Interval (ms) 200, 250, . . ., 400 300 300 300 Off, 30, 40, . . ., 80 Off Off Off Additional Pacing Features Non-Comp Atrial Pacing Single Chamber Hysteresis (bpm, min-1) V. Rate Stabilization V. Rate Stabilization Off Off Off V. Rate Stabilization Minimum 500, 550, . . ., 900 Interval (ms) 500 500 500 V. Rate Stabilization Interval Increment (ms) 50, 60, . . ., 400 150 150 150 On, Off Off Off Off PMT Intervention On, Off PVC Response On, Off On On On V. Safety Pacing On, Off On On On a b c d PVAB is the minimum value that PVARP is shortened to, under sensor-varied PVARP operation. Atrial events that fall within the PVAB are ignored by the Mode Switch, NCAP, PVC Response, and PMT Intervention features. Peak pacing amplitude. When tested per Cenelec standard 45502-2-1, the measured amplitude A depends upon the programmed amplitude Ap and programmed pulse width Wp: A = Ap x [0.9 - (Wp x 0.145 ms-1)]. With a 40 ms sine2 waveform (ventricular sensitivity) or a 20 ms sine2 waveform (atrial sensitivity). When using the Cenelec waveform, the rated sensing threshold value will be 1.5 times (ventricular) or 1.4 times (atrial) the rated sine2 sensing threshold. This setting applies to all sensing in this chamber, for both tachyarrhythmia detection and bradycardia pacing operations. Marquis DR 7274 Reference Manual 375 Appendix B System maintenance parameters 376 System maintenance parameters Table B-5 System maintenance parameters Parameter Programmable values Shipped Nominal Reset Automatic Capacitor Formation Interval (months) Auto, 1, 2, . . ., 6 Autoa Auto Auto Patient Alert time (enter time in hours and minutes) 8:00 am --- 8:00 am Impedance patient alerts A. Pacing lead On, Off Off On Off Minimum Threshold (ohms) 200, 300, 400, 500 200 200 200 Maximum Threshold (ohms) 1000, 1500, 2000, 3000 3000 3000 3000 On, Off Off On Off Minimum Threshold (ohms) 200, 300, 400, 500 200 200 200 Maximum Threshold (ohms) 1000, 1500, 2000, 3000 3000 3000 3000 On, Off Off On Off 20, 30, 40, 50 20 20 20 V. Pacing lead V. Defibrillation lead Minimum Threshold (ohms) Maximum Threshold (ohms) 100, 130, 160, 200 200 200 200 On, Off Off On Off Minimum Threshold (ohms) 20, 30, 40, 50 20 20 20 Maximum Threshold (ohms) 100, 130, 160, 200 200 200 200 SVC (HVX) Defibrillation lead Lead impedance alert urgency Low, High --- Low --- Low Battery Voltage ERI patient alert Off, On-Low, On-High Off On-Low Off Excessive Charge Time ERI patient alert Off, On-Low, On-High Off On-Low Off Number of Shocks Delivered in an Off, On-Low, On-High Episode patient alert Off On-Low Off 3 3 3 All Therapies in a Zone Exhausted Off, On-Low, On-High for an Episode patient alert Off On-Low Off VF Detection/Therapy Offb On-High On-High Number of Shocks threshold a b 1, 2, . . ., 6 Off, On-High On-High Automatic Capacitor Formation is disabled until VF Detection is set to On for the first time. When this alert is turned on, it does not sound when a magnet is applied unless VF detection or more than two VF therapies are turned off. Marquis DR 7274 Reference Manual Device Parameters Data collection parameters Data collection parameters Table B-6 Data collection parameters Parameter Programmable values Shipped EGM Channel 1 Source Can to HVB, Can to Vring, Can to Aring, Vtip to HVB, Vtip to Vring, Atip to Vring, Atip to Aring, Can to HVX,a HVB to HVXa Atip to Aring Atip to Aring Atip to Aring EGM Channel 1 Range (mV) ± 2, ± 4, ± 8, ± 16 ±8 EGM Channel 2 Source Can to HVB, Can to Vring, Vtip to HVB, Vtip to Vring, Can to HVX,a HVB to HVXa Vtip to Vring Vtip to Vring Vtip to Vring EGM Channel 2 Range (mV) ± 2, ± 4, ± 8, ± 16 ±8 ±8 ±8 Store EGM Channel 1?b Yes, No Yes Yes Yes Store EGM Channel 2 Yes (fixed) --- --- --- Store EGM during charging? Yes, No Yes Yes Yes Store EGM before tachycardia starts? Yes, No No No No Device Date/Timec (enter time and date) --- --- --- Premature Event Threshold (%) 56, 59, 62, 66, 69, . . ., 84, 88, 91, 94, 97 69 69 69 Holter Telemetry Duration (hours) Off, 0.5, 1, 2, 4, 8, 16, 24, 36, 46 Off Off Off a b c Nominal ±8 Reset ±8 An SVC lead must be present for this configuration. Both channels are available as real-time telemetered signals, regardless of this setting. The time stamp on episode records and other stored data is determined by the device’s date/time clock. Marquis DR 7274 Reference Manual 377 378 Appendix B System test and EP study parameters System test and EP study parameters Table B-7 System test and EP study parameters Parameter Selectable values Default Pulse Width - Auto Dec, Manual Pulse Width - Auto Dec Atrium, Ventricle Ventricle AAI, DDI, DDD DDDb Mode (ventricular test)a VVI, DDI, DDD VVIb Lower Rate (ppm, min-1) 30, 35, . . .,60, 70, 75, . . .,150c 90 AV Delay (ms) 30, 40, . . ., 350 150b V. Amplitude (V)d 0.5, 1, . . ., 4, 5, 6 3b V. Pulse Width (ms) 0.03, 0.06, 0.1, 0.2, . . ., 1.6 0.4b V. Pace Blanking (ms) 150, 160, . . ., 440 200b 0.5, 1, . . ., 4, 5, 6 3b A. Pulse Width (ms) 0.03, 0.06, 0.1, 0.2, . . ., 1.6 0.4b A. Pace Blanking (ms) 150, 160, . . ., 250 200b PVARP (ms) 150, 160, . . ., 500 310b Modea ODO, AAI, VVI, DDI, DDD --- AV Delay (ms) 30, 40, . . ., 350 250 Lower Rate (ppm, min-1) 30, 35, . . .,60, 70, 75, . . .,120c --- Pacing threshold test parameters Test Type Chamber Mode (atrial test)a A. Amplitude (V)d EGM Amplitude test parameters Marquis DR 7274 Reference Manual Device Parameters System test and EP study parameters Table B-7 System test and EP study parameters (continued) Parameter Selectable values Default #S1 2, 3, . . ., 8 8 S1S1 (ms) 300, 310, . . ., 2000 400 Delay (ms) 50, 60, . . ., 600 310 T-Shock induction parameters Energy (J)e 0.4, 0.6, . . ., 1.8, 2, 3, . . ., 16, 18, 0.6 20, . . ., 30 Pathway AX>B, B>AX AX>B Waveform Monophasic, Biphasic Monophasic Pulse Amplitude (V)d 8 V (fixed) --- Pulse Width (ms) 1.6 ms (fixed) --- Enable Enabled, Disabled Disabled Resume at Deliver Enabled, Disabled Enabled 20 ms (fixed) --- 0.5, 1, . . ., 4, 5, 6, 8 8 50 Hz Burst Induction Parameters Interval (ms) Pulse Amplitude (V)d Pulse Width (ms) 0.03, 0.06, 0.1, 0.2, . . ., 1.6 1.6 Resume at Burst Enabled, Disabled Enabled Manual Burst Induction Parameters Chamber Ventricle, Atrium Ventricle Interval (ms) 100, 110, . . ., 600 600 Pulse Amplitude (V)d 0.5, 1, . . ., 4, 5, 6, 8 4 Pulse Width (ms) 0.03, 0.06, 0.1, 0.2, . . ., 1.6 0.5 Resume at Burst Enabled, Disabled Enabled VVI Backup On, Off Off VVI Backup Pacing Rate (ppm, min-1) 30, 35, . . ., 120 60 VVI Backup Amplitude (V)d 0.5, 1, . . ., 4, 5, 6 4b VVI Backup Pulse Width (ms) 0.03, 0.06, 0.1, 0.2, . . .,1.6 0.5b Marquis DR 7274 Reference Manual 379 Appendix B System test and EP study parameters 380 Table B-7 System test and EP study parameters (continued) Parameter Selectable values Default Chamber Ventricle, Atrium Ventricle #S1 1, 2, . . ., 15 8 S1S1 (ms) 100, 110, . . ., 2000 600 PES Induction Parameters S1S2 (ms) Off, 100, 110, . . ., 600 400 S2S3 (ms) Off, 100, 110, . . ., 600 Off Off, 100, 110, . . ., 600 Off 0.5, 1, . . ., 4, 5, 6, 8 4 S3S4 (ms) Pulse Amplitude (V)d Pulse Width (ms) 0.03, 0.06, 0.1, 0.2, . . ., 1.6 0.5 Resume at Deliver Enabled, Disabled Enabled VVI Backup On, Off Off VVI Backup Pacing Rate (ppm, min-1) 30, 35, . . ., 120 60 VVI Backup Amplitude (V)d 0.5, 1, . . ., 4, 5, 6 4b VVI Backup Pulse Width (ms) 0.03, 0.06, 0.1, 0.2, . . .,1.6 0.5b Manual therapy parameters In general, each manual therapy provides the same parameter values as the automatic therapy. See Table B-3. a b c d e The selectable values for this parameter depend on the programmed pacing mode. The default value for this parameter is set according to the permanently programmed settings for bradycardia pacing if the device has been interrogated. Otherwise it defaults to the indicated nominal value. The maximum range value is dependant on the programmed pacing mode. Peak pacing amplitude. When tested per Cenelec standard 45502-2-1, the measured amplitude A depends upon the programmed amplitude Ap and programmed pulse width Wp: A = Ap x [0.9 - (Wp x 0.145 ms-1)]. Delivered energy based on a biphasic pulse into a 75 ohm load. For energy less than 1 joule, tolerance is ± 0.25 J. Marquis DR 7274 Reference Manual Device Parameters Fixed parameters Fixed parameters Table B-8 Fixed parameters Parameter Fixed value Fixed blanking periods Atrial blanking after a sensed atrial event 100 ms Atrial blanking after a paced ventricular event 30 ms Atrial blanking after high voltage therapy 520 ms Ventricular blanking after a sensed ventricular event 120 ms Ventricular blanking after a paced atrial event 30 ms Ventricular blanking on a high voltage pulse delivery 520 ms Fixed bradycardia pacing parameters Ventricular Safety Pacing intervals 110 ms 70 msa PVC Response (PVARP extension) Extended to 400 msb PMT Intervention (PVARP extension) Extended to 400 msb Fixed high voltage therapy parameters Maximum charging period 30 seconds Waveform Biphasic Tilt 50% Refractory period after V-sense during cardioversion synchronization 200 ms Refractory period after charge end 100 ms Refractory period after paced event during charging or synchronizationc 400 ms Refractory period after charge beginsc 400 ms Atrial Vulnerable Period 250 ms Escape interval after high voltage therapy 1200 ms Suspension of VT detection after defibrillation therapy 17 V. events Marquis DR 7274 Reference Manual 381 382 Appendix B Fixed parameters Table B-8 Fixed parameters (continued) Parameter Fixed value Fixed EP Study parameters T-Shock pacing amplituded 8V T-Shock pacing pulse width 1.6 ms 50 Hz burst pacing interval 20 ms Hardware parameters Atrial rate limit (protective feature) 171 ppm (min-1)e Ventricular rate limit (protective feature) 171 ppm (min-1)e Input impedance 100 kΩ minimum a b c d e The shorter VSP interval takes effect when the pacing rate exceeds the results of the following formula: 60,000 / 2 x (Ventricular Pace Blanking + 110) per minute. PVARP is only extended to 400 ms if the current PVARP (either the programmed PVARP value or the current Sensor-Varied PVARP value) is less than 400 ms. Does not affect event classification during charging. Peak pacing amplitude. When tested per Cenelec standard 45502-2-1, the measured amplitude A depends upon the programmed amplitude Ap and programmed pulse width Wp: A = Ap x [0.9 - (Wp x 0.145 ms-1)]. Does not apply during therapies, programmed high rates, or ventricular safety pacing. Marquis DR 7274 Reference Manual Device Parameters Patient information parameters Patient information parameters Table B-9 Patent information parameters Information field Description and required action Patient Enter the patient name (up to 30 characters). ID Enter the patient ID (up to 15 characters). Date of Birth Select patient’s date of birth. ICD Number (Not selectable) Displays serial number for implanted device after interrogation. Lead 1 . . . Lead 2 . . . Lead 3 . . . Enter detailed information for leads 1, 2, and 3: Model, Position: pick from list of positions, or enter position, Serial Number, Manufacturer, and Implant date. Implant Enter measured values from implant. Using the displayed submenu, enter new information including lead data from the Analyzer. Notes Enter notes about patient or other information. History (2 fields) Select medical history from list box. If necessary, you can indicate that more information is located in the Notes field. EF, on Select the ejection fraction from a table of values. Then enter the date in the following field. Physician Select or add the name of the physician. You can also enter the physician’s phone number at the same time. Phone Enter the phone of the physician. Hospital Select or add the hospital information. Last Update (Not selectable) Displays the date of the last Patient Information update. Marquis DR 7274 Reference Manual 383 384 Appendix B Programmer symbols Programmer symbols Table B-10 shows some symbols the programmer may display on the screen while you are programming the device and describes their meaning. Table B-10 Programmer symbols Nominal – Indicates the Medtronic nominal value for a parameter. Programmed – Indicates the value currently programmed in the device for a parameter. Interlock – Appears when one selected value is incompatible with another value. You cannot program the device to this setting until you resolve the parameter interlock (see “Parameter interlocks” on page 386). Warning – Indicates a value has an associated warning. You can still program this value, but the programmer will display the warning. Informational – Indicates additional, possibly cautionary information associated with the selected values. You can program these values, but the programmer provides information for you to consider. Marquis DR 7274 Reference Manual Device Parameters Programmer symbols Parameter Interactions Window The Parameter Interactions window displays details that correspond to interlock, warning, and information symbols marking displayed parameters on the current screen. Also, if the displayed screen contains either an interlock, warning, or information symbol, one of the following icon buttons appears next to [Program] at the bottom of the screen, for example: Figure B-1. Parameter icon buttons Select the icon button from the bottom of the screen to display the Parameter Interactions window. Figure B-2. Parameter Interactions Screen Marquis DR 7274 Reference Manual 385 386 Appendix B Parameter interlocks Parameter interlocks The programmer software restricts specific programming situations to ensure that tachyarrhythmia detection is safe and effective and that bradycardia features operate properly. These software restrictions are referred to as interlocks. If a restricted programing situation is attempted, an interlock message appears on the programmer screen stating the reason for the restriction. Interlocks can be summarized by the following categories: ■ General Safety These interlocks adhere to normal programming conventions. For example, the programmer does not allow programming of the FDI greater than the TDI. ■ Maintain a ventricular sensing window These interlocks limit parameter values in order to maintain 50% of the VP - VP interval as a ventricular sensing window. This helps to ensure detection of a ventricular arrhythmia during ventricular pacing. For example, Ventricular Pace Blanking must be programmed to a value less than or equal to ½ the lower rate interval. ■ No pacing in the detection zone These interlocks prevent programming of pacing intervals in the detection zone. For example, they prevent an atrial pace during the VTDI (or VFDI), since cross chamber sensing could cause an inappropriate detection of a ventricular tachycardia. These interlocks also prevent under-detection due to cross-chamber blanking. ■ No bradycardia pacing in or near the VT detection zone These interlocks limit parameter values in order to maintain a 30 ms period between the atrial pacing interval and tachyarrhythmia detection interval and avoid intrinsic conduction in the VT detection zone. ■ General bradycardia These interlocks ensure that the Brady features operate properly. For example, Single Chamber Hysteresis cannot be be turned on at the same time as Ventricular Rate Stabilization because these two features have opposing actions. Marquis DR 7274 Reference Manual Index Numerics 1:1 VT-ST Boundary and pattern analysis 92 and PR Logic 90 considerations 89 definition 88, 103 restrictions 90 2:1 block rate 161 definition 198 example 162 50 Hz Burst induction 329 definition 341 details about 332 enhancements 17 how to deliver 331 5358 Defibrillator Implant Support Device 35 9767 and 9767L programming head 34 9790c programmer 34 setting up the 212 A A. Sensitivity definition 61 programmable values 61 A:V Dissociation 94 A-A Median 105, 182 see also median interval AAI and AAIR modes 165 and VT detection 165 abbreviations and acronyms xvii ablation, RF 364 aborting an emergency therapy 26 aborting induction or therapy 327, 330, 333, 336, 340 acceleration acceleration curves 172 definition 172 parameters 172 settings 198 VT acceleration 87 accelerometer 16, 171 (activity sensor) definition 198 Active Can 16, 20, 111, 131 definition 143 high voltage therapies 111 if off during defibrillation or cardioversion 111, 131 parameter 110, 130 Patient Alert, definition 255 active fields 222 activity acceleration acceleration curves 172 definition 167, 198 Marquis DR 7274 Reference Manual 388 Index parameters 167 activity deceleration deceleration curves 173 definition 167, 198 Exercise setting 174 parameters 167 activity sensor, see accelerometer Activity Threshold definition 198 Rate Response Pacing 167 AF Evidence 93 AFib/AFlutter criterion 88 considerations 89 definition 88 details about 95 parameters 88 programming 91 Alert Time parameter definition 253 alerting the patient to system events 22, 253 All Therapies in a Zone Exhausted for an Episode alert definition 254 Amplitude automatic ATP therapies 338 definition 148 effect on ICD longevity 207 inductions 326, 329, 332, 335 pacing 149 post shock 196 annotations Decision Channel 238, 239, 285 ECG 240 Marker Channel 236, 237 antegrade zone 92 Antitachycardia Pacing (ATP), see ATP A-pulse width, see pulse width ARP (Atrial Refractory Period) 166 definition 198 parameter 164 artifacts 233 ATP (Antitachycardia Pacing) 143, 341 definition 198, 341 how to program 123 parameters for manual therapy 338 ATP therapies details about 124 atrial fibrillation⁄flutter and Mode Switch 180 Marquis DR 7274 Reference Manual atrial pacing and ventricular parameters 164 preventing competitive atrial pacing 186 see AAIR and AAI modes, DDDR and DDD modes, DDIR and DDI modes Atrial Refractory Period (ARP), see ARP atrial tracking 2:1 Block 161 at high rates 161 definition 198 in DDDR and DDD modes 156 Mode Switch 180 Wenckebach operation 162 Atrial Vulnerable Period (AVP), see AVP audible tones Patient Alert monitoring system 253 programmer 227 responding to 258 auto cap See automatic capacitor formation Auto Resume 341 after induction 324 detection, in EP study 328, 331, 334, 337 auto-adjusting sensitivity 64 definition 103, 198 automatic capacitor formation 204 details 206 parameters 376 automatic device status monitoring 304 automatic interrogation 232 automatic measurements battery and lead status 290 start time 274 automatic telemetry attempts 241 AV dissociation 94 AV interval minimum PAV and SAV 155 PAV 158 Rate Adaptive AV 175 SAV 159 A-V synchrony 165, 189 AVP (Atrial Vulnerable Period) events 118, 137 B backup VVI pacing 17 for Manual Burst induction 334 for PES induction 337 parameters 332, 335 basic bradycardia pacing 148 Index amplitude and pulse width 149 details about 152 how to program 151 pacing modes 148 battery depletion 359 viewing status 290 voltage at implant 36 elective replacement indicator 8 patient alert 254 replacement indicators 8 Battery/Lead Status report 246 binary search protocol 43 biphasic waveform 114, 134 definition 143 blanking period 65 after cardioversion 137 after defibrillation 118 cross-chamber 61, 165 definition 103, 198, 352 fixed 65 pace blanking, definition 105, 199 Post-Ventricular Atrial Blanking (PVAB) 65 when setting up sensing 61 bradycardia pacing after high voltage therapies 196 basic 148 competitive atrial pacing, preventing 184 dual-chamber 154 during cardioversion 137 during defibrillation 118 enhancements 16 how to program 151 key terms 198 mode 148 AAIR and AAI 165 DDDR and DDD 156 DDIR and DDI 157 DOO, VOO, and ODO 16, 152 VVIR and VVI 166 Mode Switch 180, 183 new modes 16 optimizing cardiac output 167 parameters 148 parameters based on mode 152 PMT Intervention 189 PVC Response 189 Rate Adaptive AV 175 Rate Responsive pacing 171 single chamber 164 Single Chamber Hysteresis 177 solving pacing problems 349 Ventricular Rate Stabilization 178 Ventricular Safety Pacing 193 verifying effective pacing 52 Burst induction 50 Hz Burst 329 definition 341 details about 332 how to deliver 331 Manual Burst 332 definition 341 details about 334 how to deliver 334 Burst pacing therapy 125, 144 buttons on-screen 226 programmer 27 programming head 219 C Can (HVA) electrode, also see Active Can 113 Can to HVX EGM Source 271 capacitor charging period 113, 133 definition 208, 322 delivering higher energy than programmed 360 how charging affects the programming head indicator lights 219 capacitor formation 204 automatic 204 automatic adjustments 206 definition 208, 322 effect on ICD longevity 204 manual 320 timestamp 205 Cardiac Compass Trends report 14, 294 AT/AF total hours per day 298 day and night heart rates 299 details 296 heart rate variability 300 non-sustained VT episodes per day 297 one or more shocks per day 297 patient activity 299 percent pacing per day 298 printing 296 programming and interrogation annotations 296 ventricular rate during AT/AF 298 ventricular rate during VT, FVT and VF 297 Marquis DR 7274 Reference Manual 389 390 Index VT/VF episodes per day 297 cardiac support, optimizing pacing 167 cardioversion 144, 341 after delivering 137 emergency 28 selectable values 368 how to program 132 manual parameters 338 manual therapy 341 parameters for manual defibrillation 338 therapies for FVT 123, 132 cardioversion therapy details about 133 cautery, electrosurgical 363 Changed Parameters screen 303 Changes This Session report 246 Charge Circuit Inactive 351, 360 Charge Circuit Timeout 351, 360 Patient Alert 255 charge time charge time test 205 effect on ICD longevity 204 managing charge time 205 optimizing 204 testing 320 typical times for each energy level 11 full energy 10 Charge/Dump test 10, 320 considerations 320 performing 321 charging performance how to evaluate 205 charging period 144 definition 208, 322 checking and opening the package 358 Checklist 261 creating, editing, and deleting 263 definition 264 using 262 clearing information 273 clinically significant data report 294 clock, device 272 CNID (combined number of intervals to detect) definition 103 collecting data key terms 306 Combined Count detection 81, 86 details about 81 Marquis DR 7274 Reference Manual Command bar 224 communication equipment 366 competitive atrial pacing other methods of preventing 186 preventing 184 concurrent pacemaker use 360 Confirm VF after initial detection 111, 144 parameter 110 confirmation during charging 115, 134 enhancements 16 interval 115, 134 VF, after initial detection 115 VT or FVT, after initial detection 134 connecting leads 40 connector 4 how to 41 counter data 12 printing 246 criteria AFib/AFlutter 95 FVT detection 76 high voltage synchronization 114, 135 implant 42 Other 1:1 SVTs 96 PR Logic 88, 100 redetection 84 Sinus Tach 96 Stability 97 termination, episode 84, 85 VF confirmation 115 VF detection 66 VT detection 70 VT or FVT confirmation 134 cross-chamber blanking 165 crosstalk 165 definition 198, 352 current pathway 144 D data Cardiac Compass Trends 13 clearing 273 counters 12 episode and therapy counters 275 records 283 episode data 11 episode log 282 Flashback Memory 288 Index lead performance trends 13 viewing 293 parameters 377 Quick Look observations 252 saving and retrieving device data 242 saving to diskette 242 storage capacity 11 summary of features 266 data file names 245 date, device 272 DDDR and DDD modes 156 DDIR and DDI modes 157 deceleration deceleration curves 173 definition 167 exercise 174 parameters 174 settings 172 Decision Channel annotations 238, 285 definition 248, 352 PR Logic annotations 239 defibrillation 110 after delivering 118 AVP (Atrial Vulnerable Period) events 118 canceled during charging 116 confirming VF 115 considerations 111 definition 144 delivered asynchronously 115 emergency 28 high voltage electrodes 113 manual therapy 340 parameters 338 parameters 110 post shock blanking 118 refractory events during synchronization 118 selectable emergency values 368 VVI pacing 118 defibrillation threshold testing how to perform 45 defibrillation threshold testing support 17 [DELIVER] button 27 delivering a manual therapy 338 emergency therapies 26 delivery pathway electrodes 113, 133 detection 57 Auto Resume after induction 327, 330, 333, 336 Combined Count 81 disabling 58 double tachycardia 100 enhancements 15 episode termination 84 flowchart 59 FVT 76 considerations 76 details 78 parameters 76 programming 78 restrictions 77 zone merging 80 High Rate Timeout 101 considerations 101 details 102 parameters 101 programming 102 key terms 103 overview 58 parameters 369 PR Logic criteria 88, 100 AFib/AFlutter 95 considerations 89 details 91, 95 Other 1:1 SVTs 96 parameters 88 programming 91 restrictions 90 Sinus Tach 96 redetection 84 considerations 84 details 85 parameters 84 programming 85 sensing 61 considerations 61 details 64 how to program 63 parameters 61 solving problems 347 Stability criterion 97 considerations 97 details 98 parameters 97 programming 98 suspended during manual therapy 324 suspended with magnet 5 suspending detection 60 verifying accurate 51 VF 66 considerations 67 Marquis DR 7274 Reference Manual 391 392 Index details 68 parameters 66 programming 68 restrictions 68 VT 70 considerations 70 details 72 parameters 70 programming 72 restrictions 71 VT monitoring 74 VT acceleration 87 device dimensions 4 implanting 359 programming head 35 replacing 36 storage and handling 358 device clock 272 device status indicators 304 Charge Circuit Inactive 304 Charge Circuit Timeout 304 electrical reset 264, 304, 305, 307, 352 ERI and EOL 291 responding to 351 diagnostics 266 see also data diathermy 363 dimensions, device 4 disk operations reading data 245 saving ICD data 242 display panel buttons emergency on-screen 27 display screen command bar 224 features 219 dissociated rhythm 94 DOO mode Patient Alert, definition 255 double tachycardia definition 104 detection 100 double tachycardia detection details about 100 dropped device 358 dual-chamber pacing 154 competitive atrial pacing, preventing 184 considerations 156 DDDR and DDD modes 156 Marquis DR 7274 Reference Manual DDIR and DDI modes 157 details about 156 Mode Switch 180 Paced AV interval 158 PMT Intervention 189 PVAB (Post-Ventricular Atrial Blanking) 160 PVARP (Post Ventricular Atrial Refractory Period) 159 PVC Response 189 Rate Adaptive AV 175 Sensed AV interval 159 Ventricular Safety Pacing 193 E ECG annotations 240 cable 212 Show Artifacts option 233 viewing on programmer 233 EGM amplitude automatic measurement 274 test 318 considerations 318 parameters 318 performing 320 restrictions 319 trend data 292 EGM Source definition 267 details about 269 enhancements 15 how to program 269 Leadless ECG signal 271 parameters 267 EGM storage 207, 267, 268, 269, 285, 286 effect on longevity 268 pre-onset storage 15, 308 affect on longevity 208 EGM strip 285 atrial interval display options 285 conserving space 286 Decision Channel annotations 285 definition 248 enhanced pre-onset storage 15 Marker Channel telemetry 242 memory 286 storage capacity 11, 286 suspended recording 286 SVT and NST episodes 285 viewing 285 Elective Replacement Indicator (ERI), see ERI Index Electric or Magnetic Interference (EMI) 366 electrical isolation during implantation 358 electrical reset 264, 307, 351, 352 definition 264, 307, 352 Patient Alert 255 programmer message 304 response to 305 electronic article surveillance 366 Electrophysiologic Studies, see EP study electrosurgical cautery 363 [Emergency] button 26, 27 emergency therapy 25 aborting 26 buttons 27 cardioversion 28 selectable values 368 defibrillation 28 selectable values 368 delivering 26 effect on system operation 26 fixed burst selectable values 368 fixed burst pacing 29 parameters, temporary 27 selectable values 368 VVI pacing 30 selectable values 368 while reading from a disk 242 while saving to a disk 242 EMI (electromagnetic interference) definition 104, 352 End of Life (EOL), see EOL ending a patient session 232 energy 111, 112, 113, 131, 133 delivered T-Shock induction 326 effect on ICD longevity 207 programmed vs. stored 10 EOL (End of Life) 9, 291, 351 definition 307 EP study 323 Auto Resume 328, 331, 334, 337 conducting EP tests enhancements 17 inductions 328, 331, 334, 337 key terms 341 overview 324 parameters 378 self-check before induction 325 epicardial leads 38 episode definition 104 episode counters 275 episode data 11 EGM strip 285 EGM text 287 episode records 283 interval plot 284 viewing 284 log 282 summary 287 SVT and NST 283 text viewing 287 viewing 281 episode redetection 86 illustration 86 episode termination 85 equilibration 358 equipment for an implant 34 ER symbol (Buffer Full symbol) 332 ERI (Elective Replacement Indicator) 9, 291, 351 escape interval definition 198 event definition 104 events leading to VF or VT 288 Excessive Charge Time ERI alert definition 254 exercise deceleration option 174 explant and disposal 363 explanting the ICD how to 37 external defibrillation 364 F far-field R-wave 66, 166 sensing 93 fixed blanking periods 65 fixed burst emergency selectable values 368 fixed burst pacing emergency 29 how to deliver emergency 29 fixed parameters 65, 381 Flashback Memory storage capacity 12 viewing 288 Marquis DR 7274 Reference Manual 393 394 Index follow-up, patient Cardiac Compass Trends 294 guidelines 50 session 49 testing 362 verifying accurate detection 51 verifying adequate cardiac support 169 verifying effective bradycardia pacing 52 verifying status of the implanted system 50 forming the capacitors 204, 206 definition 208 effect on ICD longevity 204 timestamp 205 FVT detection 76, 288 considerations 76 definition 104 details 78 details about 78 parameters 76 programming 78 restrictions 77 zone merging 80 FVT episode definition 104 detecting 76 viewing 282 FVT event definition 104 FVT Interval definition 76, 104 FVT plus SVT, see double tachycardia FVT therapy ATP (Antitachycardia Pacing) therapies 120 considerations 122 details 124 how to program 123 parameters 120 cardioversion 130 considerations 131 details about 133 how to program 132 parameters 130 H heart rate variability Cardiac Compass Trends report 300 High Rate Timeout 16, 101 and inappropriate therapies 101 considerations 101 definition 105 Marquis DR 7274 Reference Manual details about 102 parameters 101 programming 102 High Rate Timeout Therapy 101 definition 101 details 103 High urgency, Patient Alert tone 259 high voltage implant values 42 high voltage lines, warning 366 high voltage therapy energy levels compared 10 how to program pacing after 197 pacing parameters 196 post shock pacing parameters 197 providing pacing after 196 high-energy radiation 364 higher energy on the output capacitor 360 Holter Telemetry 218, 272 definition 272 parameters 268, 272 home and occupational environments 365 home appliances 366 HVA/HVB/HVX electrodes 144 hysteresis considerations 169 details 177 I ICD connecting the leads 40 implanting 33 required equipment 34 longevity projections 6 physical characteristics 4 positioning and securing 46 replacement indicators 304 replacing 36 response to magnet 5 saving data 242 size 4 Icons and buttons 224 impedance definition 322 lead, measuring 316 test trends 292 implant list of tasks 34 patient information 301 required equipment 34 Index implant support instrument 35 implanted system verifying the status 50 inactive charge circuit 351 incisions, surgical 39 indications and usage 23 indicator elective replacement (ERI) 351 induction 50 Hz Burst 329 details about 332 how to deliver 331 aborting 327, 330, 333, 336, 340 Manual Burst 332 details about 334 how to deliver 334 PES 335 details about 337 how to deliver 337 T-Shock 326, 337 definition 342 details about 328 how to deliver 328 informational symbol, programmer 384 inhibiting pacing Underlying Rhythm Test 313 interlock definition 308 interlock symbol, programmer 384 internal clock 272 [Interrogate] button 219 interrogating the device definition 248 interval plot 284 viewing 284 interval storage 288 J junctional zone 92 K key terms bradycardia pacing 198 collecting data 306 detection 103 EP study 341 treating tachyarrhythmia episodes 143 using the programmer 248 L last session definition 248 lead compatibility 360 lead evaluation Battery and Lead Measurements screen 290 EGM Amplitude test 318 considerations 318 parameters 318 performing 320 restrictions 319 Lead Impedance test 316 considerations 316 details 317 performing 316 lead performance trends 292 sensing integrity counter 275 lead impedance auto measurement 254 automatic measurement 274 Out of Range alerts definition 254 patient alert 254 test 316 considerations 316 details 317 performing 316 trend data 292 trends 292 lead performance trends 292 collecting data 274 graphs 293 Leadless ECG signal 15, 271 leads connecting to ICD 40 evaluating 39, 275, 290, 292, 316, 318 measurements at implant 40 positioning 37 selecting 358 status, viewing 290 using epicardial 38 using transvenous 37 lithotripsy 364 Live Rhythm Monitor 219, 221 definition 248, 352 how to adjust 234 long term clinical trends see Cardiac Compass Trends report longevity definition 208 Marquis DR 7274 Reference Manual 395 396 Index effect of programmed values 207 managing 207 optimizing ICD 207 projections 6 Low Battery Voltage ERI alert definition 254 Low Urgency, Patient Alert tone 259 Lower Rate definition 149 Mode Switch 180, 183 considerations 180 definition 154 details 182 details about 182 enhancements 16 how to program 182 parameters 180 monitoring for real-time and stored data 22 M N magnet application 5 Magnetic Resonance Imaging (MRI) 364 manual burst induction definition 341 details about 334 how to deliver 334 manual therapies Burst pacing 341 cardioversion 341 defibrillation 340 details about 340 how to deliver 340 Ramp pacing 341 Ramp+ pacing 341 Marker Channel telemetry 218 annotations 236 definition 248 mass of device 4 median interval 95, 100, 182 definition 105 medical therapy hazards 363 medical treatment influencing device operation 360 messages Charge Circuit Inactive 304 Charge Circuit Timeout 304 Electrical Reset 304 Serious ICD Error 305 Minimum PAV definition 168 Minimum SAV definition 168 mode AAIR and AAI 165 basic pacing 148 DDDR and DDD 156 DDIR and DDI 157 definition 148 pertinent parameters 152 VVIR and VVI 166 NCAP (Non-Competitive Atrial Pacing) definition 154 details 185 how to program 185 new features 14 accelerometer 16 additional pacing modes 16 AT-style Mode Switch 16 backup VVI pacing 17 Cardiac Compass Trends 14 confirmation during charging 16 DFT testing support 17 EGM amplitude test 15 EP studies 17 High Rate Timeout 16 Leadless ECG 15 Patient Alert 14 pre-onset EGM storage 15 programmable Active Can 16 RapidRead telemetry 14 Smart Auto Cap Formation 15 VT monitoring 15 NID (number of intervals to detect) CNID values 82 VF 66 VT 70 nominal symbol, programmer 384 nominal values bradycardia pacing parameters 373 data collection parameters 377 detection parameters 369 emergency therapy parameters 368 system maintenance parameters 376 system test and EP study parameters 378 therapy parameters 371 Non-Competitive Atrial Pacing (NCAP), see NCAP NST episodes 283, 285 Number of Intervals to Detect, see NID Number of Shocks Delivered in an Episode alert Marquis DR 7274 Reference Manual Index definition 254 O ODO pacing mode 153 on-screen and display panel buttons 27 optimizing therapy with Smart Mode and Progressive Episode therapies 139 Other 1:1 SVTs criterion 88 considerations 89 definition 88 details about 96 parameters 88 programming 91 P Pace Blanking 150 definition 105, 148, 199 Paced AV (PAV), see PAV pacemaker concurrent 360 pacemaker dependent patients 360 Pacemaker-Mediated Tachycardia (PMT), see PMT pacing activity threshold definition 352 after high voltage therapies 196 how to program 197 backup VVI pacing 17 competitive atrial pacing, preventing 184 details about basic bradycardia 152 details about dual-chamber 156 dual-chamber 154 emergency selectable values 368 emergency fixed burst 29 emergency VVI 30 enhancements 16 how to program Non-Competitive Atrial 185 how to program Ventricular Safety 194 interactions between features 180 interval used during defibrillation 118 mode 148 AAIR and AAI 165 DDDR and DDD 156 DDIR and DDI 157 DOO, VOO, and ODO 16, 152 effect on ICD longevity 207 selecting 150 VVIR and VVI 166 Mode Switch 180 operations 325 optimizing cardiac output 167 parameters 373 PMT Intervention 189 PVC Response 189 Rate Responsive pacing 171 single chamber 164 Single Chamber Hysteresis 177 solving problems 349 threshold definition 199, 322 Ventricular Safety Pacing 193 pacing evaluation Pacing Threshold test 313 considerations 315 parameters 314 performing 315 Underlying Rhythm test 312 considerations 312 performing 313 Pacing Threshold test 313 considerations 315 parameters 314 performing 315 package checking and opening 358 Parameter Interactions window 385 Parameter Settings report 246 Parameter Summary report 246 parameters detection 369 emergency 368 EP study 378 fixed 65, 381 minimum auto cap formation interval 204 pacing 373 Patient Information 383 system maintenance 376 system test 378 temporary 27 therapy 371 viewing live waveforms 233 Pathway parameter 110 Patient Alert monitoring system 253 alert schedule 257 definition 264 enhancements 14 event log 259 parameters 253, 376 Marquis DR 7274 Reference Manual 397 398 Index patient instructions 258 programming 258 tones 259 using a magnet 5 patient follow-up conducting a session 49 guidelines 50 Patient Information parameters 383 patient information 301 categories 302 displaying and printing 303 parameters 302 viewing and entering 301, 303 patient screening 23 PAV (Paced AV Interval) 156, 158 definition 154, 199 PES (Programmed Electrical Stimulation) details 337 how to deliver 337 inducing an arrhythmia 335 Programmed Electrical Stimulation 341 PES induction details about 337 physical characteristics of the device 4 PMT (Pacemaker-Mediated Tachycardia) definition 199, 352 detecting and preventing 189 PMT Intervention 189, 191 definition 154, 189 details 191 details about 191 how to program 190 POR. See electrical reset position and secure the device how to 46 positioning ICD 46 leads 37 programming head 219 post shock blanking 196 after cardioversion 137 after defibrillation 118 Post Shock Pacing 196 considerations 196 details about 197 how to program 197 parameters 196 Post Ventricular Atrial Blanking (PVAB), see PVAB Marquis DR 7274 Reference Manual Post Ventricular Atrial Refractory period (PVARP), see PVARP post-ERI conditions 9 Power-On Reset. See electrical reset PR Logic criteria 86, 88, 100, 166 A:V Dissociation 94 AF Evidence 93 AFib/AFlutter 95 annotations 239 considerations 89 definition 105 details about 91, 95 far-field R-wave sensing 93 Other 1:1 SVTs 96 parameters 88 pattern analysis 92 programming 91 regularity, ventricular cycle length 94 restrictions 90 Sinus Tach 96 using sensed events during PVAB 160 Premature Event Threshold definition 272 parameters 268 Premature Ventricular Contractions, see PVCs pre-onset EGM storage effect on ICD longevity 208 preparing for an implant 34 print queue 247 [Print...] button 246 printing print queue 247 reports 246 session data 246 while recording live ECG 241 printing, reports how to 247 [PROGRAM] button 219 Programmed Electrical Stimulation (PES) 341 programmed parameters check 325 programmed symbol, programmer 384 programmer 34, 232 9790c 34, 232 required software 34, 35 screen reports 246 setting up 212 status bar display 220 symbols 384 programming head 35 Index buttons 325 light array during charging 219 positioning 219 Progressive Episode Therapies 111, 122, 131, 140, 144 details about 142 how to program 142 projected longevity 6 protocol, binary search 43 Pulse Amplitude effect on longevity 6 Pulse Width and amplitude 149 automatic ATP therapies 338 definition 148 effect on ICD longevity 207 inductions 326, 329, 332, 335 maintaining consistent capture 149 pacing 149 PVAB (Post-Ventricular Atrial Blanking) 160 definition 154, 199 PVARP (Post Ventricular Atrial Refractory Period) 159 2:1 block 161 definition 154, 199 during Mode Switch 180 interactions with other features 159 minimum sensor-varied value 160 PMT intervention 191 PVC Response 190 role in preventing competitive atrial pacing 186, 188 role in preventing PMT 189 Wenckebach 163 PVARP (Post-Ventricular Atrial Refractory Period) 159, 161 definition 199 PVARP extension 190 PVC (Premature Ventricular Contraction) definition 199, 352 PVC Response 190 definition 155, 189 details about 190 how to program 190 suspended 190 Q Quick Look 251 definition 264 observations 252 definition 264 report 246 software display definition 322 using 251 QuickLink software design definition 264 R RAAV see Rate Adaptive AV 169 radiation, high-energy 364 Radio Frequency (RF) ablation 364 Radiopaque ID 4 Ramp pacing 127, 144 Ramp+ pacing 129, 145 RapidRead telemetry 14 rate A-A median 182 sensor-indicated 169, 171 Upper Sensor 181 Upper Tracking 156 Rate Adaptive AV details about 175 Rate Adaptive AV (RAAV) 169, 175 definition 200, 353 details about 175 how to program 175 programmable values 155, 167 Start Rate 167 Stop Rate 168 Rate limited ATP therapies 125 Rate Response 16 definition 167 how to program 170 Rate Responsive Pacing 167 considerations 169 details about 171 environmental vibration 169 in DDD mode 169 reading data from a disk 245 real-time and stored data 22 real-time/stored EGM 15 recording live waveforms 240 Redetect CNID 86 Redetect NID (number of intervals to detect) 86 VF, definition 66, 84, 106 VT, definition 70, 84, 107 redetection 84 Marquis DR 7274 Reference Manual 399 Index 400 considerations 84 definition 105 details 85 episode 86 parameters 84 programming 85 VT acceleration 87 redetection and episode termination details about 85 refractory events 137 during defibrillation 118 refractory period 66 definition 105 PVARP 159, 161 regularity, ventricular cycle length 94 replacement indicators 8, 291 elective (ERI) 351 replacing an ICD 36, 304 reports Battery/Lead Status 246 Cardiac Compass 246 Cardiac Compass Trends 13, 14, 294 Changes This Session 246 Counters 246 Full Summary 246 Last VT/VF Episode 246 Mode Switch Episode List 246 Parameter Settings 246 Parameter Summary 246 printing 246 Quick Look 246 SVT/NST Episode List 246 Ventricular Interval Stability List 246 VT/VF Episode List 246 reset values bradycardia pacing parameters 373 data collection parameters 377 detection parameters 369 system maintenance parameters 376 therapy parameters 371 resuscitation, have available while testing ICD 358 retrograde zone 92 definition 200 RV (HVB) electrode 111, 113, 131 S safety margin adequate 196 post-shock pacing 196 safety pacing, ventricular 193 Marquis DR 7274 Reference Manual SAV (Sensed AV Interval) 159 SAV (Sensed AV) 156 definition 155 saving and retrieving device data 242 screen 219 about the display 219 active fields 222 buttons 226 command bar 224 Live Rhythm Monitor 221 task area 222 tool palette 224 screening, patient 23 search protocol, binary 43 selecting values 222 Sensed AV (SAV), see SAV Sensed AV (Sensed AV) 159 sensed event definition 105, 200, 353 sensing 61 blanking periods 65 considerations 61 details about 64 EGM Amplitude test 318 considerations 318 parameters 318 performing 320 restrictions 319 how to program 63 parameters 61 refractory periods 66 sensing integrity counter 275 sensing problems solving 345 Sensitivity 61, 149 auto-adjusting 64 definition 198 definition 105, 148, 200, 322, 353 details about 64 how to program 63 parameters 61 threshold 149 sensor-indicated rate 169, 171 definition 200 sequence definition 145 shipped values data collection parameters 377 pacing parameters 373 system maintenance parameters 376 Index therapy parameters 371 Show Artifacts 233 Single Chamber Hysteresis 164, 170 compatibility 170 considerations 169 definition 168 details about 177 how to program 176 verify adequate cardiac support 169 single chamber pacing 164 atrial pacing and tachycardia detection 165 considerations 164 details about 165 parameters 164 Sinus Tach criterion 88 considerations 89 customizing for slow conduction 90 definition 88 details about 96 parameters 88 programming 91 restrictions 90 size of device 4 Smart Auto Cap 15, 206 Smart Mode 139, 140 definition 353 details about 141 how to program 140 therapy selection 139 unsuccessful therapy count 139 software version required 34, 35 Stability criterion 97, 165 considerations 97 definition 97, 106, 353 details about 98 parameters 97 programming 98 starting and ending patient sessions 230 static magnetic fields 366 status bar 219 status indicators 351 sterile supplies 35 storage and handling avoiding shock 358 warnings 358 stored energy levels 10 surface area of device can 4 surgical incisions 39 [Suspend] button 60 suspended EGM recording 286 suspending detection 60 detection and therapy with a magnet 5 sustained high rate 16, 101, 102 suture holes 4 SVC (HVX) electrode 111, 113, 131 SVT episodes 283, 285 Limit definition 88 symbol, ER 332 symbols, programmer 384 synchronization definition 145 synchronizing cardioversion after charging 135 defibrillation without confirming VF 114 synchrony definition 200 system identification 301 overview 20 system evaluation tools Checklist 261 creating, editing, and deleting 263 using 262 key terms 264 Patient Alert monitoring system 253, 255, 259 alert schedule 257 event log 259 parameters 253 patient instructions 258 programming 258 Quick Look 251 observations 252 using 251 summary 250 system problems detection 347 device status indicators 351 overview 344 pacing 349 sensing 345 therapy 348 system tests Charge/Dump test 320 performing 321 EGM Amplitude test 318 parameters 318 Marquis DR 7274 Reference Manual 401 Index 402 performing 320 restrictions 319 Lead Impedance test 316 details 317 performing 316 Pacing Threshold test 313 parameters 314 performing 315 parameters 378 Underlying Rhythm test 312 performing 313 T tachyarrhythmia detection, see detection tachyarrhythmia therapy, see therapy tachycardia accelerated by an ATP therapy 125 TARP (Total Atrial Refractory Period) 161 definition 201 Task area 222 telemetry enhancements 14 Holter 218 temperature limits 359 temporary parameter values 27 termination, episode 84, 85 test charge 320 test values definition 322 testing charge time 205, 320 defibrillation operation and effectiveness 42 device capacitors 205, 320 lead impedance 316 pacing threshold 313 sensing and pacing thresholds 39 sensing performance via EGM Amplitude 318 underlying rhythm 312 therapeutic ultrasound 365 therapy 109, 145 aborting 327, 330, 333, 336, 340 aborting an emergency therapy 26 aggressiveness 123, 132 antitachycardia pacing 120 counters 275 defibrillation 110 considerations 111 parameters 110 emergency 26 aborting 26 buttons 27 Marquis DR 7274 Reference Manual cardioversion 28 defibrillation 28 delivering 26 effect on system 26 fixed burst pacing 29 parameters, temporary 27 VVI pacing 30 enhancements 16 key terms 143 manual therapies 340 parameters 371 solving tachyarrhythmia problems 348 suspended with magnet 5 verifying accurate detection 51 verifying appropriate therapy 51 thickness of device 4 threshold Pacing Threshold test 313 parameters 314 performing 315 sensitivity 149 time stamp memory 272 time, device clock 272 timeout charge circuit 351 Tool palette 224 Total Atrial Refractory Period, see TARP tracking definition 201 transvenous leads 37 trends Cardiac Compass 13, 14 lead performance 13 troubleshooting detection 347 device status indicators 351 overview 344 pacing 349 sensing 345 therapy 348 T-Shock induction 328 definition 342 details about 328 enhancements 17 how to deliver 328 Mode Switch operation after delivering 181 typical charge times 10, 11 U ultrasound, therapeutic 365 Index Underlying Rhythm test 312 performing 313 undersensing definition 201, 322, 353 upper rate 161 refractory periods 150 Upper Sensor Rate 181 DDD mode 150 definition 149 interval 161 Upper Tracking Rate 156 definition 155 use by date 359 V V. Sensitivity definition 61 programmable values 61 value selection 222 Varied setting, PVARP 160 ventricular cycle length regularity 94 Ventricular Rate Stabilization (VRS) definition 168 details about 178 how to program 178 Interval Increment definition 168 Ventricular Safety Pacing (VSP) 193 definition 155, 193 details about 194 how to program 194 switch rate 194 verify accurate detection 51 adequate cardiac support 169 effective bradycardia pacing 52 status of the implanted system 50 VF confirmation 115, 145 episode definition 106 event definition 106 inducing with 50 Hz Burst 329 inducing with T-Shock 326 spontaneous termination 116 therapy 110 therapy cancelled 117 VF detection 66 definition 106 details about 68 parameters 66 programming 68 restrictions 68 VF Detection Enable definition 66 VF Detection/Therapy Off alert definition 254 VF episode detecting 66 viewing 282 VF Interval considerations 67 definition 66, 106, 353 how to program 68 VF NID (number of intervals to detect) definition 66, 106 VF plus SVT, see double tachycardia VF therapy 110 considerations 111 details about 112 how to program 112 parameters 110 viewing live waveforms 221, 233 volume of device 4 VOO mode Patient Alert, definition 255 VT acceleration 87 definition 106 VT detection 70 and atrial pacing 165 definition 106 details about 72 Monitor setting 74 parameters 70 programming 72 restrictions 71 VT Detection Enable parameter, definition 70 VT episode detecting 70 viewing 282 VT episode, definition 107 VT event, definition 107 VT Interval definition 70, 107, 353 parameters 70 VT Monitoring 15, 74 definition 107 VT NID (number of intervals to detect) Marquis DR 7274 Reference Manual 403 404 Index definition 70, 107 VT plus SVT, see double tachycardia VT therapy ATP (Antitachycardia Pacing) therapies 120 considerations 122 details 124 how to program 123 parameters 120 cardioversion 130 considerations 131 details about 133 how to program 132 parameters 130 VT zone 288 V-V median 175 see also median interval 105 VVI and VVIR modes 166 VVI emergency pacing 30 W warning symbol, programmer 384 warnings accessories 359 avoiding shock during handling 358 battery depletion 359 commercial electrical equipment 366 concurrent pacemaker use 360 device implant and programming 359 dropped device 358 electronic article surveillance 366 explant and disposal 363 general 358 home and occupational environments 365 lead evaluation and connection 361 medical therapy hazards 363 diathermy 363 electrosurgical cautery 363 external defibrillation 364 high-energy radiation 364 lithotripsy 364 Magnetic Resonance Imaging (MRI) 364 Radio Frequency (RF) ablation 364 therapeutic ultrasound 365 patient follow-up testing 362 resterilization 359 storage and handling 358 waveform biphasic 114, 134 cardioversion 134 defibrillation 114 Marquis DR 7274 Reference Manual definition 248 Wenckebach operation 162 definition 201 width of device 4 Z zone merging 80 definition 107 World Headquarters Medtronic, Inc. 710 Medtronic Parkway Minneapolis, MN 55432-5604 USA Internet: www.medtronic.com Tel. 763-514-4000 Fax 763-514-4879 Japan Medtronic Japan Solid Square West Tower 6F, 580 Horikawa-cho, Saiwai-ku, Kawasaki, Kanagawa 210-0913 Japan Tel. 81-44-540-6112 Fax 81-44-540-6200 Medtronic USA, Inc. Toll-free in the USA: 1-800-763-4636 (24-hour consultation for physicians and medical professionals) Asia Medtronic International Ltd. Suite 1602 16/F, Manulife Plaza The Lee Gardens, 33 Hysan Avenue Causeway Bay Hong Kong Tel. 852-2891-4068 Fax 852-2591-0313 Canada Medtronic of Canada Ltd. 6733 Kitimat Road Mississauga, Ontario L5N 1W3 Tel. 905-826-6020 Fax 905-826-6620 Toll-free in Canada: 1-800-268-5346 Europe/Africa/Middle East Headquarters Medtronic Europe S.A. Route du Molliau CH-1131 Tolochenaz Switzerland Internet: www.medtronic.co.uk Tel. 41-21-802-7000 Fax 41-21-802-7900 Australia Medtronic Australasia Pty. Ltd. Unit 4/446 Victoria Road Gladesville NSW 2111 Australia Tel. 61-2-9879-5999 Fax 61-2-9879-5100 Medtronic E.C. Authorized Representative/Distributed by Medtronic B.V. Wenckebachstraat 10 6466 NC Kerkrade The Netherlands Tel. 31-45-566-8000 Fax 31-45-566-8668 *198482001* © Medtronic, Inc. 2002 All Rights Reserved UCX198482001 198482001 February 2002