1
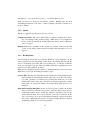
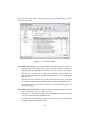
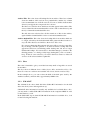
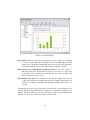
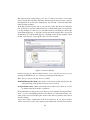
Arctor Version 3.6 Manual
Byteplant GmbH
Jun 3, 2011
Contents
1
Introduction
5
1.1
Arctor’s File-based Backup vs. Disk Image Backup . . . . . . . .
5
1.2
Why you should use Arctor . . . . . . . . . . . . . . . . . . . . .
6
1.3
Recommended Arctor configurations . . . . . . . . . . . . . . . .
7
1.3.1
Single PC installations . . . . . . . . . . . . . . . . . . .
7
1.3.2
Networked installations . . . . . . . . . . . . . . . . . .
7
Overview . . . . . . . . . . . . . . . . . . . . . . . . . . . . . .
8
1.4
2
Installation
9
2.1
System Requirements . . . . . . . . . . . . . . . . . . . . . . . .
9
2.2
Arctor Installation . . . . . . . . . . . . . . . . . . . . . . . . . .
9
2.2.1
Windows . . . . . . . . . . . . . . . . . . . . . . . . . .
9
2.2.2
Mac OS X . . . . . . . . . . . . . . . . . . . . . . . . .
10
2.2.3
Registering Arctor . . . . . . . . . . . . . . . . . . . . .
10
2.2.4
Uninstalling Arctor . . . . . . . . . . . . . . . . . . . . .
10
2.2.4.1
Windows . . . . . . . . . . . . . . . . . . . . .
10
2.2.4.2
Mac OS X . . . . . . . . . . . . . . . . . . . .
10
Updating Arctor . . . . . . . . . . . . . . . . . . . . . .
10
Getting Started . . . . . . . . . . . . . . . . . . . . . . . . . . .
11
2.3.1
Editing Backup Task Settings . . . . . . . . . . . . . . .
11
2.3.2
Editing Backup Archive Settings . . . . . . . . . . . . . .
13
2.3.2.1
Viewing Selected Files . . . . . . . . . . . . .
13
2.3.2.2
Viewing Selected File Sizes . . . . . . . . . . .
13
2.3.3
Running Backups . . . . . . . . . . . . . . . . . . . . . .
14
2.3.4
Restoring Files . . . . . . . . . . . . . . . . . . . . . . .
15
2.2.5
2.3
1
3
Using Arctor
17
3.1
How Arctor Works . . . . . . . . . . . . . . . . . . . . . . . . .
17
3.1.1
Modes . . . . . . . . . . . . . . . . . . . . . . . . . . . .
18
3.1.2
Backup Runs . . . . . . . . . . . . . . . . . . . . . . . .
18
3.1.3
Archive Files . . . . . . . . . . . . . . . . . . . . . . . .
19
Statistics and Information . . . . . . . . . . . . . . . . . . . . . .
19
3.2.1
Files . . . . . . . . . . . . . . . . . . . . . . . . . . . . .
19
3.2.2
Sizes . . . . . . . . . . . . . . . . . . . . . . . . . . . .
21
3.2.3
S.M.A.R.T. . . . . . . . . . . . . . . . . . . . . . . . . .
21
3.2.4
Disk Usage . . . . . . . . . . . . . . . . . . . . . . . . .
23
3.2.5
I/O . . . . . . . . . . . . . . . . . . . . . . . . . . . . .
23
3.2.6
Summary . . . . . . . . . . . . . . . . . . . . . . . . . .
24
3.3
Preferences Wizard . . . . . . . . . . . . . . . . . . . . . . . . .
24
3.4
Restore Wizard . . . . . . . . . . . . . . . . . . . . . . . . . . .
24
3.5
Using the Arctor Service (Windows) . . . . . . . . . . . . . . . .
26
3.6
Toolbar and Menu Commands . . . . . . . . . . . . . . . . . . .
27
3.2
4
Configuration
29
4.1
Archive Settings . . . . . . . . . . . . . . . . . . . . . . . . . . .
29
4.1.1
Name . . . . . . . . . . . . . . . . . . . . . . . . . . . .
30
4.1.2
Enabled . . . . . . . . . . . . . . . . . . . . . . . . . . .
30
4.1.3
Source Directory . . . . . . . . . . . . . . . . . . . . . .
30
4.1.4
Recurse Subdirectories . . . . . . . . . . . . . . . . . . .
31
4.1.5
Include/Exclude Filter Patterns . . . . . . . . . . . . . . .
31
4.1.6
Archive Directory . . . . . . . . . . . . . . . . . . . . .
31
4.1.7
Smart Backup . . . . . . . . . . . . . . . . . . . . . . . .
32
4.1.8
Compress Files . . . . . . . . . . . . . . . . . . . . . . .
33
4.1.9
Versions To Keep . . . . . . . . . . . . . . . . . . . . . .
33
4.1.10 Days To Keep . . . . . . . . . . . . . . . . . . . . . . . .
33
Backup Task Settings . . . . . . . . . . . . . . . . . . . . . . . .
34
4.2.1
Name . . . . . . . . . . . . . . . . . . . . . . . . . . . .
34
4.2.2
Scan Settings . . . . . . . . . . . . . . . . . . . . . . . .
34
4.2.3
I/O Limit . . . . . . . . . . . . . . . . . . . . . . . . . .
35
4.2
2
4.3
5
35
4.3.1
Archive Root Directory . . . . . . . . . . . . . . . . . . .
35
4.3.2
Verify Files . . . . . . . . . . . . . . . . . . . . . . . . .
35
4.3.3
Skip Locked Files . . . . . . . . . . . . . . . . . . . . .
35
4.3.4
Check Archive Timestamp . . . . . . . . . . . . . . . . .
36
4.3.5
Mail Notification . . . . . . . . . . . . . . . . . . . . . .
36
4.3.6
Start Minimized . . . . . . . . . . . . . . . . . . . . . .
37
4.3.7
Check For Updates . . . . . . . . . . . . . . . . . . . . .
37
4.3.8
Confirm Save . . . . . . . . . . . . . . . . . . . . . . . .
37
4.3.9
Detailed Logging . . . . . . . . . . . . . . . . . . . . . .
37
Backup Strategies
38
5.1
Locate Your Files . . . . . . . . . . . . . . . . . . . . . . . . . .
38
5.2
Choose Files to Backup . . . . . . . . . . . . . . . . . . . . . . .
39
5.2.1
Selecting Files by Extension . . . . . . . . . . . . . . . .
39
5.2.2
Selecting Files by Directory . . . . . . . . . . . . . . . .
40
Multi-User environments . . . . . . . . . . . . . . . . . . . . . .
40
5.3.1
Mac OS X . . . . . . . . . . . . . . . . . . . . . . . . .
40
5.3.2
Windows . . . . . . . . . . . . . . . . . . . . . . . . . .
40
5.3.3
Networked Installations . . . . . . . . . . . . . . . . . .
40
Scheduling Backups . . . . . . . . . . . . . . . . . . . . . . . . .
41
5.4.1
Long-Term Backups . . . . . . . . . . . . . . . . . . . .
42
5.4.2
Bare Metal Backup . . . . . . . . . . . . . . . . . . . . .
42
Pitfalls . . . . . . . . . . . . . . . . . . . . . . . . . . . . . . . .
42
5.5.1
File Name . . . . . . . . . . . . . . . . . . . . . . . . . .
43
5.5.2
File Time . . . . . . . . . . . . . . . . . . . . . . . . . .
43
5.3
5.4
5.5
6
Preference Settings . . . . . . . . . . . . . . . . . . . . . . . . .
Licensing and Contact Information
44
6.1
License Information . . . . . . . . . . . . . . . . . . . . . . . . .
44
6.1.1
Arctor Professional . . . . . . . . . . . . . . . . . . . . .
44
6.1.2
Arctor Enterprise . . . . . . . . . . . . . . . . . . . . . .
44
6.1.3
Arctor Enterprise Site . . . . . . . . . . . . . . . . . . .
44
6.1.4
Arctor Freeware . . . . . . . . . . . . . . . . . . . . . .
45
Ordering Arctor . . . . . . . . . . . . . . . . . . . . . . . . . . .
45
6.2
3
6.3
Support . . . . . . . . . . . . . . . . . . . . . . . . . . . . . . .
45
6.4
Copyright . . . . . . . . . . . . . . . . . . . . . . . . . . . . . .
45
6.5
License and Usage Terms . . . . . . . . . . . . . . . . . . . . . .
46
4
Chapter 1
Introduction
Arctor is an easy-to-use and powerful file-based backup solution that allows you to
utilize the most economical, reliable, and efficient backup media, such as hard disk
drives, memory sticks, or network attached storage devices. Providing immediate
access to backup files, Arctor can quickly and easily restore your data in the event
of accidental data loss due to damaged equipment, software upgrades, viruses, user
mistakes, hackers and theft.
Using Arctor, you are able to set up regular, unattended, automatic backups to
make sure your files are kept safe. Other than the most recent version of file,
Arctor also holds older versions readily available. Unless you choose to compress
(.zip) backup files, Arctor holds the backups in the same format as the original file.
1.1
Arctor’s File-based Backup vs. Disk Image Backup
Backup solutions fall into to categories: disk image backup and file-based backup.
Disk Image Backup A disk image backup (sometimes referred to as bare metal
backup) is a dump of the whole file system structure of a drive into a single,
very large file (this large file typically needs to be split into several smaller
files, so the operating system can handle them, or to store them on a set of
DVD recordables). Disk image backups are most useful in saving and restoring an entire system installation including hard disk partitioning data and
boot information. However, if the hardware configuration has been changed
since the time the disk image was made (note that a hard disk crash typically involves a change in the hardware configuration, as the faulty disk is
replaced by a new one), restoring a complete system from a disk image may
not work. Moreover, disk image backups are not incremental, which makes
them unworkable on a day-to-day basis: 99% of the data saved every day is
either unchanged or temporary. Restoring single files from a disk image is
5
tedious and inefficient: the backup software needs to search the entire disk
image to extract the needed file data.
File-based Backup File backups are done on individual files. Arctor saves files
only when its modification time stamp has changed to a later date than the
modification time of an existing backup in the archive drive. Thus, backups are always incremental and only minimal backup storage is required
even with daily backups. Arctor’s file-based backup also gives you another
advantage: you can find and access your backup files directly at any time
in your archive, without the need to scan numerous backup media or files.
With the smaller storage footprint of each day’s backup files, you can retain
more previous versions of your files, to safeguard against accidental deletion
or modification. File-based backup, however, is not well suited to backup
entire system installations, as there is no way to backup disk partition tables,
boot information, or operating system data.
1.2
Why you should use Arctor
While any software package installed on your computer system can be re-installed
easily from its installation media, your business data, your personal data and configuration files might be lost in the event of an operating system crash, a hard disk
crash or (even more likely) by accidental modification or deletion of files. Arctor
File Repository provides you with the following:
• Using Arctor’s Smart Backup Technology, previous versions of your files
or deleted files are available at your fingertips.
• Arctor does not use a proprietary archive file format. Archived files can be
accessed with the same tools you usually use.
• You can choose to backup your files to any connected storage device.
• The restore wizard lets you restore files or directories to a choice of previous
dates.
• Powerful purge options give you control about how long previous versions
are kept.
• Arctor offers the advantages of both full and incremental backups.
• Arctor backup solutions are scalable from small-sized single-user installations to enterprise-wide networked installations.
• Arctor optionally compresses archived files (.zip file format).
In short, Arctor should form the cornerstone of your backup strategy.
6
1.3
Recommended Arctor configurations
The best use of Arctor for you computer environment depends on the structure of
your network and on your requirements. This section lists a few example configurations.
1.3.1
Single PC installations
Second hard disk in your computer This configuration will help you to safeguard against accidental file deletion or modification, and two harddisks
rarely break down at the same time. However, both disks are still mounted
in the same computer case and may be damaged at the same time (i.e. water
damage, heat damage, etc.). Try to use disks of different manufacturers, or
at least different production lots.
External hard disk drive In this configuration the system disk and backup disk
are mounted in different cases and use different power supplies, reducing the
risk of simultaneous breakdown. Additionally, today’s external hard disks
have high-bandwidth cable or wireless interfaces, making access as efficient
and fast as if the hard disk was mounted internally.
USB flash drive USB flash drives at the moment are usually too small to hold all
your backups, but this is changing rapidly. Portability and ease-of-use make
them the ideal choice for data you may need to carry between your office
and home PCs.
You can take the external disk or USB flash drive with you when leaving the office
to keep your backups safe from theft or physical disaster at the office, and also use
it to copy files to your home PC, to keep it up-to-date with the latest data from your
office PC. Arctor’s Restore Wizard will assist you with this.
1.3.2
Networked installations
Networked-Attached Storage Network attached storage devices, basically a hard
disk drive or a RAID disk array with a network interface, together with Arctor make up the perfect backup solution for small company networks. In
this configuration, Arctor runs on every client PC to write backup data to the
storage device.
Networked Server You can also use a networked server with spare hard disk capacity (or a RAID array) as your backup solution. In this configuration, you
can either let the server fetch the backup data from the clients (Arctor runs
on the server), or let the clients write backup data to the server (Arctor runs
on every client).
7
In all network environments you have to take special care that the computers running Arctor have the necessary access permissions to read the files you want to
backup, and to write or delete files on the archive device or on the archive network
share.
1.4
Overview
Installation procedures and some troubleshooting tips are covered in Installation
(chapter 2). We recommend that you read Getting Started (section 2.3) to get an
impression of Arctor’s features and abilities.
The chapter Using Arctor (chapter 3) provides an introduction to Arctor and how
to use it. There is also a reference section about Arctor’s toolbar and menu commands, and a section covering unattended backups using the Arctor service.
Configuration (chapter 4) covers all of Arctor’s settings in detail.
Backup Stategies (chapter 5) offers help to identify files you need to backup, and
to decide upon the optimal backup strategy for your business.
See Licensing (chapter 6) for ordering and license details.
There are additional resources available online. Take a look at the FAQ list if you
are running into problems.
Byteplant support can also be contacted by email to [email protected].
8
Chapter 2
Installation
The installation section covers system requirements, Arctor install, uninstall and
update procedures, and a ’Getting Started’ section to give on overview of Arctor’s
usage.
2.1
System Requirements
Arctor requires the following minimum system configuration
• Windows 2000 or later, Mac OSX 10.4 (Intel) or later
• 128MB of RAM (or more)
• 10MB of hard disk space for Arctor’s installation files
• 800x600 screen resolution, 1024x768 or more recommended
2.2
2.2.1
Arctor Installation
Windows
Double click the distribution file and follow the step by step installation procedure.
You can cancel setup at any time by clicking the ’Cancel’ button.
If you want the option to run unattended backups, (while no user is logged in), be
sure to select the ’Arctor Service Program Files’ installation option. There is no
need to install this option right away, you can re-run the installation process at a
later time.
9
2.2.2
Mac OS X
Double-click the distribution file, and in the Window that appears, drag the Arctor
icon to the ’Applications’ folder.
2.2.3
Registering Arctor
To register Arctor choose ’Register’ from the ’Help’ menu, and enter the registration data you received when you purchased your licence using copy and paste.
Press the ’Register’ button and make sure the key is accepted. If your license data
is not accepted, make sure you entered the license key correctly.
To obtain a license key, please visit our online shop.
2.2.4
Uninstalling Arctor
The uninstall process will remove all Arctor files and resources, but will preserve
all backups and configuration files you created. If you want to remove these files
as well, please delete them manually.
2.2.4.1
Windows
You can uninstall Arctor in one of two ways.
• Choose ’Uninstall Arctor’ (located in the Arctor program group) from the
’Start’ menu. You will be asked if you want to ”completely remove Arctor
and all of its components.” Click ’Yes’ to continue with the de-installation
or ’No’ to cancel.
• Click the ’Add or Remove Programs’ icon in the Control Panel, and choose
Arctor. You will be asked if you want to ”completely remove Arctor and all
of its components.” Click ’Yes’ to continue with the de-installation or ’No’
to cancel.
2.2.4.2
Mac OS X
Open the ’Applications’ folder, select Arctor, and delete it.
2.2.5
Updating Arctor
You can update an existing installation by simply following the setup instructions.
There is no need to uninstall Arctor first. Uninstalling, re-installing or updating
Arctor always preserves your configuration files.
10
2.3
Getting Started
When you run Arctor for the first time, the Quickstart Wizard will help you configure your first backup archive.
In the first step you select a directory prefix, used when creating default archive
directory paths whenever you configure an archive. In the simplest case, this prefix
just points to the directory where your backup device is mounted. When using
Windows, in many cases this will be just a drive letter, while on Mac systems
external devices are usually mounted in the /Volumes/ directory.
In the next step, you can select a backup source directory. In the default configuration, a backup run will copy all files in the source directory to the archive directory.
You will notice that the archive directory setting is set automatically to a sensible
path, using the prefix you set in the previous step. There is no need for the archive
directory to actually exist, Arctor will create the directory as needed.
If you want to, you can setup email notifications in the next step, but you can also
do this later (just choose ’Preferences’ from the main menu).
At this point, you’er done setting up your first archive, and you may choose to run a
backup immediately. However, backing all files (for example including temporary
files such as an Internet browser cache) is wasteful, and you might want to refine
your settings a bit more before running a backup. In this case, remove the check
mark from the ’Run Fist Backup Now’ box, and proceed to finish the dialog.
Arctor’s main window will now show the task schedule overview to the left, and
the settings of the selected item to the right.
The toolbar allows you to to add or remove a backup archive or a a backup task.
The right view of the main form can be switched between different views. You can
edit settings, or view statistics charts and reports.
2.3.1
Editing Backup Task Settings
Backup tasks are used to organize archives, and to define the backup times for all
the archives it contains. You can access task settings and statistics by selecting a
task.
The scan settings set the scheduled backup times for archives in this task. Any
changes here are stored immediately, but the schedule is not active while you are
still viewing or modifying the configuration. For Arctor to run backups, you have
to choose ’Start Schedule’ from the tool bar or from the main menu, but don’t do
this just yet, while you still might want to change your configuration.
You can use drag and drop to move archives between tasks. One and the same
archive can appear more than once in different tasks (use ’Add Existing...’ to create another reference to an existing archive), which gives you the flexibility to
implement complex scheduling schemes.
11
Figure 2.1: Empty Arctor Main Window
Figure 2.2: Editing Tasks
12
Removing archives or tasks from the backup task schedule does not delete the
archive settings, or any backup data. You can later access archives again by using
the ”Add Existing Archive...” menu command.
2.3.2
Editing Backup Archive Settings
To enter or modify an archive’s settings, select the archive, and switch to the ’Settings’ tab. Archive settings define the source directory and name patterns of files
that you want to back up. You can also configure archive housekeeping settings,
such like the number of old versions of your files you want to keep.
While you have not yet saved your changes to a archive, you can use the ’Undo’
button to revert to the last saved state.
While playing around, you might notice that some settings are highlighted with a
light blue color when empty. You have to enter these values before you can save
the settings. When you try to save archive settings which are in an inconsistent or
invalid state, an error message will be displayed.
To create backups of directories that do not reside in the initial archive’s source
directory tree, use ’New Archive’ from the tool bar or main menu to create a new
archive.
2.3.2.1
Viewing Selected Files
Switch to the ’Files’ tab to see which files are selected by the source directory filter
patterns. Arctor will start scanning the source directory, which may take a few
moments. (How long this takes is in fact a good indicator how well you selected the
source directory: try to define the files you want to backup as narrow as possible.
A prerequisite for this is, of course, to the save valuable files in a disciplined way).
When finished, you will see a list of all the directories in the source directory and
the accumulated disk space used. You can switch this view to show file extensions
or file names. The ’Exclude’ button offers a quick way to add items to an archive’s
exclude filter patterns.
You can also switch the view to show all the files in the source directory not selected, or to show files already backed up (’Archive Files’). Finally, ’Archive Orphan Files’ are all files already backed up, but which do no longer match the source
file filter patterns. Orphan files can appear for example when you restrict the filter
patterns to exclude files already backed up in an earlier backup run.
2.3.2.2
Viewing Selected File Sizes
This view gives you an idea of the overall number of selected files per size bucket.
For example, if you do not expect a file in the range of 100MB or larger to be
13
Figure 2.3: View Selected Files
selected, and a bar appears over the 100MB label, you should check the filter patterns.
2.3.3
Running Backups
When you are satisfied with your file selection, press the Run Once button. This
will run a backup for the currently selected archive or task immediately. Once
Arctor has finished, you can view what Arctor has done. Press the ’Show Log’
button in the tool bar to bring up the log file viewer.
When you press the ’Start Schedule’ button in the tool bar, Arctor will leave the
configuration mode (the mode you are currently in) and start backup mode. In
backup mode, Arctor hides its main window and only displays an icon in the system
tray (Windows) or in the dock (Mac), while it silently runs backups. You can bring
Arctor back into configuration mode by clicking this icon.
You can also configure Arctor to run backups immediately after Arctor is started.
You can set this up in the preferences dialog (enable the ’Start Minimized’ setting).
Notes (Windows):
• Some Windows versions are configured to hide icons in the system tray. To
bring an icon back into view, click the small arrow near the system tray.
14
Figure 2.4: View File Sizes
• To run unattended backups, even when the Arctor application is not running,
and/or no user is logged in, you need to run backups using the Arctor service.
Choose ’Run As Service’ from the ’File’ menu to enable the Arctor service.
2.3.4
Restoring Files
Arctor’s Restore Wizard helps you to restore single or multiple files from an
archive. To open the Restore Wizard, click the ’Restore’ button.
The first step in restoring files is to select an archive directory from which to restore. The archive directory of the currently selected archive is preselected.
The second step is to select the directory to which Arctor will restore the files.
Finally, a directory tree is displayed and can be used to select file versions, or even
entire directories to restore. You can select a date to restore file versions from a
specific date. The ’Snapshot Date’ box offers all the likely choices.
On the next page, the Restore Wizard allows you to start the restore process by
pressing the ’Finish’ button, or to cancel by pressing the ’Cancel’ button.
There are two options you may choose to enable:
Modified/Missing Files Only Files in the restore directory that already carry the
same timestamp as the archived version are not restored.
15
Figure 2.5: Restore Wizard
Prompt On Overwrite When a file already exists in the restore directory, you are
prompted if the file should be overwritten.
Be careful when restoring to the source directory: If you disable ’Prompt On Overwrite’, or if you accidentally pick the wrong button, you may inadvertently overwrite a newer version already in place in the source directory with an older version
from the archive.
Arctor never deletes existing files in the restore directory. If you want to make a
’clean’ start, restore to the source directory, but rename the source directory before
starting to restore. You may later realize that you still need some files from the
renamed directory.
16
Chapter 3
Using Arctor
This section provides an overview of how Arctor works,and how to use the Arctor.
There is also a complete reference of Arctor’s toolbar and menu commands.
3.1
How Arctor Works
Arctor groups backups into archives and tasks. Each archive defines a source directory, defining the files that should be backed up, and a target directory, where the
backup files are stored. Usually you choose the root directory of a project as the
source directory, or your home directory, with the archive directory residing somewhere on the backup media (which might be a backup hard drive, or a network
share mounting a remote storage device).
Each archive handles only files from within a single source directory (or single
source directory tree). When a backup is executed (or ”run”), Arctor places a copy
of all the selected files that have been modified since the last backup in in the
archive directory.
The most important settings of archives are:
• a source directory, where the files you want to backup reside,
• a set of file filter masks that define the file types or subdirectories that should
be included,
• an archive directory, where the backup files are stored,
• and additional options that define if and how older backups of files should
be kept.
This can be summarized as follows:
17
One archive — one source directory tree — one archive directory tree.
Tasks can be used to group several archives together. Backup tasks also hold
scheduling information: how often, or when a backups should be executed for a
group of archives.
3.1.1
Modes
The Arctor application is always in one of two modes:
Configuration mode The Arctor main window is displayed which allows entering or modifying backup archive settings. While Arctor is in configuration
mode, no files are backed up, and if enabled, the Arctor Service (Windows
only) is stopped.
Backup mode Arctor is hidden in the system tray (usually in the bottom right
corner of your desktop) and executes the backup tasks and archives you configured.
3.1.2
Backup Runs
Arctor backups are run by the Arctor Service (Windows, only if enabled), or by the
Arctor application itself. Depending on this choice, the backup will run with the
service’s credentials (user name and access permissions), or with the credentials
of the user currently logged in. This may make a difference regarding the access
permissions on files and network shares.
Whenever the scheduled execution time for a backup archive has arrived (or when
’Run Once’ is pressed), the backup itself takes 3 steps:
Scan for Files The first step when Arctor runs a backup is identifying files matching the include and exclude filter masks. Arctor first scans the source directory (and, optionally, its subdirectories) for files that match any one of the
include filter masks. After that, these files are matched against the exclude
filter masks. If a file name matches any exclude filter mask, the file is not
included.
Find and Backup Modified Files In the second step Arctor checks the archive
directory and tries to find the same version of that file. If the same version is
found in the archive, Arctor extends the valid date of that file version to the
current date and time. If it is not found, the source file is archived. In this
step, Arctor keeps all of its housekeeping information coded in an archive
file’s name, eliminating the need for a separate backup database, and thus
eliminating a number of consistency problems.
18
Purge Files In the final step, archive file versions are deleted depending on a number of possible settings:
• Because too many versions of a file are in the archive (depends on the
Versions To Keep setting)
• Because a file version is too long out-of-date (Days To Keep setting).
• Because Smart Backup requires it
The initial backup run of an archive is always a full backup. All subsequent runs
are incremental backup runs and are much less time consuming. If you run backups
during working hours, and feel that operation of your computer or the network is
impaired (e.g. sluggish response) while the backup is running, you may consider
limiting the I/O bandwidth in the task settings.
3.1.3
Archive Files
Arctor uses the source file name as the first part of the archive file name. This is
followed by internal Arctor information, and ends with the file extension .arf (or
.zip if the archive uses compression).
If you want to take a peek into an .arf archive file, you can do so. What you will
see is that Arctor does not change anything other than the filename. To restore a
file, you can copy it elsewhere, and cut off the file name part added by Arctor. You
can now typically open the file immediately by double-clicking it, invoking the
default application associated with this type of file. Don’t ever change or rename
files in the archive directory directly: The internal information part of the filename
is vital for Arctor to find different versions and match them against source files. If
you have the appropriate archive tools installed, you can open .zip archive files
directly by double-clicking them.
Archive files can always be restored manually. Arctor does not use a proprietary
file format, so you can copy any file from the archive directory to where you want
it, and open it with the application that was used to create it (i.e., Microsoft Word).
3.2
Statistics and Information
For archives and tasks different sets of informational views are available, designed
to help you set up and maintain backup archives.
3.2.1
Files
The Files tab is available for archives only. It can show 4 different views of files
(Source Files Selected, Source Files Not Selected, Archive Files and Archive Or19
phan Files). For each of these views three subviews are available: Directory, File
Extension, File Name.
Figure 3.1: View Selected Files
Source Files Selected This view shows all files selected in the source directory.
The file name must match at least one Include Filter Mask, and must not
match any Exclude Filter Mask, as defined on the Settings tab of an archive.
The Directory subview shows directories containing selected files, how
many selected files there are, and the accumulated size of all selected files in
that directory.
The File Extension subview lists all file extensions that appear, again with
the number of selected files with that extension, and the accumulated size.
You can use the Exclude button to add items to the exclude filter patterns on
the Settings page.
Source Files Not Selected This view shows all files not selected in the source directory (the inverse of Source Files Selected).
The Directory subview shows directories containing files that aren’t selected,
complete with count and accumulated size.
The File Extension subview lists all file extensions of files not selected, again
with file counts and accumulated size.
20
Archive Files This view shows all backup files in an archive. The Count column
shows the number of file versions for a particular file, and the Size column
is the accumulated size of all file versions. If some or all files in the archive
directory are zipped, the compressed size is shown.
The Directory subview shows the directories that appear in the archive. The
Count column lists the accumulated file version count for that directory, and
the Size column the accumulated file sizes.
The File Extension subview lists all file extensions of files in the archive,
again with the accumulated file version count and accumulated size.
Archive Orphan Files This view shows the backup files in an archive which are
no longer selected by the include/exclude filter patterns defined on the Settings tab. The subviews are similar to the Archive Files view.
If you never change the filter patterns, this page will not ever show any files.
If you change your filter patterns to be more restrictive, backup files will
appear here that were saved during earlier backup runs, but are no longer
included in backups. You can use this to check the changes you made to the
filtering patterns, or to find (possibly large) backup files you do not want to
keep. In the file name subview, you can use the Delete button to delete all
versions of the selected archive orphan file.
3.2.2
Sizes
This view is intended to give you an idea how many small or large files are stored
in an archive.
The Sizes shows 2 different views of files (Source Files, and Archive Files). For
these two views two subviews are available: File Count, and Accumulated Size.
In the example above, you can see that the bulk of the disk space used by the
Archive is taken by mid-size files, approximately 1MB in size.
3.2.3
S.M.A.R.T.
The S.M.A.R.T. tab shows hard disk drive S.M.A.R.T. information for the disk
drives involved (source and target directory).
S.M.A.R.T. drive information is usually only available for local disk drives. Also,
you may need to enable S.M.A.R.T. information in the computers BIOS in order
for this feature to work.
In the S.M.A.R.T. report, check if S.M.A.R.T. information is available. If so, look
for the following information:
21
Figure 3.2: View File Sizes
Drive Status The drive status should be displayed as OK. Otherwise, something
is wrong, and the explanation should be found in the S.M.A.R.T. attribute
listing below. Check if the Prefail flag values are well above the thresholds.
If any Prefail value is below, Drive Status will be signaled as failure.
Reallocated Sectors Count, Reallocated Event Count If the disk surface is
damaged, hard drive automatically re-allocates bad sectors to spare areas
on the disk surface. An increased count indicates there was a problem, and
this problem may still be present.
Drive Temperature High drive temperatures translate into higher wear and tear
on the drives lubricants, bearings and electronics. Healthy temperatures are
well below 50 degrees centigrade, though higher temperatures may be acceptable.
Unfortunately there is little else that can be said in general, as hard disk drive vendors use different fields in different ways. However, you should be watching out for
changes, which can indicate a problem, and when in doubt, consult documentation
and other resources provided by the vendor your hard disk.
22
3.2.4
Disk Usage
The Disk Usage tab can show you how the disk space used by an archive develops
over time. The view can be switched in different ways:
Display Value Choose either Disk Usage (Archive) or Selected Files (Source).
Display Type Choose either File Count or Size, to switch between a file count
display, or a disk space usage display
Time Range The <auto> time range setting displays all available data, up to one
year back. You can also choose shorter ranges.
Figure 3.3: View Disk Usage
3.2.5
I/O
The I/O display shows the disk I/O activity of Arctor over time. The display can
be switched in different ways:
Display Value Choose either Archive Files (Read/Write) or Source Files
(Read/Write).
Display Type Choose either Files/second or Byte/second
23
Time Range The <auto> time range setting displays all available data, up to one
year back. You can also choose shorter ranges.
3.2.6
Summary
The Summary tab shows summary information for either a single archive, or for
an entire task. The summary information includes file count, average file size, and
other information, for both source and archive files.
3.3
Preferences Wizard
Choose ’Preferences’ from the ’File’ menu to bring up the preferences wizard.
Note that your changes will take effect only after you left the wizard with the
’Finish’ button on the last page.
Here a some of the settings available (for a complete list, see the next section):
Archive Directory Set up a directory where all the backup files should go. In the
simplest case, this can be the drive letter specifying your archive drive. This
setting is used to preset the target directory in newly entered archive with a
default.
Mail Notification Arctor can be configured to send an email whenever a backup
run has finished. The settings apply both to the Arctor Service (if installed),
and to the Arctor application when it is in backup mode (minimized to the
system tray).
3.4
Restore Wizard
Arctor’s Restore Wizard helps you to restore single or multiple files from the
archive. To open the Restore Wizard, press the ’Restore’ button in the Toolbar.
The Restore Wizard will guide you through the restore process.
The first step in restoring files is to select an archive directory from which to restore. The archive directory of the currently selected archive is pre-selected. Proceed with the Next button.
The second step is to select the directory to which Arctor will restore the files.
If you want to restore the files directly to the source directory, check Restore to
Original Location.
Once you have selected your directory, you can choose the files to restore on the
next page.
24
The Snapshot Date setting allows you to choose a date if you want to restore files
from a specific date and time. The dates displayed in the Snapshot Date selection
field depend both on the times when Arctor was run and on the time when files
where actually modified.
In the Explorer-like window below, you can choose files and directories individually. If any file is selected within a directory, a check mark appears on that directory. By clicking on a directory you can either deselect everything it contains (the
check mark disappears), or select the version valid at the snapshot date of every file
in that directory (a check mark appears). Clicking on files works similarly, either
the file is de-selected, or the snapshot date version is selected.
Figure 3.4: Restore Wizard
On the next page, the Restore Wizard allows you to start the restore process by
pressing the Finish button, or to cancel by pressing the Cancel button.
There are two options you may choose to enable:
Modified/Missing Files Only Files in the restore directory that already carry the
same timestamp as the archived version are not restored.
Prompt On Overwrite When a file already exists in the restore directory, you are
prompted if the file should be overwritten.
Be careful when restoring to the source directory: If you disable ’Prompt On Overwrite’, or if you accidentally pick the wrong button, you may inadvertently overwrite a newer version already in place in the source directory with an older version
from the archive.
Arctor never deletes existing files in the restore directory. If you want to make a
’clean’ start, restore to the source directory, but rename the source directory before
25
starting to restore. You may later realize that you still need some files from the
renamed directory.
3.5
Using the Arctor Service (Windows)
A service is a special type of program that can be run under the system account
without user interaction. Therefore, a service can be run even when no one is
logged on, and will continue to run, even when you log off (of course, the computer
must not be powered off).
If you want unattended backups on your server, you need to enable the Arctor
Service. Running the Arctor Service requires a valid Enterprise or Trial license.
To enable the Arctor service, choose ’Run As Service...” from the ’File’ menu.
You will be asked to enter the password of your account, and the Arctor service
will use your account when running backups. If the service is already enabled, a
check mark will appear next to the ’Run As Service’ menu item.
If you decide to stop using the Arctor service, choose ’Run As Service...’ once
more from the file menu to disable the service.
Enabling or disabling the Arctor service requires administrator privileges, so be
sure to run Arctor with administrator privileges (Windows Vista/2008 or later).
The Arctor application will manage the Arctor service as follows:
• The Arctor service always loads and uses the profile of the user that enabled
the service, and run with this user’s credentials when accessing files on local
disks or on remote network shares.
• When Arctor is started, and the Start Minimized option is unchecked, the
service will be stopped. This eliminates the possibility of unfinished configuration changes interfering with the operation of the service.
• When Arctor is minimized to the system tray, the Arctor service will be
restarted to run backups as scheduled. Likewise, when Arctor returns from
the system tray, the service will be stopped.
• When you exit the Arctor application, the service will be automatically
restarted (if it is not running already), and run backups as scheduled.
• Starting and stopping the service will only work if the user has sufficient
access rights, otherwise Arctor will display an error message. On Windows
Vista/2008 or later, be sure to run Arctor with administrator privileges.
26
3.6
Toolbar and Menu Commands
This section lists Arctor’s toolbar and menu commands in alphabetical order.
Add Existing... Adds a reference to an existing archive to the currently selected
task. One and the same archive can be referenced more than once from the
same profile, or from different profiles.
Add Task Adds a new, empty task.
Add Archive Adds a new, empty archive to the currently selected task. Use Duplicate Archive if you want to copy an existing archive (including its filter
pattern settings etc.).
Cancel Interrupts the current activity.
Duplicate Archive Creates a copy of the currently displayed archive. This is useful for example to get started with a new archive, while using another archive
as the template for the filter pattern settings. Note that the copy is slightly
different from the original: it is automatically renamed, and the archive directory is changed accordingly. Duplicating an archive does not copy the
backup files stored in the archive directory.
Exit Exits Arctor. No more files will be backed up, unless the Arctor service is
installed.
Preferences... Opens the Preferences Wizard.
Quickstart... Opens the Quickstart Wizard.
Remove Task Removes a task, and all the references to archives within. No files
are deleted, see Remove Archive.
Remove Archive Removes an archive from a task. Removing an archive does not
delete its settings file or any backup files already created. You can later add
the archive again by using Add Existing.... If you want to free the disk space
of the files archived with that archive, delete its archive directory and all files
within manually.
Restore... Opens the Restore Wizard.
Run As Service... Enables or disables the Arctor service.
Run Once Runs a backup of the currently selected archive or task. The backup run
is not done as a background process, you can interrupt execution by pressing
Cancel. When running a backup task, disabled archives will be skipped.
When backing up a single archive, the backup will be executed, even if the
archive is disabled.
27
Apply Save settings changes to the currently archive. Note that Arctor won’t let
you save incomplete or invalid settings. Check the message displayed to see
what is wrong, fix it, and try again.
Show Log Display Arctor’s log file.
Start Schedule Make Arctor enter backup mode. This minimizes Arctor to the
system tray.
Stop Leave backup mode if Arctor is in the system tray, and show the configuration window.
Undo Undo any changes to the currently displayed archive.
28
Chapter 4
Configuration
Arctor’s configuration is stored in two plain text configuration files Arctor.ini,
and Arctor.cf. Before a file is overwritten, Arctor creates a backup copy of
every file changed during a session. If anything goes wrong, you can easily restore
settings by renaming the backup file. All configuration files can be viewed or edited
with a standard text editor, should the need arise.
The Arctor.ini file holds settings that control user interface appearance and
defaults.
The backup profile Arctor.cf holds a list of backup tasks and backup archives.
The backup archives specify which files to back up, and where they are archived.
The backup archives are grouped into tasks. Tasks also hold the scheduling information: how often or at what time backups are run.
The profile does not store the archive settings, but only a reference where the
archive settings and the backup files are located. When an archive is not online,
the profile will continue to keep the reference, but its status will be reported as
unknown.
The file location depends on the operating system and on the operating system version. Use Explorer/Finder to search for these files in your account’s home directory.
Every user has his own version of the Arctor Arctor.cf and the Arctor.ini
files.
Finally, for every archive there is a settings file containing information about which
files to back up, and where they are found. Archive settings are stored in the archive
target directory, and named Arctor.rule.
4.1
Archive Settings
Backup archives define files within a single source directory (or single source directory tree) to be backed up. The backup copies of the source files are placed in
29
the archive target directory.
Figure 4.1: Archive Settings
4.1.1
Name
The archive name is intended to help you to identify which files an archive includes,
so choose a telling name. The name will be displayed in the overview on the
left side of Arctor’s main window, and it will be used to create a default archive
directory name.
You must specify an archive name in order to be able to save the archive settings.
4.1.2
Enabled
Unchecking this field excludes an archive from automated backups. You can reenable an archive by checking this field again.
Both the Run Once and Run Group Once commands run a backup regardless of
whether the archive is enabled or not.
4.1.3
Source Directory
Choose a valid source directory here, either by entering the directory name directly,
or by selecting a source directory using a dialog opened by pressing the folder
30
button to the right of the source directory input field.
You must specify a source directory to be able to save the archive settings.
4.1.4
Recurse Subdirectories
Check Recurse Subdirectories if you want files in subdirectories of the source directory included.
4.1.5
Include/Exclude Filter Patterns
This input fields allows you to enter any number of file name filter patterns. A file
is included in backups if
• the filename matches any include filter pattern, and
• the filename does not match any exclude filter pattern.
You can use the wildcard characters * and ?, where * stands for any number of
any character, and ? for one arbitrary character.
You must specify at least one include filter mask, otherwise you will not be able to
save your settings. The default include filter mask (*) includes each and every file
in the source directory. (Note that the *.* filter mask will not include files that
lack a file extension, e.g. README).
Both include and exclude filter masks may contain the path delimiter character (\).
You can use this to specify subdirectories. However, unless Recurse Subdirectories
is checked, subdirectory specifications will not have any effect.
You can test your include/exclude filter pattern settings by switching to the Files
tab. You will be presented with a dialog showing a view of the directories included
and the disk space they use. You can switch this view to show files or file extensions. Use this dialog to refine your exclude filter mask: Select the item you want
to exclude, and add it to the exclude filter mask by pressing the Exclude button.
4.1.6
Archive Directory
When creating a new archive, Arctor will have preset this field with a default directory name created using the archive root directory (you can set this using Arctor’s
Preferences Wizard), the backup task name, and the backup archive name. You
may want to choose another directory. Once you have chosen a directory, Arctor
will display the free disk space on the drive that the selected directory resides on.
If the archive directory does not exist, Arctor will prompt you if the directory
should be created once you save your changes.
31
You must specify a archive directory in order to be able to save your settings. No
two archives may use the same archive directory.
There are some caveats you should be aware of:
• If you change the archive directory of an existing archive, Arctor needs to
move the archived files as well. This is a constant time operation, as the
directory is simply renamed. However, it is not possible to rename files if
different disk volumes are involved. Instead the archive must be copied,
which may take a lot of time, depending on the archive size. For this reason,
this method of changing the archive directory to a different drive will not
work.
If you want to move an archive to a different volume, copy all files manually,
and use the Add Existing... command to add the copied archive to your Arctor
profile.
• Caution: The directory trees of each backup archive must be distinct — the
archive directory may not be contained in any other archive’s target directory tree. Otherwise, files from different source directories will get mixed
up in the same directory, and different purge settings for different archives
can interfere with each other. The best way to avoid this kind of mixup is to adhere to the proposed naming convention for archive directories:
<archive root>\<task>\<archive>. You can set the archive root
directory in the Preferences Wizard.
• To avoid infinite recursion, the archive directory must not be part of the
source directory tree. If you enter an archive like this, Arctor will not let
you save it.
4.1.7
Smart Backup
Check this if you want smart backup enabled. Smart Backup could be more aptly
named smart purge, as this is exactly what it does: purge aging files from the
archive, with a smart algorithm that conserves disk space but still enables you to
retrieve older versions of your files.
Smart Backup will make sure that your archive always contains:
• all intra day backups made in the last 24 hours
• one daily backup for every day one week back
• one weekly backup for one month back
• one monthly backup for one year back
32
• one yearly backup for as long as you wish (configurable in the Days To Keep
setting)
When restoring a file, saved with Smart Backup, you will be able to choose from
these versions. Keep in mind, though, that Arctor will not create backups if a file
hasn’t changed. So if a file was not changed during your last vacation, there will
not be a different backup file version for this period (after all, the earlier version
was still valid at this time).
Smart Backup can be combined with the other purge options (Versions To Keep and
Days To Keep. For example, Smart Backup combined with a Days To Keep value
of 365 will keep backups only for the last year, and no yearly backups at all.
4.1.8
Compress Files
Check this if you want the archive files compressed. Each file, when backed up,
is saved into a ZIP-archive. The compression factor depends on the type of data
compressed. Typically, compressed files are about 2 to 4 times smaller than uncompressed.
This option makes backup runs more CPU intensive, but can reduce network traffic
when the archive directory is on a network share.
Some operating systems allow you to turn on compression for local disk drives. In
this case, there is no need for you to activate Arctor’s compression. Also, there
is no need to compress files already compressed (for example *.zip archives,
images, video or audio files.
4.1.9
Versions To Keep
This option makes sure that no more than the specified number of versions of a
single file is kept at the same time in the archive. When the limit is exceeded, the
oldest version of a file is purged.
4.1.10
Days To Keep
This option purges any file from the archive that has been deleted or replaced by
another version for longer than the number of days specified.
When using Days To Keep, deleted files are purged after a certain number of days.
Otherwise, if the original file in the source directory has been deleted, the archived
versions of that file are never purged, they are kept indefinitely.
33
4.2
Backup Task Settings
Backup tasks hold the scheduling settings for a group of backup archives. You can
access the task settings by selecting a task and switching to the settings tab.
Figure 4.2: Task Settings
4.2.1
Name
The name is intended to help you to identify at a glance what a task does, so choose
a telling name. The task name will be displayed in the overview on the left side
of Arctor’s main window, and it will be used to create a default archive directory
name.
4.2.2
Scan Settings
The scan settings specify at what times Arctor should schedule backups for all the
archives in a task. Three settings are available:
Interval Backups are executed whenever a number of seconds has elapsed since
last time the task was run. With this mode you can create intra day backups.
34
Time-of-day Backups are run at a certain time. Enable ’Retry Missed Schedules’
to run the backups after power-up if your system was powered down at the
scheduled time.
On Request This setting, in effect, disables the task. Backups can only be run
manually using the ’Run Once’ menu command.
4.2.3
I/O Limit
When backing up files over a network, Arctor’s I/O demands can happen to max
out the available network bandwidth, slowing down other services using the same
network resources. If you run backups during the day, it may be useful to limit the
I/O bandwidth used by Arctor.
The bandwidth limit can be either turned off, or adjusted in a range of 1MByte/s to
100MByte/s.
4.3
4.3.1
Preference Settings
Archive Root Directory
Whenever you set up an archive, Arctor will generate a default archive directory
name based the archive root directory, on the task name and on the archive name.
This setting can be just a backup hard drive specification such as D:\.
When editing archive settings, you can always override the target directory generated by default.
4.3.2
Verify Files
Check this if you want to be sure that each and every archived file is exactly the
same as its original.
This option makes backups more time-consuming. This option may also generate
an error message if a file is being modified during backup.
4.3.3
Skip Locked Files
Windows version only: Check this option to automatically skip any locked files
(files in use and exclusively opened by another process). Typical examples for exclusively opened files are the Windows registry files such as NTUSER.DAT, which
are permanently locked and not readable.
There is no need for this setting on other platforms, because files cannot be exclusively locked in all operating systems but Windows.
35
4.3.4
Check Archive Timestamp
When this option is checked, Arctor will not back up a file when a newer version
is already found in the archive, instead an error message will appear.
If this error appears, it usually indicates that something is amiss. Possible reasons
include poorly synchronized clocks, or simply a wrong clock setting, or someone
restored an older version of a file, without adjusting the modification time.
When you encounter this problem, check the system clock. You may also need
to either adjust the modification time of the file(s) in question. You can also disable this option, run the backup in question again, and re-enable ’Check Archive
Timestamp’ afterwards.
4.3.5
Mail Notification
Arctor can be configured to send an email whenever a backup run has finished, either always, or only if at least execution of one backup has failed. The mail settings
apply both to the Arctor service and to Arctor itself (when in backup mode).
To use this feature, you have to configure the SMTP server and the email addresses
to use.
Figure 4.3: Preferences Wizard
You can test your settings by clicking the Test button.
36
4.3.6
Start Minimized
Arctor normally starts displaying its main window (configuration mode). If you
want Arctor to immediately start hidden (backup mode), ready to execute any
scheduled backup tasks, check Start Minimized. If the backup interval setting is
interval mode, Arctor will begin to backup files after a short grace period.
You can start Arctor in backup mode at system boot.
• If you are using Mac OS X, start Arctor, right click on its dock icon, and
choose ’Options’ -¿ ’Open At Login’.
• If you are using Windows, create a shortcut for Arctor in the AutoStart folder
of your start menu, and check Start Minimized (Windows XP/2000/2003).
To run Arctor at system boot with admin privileges, you need to use the task
scheduler (Windows Vista/2008 or later).
4.3.7
Check For Updates
You can set up Arctor to automatically check for updates over the Internet whenever it is started. It is highly recommended you leave this option checked to stay
informed about important updates.
4.3.8
Confirm Save
Whenever you switch to view another archive while the archive settings have been
changed, you will be prompted to confirm or undo your changes. To prevent this
warning from appearing, uncheck the Confirm Save Change option. Any changes
to your archive settings will be automatically saved. With either setting, Arctor
will not allow you to save incomplete or invalid settings.
4.3.9
Detailed Logging
The Detailed Logging option increases the verbosity of messages in Arctor’s log
file (Arctor.log in the installation directory). Use with caution, as the generated logs can grow fast. This feature can be very useful to debug your archive
settings whenever something happens you do not expect.
Arctor’s log file is automatically cycled whenever its size exceeds about 10MB.
The old log file is preserved (Arctor.log˜).
37
Chapter 5
Backup Strategies
You first need to identify the files you have to backup, and then decide upon a
backup strategy.
5.1
Locate Your Files
Regardless of your operating system, check each and every application you use,
and think about what data might need safe keeping. Look for the not so obvious,
long forgotten data that you once worked upon (for example an address book or
document templates).
Always remember what projects you a working on, and were you put the files for
that project. Take note of file locations, applications, projects and dates.
If you are using Mac OS X, a user’s files can be found in his or her home directory,
and sometimes in the /Users/Shared directory.
Finding your files in a Windows environment used to be a challenging task, because you could never be sure were an application would store its configuration
or data files. For once, things have been getting easier with the arrival of Windows 2008/Vista. For the first time in the history of Windows, your files and
your application settings can now usually be found in a directory tree named
C:\Users\<name>, in all language editions of Windows.
In
Windows
2000/2003/XP,
look
for
a
directory
called
C:\Documents and Settings\<user name>\ or whatever the local translation might be. A sure way to find your home directory is to look up the
shell folders for the user currently logged in. Run the the windows registry editor
(regedit) and search the following key:
[HKEY_CURRENT_USER\Software\Microsoft\Windows\
CurrentVersion\Explorer\Shell Folders]
38
On Windows 2000/XP/2003 it can be also a good idea to take a peek into the
C:\Documents and Settings\All Users\ directory and see what is
stored there.
Other applications used to store some or all of their files in their installation directory, somewhere in the C:\Program Files\ directory tree (or its localized
name). Windows Vista or later remaps files created here to the C:\Users\ directory tree.
A user’s home directory in Windows is usally cluttered with things like ’Temporary
Internet Files’ (the Internet browser cache) and the like. Be sure to exclude these
files from backup, they just use up disk space and slow down backups.
5.2
Choose Files to Backup
For each archive, use the ”Show Files” dialog to verify selected files.
Avoid backing up temporary files, such as the Internet browser cache. Temporary
files can consume lots of disk space, and there is no point in backing them up.
Check the TEMP and TMP environment variables to find out where the system
temporary directory is located.
For files changed frequently, make sure the Smart Backup option is checked. This
makes sure that the number of versions in your archive directory doesn’t grow
without bounds, and it still gives you the option to restore either from intermediate
or from very old versions.
If you are backing up someone else’s files, talk to him about what files are needed
and what files aren’t. Sometimes the largest files, taking up most disk space, are
either temporary, or can be easily recreated from other files.
Once you think you have all interesting files selected, switch your display to all the
files which are excluded from backup, and make sure you didn’t leave something
worthwhile aside.
5.2.1
Selecting Files by Extension
When setting up your include/exclude patterns using file extensions, it is usually
a good idea to have rather broad include definition, while keeping the exclude
patterns detailed and specialized. An example for this is using the * include pattern
(all files), and exclude patterns that only deselect some specific file extensions you
know you never need to restore, such as .tmp, or .obj. This way files with new
extensions will be automatically backed up as the appear.
39
5.2.2
Selecting Files by Directory
Like with extensions, it is a good idea to have a broad include file specification,
and specifically exclude directories, such as tmp/. The trailing slash (Windows:
backslash) is needed to define the pattern as a directory.
You can also use directory specifications as include patterns. To create an archive
of the home directory of the two users Alice and Bert, you can use /Users/ as the
source directory, and the patterns alice/* and bert/* to include only Alice’s
and Bert’s files.
However, it is more flexible to setup separate archives.
5.3
5.3.1
Multi-User environments
Mac OS X
In Mac OS X, every user can run his or her own instance of Arctor. Be sure to
use different archive directory trees for different users, as some validation checks
will not be enforced: For example, you must be cautious never to nest archive
directories for different archives, because backups might be overwritten, and the
purge settings for the two archives will interfere with each other.
5.3.2
Windows
The Windows version of Arctor only allows a single instance to run. So in Windows, if there is more than one user logged in at a given time, you need to run the
Arctor Service instead, taking care of the backups for all users.
It is best to configure Arctor using an administrator account, and with Windows
Vista or later you need to run the Arctor application with admin privileges in order
to configure, start or stop the Arctor service.
Make sure that the service runs with an account that has access permissions to all
source directories, and both write and delete permissions for the archive directories.
If you use the Arctor service, all validation checks are in place, so you will get an
error message when you try to setup nested archive directories (see the Mac OS X
section). However, special care has still to be taken in a networked installation.
5.3.3
Networked Installations
When using Arctor in a network, you can choose between installing Arctor on
every computer, or installing Arctor only on a server.
40
• In the first case, every client computer uses Arctor to write its backup data
to the archive device. You have to make sure you are using different archive
directory trees for different users and different computers, as some validation checks will not be enforced. You must never nest archive directories
for different archives, because backups might be overwritten, and the purge
settings for the two archives will interfere with each other.
There is no need to run any additional software on the archive device, you
can use any storage device you can connect to.
• In the latter case, you should use some kind of Windows Server where you
can install the Arctor service. The Arctor service will always run in the background and fetch backup data from the client computers over the network.
There is no need to install any software on the client computers.
In all network environments you have to take special care that the computers running Arctor have the necessary access permissions to read the files you want to
backup, and to write or delete files on the archive device or on the archive network
share.
You should also consider disabling the bandwidth-consuming option ’Verify’.
Also, you can set an I/O limit if Arctor’s traffic is using too much of your network bandwidth. Remember that the first run of any backup archive will create the
heaviest load on your system, because it is a full backup. The following runs are
incremental and will run faster with less load.
5.4
Scheduling Backups
Below are some examples of how to integrate Arctor into your backup strategy:
• Run the backup sometime at night, while no one is using their computer.
This will make sure that every day’s work is saved. However, this method
will require that you leave all of the computers powered on each night.
• Run the backup continuously, with a configurable scan interval. This is best
done with a backup server (running the Arctor Service) fetching files over
the network. When you shutdown your PC in the evening, the latest changes
saved for that day are the changes fetched at the time of the last scan, any
last minute changes done by a user just before shutdown are saved only after
power-up the next morning.
The big advantage of this approach is that you can even restore intraday
backups from your archive. If you experience data loss in the middle of the
day, you do not need to restore from yesterday’s version.
41
• Run Arctor once per day on power-up. This can be accomplished by copying
a shortcut to Arctor in the windows AutoStart folder, checking ”Start Minimized” in Arctor’s preferences dialog. Set up the backup time-of-day to 5
o’clock in the morning, while the computer is powered down. Check Retry
Missed Scans. On power-up, Arctor will immediately start its backup run for
the backup task in question.
• Run the backup on demand only. You could make it part of your daily ritual
to run Arctor in the morning, while fetching your first cup of coffee, during
the lunch break, and in the evening, before shutting down for the night. Use
Run Once command for this while in configuration mode.
5.4.1
Long-Term Backups
You might consider doing additional long-term backups on CD-R or DVD-R. If the
source directory doesn’t fit, get rid of all the clutter, such as temporary files, not
selected for backup anyway. Arctor does a great job in getting the files you need
sorted out. The Files tab is very useful to find out if the files of a particular backup
archive will fit onto a CD or DVD recordable.
To back up all the selected source files, let Arctor run the archive once to be sure
the latest version of every file is in the archive directory. Use ”Restore” to retrieve
the latest versions of your files into another folder you use as temporary space for
the data that goes onto the backup CD. Fire up your favorite CD burning program,
and have it write that folder onto the CD.
5.4.2
Bare Metal Backup
If you feel that at lot of your work has gone into system setup and into installing
software packages, you might consider supplementing Arctor with a proven disk
image based backup software (bare metal backup).
A simple, and free option is to get a bootable CD from any Linux distribution. There is no need to install Linux, just boot this CD, and a hard disk
image backup with Linux can be as simple as typing a command line such as
dd if=/dev/hda1 of=/dev/hdc1. You should easily find step-by-step instructions for this approach on the Internet.
If you are using Mac OS X, you do not need a Linux CD, just boot from your
operating system CD.
5.5
Pitfalls
Choose the combination of source and archive device file systems carefully. FATformatted file systems (such as often used with USB sticks) should be avoided.
42
5.5.1
File Name
If you mix different operating systems and devices in a network, be aware of two
possible file name pitfalls: file name encoding, and case sensitivity:
• To support both Western, Chinese or Japanese characters, today’s file systems use one or the other Unicode implementation to encode file names.
Make sure the archive volume supports the full Unicode character set, or at
least the characters most commonly used in your country.
• Both the Mac HFS and Windows NTFS are case-insensitive, case-preserving
file systems. File names are stored as his, but if a file name differs only in the
case of one or more characters, the name still points to the same file. Under
Linux, file names are case sensitive, and a directory name Alice can exist
at the same time as a different directory named alice.
In short, expect trouble if you are mixing case-sensitive and case-insensitive
file systems as source or archive volume.
5.5.2
File Time
Arctor relies on the file modification time stamps to quickly determine if a file
needs to be backed up or not.
FAT file systems store file time using local time. So if you are in London, and
create a file at 08:00 on your FAT-formatted USB stick, and take this USB stick to
New York, a New York computer will report the file as modified at 08:00, when in
fact the file was written at 03:00 New York time — wrong. So avoid the FAT file
system as either source or archive volume, and use the NTFS file system instead
under Windows, because NTFS always uses UTC file time stamps.
Don’t let yourself be confused by the Windows daylight savings time bug: When
transitioning from daylight savings time to normal time and vice versa, the Windows Explorer switches its modification time display for all files, even those that
shouldn’t be affected. Don’t trust the Windows Explorer, trust Arctor to report the
correct modification time.
43
Chapter 6
Licensing and Contact
Information
6.1
License Information
Four different licenses are offered for Arctor. You can upgrade to a higher price
version anytime by simply paying the price difference.
6.1.1
Arctor Professional
This license is intended for use on one computer, and offers all features, exception
the following:
• The Professional license does not allow to use the Arctor service for unattended backups.
6.1.2
Arctor Enterprise
This license is intended for use on one computer or server, and offers all features,
without exceptions.
6.1.3
Arctor Enterprise Site
This license is intended for multiple computers at one location, and offers all features, without exceptions.
44
6.1.4
Arctor Freeware
The Arctor Freeware license is for non-commercial and private use only, and offers
all features, exception the following:
• The number of archives is restricted to 3.
• It does not offer compression (.zip) of the archive files.
• It does not allow to use the Arctor service for unattended backups.
6.2
Ordering Arctor
For the latest pricing information, please visit our online shop.
Arctor is distributed online electronically and shipped on CD-ROM, if requested.
Please visit our online shop to place your order online. Ordering online and paying
by credit card is by far the fastest way to order: Your license key is usually delivered
in a matter of minutes.
If you do not want to order online using your credit card, we offer a variety of
alternative ordering methods. Please visit our online shop to find out more.
For volume discounts
[email protected].
6.3
and
other
pre-sales
questions,
please
contact
Support
A purchase of Arctor includes email support and maintenance updates for 12
months. Please write to us at [email protected]. We will also try to help
you with the Trial version of Arctor if we can.
Contact us for information regarding other support options by email to
[email protected]
For the latest version always check the Arctor download page.
Byteplant offers consulting and the development of custom software. Please inquire by email to [email protected].
6.4
Copyright
Arctor is copyright ©by Byteplant GmbH
Byteplant GmbH
45
Heilsbronner Strasse 4
D-91564 Neuendettelsau / Germany
E-Mail: [email protected]
Company Homepage: http://www.byteplant.com
6.5
License and Usage Terms
END-USER LICENSE AGREEMENT FOR ARCTOR This End-User License
Agreement (”EULA”) is a legal agreement between you (either an individual or a
single entity) and byteplant GmbH. If you do not agree to the terms of this EULA,
do not install, copy, or use ARCTOR.
SOFTWARE PRODUCT LICENSE ARCTOR is protected by copyright laws and
international copyright treaties, as well as other intellectual property laws and
treaties. ARCTOR is licensed, not sold.
LICENSE/USAGE TERMS Freeware Edition: The Freeware Edition of ARCTOR
may be used freely without purchase of a license for personal and non-commercial
use only. It is expressly forbidden to install ARCTOR for any commercial use,
instead a commercial license must be purchased.
Commercial Editions: For payment of the license fee the licensee is granted one (1)
non-exclusive, non-transferable license to install and use a Commercial Edition of
ARCTOR. It is expressly forbidden to install Commercial Editions of ARCTOR for
use on multiple computers without purchasing a suitable license. Licensee warrants
that they will make a reasonable effort to remove unused licenses of ARCTOR.
Site License: For payment of the site license fee the licensee is granted one (1)
non-exclusive, non-transferable license to install and use the Enterprise Edition of
ARCTOR on one (1) or more computers owned by one person, company or institution and located on one property owned by this person, company or institution
(e.g. campus or business premises). It is expressly forbidden to install the Site
License of ARCTOR for use on other computers without paying additional license
fees. Licensee warrants that they will make a reasonable effort to remove unused licenses of ARCTOR. Please contact [email protected] for information on other
available license models and volume discounts.
DISCLAIMER OF WARRANTY ARCTOR AND THE ACCOMPANYING
FILES ARE SOLD ”AS IS”. BYTEPLANT MAKES AND CUSTOMER RECEIVES FROM BYTEPLANT NO EXPRESS OR IMPLIED WARRANTIES
OF ANY KIND WITH RESPECT TO THE SOFTWARE PRODUCT, DOCUMENTATION, MAINTENANCE SERVICES, THIRD PARTY SOFTWARE OR
OTHER SERVICES. BYTEPLANT SPECIFICALLY DISCLAIMS AND EXCLUDES ANY AND ALL IMPLIED WARRANTIES OF MERCHANTABILITY, FITNESS FOR A PARTICULAR PURPOSE, AND NON-INFRINGEMENT.
46
DUE TO THE VARIETY OF USER EXPERTISE, HARDWARE AND SOFTWARE ENVIRONMENTS INTO WHICH ARCTOR MAY BE SUBJECTED,
THERE IS NO WARRANTY FOR TECHNICALLY ACCURATE PERFORMANCE. THE USER ASSUMES ALL RISK OF USING ARCTOR. THE MAXIMUM LIABILITY OF BYTEPLANT WILL BE LIMITED EXCLUSIVELY TO
THE PURCHASE PRICE.
LIMITATION OF LIABILITY NO LIABILITY FOR CONSEQUENTIAL DAMAGES. To the maximum extent permitted by applicable law, in no event shall
byteplant GmbH or its suppliers be liable for any damages whatsoever (including, without limitation, damages for loss of business profit, business interruption,
loss of business information, or any other pecuniary loss) arising out of the use of,
or inability to use, this software product, even if byteplant GmbH has been advised
of the possibility of such damages.
LEGAL NOTICES ARCTOR uses the cairo (http://www.cairographics.org) and
wxWidgets (http://www.wxwidgets.org) libraries.
Copyright Copyright Byteplant GmbH.
Byteplant GmbH Heilsbronner Strasse 4 D-91564 Neuendettelsau Germany EMail: [email protected] Company Homepage: http://www.byteplant.com
47