1
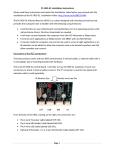
- User Manual -
Table of Content
1. Summary
1.1 Overview
……………………………………………………………………………P3
1.2 Key Functions ………………………………………………………………………...P3
1.3 Specifications…………………………………………………………….....................P4
1.4 Package content…………………………………………………………………..…...P5
1.5 Attention…………………………………………………………………...………….P5
2. Product layout..……………………………………………………………......................P6
3. How to install ………..……………………………………………………......................P7
4. Client Software Installation
………………………………………………………......P8
5. Operation mode ………...……………………………………………………………….P10
6. Online watch ..………………………………………………………………...................P15
7. Download recorded video ………………..……………………………………………..P13
8. Set Motion Detection, Email Alerts ……………………………………………………P17
9. Listening and Speaking
….……………………………………………………………P20
10. Video Recording Methods …………………………….………………………………P21
11. Reset Camera ………………………………………………………………………….P21
12. Light Control ………………………………………………………………………….P22
13. Indication Light Meaning ……………………………………………………………...P23
14. Advanced Setting for Professional …………………………………………………….P24
__________________________________________________________________________________________
2 / 30
15.Advanced Setting for Professional –update patch …………………………………….P25
16.Accessory…………………………………………………………………………………P27
17.Trouble Shooting ………………………………………………………………………...P28
18. Disclaimer ……………………………………………………………………………………………..P30
__________________________________________________________________________________________
3 / 30
1. Summary
1.1 Overview
It is a WiFi enabled IP Network CCTV Security Digital Video Recorder (DVR) camera, not a real
lamp. This is an innovative design and being patented. The idea is very simple to use and can be
used worldwide, just insert a Micro-SD card and screw-in like a bulb, turn on power, it will be auto
recording. Using this device, there is no drilling holes and no cabling, just using existing bulb holder.
It is no need technical background, you know how to replace a normal bulb, then you know how to
install it.
Besides, you can use your mobile phones or computers remotely access it via internet, watching and
hearing what is happening at there. It can be broadly used in any environments and setup by your
own like home, office, factory, shopping mall, restaurant and so on.
1.2 Key Functions
Function
Description
Provide true HD 960P resolution 1280x960 pixels.
Provide two operation modes, AP mode that is point to point access.
WiFi mode that is joining existing network and to be accessed outside
via internet.
Using H.264 compression, delivers high quality video and a superb
compression ratio.
Onvif compatible that means video can be saved to ONVIF supported
NVR machines for backup large volume video files
Using Peer-to-Peer technology, no need setting on routers and no need
DDNS and no need IP address setting, just plug and play.
Local storage using Micro-SD card, accepting 2GB-32GB, 32GB card
can store 12 days video files, recommend using CLASS 10 card.
When there is motion detected, it will trigger alarms by email alert or
push warning message to mobile phone.
When there is motion detected, email alert can send 3 pictures to your
dedicated email account
__________________________________________________________________________________________
4 / 30
Able to hear sound from bulb camera on mobile phones, PCs and MAC
and so on.
Built-in IR-cut, no color casting
Provide clear image at night (in black and white)
1.3 Specifications
System
Embedded Linux OS
Using industrial grade TI solution CPU, TIDM365
Image Sensor
1/4" CMOS progressive sensor,1.3M pixels
Video
H.264 Compression Format
Resolution : 960P (1280*960) / (1280*720)/VGA (640*480) /
QVGA(320*240)
Frame Rate : 0 – 25 FPS
Data Rate : 32Kbps – 2.0M Kbps
Light intensity, contrast ratio, saturation level are adjustable
Network
Using Peer to Peer (P2P) technology, no need configuration and no
DDNS
Support two modes, AP mode and WiFi mode :
AP mode – For local usage, no need internet remote access and no
need to connect to wifi router
WiFi mode – Connect to wifi router and to be accessed via internet
Wi-Fi compliant with wireless standards IEEE 802.11b/g/n
Support both WEP & WPA WPA2 encryption for wireless
Wireless transmission distance in open area around 100 meters
Watch
On line viewing and control via iPhones、iPad、Android Smart
Phones、Wins PC、Notepads、Notebooks、MAC
Free client software for mobile phones and computers
One software can display max. 64 bulbs
Simple installation, just download and launch it. No configuration
and no setup at all.
Storage
Local storage, support Micro-SD card, 2GB-32GB (class10 card
recommended)
__________________________________________________________________________________________
5 / 30
32GB card can store 12days video by using VGA(640*480) format
Support looping and motion detection recording
Recorded files can be remotely downloaded to computer or mobile
phone for viewing
Support client side recording, on PC or mobile phones
Alarm
Motion detection triggering email alert
Motion detection triggering mobile phone push alert
Night Vision
Using 2pcs of 3rd generation LED ARRAY, more longer life 3-5yrs
and more brighter
Night vision distance about 20 meters
LEN
3.6mm, 90 degree viewing angle, 3.0M pixels
Min. Illumination
0.1 Lux (IR Off), 0 Lux (IR ON)
IR-CUT
Built in IR-CUT, no color cast in day, clearer images at night
Audio
ADPCM Format
Built-in microphone
Through Client software able to hear sound
Motion Detection
Motion detection distance 5 meters
Adapters
E27/E26/B22 optional
Voltage
Worldwide usage, AC 100-240V
Power Consumpt.
< 5W
Operation Temp.
-20~50℃
Weight
Gross: 300g
Packaging size
85*85*175mm (L*W*H)
1.4 Package Content
1 x Bulb WiFi IP Network DVR Camera (not include memory card)
1 x CD (user manuals inside)
1 x Micro-SD card reader (plug to computer for viewing videos if needed)
1 x Reset Pin (manually reset the camera)
1 x Reset Remote Control (optional, for bc-881m and bc-883 only)
1.5 Attention
1. Before replacing the camera, please ensure the power is OFF and the circuit
voltage is within the operation range (100 – 250V AC)
2. Please hold the plastic enclosure of the camera during installation or removal
to ensure safety
3. If camera running for more than 2hrs with IR light On, the plastic case will be little bit warm that
is normal, and the metal part will be warm too. But when IR light off, it will cool down quickly.
__________________________________________________________________________________________
6 / 30
2. Product Layout
__________________________________________________________________________________________
7 / 30
Buttons
Button
Function
Micro-SD card slot
For inserting Micro-SD card,
accepting 2GB-32GB, recommend
CLASS 10 card
Reset
Using reset pin, press and hold for 10
seconds, device will be reset to factory
default mode(AP mode)
Or Press reset button on remote
control once and hearing 10 beeps,
Picture
device will be reset to factory default
mode (AP mode)
3. How to install
1. Insert a Micro SD card (2GB-32GB, format it for first time usage) into the camera card-slot
1.1. Before screw-in the camera, ensure the socket power is off and the voltage is
within the operation range (AC 100 – 250V)
2. Screw-in the camera into a bulb holder like a bulb
3. Turn on power
__________________________________________________________________________________________
8 / 30
4. Client Software Installation
Client APP for mobile phones are available on Apple Store and Google Play for
download, the APP name is called “BulbCam”, or you can follow below to download
from our website (www.bulbcam.net)
4.1 Andriod Smart Phones
Scan to install
Or download at http://www.bulbcam.net/download/bulbcam.apk
Software name : BulbCam
4.2 iPhone /iPad
Scan to install
Or search “BulbCam” in APP Store and install it
__________________________________________________________________________________________
9 / 30
Software name : BulbCam
4.3 Win PC
Download it from http://www.bulbcam.net/download/bulbcam.zip
Unzip the file
Click “bulb cam.exe” to install it
Software name : BulbCam
4.4 MAC
Software name : BulbCam
Download it from http://www.bulbcam.net/download/bulbcam.dmg
Install it
__________________________________________________________________________________________
10 / 30
5. Operation Mode
This device supports two operation modes.
Mode Name
Function
AP Mode (Point-to-Point)
It is the default mode, Mobile phones or PCs can
directly connect with bulb camera using WiFi feature
provided by bulb camera itself, so also called
point-to-point connection. In any stage, pressing RESET
button, will go back to this mode.
WiFi Mode
Using WiFi feature provided by exiting WiFi router and
that has been connected to internet, setting bulb camera
connect to the router. Then the bulb camera can be
accessed via internet. Each bulb has a device ID, that is
used to identify its identity in internet world.
Remark :
1. Computer with WiFi feature can also be used to set AP mode or WiFi mode in case your mobile
phones failure. If no Computer wifi device, you can be found in our accessory list.
2. Sample pictures are from iPhone, but all functions are the same on other devices.
3. Different connection Diagrams are demonstrated separately.
__________________________________________________________________________________________
11 / 30
5.1 AP Mode (point-to-point)
It is known as a point-to-point connection and the bulb camera is in this mode by default. Each bulb
camera has a unique ID (like LH00xxxx), we call this as a device ID and its identity when being
connected to internet world, a password is required when making connection to it.
Search Bulb camera in mobile
phones setting WiFi section
picture from iPhone
Select SSID same as device ID,
and key in Password
SSID : LH0000xxx
Pwd. : 88888888
If can not find it, reset the bulb
camera by reset pin or reset
button on remote
(stick at back of packing box)
Launch installed bulb app in
mobile phones
Tap “Local” or “LAN”, then
tap device id to watch
__________________________________________________________________________________________
12 / 30
5.2 WiFi Mode (Internet Access)
Joining existing WiFi router, let connected watch devices (Andriod smartphone/ iphone/ ipad/
PC/MAC/Notepad..) over WAN/LAN network to access it. If the existing WiFi router is connected to
internet, then the bulb camera can be accessed worldwide. Below action is transforming from AP mode
to Wifi mode.
Remark : Bulb camera’s device ID (like LH00xxxx) is its identity and it is for WAN connection, also
this ID is used as a login account no.
Assume AP mode is set in section 5.1
Select a bulb camera in camera list of
LAN section of APP
Tag “>” Go to “WiFi”
Pictures from Android Phone
Select existing WiFi Router SSID
by pressing “SEARCH” button and
then press GREY triangle part to
select. After that key in Router’s
WiFi password. Bulb camera will
reboot automatically
Bulb camera will be connected to
current router after 2 minute later
Press RESET button or Using
RESET pin to reset it (if wrong
SSID or PWD entered, or not
found after 2 mins ),back to AP
mode repeat again
__________________________________________________________________________________________
13 / 30
5.2.1 WiFi Mode Trouble Shooting Strategy
If you could not connect the bulb camera to WiFi router even password and everything is correct. Then
you have to read below instructions.
Under WiFi mode, bulb camera will be connected with router. To have better performance and being
successfully connected with router, there are some key points must be aware :
1. Router’s DHCP service must be enabled. Bulb camera depends on it to get IP
address.
2. Router’s SSID, must no space in between, that means format like “my ssid” is not
acceptable, only acceptable “myssid”
3. Router’s wireless channel, we would suggest using no. “13” (some old router
without channel 13, then select channel 11)
4. Router’s security method, we would suggest using “WPA2-PSK” (AUTO is not
recommended)
5. Router’s encryption method, we would suggest using “AES” (AUTO is not
recommended)
5.3 On PC, Change to WiFi Mode
If your mobile phone is not available, you can also use computer changing WiFi setting. The steps are :
Select a bulb device ID in Local section, click right hand mouse button, select “Set WiFi Connection”
Press “Scan” button, then select router SSID from list box, select Wireless security type
__________________________________________________________________________________________
14 / 30
“WPA2-PSK”, select Data Encryption “AES”, manually typing Router’s WiFi password. After that
press “OK” button, bulb camera will reboot.
6. Online watch
There are two viewing types, they can be selected at the first page of client software. Select which type
to use, and then click/tag the device ID in list to viewing it.
Watch Types
Description
LAN / Local
If you are in house or office, and the bulb camera is in the same local area
network or point to point network. Then you can use Local/Lan type to watch
online. No need to login account, but you can use setting watching passwords
to prevent other accessing it. And the speed is much faster because it is in
PC
local /LAN
Phone
If you want to access bulb camera from outside via internet, then select WAN
WAN / Remote
PC
tab. It requires to login an account. The device ID (LH0xxxxx) of bulb
camera is the account no. and the password is 123456. You can create other
accounts and add all bulb cameras into it as a central management account.
Phone
__________________________________________________________________________________________
15 / 30
7. Download recorded video
If a micro-SD card has been placed inside a bulb wifi dvr camera, when it is power on, it will auto
record video by itself. To preview the content of Micro-SD card, you can download recorded video
files from bulb camera to your computer by using the function “SD File Download” in PC client
software.
Select a bulb camera in list -> click right hand mouse button -> select “SD File Download” -> Click
“Search” ->Click on a file to download -> when download done, click to preview
__________________________________________________________________________________________
16 / 30
8. Set Motion Detection, eMail Alert
There are two alarm types, Email Alert and Push Message Alert (for Mobile phone). But these alarms
are basing on Motion Detection, when a motion is detected, it will trigger these functions.
Set Motion Detection and Email Alert:
On mobile phones:
Select a bulb camera in device list of local section, tag “>” -> select “Alarm Settings” -> Set
“Alarm sensitivity” to “High”, tick Motion detection checkbox.
If you want Email Alert, then go to Email section, fill in email alert fields. “Reciever E-mail”,
“Sender E-mail”…so on, all needed.
***Here you need smtp-server and smtp port information, if you don’t know that you have to ask
email Service provider. But these information can be filled-in later on.
__________________________________________________________________________________________
17 / 30
On PC
Select a bulb camera in device list of LAN section, click right hand mouse button -> select “Alarm
Alerts/Email” -> Tick “Motion Detection” box
If you want Email Alert, then fill in other fields. “Reciever E-mail”, “Sender E-mail”…so on, all
needed.
***Here you need smtp-server and smtp port information, if you don’t know that you have to ask
email Service provider. But these information can be filled-in later on.
__________________________________________________________________________________________
18 / 30
__________________________________________________________________________________________
19 / 30
9. Listening and Speaking
On Mobile phone
When in viewing mode, click
If it is connected to a speaker, then click
and then click the headphone logo
to hear sound
to speak
On PC
When on viewing mode, there is a headphone logo
, click to hear sound, or click “Listen”
button
__________________________________________________________________________________________
20 / 30
10.Video Recording Methods
There are three methods to record videos
1. Built-in Micro-SD card storage device - just simply insert a card then it will auto recording
2. Recording on Mobile phone or Computer – when online watching a bulb camera on mobile phones
or computers, simply press the video sign button
, it will start recording video, and the
video files are stored on watching device.
3. Network Video Recorder device – NVR machine which supports ONVIF protocol, then it can
connect to bulb camera recording video onto it. This suits for large video file storage application,
like there are few bulb cameras and need to be centralized manage storage.
11. Reset camera
There are two methods to reset bulb camera to default (factory setting)
1. Reset pin
Using provided reset pin, insert into the reset hole and press down around 10 seconds, then release
it. Bulb camera will reboot and return all setting to factory set value.
__________________________________________________________________________________________
21 / 30
2. Reboot button
Some models come with a remote control, just press “Reboot” button on remote control, then bulb
camera will reboot by itself and return all setting to factory set value.
12. Light Control
12.1 Switch On/Off light
Light switch On/Off feature only applies to some models with normal LEDs, not every model has this
feature.
To switch On/Off, open APP and in LAN section, choose a camera, tab “>” -> “Camera Light” ->
select “ON/OFF”
__________________________________________________________________________________________
22 / 30
12.2 Motion Detection with light
Light can be controlled basing on motion detection. Once motion detected, the light will be ON
automatically, if there is no motion, the light will be OFF.
To enable this function, Motion Detection feature must be ON first, then open APP and in LAN
section, choose a camera, tab “>” -> “eHome Security” -> select “Enable / Disable”
13. Indication Light Meaning
There are two states of indication light, Blue and Red
Blue means the system is in booting stage, not ready for connection.
Red means the system is ready for connection.
__________________________________________________________________________________________
23 / 30
14. Advanced Setting for Professional
Administrator can use Internet Browser to control the back-end of bulb camera.
Each bulb camera has a local IP address, On PC software, IP address can be found in “Set IP address”
function, then key in the IP address in a browser, like in IE, 192.168.88.111
If IE is the default web browser, select “Open device IE” on menu, direct go in.
Then a prompt screen will pop up for login
Login : admin
Password : admin
If you are first time using it, then you have to click “Download activeX” and install it before you can
login.
If you have downloaded and installed but still not can not login, then go to our support website
download an activeX and manually installed by administrator role, www.bulbcam.net
When login successfully, an administration screen will be shown as below.
Administrator screen on IE :
__________________________________________________________________________________________
24 / 30
15. Advanced Setting for Professional – Update Patch
If there are new firmware released, we will update on website, www.bulbcam.net
For updating patches, download from above website first, then go to back-end administration page in
section 12.
Click “Parameter->Device Maintenance”, the screen looks like below
Click “browse” button, browsing the firmware update file from your computer, then click “upgrade”
button
When it is upgrading, don’t turn off power of bulb camera. When it is done, it will auto reboot.
__________________________________________________________________________________________
25 / 30
When the reboot is done (indication light turns to RED color), Then turn off the power, wait for 10
seconds, turn on again.
__________________________________________________________________________________________
26 / 30
16. Accessories
16.1 Extension Adapter
Item No.
Picture
Description
BC-AE16
160mm extension
adapter, bending
angle is around 10°
BC-AE20
200mm extension
adapter, Max. bending
angle is around 90°
BC-AE30
300mm extension
adapter, max. bending
angle is around 180°
BC-AE45
450mm extension
adapter, max. bending
angle is around 360°
16.2 Extension Adapter with Plug
Item No.
Picture
BC-AEP30UK
Description
300mm long
extension adapter
with UK plug
__________________________________________________________________________________________
27 / 30
BC-AEPC30UK
300mm long
extension adapter
with UK plug plus clip
and power cable
16.3 Bulb Converter
Item No.
Picture
Description
BC-ACB22
Converting E27 to B22
BC-ACGU10
Converting E27 to
GU10
BC-ACE14
Converting E27 to E14
BC-ACE12
Converting E27 to E12
17. Trouble Shooting
1. When playback video, there is video only without sound
Solution : The problem is you did not tick the “recording sound” flag in sd-card configuration.
2. I have entered my router SSID and router’s wifi password and my devices has been
connected to existing network, but I can not find the bulb camera on network after two
minutes.
Solution : Press “Reboot” button on remote control or using reset pin, set the machine back to
default mode “AP mode”, and retry again. Beware of small or large capital letters when entering
the SSID and password, must exactly match. Also, read the router setting section.
__________________________________________________________________________________________
28 / 30
3. Can not receive email alert.
Solution : First you have to check your email service provider, make sure your entering
information is correct, especially SMTP server and allowed to send email directly via that.
4. Where is your technical supporting page ?
Solution : If there are any updates on bulb wifi dvr cameras, we will update under this link,
http://www.bulbcam.net
__________________________________________________________________________________________
29 / 30
18. Disclaimer
This camera is for legal surveillance purpose. Our company does not warrant or assume
any legal liability or responsibility for illegal usage or installation.
__________________________________________________________________________________________
30 / 30