1
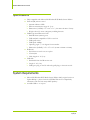
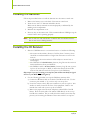
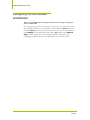
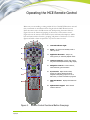
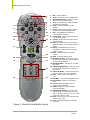
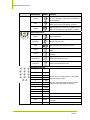
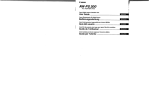
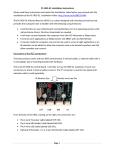
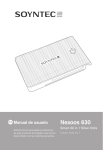
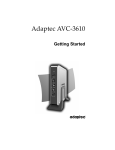
User’s Guide NVIDIA MCE Remote Control Using the MCE Remote Control in North America March 2006 DA-02326-001_v01 NVIDIA MCE Remote Control This page intentionally blank ii DU-02325-001_v01 03/23/06 Table of Contents NVIDIA MCE Remote Control and Receiver Kit ................................................ 1 Highlights ..............................................................................................................1 Specifications .........................................................................................................2 System Requirements .............................................................................................2 Unpacking and Installing the Remote and Receiver ......................................... 3 Package Contents...................................................................................................3 Installing the Batteries............................................................................................4 Installing the IR Receiver........................................................................................4 Configuring the MCE Remote and Receiver ..............................................................6 Operating the MCE Remote Control................................................................... 7 Troubleshooting............................................................................................... 11 Support and Warranty ..................................................................................... 13 DU-02325-001_v01 03/23/06 iii NVIDIA MCE Remote Control List of Figures Figure 1. Package Contents ..................................................................................3 Figure 2. Connecting the NVIDIA MCE Remote Control Receiver .............................5 Figure 3. Remote Control Functional Button Groupings...........................................7 Figure 4. Remote Control Button Layout................................................................8 List of Tables Table 1. iv Remote Control Button Reference Table .....................................................9 DU-02325-001_v01 03/23/06 NVIDIA MCE Remote Control and Receiver Kit This User’s Guide provides basic set-up and operation instructions for the NVIDIA® MCE Remote Control and Receiver Kit. Please consult the NVIDIA DualTV Quick Start Guide or NVIDIA DualTV User’s Guide for DualTV setup procedure. This kit is only compatible with a Microsoft® Windows® XP Media Center Edition (MCE) PC. For more information about Microsoft Windows XP Media Center Edition, please visit: http://www.microsoft.com/windowsxp/mediacenter/default.mspx. Highlights Bring all of your entertainment choices to your fingertips with the NVIDIA MCE Remote Control and Receiver Kit Easily navigate your Microsoft® Windows® XP Media Center Edition (MCE) PC from your couch Control your set-top box with your MCE PC Select your favorite programs using the on-screen program guide Run picture slide shows Play your favorite music Play your DVDs Adjust TV, display and A/V playback settings in MCE Switch your MCE PC into or out of standby mode Install and use in seconds USB plug-and-play Automatic configuration in MCE Ergonomic design Note: The remote control is not a universal remote. It can only be used to control MCE and (indirectly) your DualTV and a set-top box if you hook up the IR blaster (emitter). A remote control and receiver with IR blaster (emitter) is required for the MCE PC to control a set-top box. DU-02325-001_v01 03/23/06 1 NVIDIA MCE Remote Control Specifications Fully compatible with Microsoft® Windows® XP Media Center Edition Infra-red (IR) remote control ¾ Transmit indicator LED ¾ Effective transmission range: 23’ (7 m) ¾ Dimensions: (LxWxH): 7.5" x 2.4" x 1.1” (191 mm x 60 mm x 27 mm) ¾ Weight: about 3.5 ounce (100 gram) excluding batteries USB bus-powered IR receiver unit ¾ Dual IR blaster (emitter) ports ¾ USB standard: compatible to USB 1.1 and 2.0 ¾ USB type B socket ¾ USB speed: 12Mbps ¾ Operating angle: +/- 10 degrees from centerline ¾ Dimensions (LxDxH): 3.2" x 2.7" x 0.9” (81 mm x 68 mm x 22 mm) IR blasters ¾ Each blaster controls one set-top box ¾ 3.5 mm jacks ¾ Cable length: 16’ 4” (5 m) USB cable ¾ Detachable from the IR receiver unit ¾ Length: 9’ 10” (3 m) ¾ USB type A plug on the PC side and type B plug on the receiver side System Requirements Microsoft® Windows® XP Media Center Edition 2005 (original version or Update Rollup 2 - please check the NVIDIA Web site for compatibility information with the latest major MCE updates) Available USB 1.1 or 2.0 port 2 DU-02325-001_v01 03/23/06 Unpacking and Installing the MCE Remote Control and Receiver IMPORTANT: If you are installing a tuner card in your MCE PC at the same time as the remote control, NVIDIA recommends that you connect the USB IR receiver unit to your PC after you finish the software installation for the tuner card. If you are using the MCE USB IR receiver to control a set-top box, please connect the receiver to your MCE PC before you perform the Setup TV Signal step in MCE. NVIDIA recommends that you download and apply the latest MCE update before you install this MCE remote control and receiver kit. Visit http://www.microsoft.com/windowsxp/downloads/updates/mediacenter.mspx Package Contents When you get your NVIDIA MCE Remote Control and Receiver Kit, take time to go through the kit and make sure you have all the parts. Figure 1 shows the contents of the kit. 1 2 3 4 5 1. NVIDIA MCE Infra-red (IR) remote control 2. MCE USB IR receiver with detachable USB cable 3. Two IR blaster (emitter) cables 4. Two 1.5V batteries (size AA) 5. NVIDIA MCE Remote Control Quick Start Guide Figure 1. DU-02325-001_v01 03/23/06 Package Contents 3 NVIDIA MCE Remote Control Installing the Batteries Follow the procedure below to install the batteries into the remote control unit. 1. Remove the battery cover at the back of the remote control unit. 2. Insert the two AA 1.5V batteries included in the kit. Make sure the battery terminals are oriented properly as indicated by the marking in the compartment. 3. Reinstall the compartment cover. 4. Press any key on the remote unit. If the transmit indicator LED lights up, the remote control unit is operating properly. Note: Do not mix new and old batteries or alkaline with non-alkaline batteries. Do not use worn or leaking batteries. Installing the IR Receiver 1. Place the USB IR receiver in a convenient location. Consider the following: ¾ The remote works within a distance of 23 feet (about 7 meters). There should be an unobstructed line-of-sight from the remote control to the receiver. ¾ Avoid placing the receiver where it will be subject to intense heat or intense light. ¾ The USB cable is 9 feet 10 inches (3 meters) long. Be sure the receiver is within this distance from your MCE PC. ¾ The IR Blaster cable is 16 feet 4 inches (5 meters) long. Be sure your settop box (if used as input to MCE) is within that distance from the IR receiver unit (which controls the set-top box via the IR blaster). Skip step 2 if you are not using a set-top box (that is IR-controlled) as signal source to your MCE PC (see Figure 2). 2. Use the following procedure to set up the IR blaster (emitter) cable. a) Connect the IR blaster cable to the back of the IR receiver unit. Use the connector port marked “1” if you have only one set-top box. b) Locate the remote control (IR) sensor window on your set-top box. This window is usually located at the front of the equipment. Refer to the manual that comes with your set-top box if needed. c) Remove the paper sticker from the red plastic emitter LED of the IR blaster. Place the sticky side of the emitter LED directly on the set-top box IR sensor window. Do not totally block the window, since that may prevent you from using the IR remote that comes with the set-top box. 4 DU-02325-001_v01 03/23/06 Unpacking and Installing the Remote Receiver 3. Connect the IR receiver unit’s USB cable to your MCE PC. a) Make sure the USB cable is plugged into the back of the IR receiver unit. USB cable connector for IR receiver unit side USB socket on the IR receiver unit b) Power on your PC. c) Insert the plug of the USB cable into an available USB port on your PC. Windows will recognize and configure the device automatically. USB cable connector for PC side USB socket on the PC chassis Figure 2. Connecting the NVIDIA MCE Remote Control Receiver DU-02325-001_v01 03/23/06 5 NVIDIA MCE Remote Control Configuring the MCE Remote and Receiver There is no configuration step required if you are not using a set-top box with your MCE PC. If you are using your remote control with a set-top box, you need to run the TV Setup Wizard in MCE. To run the Wizard, select the Windows Start menu and launch the MCE application. If you do not go directly into the TV Setup Wizard, select Settings from the MCE main menu. Select TV and then select Setup TV Signal. Follow the directions in the Wizard. The Wizard will guide you in configuring the MCE remote receiver and IR blaster for your set-top box. 6 DU-02325-001_v01 03/23/06 Operating the MCE Remote Control Make sure you are standing or sitting within 23 feet of the MCE IR receiver unit and that you maintain an unobstructed line-of-sight with the MCE IR receiver unit. Point the remote unit at the IR receiver unit while pressing the remote buttons. Figure 3 shows the functional grouping of the buttons on the remote control. Figure 4 shows the remote control button layout with button descriptions. Table 1 lists each button with its function, grouping, and picture of the button. Use these figures and table to learn the operation of your new remote control. 1 3 4 2 1 Transmit Indicator Light 2 Power. Put the PC into standby mode or wake up the PC 3 Application Shortcuts. Jump to TV, music, picture, or video file playback mode 4 Transport Controls. Record, Stop, Pause, Play, Fast Forward/Fast Rewind, Skip, Replay 5 Navigation Controls. Traverse menus, make selections, get information 6 A/V Controls. Adjust audio volume, change TV channel, display Electronic Program Guide (EPG), jump to live TV or DVD menu, or watch recorded TV programs 7 MCE Start Button. Displays the MCE main menu 8 Alphanumeric Keypad. Enter channel numbers and text 5 6 7 8 Figure 3. DU-02325-001_v01 03/23/06 Remote Control Functional Button Groupings 7 NVIDIA MCE Remote Control 1 2 1. 2. 3. 3 4 5 7 8 4. 11 10 7. 13 12 8. 15 9. 6 9 14 5. 6. 10. 17 16 11. 12. 18 20 19 22 21 13. 14. 15. 16. 23 17. 18. 25 24 19. 20. 21. 22. 23. 24. 25. LED - Transmit Indicator Power – Put PC into or out of standby mode Application Shortcuts – Jump to TV, music, picture or video file playback menu Stop – Stop playback (press PLAY afterward will restart from beginning) Pause – Pause (or resume, if paused) playback Record – Start instant recording of current program or the selected program in EPG Play – Start playback from the start, or resume playback (if paused) Fast Forward – Fast forward, press again to cycle through 3 speeds Rewind – Reverse play, press again to cycle through 3 speeds Skip – Skip ahead 29 sec during recorded TV playback, or skip to next song, DVD chapter, or picture Replay - Skip backwards 5 sec on live or recorded TV, or skip to previous song, DVD chapter, or picture More - Display information on the item selected Back - Go back to previous screen Navigation Control - Use the arrow keys to traverse menus, press OK to confirm selection or perform action indicated MCE Start Button - Start MCE, or go to MCE main menu Channel/Page Up/Down - Scroll up or down through the TV channel lineup, or advance a page in a list Volume Up/Down - Un-mute the audio, then turn the volume up or down incrementally Mute - Mute the audio. Press again to unmute DVD Menu - Jump to the DVD playback menu Recorded TV - Jump to the recorded TV menu Live TV - Switch the display to live TV (previous channel watched) Guide - Display the on-screen electronic program guide (EPG) Alphanumeric Keypad - Use to enter a TV channel number, or for general-purpose text entry. Press any of the keys “2” to “9” to cycle through the numeral or letter Enter - Start the action in the context with the numbers or text typed Clear - Backspace and delete the character just typed Figure 4. Remote Control Button Layout 8 DU-02325-001_v01 03/23/06 Operating the MCE Remote Control Table 1. Remote Control Button Reference Table Remote Key Symbol Function Power Put the system into standby, or wake it up from standby Power (Standby) Navigation Control MCE Start Button Start MCE, or go to MCE main menu Up Go to item above Down Go to the item below Go to the item on the left, or go to previous picture during slideshow Left Go to the item on the right, or go to next picture during slideshow Right OK OK Confirm the selection. Perform action indicated. Back Go back to previous screen More Display information on the item selected Application Shortcuts My TV Jump to the My MTV menu My Music Jump to the My Music menu My Pictures Jump to the My Picture Menu My Videos Jump to the My Videos menu Transport Control Play Pause Stop Record Fast Forward DU-02325-001_v01 03/23/06 Start playback of media from the start, or resume (if paused) from current position Pause playback (or resume if already paused) Stop media playback (pressing PLAY afterwards will restart from the beginning) or a recording Starts instant recording of the currently showing program, or the selected show on the electronic program guide Fast forward the playback; press again to cycle through normal, 3x, 20x or 60x speed. Skip to the next picture during slideshow 9 NVIDIA MCE Remote Control Remote Key Symbol Function Rewind Reverse play; press again to cycle through normal, 3x, 20x or 60x speed. Skip to the previous picture during slideshow Skip Skip ahead 29 sec during recorded TV playback, or skip to the next song, DVD chapter, or picture Replay Skip backwards 5 sec on live TV or recorded TV, or skip to the previous song, DVD chapter, or picture Audio-Visual Control Volume+ or Volume- Un-mute the audio, then turn the volume up or down incrementally Chan/Page+ or Chan/Page- Scroll up or down through the TV channel lineup, or advance a page in a list Mute Mute the audio. Press again to un-mute Guide Display the on-screen electronic program guide (EPG) Live TV Switch the display to live TV (previous channel watched) Recorded TV Jump to the recorded TV menu DVD Menu Jump to the DVD playback menu Alphanumeric Keypad 10 0 0 1 1 2 2 - ABC 3 3 - DEF 4 4 - GHI 5 5 - JKL 6 6 - MNO 7 7 - PQRS Use to enter a TV channel number, or for generalpurpose text entry in MCE Press any of the keys 2 to 9 to cycle through the numeral or letter associated with that key 8 8 - TUV 9 9 -WXYZ ‘#’ # ‘*’ * Enter ENTER Start the action in the context with the numbers or text typed Clear CLEAR Backspace and delete the character just typed DU-02325-001_v01 03/23/06 Troubleshooting 1. Determine if your remote control unit has a good battery. If the transmitter indicator LED is not lit when you press a key on the remote, try replacing the batteries (use new ones only). Verify that the battery terminals match the indicators in the compartment, and ensure both the metal contacts in the compartment and the battery terminals are clean. Note: Do not mix new and old batteries or alkaline with non-alkaline batteries. 2. Determine if you are operating the remote unit in a proper location relative to the IR receiver unit. Verify the placement in terms of factors mentioned in the Installing the IR Receiver section, including line-of-sight, possible obstructions, other light source, and heat source. Ensure that the remote unit is held within the angular limit relative to the receiver unit, i.e. within 10 degree angle on either side of the centerline (a straight line perpendicular to the front bezel of the IR receiver unit). Determine if the MCE user interface is open and active and not minimized on the Windows desktop. If needed, press the green MCE Start button. 3. Verify through visual inspection that the USB cable connecting the IR receiver and the PC has not been damaged. Replace the cable if damaged. If you are using another USB cable, make sure the length does not exceed the length (9 feet 10 inches — around 3 meters) of the one that comes with the MCE remote. 4. Verify that the USB cable is plugged securely into both the IR receiver unit and the PC. DU-02325-001_v01 03/23/06 11 NVIDIA MCE Remote Control 5. Verify that the USB IR receiver device is operating properly under the MCE operating system. Go to the Windows Start menu on the desktop, select My Computer, then right-click Properties. Select the Hardware tab, and then click Device Manager. Look for and expand Universal Serial Bus Controllers. Right-click eHome Infrared Receiver to verify the device is enabled and operating properly. 12 DU-02325-001_v01 03/23/06 Support and Warranty Visit the NVIDIA Customer Care web site (listed below) to get information on support, contact the technical support team, or browse the online knowledge base. www.nvidia.com/support The following site provides detailed warranty information about the NVIDIA DualTV and other NVIDIA products. www.nvidia.com/warranty DU-02325-001_v01 03/23/06 13 NVIDIA MCE Remote Control This page is intentionally blank. 14 DU-02325-001_v01 03/23/06 Notice ALL NVIDIA DOCUMENTS ARE BEING PROVIDED “AS IS.” NVIDIA MAKES NO WARRANTIES, EXPRESSED, IMPLIED, STATUTORY, OR OTHERWISE WITH RESPECT TO THE MATERIALS, AND EXPRESSLY DISCLAIMS ALL IMPLIED WARRANTIES OF NONINFRINGEMENT, MERCHANTABILITY, AND FITNESS FOR A PARTICULAR PURPOSE. Information furnished is believed to be accurate and reliable. However, NVIDIA Corporation assumes no responsibility for the consequences of use of such information or for any infringement of patents or other rights of third parties that may result from its use. No license is granted by implication or otherwise under any patent or patent rights of NVIDIA Corporation. Specifications mentioned in this publication are subject to change without notice. This publication supersedes and replaces all information previously supplied. NVIDIA Corporation products are not authorized for use as critical components in life support devices or systems without express written approval of NVIDIA Corporation. Product Handling Do not mix new and old batteries or alkaline with non-alkaline batteries. Do not use worn or leaking batteries. Do not tamper with the batteries or expose them to fire or intense heat. Keep batteries out of children’s reach. Remove batteries if you are storing the remote control unit for an extended period of time. Do not submerse this product in water or otherwise allow liquid to go into the housing. Use only a damp cloth and gentle soap when cleaning. Detach the USB receiver from the PC before cleaning. Dispose this product or the included batteries in accordance with relevant national or local laws. Microsoft Certification Designed for Microsoft Windows XP Media Center Edition Regulatory Information U.S.A. This equipment has been tested and found to comply with the limits for a Class B digital device, pursuant to part 15 of the FCC Rules. These limits are designed to provide reasonable protection against harmful interference in a residential installation. This equipment generates, uses, and can radiate radio frequency energy, and if not installed and used in accordance with the instructions, may cause harmful interference to radio communications. However, there is no guarantee that interference will not occur in a particular installation. If this equipment does cause harmful interference to radio or television reception, which can be determined by turning the equipment off and on, the user is encouraged to try to correct the interference by one or more of the following measures: • Reorient or relocate the receiving antenna. • Increase the separation between the equipment and receiver. • Connect the equipment into an outlet on a circuit different from that to which the receiver is connected. • Consult the dealer or an experienced radio/TV technician for help. FCC Warning Any unauthorized changes or modifications not expressly approved by the NVIDIA could void the user's authority to operate this device. Canada This class B digital apparatus complies with Canadian ICES-003. Cet appeil numerique de la Classe B conforme a la norme NMB-003 du Canada. Europe This device complies with the CE requirements of the EEC directive 89/336/EEC as amended by 92/ 31/EEC with regard to electromagnetic compatibility. Trademarks NVIDIA and the NVIDIA logo are trademarks or registered trademarks of NVIDIA Corporation in the United States and other countries. The Windows logo is a trademark or registered trademark of Microsoft Corporation in the United States and/or other countries. Other company and product names may be trademarks of the respective companies with which they are associated. Copyright © 2006 NVIDIA Corporation. All rights reserved. NVIDIA Corporation 2701 San Tomas Expressway Santa Clara, CA 95050 www.nvidia.com