1
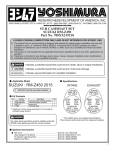
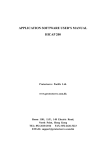
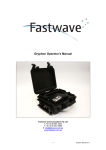
PROCKET PRO
HL400-J
JUMPING
User Manual
Version 09/2014
TAGHeuer Timing
Page 1 / 20
Contents Table
1.
Concept
2.
Standard Timing Mode
2.1. LCD description
2.2. General
2.2.1. How to navigate the different modes
2.2.2. Power
2.2.3. Time Memory
2.2.4. Delete Memory
2.3. Date Mode
2.4. STOPWATCH mode
2.5. Count Down mode (CD)
2.5.1. Set Count Down
2.5.2. Count Down timing .
2.6. TIME Mode
2.6.1. Internal Time of Day setting
2.6.2. Time of day synchronisation
2.6.3. To Synchronise at Zero
2.6.4. Timing
3.
Specific Timing Modes
3.1. Jumping A (mode A) / Jumping B (mode B) / Jumping C (mode C)
3.1.1. Start Race :
3.1.2. Pause / Restart :
3.1.3. New competitor :
3.1.4. Disqualify competitor :
3.1. Example : Jumping A (1 phase)
3.2. Example : Jumping B (2 phase)
3.3. Example Mode C (2 Round)
4.
Recommendations
5.
Download a new version of Firmware
6.
Technical specification
6.1. Pocket Pro characteristics
6.2. USB Connector
7.
Quick Guide
TAGHeuer Timing
Page 2 / 20
3
4
4
5
5
5
6
6
7
7
8
8
9
10
10
10
10
10
12
12
12
12
13
13
14
15
16
17
17
18
18
18
19
1. Concept
The Pocket Pro Jumping App. aptly named Pocket Pro - J - give Pocket Pro users access to
Timekeeping functions dedicated to the timing of Show Jumping events. Three exclusive
modes ensure time keepers; judges and officials can manage with simplicity and reliability
every Jumping event.
The dedicated jumping modes offer countdown, single and two phase or round competition,
competitor elimination and a full visual recall and memory of each and every riders
countdown allowance used and all phase times.
The Pocket Pro electronic stopwatch is the latest of TAG Heuer's Professional Timing
development regime. Additional to the three exclusive timing modes dedicated to Jumping,
this 1/100th second handheld timepiece also encompasses standard stopwatch modes,
including Split / Lap time measurement, countdown, and memorizing of the time of the day.
Together with its integrated USB connector and free application POCKET MANAGER and
supported by the Pocket-Pro 800 measurements internal memory , downloading, analysis,
printing and archiving of results are extremely simple and results can be viewed or printed
from your laptop or pc instantly.
The USB connector (HL400-4) enables connection to a photocell, a manual switch or a
wireless radio input (HL615, HL675).
Pocket Pro Manager adjusts a Lock Time for the USB Input.
Note:
Pressing the hard reset (to the right of the USB connector) resets the Lock
Time value to 0.01 sec (minium)
TAGHeuer Timing
Page 3 / 20
2. Standard Timing Mode
Several timing modes are available with Pocket Pro including
Date / Time / Count Down / Stopwatch.
Three specific timing modes are also available on the Pocket Pro: A, B, and C.
Mode A: Jumping - Table A (Speed):
With Count-Down and Phase 1
Mode B: Jumping - 2 Phase:
With Count-Down, Phase 1 and Phase 2.
Mode C: Jumping - 2 Rounds:
With Count-Down, Round 1 and Round 2
The Pocket Manager application allows downloading, analysis, printing and archiving results
To your laptop or PC
2.1. LCD description
4
1
2
5
3
1.
2.
3.
4.
5.
Number of competitor / Memory status
Battery / Mode Setting / Running status
Timing Mode
Information Split / Lap
Chronometers
TAGHeuer Timing
Page 4 / 20
2.2. General
2.2.1. How to navigate the different modes
To navigate into a different mode :
- The Pocket Pro has to be stopped (STOP)
- Reset memory (START/STOP + MEMORY)
- Pressing the MODE button now allows you to change the Timing Mode
Sequence :
DATE
STOPWATCH
TIME
CD
A
B
C
2.2.2. Power
The Pocket Pro functions with an internal battery. It can be recharged when it is
connected to a PC (USB cable) or by a (USB – 5VDC) power supply
When not used for 36hours, the Pocket Pro will switch OFF automatically (LCD OFF)
To wake up the Pocket Pro, just press any button.
It is also possible to switch OFF manually the Pocket Pro by pressing simultaneously
the MODE and MEMORY buttons for 5 seconds.
When the Pocket Pro is OFF, all the times are stored in memory.
The icon
will indicate the level of the battery
During charge: 75% ON / 25% OFF blinking
Fully charged:
with USB Cable: icon ON
Without USB cable: icon OFF
Low level
(<10% charge): blinking 50% ON & 50% OFF
(you still have 2-3 days autonomy)
TAGHeuer Timing
Page 5 / 20
2.2.3. Time Memory
The Pocket Pro has a memory of 800 times.
The number of memorized times is shown on the 3 digits (Memory status)
When the memory reaches 90% capacity (720 times), the 3 digits will flash.
Warning
Once the memory is full (800 times), the next time recorded will be stored
as 001
The previous time will be automatically deleted
The LCD will continue to flash
The memorized time can be recalled and displayed on the LCD at any time (even
during a timing session).
By pressing the MEMORY button, the memorized time 001 will be displayed as the
button is held down. The number of the memory shown is displayed on the top-left of
the LCD
Press the MEMORY button again and the next stored time will be displayed.
2.2.4. Delete Memory
To delete the memory, press simultaneously START/STOP and MEMORY
buttons.
Warning
Once the memory is deleted, all stored times are no longer available for
recall.
TAGHeuer Timing
Page 6 / 20
2.3. Date Mode
This mode allows you to update the date of the Pocket Pro.
To set the date:
- Press the MEMORY button: the first digit will flash and SET icon is ON
- Press the SPLIT/LAP button to change the value
- Press the MEMORY button to move to the next digit
Validate your setting with the MODE button (SET icon is OFF)
1. Icon Set ON = Setting
2. Date setting (in red, digit blinking)
(25.03)
3. Year setting (2013)
4. Time of the Pocket Pro (setting in
menu TIME)
2.4. STOPWATCH mode
This timing mode allows the timekeeper to make a Start/Finish, with intermediate time
(SPLIT) and lap time (LAP) with a 1/100th of a second precision
1.
2.
3.
4.
5.
Number of split / Memory status
Running status
Split time
Lap Time
Running time
The time displayed is up to 59’59.99’’ (1 hour)
SPLIT :
Intermediate time, or cumulated time taken at each time (SPLIT/LAP
button)
The SPLIT Time is to the top of the LCD (mm:ss.dc)
LAP :
Lap time or time difference between time taken (SPLIT/LAP button)
The LAP time display is in the middle of the LCD (mm: ss.dc)
Running Time :
Running time between Start and Finish
The running time is on the bottom of the LCD (mm:ss.dc)
The running time always starts from 00:00:00.
- To start, press the START/STOP button ( icon is ON)
- Three times are running and displayed
- At Split / Lap, press SPLIT/LAP Button.
The SPLIT and LAP time is stopped. The running time (bottom) continues to run.
TAGHeuer Timing
Page 7 / 20
At each press of the SPLIT/LAP button, the counter store increments.
It is possible to recall and view the running time (after SPLIT/LAP ) by pressing
MEMORY button.
For simple viewing in this mode, it is possible to reduce the information, and display
only SPLIT or LAP. For this, during the race, press the button MODE.
2.5. Count Down mode (CD)
This mode allows you to make a unit count down or loop count-down
1.
2.
3.
4.
Number of split / Memory status
Running status
Counter
Count Down (max 59:59.9)
2.5.1. Set Count Down
To change the Count-Down value, the memory has to be deleted.
To set the Count-Down value:
- Press the MEMORY button: the first digit will flash and SET icon is ON
- Press the SPLIT/LAP button to change the value
- Press again the MEMORY button to change to the next digit
- Validate your setting with the MODE button (SET icon is OFF)
The maximum count down available is 59:59.9 (mm:ss.d)
TAGHeuer Timing
Page 8 / 20
2.5.2. Count Down timing .
- To start the count down, press START/STOP button (
- The count-down value decrements (on the bottom)
- A timer (on the top) is started (increments)
icon is OFF)
At any time it is possible to PAUSE and RESTART the count-down
A long single beep will sound at the end of the Count-Down
The count-down will stop automatically at 00:00.
To restart a new count-down, you have to reset the value by pressing SPLIT/LAP
button.
During the count-down sequence by pressing the MODE button, it is possible to
change the Single Count-Down to Auto-Restart Count-down (loop mode).
The CD icon on the LCD will switch.
In this Auto-Restart Count-Down, during the last 5 seconds, the Pocket Pro will sound
a single short beep and a long beep at 00:00
The Pocket Pro will restart automatically from the pre-defined time of the count-down.
The timer will run and show the full time since the first Start.
To stop the sequence, you have to RESET the Pocket Pro.
TAGHeuer Timing
Page 9 / 20
2.6. TIME Mode
This timing mode allows you to memorize the time of day at each split.
This is very useful as a back-up system during a timing session and relates to other
timing systems such as Chrono Printer, Mini Timer or Start Clock).
In Time mode, you have on the top of the LCD the value 00:00.00 and on the bottom
the time of the day of the Pocket Pro.
1.
2.
3.
4.
5.
Number of split / Memory status
Running status
Chrono Time (hh:mm:ss)
Chrono Time (1/100)
Pocket Pro time
2.6.1. Internal Time of Day setting
To set the Internal Time of Day on Pocket Pro:
- The Pocket Pro memory has to be reset (START/STOP + MEMORY)
- Press and hold the MEMORY button for 5 sec: the first digit will flash and
SET icon is ON
- Press the SPLIT/LAP button to change the value
- Press the MEMORY button to move to the next digit
2.6.2. Time of day synchronisation
- Press SPLIT/LAP and START/STOP buttons simultaneously.
- The time of day of the Pocket Pro will be displayed on the top of the LCD with 1
minute in advance.
- The synchro will be automatic at the end of the full minute
2.6.3. To Synchronise at Zero
- Press START/STOP button
The Chrono automatically starts from zero.
2.6.4. Timing
Once the Synchronisation is made, the
icon appear.
To memorize the time of day, press SPLIT/LAP button
The time on the LCD will stay and the passing counter (top-left) is incremented.
To see the time of the day running, press MEMORY button.
TAGHeuer Timing
Page 10 / 20
Before Set Time of the Day
Set time of the Day + 1 min.
START/STOP
SPLIT/LAP
START/STOP
SPLIT/LAP
Memorized Split / Time of Day
TAGHeuer Timing
Manual Synchro / Start
Page 11 / 20
3. Specific Timing Modes
In Pocket Pro Jumping, 3 timing modes are available on the Pocket Pro.
A: Jumping - Table A (Speed):
With Count-Down and Phase 1
B: Jumping - 2 Phase:
With Count-Down, Phase 1 and Phase 2.
C: Jumping - 2 Rounds:
With Count-Down, Round 1 and Round 2
1.
2.
3.
4.
5.
Number of split / Memory status
Running status
Chrono Phase 1 (in A) / Phase 2 (in B/C)
Chrono Phase 1 (in B/C)
Count Down
3.1. Jumping A (mode A) / Jumping B (mode B) / Jumping C (mode C)
Each competitor is identified by its passing number (sequential) and not by its bib
number.
The Count-Down value has to be set previously into the CD mode
(in Minutes/Seconds).
In Jumping mode, it is automatically corrected in seconds (example : 1’15’’ = 75 sec)
Once the first competitor is started, it is possible to change the count-down beep signal
by pressing the MODE button. The A, B or C icon will be flashing.
When it is flashing, as with the Count-Down mode, the last 5 beeps will sound.
3.1.1. Start Race :
For each of the following steps (Count Down, Start / Jump-off / Finish) of Phase or
Round, press START/STOP button (
icon displays)
3.1.2. Pause / Restart :
At any time it is possible to Pause the Count-Down or Time by pressing SPLIT/LAP
button.
The
icon is flashing.
To restart, press START/STOP button
TAGHeuer Timing
Page 12 / 20
3.1.3. New competitor :
After a finish you can prepare for the next competitor, press SPLIT/LAP button.
The competitor counter is incremented.
3.1.4. Disqualify competitor :
During the session, it is possible to disqualify a competitor.
For this, press and hold the SPLIT/LAP button for 5 seconds
The time of a disqualified competitor is displayed as 0 during recall
Warning:
It is important that the time is running to disqualify a competitor
A short press on the button will only pause the time.
TAGHeuer Timing
Page 13 / 20
3.1. Example : Jumping A (1 phase)
1. Competitor n° 1 : ready to Start
Count Down
2. Competitor n° 1:
Count Down running
3. Competitor n° 1:
Count Down Stopped (21.4 sec)
Phase 1 run
4. Competitor n° 1
Phase 1 stopped (124.93 sec)
Result
Count Down: 21.40
Phase 1: 124.73 sec
5. Next competitor
Competitor n° 2
TAGHeuer Timing
Page 14 / 20
3.2. Example : Jumping B (2 phase)
1. Competitor n° 1: Ready to Start
Count Down
2. Competitor n° 1:
Count Down running
3. Competitor n° 1:
Count Down stopped (21.4 sec)
Phase 1 running
4. Competitor n° 1:
Phase 1 stopped (124.93 sec)
Phase 2 running
5. Competitor n°1:
Phase 2 stopped
Result
Count Down: 21.40
Phase 1: 124.73 sec
Phase 2: 109.12 sec
6. Next Competitor
Competitor n° 2
TAGHeuer Timing
Page 15 / 20
3.3. Example Mode C (2 Round)
1. Competitor n° 1 : Ready to Start
Count Down
2. Competitor n° 1:
Count Down running
3. Competitor n° 1:
Count Down Stopped (21.4 sec)
Round 1 running
4. Competitor n° 1:
Round 1 stopped (124.93 sec)
5. Competitor n°1:
Round 2 : running
Display results Round 2
6. Competitor n° 1
Round 2 stopped
Result
Count Down: 21.40
Round 1: 124.73 sec
Round 2: 109.12 sec
7. Next Competitor
Competitor n° 2
TAGHeuer Timing
Page 16 / 20
4. Recommendations
Although the Pocket Pro can be used indoors and outdoors, optimal viewing and
protection is best when the display is in the shade or covered from direct sunlight and rain.
Never immerse the Pocket Pro in water.
The Pocket Pro is developed to endure light rain.
The USB socket is protected by the black rubber, and prevents any water ingress.
It is very important and recommended to keep the rubber in place at all times when not
using the USB connection.
The optimal visibility of LCD is when the Pocket Pro is protected from direct sunlight
The Pocket Pro can overheat in excessive direct sunlight.
The LCD Plexiglas is fragile. It is not recommended to clean it with a solvent or alcohol
IMPORTANT
A slightly damp cloth is recommended for cleaning the Pocket Pro
5. Download a new version of Firmware
Program downloads and new releases of the TAG Heuer firmware “up loader” are
available free of charge on our website www.tagheuer-timing.com.
For this operation, you need to have:
• Mini-USB cable HL545-3
• The software «TAGHeuerFirmmanager.exe » version minimum V10.0
Procedure
• Copy the software «TAGHeuerFirmManager.exe » onto your hard disk drive
• Connect the Mini-USB cable (HL545-3) to the PC and to the Pocket Pro
• Run the software « TAGHeuerFirmManager.exe »
• Select the COM Port
• Select the file: Update (HL400_xxx.dat)
• Press START on the software.
• Press reset on Pocket Pro
• As soon as the upgrade is downloaded into the HL400, validate the software with OK.
• The HL400 is ready to use.
TAGHeuer Timing
Page 17 / 20
6. Technical specification
6.1. Pocket Pro characteristics
-
Power
Internal battery
Autonomy
Shell
Weight
Precision
-
Display
-
Size of characters
Accuracy
Memory
Temperature range
5 Vdc
600mAh / 3.7V
35 days (in use) after full charge
Aluminium – PVD surface treatment
160 g
+/- 2 sec / month
Calibration available
LCD 3 lines of 6 characters
Battery level / Timing Mode
7mm height
th
1/100 second
800 stored times
–20°C to +60°C
6.2. USB Connector
Pin
1
2
3
4
5
Description
5V
DD+
TAG Heuer Photocell
GND
TAGHeuer Timing
Page 18 / 20
7. Quick Guide
Reset memory
Buttons: Start/Stop + Memory
Change mode:
Clear Memory (Start/Stop + Memory)
Button: Mode
Power off
Buttons: Memory + Mode (hold down together for 5 seconds)
Recall recorded times
Button: Memory
Setting (Date / Time / CD)
Button: Memory to select the digit
Button: Split/Lap to change value
Button: Mode to validate the selection
Stopwatch
Button: Start/Stop: start or stop counter
Button: Split/Lap: memorize Split/Lap
Button: Mode: select display Split or LAP or both
Button: Memory: recall split/lap memorized
Count Down
Button: Start/Stop: Start or Stop counter
Button: Split/Lap: reset the preselected Count Down
Button: Memory: countdown setting
Button: Mode: Select single Count Down or Multi Count Down (CD
blinking)
Time
Button: Start/Stop + Split/Lap: Set Time-of-Day (+ 1 minutes)
Button: Start/Stop: Synchro + Start
Button: Split/Lap: Memorize Time-of-Day
Button: Memory: recall/view memorized time
Jumping A / B / C
Button: Start/Stop: Start, Next Phase, Stop, Restart after Pause
Button: Split/Lap (during run): Pause
Button: Split/Lap (after stop): Next competitor
Button: Split/Lap (5 sec): Disqualify
Button: Mode: change beep signal on the Count Down
Button: Memory: recall / view memorized time
TAGHeuer Timing
Page 19 / 20
TAG Heuer
PROFESSIONAL TIMING
6A Louis-Joseph Chevrolet
2300 la Chaux-de-Fonds
Switzerland
Tel : 032 919 8000
Fax : 032 919 9026
E-mail: [email protected]
http: //www.tagheuer-timing.com
TAGHeuer Timing
Page 20 / 20