1
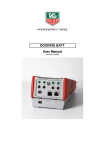
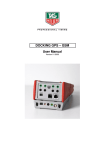
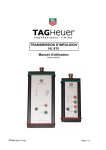
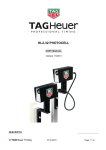
______________________________ PROFESSIONAL TIMING DOCKING GPS User Manual Version 01/2009 1. General The GPS Docking is equipped with a Li-Ion accumulator ensuring exceptional autonomy to the Chronoprinter 540, even at very low temperatures (-20°C / -4° F). A satellite detection module « GSP » ensures the automatic Time of Day synchronisation and precision control. Power Reset Input « Master Slave » System A Output Top Minute Antenna GPS Connector Antenna GSM Connector Output « Master Slave » System A Charge LED RESET button - in case of a problem with the Docking. To RESET, press the mini contact located under the identification plate of the Docking. Use a small unfolded blunt instrument to gently depress. 2. Important recommendation To guarantee the security of your timekeeping, it is necessary to use your CP 540 with the internal batteries in a charged state Do not forget to charge the Docking before its use (see « How to charge the Docking ») If the system is not used for several days, we recommend you to disconnect the Docking from the Chronoprinter, and remove the batteries from the CP 540. Do not forget to replace the « red blanking plug into the DOCKING » on the CP 540 to protect its connector. Protect the Docking with its original packing. IMPORTANT It is essential to update the software inside the CP 540 + Docking before initial use. You will find the software version on our internet site (www.tagheuer-timing.com). 3. Docking connection Remove the « DOCKING red blanking plug » from the CP 540 which gives access to the docking connector. Place the « DOCKING red blanking plug » on the Docking at the reserved place under the female connector. Place the CP 540 on the DOCKING and press firmly to ensure a good connection. 4. How to Use GPS Carefully connect the GPS antenna cable in the socket (21) in its connector. The GPS antenna must be installed in a clear open place (outdoor) with an unobstructed view of the sky in order to correctly receive the satellite signals generated by the GPS system. Menu GPS (ON/OFF) o Select GPS ON and confirm o Select the time difference between GMT time and your time zone (ex GMT – 2, in the west of GMT or GMT + 2 in the east of GMT). o Validate your choice (this information is stored in memory). o The display shows initially GPS Searching, then GPS Active as soon as it locates several satellites. o GPS Searching is also printed with the indication GPS UTC Delta = 16 sec. Then GPS ready for Synchro. o Validate 2 times under GSP to make the Synchro (mode Synchro) The synchronization of Time of the Day with the correct date is automatically made. REMARK UTC TIME The time provided by the satellites is GPS (terrestrial hours) of a certain number of seconds (16 seconds since July 2012). This information is transmitted by satellites every 12,5 mins. It remains in the GPS almanac, this allows fast synchronization. WARNING When you remove the antenna connector, firmly hold the connector. Never draw by the cable. 5. Remarks on GPS ► If GPS signal is Lost (poor positioning of the antenna), the printer indicates: Synchro GPS lost The time of day The display of the time will flicker along with GPS LOST. If the GPS signal is synchronised again, the printer indicates (repositioning of the antenna) GPS Active Synchro GPS found Time of the day DEV 3.0 µsec (for example) Remark: Automatic resynchronization of the timebase of the CP 540 (temporary loss of GSP signal) is acceptable in conditions where the drift of the time does not exceed 100 µsec (1/10'000 of a second). In case of resynchronization, the drift (DEV) is always printed. If the drift value is over 100 µsec, the base time of the CP 540 is the reference for the rest of the time keeping. The GPS can be switched OFF. ► If the Docking is disconnected the printers indicates: Docking disconnected Synchro GPS lost Time of the day When the Docking is reconnected the printer indicates Docking Connected with its serial number and Software version GPS Searching with GPS UTC Delta = 16 sec GPS Active Synchro GPS founded Time of the Day DEV 2.4 µsec (for example) 6. Information The GPS Docking has « banana » output connector to provide a signal TOP-MINUTE which is useful to synchronize other timing systems. If the GPS is used only for the CP 540, it is recommended to wait 4 – 5 mins before to switching it OFF (« memorize » the GPS precision) The GPS Docking has an Input / output « Master / Slave ». This mode of synchronization between several CP 540’s is very useful for the timekeeper, to guarantee absolute precision between different systems. For example: System A (Master) and the back-up system B (Slave). Connect the CP 540 A « Master » to CP 540 B « Slave » with the special cable HL540-11. The CP 540 A is synchronized with the Time of Day, manually or with GPS. The CP 540 B is automatically synchronized by the CP 540 A by choosing Master/Slave in the Synchro Menu. If the Main system A is disconnected or communication fails, the back-up system B will operate with its own time of base. The Drift (DEV) described later « Synchronization by GPS » is also into the mode. Thus, if the Main System A is again operational, it will take its main function as Master if the Drift is lower that 100 µsec. All information is of course printed. 7. How to charge the Docking accumulator The Docking could be charged alone or connected to a CP 540. Charge the docking with the power supply HL 540-1 from the CP 540 Connect the power supply to the POWER connector of the Docking (connector 3 poles). The LED located at the bottom of the Docking allows you to see the charging status. o LED is red during the charge (6 hours for a complete charging) o LED is green when the docking is fully charged When the CP 540 is used with the Docking, the external power supply should be connected to the CP 540. WARNING The Docking should be not charged with a temperature lower that 0°C / 32°F. Remark: The charging status of the Docking is displayed on the CP540 LCD if charged together. If the Docking is too discharged, the batteries of the CP 540 will power the system. If the power is too low, the Time on the LCD will flicked and the printer will print « Low battery » before to switching OFF automatically. When the charge indicator of the Docking shows 50% on the LCD (Docking Menu), you still have at least 4 hours of autonomy. 8. Technical specification General o o o o Accumulator o o o Operating condition External power supply Top minute output Connector IN / OUT -20°C to +60°C 12Vdc (optocoupler) for Master / Slave (2 x RJ13) Type Charging condition Charging current 7.4V Li-Po 2700mAh 0° to +40°C 500mA (~5.5 hours) GPS o o o o Precision +/- 50 n seconds (+/- 50 x 10-9 sec) Current consumption when activated 30 mA (when GPS is actived) 12 channels, continuous tracking receiver. Connector for external antenna TAG Heuer PROFESSIONAL TIMING 6A Louis-Joseph Chevrolet 2300 la Chaux-de-Fonds Switzerland Tel : 032 919 8000 Fax : 032 919 9026 E-mail: [email protected] Http: //www.tagheuer-timing.com