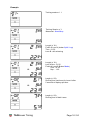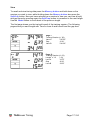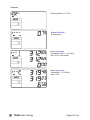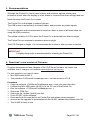
1
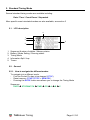
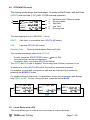
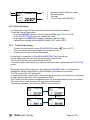
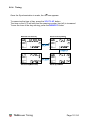
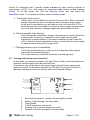
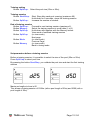
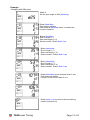
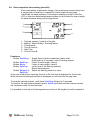
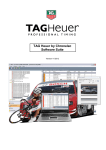
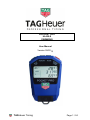
PROCKET PRO
HL400-S
SWIMMING
User Manual
Version 09/2015
TAGHeuer Timing
Page 1 / 24
Contents Table
1.
Concept
2.
Standard Timing Mode
2.1. LCD description
2.2. General
2.2.1. How to navigate the different modes
2.2.2. Power
2.2.3. Time Memory
2.2.4. Delete Memory
2.3. Date Mode
2.4. STOPWATCH mode
2.5. Count Down mode (CD)
2.5.1. Count Down timing
2.6. TIME Mode
2.6.1. Internal Time of Day setting
2.6.2. Time of day synchronisation
2.6.3. To Synchronise at Zero
2.6.4. Timing
2.7. Training with stroke record (mode A)
2.8. Dual competitor time training (mode B)
2.9. Training session up to 9 competitors (mode C)
3.
Recommendations
4.
Download a new version of Firmware
5.
Technical specification
5.1. Pocket Pro characteristics
5.2. USB Connector
6.
Quick Guide
TAGHeuer Timing
3
4
4
4
4
5
5
6
6
7
7
8
9
9
9
9
10
11
15
18
20
20
21
21
21
22
Page 2 / 24
1. Concept
The Pocket Pro Swimming App, Pocket Pro HL400-R, gives users access to timekeeping
functions dedicated to swimming training and events.
Three swimming-specific modes offer the possibility to record and analyse number of
strokes, differential times, average strokes as well as comparing the times of 2 swimmers at
the same time and even timing of up to 9 swimmers with a mass start method.
All 3 modes offer the complete solution for swimming teachers and coaches with the added
benefit to download all data and times for post training / event calculations and results.
Together with its integrated USB connector; free POCKET MANAGER Application and
Pocket-Pro 800 measurements internal memory, this device makes downloading, analysis,
printing and archiving of results extremely simple.
Results can also be viewed or printed from your laptop or pc instantly
The USB connector (HL400-4) enables connection to a photocell, a manual switch or a
wireless radio input (HL615, HL675).
Pocket Pro Manager adjusts a Lock Time for the USB Input.
Note:
Pressing the hard reset (to the right of the USB connector) resets the Lock
Time value to 0.01 sec (minium)
TAGHeuer Timing
Page 3 / 24
2. Standard Timing Mode
Several standard timing modes are available including:
Date / Time / Count Down / Stopwatch
More specific event orientated modes are also available, see section 3
2.1. LCD description
4
1
2
5
3
1.
2.
3.
4.
5.
Sequence Number of athlete / Memory status
Battery / Mode Setting / Running status
Timing Mode
Information Split / Lap
Timers
2.2. General
2.2.1. How to navigate the different modes
To navigate into a different mode:
- First the Pocket Pro has to be stopped (STOP)
- Reset memory (START/STOP + MEMORY)
- Pressing the MODE button now allows you to change the Timing Mode
Sequence:
DATE
STOPWATCH
TAGHeuer Timing
TIME
CD
A
B
C
Page 4 / 24
2.2.2. Power
The Pocket Pro functions with an internal battery. It can be recharged when by
connecting to a PC (USB cable) or by a (USB – 5VDC) power supply
When not used for 36hours, the Pocket Pro will switch OFF automatically (LCD OFF)
To wake up the Pocket Pro, just press any button
It is also possible to switch OFF manually the Pocket Pro by simultaneously pressing
the MODE and MEMORY buttons for 5 seconds
When the Pocket Pro is OFF, all the times are stored in memory
The icon
will indicate the level of the battery
During charge: 75% ON / 25% OFF blinking
Fully charged:
with USB Cable: icon ON
Without USB cable: icon OFF
Low level
(<10% charge): blinking 50% ON & 50% OFF
(you still have 2-3 days autonomy)
2.2.3. Time Memory
The Pocket Pro has a memory of 800 stored times
The number of memorized times is shown on the 3 digits (Memory status)
When the memory reaches 90% capacity (720 times), the 3 digits will flash
Warning
Once the memory is full (800 times), the next time recorded will be stored
as 001 automatically overwriting the original time
The memorized time can be recalled and displayed on the LCD at any time (even
during a timing session)
By pressing the MEMORY button, the memorized time 001 will be displayed as the
button is held down. The number of the memory shown is displayed on the top-left of
the LCD
Press the MEMORY button again and the next stored time will be displayed
TAGHeuer Timing
Page 5 / 24
2.2.4. Delete Memory
To delete the memory, press simultaneously START/STOP and MEMORY
buttons
Warning
You will not receive a request for you to “confirm Delete Memory”!
Once this step is made, all times are irretrievably deleted
2.3. Date Mode
This mode allows you to update the date of the Pocket Pro
To set the date:
- Press the MEMORY button: the first digit will flash and SET icon is ON
- Press the SPLIT/LAP button to change the value
- Press the MEMORY button to move to the next digit
Validate your setting with the MODE button (SET icon is OFF)
1.
2.
3.
4.
TAGHeuer Timing
Icon Set ON = Setting
Day/Month (red digit blinking 25.03)
Year setting (2013)
Time of Day (set in menu TIME)
Page 6 / 24
2.4. STOPWATCH mode
This timing mode allows the timekeeper to make a Start/Finish, with split time
(SPLIT) and lap time (LAP) with 1/100th second precision
1.
2.
3.
4.
5.
Number of split / Memory status
Running status
Split time
Lap Time
Running time
The time displayed is up to 59’59.99’’ (1 hour)
SPLIT :
Split time, or cumulative time (SPLIT/LAP button)
LAP :
Lap time (SPLIT/LAP button)
Running Time :
Running time between Start and Finish
The running time always starts from 00:00:00
- To start, press the START/STOP button ( icon is ON)
- Three times are running and displayed
- To record a Split / Lap, press SPLIT/LAP Button
The SPLIT and LAP time is stopped. The running time (bottom) continues to run
At each press of the SPLIT/LAP button, the memory sequence increases
It is possible to recall and view previous split and lap times during a session by
pressing the MEMORY button
For simple viewing in this mode, it is possible to reduce the information, and display
only SPLIT or LAP. For this, during the race, press the button MODE
2.5. Count Down mode (CD)
This mode allows you to make a unit count down or loop count-down
TAGHeuer Timing
Page 7 / 24
1.
2.
3.
4.
Number of split / Memory status
Running status
Counter
Count Down (max 59:59.9)
2.5.1 Set Count Down
To change the Count-Down value, the memory first has to be deleted
To set the Count-Down value:
- Press the MEMORY button: the first digit will flash and SET icon is ON
- Press the SPLIT/LAP button to change the value
- Press again the MEMORY button to change to the next digit
- Validate your setting with the MODE button (SET icon is OFF)
2.5.1. Count Down timing
- To start the count down, press START/STOP button (
- The count-down value decreases (on the bottom line)
- A timer (on the top) is started (increases)
icon is OFF)
At any time it is possible to PAUSE and RESTART the count-down
A long single beep will sound at the end of the Count-Down
The count-down will stop automatically at 00:00
To restart a new count-down, you have to reset the value by pressing the SPLIT/LAP
button
During the count-down sequence, by pressing the MODE button, it is possible to
change the Single Count-Down to Auto-Restart Count-down (loop mode)
The CD icon on the LCD will switch
In this Auto-Restart Count-Down, during the last 5 seconds, the Pocket Pro will sound
a single short beep and a then long beep at 00:00
The Pocket Pro will restart automatically from the pre-defined time of the count-down
The timer will run and show the full time since the first Start
To stop the sequence, you have to RESET the Pocket Pro
TAGHeuer Timing
Page 8 / 24
2.6. TIME Mode
This timing mode allows you to memorize the time of day at each split
This mode is very useful as a back-up system during a timing session and functions
similarly to other timing systems working at “time-of-day” such as the CP545 ChronoPrinter, Mini Timer or Start Clock
In Time mode, you have the running time on the top line of the LCD and the time of
day on the bottom line of the LCD
1.
2.
3.
4.
5.
Number of split / Memory status
Running status
Running Time (hh:mm:ss)
Running Time (1/100)
Time of Day
2.6.1. Internal Time of Day setting
To set the Internal Time of Day on Pocket Pro:
-
The Pocket Pro memory has to be reset (START/STOP + MEMORY)
Press and hold the MEMORY button for 5 sec: the first digit will flash and
SET icon is ON
Press the SPLIT/LAP button to change the value
Press the MEMORY button to move to the next digit
2.6.2. Time of day synchronisation
-
Press SPLIT/LAP and START/STOP buttons simultaneously
The time of day of the Pocket Pro will be displayed on the top of the LCD with 1
minute in advance
The synchro will be automatic at the end of the full minute
2.6.3. To Synchronise at Zero
- Press START/STOP button
The time automatically starts from zero
TAGHeuer Timing
Page 9 / 24
2.6.4. Timing
Once the Synchronization is made, the
icon appears
To memorize the time of day, press the SPLIT/LAP button
The time on the LCD will stay and the passing counter (top-left) is increased
To see the time of the day running, press the MEMORY button
TAGHeuer Timing
Page 10 / 24
Pocket Pro Swimming has 3 specific modes available for swim training sessions or
competitions. NOTE: You must erase all memorised data before moving between
modes. To do this press and hold the Memory button and also press the
Start/Stop button. You will then be able to select a different mode.
A: Training with stroke record
In this mode, you can define the length of the pool (25 or 50m), record the
number of strokes by pool crossings, as well as times for every length.
At the end of each session you are able to recall on Pocket Pro LCD or
download and view the number of strokes for every length, average stroke
rate, total swim distance, average lengths per minute and total time.
B: Dual competitor time training.
Dual mode allows comparative timing of two swimmers consecutively from
a single start for training or competition. Each length can be timed
individually for each swimmer. Post session analysis via the Pocket Pro
LCD or from the downloaded data provides you with times for every length
for each swimmer along with the gap times.
C: Training session up to 9 competitors
This timing mode allows you to time up to 9 competitors with a single
mass start and individual finishes.
The result shows you individual swimmers time and gap time.
2.7. Training with stroke record (mode A)
In this mode, you define the length of the pool (25m or 50m), record the number of
strokes for each length as well as each split time.
Post session you will be able to view every length with split times, strokes and
distance covered. Downloading the data from Pocket Pro using the Pocket Pro
Manager software provides you with an even more detailed analysis.
4
1
2
5
3
6
1.
2.
3.
4.
5.
6.
Nb of training session / number of pool lengths covered
Battery / Mode Setting / Running status
Timing Mode
Total Running time (mm:ss.dc)
Running time of current length (mm:ss.dc)
Number of strokes recorded on current length
TAGHeuer Timing
Page 11 / 24
Training setting
Button Split/Lap: Select the pool size (25m or 50m)
Training session
Button Start/Stop : Start, Stop after each pool crossing (maximum 60)
Hold down for 5 seconds : stops the training session
Button Split/Lap : Increase the number of strokes
End of training session
Button Split/Lap : Proceed to next training session (maximum 6)
Button Memory :
Select the training session to recall data (1 to 6)
Button Split/Lap
Hold down with together with the Memory button:
View mode of selected training session
Button Split/Lap
(in view mode)
Next page
Button Mode
(in view mode)
Previous Page
Button Memory
(in view mode)
Back to timing mode
Set parameters before a training session
Before a training session, it is possible to select the size of the pool (25m or 50m)
Press Split/Lap to select pool size
By pressing the button Start/Stop, you validate the pool size and start the first training
session
Maximum lengths to time is 60
This allows a training session of 1500m (with a pool length of 25m) and 3000 (with a
pool length of 50m)
TAGHeuer Timing
Page 12 / 24
Example
4 lengths with 25m pool
Mode A
Set the pool length of 25m (Split/Lap)
Button Start/Stop
Start training session
Each press of Split/Lap button: increases the
number of strokes
Button Start/Stop
End of length n° 1
Start new length (n° 2)
Stroke counter : Button Split / Lap
Button Start/Stop
End of length n° 2
Start new length (n° 3)
Stroke counter : Button Split / Lap
Button Start/Stop
End of length n° 3
Start new length (n° 4)
Stroke counter : Button Split / Lap
Button Start/Stop (push and hold down 5 sec)
End of training session
Length Counter returns back to n°4
Button Split / Lap to move to the next training
session (maximum 6)
TAGHeuer Timing
Page 13 / 24
View (button Memory)
Using the Memory button, it is possible to scroll and view all the training sessions
(from 1 to 6).
To select the training session you want to view, hold down the Memory button and
press the button Split/Lap button
Next page: button Split/Lap
Previous page: button Mode
The first 3 pages (1 to 3) display global results of the training session.
The next page (4 to 63) display results for each individual length
Page 1 :
Total time of training (1’06.76’’)
Total number of strokes (75)
Total distance covered (100m)
Page 2 :
Total time of training (1’06.76’’)
Average strokes per length (18.75)
Average distance per stroke (1.33m)
Page 3 :
Total time of training (1’06.76’’)
Average Speed (m/min) : (1.47 metres/min)
Number of strokes / min : (67.40)
Page 4 - 63: (60 pool lengths maximum)
Length n° 3 (-03)
Time of Length (16.57 sec)
Number of strokes (18)
Total distance from start (75)
TAGHeuer Timing
Page 14 / 24
2.8. Dual competitor time training (mode B)
Dual mode allows comparative timing of two swimmers consecutively from
a single start for training or competition. Each length can be timed
individually for each swimmer. Post session analysis via the Pocket Pro
LCD or from the downloaded data provides you with times for every length
for each swimmer along with the gap times.
4
1
2
5
3
1.
2.
3.
4.
5.
6.
6
Training session / number of lengths
Battery / Mode Setting / Running status
Timing mode
Time of Lane A
Gap Time
Time of Lane B
Functions
Button Start/Stop : Single Start for both competitors (mass start)
Hold down for 5 seconds : end of training session
Button Split/Lap : Finish of each length, Lane A
Button Mode :
Finish of each length, Lane B
Button Split/Lap
(at the end of the training session)
Next training session
Button Memory &: Select the training session to view
Split/Lap
At the end of each pool crossing (Lane A or B), the time is displayed for 5 seconds.
When the second competitors time is displayed you will also see the gap time.
To stop the training session, hold down Start/Stop Button for 5 seconds
To move to the next training session press Split/Lap Button and the session number
will increment ready for the next start.
It is possible to time up to 9 training sessions and up to 44 lengths for each competitor
TAGHeuer Timing
Page 15 / 24
Example
Training session n° 1
Training Session n° 1
Mass start : Start/Stop
Length (n° 01)
Finish of Lane A (button Split / Lap)
Time : 21.56
Lane B : still swimming
Length (n° 01)
Lane A time : 21.56
Finish of Lane B (Button Mode)
Time : 23.18
Gap : - 1.62
Length (n° 02)
Running time continues for Lane A after
5 seconds of display split time
Length (n° 02)
Running time of both Lanes.
TAGHeuer Timing
Page 16 / 24
View
To recall and view timing data press the Memory button and hold down on the
session you wish to view, whilst holding down the Memory button also press the
Split/Lap button. Now you have selected your session to view you can view all split
and gap times by pressing again the Split/Lap button to increment to the next length.
Use the Mode button to move back to the previous length.
The first page shows you the last split result of the training session. The following
pages show you each length with Time for Lane A and Lane B and the gap time.
Page 1
Training Session (n° 03)
Lane A
3’47.65’’
Gap
-6.39’’
Lane B
3’41.26’’
Page 13
Training Session (n° 03)
Length n° 12
(-12)
Lane A
14.73’’
Gap
-0.29’’
Lane B
15.02’’
TAGHeuer Timing
Page 17 / 24
2.9. Training session up to 9 competitors (mode C)
This timing mode allows you to time up to 9 competitors with a single mass start and
individual finishes. Also a maximum of 60 sessions can be recorded.
The result displays every finisher (in order of arrival) the time and the gap time with
best time
4
1
2
5
3
1.
2.
3.
4.
5.
6.
6
Training session / arrival number in sequential mode
Battery / Mode Setting / Running status
Timing mode
Running time from start
Finish time of each competitor
Gap with the best time
Functions
Button Start/Stop : Mass start / individual finish (maximum 9)
Button Split/Lap :
Button Memory :
Press to finish the training session (when all competitors are
finished) to move to the next session
Press the Memory button and hold down on the session you
wish to view. Whilst holding down the Memory button also
press the Split/Lap button and release. Now press
Split/Lap button to move through each competitors time and
gap time. To move back to the previous time press the Mode
button.
To exit viewing press the Memory button and you are ready
to start the next session.
TAGHeuer Timing
Page 18 / 24
Example
Training session n° 2 (02-)
Button Start/Stop
Running time
Button Start/Stop
Competitor finish n°1 (3’12.65’’)
Gap : 0.00’’ (first arrival)
Button Start/Stop
Competitor n° 2 (3’19’23)
Gap : 6.58’’
TAGHeuer Timing
Page 19 / 24
3. Recommendations
Although the Pocket Pro can be used indoors and outdoors, optimal viewing and
protection is best when the display is in the shade or covered from direct sunlight and rain
Never immerse the Pocket Pro in water
The Pocket Pro is developed to endure light rain.
The USB socket is protected by the black rubber, and prevents any water ingress
It is very important and recommended to keep the rubber in place at all times when not
using the USB connection
The optimal visibility of LCD is when the Pocket Pro is protected from direct sunlight
The Pocket Pro can overheat in excessive direct sunlight
The LCD Plexiglas is fragile. It is not recommended to clean it with a solvent or alcohol
IMPORTANT
A slightly damp cloth is recommended for cleaning the Pocket Pro
4. Download a new version of Firmware
Program downloads and new releases of the TAG Heuer firmware “up loader” are
available free of charge on our website www.tagheuer-timing.com
For this operation, you need to have:
• Mini-USB cable HL545-3
• The software «TAGHeuerFirmmanager.exe » version minimum V10.0
Procedure
• Copy the software «TAGHeuerFirmManager.exe » onto your hard disk drive
• Connect the Mini-USB cable (HL545-3) to the PC and to the Pocket Pro
• Run the software « TAGHeuerFirmManager.exe »
• Select the COM Port
• Select the file: Update (HL400_xxx.dat)
• Press START on the software
• Press and hold the reset button on Pocket Pro and release when prompted
• As soon as the upgrade is downloaded into the HL400, validate the software with OK
• The HL400 is ready to use
TAGHeuer Timing
Page 20 / 24
5. Technical specification
5.1. Pocket Pro characteristics
-
Power
Internal battery
Autonomy
Shell
Weight
Precision
-
Display
-
Size of characters
Accuracy
Memory
Temperature range
5 VDC (rechargeable with USB cable)
600mAh / 3.7V
35 days (in use) after full charge
Aluminium – PVD surface treatment
160 g
+/- 2 sec / month
Calibration available
LCD 3 lines of 6 characters
Battery level / Timing Mode
7mm height
th
1/100 second
800 stored times
–20°C to +60°C
5.2. USB Connector
Pin
1
2
3
4
5
Description
5V
DD+
TAG Heuer Photocell
GND
TAGHeuer Timing
Page 21 / 24
6. Quick Guide
Reset memory
Buttons: Start/Stop + Memory
Change mode:
Clear Memory (Start/Stop + Memory)
Button: Mode
Power off
Buttons: Memory + Mode (hold down together for 5 seconds)
Recall recorded times
Button: Memory
Setting (Date / Time / CD)
Button: Memory to select the digit
Button: Split/Lap to change value
Button: Mode to validate the selection
Stopwatch
Button: Start/Stop: start or stop counter
Button: Split/Lap: memorize Split/Lap
Button: Mode: select display Split or LAP or both
Button: Memory: recall split/lap memorized
Count Down
Button: Start/Stop: Start or Stop counter
Button: Split/Lap: reset the preselected Count Down
Button: Memory: countdown setting
Button: Mode: Select single Count Down or Multi Count Down (CD blinking)
Time (function manual back-up with Time-of-Day)
Button: Start/Stop + Split/Lap: Set Time-of-Day (+ 1 minutes)
Button: Start/Stop: Synchro + Start
Button: Split/Lap: Memorize Time-of-Day
Button: Memory: recall/view memorized time
TAGHeuer Timing
Page 22 / 24
Mode A
Configuration
Button: Split/Lap:
Button: Start/Stop:
Button: Split/Lap:
At Finish
Button : Split/Lap
Viewing
Button: Memory:
Button Memory + Split/Lap
Button Split/Lap
Button: Mode
Button Memory
Mode B
Timing
Button: Start/Stop:
Button : Split/Lap :
Button : Mode :
At Finish
Button : Split/Lap
Viewing
Button: Memory:
Button Memory + Split/Lap
Button Split/Lap
Button: Mode
Button Memory
Mode C
Timing
Button: Start/Stop:
Button: Split/Lap:
View
Button: Memory:
Button Memory + Split/Lap
Button Split/Lap
Button: Mode
Button Memory
TAGHeuer Timing
Set the pool size (25m or 50m)
Timing
Mass start
Finish for each length
Hold down for 5 sec to finish the training session
Record the strokes (one press for each stroke)
Press and hold for 5 sec to move to the next session
Choose the training session (1 to 6)
Select the training session to view
Next page
Previous page
Back to timing mode
Mass start (2 competitors)
Hold down 5 sec to finish
Finish the length for Lane A
Finish the length for Lane B
Move to the next training session
Scan all the training session (1 to 6)
Select the training session to view
Next page
Previous page
Back to timing mode
Mass start (up to 9 competitors)
Individual finish (in order of finishing)
Press to move to the next session
Scan all the training session (1 to 6)
Select the training session to view
Next page
Previous page
Back to timing mode
Page 23 / 24
TAG Heuer
PROFESSIONAL TIMING
6A Louis-Joseph Chevrolet
2300 la Chaux-de-Fonds
Switzerland
Tel : 032 919 8000
Fax : 032 919 9026
E-mail: [email protected]
http: //www.tagheuer-timing.com
TAGHeuer Timing
Page 24 / 24