1
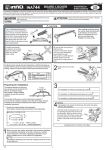
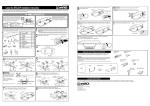
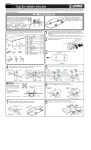
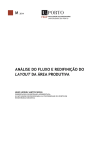
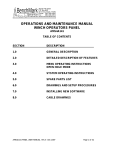
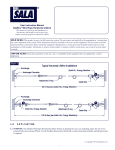
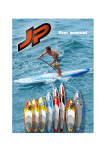
5474-71228
INA745
Installation
Instructions
CRANE FLOATER
Universal Board Carrier
US
The following Installation Instructions explain how to mount and use the INNO system carrier attachment system designed for
loading 3 surf boards or 2 long boards. After reading this manual, keep it in a safe place along with the installation instructions
for attachment systems. If you have any questions regarding this manual, please contact us listed at the end.
Failing to observe these cautions may lead to accidents
that may cause death or serious injur.
These notes explain points that you should know about
when using the roof box.
CAUTION
Note
ATTENTION
Failing to observe these attentions may lead to
injuries, or damage to the roof box, vehicle, and
surrounding objects.
CAUTION
Before driving the vehicle, rock
the attachment in the forward,
back, right and left directions to
ensure that there is no looseness
in any of the 10 Hex bolts.
Types of board and maximum loading capacity.
This is a dedicated attachment for loading 1 to 3 short board(s) or 1 to 2
long/sail board(s). Maximum loading capacity varies with each vehicle
type. Check applicable setting for your car on Application Table by
Vehicle Type. Do not load objects other than surf board or sail board.
Follow illustrations below when loading boards.
1 to 3 boards
in single row
Side by side
Belt is a consumable part. Before each use, be sure to check front and
back of belt. If following conditions are observed, immediately stop use
and replace with new part (genuine repair part). Failure to do so may
cause belt to tear while driving, resulting in fallen boards.
1. Belt surface is fuzzy or damaged.
2. Color of belt is partially faded.
3. Thread is frayed or cut.
4. Part is damaged, deformed or rusted
or missing.
5. Exhibits traces of heat or chemical damage.
Belt deteriorates if exposed to UV
rays.
When not in use, always remove
belt and store it away from direct
sunlight.
2
PARTS INCLUDED
Verify that all of these parts, components and items are included in the
carrier system you have purchased. In the event any of these parts,
components or items is missing, contact us as listed at the end of this
manual.
1
No.
1
2
3
4
2
5
6
7
6
5
4
3
8
9
10
7
8
9
10
Part
Crane assembly
Belt (With buckle)
Belt holder
Lower plate
Spacer
Hex bolt
Hex wrench
Rubber adhesive pad (S)
Rubber adhesive pad (L)
Installation Instructions
(user’s manual)
Affix the rubber adhesive pad if rack is placed on factory crossbar or
oval bar. Do not use rubber adhesive pad if rack is placed on square
or round cross bar. Refer the figures below.
CAUTION
If you miss use the rubber adhesive pad, rack may slide and the
loaded board(s) may fall off.
Qty
2
2
Use rubber adhesive pad
2
4
Do not use rubber adhesive pad
Factory crossbar
or Oval bar
2
Square bar
10
Round bar
(With round bar adapter
[sold separately])
1
8
4
Rubber
adhesive pad (S)
1
Rubber
adhesive pad (L)
Do not use rubber adhesive pad
USER’S
MANUAL
1
This product will fit square, round & most factory crossbars.*1
If you do not have factory crossbars, mount the carrier stays and
bars according to the procedures described in the Basic Carrier
System Installation Instructions.
3
CAUTION
The clearance between the front and rear carriers should be in the
range of 20 inch (50 cm) or more.
MAXIMUM CROSSBAR SIZE
~3.5"(90mm)
H
T
H: ~1.2" (30mm) [Without option]
1.2"~2.0" (30~50mm) [Needs ISF714]
T: Distance to Roof : Min2.0" (50mm)
US
*1: Round bars require
ISF715 adapter
(sold separately)
Some factory
crossbars require
ISF714 long bolt kit
(sold separately)
Install crane with hex bolt using hex wrench at position appropriate
for board width.
Hex wrench
2.4 inch (6 cm)
or more
Board width
-1-
4
10
Tighten the bolts on each side evenly in order to parallel the Upper
plate and Lower plate.
Upper plate
Lower plate
5
Belt
Hook
– Allow belt end to project 2" (5 cm) or
more from hook. If end section is short,
belt may come off and board may drop.
– Guide belt correctly by referring to
illustrations, in order to prevent board
from dropping
Spring washer
Install belt holder / lower plate at
position appropriate for board size.
Tighten same as the crane side.
Hook section
CAUTION
Tighten hex bolt further until
spring washer flattens.
Parallel
Adjust length of crane belt
according to board width and
number of boards to be loaded.
Hex wrench
11
Belt holder
Attach buckle to hook and secure
board by pulling belt. Hold board
while belt is being pulled.
)
m
5c
h(
nc ore
i
2 m
or
Buckle
Hook
Buckle
CAUTION
Do not overtension belts, since surf /
sail board may crack or deform.
Lower plate
Hold board
Bar
6
Guide spacer through folded
end of belt and securely
tighten to belt holder with hex
bolt using hex wrench.
Tighten hex bolt further until
spring washer flattens.
Spacer
Pull
12
Belt holder
Lower plate
13
Hex bolt
Hex wrench
Line up with the front rack when mounting the rear rack so that the
surfboard will be parallel to the vehicle when loaded.
Shake board to confirm it is held securely.
CAUTION
Before driving the vehicle, rock the attachment in the forward, back,
right and left directions to ensure that there is no looseness in any of
the 10 mounting Hex bolt. Retighten any loose screw.
How to guide / replace belt
Prepare new belt set. Pass belt
on crane side through adjuster
and guide it around rivet at
base of crane.
Adjuster
To crane tip
CAUTION
Pay attention to adjuster orientation.
Installing the adjuster upside down,
this will cause damage to surfboard.
Rivet at base
of crane
Adjuster
Set as close
as possible
8
9
Approx. 2 to 4 inch
(5 to 10 cm)
Carry up to 3 short boards or 2 long boards / windsurf boards.
CAUTION
Board
Maximum loading capacities may differ from OEM to after market
crossbars. Before installing, please confirm load capacities with the
owner’s manual for OEM crossbars or Fit Guide for the after market
crossbars.
Load board.
Set INNO board protector
or other cushion material
on bar and place board
on top.
Hook
14
Board
How to guide / replace belt
Guide longer belt end through crane tip and through hook. Follow
adjustment procedure of belt length.
CAUTION
Crane
Board may drop if belt is guided incorrectly.
Board
Hook section
Belt
Board
protector
US
Board
Folded end of belt
Spring washer
7
Crane
Hook
Hook
Bar
-2-
2 inch (5 cm)
or more
Information on genuine repair parts
The following genuine repair parts are available for the carrier
system. Specify the part number when ordering any part from
the store where you purchased your system.
Buckel
ISP186
Crane cover
Belt assembly
Buckle side,
crane side
Note
The specifications and external appearance of the carrier
system and genuine repair parts are subject to change
without prior notice in the interest of product improvement.
USER’S
MANUAL
Hex wrench
(4mm)
User’s manual
Hook
ISP187
Spacer
Belt holder
Lower plate
Hex bolt
Belt holder set
Contact Information
If you have any complaints, requests or comments, please contact us listed right. CARMATE shall not be held liable for any accidents or incidental losses
arising from improper installation or use, nor for those arising from installation or use after the customer has made any change to the system’s original
configuration or specifications.
*Specifications and exterior design are subject to change without notice for purposes of improvement
CAR MATE USA, Inc
383 Van Ness Ave. Suite 1603, Torrance, CA 90501 U.S.A
[email protected]
www.innoracks.com
US
-3-
INA745
CRANE FLOATER
Universal Board Carrier
Usage
Guidelines
US
Read and understand this user’s manual thoroughly before using the your new board carrier and be sure to follow all usage instructions.
Keep this manual in a safe place so that it’s handy for reference anytime.
If you sell or give away the board carrier, provide this manual to the new owner to ensure safe installation and usage.
If you have any questions regarding the information in this manual, please contact the service center listed at the end of this manual.
Caution
At least
19.7 inch (50 cm)
There should be a distance of at
least 19.7 inch (50 cm) between the
front and rear crossbars.
We cannot guarantee the
performance of racks or crossbars
made by other manufacturers when
used with the Board Locker. Please
make sure that they are installed
correctly and in good condition.
Do not attempt to modify your rack.
Obey all posted speed limits. Drive
slower under strong winds or on
rough roads.
If multiple surf/sail boards are
stacked, rear end must be higher
than front end.
If front end is higher, air resistance
increases and may place undue
strain on carrier.
REAR
Do not load sail boards or long
boards in bag. Only short boards
can be loaded in bag.
Before driving, shake board in all
directions to inspect belt tension.
Retention loose belts.
Sail board or long board bag
If a short board is loaded in a bag,
secure it firmly to prevent moving.
Do not make hard starts,
unnecessarily sharp turns, abrupt
maneuvers or sudden stops. In case
you have to perform such a
maneuver, always check afterwards
to see that the carrier and cargo
remain secure.
Be careful not to hit the surfboards
or sailboards with the vehicle’s
tailgate or trunk lid. In case your
gear is accidentally hit by the
tailgate or trunk lid, be sure to check
the carrier’s mounting condition.
Do not drive your carrier through a
car wash.
Always remove the carrier system
before running your car through a
car wash.
Daily care and storage
1
Wash any mud off the carrier system.
3
Clean the carrier system and check for the
following:
2
Use a damp cloth to wipe away dust and dirt.
4
Store all components of the carrier system together in one place to prevent any component from
being lost. Avoid storage in areas subject to direct sunlight, high temperature or excessive humidity.
Check Items
1) Worn screw threads 2) Key deformation
3) Holder deformation 4) Cracking in the components
of the carrier system
US
Note
Do not use thinner or other solvents.
-4-