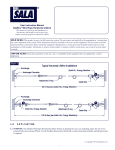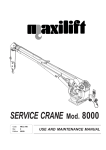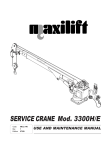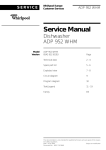
1
Expotrade Group GmbH Herrschaftswiesen 17 6842 Koblach user manual / instructions User-manual / instructions expoarch page 1 of 11 © 2011/2012 without written notice of Expotrade Group GmbH this manual may not be copied unless for own usage Expotrade Group GmbH Herrschaftswiesen 17 6842 Koblach user manual / instructions ! Important ! 1. warn- and security notice !! The expoarch design and construction is destined to be used indoor and outdoor. To ensure a safe stand, the build-up and take-down has to be in accordance with this user manual and the instructions herein has to be followed exactly. The build-up and take-down is allowed only by persons which are familiar with this usermanual and instructions herein ! Expotrade Group GmbH, their affiliates or the manufacturer cannot be held responsible for any damages at the product or also damages on other products or persons caused by any misuse, wrong operation or inappropriate repairs. If available please use gloves (best with a rubber-coating) to avoid dirty hands touching the fabric parts and to avoid any injury on your hands/fingers. Any necessary repair may be carried out only by Expotrade Group GmbH or their announced and/or authorized persons or companies. In case of any transfer of the expoarch to Third Parties you have to ensure that the usermanual and instructions are available with the product in order that a proper build-up and take-down as well as the proper and secured fixing of the expoarch is guaranteed. In case the user-manual is not available you may contact Expotrade Group GmbH or download from www.expotradegroup.com While mounting the profiles please carefully watch your fingers/hands of crushing. Near the expoarch-fabric donot handle with open fire and other sources of ignition. Please make sure, that the planned location of the expoarch is as equal as possible. Smaller height-discrepancies can be adjusted with the height-adjustment which is integrated in each of the leg. A non-equal position might result in damaging the expoarch itself and could lead to a fall-down. Expotrade Group GmbH cannot be held responsible of any damage and injury caused thereof. During build-up and take-down of the expoarch it has to be ensured that persons which are not familiar with the user-manual and instructions or which are not involved in the build-up and take-down procedure are not in the nearer surrounding of the expoarch. Furthermore please ensure that all vehicles or other products whatsoever which might disturb the build-up or take-down process or be damaged by a falling expoarch are in secure distance of the location. To build-up and take-down of the expoarch you need at least „3“ persons (more persons recommended) which are familiar with the user-manual and instructions accordingly User-manual / instructions expoarch page 2 of 11 © 2011/2012 without written notice of Expotrade Group GmbH this manual may not be copied unless for own usage Expotrade Group GmbH Herrschaftswiesen 17 6842 Koblach user manual / instructions Please note that the single components of the expoarch can be heavier in weight as maybe expected. The expoarch may not be buildt-up during windspeeds of over 50 km/h ! Once the expoarch is properly buildt-up and securely fixed please take attention of the special instructions regarding wind-speeds ! Always securely fasten the expoarch with the included tightening-cords. The cords can be fixed either with long nails (min. 50 cm length) in the soft ground or be fixed at other positions which can hold the weight and tension properly. If you donot use the cords properly, please be warned that you risk a damage or injury. Depending on the windspeed and/or at locations with no cord-fixing possibilities you may also use weights additionally to the cords. Please notice the special instructions regarding necessary weight. At windspeeds of 60 km/h or more, the expoarch has to be taken-down immediately or at least all the fabric-parts has to be taken-off the frame. In case the profiles of the expoarch are „inside“ the track of any race, please make sure that the profiles are properly covered (at least up to 2 m height) with any bumping-effect foam, fabric or other proper material avoiding injuring while crashing into the expoarch. DONOT o climb on the expoarch o hang on any position of the expoarch o hang any weights on to the expoarch which are not confirmed by Expotrade o pull on the fixing cords o carry or move the expoarch to another position after it is buildt-up o hang any light-sources in or on it which may get warm or hot o place the expoarch at a location where emergency- and/or other vehicles have to enter o hang any additional fabric-parts on or in it which are not confirmed by Expotrade o throw the profiles or any parts of the expoarch to the ground – this might damage the profiles and therefore effect the stability and/or disturb the build-up or take-down process seriously o drive with any vehicle on the parts or jump on to the parts o clean the profiles with any strong chemical which may damage the coating or welding o stow other products on the packed expoarch / this may bend the profiles and/or damage the packing-bags User-manual / instructions expoarch page 3 of 11 © 2011/2012 without written notice of Expotrade Group GmbH this manual may not be copied unless for own usage Expotrade Group GmbH Herrschaftswiesen 17 6842 Koblach user manual / instructions 2. Equipment Bag "1" Bag "2" Bag "3" tube-system „left“ side (A,B,C) incl. triangle (with overlap) center-part, all feets, all fabric-parts tube-system „right“ side (X,Y,Z) incl. triangle Fabric-parts are packed on top of the bag "2" - use the overlap to protect. 10 pcs cord-fastening nails are included in each expoarch Weights: bag (fillable with 30 l water or sand) and/or plates of 25 kg each User-manual / instructions expoarch page 4 of 11 © 2011/2012 without written notice of Expotrade Group GmbH this manual may not be copied unless for own usage Expotrade Group GmbH Herrschaftswiesen 17 6842 Koblach user manual / instructions 3. Assembly 1. First please take-out the tubes from each bag and start with laying the “center-part” to the center of the planned location. The “center-part” is easy to recognize as this is the part with 3 tubes welded together to one piece. Then lay all the tubes left (A,B,C) and right side (X,Y,Z) of the center-part to the ground by following the numbers-code on the tubes. (e.g. A-1 to A-1 and X-6 to X-6 etc.) The numbers are clearly indicated at each profile. Please mind that the “bending” of the center-part has to look upwards and the sides touch the ground ! 2. Lift-up the center-part and start to plug-in the tubes according to the number-code. Please mind that you always alternate left and right side from the center part so that the expoarch is “equally” growing up. Two persons equally holding-up the arch and one person is pushing-in the profiles one by the other at these positions. If both profiles are properly in, then move to the other side of the arch and continue to do the same equally on that side. Once done, then again move to the other side and continue like this till the arch is up. IMPORTANT: DONOT yet push any middle-tube into the center-part – only start with the side-legs !!! Otherwise the whole weight is on the middle-part and the arch may fall to any side. User-manual / instructions expoarch page 5 of 11 © 2011/2012 without written notice of Expotrade Group GmbH this manual may not be copied unless for own usage Expotrade Group GmbH Herrschaftswiesen 17 6842 Koblach user manual / instructions 3. Most important is that the “snap-button” (golden colour) is properly popping out at the hole of the connection-part as otherwise the profile is NOT fixed properly and the expoarch is not standing securely !!, There is a small “mark” at each connection part in order to better see the correct pushing-in position of the tube. If followed by this mark, the snap-button should pop-out automatically once the profile is pushed in completely – if not then twist the tube a bit. But please note that any twisted push-in of the profile may cause that the profile gets stucked in the connection part. In this occasion, please keep on holding the arch equally and try to pullout the profile by carefully shaking and twisting the profile until it is released. DONOT let the expoarch stand down in this condition if only one profile is properly in. By doing so, the profile might get stucked even more or the expoarch could fall down !! 4. To enlarge the stability of the expoarch the “upper triangle” has to be fixed between the 2nd and 3rd tube starting from the center-part. Before you push-in the 3rd tube you have to place the triangle on top of the connection-part of the tube (connection-part into the hole of the triangle) and then push-in the 3rd tube together with the triangle into the 2nd tube. Please mind the correct position of the triangle before you push finally. 5. IMPORTANT: Only after you have fixed the upper triangle you may start fixing the “middle-tubes” which are pushed into the middle-tube of the center-part. Also do it left/right side after each other. Always note, that the middle-tube has to be “one step behind” the two outer tubes as otherwise the whole weight of the expoarch is laying on the middle-tube and might damage the expoarch or even fall down during build-up ! User-manual / instructions expoarch page 6 of 11 © 2011/2012 without written notice of Expotrade Group GmbH this manual may not be copied unless for own usage Expotrade Group GmbH Herrschaftswiesen 17 6842 Koblach user manual / instructions 6. After you have fixed the triangle then you can push-in the 4th tube on left- and right side so that the expoarch is nicely and equally standing on a wider leg-distance. If this is completed, you could start fixing the “fabric-banner” below the center-part. The Spannfix-fixings has to be slinged around the middle-tube and be fixed also at both triangle-parts inside. After fixed at the triangle, you may have to adjust the fixing around the middle-leg accordingly in order to get a nice and tensioned shape at the banner. Then you may continue in fixing the left- and right fabric-parts with the smaller open triangle on top. Please mind the correct triangle-position and fix it with the ribbon/ buckles at the triangle. Furthermore start to sling around the Spannfix-fixings to all three tubes and continuesly fixing downwards. 7. By continuing in pushing the next profiles in you will notice some additional welded “holders” at the tubes. These are holders of necessary additional “lower triangle-bars”. These bars will give the expoarch additional stability at the lower part of the arch and are “absolutely necessary” !! At this position the LONG BAR MUST be clicked-into the bubble-holder immediately. Only if the long bar is clicked-into properly you may proceed with the other side of the expoarch to do the same procedure. If you forget to fix the long bar on the one side and lift the expoarch on the other side, the expoarch might be damaged and even fall down ! This is a very Important step !! User-manual / instructions expoarch page 7 of 11 © 2011/2012 without written notice of Expotrade Group GmbH this manual may not be copied unless for own usage Expotrade Group GmbH Herrschaftswiesen 17 6842 Koblach user manual / instructions 8. After both long bars are properly clicked-into the bubble-holder you may proceed with the “feets on both of the outer tubes”. DONOT start with the middle-leg as this one is still one step behind ! Once you have done this on both sides left and right, then proceed on one side with the middle-feet and then on the other side as well. In order to push-in the middle-feet the 2 persons holding-up the outer-tubes “equally” have to lift-up quite high in order to be able to push-in the middle-tube incl. feet. Once this is done, then you have to immediately FIX THE SHORT BARS as well. 9. Further fix the fabric at the tubes downwards and stop at the lower triangle position ! Reaching this position you will notice a small cut-out at the side of the fabric. First you have to “loose one bar from the bubble-holder” and push the bar from the outside into this cut-out. Then fix the bar again at the bubble-holder. This procedure has to be done with all 3 bars one after each other ! please DONOT loose all 3 bars together at the same time. The 2 other bars always have to stay fixed in the holder ! By doing this, all the 3 bars will be “hided completely” inside the fabric part. Then you may continue in fixing the fabric downwards around the tubes. At the end there is a ribbon/buckle fixing which has to be properly and carefully fixed at the feets in order to reach nice tension of the fabric. Please DONOT overtension ! User-manual / instructions expoarch page 8 of 11 © 2011/2012 without written notice of Expotrade Group GmbH this manual may not be copied unless for own usage Expotrade Group GmbH Herrschaftswiesen 17 6842 Koblach user manual / instructions SECURITY AND PROPER FIXING after successful build-up 1. Make sure that you twist the height-adjustment at each of the legs accordingly so long up or down until the expoarch is in a „most equal level“ ! Soft ground: In the feets are holes where you have to push-in the long nails 10 pcs nails with 70 cm length are included (6 nails for the legs / 4 nails for the cords) Hard ground: Either weight-bags or weight-plates can be used. The weight-bag can be fixed at the inside hided by the fabric-parts and the weight-plates are fixed at the feets so that they cannot slip off the plate. 2. Depending on windspeed the expoarch has to be additionally tightened-down by cords/ribbon which are included as well. Either these are fixed with the nails or also tightened down to any other position which can hold the weight/tension of the expoarch „on both sides“ during stronger winds. The cords/ribbon has to be fixed at the upper triangle part ! (see the red line below) User-manual / instructions expoarch page 9 of 11 © 2011/2012 without written notice of Expotrade Group GmbH this manual may not be copied unless for own usage Expotrade Group GmbH Herrschaftswiesen 17 6842 Koblach user manual / instructions FINISHED important notice for the TAKE-DOWN procedure 1. Please consider all security-steps as mentioned above. (security-distance of persons not involved, vehicles or other items) which remain unchanged and still valid also for take-down procedure 2. Start with loosing the fabric fixings at the bottom and continue upwards 3. The lower triangle-bars may be taken-out only one-by-one and after releasing the fabric they HAVE TO BE FIXED AGAIN ! 4. All steps have to be done always alternating on both sides 5. Opposite to the build-up procedure, the „middle tubes“ HAVE TO BE TAKEN OUT FIRST and the outer tubes are „one step behind“ !! IMPORTANT !! 6. Also MIND, that the long bar has to remain at the bubble-holder as long as possible/necessary in order to keep the stability or the expoarch. 7. Just MIND that the expoarch is „equally“ taken-down on both sides left and right – so please DONOT take-down first one side completely and then the other side !!!! This may result in instability of the expoarch and might damage the product or persons, items etc. under it seriously when falling down !! User-manual / instructions expoarch page 10 of 11 © 2011/2012 without written notice of Expotrade Group GmbH this manual may not be copied unless for own usage Expotrade Group GmbH Herrschaftswiesen 17 6842 Koblach user manual / instructions Warranty and contact-information Warranty Expotrade Group GmbH warrants the product for 2 years from date of delivery against defects in materials and workmanship. This warranty does not cover any defects caused by accident, misuse, fire, tearing of fabric due to inproper handling, neglect, or any attempt at repair. This warranty is offered as an additional benefit to the consumer`s statutory rights and does not affect these rights in any way. Contact Head office: Expotrade Group GmbH Herrschaftswiesen 17 6842 Koblach Austria (EU) P: +43 (0)5523-54010 [email protected] www.expotradegroup.com User-manual / instructions expoarch page 11 of 11 © 2011/2012 without written notice of Expotrade Group GmbH this manual may not be copied unless for own usage