1
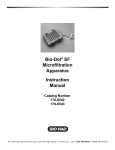
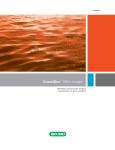
GelAir Drying
System
Instruction
Manual
Catalog Numbers
165-1771, 165-1772
For Technical Service Call Your Local Bio-Rad Office or in the U.S. Call 1-800-4BIORAD (1-800-424-6723)
Table of Contents
Page
Figures and Tables .......................................................................................ii
Safety ............................................................................................................iii
Section 1
1.1
1.2
Introduction
Overview ....................................................................................................................1
Unpacking...................................................................................................................1
Section 2
System Features............................................................................................2
2.1
2.2
2.3
GelAir Dryer...............................................................................................................2
GelAir Drying Frame .................................................................................................2
GelAir Assembly Table..............................................................................................3
Section 3
Set Up and Operation ..................................................................................3
3.1
3.2
Drying Acrylamide Gels ............................................................................................3
Drying Other Types of Gels.......................................................................................7
Section 4
Maintenance and Troubleshooting.............................................................9
Appendix A Specifications ..............................................................................................10
Appendix B Warranty Information...............................................................................10
Appendix C Ordering Information................................................................................11
Appendix D References ...................................................................................................11
Figures and Tables
Figure 1
GelAir Drying System .................................................................................1
Figure 2
GelAir Dryer.................................................................................................2
Figure 3
Drying Frame ...............................................................................................2
Figure 4
Drying Frame Assembly..............................................................................3
Figure 5
Adding the Top Layer of Cellophane.........................................................4
Figure 6
Removing Air Bubbles from Between the Sheets of Cellophane............4
Figure 7
Drying Frame Assembly..............................................................................5
Figure 8
Clamping the Drying Frame.......................................................................5
Figure 9
Trimming a Dried Gel .................................................................................6
Figure 10
Autoradiography Gel Assembly.................................................................7
Figure 11
Autoradiography Gel Assembly with Filter Paper Backing...................8
Figure 12
Agarose Gel Assembly .................................................................................9
Table 1
Approximate Drying Times for Polyacrylamide Gels in Heated
GelAir Dryer.................................................................................................6
ii
Safety
Caution/Warning
The GelAir Dryer is electrically isolated from earth ground to minimize the risk of electrical shock to the user. These guidelines should be observed when using the gel dryer.
•
To insure adequate air flow, be sure that there is at least 10 cm of clearance around the gel
dryer. Do not block the fan vent at the rear of the unit.
•
Always connect the power supply to a 3-prong, grounded AC outlet, using the 3 prong AC
power cord provided with the dryer.
This instrument should not be modified or altered in any way. Alteration of this instrument
will void the manufacturer’s warranty, and create a potential safety hazard for the user.
Bio-Rad is not responsible for any injury or damage caused by the use of this instrument
for purposes other than for which it is intended or by modifications of the instrument not performed by Bio-Rad or an authorized agent.
Important
This instrument is intended for laboratory use only.
This product conforms to the “Class A” standards for electromagnetic emissions intended for laboratory equipment applications. It is possible that emissions from this product may
interfere with some sensitive appliances when placed nearby or in the same circuit as those
appliances. The user should be aware of this potential and take appropriate measures to avoid
interference.
This Bio-Rad product 115 V and 230 V is certified to meet CAN/CSA C22.2
No. 1010-1 and UL 3101-1 safety standards. Additionally the 230 V is certified to
EN61010-1* safety standards. These products are safe to use when operated in accordance with the instruction manual.
This instrument should not be modified or altered in any way. Alteration of this instrument
will void the manufacturer’s warranty, void the CE, EN61010-1, CAN/CSA C22.2
No. 1010-1 and UL 3101-1 certification, and create a potential safety hazard for the user.
Bio-Rad is not responsible for any injury or damage caused by the use of this instrument
for purposes other than for which it is intended or by modifications of the instrument not performed by Bio-Rad or an authorized agent.
*EN61010-1 certification is an internationally accepted electrical safety and EMC standard for laboratory instrumentation,
which includes the CE mark.
iii
Section 1
Introduction
1.1 Overview
diagram 1
Dryer
Stainless Steel Top Frame
Assembly
Table
Molded Bottom Frame
Clamps
Fig. 1. GelAir Drying System.
The GelAir Drying System can be used for drying practically any type of polyacrylamide
(SDS-PAGE, native, IEF, 2-D) or agarose gel. The GelAir Drying System produces dried
gels in a format that is ideal for densitometry, autoradiography, or permanent storage. The
GelAir system requires no vacuum pump or vapor trap, is practically maintenance free, and
will dry up to 16 Mini-PROTEAN® II gels simultaneously and as quickly as a standard vacuum dryer.
1.2 Unpacking
Upon receipt of your GelAir Drying System, carefully inspect the box for any damage
which may have occurred in shipping. Severe damage to the container may indicate damage
to the system components. If any parts are missing or damaged, immediately file a claim with
the carrier in accordance with their instructions and contact Bio-Rad Laboratories.
Unpack your Gel Drying System
The complete GelAir Drying System is shipped with the following:
GelAir Dryer with power cord
Two Complete Drying Frames (molded bottom frame, stainless steel top frame and
clamps)
Assembly Table
Cellophane Support (50 pre-cut sheets)
Instruction Manual
1
Section 2
GelAir System Features
2.1 GelAir Dryer
The GelAir Dryer can be operated with or without heat by toggling the heat on/off switch.
The dryer operating temperature is optimized to dry gels without cracking. The oven has a continuously adjustable 3 hour timer that shuts off automatically when the timer expires. To operate, turn the timer knob clockwise to activate the timer, turn counterclockwise for continuous
operation. The dryer holds a maximum of four drying frames. The front flap maintains the
proper gel drying temperature and air circulation (do not remove it). Use of other manufacturers drying frames with this dryer is not recommended.
Timer Knob (continuous or timer mode)
Heat On/Off Switch
Fig. 2. GelAir Dryer.
2.2 GelAir Drying Frame
The GelAir Drying Frame maintains a flat cellophane surface for distortion-free gel drying. The drying frame consists of a stainless steel top frame, a molded bottom frame and eight
clamps. The gel is held between two sheets of cellophane which is clamped between the top
frame and the bottom frame.
Clamp
Stainless Steel Top Frame
Molded Bottom Frame
Fig. 3. Drying frame.
2
2.3 GelAir Assembly Table
The GelAir Assembly Table provides a smooth, flat surface for assembling and clamping the drying frame.
Section 3
Set-Up and Operation
3.1 Drying Acrylamide gels
Gel Preparation
Equilibrate the gel in water for a minimum of 5 minutes to minimize gel cracking during
drying.
Examine the gel and with a razor blade, carefully remove any areas of the gel which are
noticeably thicker. Bio-Rad’s Ready Gels and other brands of precast gels have a noticeably
thicker edge along the bottom of the gel. The noticeably thicker edges must be removed to
prevent gel cracking.
Frame Assembly
1. Place the molded bottom frame on the assembly table with the textured side up.
2. Fully submerge a sheet of cellophane in water.
3. Lay the wetted sheet of cellophane on top of the assembly table. It should lay flat and
should be centered over the assembly table and plastic frame. Make sure that the edges of
the cellophane are hanging over all four sides of the frame. Using your fingers, smooth
away any wrinkles and remove air bubbles trapped beneath.
Gels
Cellophane
Bottom Frame
Assembly Table
Fig. 4. Drying frame assembly.
3
4. Place as many gels on the cellophane as desired. Using a wash bottle, add water to the surface of the cellophane directly around the edges of the gels. Be sure to fill in the wells of
the gels with water. Use plenty of water. It provides a means for removing air bubbles
when applying the top layer of cellophane.
Fig. 5. Adding the top layer of cellophane.
5. Wet a second sheet of cellophane with water. Carefully lay this sheet on top of the gels.
Use both hands to hold one end of the cellophane while draping the other end over one
edge of the plastic frame. Slowly lower the cellophane to cover the gels and the rest of the
frame (Figure. 5). If air bubbles are trapped next to one or more of the gels, raise the cellophane to expose the bubbles and then lower it again. If this does not work, add more
water and try again. It is important to remove the air bubbles trapped between the two
sheets of cellophane. If they migrate next to the gel, they can cause gel cracking.
Fig. 6. Removing air bubbles from between the sheets of cellophane.
4
6. Once the top cellophane sheet is in place, make sure both sheets of cellophane overhang
all four sides of the plastic frame. Re-adjust them if necessary. Use your hand or one edge
of the stainless steel frame to smooth away any remaining bubbles. It is not necessary to
remove excess water.
Top Frame
Top Cellophane
Bottom Cellophane
Bottom Frame
Fig. 7. Drying frame assembly.
7. Place the top frame over the cellophane and center it over the bottom frame.
Top Frame
Bottom Frame
Fig. 8. Clamping the drying frame.
8. Clamp the top frame to the bottom frame using two clamps per side. Before positioning
a clamp, make sure the latch is up. Slide the clamp over the edge of the cellophane and
onto the bottom frame until it is seated over the top frame (Figure 8). Push the latch down
to lock it in place.
5
9. Lift the clamped drying frame off the assembly table and slide it onto one of the shelves
of the GelAir dryer. Always place wet assemblies below any partially dried gels. Water
dripping on a drying gel may cause cracking.
10. Turn on the dryer using the timer knob. Choose either ‘continuous on’ by turning the
knob counter-clockwise or ‘timer’ by turning clockwise. Select heat or no heat with the
heat on/off switch. Gel drying times are primarily dependent upon gel thickness (Table 1).
Table 1. Approximate drying times for polyacrylamide gels in heated GelAir
Dryer.
Gel Thickness
0.5 mm
0.75 mm
1.0 mm
1.5 mm
Drying Time
30-45 minutes
40-55 minutes
45-60 minutes
65-80 minutes
11. To test gel dryness, remove the frame from the oven. Feel the entire gel using the back of
your fingers or hand (fingertips are less sensitive for this purpose). If any part of the gel
feels cold or slightly damp, the gel is not completely dry and needs more time in the dryer.
If a gel is removed from its frame before it is entirely dry, it may crack and (or) wrinkle.
12. To remove a dry gel from the drying frame, lift the clamp latches to release the clamps
from the frame.
Fig. 9. Trimming a dried gel.
13. Separate the cellophane from the frames and cut away any unnecessary cellophane from
around the gel. You can trim the cellophane right up to the edge of the dried gel (Figure 9).
The gel will not peel or separate from the cellophane.
14. The gel is now ready for densitometry gel documentation or any other appropriate application.
6
3.2 Drying Other Types of Gels
Drying Gels for Autoradiography/Fluorography (one side exposed)
The following protocol describes a method of layering a sheet of plastic food wrap
between the gel and the top sheet of cellophane. This layering method allows easy separation of the cellophane sheet from the surface of the dried gel. Uncovering the surface of the
dried gel enables direct exposure of the gel to photographic or X-ray film for autoradiography
or fluorography.1
Cellophane backing
1. Prepare the gel by following the protocol described in Section 3.1, Drying Acrylamide
Gels, steps 1-4.
2. After completing step 4, add a layer of plastic food wrap on top of the gels. Cut the piece
of plastic food wrap to approximately the same dimensions as the cellophane (12.5" x 12.5").
Wet the plastic wrap in water. The wrap does not absorb water, but wetting it helps make
handling easier. Holding one end of the plastic wrap with both hands, drape the other end
across one edge of the plastic frame and lower the sheet to cover the entire frame. If air
bubbles are trapped beneath the plastic wrap, raise the sheet to expose the bubbles and then
lower it again. If this does not eliminate the bubbles, add more water beneath the sheet and
try again. It is important to remove all bubbles to avoid gel cracking.
Cellophane
Plastic Wrap
Acrylamide Gel
Cellophane
Fig. 10. Autoradiography gel assembly.
3. Wet the second sheet of cellophane in water and lay it over the plastic wrap, ensuring all
four sides of the cellophane overhang the plastic frame. Bubbles trapped between the
plastic wrap and the top sheet of cellophane can remain. The plastic wrap may appear
wrinkled, but this is normal and should not be a concern. Continue with steps 7-9 of
Section 3.1.
4. With plastic wrap, drying occurs from the bottom, therefore drying times will increase
slightly (no more than 15 minutes).
5. After the gel is dry, carefully peel off the plastic wrap to expose the gel. With only a single sheet of cellophane, the gel may curl up. Tape the gel to a more rigid surface to hold
it flat. The gel is now ready for autoradiography or fluorography.
Filter paper backing
Adding a sheet of filter paper to this layering process allows easier handling of thin gels
and insures less gel distortion during drying.2 Additionally, the dried gel does not curl because
it is attached to filter paper. The following protocol describes how to incorporate filter paper
into the drying sandwich.
1. Prepare the gel by following the protocol described in Section 3.1, Drying Acrylamide
Gels, steps 1-3.
7
2. Cut a piece of Bio-Rad filter paper (catalog number 165-0921) slightly larger than the
gel and wet it completely. Roll the gel out on top of the wetted paper. Place the paper
and gel on the bottom layer of cellophane. Using a wash bottle, add water to the surface
of the filter paper and directly around the edges of the gel. Be sure to fill in the wells of
the gels with water.
3. Cut a piece of plastic food wrap to approximately the same dimensions as the cellophane
(12.5" x 12.5"). Wet the plastic wrap in water. The wrap does not absorb water, but wetting it helps make handling easier. Holding one end of the plastic wrap with both hands,
drape the other end across one edge of the plastic frame and lower the sheet to cover the
entire frame. If air bubbles are trapped beneath the plastic wrap, raise the sheet to expose
the bubbles and then lower it again. If this does not eliminate the bubbles, add more water
beneath the sheet and try again. It is important to remove all bubbles to avoid gel cracking.
Cellophane
Plastic Wrap
Acrylamide Gel
Filter Paper
Cellophane
Fig. 11. Autoradiography gel assembly with filter paper backing.
4. Wet the second sheet of cellophane in water and lay it over the plastic wrap, ensuring all
four sides of the cellophane overhang the plastic frame. Bubbles trapped between the
plastic wrap and the top sheet of cellophane can remain. The plastic wrap may appear
wrinkled, but this is normal and should not be a concern. Continue with steps 7-9, of
Section 3.1.
5. Continue drying the gel long after it "feels" dry. If the paper is still damp (even though it
may not "feel" damp) and the gel is removed from the frame, the gel will crack. A 3 hour
drying time for a single gel on filter paper is recommended.
6. When the gel is dry, carefully peel off the cellophane top layer and plastic wrap to expose
the gel. The gel is now ready for autoradiography or fluorography.
Drying Agarose Gels
The GelAir Drying System can be used to dry agarose gels effectively and with little distortion.
1. Agarose gels require no preparation prior to drying.
2. Follow the procedure in section 3.3 (Drying Gels for Autoradiography; Cellophane
Backing. When assembling the gel sandwich, place a sheet of plastic food wrap over the
agarose gel before applying the top sheet of cellophane. The layer of plastic wrap reduces
stress on the agarose gel and minimizes cracking. Agarose gels require less effort during
assembly than do polyacrylamide gels because agarose gels do not crack when bubbles
are present around them. Lay the plastic wrap and cellophane on top of the gel and ensure
that all four sides of the plastic wrap and cellophane are overhanging the bottom frame.
8
Cellophane
Plastic Wrap
Agarose Gel
Cellophane
Fig. 12. Agarose gel assembly.
Note: Do not use the plastic wrap layer when drying an agarose gel on gel bond. Both the
gel bond and the plastic wrap are impermeable to water and the gel will not dry.
3. Drying times for agarose gels, as with acrylamide gels, are dependent upon gel thickness. Because agarose gels are generally much thicker than acrylamide gels, their drying
times are longer. Agarose slab gels (1%, 6-10 mm thick) require approximately 7-9 hours
in the GelAir dryer. Do not dry agarose gels under ambient benchtop conditions. Agarose
gels should be dried in the GelAir dryer.
After the gel is dry, remove the plastic wrap and upper layer of cellophane. If you wish
to remove the cellophane backing, rub the cellophane with a damp cloth until it just begins to
hydrate. The cellophane can then be easily peeled off the gel. The agarose gel will be unaffected because it will rehydrate only with heating. Note: This technique will not work with
acrylamide gels.
Section 4
Maintenance and Troubleshooting
Maintenance
The GelAir Drying System requires very little maintenance to assure reliable operation.
To clean the drying oven, wipe the inside of the drying chamber with a damp cloth. To clean
the assembly table and drying frame, rinse with water.
It is important to wipe up any excess solution that is spilled either on top of the dryer or
within the dryer to reduce the chance of electrical shock hazard.
Troubleshooting
The following is a guide to troubleshooting your GelAir Drying System.
No Power to the Dryer
Check to insure the unit is plugged into a live power outlet. Check that the input voltage
rating of the dryer matches the local voltage.
No Heat from the Dryer
Check whether the heat on/off switch is in the on position. Check to see if the fan is operating. If the fan does not operate after turning the timer switch to the on or timer mode position, call Bio-Rad Laboratories. If there is still no heat, call Bio-Rad Laboratories.
9
Appendix A
GelAir Drying System Specifications
Specifications
Input rating
Catalog number 165-1777
Catalog number 165-1778
Installation category
(overvoltage category)
Environmental conditions
Temperature
Operating humidity
Altitude
Input power cable
Timer control
Function modes
Dryer capacity
Drying frame area
Drying frame capacity
Dryer dimensions
Dryer weight
Chemical resistance
115 VAC. 60 Hz, 6.0 A
230 VAC, 50 Hz, 3.0 A
II
Indoor use only
5 °C to 40 °C
9-95%, non-condensing
Up to 2,000 M
3-wire; grounded
0 to 3 hr, fully adjustable
Off, Fan Only, Fan plus Heat
4 shelves, 4 drying frames
20 cm x 20 cm
1 large format gel (20 x 16 cm) or 4 small format gels
(7 x 8 cm)
27 x 43 x 30 cm (H x D x W)
8 kg
All of the GelAir components are resistant to corrosion
due to common electrophoresis chemicals
Appendix B
Warranty Information
The GelAir Drying System is warranted for 1 year against defects in materials and workmanship. If any defects should occur during this warranty period, Bio-Rad Laboratories will
replace the defective parts without charge. However, the following defects are specifically
excluded:
1. Defects caused by improper operation.
2. Repair or modification done by anyone other than Bio-Rad Laboratories or their authorized agent.
3. Deliberate or accidental misuse.
4. Damage caused by disaster.
For inquiry or request for repair service contact your local Bio-Rad office, listed on the
back cover.
10
Appendix C
Ordering Information
Catalog
Number
165-1771
165-1772
165-1775
165-1776
165-1777
165-1778
165-1779
165-1780
Product Description
GelAir Drying System, 115 V, includes dryer, 2 drying frames, 16
clamps, assembly table, and 50 sheets of pre-cut cellophane support.
GelAir Drying System, 230 V, includes dryer, 2 drying frames, 16
clamps, assembly table, and 50 sheets of pre-cut cellophane support.
GelAir Drying Frames, includes 2 drying frames and 16 clamps.
GelAir Assembly Table
GelAir Dryer, 115 V
GelAir Dryer, 230 V
GelAir Cellophane Support, 50 pre-cut sheets
GelAir Drying Frame Clamps, 8
Appendix D
References
1.
2.
Porter, R. and Gatschet, J., Simplified Drying of Polyacrylamide Gels for Fluorography,
BioTechniques, 13, 364-365 (1992).
Krishnan, M. and Nguyen, T., Drying Acrylamide Slab Gels for Fluorography without Using Gel
Drier and Vacuum Pump, Analytical Biochemistry, 187, 51-53 (1990).
11
Bio-Rad
Laboratories
Life Science
Group
Bulletin 0000
US/EG
Web site www.bio-rad.com Bio-Rad Laboratories Main Office 2000 Alfred Nobel Drive, Hercules, CA 94547, Ph. (510) 741-1000, Fx. (510) 741-5800
Also in: Australia Ph. 02 9914 2800, Fx. 02 9914 2889 Austria Ph. (01) 877 89 01, Fx. (01) 876 56 29 Belgium Ph. 09-385 55 11, Fx. 09-385 65 54
Brazil Ph. 55 21 507 6191 Canada Ph. (905) 712-2771, Fx. (905) 712-2990 China Ph. 86-10-8201-1366/68, Fx. 86-10-8201-1367
Denmark Ph. 45 44 52-1000, Fx. 45 4452 1001 Finland Ph. 358 (0)9 804 2200, Fx. 358 (0)9 804 1100 France Ph. 01 47 95 69 65, Fx. 01 47 41 9133
Germany Ph. 089 318 84-177, Fx. 089 318 84-123 Hong Kong Ph. 852-2789-3300, Fx. 852-2789-1257 India Ph. (91-124)-6398112/113/114, Fx. (91-124)-6398115
Israel Ph. 03 951 4124, Fx. 03 951 4129 Italy Ph. 34 91 590 5200 , Fx. 34 91 590 5211 Japan Ph. 03-5811-6270, Fx. 03-5811-6272
Korea Ph. 82-2-3473-4460, Fx. 82-2-3472-7003 Latin America Ph. 305-894-5950, Fx. 305-894-5960 Mexico Ph. 52 5 534 2552 to 54, Fx. 52 5 524 5971
The Netherlands Ph. 0318-540666, Fx. 0318-542216 New Zealand Ph. 64-9-4152280, Fx. 64-9-443 3097 Norway Ph. 47-23-38-41-30, Fx. 47-23-38-41-39
Russia Ph. 7 095 979 98 00, Fx. 7 095 979 98 56 Singapore Ph. 65-2729877, Fx. 65-2734835 Spain Ph. 34-91-590-5200, Fx. 34-91-590-5211
Sweden Ph. 46 (0)8-55 51 27 00, Fx. 46 (0)8-55 51 27 80 Switzerland Ph. 061-717-9555, Fx. 061-717-9550 United Kingdom Ph. 0800-181134, Fx. 01442-259118
Rev A
00-000
0000
Sig 1200
4006040 Rev E