1
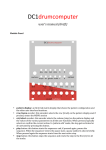
soundmachines DC1drumcomputer user's manual (January 2015) Introduction Care and feeding Specifications Introduction Soundmachines DC1drumcomputer is a powerful drum sequencer that includes traditional functions, storage and recall functions and an innovative CV control of many (most!) parameters of the sequences via four totally configurable inputs. The led matrix display shows at first glance the pattern and the active steps and the user can easily insert hits via two encoders (in an X-Y fashion). The display is also used for the configuration of the module by clearly identifying functions and values in a textual way. Basic functionalities includes: 8 track x 16 step step sequencer 128 memory locations for patterns song modes, fill-in patterns, loop (concatenations) modes variable tempo, shuffle and trigger length global and individual track length internal or external clock and reset (with ext clock divider) configurable pattern's parameter locks in song and loop mode four CV inputs for real time sequencer modifications. Examples: o tempo, shuffle o pattern loop o track rolls (3 types) o track mute o trigger length o beat density o random beat o random pattern o etc.. Micro SD card for firmware upgrade and patterns storage Care and feeding The soundmachines DC1drumcomputer module has a Doepfer compatible power connector and need 60+60mA (at maximum illumination, see menu) to work. By default the trigger voltage jumper on the back is inserted to provide 5V triggers. It is possible to switch it to output 12V triggers. Warning! when DC1 trigger voltage is set to 12V is NOT SAFE to self patch the module. Specifications: Panel Description: pattern display: an 8x16 led matrix display that shows the pattern configuration and the other user interface functions. row/menu encoder: this encoders selects the row (track) on the pattern display and, if pressed, enters the MENU section col/select encoder: this encoder selects the column (step) on the pattern display and the values of the various parameters in all the user functions. When pressed, typically selects or confirm the current action. In 'pattern edit' mode, the step gets activated or de-activated by pressing this button. play button: this button starts the sequencer and, if pressed again, pauses the sequence. When the sequencer enters the pause state a pause symbol is shown briefly. When pressed again the sequence starts from the next active step. stop button: this button stops the sequence and resets the step to the first (1) for all the tracks. In Song Mode stop button rewinds also the song to the first pattern. load button: when pressed, the display will show, as lit dots, the potential location for loading a pattern from memory (either 64 or 128, depending on the firmware release and the presence of the SDcard). The user will select, with the col/sel encoder, the location and, by pressing the col/sel encoder, loads it into memory. A sequence is defined as a set of tracks, the sequence speed, the individual tracks lenght, the gate lenght, the shuffle and the 4 CV bound functions. Please see the Appendix "SD card management" store button: As above, the user is prompted with a graphical display of the possible locations where to save the present pattern. When selected with the right encoder, by pressing it the sequence is saved and the module confirms with an "OK". Please see the Appendix "SD card management" tempo button: when pressed, the right encoder selects an integer BPM value between 8 and 254 BPM. To confirm, press the encoder or wait 5 seconds to return to the original tempo. len button: when pressed, the display shows as ALL LIT the #1 track. The user selects the track with the LEFT encoder and the LEN of the track with the RIGHT encoder. The length of the LIT track changes according to this parameter. To confirm, the user have to press the right encoder. NO track could be longer than "glob len" value. (IMPORTANT, the active steps are retained in memory even if out of scope) glob len button: when pressed the user selects the LEN of the sequence. If there are already different track lengths the global len affects only the tracks that have a len>globlen (IMPORTANT, the active steps are retained in memory even if out of scope). This parameter is not saved in memory, and when the board starts running its default value is automatically loaded. The default value of this parameter is 16 and its range is 1 <= GlobLen <= 16. shuffle: when the user press this button, a 'shuffle', (or swing) percentage is shown on the display (from 50 to 100). To confirm, press right encoder. Note: When external clock is choosen, shuffle is not enabled. Note: BPM and swing can be changed real-time: if its value is not confirmed by press of the right encoder, the parameter returns to its original value after waiting 5 seconds. The parameter returns immediately to its original value by pressing the left encoder. A,B,C,D buttons: when pressed, the user can choose for the CVinput A,B,C or D, a parameter that is shown by rotating the right encoder and confirmed with the push of the encoder (see the CV parameter chapter) clk in jack: this input accepts 5V clock signals when the switch is positioned on the left. The clock could be divided usign the relevant menu function. clock switch: selects whenever the clock is internal or external. clkout/res: when in external mode this is an input and, if HIGH resets the sequence to step 1. When in internal clock mode the clock of the sequence is output from this jack to sync with other equipment. Level is 5V. The clock out shape takes gate length and shuffle in consideration. In external clock mode, a pulse (low-to-high) on reset input 'resets' the current sequence, i.e. the current sequence (pattern) is executed starting from the first step (restart from the first step). start/stop: this input, along with the button, starts and stops the sequence. The two methods of control are concurrent, i.e. when the input on the jack is ZERO and the user presses the start button the sequence starts, etc... In external clock mode, a pulse on the start/stop input pauses the current playing sequence, and another pulse on the same input put the sequencer in play, i.e. the current sequence (pattern) is executed starting from the next step (the next step is executed). In another words, in external clock mode the start/stop input has the same behavior of the play/pause button. In internal clock mode the start/stop input is not used. It is active, currently, only in external clock mode. CVA-CVD: CV inputs for configurable functions. Those are 0-5V inputs. Modes of operation EDIT MODE: As soon as the user touches one of the encoders, the display will show a blinking dot on the matrix. The user can now move the dot by means of the two encoders (row/column). The blinking of the dot is different depending if it sits on an active step or not. When the user presses the right encoder the status of the 'pointed' step changes, cycling through ACTIVE and NON ACTIVE states. After 5 seconds of inactivity the module returns to either the STOP mode or the RUN MODE. STOP MODE: the matrix shows the active sequence, the sequencer is stopped and the module is waiting for input form the user OR from the external signals. RUN MODE: When the sequencer is active and running, and the user is not operating the unit on other modes, the display shows the 'active sequence' and, for each track, a DOT shows the current steps, moving with the clock. The status of the steps are X-OR'ed (inverted) as the sequence progresses. If the length of the tracks are all equal the user sees a vertical bar that is running on the matrix. MENU MODE: By pressing the LEFT encoder the user enters the MENU mode, and the screen shows, by rotating the left encoder, the menu items as defined below. When the user selects a menu item with the right encoder push, enters the PARAMETER CHANGE phase and can change (with the right encoder) the value of the parameter. Confirmation (end EXIT from MENU MODE) is made through a push on the right encoder. MENU MODE is also exited by pushing the LEFT encoder or by waiting 20 seconds. Menu Items: GATE LENGHT (GATL) (1..12) This is the lenght of the gate/trigger signal. It is expressed in 24th of a step, 6 is the default and 12 is the maximum value. Each sequence has its own gate lenght value stored in memory. ROLLS TYPE (ROLL) (2,3,4) The type of the 'rolls', or multiple hits during a single step. 2 is the default. With 2, max gatelength is 11, with 3 max gatelength is 7, with 4 max gatelength is 5. The parameter is active when you choose the 'rolls' type for at least one of the tracks in the CVx modes menu. CLK DIV PER TRACK (CKD1-CKD8)(1,2,4,8,16,24,32,64) You can alter the clock division for each track. 1 is the default on all the tracks. This parameter is not saved in memory, and when the board starts running its default value (1) is automatically loaded. LOCK (NLCK, LCKT, LCKC, LKTC, LTCS, LCKA): You can choose one of six lock types: in song mode, loop mode and when you insert a fill-in pattern in your current pattern, you can activate the lock: the lock should not be understood as the inability to modify a parameter of a sequence, but as the possibility of transmitting the value of a parameter or a setting, from the initial pattern to those played in succession by the DC1 drum: remind that the parameters of a sequence are not only the tracks, but "the set of tracks, the sequence speed, the individual tracks length, the gate length, the shuffle and the 4 CV bound functions" 1. NO LOCK mode (NLCK): all the parameters that compose each pattern of the song, loop and fill-in are reloaded. Each active sequence is played with its own parameters, reloaded 'on the fly' in real-time, so with its time, shuffle, gate length, etc ... 2. LOCK TIME (LCKT): only the TEMPO parameter of the patterns played by DC1 remains unchanged, and TEMPO is equal to the value set on the 'basic pattern' that is the time of the first pattern of the song or the loop. In this case a change to the value of the parameter TEMPO, modifies TEMPO of the basic pattern. 3. LOCK CV (LCKC): the CVs parameters setting of the patterns played by the DC1 remains the same as the 'basic pattern' that is, of the first pattern of the song or the loop. In this case when you change the CV's settings (eg a change of ROLL and/or DENSITY etc ...) you change the corresponding settings only in the base pattern. 4. LOCK TIME and CV (LKTC): the settings of the TIME and those of the CVs are locked to those of the basic pattern as described above. 5. LOCK TIME, CV and SHUFFLE (LTCS): the lock is extended to the value of the shuffle of the first pattern of the song or loop: even in this case a change in the shuffle parameter is effective only on the base pattern. 6. LOCK ALL (LCKA): all the parameters of an active sequence are locked to that of the first active sequence (base pattern), and only the set of tracks is reloaded. CLEAR (CLRS, CLRA) CLEAR SEQUENCE and CLEAR ALL the sequences. 1. if you want to quickly reset an active sequence (with all of its parameters, remember the definition!) to the default values, you can use the CLEAR SEQUENCE (CLRS), that 'clears' the sequence currently loaded (it is recommended that DC1 drum is in STOP mode when you clear a sequence!) 2. pay attention to the CLEAR ALL (CLRA), because it resets to the default ALL the sequences that you may be saved: so you do not commit oversights, to enable 'clear all' you have to hold down the right encoder for more than 3 seconds, otherwise it will be not activated; --if you have deleted one or all the sequences successfully, the DC1 drum writes 'OK' on the led matrices, otherwise, if something fails, it writes 'KO'. (***) --- PRESETS (PREa-PREp): (§) You can choose one of out 16 preset rhythms. An hommage to the old fixed pattern drum machines (the pattern takes up no memory) (§) Available from firmware release 1.0, see the last section of this manual SONG MODE (SNGM) OFF (default, exit from SONG MODE) SNG2 P1-P2 (the active pattern P1 and the following one are cycled) SNG4 P1-P2-P3-P4 (the active pattern P1 and the following 3 are cycled) SNG8 P1-P8 (the active pattern P1 and the following 7 are cycled) SN10 P1-P10 (the active pattern P1 and the following 9 are cycled) SN16 P1-P16 (the active pattern P1 and the following 15 are cycled) SN32 P1-P32 (the active pattern P1 and the following 31 are cycled) SN56 P1-P56 (loop on all patterns except the last 8-fill-in patterns) SN64 P1-P64 (loop on all patterns) SNGa AAAB (the active pattern A is the first of 4: AAAB) SNGb ABAC (the active pattern A is the first of 4: ABAC) SNGc AAAB CCCD (the active pattern A is the first of 8: AAAB CCCD) SNGd ABAC DEDF (the active pattern A is the first of 8: ABAC DEDF) SNGe ABAC ADAE (the active pattern A is the first of 8: ABAC ADAE) SNGf AABA CCDC (the active pattern A is the first of 8: AABA CCDC) SNGg ABBA BAAB (the active pattern A is the first of 8: ABBA BAAB) SNGh ABCA DEFD (the active pattern A is the first of 8: ABCA DEFD) LUx LUX+ and LUX- You can select the desired brightness of the matrix screen with the right button enc (press and rotate the right button enc) Note: For now, the Song Mode and the Loop Mode are mutually exclusive. If you choose Loop mode, Song mode stops being executed. CVx modes: LOOP1 (LOP1): each rising edge on the CVx input selects the next sequence and loops at the end of the available memory (so 64 or 128 seq). The new pattern is started at the end of the current one. (*) LOOP4(LOP4): each rising edge on the CVx input selects the next sequence starting from the active one until the fourth. After it the next sequence will be the first again. The sequence is started at the end of the current one. (*) LOOP8(LOP8): see above, longer. (*) RANDOM SEQ (RNDS): each rising edge on the CVx input selects a random sequence among the saved ones. The sequence is started ad the end of the current one. --Note on RNDS: The sequence is chosen randomly from those 'valids': a sequence becomes valid when you load from memory explicitly with the load button and you edit its parameters. A sequence is marked valid also when, after you've edited, you make a 'store' or 'store all', as described in the 'store' menu. (**) --TEMPO: (TMPO) The CVx analog value is mapped linearly into BPMs SHUFFLE: (SHFL) The CVx analog value is mapped linearly into shuffle LEN8 (HALF): a high value on the CVx input sets the pattern lenght to eight steps: if the actual step is between 1 and 8 or between 9 and 16, the sequencer goes to step 8 or 16 before setting the new length LEN4 (FRTH): a high value on the CVx input sets the pattern length to four steps: if the current step is between 1 and 4, or 5 and 8, or 9 and 12, or is between 13 and 16, the sequencer plays all the intermediate steps before setting up the new length FILL-IN A-H (FILa-FILh): the rising edge on the input triggers the start of a 'fill' pattern and at the end the sequencer returns to the original sequence. The fillin patterns are ALWAYS the last eigth of the memory (57-64 in case of the first release and 113-128 in case of the second release of firmware and the presence of the SDcard). (*) DENSITY (DNS1-DNS8): the input voltage is mapped into the random density 'around' the active track in the pattern. Note on the density DNSx: The density of a selected track is active only when you are in PLAY, and the value of the analog input is shown around the active steps. The effect is distributed in 'levels of intensity', ranging from a single step before or after the current active step, when the voltage level is 'low', up to a maximum of 3-step switched on before and after the active current step when the level of the input signal is maximum on the CV analog input. When you're appling density on a track and you edit the pattern, you see the original sequence: when you turn to play the matrix automatically shows the steps activated by the analogue signal density too. RANDOM BEATS (RND1-RND8): the input voltage randomizes the active track. This effect is added to the steps already turned on by the user (the steps turned on in the active track are unchanged whilst the other steps are randomized). These are the probabilities to have a step enabled (dot lit) at the corresponding level of the input voltage on the channel cv: Vg <= 0.05Vgs 0.05Vgs < Vg <= 0.15Vgs 0.15Vgs < Vg <= 0.24Vgs 0.24Vgs < Vg <= 0.34Vgs 0.34Vgs < Vg <= 0.44Vgs 0.44Vgs < Vg <= 0.54Vgs 0.54Vgs < Vg <= 0.64Vgs 0.64Vgs < Vg <= 0.74Vgs 0.74Vgs < Vg <= 0.84Vgs 0.84Vgs < Vg <= 0.93Vgs 0.93Vgs < Vg <= Vgs 0% (always off) 0,0687 = 6.87% 0,162 = 16.2 % 0,255 = 25.5 % 0,348 = 34.8 % 0,441 = 44.1 % 0,534 = 53.4 % 0,627 = 62.7 % 0,720 = 72.0 % 0,814 = 81.4 % 0,953 = 95.3 % TRACK GATE LENGTH (TGL1-TGL8): the input voltage changes the gate length of the track. The CVx analog value is mapped linearly into the corresponding track gate length. TRACK MUTE 1-8 (MUT1-MUT8): a high level on the input "mutes" instantly the output of the corresponding track. ROLLS 1-8 (ROL1-ROL8): a roll is made in the choosen track at the current step (the roll type is defined in the MENU section). Rolls are NOT ACTIVE when external clock is selected. EUCHLYD BEATS (EUC1-EUC8): the input voltage generates "really cool" euchlydean rhythms. Mapping, measures, etc... will be defined.(**) LEGENDA: "active sequence" the set of track/parameters that is loaded in memory and ready to be played or playing. Note: (*) In the cv menu of the fill-in patterns you can not set loop mode or fill-in mode: the fill-in patterns can not be nested, and you can not insert a loop in a fill-in. (**) This feature is under development. (***) This feature is under development. For now it returns to main screen. How to build a Song, numbering of the sequences in memory 1. Load from memory with the load button the 'base pattern' (i.e. the first) of the song. 2. Set the song mode and the lock (if you want to lock all or some of the parameters of the song), and begin to compose the tracks of the first pattern. 3. Press play: to stop the execution you can use the play/pause button. 4. The song playing proceeds going from the first to the subsequent patterns of the song; you can change the tracks real-time or by stopping the execution with the play/pause button. 5. Once you set up your song completely, you can save the song with 'store all' in memory at once, without need to save each pattern individually. Memory Organization The memory of DC1 drum is organized in 64 cells, each of which contains a sequence, with all of its parameters. When you load a sequence from memory to play it, the DC1 loads its tracks, the sequence speed, the individual tracks lenght, the gate lenght, the shuffle and the 4 CV bound functions. Memory Organization: Note. This is the complete LED Matrix, in the memorization screen the columns are lit every other one Update the firmware of the DC1 drum: short guide step by step Step 1. If you do not want to lost the sequences that you have already been set and saved on DC1, insert a microSD and save on the SDcard with the 'store all' (long press of the store button) the sequences that you have changed on the DC1 drum's flash (when you update the firmware of DC1 drum, for now, the contents of the flash memory is lost). On the SDcard you should see the updated file 'SEQUENCE'. This file is not editable. The SDcard have to contains the new firmware release too. Step 2. Shutdown and restart the DC1 drum, holding the two encoder buttons down and having inserted the SDcard into the slot SD. Step 3. The LED matrix shows the steps of reprogramming: the erase of the flash corresponds to the bars that are deleted, while during reprogramming the bars are advancing. Step 4. Keep inserted the SD card and wait for the program to start again with the scrolling text 'soundmachines'. After the program is started, press the load button for 3 seconds: in this way the DC1 drum reads the file 'SEQUENCE' on the SDcard which contains the sequences in the format that it is expected, and loads its content, i.e. the tracks and the parameters of all the patterns that you had built before the upgrade. At this point you are ready to use the DC1 with the updated firmware and without losing any of your work. Appendix: SD card management: When you boot a new firmware version, if you want to keep the changes to the sequences in flash, you must first save the image of the pattern and parameters (active sequences) on an SDcard as described in the subsequent paragraph 'Store the Sequences into the SDcard'. Now let's talk a few about the 'sequence loading'. Load the Sequences from SDcard You can load the sequences previously stored in the SDcard in two ways: 1. the long press of the load button forces the DC1 drum to check the presence of the SDcard and if it finds the 'properly formed' file 'SEQUENCE' on the SD, it loads the sequences contained in this file in its flash with all the parameters of the active sequences: when loaded the sequences correctly the module confirms with an 'OK'. ----2. at startup, if there is an SDcard inserted into the slot SD, the DC1 drum tries to search the file 'SEQUENCE'; if it is founded and if it is 'correctly formed' the DC1 loads the sequences contained in the file on its flash with all parameters (^) ----Recall from the preceding section 'Panel Description': store button: As above, the user is prompted with a graphical display of the possible locations where to save the present pattern. When selected with the right encoder, by pressing it the sequence is saved and the module confirms with an "OK". Save patterns and parameters in flash All changes are initially in RAM (volatile), and you can try them without saving them, but if you want to save patterns and parameters in flash you can choose between these two possibilities: 1. a short press of the 'store' button saves the single pattern (the one in sight/running) with its parameters in the location that you choose specifically with the encoders, 2. the long press of the 'store' (over 3 seconds) saves everything in flash (all parameters and the 64 patterns, in the order they are loaded and modified), and is reported directly with an 'OK' on the LED matrix without need to save each pattern individually. Store the Sequences into the SDcard As Mentioned, when you boot a new firmware version, if you want to keep the changes to the sequences in flash, you must first save the image of the pattern and parameters (active sequences) on the SDcard: > When you press the 'store all' (long press of the store button, for more than 3 seconds), the program also checks for the presence of the SDcard and if it is detected, it saves on the SD the content of all the sequences (image stored sequences) on a file called 'SEQUENCE'. If there is already a file with the same name, it is overwritten and updated with the new flash image sequences. ----The file can also be edited to change the settings, but it is preferable to carry out the changes from DC1 drum directly to make sure that DC1 could save them, and reload them correctly and without errors.(^) ----- Note for the Appendix: (^) the features between ----- are under development Firmware Release 1.0 (F1.0) - Fixed bugs and added features: 1. When the DC1 drum displays parameter 'tempo', if you exit from the parameter setting without saving the choice (by pressing the left encoder), the beat time remains set to the last value shown on the display (it doesn't return to the original value). 2. When the DC1 displays a parameter, for example the 'shuffle' or the 'Glob len', if you switch from internal to external clock, the encoder on the right becomes 'inactive'. → Added the 'free paint step': this is the possibility of editing whole tracks while pressing down the right encoder (holding down the right encoder) and rotating the right or the left encoder (like Davide Mancini and Joao Ceser suggested). This function becomes active when the right encoder is pressed by at least 500ms. if you hold down the right encoder, after 500ms, continuing to hold it down, you activate the function for which you can rotate any of the two encoders and change the status of all the steps played by DC1 (toggle states). → Added Preset Patterns, available in the menu 'PRES' by pressing the left encoder. From the user manual: ''You can choose one of out 16 preset rhythms. An hommage to the old fixed pattern drum machines (the pattern takes up no memory)''. These patterns have been built for DC1 drum by Joao Ceser. This is the set of tracks and the connections on cv input of Preset Patterns: (*) Seq 1 to 10 Seq 11 to 14 Seq 15 to 16 T1 = BD T1 = BD T1 = BD T2 = SD T2 = SD T2 = SD T3 = CP T3 = CP T3 = CP T4 = RIM T4 = CH T4 = CH T5 = CH T5 = OH T5 = \ T6 = OH T6 = CVa T6 = \ T7 = LT T7 = CVb T7 = \ T8 = HT T8 = CVc T8 = \ LFO 1 --> CVa LFO 2 --> CVb LFO 3 --> CVc LFO 4 --> Cvd (*) Preset Pattern - Legenda: BD = bass drum SD = snare drum CP = clap RIM = rim shot CH = close hat OH = open hat LT = low tom HT = high tom → Added the firmware release, accessible in the menu by pressing the left encoder (for ex. 'F1.0'). Firmware Release 1.2 (F1.2) - Fixed bugs 1. When you set the Global Length also resets the individual tracks Length (individual track length previously set) equal to the Global. 2. When the tracks have different length, at the end of the longest the DC1 resets the others (in song mode and loop mode this works well, but in normal mode it is not correct!). “If I have to play a syncopation, an 'ostinato' (circular music), maintaining a line 16-step long, I saw that if I shorten a line to 3 step the DC1 resets again at the end of the longest line and then I can not play 'crazy' syncopation, you confirm that? It is something that you can fix? Joao Ceser ” Firmware Release 1.4 (F1.4) - Fixed bug When the external clock is selected the DC1 plays the current step as many times as the clock divider. “The CLK divider, in External Clock Mode. It is right that the DC1 plays the step selected x N times depending on the external clock division? Joao Ceser ” Note: although this is extremely boring stuff, all the cited trade marks and registered product names are property of their legal owners.