1
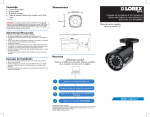
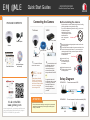
GOLBONG
2220/2221/2222/2223
Quick Start Guides
Ultra Mini Vandal Dome Camera
Connecting the Camera
PACKAGE CONTENTS:
To NVR
To Camera
Router or switch
Power adapter
Camera
OR
Camera
Ethernet Cable
12V DC(optional)
Quick Start Guides
CD
(includes software
and manual)
1.
Connect the Ethernet
cable to the camera.
Note
A 12V DC
2. Connect the other end of
the Ethernet cable to the
NVR's PoE ports. The
camera may take up to 1
minute to power up after
being connected to the NVR.
Before installing the camera
Decide whether to run the cables through the wall / ceiling
(drilling required) or along the wall / ceiling.
If you run the cables along the wall / ceiling, you must run
the cable through the
cable notch on the base.
This will keep the camera
base flush to the
wall / ceiling when
Cable Notch
mounted.
1.Use the included mounting template to mark holes for the
mounting screws.
2. Connect the Ethernet cable to the camera as shown in the
section ‘Connecting the Camera’. If you are running the
cables against the ceiling, make sure to pass the cable
through the cable notch
as shown above.
Cover Screws
3. Loosen the 3 cover
screws and then lift
the cover away from
the camera.
4. Mount the camera to the
ceiling using the included
mounting screws.
OR
power adapter (Model#:
CVA4902, not included) is
only required if connecting
the camera's Ethernet cable
to a router or switch that
does not support PoE.
Connect the other end of
the Ethernet cable to a router
or switch on your network.
See the NVR Instruction
Manual for details on
connecting the Camera to
your NVR.
Setup Diagram
SCENARIO 1:
Rourter
ATTENTION
It’s all on the Web
www.golbong.com
reserve the right to modify product design, specifications and
prices, without notice and without incurring any obligation.
E&OE © 2013 GOLBONG. All rights reserved.
SCENARIO 2:
Connect cameras to NVR
NVR
Camera
Connect cameras to local area network(LAN)
Ensure the camera is working correctly prior to permanent
installation by temporarily connecting the camera(s) and
cable(s) to the NVR.
NVR
Rourter
Camera
GOLBONG
1
Quick Start Guides
Logging into Web Client (LOCALLY)
1. Insert the system's
software CD, and follow
the instructions to install
and launch DeviceManage
2 . Click IP Search to
discover all the online IP
cameras
3 . Select the IP address
you would like to manage
4 . Click the SameToPc to colon the IP address from your network
5 . Click Modify to Save
6 . Click WeBrowse to loggin into WebClient
Note
Your default login:
Username is "admin"
Password is left blank
2
Android App
4
In the IP Devices
1 .Apply for DDNS from 3rd party
provider e.g. http://www.dyndns.org
2 .Click Devicecfg to enter setup menu
3 .Click Setting System NetService UPNP
4 .Enable UPNP and click OK to save
5 .Click Setting System NetService DDNS
6 .Select DynDns as DDNS Type and
Check Enable
7 .Enter Domain Name/User Name/Password
you just apply from the Dyndns
8 .Click OK to Save
Apple Store
1 .Open the App you download
2 .Click Add at the left top corner to add the new IP devices
3 .Select Address and fill in Domain name, e.g. xxx.dyndns.org
4 .Enter the TCP port (34567 in default, not 80)
5 .Enter the user name and password
6 .Click OK to Save
Using Cloud ID.
Optional
1.After you isntall the app, Click By
Device (
) to enter device page.
2 .Click Add at the left top corner to add
the new IP devices
3 .Select P2P Cloud
4 .Scan the Cloud ID at the package box
5 .Enter the User name and Password
Note: You can find the cloud ID thru
DeviceMange tools (recorded
in the previous step)
6 .Click OK to Save
Note: For viewing cameras remotely
via PC computer, you can install
our CMS software. The CMS
software support Cloud ID
connection as well.
Setting the NTP Server
It is no need to enable the NTP if the ip
cameras will be connect to our NVR or
CMS. The ip camera will get the synchronization from our NVR or CMS.
5
Using DDNS(Optional)
In the App
If you are having difficulties connecting with Internet
Explorer, Use the CMS software included in your CD.
See instruction manual for details. For Mac OS,
please download vMEyeSuper from Mac Store.
The Network Time Protocol (NTP) is
used to synchronize the time of an ip
camera to another server or reference
time source
1 .Click Devicecfg to enter setup menu
2 .Click Setting System NetService NTP
3 .Enable NTP server
4 .Google the local NTP Server IP and
fill in
5 .Click OK to save
Ultra Mini Vandal Dome Camera
There are two way to remotely view our IP devices. First of all,
scan the QR code below, you can download the app from the
apple store or google play
If your default Browser is not Internet Explorer,
Launch Internet Explorer, Enter the lP address, e.g.
http://192.168.X.XXX:80
7. You must install the ActiveX® plugin for DVR Netviewer to function.
Click the attention bar and select
Install ActiveX Control.
8 . Enter your User name and
Password, then click OK.
Note
3
Viewing Camera via App Remotely
2220/2221/2222/2223
Note
It has no 100% guarantee that Cloud service will be
working perfectly in your city. If you experiece bad
connection with cloud service, you has to use DDNS
service.
If you were unable to port-forward your router
automatically using UPNP, you will need to manually
forward ports 80 and 34567 to your NVR's IP address.
All routers are different. To port forward your router, please
refer to your router's user manual. An example of a port
forwarding screen is shown for illustration purposes.
Should you require further assistance, Golbong Support is
available to assist you. Make sure to register your product
prior to contacting support at: www.golbong.com/support