1
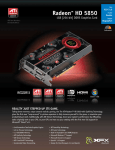
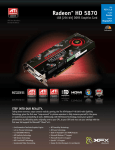
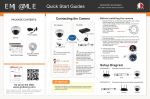
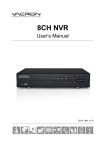
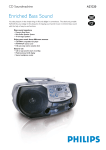
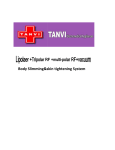
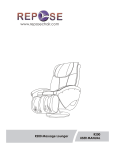
Quick Start Guides
1
USB mouse
Sound Systems*
2
Monitor/TV*
Power adapter
CD
(includes software
and manual)
Quick Start Guides
VGA* OR
It’s all on the Web
www.golbong.com
reserve the right to modify product design, specifications and
prices, without notice and without incurring any obligation.
E&OE © 2013 GOLBONG. All rights reserved.
Network Video Recorder
Connecting your system
PACKAGE CONTENTS:
NVR
GB-HD9716T-PL
*Not included/sold separately
HDMI
3
Mouse
4
Router*
5
Power
GB-HD9716T-PL
Quick Start Guides
1
Using the Mouse
4
1 : Left-click:Select a menu option
1
During live view:
• Click on a camera to bring up the
Camera Toolbar.
• Double-click on a channel to view in
full-screen; double-click again to
return to split-screen view.
Network Video Recorder
Connecting the IP camera
7
1.Click to any of (
) to enter “IP
Channel Configure Wizard”
2 .Enter the NVR’s password,
the default password is left blank
(no password)
3 .Mark the Check-box to select the
channel you would like to add the
camera in the 2nd windows
4 .Select the ip camera you would
like to add from the 1st windows.
5 .Click the Network to change the
IP address if necessary.
2
3
2 : Right-click: Open the Quick Menu or
exit menus.
6 .Click OK to add the this IP
camera to the channel.
7 .Repeat Step 4 to Step 7 until you
3 : Scroll wheel: During live view, scroll up /
down to change channel.
add all the channel with the cameras
you want.
2
Quick Menu Overview
Right-click to open the quick menu
Main Menu
Guide
Record Mode
PlayBack
Ptz Control
HighSpeedptz
Alarm Output
Color Setting
Output Adjust
Logout
Leave Full Screen
3
Open the main menu
Setup Wizard
8.Click OK to Save
9 .To delect the ip camera from windows, click the crossmark (
right side.
5
) at the top
1 .Right-click to open the Quick Menu and
then click Menu.
2 .Select Playback.
3 .Check the cameras you would like to
search for video.
4 .Under Calendar, choose the time you would
like to search for video
5 .Click Playback to start playback from
available footage in your selected time range.
Enter playback mode for
footage search and playback
Control PTZ Cameras
Adjust position and color
output for the monitor
6.Click
allow you to search the footage
by specific timeline
Logout the system
Viewing Camera via App Remotely
Setting the Date & Time
1 . Right-click to open the Quick
Menu and then click Main Menu.
2 . Click System General
3 . Select your Time Zone from the
dropdown menu.
4 . Click Date Format and use the onscreen calendar to enter the Date.
5 . Click System Date and click
Arrows to enter the Time.
6 . Click Ok to save
1 .After you install the app, Click By
Device (
) to enter device page.
2 .Click Add at the left top corner to add
the new IP devices
3 .Select P2P Cloud
4 .Scan the Cloud ID
5 .Enter the user name and password
6 .Click OK to Save.
Note: it has no 100% guarantee that Cloud
service will be working perfectly in your city.
If you experiece bad connection with cloud
service, you have to use DDNS service.
8
Using DDNS (Optional)
Android App
Apple Store
There are two way to remotely
view your IP devices. First of
all, scan the QR code below,
you can download the app
from the google play or
apple store.
For viewing cameras remotely via PC computer,
you can install our CMS software. The CMS
software supports Cloud ID connection as well.
To Find the Cloud ID
1.Right-click to open the Quick Menu and then click Guide
2.Click Next you can see the Cloud ID at the 3rd QR code
In the App
1 .Open the App you download
2 .Click Add at the left top corner
to add the new IP devices
3 .Select Address and fill in
Domain name, e.g.
xxx.dyndns.org
4 .Enter the TCP port (34567 in
default, not 80)
5 .Enter the User name and
Password
6 .Click OK to Save
Searching & Playing Back Video
Configurate the recording mode
6
Using Cloud ID
In the IP Devices
1 .Apply for DDNS from 3rd party provider e.g. http://www.dyndns.org
2 .Right-click to open the Quick Menu and then click Main Menu.
2 .Click System NetService UPNP
3 .Enable UPNP and click OK to save
4 .Click System NetService DDNS
5 .Select DynDns as DDNS Type and Check Enable
6 .Enter Domain Name/User Name/Password you just apply from
the Dyndns
7 .Click OK to Save
Optional
If you were unable to port-forward your router automatically using UPNP,
you will need to manually forward ports 80 and 34567 to your NVR's IP
address.All routers are different. To port forward your router, please refer
to your router's user manual. An example of a port forwarding screen is
shown for illustration purposes.
Should you require further
assistance, Golbong Support is
available to assist you. Make
sure to register your product prior
to contacting support at:
http://www.golbong.com/support.