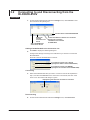
1
User’s
Manual
Xviewer
DL850 Advanced Utility
IM 701992-62E
3rd Edition
Thank you for purchasing the Xviewer with DL850 Advanced Utility Features. This user’s
manual explains the DL850 advanced utility features and how to use these features. It
mainly focuses on using this utility on Windows XP. To ensure correct use, please read
this manual thoroughly before beginning operation.
Keep this manual in a safe place for quick reference in the event a question arises. For
information on other features, how to use these features, and handling precautions, see
the following manual.
Manual Name
701992/701994
Xviewer
User’s Manual
Notes
Trademarks
Revisions
Manual No.
IM 701992-01E
Description
Explains the Xviewer’s standard features and how
to use these features.
• The contents of this manual are subject to change without prior notice as a result of
continuing improvements to the software’s performance and functionality. The figures
given in this manual may differ from those that actually appear on your screen.
• Every effort has been made in the preparation of this manual to ensure the accuracy
of its contents. However, should you have any questions or find any errors, please
contact your nearest YOKOGAWA dealer.
• Copying or reproducing all or any part of the contents of this manual without the
permission of YOKOGAWA is strictly prohibited.
• Microsoft, Windows, and Windows Vista are either registered trademarks or
trademarks of Microsoft Corporation in the United States and/or other countries.
• Adobe, Acrobat, and PostScript are trademarks of Adobe Systems Incorporated.
• In this manual, the TM and ® symbols do not accompany their respective trademark or
registered trademark names.
• Other company and product names are trademarks or registered trademarks of their
respective holders.
• September 2010:
• October 2010:
• January 2011:
1st Edition
2nd Edition
3rd Edition
3rd Edition: January 2011 (YMI)
All Rights Reserved, Copyright © 2010 Yokogawa Electric Corporation and Yokogawa Meters & Instruments Corporation
IM 701992-62E
Terms and Conditions of the Software License
Yokogawa Electric Corporation and Yokogawa Meters & Instruments Corporation, Japanese corporations (hereinafter called “Yokogawa”), grant permission to use this
Yokogawa Software Program (hereinafter called the “Licensed Software”) to the Licensee on the conditions that the Licensee agrees to the terms and conditions stipulated
in Article 1 hereof.
You, as the Licensee (hereinafter called “Licensee”), shall agree to the following terms and conditions for the software license (hereinafter called the “Agreement”) based
on the use intended for the Licensed Software.
Please note that Yokogawa grants the Licensee permission to use the Licensed Software under the terms and conditions herein and in no event shall Yokogawa intend to
sell or transfer the Licensed Software to the Licensee.
Xviewer (Model 701992, 701994) or DL850 Advanced Utility (Model 701992)
Licensed Software Name:
Number of License:
The number of licenses indicated on the license label
Article 1 (Scope Covered by these Terms and Conditions)
1.1The terms and conditions stipulated herein shall be applied to any Licensee who purchases the Licensed Software on the condition that the Licensee consents to agree
to the terms and conditions stipulated herein.
1.2The “Licensed Software” herein shall mean and include all applicable programs and documentation, without limitation, all proprietary technology, algorithms, and knowhow such as a factor, invariant or process contained therein.
Article 2 (Grant of License)
2.1Yokogawa grants the Licensee, for the purpose of single use, non-exclusive and non-transferable license of the Licensed Software with the license fee separately
agreed upon by both parties.
2.2The Licensee is, unless otherwise agreed in writing by Yokogawa, not entitled to copy, change, sell, distribute, transfer, or sublicense the Licensed Software.
2.3The Licensed Software shall not be copied in whole or in part except for keeping one (1) copy for back-up purposes. The Licensee shall secure or supervise the copy
of the Licensed Software by the Licensee itself with great, strict, and due care.
2.4In no event shall the Licensee dump, reverse assemble, reverse compile, or reverse engineer the Licensed Software so that the Licensee may translate the Licensed
Software into other programs or change it into a man-readable form from the source code of the Licensed Software. Unless otherwise separately agreed by Yokogawa,
Yokogawa shall not provide the Licensee the source code for the Licensed Software.
2.5The Licensed Software and its related documentation shall be the proprietary property or trade secret of Yokogawa or a third party which grants Yokogawa the rights. In
no event shall the Licensee be transferred, leased, sublicensed, or assigned any rights relating to the Licensed Software.
2.6Yokogawa may use or add copy protection in or onto the Licensed Software. In no event shall the Licensee remove or attempt to remove such copy protection.
2.7The Licensed Software may include a software program licensed for re-use by a third party (hereinafter called “Third Party Software”, which may include any software
program from affiliates of Yokogawa made or coded by themselves.) In the case that Yokogawa is granted permission to sublicense to third parties by any licensors
(sub-licensor) of the Third Party Software pursuant to different terms and conditions than those stipulated in this Agreement, the Licensee shall observe such terms and
conditions of which Yokogawa notifies the Licensee in writing separately.
2.8In no event shall the Licensee modify, remove or delete a copyright notice of Yokogawa and its licenser contained in the Licensed Software, including any copy thereof.
Article 3 (Restriction of Specific Use)
3.1The Licensed Software shall not be intended specifically to be designed, developed, constructed, manufactured, distributed or maintained for the purpose of the
following events:
a) Operation of any aviation, vessel, or support of those operations from the ground;,
b) Operation of nuclear products and/or facilities;,
c) Operation of nuclear weapons and/or chemical weapons and/or biological weapons; or
d) Operation of medical instrumentation directly utilized for humankind or the human body.
3.2Even if the Licensee uses the Licensed Software for the purposes in the preceding Paragraph 3.1, Yokogawa has no liability to or responsibility for any demand or
damage arising out of the use or operations of the Licensed Software, and the Licensee agrees, on its own responsibility, to solve and settle the claims and damages
and to defend, indemnify or hold Yokogawa totally harmless, from or against any liabilities, losses, damages and expenses (including fees for recalling the Products and
reasonable attorney’s fees and court costs), or claims arising out of and related to the above-said claims and damages.
Article 4 (Warranty)
4.1The Licensee shall agree that the Licensed Software shall be provided to the Licensee on an “as is” basis when delivered. If defect(s), such as damage to the medium
of the Licensed Software, attributable to Yokogawa is found, Yokogawa agrees to replace, free of charge, any Licensed Software on condition that the defective
Licensed Software shall be returned to Yokogawa’s specified authorized service facility within seven (7) days after opening the Package at the Licensee’s expense. As
the Licensed Software is provided to the Licensee on an “as is” basis when delivered, in no event shall Yokogawa warrant that any information on or in the Licensed
Software, including without limitation, data on computer programs and program listings, be completely accurate, correct, reliable, or the most updated.
4.2Notwithstanding the preceding Paragraph 4.1, when third party software is included in the Licensed Software, the warranty period and terms and conditions that apply
shall be those established by the provider of the third party software.
4.3When Yokogawa decides in its own judgement that it is necessary, Yokogawa may from time to time provide the Licensee with Revision upgrades and Version upgrades
separately specified by Yokogawa (hereinafter called “Updates”).
4.4Notwithstanding the preceding Paragraph 4.3, in no event shall Yokogawa provide Updates where the Licensee or any third party conducted renovation or improvement
of the Licensed Software.
4.5THE FOREGOING WARRANTIES ARE EXCLUSIVE AND IN LIEU OF ALL OTHER WARRANTIES OF QUALITY AND PERFORMANCE, WRITTEN, ORAL, OR
IMPLIED, AND ALL OTHER WARRANTIES INCLUDING ANY IMPLIED WARRANTIES OF MERCHANTABILITY OR FITNESS FOR A PARTICULAR PURPOSE ARE
HEREBY DISCLAIMED BY YOKOGAWA AND ALL THIRD PARTIES LICENSING THIRD PARTY SOFTWARE TO YOKOGAWA.
4.6Correction of nonconformity in the manner and for the period of time provided above shall be the Licensee’s sole and exclusive remedy for any failure of Yokogawa to
comply with its obligations and shall constitute fulfillment of all liabilities of Yokogawa and any third party licensing the Third Party Software to Yokogawa (including any
liability for direct, indirect, special, incidental or consequential damages) whether in warranty, contract, tort (including negligence but excluding willful conduct or gross
negligence by Yokogawa) or otherwise with respect to or arising out of the use of the Licensed Software.
Article 5 (Infringement)
5.1If and when any third party should demand injunction, initiate a law suit, or demand compensation for damages against the Licensee under patent right (including utility
model right, design patent, and trade mark), copy right, and any other rights relating to any of the Licensed Software, the Licensee shall notify Yokogawa in writing to
that effect without delay.
5.2In the case of the preceding Paragraph 5.1, the Licensee shall assign to Yokogawa all of the rights to defend the Licensee and to negotiate with the claiming party.
Furthermore, the Licensee shall provide Yokogawa with necessary information or any other assistance for Yokogawa’s defense and negotiation. If and when such a
claim should be attributable to Yokogawa, subject to the written notice to Yokogawa stated in the preceding Paragraph 5.1, Yokogawa shall defend the Licensee and
negotiate with the claiming party at Yokogawa’s cost and expense and be responsible for the final settlement or judgment granted to the claiming party in the preceding
Paragraph 5.1.
5.3When any assertion or allegation of the infringement of the third party’s rights defined in Paragraph 5.1 is made, or when at Yokogawa’s judgment there is possibility of
such assertion or allegation, Yokogawa will, at its own discretion, take any of the following countermeasures at Yokogawa’s cost and expense.
a) To acquire the necessary right from a third party which has lawful ownership of the right so that the Licensee will be able to continue to use the Licensed Software;
b) To replace the Licensed Software with an alternative one which avoids the infringement; or
c) To remodel the Licensed Software so that the Licensed Software can avoid the infringement of such third party’s right.
5.4If and when Yokogawa fails to take either of the countermeasures as set forth in the preceding subparagraphs of Paragraph 5.3, Yokogawa shall indemnify the Licensee
only by paying back the price amount of the Licensed Software which Yokogawa has received from the Licensee. THE FOREGOING PARAGRAPHS STATE THE
ENTIRE LIABILITY OF YOKOGAWA AND ANY THIRD PARTY LICENSING THIRD PARTY SOFTWARE TO YOKOGAWA WITH RESPECT TO INFRINGEMENT OF
THE INTELLECTUAL PROPERTY RIGHTS INCLUDING BUT NOT LIMITED TO, PATENT AND COPYRIGHT.
ii
IM 701992-62E
Terms and Conditions of the Software License
Article 6 (Liabilities)
6.1If and when the Licensee should incur any damage relating to or arising out of the Licensed Software or service that Yokogawa has provided to the Licensee under the
conditions herein due to a reason attributable to Yokogawa, Yokogawa shall take actions in accordance with this Agreement. However, in no event shall Yokogawa
be liable or responsible for any special, incidental, consequential and/or indirect damage, whether in contract, warranty, tort, negligence, strict liability, or otherwise,
including, without limitation, loss of operational profit or revenue, loss of use of the Licensed Software, or any associated products or equipment, cost of capital, loss
or cost of interruption of the Licensee’s business, substitute equipment, facilities or services, downtime costs, delays, and loss of business information, or claims of
customers of Licensee or other third parties for such or other damages. Even if Yokogawa is liable or responsible for the damages attributable to Yokogawa and to the
extent of this Article 6, Yokogawa’s liability for the Licensee’s damage shall not exceed the price amount of the Licensed Software or service fee which Yokogawa has
received. Please note that Yokogawa shall be released or discharged from part or all of the liability under this Agreement if the Licensee modifies, remodels, combines
with other software or products, or causes any deviation from the basic specifications or functional specifications, without Yokogawa’s prior written consent.
6.2All causes of action against Yokogawa arising out of or relating to this Agreement or the performance or breach hereof shall expire unless Yokogawa is notified of the
claim within one (1) year of its occurrence.
6.3In no event, regardless of cause, shall Yokogawa assume responsibility for or be liable for penalties or penalty clauses in any contracts between the Licensee and its
customers.
Article 7 (Limit of Export)
Unless otherwise agreed by Yokogawa, the Licensee shall not directly or indirectly export or transfer the Licensed Software to any countries other than those where
Yokogawa permits export in advance.
Article 8 (Term)
This Agreement shall become effective on the date when the Licensee receives the Licensed Software and continues in effect unless or until terminated as provided herein,
or the Licensee ceases using the Licensed Software by itself or with Yokogawa’s thirty (30) days prior written notice to the Licensee.
Article 9 (Injunction for Use)
During the term of this Agreement, Yokogawa may, at its own discretion, demand injunction against the Licensee in case that Yokogawa deems that the Licensed Software
is used improperly or under severer environments other than those where Yokogawa has first approved, or any other condition which Yokogawa may not permit.
Article 10 (Termination)
Yokogawa, at its sole discretion, may terminate this Agreement without any notice or reminder to the Licensee if the Licensee violates or fails to perform this Agreement.
However, Articles 5, 6, and 11 shall survive even after the termination.
Article 11 (Jurisdiction)
Any dispute, controversies, or differences between the parties hereto as to interpretation or execution of this Agreement shall be resolved amicably through negotiation
between the parties upon the basis of mutual trust. Should the parties fail to agree within ninety (90) days after notice from one of the parties to the other, both parties
hereby irrevocably submit to the exclusive jurisdiction of the Tokyo District Court (main office) in Japan for settlement of the dispute.
Article 12 (Governing Law)
This Agreement shall be governed by and construed in accordance with the laws of Japan. The Licensee expressly agrees to waive absolutely and irrevocably and to the
fullest extent permissible under applicable law any rights against the laws of Japan which it may have pursuant to the Licensee’s local law.
Article 13 (Severability)
In the event that any provision hereof is declared or found to be illegal by any court or tribunal of competent jurisdiction, such provision shall be null and void with respect
to the jurisdiction of that court or tribunal and all the remaining provisions hereof shall remain in full force and effect.
IM 701992-62E
iii
Conventions Used in This Manual
Notes
The notes and cautions in this manual are categorized using the following symbols.
Note Calls attention to information that is important for proper operation of
the software.
Symbols and Conventions Used in the Procedural Explanations
The contents of the procedural explanations are indicated using the following symbols.
Procedure
Carry out the procedure according to the step numbers. All
procedures are written under the assumption that you are starting
operation at the beginning of the procedure, so you may not need
to carry out all the steps in a procedure when you are changing the
settings.
Explanation This section describes the setup items and the limitations regarding
the procedures.
Character Notations
Bold formatting indicates menus, buttons, etc. that the procedure requires you to click or interface
terms.
iv
IM 701992-62E
Contents
1
Terms and Conditions of the Software License................................................................................. ii
Conventions Used in This Manual.................................................................................................... iv
2
Chapter 1 Features
1.1
1.2
1.3
Software Contents............................................................................................................. 1-1
File Utility Software............................................................................................................ 1-2
Real-Time Data Transfer Software.................................................................................... 1-7
Chapter 2 File Utility
2.1
2.2
2.3
2.4
2.5
2.6
Starting and Exiting the File Utility..................................................................................... 2-1
Merging Files..................................................................................................................... 2-2
Dividing and Clipping Files................................................................................................ 2-5
Converting File Formats.................................................................................................... 2-8
Finalization.......................................................................................................................2-11
Viewing the Version......................................................................................................... 2-12
Chapter 3 Real-Time Data Transfer
3.1
3.2
3.3
3.4
Starting and Exiting the Real-Time Data Transfer Software.............................................. 3-1
Connecting to and Disconnecting from the DL850/DL850V.............................................. 3-2
Starting and Stopping Data Transfers............................................................................... 3-4
Other Settings................................................................................................................... 3-6
Chapter 4 Specifications
4.1
4.2
File Utility Features............................................................................................................ 4-1
Real-Time Data Transfer Software.................................................................................... 4-2
Index
IM 701992-62E
3
4
Index
Chapter 1
1.1
Features
Software Contents
1
Features
The DL850 Advanced Utility is made up of the following two pieces of software.
2
File Utility
You can use this program to perform the following operations on data files that have
been saved by the DL850/DL850V.
• File merging
You can merge the multiple files that were created when a DL850/DL850V performed
a division and save operation on a waveform data file (with the files merged
sequentially over time). You can also merge waveform data files that were saved by
multiple DL850/DL850Vs into a single file. These merged files can be viewed in the
same Xviewer window.
• File division
You can divide a single waveform data file that was saved by a DL850/DL850V into
multiple files of equal time length. You can also clip a waveform data file to save a
segment of this file as a separate file.
• Format conversion
You can convert the format of a waveform data file that was saved by a DL850/
DL850V to .CSV, .FLD (a 32 bit floating-point format file that can be read by MATLAB),
or .WVF (an original format created by YOKOGAWA).
• Finalization
Files that are being saved through DL850/DL850V hard disk recording and files
whose recording were interrupted cannot be viewed in Xviewer because they lack the
additional information that is required to do so. By using the finalize feature, you can
add this information to these types of files.
Real-Time File Transfer Software
The waveform data files that are being recorded through DL850/DL850V hard disk
recording are transferred to a PC by the real-time file transfer software.
The transferred files can be viewed and analyzed in Xviewer.
These two programs are installed automatically when you install Xviewer.
IM 701992-62E
1-1
3
4
Index
1.2
File Utility Software
File Merging
File Merging Sequentially over Time
This feature merges the multiple files that were created when a DL850/DL850V
performed a division and save operation on a waveform data file. The result is a single
file in which the multiple files are merged sequentially over time. If the merged file
exceeds 2 GB in size, it is saved into multiple files, each of which is a maximum of 2 GB
in size.
Applicable Data Files
This feature merges the following types of data files sequentially over time.
• Waveform data files that were divided and saved into multiple files through hard disk
recording
• Files that were divided through this file utility program
• Waveform data files that were saved through hard disk recording*
* Files that meet the following conditions can be merged.
The sample rate is the same.
The number of channels is the same.
The measurement point timestamps are sequential between the files.
Files that were saved through the dual capture feature cannot be merged.
Names of Merged Files
The name of a merged file is assigned as shown below.
Assigned automatically
“m” is inserted in front of the sequence number (_000) in the name of the first file that
was merged.
Example: Name of the first file that was merged: test1_000.wdf
Name of the merged file:
test1m_000.wdf
Assigned manually
“Specified file name” + “_000.wdf”
1-2
IM 701992-62E
1.2 File Utility Software
Merging Files to View the Waveforms of Multiple Files at the Same Time
1
Features
You can use Xviewer to view, in a single window, the waveform data that has been saved
to multiple files.
By merging files that have been saved by different DL850/DL850Vs, you can view the
waveforms from many different channels.
2
Applicable Data Files
• Files that have been saved through DL850/DL850V hard disk recording
• Files that have been saved through the use of the normal trigger feature
Additionally, if the difference between the absolute times of different files is within the
record length of the file that has the earliest absolute time, you can align the absolute
times to merge the files.
The following files cannot be merged.
• Files that were saved through the dual capture feature
• Files that have different sample rates
• Files that have different record lengths
• Files containing data measured by the 16-CH Voltage Input Module or CAN Bus
Monitor Module.
3
4
Index
Number of Files That Can Be Merged
Up to 8 files can be merged.
Number of Channels That Can Be Merged
So long as the total number of channels of all the files does not exceed 128 channels,
the files can be merged.
Names of Merged Files
The name of a merged file is assigned as shown below.
Assigned automatically
When the first file that was merged is a file that was saved through hard disk
recording, “m” is inserted in front of this file’s 3-digit sequence number (_000).
Example: Name of the first file that was merged: test1_000.wdf
Name of the merged file:
test1m_000.wdf
When the first file that was merged is a file that was saved through the normal trigger
feature, “m” is inserted after the file name.
Example: Name of the first file that was merged: test1.wdf
test1m.wdf
Name of the merged file:
Assigned manually
“Specified file name” + “_000.wdf”
IM 701992-62E
1-3
1.2 File Utility Software
File Division
You can divide a file into segments that have the same specified length of time or the
same specified number of data points. You can also clip a data file to save a specified
segment of the file as a separate file.
By dividing files, you can use Xviewer to analyze them in a short period of time.
Equal Division
Starting from the beginning of a file or from a specified point in the file, you can divide the
file equally into segments by the specified length of time or by the specified number of
data points, and then save the segments as separate files. You can also divide multiple
files (up to 128 files) collectively under the same conditions.
Applicable Files
• Files that have been saved through DL850/DL850V hard disk recording
•Files that were merged sequentially over time or that were divided through this file
utility program
Files that were saved through the dual capture feature cannot be divided.
Number of File Divisions
You can divide files so long as the number of files that result does not exceed 1,000.
You cannot divide a file so that the number of data points after division exceeds 10
Gpoint.
File Names
For each of the names of divided files, the sequence number [n] (n = 0 to 999) of the
resultant file is inserted in front of the original file’s sequence number (_000).
Example: Name of the original file:
test1_000.wdf
Names of resultant files:
test1[0]_000.wdf, test1[1]_000.wdf, ...
If the size of the resultant file exceeds 2 GB, it is divided into files that are each a
maximum of 2 GB in size.
In this case, the sequence number of the original file is increased for each resultant file.
Example: If the resultant files in the above example exceed 2 GB in size:
test1[0]_000.wdf, test1[0]_001.wdf, test1[0]_002.wdf, ...
test1[1]_000.wdf, test1[1]_001.wdf, test1[1]_002.wdf, ...
Clipping
Starting from the beginning of a file or from a specified point in the file, you can clip a
file to produce a segment of the file that has the specified length of time or the specified
number of data points, and then save this segment as a separate file.
You can also clip multiple files (up to 128 files) collectively under the same conditions.
Applicable Files
• Files that have been saved through DL850/DL850V hard disk recording
•Files that were merged sequentially over time or that were divided through this file
utility program
You cannot clip files that were saved through the dual capture feature.
Size of Segments That Clipped from Files
You can clip files to produce segments that have up to 10 Gpoint of data.
File Names
For the name of the file that contains the resultant segment, [000] is inserted in front of
the original file’s sequence number (_000).
Example: Name of the original file:
test1_000.wdf
Name of the file that contains the resultant segment: test1[000]_000.wdf
If the size of the file that contains the resultant segment exceeds 2 GB, it is divided into
files that are each a maximum of 2 GB in size.
In this case, the sequence number of the original file is increased for each resultant file.
Example: If the resultant file in the above example exceeds 2 GB in size:
test1[000]_000.wdf, test1[000]_001.wdf, test1[000]_002.wdf, ...
1-4
IM 701992-62E
1.2 File Utility Software
1
Format Conversion
Features
You can convert a waveform data file that was saved by a DL850/DL850V to a .CSV,
.FLD, or .WVF file.
You can also convert the format of multiple files (up to 128 files) collectively under the
same conditions.
2
CSV Conversion
You can use a spreadsheet program, such as Excel, to manipulate the data in .CSV files.
You can also divide the file by the specified number of lines and save the resultant files.
Applicable Files
• DL850/DL850V waveform data files
Files that were saved through the dual capture feature cannot be converted.
3
4
Number of Converted Files
You can convert files so long as the number of files that result does not exceed 1,000.
Maximum Number of Lines
You can convert data into a file that has up to 100,000,000 lines.
Index
File Size
You can convert a file so long as its resultant file size does not exceed 2 GB.
File Names
The file name is the same as the name of the original file. The extension is .csv.
If you divide a file and then convert it, a 3-digit sequence number [n] (n = 000 to 999) is
inserted before the extension for each converted file.
Example: Name of the original file:
test1_000.wdf
test1_000.csv
Name of converted file:
If the original file has been divided:
Names of converted files:
test1_000[000].csv, test1_000[001].csv...
Header Data
You can also include the measurement conditions in the file as header data. If you divide
the file, you can select whether to include the header data in just the first file or in all the
files.
Time Axis Information
You can also include the timestamp data in the file. You can select absolute time or
relative time.
Data Interpolation (DL850/DL850V 16-CH Voltage Input Module or CAN Bus
Monitor Module)
When a measurement is performed with the 16-CH Voltage Input Module or the CAN
Bus Monitor Module, only a single sub channel’s data is saved, so you cannot save the
measured data of all sub channels during the same measurement time. Therefore, there
are sample points that do not have measured data from some sub channels.
You can select whether conversion is performed by leaving the missing measured values
blank or by interpolating them from the previous measured data.
IM 701992-62E
1-5
1.2 File Utility Software
FLD Conversion
You can convert data files to binary data in 32 bit floating-point format that can be read
by MATLAB.
Applicable Files
DL850/DL850V waveform data files
Files that were saved through the dual capture feature cannot be converted.
File Size
You can convert a file so long as its resultant file size does not exceed 2 GB.
File Names
The file name is the same as the name of the original file. The extension is .fld.
WVF Conversion
You can convert data files to WVF format, an original data format developed by
YOKOGAWA.
Applicable Files
DL850/DL850V waveform data files
Files that were saved through the dual capture feature cannot be converted.
File Size
You can convert a file so long as its resultant file size does not exceed 2 GB.
File Names
The file name is the same as the name of the original file. The extension is .wvf.
Finalization
Files that are being saved through DL850/DL850V hard disk recording and files whose
recording processes were interrupted cannot be viewed in Xviewer because they lack the
additional information that is required to do so. By using the finalize feature, you can add
this information to these types of files.
You can also process multiple files (up to 128 files) collectively under the same
conditions.
Applicable Files
Waveform data files that were saved through DL850/DL850V hard disk recording but
have not been finalized
Files that were saved through the dual capture feature cannot be finalized.
File Names
You can overwrite the original file or save the resultant file with the same name as the
original file in a Finalize sub folder that is created in the folder of the original file.
1-6
IM 701992-62E
1.3
Real-Time Data Transfer Software
1
Features
The waveform data files that are being recorded through DL850/DL850V hard disk
recording are transferred to a PC by the real-time file transfer software.
The transferred files can be viewed and analyzed in Xviewer.
Transfer
File List
2
During DL850/DL850V hard disk recording, while a file is being divided and saved, the
resultant files are transferred to a PC in order of their creation.
The file names are the same as the file names created by the DL850/DL850V.
If a file already exists at the transfer destination, a sequence number (1, 2, ...) is added
at the start of the name of the new file.
If the transfer is aborted before it is completed, any files that have not been completely
transferred are discarded. If you restart the transfer, the files that were not previously
transferred to the PC are transferred in order.
You can view a list of the files that have been transferred from the DL850/DL850V.
You can also view the following information in the list.
• File names (only the name of the first file)
• Date and time that the file was updated (date and time on the DL850/DL850V)
• Data size (total size of all files represented by the displayed first file)
• Transfer status
Complete: The last file has been transferred.
Transferring: The last file has not been transferred.
Aborted: The file transfer has been aborted.
• Displayable range
The range of resultant files that can be shown on Xviewer is displayed as a
percentage of all the files that were made through file division.
Log Display
You can view the file transfer history as a log. You can view the history of the last 5,000
transferred files. You can also save the displayed log as a text file.
Other Features
You can start transferring files from the DL850/DL850V at the same time that you start
this software, and you can also start performing measurements on the DL850/DL850V at
the same time that you start transferring files.
IM 701992-62E
1-7
3
4
Index
Chapter 2
File Utility
2.1
Starting and Exiting the File Utility
1
2
Procedure
1. Use one of the following methods to start the file utility.
• Double-click the DL850 File Utility icon on the desktop.
• Start Xviewer. On the Tool menu, click DL850 Advanced Utility and then File
Utility.
• On the Windows taskbar, click Start, All Programs, YOKOGAWA, Xviewer,
and then DL850FileUtility.
File Utility
Starting the File Utility
3
4
Icon
Index
Startup Window
File Divide tab
File Merge tab
Format Change tab
Finalize tab
Close button
Exiting the File Utility
1. To exit the file utility, click the close button in the upper right of the file utility
window. Alternatively, on the File menu, click Exit.
IM 701992-62E
2-1
2.2
Merging Files
Procedure
1. Start the file utility, and then click the File Merge tab.
2. Set Merge Mode to Time Series (to merge files sequentially over time) or
Channel (to view the waveforms from multiple files in a single window).
If you have set Merge Mode to Channel and you want to align the times of the
files that you are merging, select the Absolute Time check box. If the difference
between the absolute times of different files that you want to merge is within the
record length of the file that has the earliest absolute time, align the absolute
times to merge the files.
When Merging Files Sequentially over Time
Select Time Series.
File list display
When Merging Files to View the Waveforms of Multiple
Files at the Same Time
Select Channel.
Select this check
box if you want to
align the absolute
time differences of
the different files
to merge them.
2-2
IM 701992-62E
2.2 Merging Files
Selecting the Source Files
3. Click Browse next to Input File to select the files that you want to merge, or drag
the files directly to the file utility window’s file list. The selected files appear in the
file list.
To delete files from the file list, click the file that you want to delete (this selects
the file), and then click Cancel or press DELETE. To delete all files from the file
list, click Cancel All.
You can change the order of the files in the list by dragging them to different
positions.
Browse button
Refreshes with the newest list data
2
File Utility
1
3
4
Index
List of files that
will be merged
Deletes all files
from the list
Deletes the selected
file from the list
Note
Only the first file of a group of files that were created by a division and save operation by a
DL850/DL850V is displayed. Selecting the first file selects all the files.
Setting the Save Destination for the Merged File
4. Click Browse under Output File to specify the save destination for the merged file.
You can also specify the file name to save the file. If you do not specify the save
destination, the file will be saved in the same folder as the first file that is merged.
Executing File Merging
5. Click Execute to merge all the files in the file list.
Explanation
Merge Mode
Time Series
You can use this mode to merge files that are sequential in time. Select this mode when
you want to merge files that were generated by a DL850/DL850V division and save
operation back into a single file.
You can merge up to 100 files.
Channel
Select this mode when you want to view the waveforms from different files in a single
window.
If you select Absolute Time, you can align the absolute time differences of the different
files to merge them. The adjustable range of absolute time differences between files is
within the record length of the file that has the earliest absolute time.
You can merge up to 8 files, but the total number of channels among all the files that you
are merging must not exceed 128.
IM 701992-62E
2-3
2.2 Merging Files
File List
All the files that are displayed in the list are merged.
To select the table headings, on the View menu, click Row Select.
File Name:
File names displayed without extensions
Model Name:
Name of the model that saved the data
File Type:File type, such as hard-disk recording or triggered
measurement
Sample Rate:The sample rate at the time that measurements were
performed
Measure Time:Measurement time that corresponds to the file’s data with a
resolution of 10 ms
Triggered Time:For triggered measurement files, the date that the trigger
occurred with a resolution of 10 ms
Measuring Start Time:The time that the file’s measurement started with a resolution
of 10 ms. This is the measurement time of the first data.
Measuring End Time:The time that the file’s measurement ended with a resolution of
10 ms. This is the measurement time of the last data.
Record Length:
The number of data points per channel
Finalize:Whether the file was properly finalized. “Done” is displayed
if the file was properly finalized, and “Undone” is displayed
otherwise.
Files that have not been finalized cannot be merged. Use this
software program’s finalize feature to finalize these files.
File Names
For details on the names of merged files, see section 1.2, “File Utility Software.”
2-4
IM 701992-62E
2.3
Dividing and Clipping Files
1
Procedure
2
File Utility
1. Start the file utility, and then click the File Divide tab.
2. Set Divide Mode to Equal Division or Clipping.
3
Select Equal Division or Clipping.
Set the file division unit (Time, No. of Points).
Set the start position
for file division or
clipping.
Set the record length
for file division or
clipping.
File list display
Setting the Unit for File Division
3. You can set the unit for file division or for clipping to Time or No. of Points.
Setting the Start Position
4. Set the start position for file division or for clipping.
If you have set Divide Unit to No. of Points, set Start Position to First Data or Set
Point. If you set Start Position to Set Point, enter the data point to start from.
If you have set Divide Unit to Time, set Start Position to First Data or Set Time. If
you set Start Position to Set Time, enter the date and time to start from.
Setting the Record Length
5. Set the record length for file division or for clipping.
IM 701992-62E
If you have set Divide Unit to No. of Points, enter the number of data points. The
unit is fixed to Points.
If you have set Divide Unit to Time, enter the length of time. You can set the unit
to Day, Hour, Minute, or Second.
2-5
4
Index
2.3 Dividing and Clipping Files
Registering Files in the File List
6. Click Browse next to Input File to select the files that you want to use or drag the
files directly to the file utility window’s file list. The selected files appear in the file
list.
To delete files from the file list, click the file that you want to delete (this selects
the file), and then click Cancel or press DELETE. To delete all files from the file
list, click Cancel All.
You can change the order of the files in the list by dragging them to different
positions.
Browse button
Refreshes with the newest list data
List of files that
will be merged
Deletes all files
from the list
Deletes the selected
file from the list
Note
Only the first file of a group of files that were created by a division and save operation by a
DL850/DL850V is displayed. Selecting the first file selects all the files.
Selecting the Source Files
7. The file in the file list that is selected is the one that will be divided or will be
clipped.
Click the file that you want to use to select it. If you hold down SHIFT and click
a file, you can select multiple consecutive files. If you hold down CTRL and click
files, you can select just the files that you click. You can select up to 128 files.
Setting the Save Destination for the Files That Result From the Division
Operation
8. Click Browse under Output File to specify the save destination for the files that
result from the file division or clip operations. You can also specify the file name
to save the file. If you do not specify the save destination, files will be saved in the
same folder as their source files.
Executing the File Division
9. Click Execute to divide or clip the files that are selected on the file list.
2-6
If you have selected multiple files, they are all divided or clipped collectively under
the same conditions. You can divide up to 128 files at once.
IM 701992-62E
2.3 Dividing and Clipping Files
1
Explanation
Divide Mode
This setting represents the number of data points or the time from the start position that
will be used to divide or clip files. You can specify a value of up to 10 Gpoint.
For details on the file list table headings, see section 2.2.
File Names
For details on the names of the files that result from file division or clipping operations,
see section 1.2, “File Utility Software.”
IM 701992-62E
3
4
Index
Record Length
File List
2
File Utility
Equal Division:Starting from the beginning of a file or from a specified point in the file,
you can divide the file equally into segments by the specified length
of time or by the specified number of data points, and then save the
segments as separate files.
You can divide a file into a maximum of 1,000 files. You cannot divide
a file so that the number of data points after division in a single file
exceeds 10 Gpoint.
Clipping:Starting from the beginning of a file or from a specified point in the file,
you can clip a file to produce a segment of the file that has the specified
length of time or the specified number of data points, and then save this
segment as a separate file. The maximum size of this resultant file is 10
Gpoint.
2-7
2.4
Converting File Formats
Procedure
1. Start the file utility, and then click the Format Change tab.
2. Set Format to CSV, FLD, or WVF.
When Converting to CSV Format
Select CSV.
Set the data compression.
Settings for dividing the file and
converting the resultant files
Set whether a period
or a comma is used
as the decimal point.
File listdisplay
Select the
timestamp to
add to the data.
Set the information
that will be added
as headers.
Configure the data interpolation
settings for data that was measured
by a 16-CH Voltage Input Module or
a CAN Bus Monitor Module.
When Converting to FLD or WVF Format
Select FLD or WVF.
Set the data compression.
Setting the Data Compression
3. Set Compression to None, PP Comp, or Decim. If you set Compression to PP
Comp or Decim, set Compress Rate.
Setting the File Divisions (CSV)
4. Set File Divide to ON or None. If you set File Divide to ON, set the number of
lines to divide the file by (Divided Line). The number of files that will result from
the file division is displayed as Divided File Num.
Setting the Time Axis Information (CSV)
5. Set whether to include the measured data’s timestamp.
2-8
Set Time Axis Info to None, Absolute Time, or Relative Time. If you select None,
the timestamps will not be included. If you select Relative Time, the relative times
from the trigger point will be included as the timestamps.
IM 701992-62E
2.4 Converting File Formats
1
Setting the Header (CSV)
6. Set whether to include the measurement conditions as the file’s header.
Set Header to None, All file, or Head file.
If you select None, the header will not be included.
If you select All file, the header will be included in all files that result from the
division and conversion operation.
If you select Head file, the header will be included in only the first file of all the
files that result from the division and conversion operation.
2
File Utility
3
Setting the Sub Channel Interpolation
(Only when data that has been measured by the 16-CH Voltage Input
Module or CAN Bus Monitor Module is converted to CSV format)
4
7. Set whether to interpolate the measured data for sub channels that do not have
any when measurements are performed by a DL850/DL850V 16-CH Voltage Input
Module or CAN Bus Monitor Module.
Set Sub-CH Interpolation to ON or OFF.
Setting the Decimal Point (CSV)
8. Set whether a period or a comma will be used to represent the decimal point.
Set Decimal Point to Point or Comma.
If you set Decimal Point to Point, data will be separated by commas when the
CSV conversion is complete. If you set Decimal Point to Comma, data will be
separated by periods when the CSV conversion is complete.
Registering Files in the File List
The method for registering files in the file list is the same as was explained in the section
for dividing files. See page 2-6.
Selecting the Source Files
The method for selecting the source file is the same as was explained in the section for
dividing files. See page 2-6.
Setting the Save Destination for the Converted Files
9. Click Browse under Output File to specify the save destination for the converted
files. You can also specify the file name to save the file. If you do not specify the
save destination, the files will be saved in the same folder as their source files.
Executing the Conversion
10.Click Execute to convert the files that are selected on the file list.
If you have selected multiple files, they are all converted collectively under the
same conditions. You can convert up to 128 files at once.
IM 701992-62E
2-9
Index
2.4 Converting File Formats
Explanation
Compress Rate
The number of data points is compressed down to 1/(the specified value) of its original
number. For example, if you set Compress Rate to 5, the data is compressed to 1/5 of its
original size.
Time Axis Info
You can include the measured data’s timestamp as an absolute-time value or as a
relative-time value from the trigger point. If you specify relative time, the trigger point is
set as 0. Any times previous to the trigger point are displayed as negative values, and
any times after the trigger point are displayed as positive values.
Sub-CH Interpolation
You can interpolate sub channel data from the previous values measured by a 16-CH
Voltage Input Module or CAN Bus Monitor Module. If you specify no interpolation, data
points that do not have any data will be blank.
Decimal Point
You can use a period or comma as the decimal point.
The symbol that you do not use as the decimal point will be used to separate the data in
the converted .CSV file.
CSV Format
The format of files that have been converted to .CSV files is shown below.
Header
Time-axis information (timestamp)
Data Size
File List
You cannot convert a file so that the resultant file size is greater than 2 GB.
For details on the file list table headings, see section 2.2.
File Names
For details on the names of converted files, see section 1.2, “File Utility Software.”
2-10
IM 701992-62E
2.5
Finalization
1
Procedure
2
Browse button
File Utility
1. Start the file utility, and then click the Finalize tab.
Refreshes with the newest list data
3
4
List of files that
will be finalized
Index
Deletes all files
from the list
Deletes the selected
file from the list
Select this check box to overwrite files.
2. If you want to overwrite the original file with the finalized file, select the Overwrite
check box.
Registering Files in the File List
The method for registering files in the file list is the same as was explained in the section
for dividing files. See page 2-6.
Selecting the Source Files
The method for selecting the source file is the same as was explained in the section for
dividing files. See page 2-6.
For files that have not been finalized, the “Finalize” column displays “Undone.”
Executing the Finalization
3. Click Execute to finalize the files that are selected on the file list.
If you have selected multiple files, they are all finalized collectively. You can
finalize up to 128 files at once.
Explanation
Files that were not saved properly, for example, if the power was turned off while data
was being saved, do not have the additional information that is required to view these
files in Xviewer.
By finalizing these files, you can add the necessary information so that they can be
viewed in Xviewer.
IM 701992-62E
2-11
2.6
Viewing the Version
Procedure
1. Start the file utility. On the Help menu, click About DL850 File Utility to view the
version of this software program.
2-12
IM 701992-62E
Chapter 3
3.1
Real-Time Data Transfer
Starting and Exiting the Real-Time Data
Transfer Software
1
2
Procedure
Starting the Real-Time Data Transfer Software
1. Use one of the following methods to start the real-time data transfer software.
4
Index
Icon
Startup Window
Folder on the DL850/DL850V
Settings menu
Displayed in green when the connection is successful
Close button
Transfer button
Transfer destination folder
List of files that have been
transferred and are being
transferred
Exiting the Real-Time Data Transfer Software
1. To exit the real-time data transfer software, click the close button in the upper right
of the real-time data transfer window. Alternatively, on the Settings menu, click
Exit.
IM 701992-62EN
3
Real-Time Data Transfer
• Double-click the DL850 RT Transfer icon on the desktop.
• Start Xviewer. On the Tool menu, click DL850 Advanced Utility and then
Real-Time Data Transfer.
• On the Windows taskbar, click Start, All Programs, YOKOGAWA, Xviewer,
and then DL850RTTransfer.
3-1
3.2
Connecting to and Disconnecting from the
DL850/DL850V
Procedure
1. On the real-time data transfer software’s Settings menu, click Connect to view
the Connection setup dialog box.
Connects to the selected DL850/DL850V
Deletes the
selected
connection from
the list
Adds a DL850/DL850V
connection to the list
Undoes the addition or deletion of a connection
Displays the connection
information of the selected
DL850/DL850V
Adding a DL850/DL850V to the Connection List
2. Click Add to display the following dialog box.
Configure the settings according to the method that you will use to connect the
DL850/DL850V.
Click OK to add the DL850/DL850V to the list.
If you want to connect over a network
(specify the IP address of the DL850/DL850V)
If you want to connect over USBTMC
(specify the serial number of the DL850/DL850V)
Connecting
3. Select the DL850/DL850V that you want to connect to from the list explained in
step 1, and then click Connect. If the connection is successful, the color of the
arrow icon in the window will change to green.
Displayed in green when the connection is successful
Disconnecting
4. On the real-time data transfer software’s Settings menu, click Disconnect.
3-2
IM 701992-62EN
3.2 Connecting to and Disconnecting from the DL850/DL850V
1
Explanation
You can use an Ethernet or USB connection to connect a PC to a DL850/DL850V.
Network:
Specify the IP address of the DL850/DL850V that you want to connect
to.
USBTMC:
Specify the serial number of the DL850/DL850V that you want to
connect to.
2
3
Real-Time Data Transfer
4
Index
IM 701992-62EN
3-3
3.3
Starting and Stopping Data Transfers
Procedure
1. On the real-time data transfer window, set PC Folder, which is the destination
folder on the PC for the data transfer.
Transfer button
Transfer destination folder
2. Click Transfer.
The data transfer begins, and the Transfer button changes to the Stop button. The
name of the folder that the DL850/DL850V is performing hard disk recording on is
displayed under DL850 Folder, and the file information is appended to the file list
as the files are transferred.
When you want to transfer data, you have to first turn on the DL850/DL850V harddisk-recording and file-division features.
Stop button
Folder on the
DL850/DL850V
Transfer destination folder
Percentage of the file that can
be viewed in Xviewer in
relation to the total file size
List of files that have been
transferred and are being
transferred
Double-click a file to view and
analyze it in Xviewer.
Stopping Data Transfers
3. Click Stop.
3-4
IM 701992-62EN
3.3 Starting and Stopping Data Transfers
1
Explanation
When the file-division and hard-disk-recording features on the DL850/DL850V that you
are connected to have been turned on, files that have been saved and files that are being
saved through hard disk recording are transferred to the PC. If either of these features
has been turned off, you cannot transfer files.
Data that is being transferred can also be viewed and analyzed on Xviewer. Data from
files that are displayed in the file list can be viewed in Xviewer when the data is ready
to be displayed. Close Xviewer and double-click the file to view data that is being
transferred to the PC.
• Files that have been divided by the DL850/DL850V are recorded to the hard disk at the
following intervals.
(DL850/DL850V’s TIME/DIV × 10)/number of file divisions
• The following methods are recommended to avoid duplicate file names.
• Set auto-naming on the DL850/DL850V to the date.
• When deleting files on the DL850/DL850V main unit that were transferred in real time, be
sure to delete the corresponding files on the PC side.
• You can perform data transfer if one file's record length is 5 MB or more. Please adjust the
DL850/DL850V's record length and number of file divisions.
IM 701992-62EN
3-5
3
Real-Time Data Transfer
Note
2
4
Index
3.4
Other Settings
Procedure
Setting Options
1. On the real-time data transfer software’s Settings menu, click Option to display
the Option dialog box.
The software outputs a data transfer log.
When you start the real-time data
transfer software, it uses the previous
settings to start transferring data.
When you click Transfer, the connected
DL850/DL850V starts measuring.
2. Select the check boxes for the options that you want to enable, and click OK.
Viewing the Log
3. On the real-time data transfer software’s Settings menu, click Log. If you have
selected the Output Log check box on the Option screen, the data transfer log is
displayed.
Saves the log to a text file
Clears the displayed log
Viewing the Version
4. On the real-time data transfer software’s Help menu, click About
DL850RTTransfer to view the software’s version information.
3-6
IM 701992-62EN
3.4 Other Settings
1
Explanation
Option
Output Log
If this option is enabled, the transfer day and time, file name, and file size for each of the
transferred files are listed in the log. From the time when the software starts to the time
when you exit the software, the most recent 5,000 file transfers can be listed in the log.
To view the log, on the Settings menu, click Log.
Start transfer with Start-up
Start measuring with Transfer
If this option is enabled, the DL850/DL850V will start measuring as soon as you click
Transfer.
If the file-division or hard-disk-recording feature has been turned off on the DL850/DL850V that
you have connected to, an error will occur.
IM 701992-62EN
4
Index
Note
Log
3
Real-Time Data Transfer
If this option is enabled, as soon as the software starts, it will start transferring data with
the same connection conditions from the last time that the software was used. If the
connection fails, an error will occur.
2
When the Output Log check box is selected, the Log Display dialog box shows the log.
You can also save the displayed log to a text file.
3-7
Chapter 4
Specifications
4.1
File Utility Features
1
File Merging
Item
Merge mode
Applicable files
File size
File Division
Item
Division mode
Applicable files
Division unit
Start position
Division (record) length
Number of files
File size
Specifications
Equal division, clipping
• Files that have been saved through DL850/DL850V hard disk recording
• Files that were merged sequentially over time or that were divided through this file utility program
Time, no. of points
The first data entry or the specified point or time
Time:
1 to 2,592,000 seconds
No. of points:
1 to 10,000,000,000
The number of resultant files after division is 1,000 files or less.
The file size of the resultant files after division is 10 Gpoint or less each.
Format Conversion
Item
Conversion file format
Applicable files
Data compression
Specifications
CSV/FLD/WVF
DL850/DL850V waveform data files
None, PP comp, decim
Compression rate: 5, 10, 20, 50, 200, 500, 1000, 2000, 5000, 10000
File division (CSV)
Files can be divided by the specified number of lines and converted.
No. of lines per file: 10 to 100,000,000
Number of files: 1,000 max.
Time axis information (CSV) Absolute time or relative time from the trigger point can be added.
Headers (CSV)
Measurement conditions can be saved as headers.
None:
Headers are not added.
All file: Headers are added to all the files that result from the division and save operation.
Head file:Headers are added only to the first file that results from the division and save operation.
Sub-channel interpolation
Data that has been saved with a 16-CH Voltage Input Module (720220) or a CAN bus Monitor
(CSV)
Module (720240) can be interpolated.
Decimal point (CSV)
A period or a comma can be used to represent the decimal point.
File size
The size of converted files is 2 GB or less.
Finalization
Item
Applicable files
IM 701992-62E
Specifications
Waveform data files that were saved through DL850/DL850V hard disk recording but have not been
finalized
4-1
2
3
4
Specifications
Number of files that can be
merged
Specifications
Time series/channel
Time series
• Waveform data files that were divided and saved into multiple files during DL850/DL850V hard
disk recording
• Files that were divided through this file utility program
• Waveform data files that were saved through DL850/DL850V hard disk recording and that meet
the following conditions
The sample rate is the same.
The number of channels is the same.
The measurement point timestamps are sequential between the files.
Channel
• Files that have been saved through DL850/DL850V hard disk recording
• Files that have been saved through the use of the normal trigger feature
Time series:
1* to 100
*
For groups of files that have been created through file division and save
operations, only the first file is specified. 100 files or less.
Channel:
2 to 8
The total number of channels must not exceed 128.
20 GB or less, 10 Gpoint or less
Index
4.2
Real-Time Data Transfer Software
Item
Transfer feature
File list
Communication feature
Option
4-2
Specifications
Data that is being saved through DL850/DL850V hard disk recording (with the file division feature
turned on) or data that has already been saved through DL850/DL850V hard disk recording can be
transferred to a PC during hard disk recording.
The name of the file, the date and time when the file was updated, the file’s data size, the transfer
state, and the percentage of the file that can be viewed are listed.
File Name:
Displayed with the extension
Date:
Displayed in the format yyyy/mm/dd hh:mm
Displayed as the number of bytes
Data size:
State:
Transferring, Complete, Abort
Available:
Displays the percentage of the whole file that can be viewed in Xviewer
Connectable through Ethernet or USBTMC
Network:
The DL850/DL850V is detected by its IP address.
USBTMC:
The DL850/DL850V is detected by its serial number.
Output Log:From the start of the data transfer, the information of the transferred
files is listed in the log.
The contents of the log can be saved to a text file.
Up to 5,000 lines can be displayed in the log.
Start transfer with Start-up:After the software starts, the previous conditions are used
to make a connection, and the data transfer starts.
Start measuring with Transfer:At the same time that the data transfer starts, the DL850/
DL850V starts measuring.
IM 701992-62E
Index
A
1
Page
absolute time alignment........................................................ 2-2
C
Page
channel.................................................................................. 2-2
clipping.................................................................................. 1-4
connection............................................................................. 3-2
CSV conversion..................................................................... 1-5
CSV format.......................................................................... 2-10
D
Page
data compression.................................................................. 2-8
data interpolation................................................................... 1-5
decimal point......................................................................... 2-9
DL850 Advanced Utility.................................................. 2-1, 3-1
Page
time axis information...................................................... 1-5, 2-8
time series............................................................................. 2-2
trademarks................................................................................. i
transfer.................................................................................. 1-7
U
Page
W
Page
Index
Page
Page
Page
header................................................................................... 2-9
header data........................................................................... 1-5
L
Page
log file.................................................................................... 1-7
log output............................................................................... 3-7
M
Page
merge mode.......................................................................... 2-2
N
Page
network.................................................................................. 3-3
R
Page
real-time data transfer........................................................... 3-1
record length......................................................................... 2-5
revisions..................................................................................... i
S
Page
software license, terms and conditions..................................... ii
specifications......................................................................... 4-1
starting............................................................................ 2-1, 3-1
start measuring with transfer................................................. 3-7
start position.......................................................................... 2-5
start transfer with start-up...................................................... 3-7
sub channel interpolation...................................................... 2-9
symbols.................................................................................... iv
IM 701992-62E
4
WVF conversion.................................................................... 1-6
features................................................................................. 1-1
file division...................................................................... 1-4, 2-5
file division, unit of................................................................. 2-5
file merging.............................................................. 1-2, 1-3, 2-2
file name........................................................... 1-2, 1-3, 1-4, 1-5
finalization.................................................................... 1-6, 2-11
FLD conversion..................................................................... 1-6
floating-point format............................................................... 1-6
format conversion........................................................... 1-5, 2-8
H
3
USBTMC............................................................................... 3-3
equal division......................................................................... 1-4
F
2
Index
E
T
Index-1