1
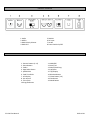
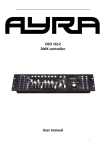
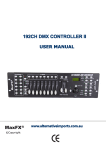
SC 1216 Plus Manual 2009‐10‐01 INCLUDED IN BOX: 1 x SC 1216 PLUS CONTROLLER DC 9V POWER ADAPTER USER MANUAL UNPACKING INSTRUCTIONS UPON RECEIVING THE UNIT, UNPACK CARTON AND VERIFY THAT ALL PARTS HAVE BEEN RECEIVED IN GOOD CONDITION. IF THERE IS ANY SIGN OF DAMAGE TO THE CARTON OR UNIT DUE TO SHIPPING OR MISHANDLING, NOTIFY THE SHIPPER IMMEDIATELY. KEEP ORIGINAL PACKING MATERIALS IN THE EVENT THE UNIT MUST BE RETURNED FOR ANY REASON. ALL FIXTURES MUST BE RETURNED IN THEIR ORIGINAL PACKAGING. IF ANY ACCESSORY IS MISSING THAT SHOULD HAVE BEEN RECEIVED WITH THE UNIT, NOTIFY OMNISISTEM IMMEDIATELY WITHIN 3 DAYS OF RECEIVING THE ITEM. IF NOTIFICATION IS NOT RECEIVED WITHIN 3 DAYS, UNIT IS CONSIDERED TO HAVE BEEN RECEIVED WITH ALL COMPONENTS AND WITHOUT DAMAGES. CONTACT US OFFICE: TECHNICAL SUPPORT: VISIT US ON THE WEB: SC 1216 Plus Manual OMNISISTEM LIGHTS & EFFECTS 6403 SOUTH 208TH STREET KENT, WA 98032 TEL: 253‐395‐9500 FAX: 253‐395‐9494 HOURS OF OPERATION: MONDAY – FRIDAY 8AM ‐ 5PM PST ATTN: SERVICE DEPARTMENT (RA#‐‐‐‐‐‐‐‐) OMNISISTEM LIGHTS & EFFECTS 6403 SOUTH 208TH STREET KENT, WA 98032 TEL: 253‐395‐9500 FAX: 253‐395‐9494 HOURS OF OPERATION: MONDAY – FRIDAY 10AM ‐ 4PM PST WWW.OMNISISTEM.COM 2009‐10‐01 FEATURES POWER: DC 9V‐12V 500mA (min.) DMX CHANNELS: 192 DMX CHANNELS SCANNERS: 12 SCANNERS OF 16 CHANNELS EACH BANKS: 30 BANKS OF 8 PROGRAMMABLE SCENES CHASES: 6 PROGRAMMABLE CHASES OF 240 SCENES SLIDERS: 8 SLIDERS FOR MANUAL CONTROL OF CHANNELS MODES: 8‐CHANNEL OR 16‐CHANNEL MODE ADDITIONAL FEATURES: ASSIGNABLE JOYSTICK FOR EASE OF CHANNELS FILE DUMP ALLOWS DATA TO BE SENT OR RECEIVED BETWEEN TWO UNITS AUTO MODE PROGRAM CONTROLLED BY SPEED AND FADE TIME SLIDERS FADE TIME/ASSIGN FADE TIME REVERSIBLE DMX CHANNELS ALLOWS FIXTURE TO REACT IN OPPOSITION TO OTHERS IN A CHASE FINE ADJUSTMENT FOR JOYSTICK PAN AND TILT BLACKOUT MASTER BUTTON MANUAL OVERRIDE BUTTON ALLOWS YOU TO GRAB ANY FIXTURE ON THE FLY BUILT‐IN MICROPHONE FOR MUSIC TRIGGERING MIDI CONTROL OVER BANKS, CHASES AND BLACKOUT DMX POLARITY SELECTOR POWER FAILURE MEMORY DMX CONNECTORS: 1 x 3‐PIN FEMALE/MALE XLR SOCKET MIDI INPUT: 5‐PIN MULTIPLE SOCKET AMBIENT TEMPERATURE: 35.6° F ‐ 113° F ( 2° C ‐ 45° C) TEMPERATURE: < 113° F (45° C) DIMENSIONS: 19” x 5.3” x 3.4” WEIGHT: 6 LBS SC 1216 Plus Manual 2009‐10‐01 IMPORTANT SAFETY INFORMATION This unit is intended for indoor use only. Ensure the power source is of the correct voltage for this fixture. Connect power through a direct switch circuit, NOT a dimmer or variable circuit source. Disconnect unit from power when not in use. Do not install or operate the device in harmful environment conditions. (i.e. extreme heat, cold, moisture or dust) If the unit has been exposed to extreme environmental conditions or drastic temperature fluctuations, ensure the unit is returned to room temperature before operating. Maximum Ambient Temperature is 113° C (45° C). Do not operate unit at temperatures higher than this. Do not aim smoke or bubble effects near unit. Do not operate the unit during thunderstorms. Disconnect power prior to cleaning unit. Do not use solvents or abrasive cleaners to clean the unit. Use a damp cloth only. Do not leave this device running unattended. Modification(s) to the device or power cord will result in termination of the dealer/manufacturer’s warranty. The safest way to disconnect your power cord from main power is to grip cord end and detach from plug. There are no serviceable parts inside this device. Maintenance and service operations are only to be carried out by authorized dealers. Contact the nearest dealer or service center for assistance with operating your unit. Unauthorized tampering can cause additional damage. All units opened by an unauthorized user will not be covered under warranty. Damages caused by the disregard of this user manual or by unauthorized personnel are not subject to warranty. SC 1216 Plus Manual 2009‐10‐01 PRODUCT OVERVIEW 5. DMX IN 6. DC Input 7. Strobe 8. Power Switch On/OFF 1. Audio 2. Midi In 3. DMX Polarity Selector 4. DMX OUT 11. MIDI/REC 12. Auto/ Del 13. Music/Bank Copy 14. Up/Down 15. Tap/Display 16. Blackout Button 17. Chase Button (1‐6) 18. Fine Button 19. Mode Button 1. Scanner Buttons (1‐12) 2. Scene Buttons 3. Faders 4. Page Select Button 5. Speed Slider 6. Fade Time Slider 7. LCD Display 8. Pan Joystick 9. Tilt Joystick 10.Program Button SC 1216 Plus Manual 2009‐10‐01 LCD DISPLAY The LCD display contains a maximum of 2 lines 8 characters each. Definitions of abbreviations is as follows: LCD DISPLAY MESSAGE SN1 SCENE 1 BK1 BANK 1 CHASE1 CHASE 1 IS ACTIVE STEP 009 THE 9th STEP OF A CHASE DATA 184 DMX VALUE (000‐255) SP: 1M54s THE CURRENT SPEED IS 1 MINUTE 54 SECONDS TP: 4.25s THE TIME OF THE LAST 2 TAPS IS 4.25 SECONDS ASS 04 05 ASSIGN DMX CHANNELS 4 & 5 RES 10 13 REVERSE DMX CHANNELS 10 & 13 DMX SETUP The SC 1216 Plus is preset to allocate 16 channels per fixture. In order to assign your fixtures to the scanner buttons located on the left side of the controller, the fixtures must be set 16 DMX channels apart. FIXTURE # DIGITAL # DIP SWITCH SETTING 1 1 1 ON 2 17 1, 5 ON 3 33 1, 6 ON 4 49 1, 5, 6 ON 5 65 1, 7 ON 6 81 1, 5, 7 ON 7 97 1, 6, 7 ON 8 113 1, 5, 6, 7 ON 9 129 1, 8 ON 10 145 1, 5, 8 ON 11 161 1, 6, 8 ON 12 177 1, 5, 6, 8 ON ENABLING THE PROGRAM MODE: To enable the program mode, hold the program button until LED is lit. SETUP JOYSTICK: 1) Press and hold the PROGRAM button until LED is lit. 2) Press and hold the MODE and FINE buttons at the same time, the assigned LED should become lit. 3) Use the BANK up/down arrow keys to select the axis you wish to assign (Pan or Tilt). 4) Use the TAP/DISPLAY button to select 16 or 8 channel mode. 5) Press the button corresponding to the scanner you wish to assign. 6) While holding the mode button press the scene number corresponding to the slider controlling the movement. (Example: If Pan is controlled by slider 4, press and hold the MODE button while tapping scene button 4) 7) When finished press the MODE and FINE buttons at the same time again to exit joystick setup. SC 1216 Plus Manual 2009‐10‐01 SCENES PROGRAMMING A SCENE: 1) Enter program mode 2) Check the blackout key and verify the LED is not lit. If the LED is lit, press it once to exit black‐out mode. 3) Verify the speed and fade time sliders are positioned at zero. 4) Press the scanner button corresponding to the unit you want to control. It is possible to control more than one scanner at a time by pressing the button corresponding to the scanner(s) you wish to program. 5) Move the faders and joystick to the desired position. Selection of page B to control channels 9‐16 is possible. 6) Tap the BANK up/down buttons to choose the bank you want to store this scene in. There are a total of 30 selectable banks. Eight scenes can be stored per bank. 7) Once all scanners are programmed into the desired position for the scene, tap the MIDI/RAC button to program this scene into memory. 8) Tap the scene button you want to allocate to store your scene. All LEDs will flash three times signifying your scene has been stored. The LCD readout will show the bank and scene. 9) To unselect the scanner(s) you have been programming and switch to another simply press the button of the scanner you have been programming again, deselecting it, and select another scanner. 10) Repeat steps 2‐7 until all scenes have been programmed. 11) If you do not intend to continue programming, press and hold the PROGRAM button for three seconds to exit program mode. The LED will go out indicating this selection. EXAMPLE: 1) Program enable. 2) Tap the Scanner 1 button to turn on its fader control. 3) Verify that the page select is set on page A, if not press the page select button to select page A. 4) Move the first and second faders all the way up to their maximum value position. 5) Select bank 1 using the BANK up/down buttons. 6) Press the MIDI/REC button. 7) Tap scene 1 to store the first scene. 8) Repeat steps 4‐7 until all scenes have been programmed into bank 1. 9) Tap the scanner 1 button to turn off the fader control. 10) When finished, disable program mode. You can now manually tap through you have just programmed. EDITING A SCENE: 1) Program enable. 2) Press the BANK up/down button to select the bank containing the scene 3) Select the scene you wish to edit by tapping its scene button 4) Use the faders and/or joystick to make the desired adjustments to the scene. 5) Once you have completed the changes, tap the MIDI/REC button. 6) Tap the scene button that corresponds to the scene you are editing. This will override the existing scene. Be sure to select the same scene in steps 3 and 6, otherwise you may accidentally record over an existing scene. SC 1216 Plus Manual 2009‐10‐01 COPY SCANNER SETTINGS: This setting allows you to copy the settings of one scanner to another. 1) Press and hold down the scanner button you wish to copy. 2) While holding down that button, tap the button of the scanner you wish to copy the settings to. COPY A SCENE: 1) Enable program mode. 2) Tap the BANK up/down button to select the bank containing the scene you wish to copy. 3) Select the scene you wish to copy by pressing its scene button. 4) Using the BANK up/down button select the bank you wish to copy the scene to. 5) Tap the MIDI/REC button. 6) Tap the scene button you wish to copy the scene to. DELETING A SCENE: 1) Enable program mode. 2) Press the desired scene button to select the scene you with to delete. 3) Press and hold down the AUTO/DEL button. While holding the button, tap the scene button that corresponds with the scene you wish to delete. 4) When the programmed scene is deleted, all DMX channel values will be set to 0. DELETING ALL SCENES: 1) With the unit removed from all power sources, press and hold down the PROGRAM and BANK down arrow button at the same time. 2) Return the unit to power sources and power on. All scenes should be cleared. COPY A BANK OF SCENES: 1) Enable program mode. 2) Tap the BANK up/down button to select the bank you wish to copy. 3) Tap the MIDI/REC button. 4) Tap the BANK up/down button to select the bank you wish to copy to. 5) Tap the MUSIC/BANK COPY button, all LEDs will briefly flash three times indicating the function is complete. 6) Press the program button for three seconds to exit program mode. SC 1216 Plus Manual 2009‐10‐01 CHASES PROGRAMMING A CHASE: NOTE: You must have already programmed scenes in order to program a chase, this function allows you to cycle through up to 240 scenes in a preselected order. It is recommended before programming chases for the first time, you delete all chases in the controller/ See "DELETE ALL CHASES" for instructions on how to do so. 1) Enable program mode. 2) Tap the CHASE button to select the chase you wish to program. 3) Select a desired scene from the bank that has scenes stored inside it. 4) Tap the MIDI/REC button. 5) Repeat steps 3‐4 until all desired scenes have been entered. INSERTING A BANK OF SCENES INTO A CHASE: 1) Enable program mode. 2) Select the chase you wish to program. 3) Use the BANK up/down key to select the bank of scenes you wish to copy. 4) Tap the MUSIC/BANK COPY button. 5) Tap the MIDI/REC copy button, all LEDs will flash three times indicating the requested operation is complete. ADD A STEP: 1) Enable program mode. 2) Press the corresponding button to the chase you wish to add a step to. 3) Press the TAP/DISPLAY button, the LCD will show the current step. 4) Press the BANK up/down button and scroll to the step you wish to insert the step after. 5) Press the MIDI/REC button, the segment display will read the step one step higher than before. 6) Tap the TAP/DISPLAY button again. The LCD shows the current chase, scene, and bank. Create a desired scene and record it as a new step or select a previously programmed a scene to add to the chase. 7) Once you have selected the scene you wish to add, press the MIDI/REC button again. All LEDs will flash three times indicating the new step has been inserted into the chase. SC 1216 Plus Manual 2009‐10‐01 DELETING A STEP: 1) Enable program mode. 2) Select the chase that contains the step you wish to delete. 3) Press the TAP/DISPLAY button, the LCD shows the current step. 4) Press the BANK up/down button and scroll to the step you wish to select. 5) Press the AUTO/DEL button to delete the step. All LEDs will flash three times indicating the requested operation has been performed. DELETE A CHASE: 1) Press the button corresponding to the chase you wish to delete. 2) Press and hold down the AUTO/DEL button while holding down the chase button. All LEDs will flash three times indicating the requested operation is complete. DELETE ALL CHASES: 1) With the unit removed from all power sources, press and hold down the AUTO/DEL and BANK down arrow button at the same time. 2) Return the unit to power sources and power on. All chases should be cleared. SC 1216 Plus Manual 2009‐10‐01 JOYSTICK/CHANNEL SELECTION SETUP JOYSTICK: 1) Press and hold the PROGRAM button until the LED is lit. 2) Press and hold the MODE and FINE buttons at the same time, the assigned LED should light. If the reverse LED lights, press MODE and FINE again to enter assign mode. 3) Use the BANK up/down keys to select the axis you wish to assign (Pan or Tilt). 4) Use the TAP/DISPLAY button to select 16 or 8 channel mode. 5) Press the button corresponding to the scanner you wish to assign. 6) While holding the mode button press the scene number corresponding to the slider controlling movement. (Example: If pan is controlled by slider 4, press and hold the MODE button while tapping scene button 4) 7) Once you have selected the scene you wish to add, press the MIDI/REC button again. All LEDs will flash three times indicating the new step has been inserted into the chase. REVERSE JOYSTICK MOVEMENT/DMX CHANNEL: 1) Enable program mode. 2) Press and hold the MODE and FINE buttons at the same time to enter assign mode. Then press MODE and FINE buttons again to enter reverse mode. The reverse LED should light indicating reverse mode is active. 3) Use the BANK up/down arrow buttons to change between the Pan and Tilt, the corresponding LED lights indicating this selection. 4) Press the TAP/DISPLAY button to change between 8 channel and 16 channel mode. 5) Press the scanner button to select the scanner. 6) While holding the MODE button, press the corresponding scene button for the channel you wish to reverse. 7) Continue steps 3‐7 as needed. You may reverse a maximum of 48 channels for 12 scanners. DELETE A SCANNER OF DMX CHANNELS: 1) Enable Assign or Reverse mode. 2) Tap the scanner button to select the scanner you wish to delete. 3) Press the MODE and AUTO/DEL buttons at the same time. All LEDs will flash three times indicating the requested operation is complete. CLEAR ALL DMX CHANNELS: 1) Turn the unit off via the power button only. 2) Press the MODE and AUTO/DEL buttons at the same time. 3) While holding the two buttons, turn the power back on to the unit. All LEDs will flash briefly indicating the requested operation is complete. DISPLAY DMX CHANNELS: 1) Press the MODE and FINE buttons at the same time enabling assign mode. 2) Press the MODE and FINE buttons again, lighting the reverse LED. 3) Press the scanner button set at the desired Pan and Tilt and the LCD will display the DMX values for Pan and Tilt. SC 1216 Plus Manual 2009‐10‐01 FADE TIME FADE TIME/ASSIGN FADE TIME: 1) With the power off, press the MODE and TAP/DISPLAY buttons at the same time. 2) Turn the power on, tap the TAP/DISPLAY button to change between Fade Time and Assign Fade Time, the LCD reads: 3) Press the MODE and TAP/DISPLAY buttons at the same time to store your setting into memory. If you do not wish to save your setting, press the BLACKOUT button to exit this operation. SC 1216 Plus Manual 2009‐10‐01 PLAYBACK There are three modes in which you can run scenes and chases: MANUAL mode, AUTO mode, and MUSIC mode. MANUAL MODE: 1) While the unit is powered on, manual mode is automatically started. 2) Check and verify both the Auto and Music LEDs are off. 3) Use the BANK up/down arrow buttons to select the bank with the scenes you wish to run. 4) Press the scene button corresponding to the scene you wish to display. RUNNING CHASES IN MANUAL MODE: 1) While the unit is powered on, manual mode is automatically started. 2) Select the chase you wish to run by pressing the corresponding chase button. Pressing this button a second time will unselect the chase. AUTO MODE: This function allows you to run a bank of programmed scenes in sequence. 1) Press the AUTO/DEL button to activate auto mode. The Auto LED will light indicating the Auto mode is active. 2) Use the BANK up/down button to select a bank of scenes to run. 3) After selecting the bank of scenes to run, you can use the speed slider and Fade Timer Slider to adjust the speed of the scene progression. 4) You can use the TAP/DISPLAY button to set the speed instead. The amount of time between the last two taps will instruct the controller in the length of time between steps. This setting will stay in effect until the speed slider is moved. 5) Press the AUTO/DISPLAY button to exit Auto mode. RUNNING CHASES IN AUTO MODE: 1) Press the AUTO/DEL button to activate Auto mode. 2) Select the desired by pressing one of six Chase buttons. Pressing the button a second time will negate the selection. 3) Use the speed slider and Fade Time Slider to adjust the chase to your specifications. MUSIC MODE: 1) Press the MUSIC/BANK COPY button to activate Music mode. 2) Use the BANK up/down arrow buttons to select a bank of scenes you wish to run. The scenes selected will run through sequentially to the beat of the music identified by the built‐in microphone. 3) Tap the MUSIC/BANK COPY button again to exit Music mode. RUNNING CHASES IN MUSIC MODE: 1) Press the MUSIC/BANK COPY button to activate Music mode. 2) Select the desired chase by pressing one of six chase buttons. This will activate the chase and cause it to respond to the rhythms of the music. SC 1216 Plus Manual 2009‐10‐01 FILE TRANSFER File transfer allows the user to transfer all information stored in one SC 1216 Plus to a second SC 1216 Plus. You must connect the units using a 3‐pin CLR cable. The unit sending the information will have the cable plugged into the DMX OUT plug and the receiving unit will have the cable running into the DMX IN location. TO SEND A FILE DUMP: 1) With the power turned off to the unit, press and hold down the SCANNER 2 and SCANNER 3 buttons & SCENE 1 button at the same time. 2) Turn the unit power on while pressing these three buttons, the LCD display will read "TRANSMIT" indicating that the unit is ready to send the files. 3) Press SCENE 7 and SCENE 8 buttons at the same time to send the file dump. 4) If an error occurs during the file dump, the LCD display will read "ERROR". RECEIVE FILE DUMP: 1) With the power turned off to the unit, press and hold down the SCANNER 8 and SCANNER 9 buttons & SCENE 2 button at the same time. 2) Turn the unit power on while pressing these three buttons, the LCD display will read "RECEIVE" indicating that the unit has received the file dump. 3) When receiving is over, the unit will automatically return to normal mode. MIDI CHANNEL SETTING: 1) Press and hold the MIDI/REC button for three seconds. The LCD shows the MIDI channel of last time. 2) Use the BANK up/down button to select the DMX channel 01‐16 to assign to the MIDI channel. 3) Press and hold the MIDI/REC button to save your settings. The LEDs will flash three times indicating that the required operation has been performed. TROUBLESHOOTING If your unit does not turn on: Check the main power source is fully functional Check power cord connection on each side Check to make sure your power button is in the correct position. There are no serviceable parts inside this device. Maintenance and service operations are only to be carried out by authorized dealers. Contact the nearest dealer or service center for assistance with operating your unit. Unauthorized tampering can cause additional damage. All units opened by an unauthorized user will not be covered under warranty. For additional information regarding operation of the unit or if you have a unit to be sent in for service*, contact the OmniSistem Technical Department at 253‐395‐9500 Monday – Friday 10am ‐ 4pm PST. * All service items must be given an RA# prior to shipping to our facilities. You can acquire a RA # by calling our offices during regular business hours. All service items must be shipped with a copy of original receipt if purchased within a year and covered under our warranty policy. If the unit has been modified warranty is void. SC 1216 Plus Manual 2009‐10‐01