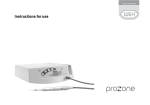
1
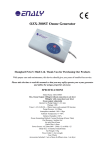
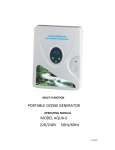
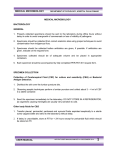
Ozone Generator With proper care and maintenance, this device should give you years of trouble-free service. Please take the time to read this manual so that you may safely operate your ozone generator and utilize the unique properties of ozone. SPECIFICATIONS Max. Ozone Output: 200mg/h without connection to air dryer 500mg/hr with connection to air dryer Ozone output: adjustable Internal Air Pump Output: 1-2 L/min Wattage: 10W Timer: 60min ( every 5 min interval ) and constant ON function Pump Pressure: 17Kpa Ozone Generating Method: Corona Discharge (Ozone Tube) Gas Resource: Ambient Air Air inlet Dim:6.5mm Outlet Dim: 6.5mm Power Source: AC110-120V or AC220-240V Body Size: 215mmX150mmX60mm Net Weight: 800g Power Cable: 1-1.5m in length Case: Plastic Accessories Included: 2 sets of hose & diffuser stone, 1 air dryer SAFETY WARNINGS HEALTH HAZARD WARNING: 1. Permissible Exposure Limits: The following limits accepted in USA, UK and other parts of Europe: 8 hour per day/5 days per week (occupational exposure limit) - 0.1 ppm 15 minute (short term exposure limit) - 0.3 ppm The OZX-300AT ozone generator is capable of delivering up to 200 gram of ozone per hour. In an enclosed space, the ozone concentration generated by the OZX-300AT quickly exceeds the 15-minute exposure limit of 0.3 parts per million. 2. Toxicology of ozone: Above the exposure limit there is risk of inflammation to the respiratory system. Ozone has been shown to induce asthma attacks. People with history of asthma episodes should not enter a newly ozonized area until all the residual ozone has fully dispersed and the area well ventilated with fresh air. Ozone has a distinctive sharp odor and is detectable by smell even at concentrations well below the 15-minute exposure limit. Most people can detect the smell of ozone at concentrations around 1/10th of the 15-minute exposure limit. A strong smell of ozone normally indicates an ozone concentration that exceeds the 15-minute exposure limit. WARNING: People with smell disorder should not operate this equipment. Leave some room for the unit when using. Don’t attempt to confirm ozone production by directly smelling the ozone coming out of the unit. Short-term inhalation of high concentrations of ozone and long-term inhalation of low concentrations of ozone can cause serious harmful physiological effects. Do not directly inhale ozone gas produced by this device. GENERAL SAFETY WARNINGS: 1. The unit is not waterproof, for indoor uses only. DO NOT allow water to enter. Water damage is not covered by warranty. 2. DO NOT open, temper or try to repair the unit. The unit utilizes very high voltages that can result in injury. Do not touch an opened or tempered unit, while it is working. 3. DO NOT operate the unit in humid conditions (Humidity > 95%). 4. The suggested minimum room space is 30 m3 to avoid very strong smell of ozone when purifying air. 5. Keep the unit at a place where the unit is not reachable by children 6. Unplug when you no longer need it. 7. DO NOT use unit within an environment with flammable gases or explosive materials. 8. DO NOT touch the machine with wet or damp hands. 9. Avoid using the unit repeatedly in the warehouse of metals and lactoprene materials. 10. Use only ozone compatible hoses between the ozone generator and the injection point. Failure to use the correct materials could result in an undesirable leakage of ozone into the surrounding airspace. 11. DO NOT lubricate fittings or hoses with mineral oil or grease. 12. DO NOT place the unit on the carpet when using. 2 UNIT DESCRIPTION What Is in The Box: 1 OZX-300AT 1 Enaly Air Dryer (200ml) and 1 connecting hose (10 cm) 2 hoses (100 cm each) 2 diffuser stones 1 OZX-300AT user’s manual 1 Enaly Air Dryer user’s manual Ozone Output Adjuster Control Panel Air Inlet Ozone Outlet Air Dryer Power Switch The power switch to turn on the power of the unit is at the left side of the generator. The air inlet is at the front side of the generator. The ozone outlet is at the right side corner. The ozone output adjuster is to adjust ozone output. The control panel is on the top side of the unit. Control Panel Controls LED Display Function Indicates timer time: Indicates Constant-ON Mode: 00, 05, 10, 15, … , 60 min ON Press it to start working LED Display ON/OFF Press it to stop working Press and hold it for 3 sec to switch to Constant-On mode UP ON/OFF UP DOWN DOWN Each press increases the timer time by 5 min up to 60 min Each press decreases the timer time by 5 min down to 0 min 3 BEFORE USE PREPARATION 1. 2. 3. Ensure that all hoses are free from dust or other contaminants before connecting. Connect one end of 10 cm hose to an air inlet (either one) of Enaly Air Dryer. Connect the other end of 10 cm hose to the air inlet of the unit. WARNING: Avoid using a hose longer than 10 cm to make the connection to Enaly Air Dryer. An overly long hose can overload the internal air pump and cause a premature failure. 4.1 For water/liquid treatments, connect the 100 cm hose to the ozone outlet and a diffuser stone to the other end of hose. 4.2 For air treatment, it is recommended to run without the hose connecting to the ozone outlet. 5. Plug in the power plug into a power outlet. WARNING: Use only the rated voltage indicated on the product information label. The product information label is affixed on the case. OPERATING THE UNIT 1. Switch the power switch to turn the power on. The LED Display will indicate a timer time last set or “ON”(“60”min is shown for the first time use) 2. Turning the ozone output adjuster to adjust ozone output. The unit will produce its maximum ozone output when the ozone output adjuster is at its maximum position. The ozone output is decreasing from its maximum level as the ozone output adjuster is being turned counter-wisely. The minimum ozone level is less than 40% of the max. output. (Either follow step 3.1 or 3.2) 3.1 Using the Timer: 3.1a Press the UP key or the DOWN key once to either increase or decrease the timer time by 5 min. Press repeatedly until you reach the desired timer time. The maximum timer time is 60 min. The minimum timer time is 0 min (displaying “00”). 3.1b Press the ON/OFF key to start working. The timer time starts blinking and counting down in a 5-minute interval. When the timer time reaches “00”the unit will stop. After 3 sec the LED will again indicate the timer time last set. 3.1c To pause timing, press the ON/OFF key (This will pause working too). The LED display will indicate the timer time last shown before the pause. To resume timing, press ON/OFF key again. OR To stop working immediately, switch the power switch to turn the power off. To restart, repeat from the step1. Note: When the timer time is set at “00”, ON/OFF key is not functioning. To adjust the timer time during count-down either press or UP or Down key. To switch to the Constant-On mode when it is working under timer mode, press and hold the ON/OFF key for 3 sec. If the timer was last used before turning the power off, after turning the power on, the LED will indicate a timer time last set. 4 3.2 Using the Constant-ON Mode: 3.2a Press and hold the ON/OFF Key for 3 sec. The LED display will show “ON”to indicate the unit is in the Constant-On mode. The unit will start immediately after “ON”is shown. 3.2b To stop working under Constant-on mode, press the ON/OFF key. The LED display will indicate a timer time last set. To resume Constant-On, press ON/OFF key again and repeat the step 3.2a) OR To stop working immediately, switch the power switch to turn the power off. To restart, switch the power switch to turn on the power. Note: To switch to the timer mode when it is working under Constant-on mode, press the ON/OFF key and follow the instruction 3.1. During Constant-On Mode, the UP and Down keys are not functioning. If the Constant-ON mode was last used before turning the power off, after turning the power on, the LED will indicate “ON”. The unit will start working after 3 sec WARNING: To avoid overheating when running it for an extended period of time, keep the area around the generator free from obstructions to maximize air movement and use an external fan if possible. GUIDANCE FOR APPLYING OZONE TREATMENT For any liquid treatment, place the unit at least 10cm above the liquid’s surface to prevent it from entering the generator. For air treatment it is recommended to run without the hose connecting to the ozone outlet. WARNING: Place the unit at least 10 cm above the liquid’s surface to prevent backflow. Application Making pure water, ozonated water. Functions You can ozonate water to remove contaminates or to introduce ozone into your system. If you goal is to remove contaminants, ozonate 1 litre for 10 minutes then let sit for 1 hr. To create ozonated water for ingestion, ozonate RO or distilled water / ice cubes for 10 minutes then drink within 10 minutes. Please consult your doctor or research ozonated water on the web for more information. Time 10 minutes on High for 1 litre. 5 Eliminating odor and deodorizing houses offices, cars, etc. Remove pesticides and bacteria from vegetables & fruit Break down residual antibiotic and hormone in chicken and pork Shock Treatments Removing cosmetics Ozone generators should never be used as air purifiers in otherwise clean air environments. If you have second hand smoke, musty smells (from mold) or live near a high contamination area (near freeway, factory etc), then your air will benefit from ozone decontamination. To remove harmful substances from the air, run the IZ-500MG with a fan to distribute the ozone until the offensive odors are gone. You can also opt to do shock treatments in unoccupied rooms for 1-2 hours at a time and 30 40 minutes down time before re-entering room. Put your veggies and fruit in the sink and fill half way with water. Put ozone tube with aerator stone into water and ozonate for 10 minutes on high. Soaking your fruits and vegetables in ozonated water will give them good color and remove all pesticide and bacteria residue. Do not use a sink that is made from aluminium however, only steel or porcelain basins. Clean the flesh meat as chicken, pork, etc, and then put them in a pot. Put water in the pot to have them fully covered by water. Then diffuse ozone into the water. The bubbles you will see on the surface are the harmful additives. The hormonal substances which are oxidized will have a chemical taste. Rinse off after ozone treatment and store. You now have antibiotic and hormone free meat! Put the ozone generator 3 feet from ground, close the windows & vents and vacate room. Plastic hose can be detached from the machine when you are air purifying. After treatment, open the windows and doors and air out for at least 30 minutes. You can promote great skin care by washing your face every night with ozonated water to remove make-up. Within weeks of ozone treatments you will notice a difference in you skin texture. How? After removing your make-up, fill your sink half way with water then ozonate water for 10 minutes. Wash your face for 1 minute with this ozonate water Depends on levels of contaminants in air. 10 minutes 10-15 minutes For shock treatments, 1 hour for 250 sq ft. 10 minutes Ozonated water can prevent and remove acne and prevent mycotic infections. Simply fill your sink half way with water and ozonate water for 10 minutes then apply to your face for several minutes up to several times a day to remove or prevent acne. 5 minutes Females suffer from gynaecological inflammation, mainly because of fungoid, such as colpitis, leukorrhagia. Diffusing ozone into bathtub for 1 hour. (Only 6 inches of water) Sit in the ozonated water for 10 minutes then fill the rest of the tub with water to enjoy a relaxing hot tub for as long as you’ d like. Bathing in ozonated water promotes good general health as well. 15 minutes Acne Feminine hygiene 6 Pudendal pruritus, skin disease, tinea, dermatophytosis Foot inflammation is mainly the result of fungus. Soak your feet in ozonated water to kill foot fungus and to promote foot health. Ozonate water in a basin for 10 minutes then soak your feet for 10-15 minutes to gain the benefits of an ozone foot bath. 10 minutes MAINTENANCE If you only use your ozone generator intermittently, you should store the device in a dry place when not in use and protect it from dust with a plastic bag. If you choose to use an automated ozone delivery system, carry out regular inspections to ensure that your system is working effectively. Examine all hoses and connections for leaks or damage. Check air-pump flow rates. Examine check-valves for effectiveness. Replace or clean dirty particulate filters. Replace or recharge the Air Dryer (for more info please see its user’s manual) Check the diffuser for an efficient bubble-pattern or if using a Venturi inlet, check for the presence of a vacuum. ONE YEAR LIMITED WARRANTY Shanghai Nailing Electron-tech Co., Ltd. warrants each new product sold by Shanghai Nailing Electron-tech Co., Ltd. and its authorized resellers against defects in materials and workmanship for ONE (1) YEAR from the date of original purchase of the product. This warranty applies only to the first retail purchaser of the product and is not transferable to any subsequent owners or purchasers of such products. If a defect exists, at its sole discretion Shanghai Nailing Electron-tech Co., Ltd will repair or replace the product. Any repair or replacement will assumes the remaining warranty period of the original product. One Year Limited Warranty Does Not Apply: (1) to damage caused by accident, abuse, misuse, misapplication, or any other product(s); (2) to a product or any part(s) that is modified, tampered with, altered, converted or repaired in anyway by anybody other than Shanghai Nailing Electron-tech staff or Shanghai Nailing Electron-tech authorized reseller, (3) to a product or any part(s) such as ozone cell (including ozone plate, ozone tube or ozone lamp) that is consumable or expendable (Shanghai Nailing Electron-tech Co., Ltd. reserves the right to amend the list of consumables without prior notice), (4) to an optional unit or any other accessories used in connection with the product such as air stones, tubing, air filters or air dryers. (Shanghai Nailing Electron-tech Co., Ltd. reserves the right to amend the list of optional units and accessories without prior notice). (5) if any serial or lot number has been removed or defaced. 7 THE WARRANTY AND REMEDIES SET FORTH ABOVE ARE EXCLUSIVE AND IN LIEU OF ALL OTHER WARRANTIES, REMEDIES AND CONDITIONS, WHETHER ORAL OR WRITTEN, EXPRESSED OR IMPLIED AND WARRANTIES OF MERCHANTABILITY AND FITNESS FOR A PARTICULAR PURPOSE ARE HEARBY DISCLAIMED. IF SHANGHAI NAILING ELECTRON-TECH CO., LTD. CANNOT LAWFULLY DISCLAIM IMPLIED WARRANTIES UNDER THIS LIMITED WARRANTY, ALL SUCH WARRANTIES, INCLUDING WARRANTIES OF MERCHANTABILITY AND FITNESS FOR A PARTICULAR PURPOSE ARE LIMITED IN DURATION TO THE DURATION OF THE WARRANTY. No Shanghai Nailing Electron-Tech reseller, agent, or employee is authorized to make any modification, extension, or addition to this warranty. SHANGHAI NAILING ELECTRON-TECH CO., LTD. SHALL NOT BE LIABLE UNDER ANY CIRCUMSTANCES FOR LOSS OF USE OF SUCH PRODUCT, LOST PROFITS, DIRECT DAMAGES, INDIRECT DAMAGES, CONSEQUENTIAL DAMAGES AND/OR INCIDENTAL DAMAGES. This warranty gives you specific legal rights. You may also have other rights which vary from country to country. Obtaining Warranty Service Contact Shanghai Nailing Electron-tech Co., Ltd. authorized reseller in the country where you purchased the product or us. You will be asked to furnish (1) your name, address, telephone number , (2) the selling reseller’s name, (3) proof of the original purchase containing a description of the product(s), purchase date, and the appropriate Enaly serial and/or lot number; (4) the description of failure. You will be advised by the authorized reseller or us, if you need to return the unit for servicing. You will be responsible for all return shipping costs. Shanghai Nailing Electron-tech Co., Ltd. or the reseller is not responsible for incoming freight costs. PLEASE MAKE NOTES FOR YOUR OWN REFERENCES PURCHASED FROM: PURCHASED DATE: LOT NO. Authorized Reseller: 8