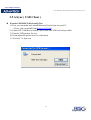
1
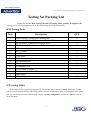
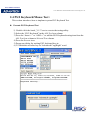
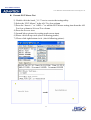
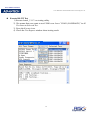
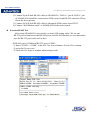
Your ePlatform Partner User’s Manual for Advantech SOM-A255x series testing kit V1.30 User’s Manual Advantech RISC SOM-A255x series Testing kit Released Version: V1.30 Released Date: May. 19. 2004 Advantech Co., Ltd Risc Embedded Computing Division http://www.advantech.com/risc Your ePlatform Partner User’s Manual for Advantech SOM-A255x series testing kit V1.30 ABSTRACT This application note describes how to use testing kit of RISC SOM Design-in Support Express. Based on the testing set, users can test RISC SOM system performance & I/O function . The application note content includes Watch Dog, Backlight, Touch screen, PS/2 Keyboard, PS/2 Mouse, PCMCIA/CF/SD/MMC, RS-232 Full-Function COM Port, RS-485 COM Port, USB Host, USB Client, LAN TCP/IP , HW Reset / SW Reset /Suspend/Resume, Audio(Line-In, Line-Out , Speaker ), Power Properties, CRT out, TV-in , TV-out ,IrDA. Copyright This document is copyrighted, © 2003. All rights are reserved. The original manufacturer reserves the right to make improvements to the products described in this document at any time without notice. No part of this document may be reproduced, copied, translated or transmitted in any form or by any means without the prior written permission of the original manufacturer. Information provided in this document is intended to be accurate and reliable. However, the original manufacturer assumes no responsibility for its use, nor for any infringements upon the rights of third parties that may result from such use. Acknowledgements IBM, PC/AT, PS/2 and VGA are trademarks of International Business Machines Corporation. Intel® is trademark of Intel Corporation. Microsoft® Windows® CE.NET is a registered trademark of Microsoft Corp. All other product names or trademarks are properties of their respective owners. For more information on this and other Advantech products please visit our website at: http://www.advantech.com http://www.advantech.com/risc For technical support and service for please visit our support website at: http://eservice.advantech.com.tw/eservice/ Or directly mail to Advantech RISC platform application engineer: [email protected] Advantech RISC SOM design-in member can login-in the Advantech SOM Design-in Zone for professional & real-time technical support & service: http://risc-designin.advantech.com.tw PS. The RISC design-in zone web portal is only for SOM design-in member only. 2 Your ePlatform Partner User’s Manual for Advantech SOM-A255x series testing kit V1.30 Revision History Version V1.30 Date Reason st 2004.05.19 1 Official release version Table of Contents Testing Set Packing List ……………………………………………………………………………………… 4 Chapter 1 Introduction 1.1 Testing Kit Purpose ………………………………………………………………………… 5 …………………………………………………………………………... 7 Chapter 2 Testing Method 2.1 Watch Dog Test 2.2 Backlight Control Test 2.3 Touch Screen Test 2.4 PS/2 Keyboard/Mouse Test ……………………………………………………………. 10 2.5 PCMCIA/CF /SD/MMC Test ………………………………………………………….... 2.6 RS-232 Full-Function COM Port Test 2.7 RS-485 COM Port Test 2.8 USB Host (Keyboard Test) 12 ………………………………………………………………… 14 …………………………………………………………….. 16 ………………………………………………………………..…. 17 ………………………………………………………………………… 18 2.12 Audio (Line-in , Line-out , Speaker )Test 2.13 Power properties Test 2.15 TV-in Test 2.16 TV out Test 2.17 IrDA Test 12 ……………………………………………….... 2.11 HW Reset / SW Reset / Suapend/Resume Button 2.14 CRT out Test 8 ……………………………………………………………………….. 9 2.9 A.Sync ( USB Client ) 2.10 LAN TCP/IP Test ……………………………………………………………………. ………………………………….. 18 ……………………………………………… 19 …………………………………………………………......….. 20 ……………………………………………………………………………. 21 ……………………………………………………………………………….. 22 ……………………………………………………………………………... 23 …………………………………………………………………………………. 24 3 Your ePlatform Partner User’s Manual for Advantech SOM-A255x series testing kit V1.30 Testing Set Packing List Testing Set includes H/W testing tools and S/W testing Utility (packing in Support CD). Testing process will be implemented by S/W testing Utility and H/W testing tools. H/W Testing Tools Item 1 2 3 4 5 6 7 8 9 10 11 12 13 14 15 16 Description COM Port RS-232 loop-back testing tool Advantech ADAM-4520 for testing RS-422/485 function Big 4-P power connector for ADAM-4520 RS-485 cable (DB-9 connector 2 Pin , 30 cm) USB ActiveSync cable RS-232 cable RS-485 cable JTAG cable Audio Line-in cable Null Modem cable Mini Jumper 2.0mm (Black) AV terminal cable RS-232 cable (COM4) PS/2 Y cable(for KB&MS) Audio cable PURCH Stylus QTY. 3 1 1 1 1 1 1 1 1 1 10 1 1 1 1 1 S/W testing Utility S/W testing Utility is packed in Support CD. The testing utility’s name is Auto4_V1.17.exe. Testing process will be implemented by S/W testing Utility and H/W testing tools. When users implement the testing process, user also need to use Advantech-developed “System configurator” which has a shortcut icon on WinCE desktop. 4 Your ePlatform Partner User’s Manual for Advantech SOM-A255x series testing kit V1.30 Chapter 1 Introduction 1.1 Testing Kit Purpose After customers finish their own carrier board design and get the PCB assembly back, customers need to check their own design carrier board. Testing Kit helps customers to verify their target platform. Testing Kit includes H/W testing tools, S/W testing utility. Testing Kit can help customers in the following situation: 1) When user wants to evaluate their own design carrier board I/O & system functions. 2) When customers mass-product their carrier board, testing set can be used in factory testing line. The testing method mentioned in this application note is well-verified by Advantech. Advantech also use these testing methods in Advantech mass-production testing line. 5 Your ePlatform Partner User’s Manual for Advantech SOM-A255x series testing kit V1.30 Chapter 2 Testing Method Testing process will be executed by H/W peripheral testing tools & S/W testing utility. Before start to introduce every I/O functions’ testing method, users need to know how to operate Auto4_V1.17.exe utility. Auto4_V1.17.exe is Advantech-developed application program. The AP is packed in Support CD. Every RISC SOM series boards use the same Auto4_V1.17.exe. Auto4_V1.17.exe’s UI is the following picture. ALL Test Items: column is all test items list. If users want to test any I/O or system function, user must press “Insert>>” or “Add>>” button to add the function to Seleted Test column. After users finish the test item selections, press the “Execute” or “EXE ALL” to excute 1 or more than 1 test items. The testing results will show in “Test Reports” window. 6 Your ePlatform Partner User’s Manual for Advantech SOM-A255x series testing kit V1.30 2.1 Watch Dog Test This section introduces how to implemet system Watch Dog Test. Execute Watch Dog Test 1) Double click system configuration (Advantech AP) on WinCE Desktop, select “WatchDog” page. 2) Setting “WatchDog timer” and press “Enable” button, then “Elapse Time:” will start to count. 3) If system works well and always send out the trigger signal, “Elapse Time:” will reset to 0 and recount again before “WatchDog Timer” setting time passes. If system doesn’t works well and can’t send the trigger signal, system will reboot after “WatchDog Timer” time pass. 7 Your ePlatform Partner User’s Manual for Advantech SOM-A255x series testing kit V1.30 2.2 Backlight Control Test : This section describes how to test LCD backlight control. z Execute Backlight On/OFF Control Test 1) Double click system configuration (Advantech AP) on WinCE Desktop, select “Display” page. 2) Press “Off Now” button in “Display” page. If system works well, then LCD backlight will turn to dark. If not, users need to check the carrier board design about backlight control circuit. If users want to light the LCD backlight, users just need to move the USB mouse or click the T/S. z Execute Backlight Brightness & Contrast Control Test This section describes how to test LCD backlight brightness & contrast control. Advantech rserves LCD brightness & contast control signals on SODIMM-200 pin golden finger connector. If users implement the brightness control by refrencing DSN of “Advantech Refrence Carrier Board”, then users can use following steps to test LCD backlight & contast control. 8 Your ePlatform Partner User’s Manual for Advantech SOM-A255x series testing kit V1.30 2.3 Touch Screen Test : This section describes how to test 4-wires resistive Touch Screen function. In fact when users connect T/S with SOM carrier board, user can easily test how Touch Screen works. If users feel that T/S function drifts, user can use T/S calibration function to calibrate it. Recalibration steps are as followings: 1) Double click the “System configurator” icon, and enter the “TouchScreen” page. 2) Press the “Calibrate” button 3) Follow the system window indicator to recalibrate it. Through user can easily test the T/S function without testing program, Advantech also provide the T/S test utility In Auto4_V1.17.exe. User can follow the steps to execute Touch Screen Test. z Execute Touch Screen Test 1) Double click the Auto4_V1.17.exe to execute the testing utility. 2) Select the “TouchScreen” in the ALL Test Item column 3) Press the “Insert>>” or “ADD>>” to add the TouchScreen testing item from the ALL Test Item column to Selected Test column. 4) press the Execute icon. 5) Launch below picture for waiting touch screen input. 6) Please touch left-top circle(check following picture) 7) Please touch right-bottom circle(check following picture) 9 Your ePlatform Partner User’s Manual for Advantech SOM-A255x series testing kit V1.30 2.4 PS/2 Keyboard/Mouse Test : This section introduces how to implemet system PS/2 Keyboard Test. z Execute PS/2 Keyboard Test 1) Double click the Auto4_V1.17.exe to execute the testing utility. 2) Select the “PS/2 Keyboard” in the ALL Test Item column 3) Press the “Insert>>” or “ADD>>” to add the PS/2 Keyboard testing item from the ALL Test Item column to Selected Test column. 4) Press the Execute icon. 5) Popup one dialog for waiting PS/2 keyboard key-in. 6) To finish this test after key-in “Advantech CopyRight” word. 10 Your ePlatform Partner User’s Manual for Advantech SOM-A255x series testing kit V1.30 z Execute PS/2 Mouse Test 1) Double click the Auto4_V1.17.exe to execute the testing utility. 2) Select the “PS/2 Mouse” in the ALL Test Item column 3) Press the “Insert>>” or “ADD>>” to add the PS/2 Mouse testing item from the ALL Test Item column to Selected Test column. 4) Press the Execute icon. 5) Launch below picture for waiting touch screen input. 6) Please click left-top circle.(check following picture) 7) Please click right-bottom circle. (check following picture) 11 Your ePlatform Partner User’s Manual for Advantech SOM-A255x series testing kit V1.30 2.5 PCMCIA/CF /SD/MMC Test z Execute PCMCIA/CF/SD/MMC Test 1) Write one test data to storage card (CF/SD/MMC Card) and read back for verification. 2.6 RS-232 Full-Function COM Port Test Advantech use self-LOOPBACK method to test RS-232 port. By H/W selfLOOPBACK testing tool & S/W testing Utility, the testing procedure will test CTS signal loop-backs w/ RTS signal, DTR signal loop-backs w/ DSR signal and TX signal loop-backs w/ RX signal in many kinds of baud rate(2400, 4800, 9600, 19200, 38400, 57600,115200 bps). z Setup RS-232 COM Port Self-LOOPBACK Testing tool 1) Connect RS-232 COM Port Self-LOOPBACK Testing tool to RS-232 connectors on SOM carrier board. Please check the following picture. 12 Your ePlatform Partner User’s Manual for Advantech SOM-A255x series testing kit V1.30 z Execute RS-232 Test 1) Execute Auto4_V1.17.exe testing utility. 2) We assume that user wants to test COM1 now. Insert”COM1 (LOOPBACK)” in All Test Items to Selected Test. 3) Press the Execute icon. 4) Check the Test Reports window about testing result. 13 Your ePlatform Partner User’s Manual for Advantech SOM-A255x series testing kit V1.30 2.7 RS-485 COM Port Test : (Includable SOM-A2558;) We use loop-back concept to test RS-485 I/O function. When testing RS-485 function, we need ADAM-4520. ADAM-4520 can convert RS-485 signals to RS-232 signals and RS-232 signals to RS-485 signals. RS-232 Signals Advantech ADAM-4520 RS-485 Signals z Setup RS-485 testing tools ADAM-4520 1) ADAM-4520 won’t work without 12V power input. Testing set includes ADAM-4520 small 4-P power connector. User should connect the power `connector to ATX-Power & ADAM-4520 like following pictures. Connect yellow cable of ADAM-4520 power connector to ADAM-4520 “(R)+Vs” pin and black cable to ADAM-4520 “(B)GND 10”. RS-485 cable: Connect to Carrier Board COM5 cable ADAM-4520 Power cable : Connected to ATX-Power supply ADAM-4520 Null Modem cable : Connected to Carrier Board RS-232 connector 14 Your ePlatform Partner User’s Manual for Advantech SOM-A255x series testing kit V1.30 2) Connect 9-pin D-Sub RS-485 cable to ADAM-4520. “DATA+” pin & “DATA-“ pin of ADAM-4520 should be connected to SOM carrier board RS-485 connector. Please check the above picture. 3) Connect 9-Pin D-Sub RS-485 cable to Advantech SOM carrier board CN32. 4) Connect “Null Modem cable” to ADAM-4520 & the carrier board. z Execute RS-485 Test After setup ADAM-4520, user needs to execute S/W testing utility. We use one RS-232 port to loop-back with RS-485 port to test RS-485 function, so user must make sure the RS-232 port works well at first. If RS-485 port is COM4 and RS-232 port is COM3: 1) Insert “COM3<->COM4” in the ALL Test Item column to Selected Test column. 2) press the Execute icon. 3) check the Test Reports window about testing result. 15 Your ePlatform Partner User’s Manual for Advantech SOM-A255x series testing kit V1.30 2.8 USB Host (Keyboard Test) z Execute USB HOST (Keyboard) Test 1) Double click the Auto4_V1.17.exe to execute the testing utility. 2)Select the “USB Keyboard” in the ALL Test Item column 3) Press the “Insert>>” or “ADD>>” to add the USB Keyboard testing item from the ALL Test Item column to Selected Test column. 4) Press the Execute icon. 5) Popup one dialog for waiting USB keyboard key-in. 6) To finish this test after key-in “Advantech CopyRight” word. 16 Your ePlatform Partner User’s Manual for Advantech SOM-A255x series testing kit V1.30 2.9 A.Sync ( USB Client ) z Execute USB HOST (Keyboard) Test 1) First, you can make sure install Microsoft ActiveSync in your PC. (If not, you can install from Support CD Disk) 2) Connect PC USB Host to board USB Client with USB ActiveSync cable. 3) Transfer USB packets for test. 4) It can adjust the packet size for verification. 5) “Execute” A. Sync test. 17 Your ePlatform Partner User’s Manual for Advantech SOM-A255x series testing kit V1.30 2.10 LAN TCP/IP Test : z Execute LAN Test 1) Connect Ethernet cable 2) Double click the Auto4_V1.17.exe to execute the testing utility. 3) Select the “LAN TCP/IP test” in the ALL Test Item column 4) Press the “Insert>>” or “ADD>>” to add the LAN TCP/IP testing item from the ALL Test Item column to Selected Test column. 5) Press the Execute icon. 6) PING one specific IP for test 2.11 HW Reset / SW Reset / Suapend/Resume Button z Execute HW Reset / SW Reset / Suapend/Resume Test 1) Press the assign button and check the function work. 18 Your ePlatform Partner User’s Manual for Advantech SOM-A255x series testing kit V1.30 2.12 Audio (Line-in , Line-out , Speaker )Test z Execute Audio (Line-in , Line-out , Speaker) Test 1) Connect PC Line-Out to Line-In with audio cable and Line-Out connect amplifier. 2) Play music from PC to press “record”. 3) After “stop” and “play”, you can make sure listen voice from amplifier. (If you test it, you can also listen voice from speaker.) 4) If have, please enter yes. Enter “close” when listen voice 4 1. First, enter “record” after play media file 3 After “stop” and play voice. 2. After record ,enter ” stop” 19 After listen voice, pls enter “Yes” Your ePlatform Partner User’s Manual for Advantech SOM-A255x series testing kit V1.30 2.13 Power properties Test z Execute Power properties Test 1) Double click the Auto4_V1.17.exe to execute the testing utility. 2) Select the “Power properties test” in the ALL Test Item column 3) Press the “Insert>>” or “ADD>>” to add the Power properties testing item from the ALL Test Item column to Selected Test column. 4) Press the Execute icon. 5) Read power status and the capacity of battery. 20 Your ePlatform Partner User’s Manual for Advantech SOM-A255x series testing kit V1.30 2.14 CRT out Test z Setup CRT Monitor Test 1) Connect CRT Monitor cable to CN12 connector on SOM carrier board. Please check the following picture. z CRT out Test 1) You can see the following picture. 21 Your ePlatform Partner User’s Manual for Advantech SOM-A255x series testing kit V1.30 2.15 TV-in Test z Setup TV-in Test 2) You can connect some devices (ex: DVD player, CCD Camera…etc) to verify TV input function. Connect AV cable to CN13 red color connector on SOM carrier board. Please check the following picture. z TV-in Test 1) First, you have to run the” VideoInForSom2552-F.exe”program and wait 3~5 sec. 2) You can see some frame from DVD player (or other device). Please check the following picture. 22 Your ePlatform Partner User’s Manual for Advantech SOM-A255x series testing kit V1.30 2.17 TV out Test z Setup TV out 1) You can connect Television to verify TV output function. Connect AV cable to CN13 white color connector on SOM carrier board. Please check the following picture. z TV-out Test 1) First, you have to run the” TvOutForSom2552-F.exe”program and wait 3~5 sec. 2) You can see some frame on the television. Please check the following picture. 23 Your ePlatform Partner User’s Manual for Advantech SOM-A255x series testing kit V1.30 2.17 IrDA Test z Setup IrDA Test 1) First, you ca n make sure install Microsoft ActiveSync in your PC. (If not, you can install from Support CD Disk ) 2) You can use a IrDA module(for USB or COM interface) 3) Make a new connection (Start-Setting-Network and Dial-up connection), select “Direction Connection”, setting “Infrared port”. 4) Click “Finish” and addition a My connection icon 5) Open control panel-PC connection and click “change”. Select “My connection icon” and Click OK If PC host (ActiveSync) will receive WinCE system request and select sync mode. Click”No” setup device as a Guest (If there in not auto search, please confirm PC host connection setting “Infrared port”) 24