1
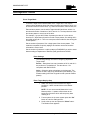
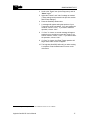
Logicube OmniSCSI User’s Manual
Logicube, Inc.
Chatsworth, CA 91311
USA
Phone: 818 700 8488
Fax: 818 700 8466
Version: 2.6
MAN-OmniSCSI
Date: 02/05/14
Logicube OmniSCSI User Manual
I
TABLE OF CONTENTS
Limitation of Liability and Warranty Information
Logicube Disclaimer
LOGICUBE IS NOT LIABLE FOR ANY INCIDENTAL OR CONSEQUENTIAL DAMAGES, INCLUDING,
BUT NOT LIMITED TO PROPERTY DAMAGE, LOSS OF TIME OR DATA FROM USE OF A LOGICUBE
PRODUCT, OR ANY OTHER DAMAGES RESULTING FROM PRODUCT MALFUNCTION OR FAILURE
OF (INCLUDING WITHOUT LIMITATION, THOSE RESULTING FROM: (1) RELIANCE ON THE
MATERIALS PRESENTED, (2) COSTS OF REPLACEMENT GOODS, (3) LOSS OF USE, DATA OR
PROFITS, (4) DELAYS OR BUSINESS INTERRUPTIONS, (5) AND ANY THEORY OF LIABILITY, ARISING
OUT OF OR IN CONNECTION WITH THE USE OR PERFORMANCE (OR FROM DELAYS IN SERVICING
OR INABILITY TO RENDER SERVICE ON ANY) LOGICUBE PRODUCT.
LOGICUBE MAKES EVERY EFFORT TO ENSURE PROPER OPERATION OF ALL PRODUCTS.
HOWEVER, THE CUSTOMER IS RESPONSIBLE TO VERIFY THAT THE OUTPUT OF LOGICUBE
PRODUCT MEETS THE CUSTOMER’S QUALITY REQUIREMENT. THE CUSTOMER FURTHER
ACKNOWLEDGES THAT IMPROPER OPERATION OF LOGICUBE PRODUCT AND/OR SOFTWARE, OR
HARDWARE PROBLEMS, CAN CAUSE LOSS OF DATA, DEFECTIVE FORMATTING, OR DATA
LOADING. LOGICUBE WILL MAKE EFFORTS TO SOLVE OR REPAIR ANY PROBLEMS IDENTIFIED BY
CUSTOMER, EITHER UNDER WARRANTY OR ON A TIME AND MATERIALS BASIS.
Warranty
DISCLAIMER
IMPORTANT - PLEASE READ THE TERMS OF THIS AGREEMENT CAREFULLY. BY INSTALLING OR USING
LOGICUBE PRODUCTS, YOU AGREE TO BE BOUND BY THIS AGREEMENT.
IN NO EVENT WILL LOGICUBE BE LIABLE (WHETHER UNDER THIS AGREEMENT, RESULTING FROM THE
PERFORMANCE OR USE OF LOGICUBE PRODUCTS, OR OTHERWISE) FOR ANY AMOUNTS REPRESENTING
LOSS OF PROFITS, LOSS OR INACCURACY OF DATA, LOSS OR DELAYS OF BUSINESS, LOSS OF TIME, COSTS
OF PROCUREMENT OF SUBSTITUTE GOODS, SERVICES, OR TECHNOLOGY, PROPERTY DAMAGE, OR
INDIRECT, CONSEQUENTIAL, OR PUNITIVE DAMAGES OF A PURCHASER OR USER OF LOGICUBE PRODUCTS
OR ANY THIRD PARTY. LOGICUBE’S AGGREGATE LIABILITY IN CONTRACT, TORT, OR OTHERWISE
(WHETHER UNDER THIS AGREEMENT, RESULTING FROM THE PERFORMANCE OR USE OF LOGICUBE
PRODUCTS, OR OTHERWISE) TO A PURCHASER OR USER OF LOGICUBE PRODUCTS SHALL BE LIMITED TO
THE AMOUNT PAID BY THE PURCHASER FOR THE LOGICUBE PRODUCT. THIS LIMITATION OF LIABILITY
WILL BE EFFECTIVE EVEN IF LOGICUBE HAS BEEN ADVISED OF THE POSSIBILITY OF ANY SUCH DAMAGES.
Logicube OmniSCSI User’s Manual
- II -
INTRODUCTION
LOGICUBE MAKES EVERY EFFORT TO ENSURE PROPER OPERATION OF ITS PRODUCTS. HOWEVER, THE
PURCHASER IS RESPONSIBLE FOR VERIFYING THAT THE OUTPUT OF A LOGICUBE PRODUCT MEETS THE
PURCHASER’S REQUIREMENTS. THE PURCHASER FURTHER ACKNOWLEDGES THAT IMPROPER OPERATION
OF LOGICUBE PRODUCTS CAN CAUSE LOSS OF DATA, DEFECTIVE FORMATTING, OR DEFECTIVE DATA
LOADING. LOGICUBE WILL MAKE EFFORTS TO SOLVE OR REPAIR ANY PROBLEMS IDENTIFIED BY
PURCHASER, EITHER UNDER THE WARRANTY SET FORTH BELOW OR ON A TIME AND MATERIALS BASIS.
LIMITED WARRANTY
FOR ONE YEAR FROM THE DATE OF SALE (THE “WARRANTY PERIOD”) LOGICUBE WARRANTS THAT THE
PRODUCT (EXCLUDING CABLES, ADAPTERS, AND OTHER “CONSUMABLE” ITEMS) IS FREE FROM
MANUFACTURING DEFECTS IN MATERIAL AND WORKMANSHIP. THIS LIMITED WARRANTY COVERS
DEFECTS ENCOUNTERED IN THE NORMAL USE OF THE PRODUCT DURING THE WARRANTY PERIOD AND
DOES NOT APPLY TO: PRODUCTS DAMAGED DUE TO PHYSICAL ABUSE, MISHANDLING, ACCIDENT,
NEGLIGENCE, OR FAILURE TO FOLLOW ALL OPERATING INSTRUCTIONS CONTAINED IN THE OPERATING
MANUAL; PRODUCTS WHICH ARE MODIFIED; PRODUCTS WHICH ARE USED IN ANY MANNER OTHER THAN
THE MANNER FOR WHICH THEY WERE INTENDED, AS SET FORTH IN THE OPERATING MANUAL; PRODUCTS
WHICH ARE DAMAGED OR DEFECTS CAUSED BY THE USE OF UNAUTHORIZED PARTS OR BY
UNAUTHORIZED SERVICE; PRODUCTS DAMAGED DUE TO UNSUITABLE OPERATING OR PHYSICAL
CONDITIONS DIFFERING FROM THOSE RECOMMENDED IN THE OPERATING MANUAL OR PRODUCT
SPECIFICATIONS PROVIDED BY LOGICUBE; ANY PRODUCT WHICH HAS HAD ANY OF ITS SERIAL NUMBERS
ALTERED OR REMOVED; OR ANY PRODUCT DAMAGED DUE TO IMPROPER PACKAGING OF THE WARRANTY
RETURN TO LOGICUBE. AT LOGICUBE’S OPTION, ANY PRODUCT PROVEN TO BE DEFECTIVE WITHIN THE
WARRANTY PERIOD WILL EITHER BE REPAIRED OR REPLACED USING NEW OR REFURBISHED
COMPONENTS AT NO COST. THIS WARRANTY IS THE SOLE AND EXCLUSIVE REMEDY FOR DEFECTIVE
PRODUCTS. IF A PRODUCT IS HAS BECOME OBSOLETE OR IS NO LONGER SUPPORTED BY LOGICUBE THE
PRODUCT MAY BE REPLACED WITH AN EQUIVALENT OR SUCCESSOR PRODUCT AT LOGICUBE’S
DISCRETION. THIS WARRANTY EXTENDS ONLY TO THE END PURCHASER OF LOGICUBE PRODUCTS. THIS
WARRANTY DOES NOT APPLY TO, AND IS NOT FOR THE BENEFIT OF, RESELLERS OR DISTRIBUTORS OF
LOGICUBE PRODUCTS. UNLESS OTHERWISE AGREED IN WRITING BY LOGICUBE, NO WARRANTY IS
PROVIDED TO RESELLERS OR DISTRIBUTORS OF LOGICUBE PRODUCTS.
IN ORDER TO RECEIVE WARRANTY SERVICES CONTACT LOGICUBE’S TECHNICAL SUPPORT DEPARTMENT
VIA PHONE OR E-MAIL. PRODUCTS RETURNED TO LOGICUBE FOR REPAIR UNDER WARRANTY MUST
REFERENCE A LOGICUBE RETURN MATERIAL AUTHORIZATION NUMBER (“RMA”). ANY PRODUCT RECEIVED
BY LOGICUBE WITHOUT AN RMA# WILL BE REFUSED AND RETURNED TO PURCHASER. THE PURCHASER
MUST CONTACT LOGICUBE’S TECHNICAL SUPPORT DEPARTMENT VIA E-MAIL
([email protected]) OR VIA PHONE AT +1-818-700-8488 OPT. 3 TO OBTAIN A VALID RMA#. THE
PURCHASER MAY BE REQUIRED TO PERFORM CERTAIN DIAGNOSTIC TESTS ON A PRODUCT PRIOR TO
LOGICUBE ISSUING AN RMA#. THE PURCHASER MUST PROVIDE THE PRODUCT MODEL, SERIAL NUMBER,
PURCHASER NAME AND ADDRESS, EMAIL ADDRESS AND A DESCRIPTION OF THE PROBLEM WITH AS
MUCH DETAIL AS POSSIBLE. AT LOGICUBE’S SOLE AND ABSOLUTE DISCRETION, REASONABLE TELEPHONE
AND EMAIL SUPPORT MAY ALSO BE AVAILABLE FOR THE LIFE OF THE PRODUCT AS DEFINED BY LOGICUBE.
EXCEPT AS OTHERWISE SPECIFICALLY PROVIDED IN THIS AGREEMENT, LOGICUBE PRODUCTS ARE
PROVIDED AS-IS AND AS-AVAILABLE, AND LOGICUBE DISCLAIMS ANY AND ALL OTHER WARRANTIES
(WHETHER EXPRESS, IMPLIED, OR STATUTORY) INCLUDING, WITHOUT LIMITATION, ANY WARRANTIES OF
MERCHANTABILITY, FITNESS FOR A PARTICULAR PURPOSE, OR NONINFRINGEMENT OF THIRD PARTY
RIGHTS.
SOME JURISDICTIONS DO NOT ALLOW THE EXCLUSION OR LIMITATION OF INCIDENTAL OR
CONSEQUENTIAL DAMAGES, OR LIMITATIONS ON HOW LONG AN IMPLIED WARRANTY LASTS, SO THE
Logicube OmniSCSI User’s Manual
III
TABLE OF CONTENTS
ABOVE LIMITATIONS OR EXCLUSIONS MAY NOT APPLY TO YOU. THIS WARRANTY GIVES YOU SPECIFIC
LEGAL RIGHTS, AND YOU MAY HAVE OTHER RIGHTS WHICH VARY FROM JURISDICTION TO JURISDICTION.
RoHS Certificate of Compliance
LOGICUBE PRODUCTS COMPLY WITH THE EUROPEAN UNION RESTRICTION OF THE USE OF
CERTAIN HAZARDOUS SUBSTANCES IN ELECTRONIC EQUIPMENT, ROHS DIRECTIVE (2002/95/EC).
THE ROHS DIRECTIVE PROHIBITS THE SALE OF CERTAIN ELECTRONIC EQUIPMENT CONTAINING
SOME HAZARDOUS SUBSTANCES SUCH AS MERCURY, LEAD, CADMIUM, HEXAVALENT
CHROMIUM AND CERTAIN FLAME-RETARDANTS IN THE EUROPEAN UNION. THIS DIRECTIVE
APPLIES TO ELECTRONIC PRODUCTS PLACED ON THE EU MARKET AFTER JULY 1, 2006.
Logicube Technical Support Contact Information
1. By website: www.logicube.com
2. By email: [email protected]
3. By telephone: 1 - (818) 700 8488 ext. 3 between the hours of 7am –5pm PST, Monday
through Friday, excluding U.S. legal holidays.
Logicube OmniSCSI User’s Manual
- IV -
Table of Contents
LOGICUBE OMNISCSI USER’S MANUAL ................................................ I
TABLE OF CONTENTS.............................................................................. I
1. INTRODUCTION TO THE LOGICUBE OMNISCSI ............................... 1
Introduction ......................................................................................... 1
Features .......................................................................................... 1
Using this guide .............................................................................. 1
System description ......................................................................... 2
2. GETTING STARTED (FAST START) .................................................... 3
Applying power to the Logicube OmniSCSI ..................................... 3
Connecting Drives to the OmniSCSI .............................................. 3
Things to remember:....................................................................... 3
Adapters for other types of SCSI drives ......................................... 4
Power switch and Power button ........................................................ 4
The user interface ............................................................................... 4
“Shortcut” buttons (available at all times) ....................................... 5
“Soft” Buttons .................................................................................. 5
“Navigation” (Arrow) Buttons .......................................................... 5
Indicator Lights ............................................................................... 5
3. CLONING MODES AND SETTINGS .................................................... 6
Main Menu Screen ............................................................................... 6
About Screen .................................................................................. 6
Drive Information ............................................................................ 6
Screen Contrast .............................................................................. 6
Cloning ................................................................................................. 7
Using the OmniSCSI ....................................................................... 7
Clever Clone Mode ......................................................................... 8
Clever Clone Step-by-Step ............................................................. 8
Selective Partitions Mode ............................................................... 8
Copy Methods ................................................................................. 9
Selective Partitions Step-by-Step ................................................... 9
Mirror Clone Mode ........................................................................ 10
Mirror Clone Step-by-Step ............................................................ 11
Logicube OmniSCSI User Manual
I
TABLE OF CONTENTS
Master Manager Mode .................................................................. 11
Master Manager Step-by-Step ..................................................... 11
Optional Preference Settings ........................................................... 12
Verify ............................................................................................. 12
Verify Settings ............................................................................... 13
CHS Translation ........................................................................... 13
CHS Translation Settings ............................................................. 13
4. OMNIDIAGNOSTICS™ ...................................................................... 15
Introduction ....................................................................................... 15
Enabling OmniDiagnostics............................................................ 15
OmniDiagnostics Features ............................................................... 16
Erase Target Mode ....................................................................... 16
Erase Settings .............................................................................. 16
Erase Target Step-by-Step ........................................................... 16
5. SOFTWARE LOADING INSTRUCTIONS ........................................... 18
Logicube OmniSCSI Software Updating Procedures .................... 18
Loading Software through the CompactFlash card ...................... 18
Loading Software to the OmniSCSI One to One .......................... 18
6. FREQUENTLY ASKED QUESTIONS AND ANSWERS ..................... 19
7. INDEX ................................................................................................. 22
Logicube OmniSCSI User’s Manual
- II -
1. Introduction to the Logicube OmniSCSI
Introduction
Thank you for purchasing the Logicube OmniSCSI Hard Drive Duplication device. With
proper use, this system will accurately clone Hard Disk Drives for years to come
The Logicube OmniSCSI duplicates or clones the contents of one hard drive onto another; a
1
source drive, typically referred to as the Master and a destination drive known as the Target.
Features
Clones most SCSI drives
2
Data transfer rates approaching 6.0 GB/min
Master and Target drives can be of different size, make and model
Automatically scales FAT16/32, NTFS 4.0/5.0/6.0, and Windows
2000/NT/ME/XP partitions
Optional diagnostics software for Department of Defense (DoD)
specification data wiping
Using this guide
This user guide is made up of 7 sections:
Introduction
Getting Started (Fast Start)
Cloning Modes and Settings
Omnidiagnostics
Software Loading Instructions
Frequently Asked Questions
Index
Please read Modules 1. Introduction, and Module 2. Getting Started before
attempting a drive cloning session. It is recommended that you practice with a
scratch drive to fully appreciate all of the features.
1
The term Master as used does not refer to the master jumper setting on the hard drive.
2
As of this writing, SCSI “Fibre Channel” drives as well as 2.5” SCSI-2 laptop drives are not supported.
Logicube OmniSCSI User Manual
1
INTRODUCTION
System description
The complete Logicube OmniSCSI system includes the following:
The Logicube OmniSCSI unit
Two (2) 68-pin flat ribbon cables and two (2) drive power cables are
provided
A System CompactFlash card for software updates
An AC power cord
A CD containing the user’s manual
NOTE: Please contact Logicube Technical Support at (818) 700-8488 X3 if
any of the above pieces are missing.
Caution: Avoid dropping the Logicube OmniSCSI or subjecting it to sharp jolts.
When in use, place it on a flat surface.
Caution: Keep the unit dry. If you need to clean your Logicube OmniSCSI, use
a lightly damp, lint free cloth. Do not run the cloth over the top cooling grid as
moisture could get inside the unit. Avoid using soap or other cleaning agents
particularly those containing bleach, ammonia, alcohol or other harsh chemicals.
Caution: Do not attempt to service the Logicube OmniSCSI. Doing so may void
the warranty. If your unit requires service, please contact Logicube Technical
Support for assistance.
2
Logicube OmniSCSI User’s Manual
2. Getting Started (Fast Start)
Applying power to the Logicube OmniSCSI
The Logicube OmniSCSI is able to detect the capacity, C/H/S information and the partition table
of any SCSI drive that is attached to the Master or Target positions.
NOTE: Never “daisy chain” more than one SCSI drive to each Master or Target position. The
unit can only handle one drive on each position.
Before applying power, perform the following steps listed below.
Connecting Drives to the OmniSCSI
1. To attach a SCSI Master drive, plug the 68-pin ribbon cable into the
SCSI data socket such that the red line is near the power connector,
(4-hole receptacle). Plug a drive power cable into the corresponding
power receptacle.
3
2. Attach the opposite ends of the cables to the Master SCSI drive .
NOTE: The drive will not actually be powered until a copy operation or
drive information is started.
3. Connect the remaining cables to their respective connectors for the
Target drive position following the same information as steps 1 and 2.
Things to remember:
The OmniSCSI supplies power to all drives during a cloning or
drive information session. There is no need to connect an
external power source to the drives.
It is OK to connect and disconnect Master or Target drives
while the OmniSCSI is powered and idle. However, do NOT
connect or disconnect drives during a cloning or drive
information session. The Status light will typically blink to
indicate that the unit is cloning or performing a drive
information session.
3
SCSI drives can be set for any ID, except 7, which is reserved for the SCSI Host Adapter. For best results, set each
Target drive to SCSI ID 0, this will allow drive identification to proceed more quickly.
Logicube OmniSCSI User Manual
3
CLONING MODES AND SETTINGS
Adapters for other types of SCSI drives
Logicube sells specialized adapters that allow the following
types of SCSI drives to be connected to the Logicube
OmniSCSI:
80-pin Adapters for connecting drives with SCA-80
connectors.
50-pin Adapters for connecting drives with old-style
SCSI-1 connectors.
Power switch and Power button
The Logicube OmniSCSI includes an On/Off switch and an On/Off button. One power switch is
a rocker switch that is located on the unit’s power supply. The power button is located on the
back of the unit.
When the unit needs to be re-booted, tap the power button. This will shut the unit off. Wait a
few seconds for the drives to stop spinning, then tap the power button again. The unit will
reboot and be ready to use.
NOTE: Please check the switch on the power supply to make sure that it is on. The power
button will not function if the power supply switch is off.
The user interface
The user interface (UI) has been designed with the professional in mind. It is fast, responsive,
and to the point; which means it requires very few key strokes to achieve a desired action. It
also displays fewer “are you sure” messages that may slow down the cloning session.
Figure 1. Buttons and Interface
4
Logicube OmniSCSI User’s Manual
CLONING MODES AND SETTINGS
“Shortcut” buttons (available at all times)
START/STOP Button – Press it twice to begin a cloning operation
using the current settings; press the START/STOP button in mid
process to abort it. A single key stroke presents a preview screen
where you can see the current setting, and decide whether to press it
again to begin the capture, or back out to reconfigure.
The “Help” (”?”) button provides context sensitive help and is active at
all times. Press it to get specific help on the current screen. If the selection cursor is on the screen, pressing the Help button will retrieve
specific help for that item pointed to. The Help button also brings up a
slider to adjust the screen contrast.
The “Set” button is the third “shortcut” button. It brings you to the
settings screen where you can change capture modes and other
settings of the unit.
“Soft” Buttons
The “soft” buttons are used anywhere selection or toggling are necessary.
The “Select” button is used to select an option (e.g. a partition to copy), to
toggle between multiple available options or to enter a sub-menu.
The “Back” button is used to go “up” in the menu system or to cancel out of a
given operation.
“Navigation” (Arrow) Buttons
The four Arrow buttons are used for navigation.
The “Up” and “Down” buttons are most often used when there is a
scrollable window of text and the right side of the screen displays the
scroll arrows. This occurs when the amount of information to display
exceeds the screen size. There are also screens in the Settings menu
where navigating from one option to another requires moving up or
down.
The “Left” and “Right” buttons are used to navigate from one option to
another in the Settings menu. The currently active option will be
enclosed by a dashed rectangle.
Indicator Lights
The POWER indicator light remains on while the Logicube OmniSCSI is
receiving power.
The STATUS indicator is lit during cloning operations and any operation that
accesses the Master or Target drive. It will flash green as data is transferred
from one drive to the other.
An ERROR light will come on if a problem is encountered during cloning or any
other operation. The Status Light will stop flashing and turn red. If this occurs,
check the screen for an error message and instructions on what to do next.
Logicube OmniSCSI User’s Manual
5
3. Cloning Modes and Settings
Main Menu Screen
The main menu screen appears when the Logicube OmniSCSI is first powered up after it goes
through the Self Test. It displays the Splash Screen and two menu options: About and Drives.
About Screen
Select the About Screen by highlighting “About” and pressing the Select
button. It will display the serial number of your unit along with the software and
firmware versions that are loaded. In addition, the About screen lists all options
currently enabled on the unit and provides contact information for Logicube
Technical Support.
To return to the main menu, simply press the Back button at any time.
Drive Information
Select the Drive Information screen by highlighting “Drives” and pressing the
Select button. The drives will power-up and the Logicube OmniSCSI will
attempt to read the drive information. After 30 to 45 seconds, the unit will show
a list of all the drives it has detected. Use the arrow keys to navigate the list.
When a drive is highlighted (and the Select button pressed), the unit will access
the drive and report back the drive’s model number, capacity, geometry and
other information.
To see the drive’s partition information, highlight “See More” and press the
Select button to display all of the partitions located on that drive.
To return to the main menu, you may press the Back button at any time.
Screen Contrast
To adjust the contrast of the display, simply press the Help button at any time.
Underneath the Help information is a slider bar to adjust the screen contrast.
Use the Left and Right arrows to adjust the bar. Once the desired contrast is
set, press the Select button to return to the previous screen.
Logicube OmniSCSI User Manual
6
CLONING MODES AND SETTINGS
Cloning
Using the OmniSCSI
4
The OmniSCSI can be in one of several modes of operation . To set a mode hit
the “Set” button, navigate to the top icon and hit the “Select” button. You will
5
now see the following screen :
You will notice the three tabs along the top of this screen labeled “Clone”,
“Tools”, and “Diag”. You can navigate between the three tabs when the
dashed rectangle is around the label of each tab.
For example, pressing the right arrow button when the dashed rectangle is
around the “Clone” label will cause the “Tools” tab to become active and
display the available tools.
Pressing the right arrow again when the dashed rectangle is around the
“Tools” label will cause the “Diag” tab to become active and display the
6
installed diagnostics .
4
Some of the modes are optional and require the purchase of a separate license. Call Logicube Sales for more details at
(818) 700 8488.
5
Depending on the options you purchased and installed your screens may not match the examples exactly.
6
If you did not purchase the Diagnostic option this screen will not contain any selectable items.
Logicube OmniSCSI User’s Manual
7
CLONING MODES AND SETTINGS
Clever Clone Mode
Clever Clone automatically scales all FAT32 and NTFS partitions to fill the
Target drive in its entirety, and makes all the necessary adjustments to ensure
a valid and bootable Target drive. It can also scale FAT16 partitions up to
2GB.
NOTE: When Clever Clone scales down an NTFS partition, it can only scale it
to 55% of the original size and depending on the data on the Master drive, may
not be able to fit in a smaller drive.
Clever Clone Step-by-Step
1. From anywhere in the menu system press the “Set”
button to enter the Settings menu.
2. Scroll to the top icon and press the “Select” button.
The Modes screen appears.
3. Scroll to the “Clever” item (the light bulb icon), and
7
press “Select” again .
4. Adjust the “Verify” and “CHS” settings as needed.
(These settings are discussed later in this chapter).
5. When you are ready to start the cloning process, press
the “START/STOP” button twice.
Selective Partitions Mode
Selective Partitions is the most elaborate and flexible cloning mode. It provides
the highest level of control over the cloning process, allowing you to individually
select one or multiple partitions from the Master drive. It also allows you to
choose a unique copy method for each.
NOTE: Not all copy methods are available for all partition types.
7
You may need to switch from another tab screen to the Clone tab to access this option.
8
Logicube OmniSCSI User’s Manual
CLONING MODES AND SETTINGS
Copy Methods
Clever Clone – The default mode that lets the OmniSCSI
determine the best (usually fastest) way to clone. It is denoted
by the light bulb icon. It works with all FAT16/FAT32 and NTFS
type partitions.
Mirror – This setting clones the full contents of the selected
partition without any partition scaling. (This setting is similar to
100% Clone mode, which mirrors the entire Master drive.)
NOTE: Partition Mirror is available for any partition type, and is
the only method available to partitions that are unrecognized
by Clever Clone mode.
None (blank) – This setting instructs the Logicube OmniSCSI
not to clone the selected partition.
Selective Partitions Step-by-Step
1. From anywhere in the menu system press the “Set”
button to enter the Settings menu.
2. Scroll to the top icon and press the “Select” button.
The Modes screen appears.
3. Scroll to the “Selective” item (the painter’s palette), and
8
press “Select” again . The MASTER drive will now
power up. Some seconds later you will see a list of all
partitions found on the MASTER.
4. On the right hand side you will see a designator for the
partition type:
FAT16 - FAT16 partition
FAT32 - FAT32 partition
NTFS - NTFS partition
CQ - COMPAQ diagnostics partition
?? - unknown partition
5. Use the scroll buttons to place the cursor by a given
partition and press the “Select” button multiple times to
cycle among the 5 options.
(Clever -> Mirror, etc.)
8
You may need to switch from another tab screen to the Clone tab to access this option.
Logicube OmniSCSI User’s Manual
9
CLONING MODES AND SETTINGS
The following is an example of what may appear on the screen
when using Selective Partitions Mode.
In the example above, there are three partitions that have been
selected for cloning.
6. Scroll to other partitions and repeat the above step.
Note that it is OK to assign unique cloning modes to
each selected partition.
7. Adjust the “Verify” and “CHS” settings as needed.
(These settings are discussed later in this chapter).
8. When done, press the “Start/Stop” button twice to
start cloning.
NOTE: When multiple copies are required, all you
need to do is change the TARGET drives, and press
“Start/Stop” twice. Your last selections are used. If the
unit senses that the MASTER drive was changed (by
reading the serial number of the MASTER), it will again
return you to the selection screen, where you specify
the method of copy for each partition.
NOTE: If you wish to change the last used settings
(and the MASTER drive did not change), follow the
“Selective Clone Step-by-Step” instructions above.
Mirror Clone Mode
This mode simply makes a bit-by-bit mirror copy of the Master drive. It does not
adjust any values or perform any translation from drive to drive. It simply copies
whatever percentage of the Master drive that is designated.
NOTE: Drives in a RAID array have dynamic or striped partitions and also
need to be Mirror Cloned. When cloning a multiple drive RAID array, each
drive in the array needs to be Mirror cloned to an identical Target drive.
You can change the percentage of Master disk you wish to mirror. For
example, setting to 50% will mirror the first 50% of the Master drive’s size. The
percentage of the Master drive to be mirrored is calculated starting from the
first physical sector.
10
Logicube OmniSCSI User’s Manual
CLONING MODES AND SETTINGS
Mirror Clone Step-by-Step
1. From anywhere in the menu system press the “Set”
button to enter the Settings menu.
2. Scroll to the top icon and press the “Select” button.
The Modes screen appears.
9
3. Scroll to the “Mirror” item and press “Select” again .
4. Adjust the “Verify” and “CHS” settings as needed.
(These settings are discussed later in this chapter).
5. A screen appears asking you what percentage of the
Master drive to clone. Use the Up/Down scroll arrows
to adjust this value in increments of 5%. If less than
100% is chosen for the FRONT of the drive, the unit
will also ask for a percentage from the REAR of the
drive.
6. When you are ready to start the cloning process, press
the “START/STOP” button twice.
Master Manager Mode
Master Manager mode is useful in the creation of a multi-partition Master drive.
Many IT technicians prefer to store multiple partitions (e.g. one for the
accounting department, one for the marketing department, etc.) on a single
Master drive. When a new PC is to be configured or a drive crash occurs, all
the technician needs to do is select that partition and clone it.
The Master Manager mode is also useful for creating backups of drive
partitions containing important data. The Logicube OmniSCSI can hold up to 24
partitions on one Master Manager drive. Drives up to 1TB in capacity have
been successfully tested with the Master Manager mode.
Master Manager Step-by-Step
NOTE: To create a Master drive using Master Manager, you
must start with an unformatted drive.
1. Attach the original Master drive (the drive you want to
clone data from) to the Master position. Attach the
Master Manager drive to the Target position.
2. From anywhere in the menu system press the “Set”
button to enter the Settings menu.
3. Scroll to the top icon and press the “Select” button.
The Modes screen appears.
4. Switch to the “Tools” tab. Scroll to the “Master Manager” item (the puzzle piece) and press “Select”
again.
9
You may need to switch from another tab screen to the Clone tab to access this option.
Logicube OmniSCSI User’s Manual
11
CLONING MODES AND SETTINGS
5. Press the “Start/Stop” button twice to start cloning.
You will be warned that continuing will modify your
Destination drive. If you are ready to do this, choose
“Yes” to continue.
6. Both drives will now power up. After a few seconds the
unit will display a list of all partitions found on the drive
on the Master position..
7. Choose only one Source partition by placing the
cursor by the desired partition. Press “Select” to toggle
among the cloning methods exactly as you would in
“Selective” mode.
8. Press “Start/Stop”. After a few seconds the Logicube
OmniSCSI will display a list of all partitions on the
Master Manager drive (if any) that are large enough to
hold the data to be cloned from the Target drive.
NOTE: Existing Master drive partitions that are too small to
hold the amount of data selected from the Target drive will not
appear on the display.
9. Choose the Master partition you wish to overwrite, or
scroll down and select the “Add New Partition” option.
10. When you are ready to start the cloning process, press
the “START/STOP” button.
11. When the cloning process is complete, you can repeat
steps 2 through 10 to clone any other partitions on the
original Master drive.
Optional Preference Settings
In addition the different cloning modes, there are preference settings that can be used to adjust
the behavior of the cloning operation. Each of these preference settings is accessible through
the Settings menu, which can viewed at any time from anywhere in the menu system by
pressing the Set button.
NOTE: Not all preference settings are available in every cloning mode.
Verify
The Verify preference allows you to choose whether the Logicube OmniSCSI
scans the Target drives for bad or weak sectors. With Verify activated, the
Logicube OmniSCSI scans target drives during the cloning process. If a bad or
weak sector is detected, the cloning process is aborted.
NOTE: With newer drives this problem is virtually non-existent since the drives
employ extensive on-the-fly bad sector detection and re-allocation.
12
Logicube OmniSCSI User’s Manual
CLONING MODES AND SETTINGS
Engaging the verification feature slows the speed of cloning by a factor of two
or more. If a bad sector is detected on the Targets (with Verify turned on), the
cloning process will abort with an error message.
IMPORTANT NOTE: This setting does not perform data verification.
To use Verify, scroll to the Verify icon in the Settings Menu, and press the
“Select” button. Verify is available in Clever, Selective and Master Manager
modes.
Verify Settings
None (Default) - No target drive scan is performed.
100% - Full verification. The OmniSCSI will verify that it
can write to every sector it needs to write to.
NOTE: Logicube strongly recommends against using a
hard drive that has been shown to have bad sectors as
new defects are likely to develop.
CHS Translation
CHS Mode sets the geometry (Cylinder, Head and Sector) translation used on
each Target drive. CHS information is stored in the partition table of the hard
drive and is used by the BIOS to determine from which partition to boot.
The correct setting will depend upon the capacity of the Target drive and on the
BIOS of the PC in which it will be used. Check with the hard drive and PC
manufacturer to determine which CHS mode is best as different BIOS systems
use different translation methods for large (over 528 MB) capacity drives.
To use CHS Translation, scroll to the CHS icon in the Settings Menu, and press
the “Select” button to scroll through the options. CHS is available in Clever
and Selective Clone modes.
CHS Translation Settings
Following are the CHS modes supported by the Logicube
OmniSCSI:
LBA (Default) – This CHS Mode will work for most hard drive
and PC combinations and should be used unless otherwise
indicated.
Large – Also known as Extended CHS (ECHS) mode. It is
used on all Compaq and Samsung computers, some IBM
PC’s, IBM Thinkpad laptops, some newer Dell laptops, and
possibly other computers. It should also be used whenever a
Phoenix BIOS version 4.0 or earlier is encountered.
Logicube OmniSCSI User’s Manual
13
CLONING MODES AND SETTINGS
LBA 8.5 and Large 8.5 – These settings force all partitions to
remain below the 8 GB mark. This is useful with Legacy
motherboards that cannot support drives larger that 8.5 GB.
LBA-1, LBA-2, Large-1 and Large-2 – These settings instruct
the Logicube OmniSCSI to “shave off” one or two cylinders
from the total drive size when constructing the Target partition
tables.
NOTE: Most of the time, blocking out one cylinder is enough
but two may need to be blocked out to achieve good results.
14
Logicube OmniSCSI User’s Manual
4. OmniDiagnostics™
Introduction
The Logicube OmniSCSI has optional software packages that are not part of the standard
10
unit . Foremost of these is OmniDiagnostics, an optional feature that allows Target drives to
be wiped clean of data.
Enabling OmniDiagnostics
All optional software packages are already inside your Logicube OmniSCSI
(and are automatically updated when you install a newer software version). To
use an option like Omnidiagnostics, it first needs to be enabled.
To enable OmniDiagnostics on your Logicube OmniSCSI, contact Logicube to
purchase a license key that is unique to your unit. Once you have obtained the
license key, follow this procedure to enter it into your Logicube OmniSCSI
1. Press and hold the Reset button. While holding it down, press and
hold the “Start/Stop” button. Release the Reset button.
2. The OmniSCSI will display an “Entering Setup” message as it goes
through the self test.
3. In the Setup Menu, Scroll to the “Enable Option” menu item and press
the Select button.
4. Enter the OmniDiagnostics activation code you received from
Logicube.
5. If all symbols have been entered correctly, the Logicube OmniSCSI will
reboot to the main menu.
6. To verify that OmniDiagnostics has been activated, go to the About
Screen. You will now see OmniDiagnostics listed as an installed option.
NOTE: Once the license key is entered, an optional software package is
permanently enabled. The key will not need to be entered again, unless the
Firmware or the BIOS are changed on the Logicube OmniSCSI itself.
NOTE: Loading new software updates will not disable the Omnidiagnostics
option.
10
As of this writing, the only optional feature available is Omnidiagnostics. Other features may become available in the
future. Check www.logicube.com periodically to keep abreast of new information.
Logicube OmniSCSI User Manual
15
OMNIDIAGNOSTICS™
OmniDiagnostics Features
Erase Target Mode
The Erase Target mode erases all data on the Target drive. This may be
required when discarding drives that contain sensitive information to which you
do not want others to have access, e.g. financial information, trade secrets, etc.
Erase writes a pattern over the whole Target drive 2 X n+1 times, where n is
the selected number of iterations of all 0’s and all 1’s. The last pass then writes
the chosen pattern to every byte of the drive.
For example, if you set the number of passes (the value of n in the above
formula) to 1, WipeClean will perform a total of three passes, first writing all 0’s
then again writing all 1’s. Then one more pass will be made this time writing the
chosen pattern.
Set the number of passes to 0 for a single pass of the chosen pattern. This
method is acceptable for quickly wiping a drive where removal of sensitive
information is not an issue.
Set the number of passes to 1 and the pattern to RANDOM if you wish to erase
data according to Department of Defense (DoD) specification M-5220.
Erase Settings
The following settings are used in configuring WipeClean
Target mode:
Passes – Determines how many iterations of all 0’s and all 1’s
are performed. The default is 0. Set the value to 1 for
compliance with DoD M-5220.
Value – Select the value to be written on the last pass. The
options are 0xf6, 0x00, 0xff, and Random (DoD default). (The
Random setting will fill the Target drive with a pseudo random
pattern).
Erase Target Step-by-Step
1. Attach the drive(s) to be erased to the Target
position(s). Attach a scratch drive to the Master
position.
NOTE: Do not use an actual Master drive in the
Master position. A pattern will be written to the
beginning of the drive which will corrupt any data
residing on it.
2. From anywhere in the menu system press the “Set”
button to enter the Settings menu.
3. Scroll to the top icon and press the “Select” button.
The Modes screen appears.
16
Logicube OmniSCSI User’s Manual
OMNIDIAGNOSTICS™
4. Scroll to the “Erase” item (in the Diag menu), and hit
11
“Select” again .
5. Adjust the “Passes” and “Value” settings as needed.
(These settings are discussed in the previous section
titled “Erase Settings”).
6. Press the Start/Stop button twice.
7. A message will appear stating that portions of your
Target drive will be overwritten. If you are prepared to
continue, choose “<Yes>”. If you wish to abort the
operation, choose “<No>”.
8. If “<Yes>” is chosen, a second message will appear
stating that you are about to erase the Target. If you
wish to continue, choose “<Yes>”. If you want to abort
the operation, choose “<No>”.
9. If “<Yes>” is chosen, the Erase Target operation will
begin and a status screen will appear.
10. The Logicube OmniSCSI will notify you when erasing
is complete. Press the Back button to return to the
main menu.
11
The OmniDiagnostics™ option needs to be installed for Erase™ to be available.
Logicube OmniSCSI User’s Manual
17
5. Software Loading Instructions
Logicube OmniSCSI Software Updating Procedures
New and improved software will appear from time to time on our web site at www.logicube.com.
Loading Software through the CompactFlash card
NOTE: Loading or updating software through the CompactFlash card requires
the use of a CompactFlash card reader (or multi-card reader).
Download the current OmniSCSI One to One software from the Logicube web
site to your PC. A copy of the software that shipped with your OmniSCSI can
also be found on the CD that shipped with your unit.
Loading Software to the OmniSCSI One to One
1. Locate the OmniSCSI software named Omnidup.
2. Make sure the OmniSCSI is turned off and remove the
CompactFlash card from the back of the unit.
3. Attach the CompactFlash card reader to a PC through
a CompactFlash card reader.
4. Copy the Omnidup file from the PC to the root
directory of the CompactFlash card. After the file has
been copied, remove the CompactFlash card from the
PC and insert it to the OmniSCSI.
5. Turn on the OmniSCSI. The new software should be
loaded during the boot process. To verify the new
software, use the arrow buttons to highlight “About”
and press the “Select” button.
NOTE: Please contact Logicube Technical Support at (818)
700-8488 X3 if you have any trouble with the software update.
Logicube OmniSCSI User Manual
18
6. Frequently Asked Questions and Answers
Q. How does the OmniSCSI determine the size of partitions on the Target drive?
A. In the default CleverCopy mode, all known partitions (FAT16/FAT32/NTFS) are scaled
proportionally to the ratio of Master/Target size. All unknown partitions (e.g. HPFS, UNIX etc.) are
mirrored, that is they maintain their size. Please note that FAT16 partitions cannot exceed 2.1GB
when scaled up, nor be smaller than 32MB when scaled down.
Q. Can the OmniSCSI clone to dissimilar drives?
A. Yes. The OmniSCSI will take care of all the necessary adjustments of Target drive structures to
ensure the drive (of any size) will be valid and bootable.
Q. Can the OmniSCSI clone file systems such as UNIX, and HPFS?
A. Yes, but results are guaranteed only if cloned between identical drives and Mirror copy mode is
used.
Q. Do Target drives have to be partitioned and formatted prior to copying?
A. No. Target drives need not be partitioned or otherwise treated. The OmniSCSI disregards
everything on the Target drive, and re-formats and partitions the Target on-the-fly.
Q. My Target drive will not boot. Why?
A. Please check several things:
Try changing the CHS setting (if Clever was used).
Try Mirror mode and perform a bit-by-bit copy of the drive.
Q. How does the OmniSCSI handle bad sectors on the Master and Target?
A. Bad (or “weak”) sectors on the Master are handled in the following way:
The OmniSCSI will abort the cloning process upon encountering the first bad sector.
Note that the OmniSCSI will still make several attempts to read the bad sector in
question, but unless a perfect read was achieved, the process will abort.
Bad sectors on Targets are handled as follows:
If the Verify setting is disabled, the OmniSCSI will not detect bad sectors on the
Target. Note, however, that newer drives use automatic reallocation and will rarely
exhibit a bad sector, and thus reduce the probability of a problem to a negligible
amount.
Logicube OmniSCSI User Manual
19
FAQ’s
With the Verify setting set, the OmniSCSI will abort the operation upon detecting the
first bad sector.
Q. Can you briefly explain the difference between Mirror Copy and Clever Copy?
A. Mirror Copy merely copies all sectors in a given partition (or drive) from the beginning to the
specified percentage. It does not look at drive structures, and can thus copy any type of known or
unknown data. Since Mirror copy does not determine where useful data starts and stops, it ends up
copying every sector on the drive, a time consuming operation.
Clever Copy analyzes the drive structures, and copies only sectors that are occupied by useful files
and data. It also adjusts the various drive structures to assure a valid and fully partitioned Target
drive. Clever Copy is by far the most recommended mode of cloning.
Q. Can I copy from a larger drive to a smaller drive?
A. Yes, especially with FAT formatted drives, as long as the data content of each partition fits into
the scaled down size of its corresponding partition. Otherwise, an error message is displayed.
NTFS partitions can be scaled down, but may not fit smaller drives depending on the type of data
and location of data on the Master drive.
Q. Can I clone drives with virus protection software installed
A. Yes. But remember to decline the “repair” of the Target drive should a virus protection program
complain about altered Master boot record etc.
Q. Why do I have an un-partitioned free space at the end of my Target drive?
A. This can happen if Mirror Clone is used to clone from a small drive to a larger Target drive.
Q: Why does my cloned Windows 2000 or Windows XP partition boot to a blue screen?
A: If Clever copy mode was used, try changing the CHS setting.
Q: Why do I get the error “Can’t fit data to Target” when cloning between drives of the same size?
A: The drives may be from different manufacturers and the Target actually somewhat smaller than
the Master. Also, the Master drive may have some data at the very end of the partition. This would
prevent it from scaling down.
We recommend that you use a defragment utility on the Master drive before cloning it to the Target
again.
Q: My cloning session stops with the error “Error initializing/writing NTFS data.” Why?
A: This error means that NTFS Clever Clone has encountered corrupt data in the boot sector, MFT
or Volume Bitmap of the Master drive. The drive may still boot in a PC, however.
20
Logicube OmniSCSI User’s Manual
FAQ’s
Q: My cloning session always stops at a certain point with an “ERROR 120” or “ERROR 123”
message. Why?
A: “ERROR 120” occurs when a bad sector is encountered on the Master drive. “ERROR 123”
usually occurs when Verify is turned on and a bad sector is found on the Target drive.
Q: Why does the cloning session stop with an “Invalid MBR” error message?
A: This error comes up when the partition table or boot sector contains corrupt data. Despite the
error, the Master drive may still boot in a PC.
Logicube OmniSCSI User’s Manual
21
7. Index
Add Partition, 12
Back, 5
bad sector, 12
Bad sectors, 19
BIOS, 13, 15
BIOS, Phoenix, 13
Button, BACK, 6, 17
Button, HELP, 5, 6
Button, Power, 4
Button, Reset, 4, 15
Button, Right Arrow, 6, 7
Button, SELECT, 6, 15
Button, SET, 11, 12
Button, START/STOP, 5
Cable, Drive power, 2, 3
Cable, SCSI, 2
Clever Clone, 9
Clever Clone™, 8, 9, 20
CleverCopy, 19, 20
Clone, 1, 7, 8, 9, 10, 11, 13, 19, 20
CLONE NOW, 5
CLONE NOW! button, 5
Clone tab, 7, 9
Compaq computers, 13
Compaq diagnostics partition, 9
Connector, Power, 3
Cylinders, 14
Defragment (Defrag), 20
Diag tab, 7
Diagnostic option, 7
Disk, Floppy, 2
Display, OLED, 12
Department of Defense, 16
DoD, Department of Defense, 1, 16
DoD, Specification M-5220, 16
Drive, Jumper Setting, 1
Drive, Master, 1
Drive, SCSI, 1, 3, 4
Drive, Target, 1
Drives, Fibre Channel, 1
Drives, SCA-80 (80-pin), 4
Drives, SCSI, 1, 3, 4
Drives, SCSI-1 (50-pin), 4
Drives, SCSI-2, 1
Erase ™ Target Mode, 16, 17
Logicube OmniSCSI User Manual
Formatted drives, 19
Geometry, Drives, 6, 13
HDD, Hard Disk Drive, 1
Help, 5
HPFS, 19
Indicator Lights, 5
Large, 13
Large 8.5, CHS Translation Setting, 14
LARGE, CHS Translation Setting, 13, 14
LARGE-1, CHS Translation Setting, 14
LARGE-2, CHS Translation Setting, 14
LBA, 14
LBA 8.5, CHS Translation Setting, 14
LBA, CHS Translation Setting, 13, 14
LBA-1, CHS Translation Setting, 14
LBA-2, CHS Translation Setting, 14
Left/Right buttons, 5
Light, Error, 5, 21
Light, Power, 5
Light, Status, 3, 5
Master Manager™, 11, 13
Mirror (100%) Clone™, 9, 10, 11, 20
Mirror Clone, 20
Mirror Clone™, 10, 11, 20
NTFS, Master File Table, 20
OmniDiagnostics™, 15, 16, 17
OmniSCSI™, Logicube, I, 1, 2, 3, 4, 5, 6, 7, 9, 13,
15, 17, 18, 19, 20
Optional Preference Settings, 12
partition, 8
Partition Mirror, 9
Partition, Drive, 9, 12
Partition, FAT16, 1, 8, 9, 19
Partition, FAT32, 8, 9, 19
Partition, NTFS, 1, 8, 9, 19, 20
Partition, Partitions, 1, 3, 5, 6, 8, 9, 10, 12, 13, 14,
19, 20, 21
Partition, Unknown (??), 9, 19
PC (computer), 13, 18, 20, 21
Position, Master, 16
Position, Target, 3, 16
Power Supply, 4
RAID Array, 10
Re-allocation, 12
Scratch drive, 1, 16
22
INDEX
Screen Contrast, 5, 6
Screen, About, 6, 15
Screen, Drive Info, 6
Screen, Main Menu, 6
Screen, Settings, 5, 8, 9, 11, 12, 16
Screen, Status, 17
SCSI Host Adapter, 3
SCSI ID, 3
Sector, bad, 12, 13, 19, 20, 21
Self-Test, 6, 15
Set button, 5
Setting, CHS Translation, 13
Setting, Enable Option, 15
Setting, Verify, 8, 10, 11, 12, 13, 19, 20, 21
Software, Loading, 18
Switch, Power, 4
Technical Support, Logicube, 2, 6, 18, 23
Tools tab, 7
Unix, 19
UNIX, 19
User interface (UI), 4
Verify, 12, 19
Virus protection, 20
Virus Protection, 20
Virus Protection Software, 20
Weak sectors, 19
Website, Logicube, 15, 18
Window, Clone, 8, 9, 11
For further assistance please contact Logicube’s technical support at: 818 700 8488 ext. 3, or by email to
[email protected].
Logicube OmniSCSI User’s Manual
23