1
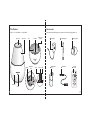
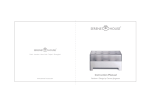
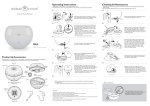
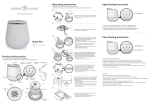
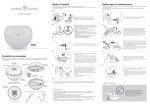
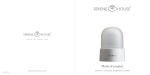
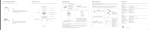
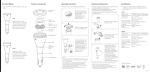
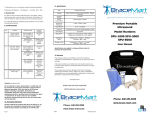
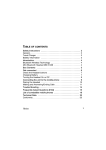
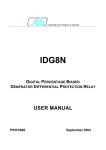
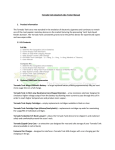
Paris•London•New York•Taipei•Shanghai
Instruction Manual
www.serene-house.com
Vulcan II / Design by Carsten Jörgensen
Table of Contents
Main Unit....................................................................................04
Accessories...............................................................................05
Operating Instructions..........................................................06
Please read this manual carefully before using the Scentilizer.
After reading this manual,
please keep it in a readily accessible place.
Remote Control......................................................................09
Cleaning & Maintenance.......................................................12
Safety Precautions...................................................................14
Specifications............................................................................17
Troubleshooting......................................................................18
2
3
The Product
Accessories
Vulcan II(111101003 White / 111101004 Black)
Please check if all the following items are present and if there is any damage before use.
Spray hole
Glass cover
Vent
Speaker
Ventilation
inlet
Atomizer
Power
Water mark
(190ml)
Audio
USB
1 AC adapter
Waterproof
4 cap
2 Cleaning brush
6 Audio cable
3 Retaining plate
Remote
7 control
Main unit
Sensor
4
5
Opearating Instructions
3
• Always place your Scentilizer on a firm, flat, and level surface.
• Condensation may form on the Scentilizer causing the floor to become wet during summer
when humidity is high or during winter when room temperature is low.
Add 5-10 drops of SERENE HOUSE 100% natural
essential oil into the tank.
Please do not let the essential oil drip onto the
exterior of the Scentilizer.
1
2
1
Remove the water level label and place the retaining
plate into the vent in the tank.(as shown in diagram
left).
4
• Be sure to follow this instruction to prevent water from
flowing into the vent hole and causing malfunction.
Make sure the retaining plate is correctly covering
the vent(as shown in the left diagram)and the
glass cover properly in place.
Use a clean cloth to gently wipe the surface of this
Scentilizer, if needed.
2
Add water slowly into the water tank and make sure
the water level does not exceed its designated water
mark level. Please avoid adding water near the vent
area.
• Please filter the tap water to reduce the limes before use.
• For best result, do not use pure water, distilled water or
other liquids.
• Water should be in room temperature(25℃ ~ 40℃)
(76.9˚F-103.9˚F)Do not use water below 25℃(76.9˚F).
• Never add water into the vent hole.
6
5
Insert the AC adaptor into the socket of the main
unit, as shown in the left diagram.
7
Remote Control
6
Front
Use the remote control and press the power button
to start the unit.
LIGHT BUTTON :
Turns the LED light on and off.
• The remote control goes off to power-saving mode when
not in used for more than 10 seconds.You may press any
button to restore the default status or continue to
perform other operations.
ATOMIZING BUTTON :
Controls the atomization mode
normal / strong / off.
TIMER BUTTON :
Sets the machine’s automatic off time,
30 / 60 / 90 minutes and continuous mode.
7
MUSIC SELECTION BUTTON(Up):
Selects the previous track when using the USB
playback function.
The machine starts to operate.
MUSIC SELECTION BUTTON(Down):
Selects the next track when using the USB
playback function.
8
USB BUTTON :
Plays the music files in the USB device.
The built-in LED lights of this Scentilizer will flash when the water level is near
empty. The Scentilizer will automatically stop operating shortly after. For immediate
re-use, please empty the residual water and replenish water accordingly.
back
1
9
For the best performance, make sure to clean your Scentilizer after each use.
• Please follow the instructions on page 12 in this manual for proper cleaning and maintenance.
8
POWER BUTTON :
Turns the machine on and off.
2
DEFAULT BUTTON :
Plays the built-in music.
AUDIO BUTTON :
Plays the external 3.5mm audio input port’s
music.
VOLUME ADJUSTMENT BUTTON :
Increases the volume of music.
CR2032:
Lithium battery,
included.
VOLUME ADJUSTMENT BUTTON :
Reduces the volume of music.
9
POWER SETTING
ATOMIZING TIME SETTING
1. Press the POWER button
to enter operation mode.
2. The ON / OFF button makes the unit work / standby(atomization function stops; when in
standby mode, you can still use the remote control to start related functions).
ATOMIZING SETTING
1. Press ATOMIZING
to enter the setting mode.
2. Press ATOMIZING
repeatedly to select the atomization mode.
• Press once –(STRONG)Full power of atomizing.
• Press twice –(NORMAL)Minimal power of atomizing.
• Press three times –(Off)turn off the atomizing.
LIGHT SETTING
to enter setting mode.
2. Press LIGHT
repeatedly to turn the LED lights on or off.
AUDIO SETTING
1. When the machine is on, the music mode is set to built-in audio source.
to activate the USB audio source.
• Supported format for USB playback : MP3, WMA.
3. Press AUDIO
4. Press DEFAULT
10
2. Press TIMER
to enter setting mode.
repeatedly to select the atomizing mode.
3. The set time(in minutes)order is : 30 / 60 / 90 / continual(the indicator goes off)
VOLUME
1. To adjust the volume level, press the VOLUME button, Volume Up
there are a total of 16 volume levels.
, Volume Down
;
TRACK SELECTION
1. To select a music track, press TRACK, Previous Track
, Next Track
.
2.The track selection function can only be used for USB audio source mode.
1. Press LIGHT
2. Press USB
1. To adjust the atomizing time setting, press TIMER
to activate the external audio source.
Caution
• NEVER connect the power without covering the glass cover.
• Do not remove the glass cover or block the spray hole(s) of the glass cover during use.
• Never open the glass cover or put your finger or other objects into the tank while the
product is in operation as water leakage, injury, or malfunction may occur.
• Make sure to pour out the water that has been in use for over24 hours.
• For best performance, we recommend SERENE HOUSE essential oils with this Scenitilizer.
Use of other essential oils may cause damage to the product.
• Make sure to wipe clean with a cloth if oil drips on the main unit or floor.
to activate the built-in music source.
11
Cleaning & Maintenance
3
• Always disconnect the AC adapter from the electrical outlet before cleaning.
• For best atomizing performance, please clean the Scentilizer after each use.
Empty the water in the tank, add a small amount of
warm water(do not exceed 40℃)(103.9˚F),
and a few drops of neutral cleanser.
Use the cleaning brush provided to clean the
internal surface of the water tank. Gently rinse all
the soap out of the water tank after washing. do
not use dishwashing liquid.
1
1
4
Remove the AC adapter from the electrical outlet
and then remove the plug from the main unit.
Use a clean cloth to wipe off the excess water on
the surface of the Scentilizer.
2
2
5
1
2
Remove the glass cover first, and then remove the
retaining plate from the vent hole and replace it with
the provided waterproof cap.
12
Remove the waterproof cap and put the retaining
plate back onto the vent hole. Put the glass cover
back onto the water tank.
2
1
• Never use acidic cleansers as this may cause malfunction.
• The glass cover breaks easily, please handle with care
when cleaning.
• Do not clean the Scentilizer directly under the faucet to
prevent water from flowing into the ventilation inlet and
cause malfunction. If water accidently flows into the main
unit, please allow internal mechanism to dry thoroughly
(at least 6 hours)before the next use.
13
Safety Precautions
For safety, please be sure to follow these instructions :
• The precautions listed in this manual are to ensure safe and proper use of this product by the user, and
to avoid any danger or loss that might occur.
Warning
• Stop using the product immediately and unplug the AC adapter once smoke, smell,
unusual sounds or other anomalies occur.
• Do not modify, fix, or dismantle this product, as fire, electric shock, damage, or
injury may occur.
• When the product is at the end of its life, we recommend disposal at a collection
point for the recycling of electrical and electronic equipment, rather than with
household waste. The symbols on the product, instruction manual, and packaging
allow for proper sorting and disposal.
• Adaptor input rating AC100V - 240V 50 / 60Hz.
• Only the included AC adapter may be used with the product, using other products
may result in fire.
• Do not connect the AC adapter to the main unit when installing, as electric shock
and injury may occur.
• The product should always be unplugged and the water container should always be
empty when moving the product or when the product is not in operation.
• When unplugging the AC adapter from the outlet, do not pull on the wire, Hold
the AC adapter firmly and then unplug it, or else damage or injury may occur.
• Please avoid dripping the essential oil onto the exterior of the product or onto
furniture. If essential oil dripping accidently occurs, wipe off immediately to avoid
fading of the exterior of the product or the furniture.
• The AC adapter will heat up when the product is operating; this is normal.
14
• Do not use the product when electric cord or plug is damaged or the product has
been accidently hit, dropped, broken, or damaged in any way.
• Do not handle the main unit and AC adapter with wet hands, or let water or
other liquids stick to or spray onto them, as this may result in an electric shock.
• This product is not a toy. Do not let children use this product. Keep out of reach
of children as electric shock and injury may occur. Children should be properly
supervised to ensure that they will not play with this product at all times.
• KEEP OUT OF REACH OF CHILDREN AND PETS.
• The product must be disconnected from the electrical outlet before use and
maintenance.
• This product is not intended for use by persons(including children)with
reduced physical, sensory, or mental capabilities, or lack of experience and
knowledge, unless they have been given supervision or instruction concerning use
of the product by a person responsible for their safety.
• Do not intentionally inhale the mist emitting from the product nozzle. This may be
harmful to your health.
• Do not open the glass cover or put your finger or other objects into the tank
while the product is in operation as water leakage, injury, or malfunction may
occur.
• Do not place the product on a carpet.
• To avoid fire, electric shock, injury or damage, do not place the product in the
areas listed below :
* In direct sunlight or next to a heating appliances
* In dusty places
* On tilted, unstable, or uneven surfaces
* Places full of smoke or next to stoves
* Next to or above electrical products(TV, stereo, refrigerator, etc.)
• Do not bend, heat, or place heavy objects on the power cord as fire or
malfunction may occur.
15
Precautions before use
• Please read all instructions before using the product. Use it safely and correctly.
• This product is a vaporized fragrance diffuser and uses ultrasonic vibration technology to
generate fragrant vapors, it also has a seven-color LED lighting function.
• Read the “Operating Instructions” section on page 6 ~ page 8 of this manual for correct
operation.
• Make sure to read and follow the “Maintenance” instructions on page12 of this manual
for cleaning and maintenance.
• Parts of the main unit are made of porcelain and glass, be sure to handle and use with caution.
• The product’s main unit is delicate and may sustain damage during transportation. If the
product leaks when filled with water, please contact our distributor or customer care center
immediately.
• This product is manufactured using the ultrasonic atomization principle, and can only be used
for spreading fragrance, it does not have humidification functions.
Notes on the use of oils
For best performance of this Scentilizer, we recommend using SERENE HOUSE essential oils.
• Essential oils are highly concentrated oils. Use with caution.
• Do not spill the oils as they may damage plastic objects and furniture.
• Children and pets are very sensitive to essential oils. Use with caution.
• Stop using the product and open the windows for ventilation if you start to feel
uncomfortable.
• Be sure to use appropriate amounts of essential oil.
• If you have any special physical conditions, such as pregnancy, lung failure, cancer, epilepsy
or other illnesses, please consult your doctor before using essential oils.
Specifications
Product name
Model code
Atomization mode
Vulcan II
111101003 White / 111101004 Black
Ultrasound
(Normal)20-25 ml /h(0.7-0.8 fl. oz./h)
(Strong)35-40 ml /h(1.2-1.4 fl. oz./h) Test results may vary
depending on ventilation,
(Normal) Approx. 8 - 9 hrs
Continuous atomization time (Strong)Approx. 4 - 5 hrs
temperature, humidity,
Atomizing ability
and height of space.
Suggested room size
Ultrasonic frequency (MHz)
Water tank capacity
Input
Output
Rated power
15 - 35 m²(162 - 377 ft²)
1.70 ±4%
190ml(5.7 fl. oz.)
DC24V
DC5V 500mA
18W
Remote control battery
Product size
Main unit weight
Operation mode
Music mode :
Built-in music
USB mode
Audio mode
Lithium battery CR2032
Φ16.1 × H 22.5 cm(Φ6.3"× H 8.9")
Country of origin
China
AC adapter, remote control, cleaning brush, audio cable,
waterproof cap, retaining plate, warranty card.
Accessories
Approx. 1540g,(3.4 lbs)Including main unit, glass cover, and AC adapter
Remote control
Repeat playback, built-in speakers
Supports MP3 / WMA formats
Plays back external 3.5mm audio input port
Patent Product
16
17
Troubleshooting
If you experienced unsatisfactory operations, please follow our troubleshooting guidelines
listed below.
Machine does not operate
● Check the adapter
→ Make sure the adapter is correctly plugged into the electrical outlet.
● Power cord not connected to the main unit.
→ Be sure plug is inserted into the main unit correctly.
● Check remote control.
→ Replace a new battery for the remote control.
● Remote control is used too far away from the product.
→ Be sure the remote control is used within the receiving range
(4 meters and 10° angel of distance from the sensor).
The product does not atomize or does not atomize effectively
● Check the water temperature.
→ Please use tap or mineral water between 25°C and 40°C(76.9˚F-103.9˚F).
Volume too high or too low
● Volume adjustment button improperly set.
→ Adjust the volume control with the remote control to increase volume or to reduce
volume.
LED lights not fuctioning
● Check the LED light setting with the remote control.
→ Be sure to turn on the light setting with the remote control.
Do not attempt to dismantle or repair the product by yourself.
If the unit still does not operate satisfactorily,
please visit our website www.serene-house.com, and click link "Support",
or contact our customer service.
● heck the water type used.
→ Be sure to use tap or mineral water. Do not use pure water or distilled water.
● Check the water volume.
→ Make sure the water do not exceed its designated water mark level.
● Dirty atomizer.
→ Follow the “Maintenance” instructions on page12.
● Placement of the product.
→ Place on a firm, level, and stable surface where unaffected by wind.
● Check the remote control
→ Switch to the desired atomizing amount mode with the remote control, if the
ATOMIZING button is OFF and the lights indicator is ON.
18
19