1
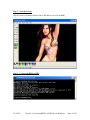
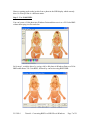
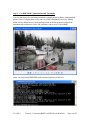
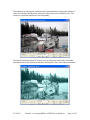
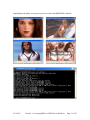
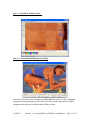
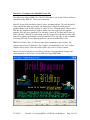
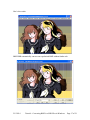
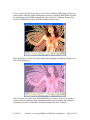
Tutorial - Converting BMP’s to SHR Files using BMP2SHR in Windows Table of Contents Tutorial - Converting BMP’s to SHR Files using BMP2SHR in Windows........................1 Table of Contents.............................................................................................................1 Introduction .....................................................................................................................2 Tutorial 1 - Creating an SHR Screen File from an SHR PNT File..................................4 Step 1 – Capture the Screen.........................................................................................4 Step 3 – Convert the BMP to SHR .............................................................................5 Step 4 – Put the SHR File on a Disk............................................................................6 Tutorial 2 - Creating SHR Files from Digital Photos......................................................6 Step 1 – Use 24-bit BMPs............................................................................................7 Step 2 – Use BMP2SHR’s Quantization and Thresholds............................................8 Default Options QCO and A6 – AKA Option QA...................................................10 Step 1 – Process and Review DIB Output.................................................................12 Step 2 – Edit DIB in Windows Paint ......................................................................13 Step 3 – Convert Edited DIB and Put On Disk..........................................................13 Tutorial 4 - Creating a 640 x 200 SHR Screen File.......................................................14 Tutorial 5 - Creating Dithered 640 x 200 SHR Images from SHR Files.......................15 Using ClipShop to Prepare a Dithered Screen Grab..................................................16 Tutorial 6 – Two Options for Mode320 Conversion of 640 x 400 BMPs.....................19 End of Tutorial – Additional Comments...........................................................................21 2/15/2014 Tutorial – Converting BMP’s to SHR Files in Windows Page 1 of 21 Introduction By now you have read the BMP2SHR Program Documentation: http://www.aztecmuseum.ca/extras/bmp2shr.pdf What you will need to follow along: • • • • Windows Paint - Required CiderPress – Required - http://ciderpress.sourceforge.net/ ClipShop – Optional – http://www.clipshop.ca/ Kegs32 Emulator – Optional - http://www.emaculation.com/kegs32.htm This tutorial assumes that you have a pretty fair knowledge of Windows BMPs, and Apple II GS SHR Files. Documentation for SHR Files has been provided in the BMP2SHR Program Distribution: http://www.aztecmuseum.ca/extras/B2S.zip 320 x 200 Brooks Format Output 320 x 200 SHR Greyscale 320 x 200 SHR Greyscale – Red Tint 640 x 200 Dithered Greyscale – Red Tint BMP2SHR is a command line utility that was developed over a couple of months or so. The conversion algorithms are my own. I didn’t bother to look at anyone else’s code much when I wrote this, and just used the information in the Apple Tech Docs and info 2/15/2014 Tutorial – Converting BMP’s to SHR Files in Windows Page 2 of 21 provided by guys like Charlie and Antoine to help me along I wrote BMP2SHR for my own purposes and to have a little fun, and if you find it useful that’s great! BMP2SHR wasn’t designed to provide photorealistic color output (the SHR display is not capable of photorealistic color by today’s standards) or to dither an image using complex color patterns. It was designed to be a basic general purpose graphics conversion utility to provide Windows users with a convenient source of SHR files. BMP2SHR is not an interactive editor. The approach with BMP2SHR is to use thirdparty editors and viewers and to use the Windows Clipboard with CiderPress or Kegs32, or the Internet, or your digital camera or scanner, to grab graphics for conversion (or to use any that you happen to have laying around). And to lever the existing tools in Windows, and to work between GUI applications and the Windows Cmd Console (pretty much the same way a programmer in Linux or most other command shell users work (including yours truly)). Speed is not so much an issue but would be on an Apple II GS where seconds count. In Windows, little command line utilities like BMP2SHR run quickly by comparison. BMP2SHR will produce (but is not limited to) the following output: • • • • • Picture using 1 palette of up to 16 colors (grey scale or colors) o Mode320 and Mode640 Blended Monochrome – 3 grey levels o Mode320 and Mode640 Monochrome – 2 color o Mode320 Merged GreyScale – 16 grey levels Tinted or Untinted o Mode640 Merged and Dithered Greyscale – 8 grey levels Tinted or Untinted o Mode320 – 16 Colors o Mode400 variations of the above in two VOC formats Picture using up to16 palettes (of up to 16 colors per palette) o Mode320 Color o Mode640 Color o Mode400 variations of the above in two VOC formats Picture using 200 palettes (1 palette for each line) o Mode3200 Brooks format Merged or Verbatim o Mode400 variation of Brooks for the VOC Windows 24-bit BMP - editable copy of Verbatim output o With Brooks Output o With Dithered GreyScale Output Windows 256 Color DIB o With 24 Bit BMP Input So let’s get started! 2/15/2014 Tutorial – Converting BMP’s to SHR Files in Windows Page 3 of 21 Tutorial 1 - Creating an SHR Screen File from an SHR PNT File Step 1 – Capture the Screen “Pose” an existing SHR file on a 2mg disk image in CiderPress (or Kegs32) and capture the CiderPress viewing Window using the Windows Clipboard (by pressing the ALT+PRINTSCREEN key combination): You can alternately extract the PNT file in CiderPress from the Action Menu: 2/15/2014 Tutorial – Converting BMP’s to SHR Files in Windows Page 4 of 21 Step 2 – Save the Screen Clip the screen in Windows Paint to 640 x 400 and save as a 24 bit BMP: Step 3 – Convert the BMP to SHR 2/15/2014 Tutorial – Converting BMP’s to SHR Files in Windows Page 5 of 21 Step 4 – Put the SHR File on a Disk Using CiderPress and a blank 2mg disk image, from the “Action” menu, select “Add files” with file attribute preservation tags to add the converted SHR files to the disk. Step 6 is up to you. This concludes the first section of the tutorial. Tutorial 2 - Creating SHR Files from Digital Photos Converting a photo to SHR GreyScale (in this case a RedScale) always gets good results: 2/15/2014 Tutorial – Converting BMP’s to SHR Files in Windows Page 6 of 21 However getting good results in color from a photo in the SHR display which can only show 16 colors per line is a different matter. Step 1 – Use 24-bit BMPs You can’t paste a 24 bit photo into Windows Paint and then save it as a 256 Color BMP without destroying it as shown below: So for step 1, avoid the above by saving a 640 x 400 photo in Windows Paint as a 24 bit BMP rather than a 256 Color BMP, followed by conversion using BMP2SHR: 2/15/2014 Tutorial – Converting BMP’s to SHR Files in Windows Page 7 of 21 Step 2 – Use BMP2SHR’s Quantization and Thresholds You may not always be converting retouched swimsuit photos or photos with optimized palettes. Here’s a digital photo of my son (circa 2005) standing by one of my fishing skiffs with my father-in-law’s truck and larger boat in the background. I reduced the saturation and scaled this to 640 x 400 resolution, and saved as a 24-bit BMP: I then converted using BMP2SHR with command options QA M4 A10. 2/15/2014 Tutorial – Converting BMP’s to SHR Files in Windows Page 8 of 21 The technique of reducing the saturation assists quantization by reducing the number of colors by creating a hybrid palette somewhere between grey-scale and true-color. The results are somewhat reminiscent of an oil painting: The tinted CyanScale (option GC) below also provides good results and is somewhat smoother but lacks the contrast provided by retaining the colors with reduced saturation: 2/15/2014 Tutorial – Converting BMP’s to SHR Files in Windows Page 9 of 21 Another example of a converted photo with reduced saturation: 640 x 400 24-bit BMP 320 x 200 mode3200 Brooks SHR Me with my Grandson - 2009 Default Options QCO and A6 – AKA Option QA By default these options are used, but if you change any options in BMP2SHR you must change all options (except when you force Brooks Output). Option A or Option T Threshold (color intensity) settings should always follow Option Q Quantization settings on the command line. Refer to the manual for a more detailed description of available options. Option 3200 – Option 3200 forces exclusive Brooks mode3200 Output using Option QA. This option disables other possible output. Option QA – Option QA combines the following two options. Option A6 - Back in the days of 16 color EGA Graphics we used thresholds to set from 4 color intensities of red, green, and blue (RGB) gun values to give us 64 possible colors. BMP2SHR uses thresholds to reduce color the same way; from 4 color intensities (option A4) to 10 color intensities (option A10). You can skip the thresholds especially for converting digital graphics of few colors, or for grayscale, but probably not for photos. Option QCO - Option QCO uses reduction of color depth to group colors to the16 most used colors per line and also preserves the original colors (from 4096 possible colors). This grouping is called the population method of quantization. It is a 2 dimensional method of grouping colors into horizontal sets rather than looking at a 3 dimensional group of pixels zone wide or image wide and merging those values through error diffusion or median-cut or some other way. Lower thresholds help, but color frequency (especially in backgrounds) destroys the photo of a human subject or of an object somewhat, creating false bands of colors when more and different colors are used in a background on one line than the next (photos are more inconsistent than digitally created images). 2/15/2014 Tutorial – Converting BMP’s to SHR Files in Windows Page 10 of 21 Depending on the photo, you may get your best results with BMP2SHR’s defaults. 2/15/2014 Tutorial – Converting BMP’s to SHR Files in Windows Page 11 of 21 Tutorial 3 - Editing Brooks Photo Output in Windows Paint Step 1 – Process and Review DIB Output We can also use another feature of BMP2SHR to fine-tune photo output. When BMP2SHR creates a Brooks Format 3200 Color SH3 file it also creates a 24 bit bmp file of the same basename as the original BMP but with a DIB extension (i.e. converting a photo called Biker.bmp also creates Biker.dib). This DIB file can be renamed to something else (like Biker2.bmp) and re-edited in Windows Paint to get rid-of wrong colors and then re-processed. As we see above, since BMP2SHR uses a population method to set its palette, some of the blue in the wet biker’s bathing suit took over the light area on her shoulders that was reflecting the sun. This was because a light color was not in the palette for the line, so the popular bathing suit color was smeared instead. Easy to see, and easy to fix! Now we can edit the DIB in Windows Paint, substituting a more suitable color from the same line by using the Eyedropper tool to select the color from another pixel in the same line, and the Pencil Tool or Fill tool to retouch the pixels. We need to do this in “fat bits” mode (In Windows Paint, View 400% is probably the easiest to see). 2/15/2014 Tutorial – Converting BMP’s to SHR Files in Windows Page 12 of 21 Step 2 – Edit DIB in Windows Paint Step 3 – Convert Edited DIB and Put On Disk Not much more can be done with photos as BMP2SHR now works. As far as additional quantization and tweaking goes, that’s likely best done with the large number of BMP and photo editors that are available besides Windows Paint. 2/15/2014 Tutorial – Converting BMP’s to SHR Files in Windows Page 13 of 21 Tutorial 4 - Creating a 640 x 200 SHR Screen File The elaborately dithered SHR 640 x 200 PNT files that we see on the GS have no direct equivalent on the IBM-PC. Here’s one reason why. Most PC images 640 wide had at least 16 colors, and many images 320 wide had only 4 colors, and not the other way around. The Plantronics Colorplus (a third party PC graphics adapter sold in 1982) offered 16 colors in 320 x 200 mode and 4 colors in 640 x 200. But few programs made use of these modes since the majority of PC graphics adapters of the day were standard CGA with only 4 colors in 320 mode and 2 colors in 640 x 200 mode. When EGA came along, most PC images 640 wide had 16 colors (and many EGA graphics had a higher vertical resolution of 350, not 200). So the availability of existing 640 wide 4 color digital graphics to convert from IBM files is rare. BMP Files of 640 x 200 x 4 Colors as some kind of standard are non-existent. The common aspect ratio of Windows Color Graphics was modeled after the VGA (Video Graphics Array) and 4:3 like 640 x 480 or 800 x 600, with 16 Colors or better. But you can still create these if you like by coloring CGA monochrome images, and converting them to 640 x 200 x 4 color SHR files using BMP2SHR: 2/15/2014 Tutorial – Converting BMP’s to SHR Files in Windows Page 14 of 21 The above file was originally a 640 x 200 IBM CGA Monochrome Image which I pasted into Windows Paint and colored using only 4 colors per line. It is hardly of the quality of many dithered SHR files created on the Apple II GS, but serves to illustrate what you might expect by converting an IBM-PC 4 color BMP. If you stay within the 4 color per line guidelines, and a maximum of 16 palettes you can get-away with doing this. If you have a VOC which displays 400 lines in mode400, and you convert a 640 x 400 BMP within these guidelines you can get double the vertical resolution. In this case you can reduce the colors in an EGA or VGA 16 color image to 4 colors per line easily in my ClipShop utility and save as a 640 x 400 large scale BMP suitable for conversion (640 x 400 and 320 x 200 are the fundamental sizes used and produced by ClipShop for saving, and clipboard pastes as well as viewing). But BMP2SHR was not written to replace Apple II GS programs like Super Convert any more than it was written to replace other GS graphics editors like Convert 3200. So you must do the palette work yourself, and this can be a long painstaking process on a complex image. Alex Lee has a good write-up on the work he has done with dithered images on the GS which you may want to read now: http://www.whatisthe2gs.apple2.org.za/the-perfect-gs-os-desktop-picture-or-how-to-getthe-most-of-the-640-x-200-super-hi-res-mode/ This even sounds like too much work. Tutorial 5 - Creating Dithered 640 x 200 SHR Images from SHR Files You can convert 640 x 200 dithered SHR files from dithered SHR files in PNT format using the native ProDOS 8 PICSAVE utility that comes with BMP2SHR. You can’t go wrong with PICSAVE because it saves the SHR memory of the GS or Apple //e with VOC or Carte Blanche directly. Read about it here: http://www.aztecmuseum.ca/extras/PicSave.pdf You can also use kegs32 screen captures or the CiderPress viewer or CiderPress’s extract conversion feature to aquire existing dithered screens in BMP format to convert using BMP2SHR. If the BMP can be converted to a dithered mode640 SHR it will be automatically converted. And if it started life as a dithered SHR and you don’t mess-up the dither pattern by adding a color to a line that doesn’t match BMP2SHR will be able to reengineer the palette correctly for round-trip conversion. ClipShop or some other editor which allows repalettization at the image level is a betterbet for changing colors while preserving dither integrity. 2/15/2014 Tutorial – Converting BMP’s to SHR Files in Windows Page 15 of 21 Using ClipShop to Prepare a Dithered Screen Grab After capturing a dithered SHR screen from kegs32 (or saving or capturing in CiderPress) and sizing it to a 640 x 400 24-bit BMP in Windows Paint, my ClipShop utility will load it and convert it to a 256 color BMP with colors intact. ClipShop has many features, including the ability to interoperate with Windows Paint and the ability to globally change palette colors, and also to save or paste in resolutions of either 640 x 400 (mode640) or 320 x 200 (mode320). Mode320 pastes and saving to BMP is supported in ClipShop using the same lossy approach that BMP2SHR uses for conversion, and mode640 compatible BMPs are also produced by ClipShop, so no need to put on an Apple II to view the results… just have a look in ClipShop and see if you want it or not. One of the features of ClipShop is the ability to map a color at the image level. Neither Windows Paint nor Microsoft Office Picture Manager can do this. ClipShop does a lot that Paint and Photo programs can’t do and is targeted at legacy graphics. So let’s say that I don’t like to see little girls in sailor suits that look like a hangover from a bad acid trip. Green hair is definitely out! So is purple hair for that matter. “Pleasing” colors are more appropriate to my old eyes. So I fire-up Ye Olde ClipShoppe and twice as quick as Elmer Fudd trying to catch that wascally wabbit, I click a couple of times, adjust a few colors and create a lame pastel version of the dithered image. It is so lame that even Canadian Border Services would not even think of checking the blonde sailor’s briefcase for belly-button studs or whatever girls with psycho-hair smuggle these days. 2/15/2014 Tutorial – Converting BMP’s to SHR Files in Windows Page 16 of 21 Here’s the results: BMP2SHR automatically converts our repalettized BMP without further ado: 2/15/2014 Tutorial – Converting BMP’s to SHR Files in Windows Page 17 of 21 Let’s see that again. The image below was saved to a Windows BMP using CiderPress’s extract feature, and after palette editing and re-saving in ClipShop, BMP2SHR converted the edited image back to SHR automagically (From Alex Lee’s Ultimate Desktop Pics… A little too bright for the top of my desk! Perhaps at Halloween!): But with apologies to Alex and a little tinting and remapping in ClipShop my mouse can take-off his sunglasses! Well, I am sure you get the idea. With BMP2SHR you can have your way in Windows when it comes to ultimately doing something arguably useless with the many dithered masterpieces from the GS that have no historical equivalent in PC Graphics. 2/15/2014 Tutorial – Converting BMP’s to SHR Files in Windows Page 18 of 21 Tutorial 6 – Two Options for Mode320 Conversion of 640 x 400 BMPs Converting Color BMP’s to SHR is about as straight forward as it gets. Color BMPs that match the SHR palette scheme will convert to a PIC file and are no problem (otherwise they end-up in Brooks Format which may not be a problem for you either). Simple converted 320 x 200 Color BMPs look the same on the GS: So far so good, but since the resolution of SHR is 320 x 200 and the resolution of Color BMP’s from PC legacy graphics is often 640 x 480 you will need to consider your tradeoff; BMP2SHR throws away extra pixels when converting color images wider than 320 except when a Color BMP meets the requirements for SHR’s 640 x 200 mode640. If you have a VOC you can repalettize a Color BMP to match mode640 and display the converted image in the VOC’s mode400 without resolution loss, but for normal SHR display, you will end-up with an SHR file with 75% of the image missing when a 640 x 400 Color BMP is converted.: However, BMP2SHR provides a Merge Option for 640 x 400 24 bit BMPs which may provide you with output that is a little more like the Original. Shown below are a series of BMPs converted from an EGA 640 x 350 x 16 Color Slideshow, resized in ClipShop to 640 x 400 then saved as 24 bit BMPs and converted with and without merge… 2/15/2014 Tutorial – Converting BMP’s to SHR Files in Windows Page 19 of 21 2/15/2014 Tutorial – Converting BMP’s to SHR Files in Windows Page 20 of 21 If you are having trouble viewing the above in detail use your zoom option in your pdf viewer and set it to 250%. (These small images are scaled to 40% so viewing at 250% will give you full-scale). Refer to the manual for a more detailed description of the M4 Merge options, and other available options. End of Tutorial – Additional Comments BMP2SHR functions well enough, but in the history of AppleDom, SHR Graphics is an Ocean of a Topic! And despite its admittedly limited capabilities, BMP2SHR is a Whale of a Graphics Converter. The Subject of PC Graphics is a Large and Long One as well. When one embarks on the journey of programming cross-legacy cross-platform Multiversal Graphics Converters and the Programs that use them, the devil is in the forgotten details that have vanished into the sands of time. It was for this reason; the very same reason that I resurrected the Aztec C Compilers, and other old things, and the very same reason that I have written MS-DOS and Windows graphics converters for every Apple II Graphics Mode, and the ClipShop Graphics editor; to both implement and preserve this knowledge in a functional form for those who may come after. Lofty goals indeed, but meaningless without the ability to access the details; hence this tutorial (and the BMP2SHR user manual). Neither of these documents is exhaustive (nothing is) but are intended to give you a starting point; not to present brilliant artwork (which I will leave to you). For me like most real graphics programmers, there is little challenge in doing so. But for those Apple II users and retro-computing enthusiasts who take their graphics seriously; it is for you that all of this has been written, including this tutorial, and made freely available. Please use BMP2SHR and pass-it-on to whoever you please, including the documentation, source code and demos that come with all of this, with my fervent hope that the history and details of the Apple IIGs’s SHR graphics (along with all legacy computer graphics) will persist long into the future so that others may enjoy the same fun with this old stuff that you and I enjoy today. So in other words, this is for guys like Osgeld and Jonas to use, and for guys like Charlie and Antoine and Rob to know about, so they know I was listening. The dithering stuff was done for Michael Mahon and of course for Alex Lee. And of course the whole thing was done for all of csa2 (including Andy McFadden and Tom Charlesworth) for keeping the old stuff alive and well and for their work on SHR as well as everything else. All the Best, Bill Buckels [email protected] February, 2014 2/15/2014 Tutorial – Converting BMP’s to SHR Files in Windows Page 21 of 21