1
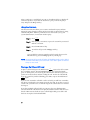
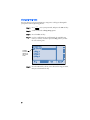
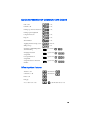
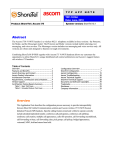
ShoreTel® 530/560/560g IP Phone
User Guide
Document and Software Copyrights
Copyright © 1998–2007 by ShoreTel, Inc., Sunnyvale, California, U.S.A. All
rights reserved. Printed in the United States of America. Contents of this
publication may not be reproduced or transmitted in any form or by any
means, electronic or mechanical, for any purpose, without prior written
authorization of ShoreTel, Inc.
ShoreTel, Inc. reserves the right to make changes without notice to the
specifications and materials contained herein and shall not be responsible
for any damage (including consequential) caused by reliance on the
materials presented, including, but not limited to, typographical, arithmetic,
or listing errors.
Trademarks
ShoreTel®, ShoreCare®, ShoreWare®, ShoreGear® and ControlPoint® are
registered trademarks of ShoreTel, Inc. in the United States and/or other
countries. ShorePhone™ is a trademarks of ShoreTel, Inc. in the United
States and/or other countries. All other copyrights and trademarks herein
are the property of their respective owners.
Patents
This product is covered by one or more of the following patents: United
States Patent 6,996,059, United States Patent 7,003,091. ShoreTel, Inc. All
rights reserved.
Version Information
PN 850-1079-02
ShoreTel Release 7.5
Revision 1
ShoreTel 530/560/560g IP Phone User Guide
Date: October 15, 2007
Company Information
ShoreTel, Inc.
960 Stewart Drive
Sunnyvale, California 94085 USA
Phone: +1.408.331.3300 OR +1.800.425.9385
Fax: +1.408.331.3333
www.shoretel.com
Contents
GETTING STARTED . . . . . . . . . . . . . . . . . . . . . . . . . . . . . . . . . . . . . . . . . . . . 5
Your Phone's Display . . . . . . . . . . . . . . . . . . . . . . . . . . . . . . . . . . . . . . . . 6
Guide to Status Icons. . . . . . . . . . . . . . . . . . . . . . . . . . . . . . . . . . . . . . . . 7
LOGGING IN . . . . . . . . . . . . . . . . . . . . . . . . . . . . . . . . . . . . . . . . . . . . . . . . . 11
MANAGING CALLS – BASIC FEATURES . . . . . . . . . . . . . . . . . . . . . . . . . . . . 12
Placing Calls. . . . . . . . . . . . . . . . . . . . . . . . . . . . . . . . . . . . . . . . . . . . . . . 12
Using the Handset . . . . . . . . . . . . . . . . . . . . . . . . . . . . . . . . . . . . . . 12
Using the Speakerphone . . . . . . . . . . . . . . . . . . . . . . . . . . . . . . . . . 12
Using the Headset . . . . . . . . . . . . . . . . . . . . . . . . . . . . . . . . . . . . . . 12
Answering Calls . . . . . . . . . . . . . . . . . . . . . . . . . . . . . . . . . . . . . . . . . . . . 13
Using the Handset . . . . . . . . . . . . . . . . . . . . . . . . . . . . . . . . . . . . . . 13
Using the Speakerphone . . . . . . . . . . . . . . . . . . . . . . . . . . . . . . . . . 13
Using the Headset . . . . . . . . . . . . . . . . . . . . . . . . . . . . . . . . . . . . . . 14
Sending a Call to Voice Mail . . . . . . . . . . . . . . . . . . . . . . . . . . . . . . 14
Diverting a Call . . . . . . . . . . . . . . . . . . . . . . . . . . . . . . . . . . . . . . . . . 14
Answering Additional Calls . . . . . . . . . . . . . . . . . . . . . . . . . . . . . . . . . . . 14
Transferring a Call . . . . . . . . . . . . . . . . . . . . . . . . . . . . . . . . . . . . . . . . . . 15
Making a Conference Call . . . . . . . . . . . . . . . . . . . . . . . . . . . . . . . . . . . . 15
Using the Intercom . . . . . . . . . . . . . . . . . . . . . . . . . . . . . . . . . . . . . . . . . 16
Placing a Call On or Off Hold . . . . . . . . . . . . . . . . . . . . . . . . . . . . . . . . . 16
Redialing and Checking Missed Calls . . . . . . . . . . . . . . . . . . . . . . . . . . . 17
AUDIO CONTROLS . . . . . . . . . . . . . . . . . . . . . . . . . . . . . . . . . . . . . . . . . . . . 18
Adjusting Ring Tone Volume . . . . . . . . . . . . . . . . . . . . . . . . . . . . . . . . . . 18
Adjusting Handset Volume . . . . . . . . . . . . . . . . . . . . . . . . . . . . . . . . . . . 18
Adjusting Headset Volume . . . . . . . . . . . . . . . . . . . . . . . . . . . . . . . . . . . 18
Adjusting Speakerphone Volume . . . . . . . . . . . . . . . . . . . . . . . . . . . . . . 18
Muting an Active Call . . . . . . . . . . . . . . . . . . . . . . . . . . . . . . . . . . . . . . . 18
VOICE MAIL . . . . . . . . . . . . . . . . . . . . . . . . . . . . . . . . . . . . . . . . . . . . . . . . . . 19
Logging Into the Main Menu. . . . . . . . . . . . . . . . . . . . . . . . . . . . . . . . . . 19
Logging In from Another Extension . . . . . . . . . . . . . . . . . . . . . . . . . . . . 19
Logging In from an External Phone . . . . . . . . . . . . . . . . . . . . . . . . . . . . . 19
Leaving a Message and Message Options . . . . . . . . . . . . . . . . . . . . . . . 24
OPTIONS . . . . . . . . . . . . . . . . . . . . . . . . . . . . . . . . . . . . . . . . . . . . . . . . . . . . 25
Changing Call Handling Mode and Forwarding . . . . . . . . . . . . . . . . . . . 25
Changing Automatic Off Hook Preference . . . . . . . . . . . . . . . . . . . . . . . 27
Changing Ring Tone . . . . . . . . . . . . . . . . . . . . . . . . . . . . . . . . . . . . . . . . 28
Programming Your Custom Buttons . . . . . . . . . . . . . . . . . . . . . . . . . . . . 29
Changing the Agent State . . . . . . . . . . . . . . . . . . . . . . . . . . . . . . . . . . . . 31
Enabling or Disabling Handsfree Mode . . . . . . . . . . . . . . . . . . . . . . . . . 32
DIRECTORY . . . . . . . . . . . . . . . . . . . . . . . . . . . . . . . . . . . . . . . . . . . . . . . . . . 33
MANAGING CALLS – ADVANCED FEATURES . . . . . . . . . . . . . . . . . . . . . . . 34
Programmable Custom Buttons . . . . . . . . . . . . . . . . . . . . . . . . . . . . . . . 34
3
Bridged Call Appearances. . . . . . . . . . . . . . . . . . . . . . . . . . . . . . . . . . . . 37
Silent Monitor / Barge In . . . . . . . . . . . . . . . . . . . . . . . . . . . . . . . . . . . . . 38
Extension Monitoring . . . . . . . . . . . . . . . . . . . . . . . . . . . . . . . . . . . . . . . 38
Answering a Monitored Extension's Call . . . . . . . . . . . . . . . . . . . . . 39
Whisper Page. . . . . . . . . . . . . . . . . . . . . . . . . . . . . . . . . . . . . . . . . . . . . . 39
Picking Up the Night Bell . . . . . . . . . . . . . . . . . . . . . . . . . . . . . . . . . . . . 40
Toggling the Hunt Group Status . . . . . . . . . . . . . . . . . . . . . . . . . . . . . . . 40
Overhead Paging. . . . . . . . . . . . . . . . . . . . . . . . . . . . . . . . . . . . . . . . . . . 40
Using Group Paging . . . . . . . . . . . . . . . . . . . . . . . . . . . . . . . . . . . . . . . . 41
Parking and Unparking Calls . . . . . . . . . . . . . . . . . . . . . . . . . . . . . . . . . . 41
CALL MANAGER SOFTWARE . . . . . . . . . . . . . . . . . . . . . . . . . . . . . . . . . . . . 42
WEB ACCESS . . . . . . . . . . . . . . . . . . . . . . . . . . . . . . . . . . . . . . . . . . . . . . . . . 43
TROUBLESHOOTING . . . . . . . . . . . . . . . . . . . . . . . . . . . . . . . . . . . . . . . . . . . 44
Viewing Phone Information . . . . . . . . . . . . . . . . . . . . . . . . . . . . . . . . . . . 45
Rebooting Your Phone . . . . . . . . . . . . . . . . . . . . . . . . . . . . . . . . . . . . . . 46
Adjust Display Contrast . . . . . . . . . . . . . . . . . . . . . . . . . . . . . . . . . . . . . . 46
QUICK REFERENCE OF COMMON STAR CODES . . . . . . . . . . . . . . . . . . . . 47
Office Anywhere Features . . . . . . . . . . . . . . . . . . . . . . . . . . . . . . . . . . . . 47
4
GETTING STARTED
Welcome to your ShoreTel™ IP phone! Your phone has many unique features,
including an intuitive visual interface, custom keys, quick dialer directory, call
handling modes for when you do not want to be disturbed, intercom,
conferencing and much more.
Handset with
Finger Rest
LCD Display
160 x 80 pixel, 2-bit grayscale
Scroll Button
Select options
in interface.
Speaker
Delivers
high
quality
wideband
sound.
Soft Keys
Context-sensitive
functions defined
on display.
Headset Jack
Dial Pad
Handset Jack
Audio Control Keys
Volume button controls
handset, headset, speaker,
and ring volume. Mute,
Speaker, and Headset keys
illuminated when functions
are active.
Function Keys
Perform core
telephony
functions.
Indicator LED
Flashing light alerts
the user to incoming
calls and unheard
voice messages.
Custom Keys
Can be configured as
call keys, monitored
extensions, or speed
dial keys. Six custom
keys with tri-color LED
indicators. (IP530
models have three
plain custom keys.)
Function Keys
overlay
Vinyl overlay
imprinted with
international
symbols
Microphone
NOTE This User Guide also applies to IP 530 Phone. The older 530 model
has three plain custom keys while the IP 560/560g models have six
custom keys with LEDs embedded.
5
Your Phone's Display
Your ShoreTel IP phone's display shows your name and extension, call
handling mode, call appearance, monitored extensions, calls, duration of call,
voice messages, date and time, soft key functions, and your phone’s operating
status.
ShoreTel 560/560g Idle Display
Your
Extension
Status Icon
Speed Dial
DID
Monitored
Extension
Missed
calls
IP phone
banner name
6
Soft key
functions
Call
handling
mode
Agent state
Unheard
voice
messages
Guide to Status Icons
Your ShoreTel IP phone offers icons to help indicate the operational state of
the device. The table below provides information about these icons, as well as
additional information about the LED colors and blink patterns associated
with the various operational states. LED color references apply only to the
IP560/560g models, which support three-color LED display for the custom
keys. Values shown in the table below apply to ShoreTel 6.1 (build
11.15.2603.0) and higher.
Icon
Blink
Icon
LED Color and
Blink Pattern
State
Call Appearance States
Off
Idle
Orange
Steady on
Idle and DND
Off
Idle and Message Waiting
Orange
Steady on
Idle, Message Waiting and DND
Green
Steady on
Off Hook
Green
Steady on
Active Call
Green
Steady on
Active Conference Call
Green
Steady on
Remote Hold
Green
1000ms on, 1000ms off
Offering Call
Orange
250ms on, 250ms off
Held or Parked Call or
Conference Call
7
Icon
Blink
Icon
LED Color and
Blink Pattern
State
Red
Steady on
Whisper Page Call
Red
Steady on
Active Call Whisper Muted
Extension Monitor States
Off
Idle
Orange
Steady on
Idle and DND
Off
Idle and Message Waiting
Orange
Steady on
Idle, Message Waiting and DND
Green
1000ms on, 1000ms off
Offering Call
Green
Steady on
Active Call Picked Up
Orange
250ms on, 250ms off
Held or Parked Call or
Conference Call
Red
Steady on
Monitored Ext. on Active Call
Red
Steady on
Monitored Ext. on Conference
Call
Green
200ms on, 100ms off,
700ms on, 1000ms off
Monitored Ext on active Call +
Offering Call
Green
800ms on
Picked up Monitored Ext. Call +
Monitor Ext on Active Call
Orange
200ms on
8
Icon
Blink
Icon
LED Color and
Blink Pattern
State
Orange
200ms on, 100ms off,
200ms on, 500ms off
Picked up Monitored Ext. Call
and Held + Monitor Ext on
Active Call
Orange
200ms on
Picked up Monitored Ext. Call +
Monitor Ext held Active Call
Green
800ms on
Orange
200ms on
Green
100 on
Bridged Call Appearance States
Off
Idle
Green
1000ms on, 1000ms off
Offering Call
Green
Steady on
Active Call Picked Up
Red
Steady on
Line In-Use
Orange
250ms on, 250ms off
Held or Parked Call or
Conference Call
Feature Key With Extension
Target States
Off
Idle or Offering Call
Red
Steady on
Connected or Held Call
Orange
Steady on
DND
Red
Steady on
(Dial/Transfer Mailbox Only) MWI
9
Icon
Blink
Icon
LED Color and
Blink Pattern
State
Green
1000ms on, 1000ms off
(Pickup, Pick/Unpark, Pickup
NightBell Only) Offering
Orange
250ms on, 250ms off
(Unpark, Pick/Unpark Only) Held/
Parked
Toggle Functions
(Record, Whisper Mute)
10
Off
Function Off
Orange
Steady on
Function Available
Orange
500ms on, 500ms off
Record Active
Orange
500ms on, 500ms off
Whisper Mute Active
LOGGING IN
If you are using your phone for the first time and no extension has been
assigned, the phone's display shows “Available.” You can place calls but not
receive them. You need to log in, change your password, record your name,
and assign your extension to this phone. To log in:
V o ic e M a i l
Step 1
Press
Step 2
Enter the extension number assigned to you by your system
administrator.
Step 3
If your system administrator assigned you a password, enter
it now (otherwise enter a default password of 1234), and
press
.
Step 4
Enter a new password followed by
. Check with your
system administrator for password length. Repeat to confirm
password.
Step 5
Record your name and press
following options:
.
, then press one of the
Accept
Review
Re-record
Delete
Cancel
Step 6
To assign your extension to this phone, press
mail options, and then press
Then, press
for voice
to re-assign the extension.
.
You are now logged in. Your phone can receive calls, and you can check for
new messages. With appropriate permissions (set by your system
administrator), you can log into any ShoreTel IP phone on your network to
assign your extension to that phone.
11
MANAGING CALLS – BASIC FEATURES
Placing Calls
Using the Handset
To place an internal call, pick up the handset and dial the extension. To place
an external call, dial the trunk access code, then the phone number.
To end a call, hang up the handset.
Using the Speakerphone
To place an internal call, press the Speakerphone button
and dial the
extension. To place an external call, dial the trunk access code, then the phone
number.
To end a call, press the Speakerphone button
again.
Using the Headset
To place an internal call, press the Headset button
and dial the
extension. To place an external call, dial the trunk access code, then the phone
number.
To end a call, press the Headset button
again.
The figure below shows the information that appears on your ShoreTel 560/
560g IP phone when an outbound call is placed. Note that the soft key
functions at the bottom of the window are different from those that appear
when the phone is idle – they now allow you to park the call or hang up.
Outgoing call: ShoreTel 560/560g
Duration
of call
Call
recipient’s
extension
12
Call
recipient’s
name
Soft key
functions
Answering Calls
Ring tones, the blinking Incoming Call Icon, and the flashing red LED light in
the top right-most corner of your phone all identify an incoming call on your
phone. A double ring signals an internal call, while a single ring signals an
external call. On ShoreTel 560/560g phones, the call key also blinks green.1
If the information is available, the caller’s name, number, and the incoming
call icon appear on your display, as shown in the figure below. (The caller's
name may be abbreviated to fit on one line.)
Incoming
call icon
Caller’s name or
phone number
Caller’s
extension
Trunk information
This will be the DNIS
(if applicable).
Otherwise, it is the
trunk group name and
trunk name.
Soft key
functions
Call duration
Dialed
Workgroup
name.
To answer the call, do one of the following:
Using the Handset
To answer a call, pick up the handset when the phone rings.
To end a call, hang up the handset.
Using the Speakerphone
To answer a call, press the Speakerphone button
lights green.
To end a call, press the Speakerphone button
. The LED in the button
again.
1. This behavior does not occur with IP530 phones, which lack LEDs in the
custom keys.
13
Using the Headset
To answer a call, press the Headset button
green.
To end a call, press the Headset button
. The LED in the button lights
again.
Sending a Call to Voice Mail
When an incoming call arrives, a To VM soft key becomes available, as shown
in the figure on the previous page. Press the To VM soft key to send the caller
directly to your voice mailbox.
Diverting a Call
You can send an incoming call to another extension or to an outside number
without answering it.
Tra n sfe r
Step 1
Press
Step 2
Enter the number, or press the extension's custom key.
Step 3
Press the Transf soft key to complete the transfer to an
extension.
.
Answering Additional Calls
With the appropriate permissions, you can receive up to 16 incoming calls at
once. (The maximum number is set by your system administrator.) If you
receive an incoming call while you are on the phone, you can press the
blinking call appearance button to answer the incoming call, and the current
call will automatically be put on hold.
Alternately, if the phone is out of call appearance buttons, you can interact
with multiple calls using Personal Call Manager.
If you receive an incoming call while you are on another call, you will hear a
beep on the call. To answer
the incoming call and put the current call on hold,
H o ld
press the Hold button
. To return to the previous call, press the call
appearance key.
14
Transferring a Call
To transfer a call from your extension to another number:
Tra n sfe r
Step 1
Press the Transfer button
Step 2
At the prompt, dial the number (or press the extension's
custom key, or use the Directory to find the party), then do
one of the following:
. The call is put on hold.
a
Complete a blind transfer by hanging up or by pressing
the Transf soft key.
b
Speak to the recipient before transferring by pressing the
Conslt soft key. After consultation, press the Yes soft key
to complete the transfer, or press the Cancel soft key to
abandon the transfer and return to the original call.
c
Consult by intercom by pressing the More soft key, and
then pressing the Intcom soft key.
d
Send the call to the recipient's voice mailbox by pressing
the More soft key, and then pressing To MB.
Making a Conference Call
To conference a party into a connected call:
C o n fe re n c e
Step 1
Press the Conference button
Step 2
Dial the extension of the party you would like to conference.
Step 3
Press the Confrn soft key to ring the party directly.
. The call is put on hold.
or
Dial the number and press the Conslt soft key to speak with
the recipient before ringing him or her into the conference
call. After consultation, press the Yes soft key to complete
the conference call, or press the Cancel soft key to return to
the original two-party call.
Step 4
Repeat to add additional parties.
With the appropriate permissions (set by your system administrator), you can
conference up to six parties into a single call.
15
After a conference is established, you can use the Show soft key to display all
conferenced parties. If you wish to disconnect a party, scroll to the party's
entry and press the Drop soft key.
Using the Intercom
The Intercom function allows you to connect with another party without
ringing the party through a call line. Both you and the recipient must be using
a ShoreTel IP phone and have permission to use this feature (set by your
system administrator). To intercom another party:
In t e r c o m
Step 1
Press
Step 2
Dial the party’s extension, or press the custom key associated
with the extension.
Step 3
Press the Intcom soft key.
Step 4
To end the call, press the HangUp soft key.
.
or
You can dial the recipient's number on the keypad, then press the
Intcom soft key; press the HangUp soft key to hang up.
NOTE An intercom call overrides all other call handling modes on the dialed
extension. This allows you to intercom a user whose phone is forward
always to voice mail.
Placing a Call On or Off Hold
H o ld
To place a call on hold, press the Hold button
, or press the call's custom
key, if available. On the ShoreTel 560/560g phone, the custom key blinks
green, at which point you can safely place the handset on hook (or press the
speaker or headset button) without ending the call. To take the call off hold,
press the custom key with the blinking green LED, or press the Hold button
H o ld
again.
If you are not on another call while a call is on hold, you will hear a reminder
ring in 15 seconds and at one-minute intervals after that. If you have received
several calls, you will receive a reminder ring for the call that has been on hold
the longest.
If you have multiple calls on hold, you can press the green blinking LED
associated with the call that has been placed on hold to answer that call. Note
that the LED associated with an active call will light solid green, while calls
that have been placed on hold will blink.
16
Redialing and Checking Missed Calls
You can use the Redial function to dial not only the last number you called,
but the last several calls you made and received, including those you missed
(denoted by the
icon). The date and time information appears directly
above the soft keys for the selected call. To redial a call:
Step 1
R e d ia l
Press
. Press it again to dial the last number you called
(see below).
or
Use the Scroll button to select the number you want to call,
then press the Dial soft key. (You can also press the Intcom
soft key to intercom an internal extension.)
Arrow indicates
there are more
selections
below
17
AUDIO CONTROLS
Adjusting Ring Tone Volume
To adjust the ring volume, while the handset is on hook and the speakerphone
is off, press
and
on the volume button. By pressing
repeatedly,
you can turn the ringer volume off.
Adjusting Handset Volume
To adjust the handset volume, while the handset is off hook,
press
and
on the volume button.
Adjusting Headset Volume
To adjust the headset volume, while the headset LED is illuminated,
press
and
on the volume button.
Adjusting Speakerphone Volume
To adjust the speakerphone volume, while the speakerphone LED is
illuminated, press
and
on the volume button.
Muting an Active Call
To mute the active call, press the Mute button
un-mute the call, press the button again.
18
. The LED turns red. To
VOICE MAIL
A steadily flashing light on your phone’s right-most upper corner and stutter
dial tone signifies that you have unheard messages. The number of unheard
messages appears on the idle screen of your phone’s display by the icon
.
Logging Into the Main Menu
V o ic e M a i l
To log in to the main voice mail menu, press the Voice Mail button
,
then dial your password followed by
. (Your default password is 1234.)
Logging In from Another Extension
To log in to the main voice mail menu from another extension, press the Voice
Mail button V o i c e M a i l , followed by
, then your extension, followed by your
password, and then
.
To log in to the main voice mail menu from an analog phone, press
,
then your extension, followed by your password, and then
.
Logging In from an External Phone
To log in to the main voice mail menu from an external phone, dial the voice
mail access number provided by your system administrator, press
, then
your extension, then your password followed by
.
Listening to and Interacting with New Messages
From the Main Menu, you can listen to and replay new messages by
pressing
. To interact with new messages, press one of the following:
Replay the message
Save the message
Delete the message
Forward the message
After recording the prefacing remark, press:
If correct
Review
Re-record
Cancel recording
After addressing the message, press
simply hang up to send the message.
to mark it urgent, or
Reply to the message
19
Choose one of the following options:
Reply with a voice message
Reply with a call back
Return to the previous menu
Hear envelope information (time and date sent)
Move backward
While listening to a message, you may “rewind” to several seconds
earlier in the message.
Pause
Move forward
While listening to a message, you may “fast forward” to several
seconds later in the message.
Followed by
to Transfer to Assistant
While listening to a message, you may contact the assistant to
inquire or share information about a voice mail.
Continue to next message
Cancel message review
Sending Messages from Voice Mail
From the Main Menu, you can send messages by pressing
. The
following options are available while recording your message:
Cancel
Done recording
Review
Re-record
After you are satisfied with your recording, you will be prompted to enter
the recipient’s extension. At this time, you have the option to press:
Additional addressing options
Look up recipient by name in a directory
Specify a personal distribution list
Broadcast to all extensions
Cancel addressing options
20
After the message is addressed, if desired, you can press:
Mark / unmark urgent
Request return receipt
Listening to Saved Messages
From the Main Menu, you can listen to saved messages by pressing
.
To interact with saved messages, press any one of the options under
“Listening to and Interacting with New Messages” on page 19 (except
for option 2).
Mailbox Options
Press
to access various options for your personal mailbox, then
press one of the following:
Record personal greeting
NOTE When you record a personal greeting, it is linked to the current
active call handling mode.
Record your personal greeting for the current active call handling
mode at the tone and press
, then select from the following
options:
Accept
Review
Re-record
Delete
Cancel
Choose call handling mode
For more information on call handling, see “Changing Call
Handling Mode and Forwarding” on page 25. The following modes
and options are available:
Standard
In a Meeting
Out of the Office
Extended Absence
Custom
Cancel
21
Reassign extension
If you have the proper permission, you can assign your extension to
any phone. The following options are available:
Assign the extension2
Unassign the extension (The phone reverts to the extension
originally assigned to it.)
To assign to your extension to your last external number.
Set your password
Enter your new password, followed by
Press
and repeat to confirm.
to cancel.
Disable or enable envelope information
Use this option to turn on/off the envelope information which
contains the date/time of the message, caller ID and/or the recorded
name of the person who left the voice mail message.
Record your name
Press
when you are finished recording your name, then choose
from the following options:
Accept
Review
Re-record
Delete and use default system recording
Cancel
Listen to your deleted messages
As a safeguard against accidental erasures, the system retains
deleted messages for a few hours. To listen to your deleted
messages, press
. Voice mail plays all the deleted messages still
available to the system. During playback, you can manage deleted
messages as if they were newly arrived messages. Press
to
restore the deleted message to a saved message.
Remove deleted messages
2. If you assign your extension to a phone that is normally occupied by
another user, calls to the original user’s extension will go to the forwarding destination as defined by their active Call Handling Mode.
22
The following options are available:
Confirm
Cancel
Additional options
The following additional options are available:
Enable or disable Outlook automated call handling
Change e-mail delivery options
Disable e-mail delivery
Enable e-mail delivery
Enable e-mail delivery with voice message attached
Mark voice messages heard after e-mail delivery
Change agent state
Log in and assign extension
Log out
Log in without assigning extension
Change Find Me forwarding state
By enabling Find Me, callers who are routed to your voice
mail box can be instructed to press 1 and the voice mail
system will call you at one of two possible numbers where
you can be located. To set the Find Me destinations, use
Personal Call Manager or Web Access.
Enable
Disable
Previous menu
Cancel current operation
Log Off
Return to Auto-Attendant
Transfer to Assistant
Hear Mailbox Status
Select this option to hear the number of unheard messages.
23
Leaving a Message and Message Options
When your call is sent to voice mail, you may leave a message when
prompted, or you can use one of the following options while listening to the
mailbox greeting:
Bypass greeting and leave a message, then hang up to send it.
Transfer to assistant.
Forward to recipient’s Find Me destination (an optional number where
calls can be forwarded) — if enabled; otherwise you will be prompted to
record a message.
Transfer to auto-attendant.
After message recording, select from one of the following options:
Message Options, then:
Send message
Cancel
Review
Re-record
Mark / unmark urgent
Transfer to auto-attendant
Transfer to assistant
Re-record
Send message, transfer main menu
Send message, forward to recipient’s Find Me destination, if enabled
Send message, transfer to auto-attendant
NOTE Hanging up sends the message.
24
OPTIONS
Changing Call Handling Mode and Forwarding
NOTE Use Personal Call Manager or Web Access to configure the modes with
different call forwarding destinations and personal greetings.
You can set one of five distinct call handling modes for your extension,
including four “Do Not Disturb” options to forward incoming calls or send
them to voice mail. You can record personal greetings, which are linked to the
active call handling mode.
By default, your phone is set to Standard mode, which allows you to answer
all incoming calls. Other mode options include In a Meeting, Out of Office,
Extended Absence, and Custom.
You can use the Options button
following:
Step 1
to select the desired mode by doing the
Press the Options button
and then
Step 2
O p t io n s
O p t io n s
, followed by your password
.
Verify that the 1. Call Handling is highlighted, as shown
below, and then press the Edit soft key.
Arrow indicates
there are more
selections
below
This user is not
a member of a
workgroup, so
Agent State is
unavailable.
Step 3
Scroll to the desired setting call handling mode (shown
below).
25
Asterisk
indicates
that this is
the current
mode.
Step 4
When the desired mode is selected, press the OK soft key
and then the Done soft key.
NOTE You can "one-touch" toggle between Standard and In a Meeting by
using the Mode soft key (located on the phone display) without having
to log in under the Options button.
You can also change the call forward destination for each call handling mode.
Step 1
Press the Options button
and then
26
O p t io n s
, followed by your password
.
Step 2
Verify that the 1. Call Handling is highlighted and then press
the Edit soft key.
Step 3
Select the desired call handling mode and press the Edit soft
key.
Step 4
Enter the desired number and press the OK soft key.
Changing Automatic Off Hook Preference
ShoreTel users who frequently use a headset may want to use the Automatic
Off Hook Preference feature to select which audio path (speakerphone or
headset) is automatically activated when placing or receiving calls. You can
control the call activity with Personal Call Manager.
To configure the Automatic Off-Hook Preference feature, follow the procedure
below:
Step 1
Press the Options button
and then
O p t io n s
, followed by your password
.
Step 2
Press 2 or scroll to the second option from the list 2. Auto
Off-Hook.
Step 3
With this option highlighted, press the Edit soft key.
Step 4
Scroll to 2. Headset (see below), and press the OK soft key
or select 1. Speaker to keep it on speakerphone.
Asterisk
indicates
that this is
the current
mode.
Step 5
Press the Done soft key.
27
Changing Ring Tone
You can choose between four distinctive ring tones to help you distinguish
your phone from neighboring phones.
O p t io n s
Step 1
Press
Step 2
Scroll to select the Change Ring option.
Step 3
Press the Edit soft key.
Step 4
Use the Scroll button to scroll through the available ring
tones (see below), and then press the Ring soft key to hear
the selected ring tone.
, enter your password, and press the OK soft key.
Asterisk
indicates
that this is
the current
mode.
Step 5
28
Press the OK soft key when you’ve chosen the ring you want,
then press the Done soft key.
Programming Your Custom Buttons
You can program the custom buttons on your IP 560/560g phone as shortcuts
to operations that would normally require pressing two or three buttons to
accomplish the same task.
To program the custom buttons on your IP 560/560g phone, follow the
procedure below:
NOTE Contact your system administrator to verify that you have permissions
to configure the programmable buttons on your phone before
proceeding.
Step 1
Press the Options button
and then
O p t io n s
, followed by your password
.
Step 2
Scroll through the list to option 4. Program Buttons, or press
4 on the keypad.
Step 3
Press the Edit soft key.
Step 4
Press the custom button that you would like to program.
Step 5
Scroll through the list of functions until you find the
function that you would like to apply to this button (see
below).
Arrow indicates
there are more
selections
below
Step 6
When you have highlighted the desired function, press the
Next soft key.
Step 7
Enter an extension or external number. Then, press the Next
soft key.
Step 8
Press the
soft key to shift the key pad between
numeric and alphabet mode, and enter a descriptive label no
29
longer than five characters that will remind you of the new
function of the custom button.
NOTE When in alphabet mode, press the appropriate key on the dial pad
multiple times to scroll through the alphabet letters associated
with that key. Example: For the letter ‘C’ you would press the #2
digit three times on the dial pad.
Step 9
Press the Done soft key.
Step 10 Press the Done soft key again to store your changes.
30
Changing the Agent State
If you are a member of a workgroup and you need to log in to the workgroup
at the start of your day, or log out to take a break, you can change your agent
state via the IP 560/560g interface.
Note that the Agent State option is only available if your PCM client type is
one of the following: Workgroup Agent, Workgroup Supervisor, or Operator.
To change the agent state on your IP 560/560g phone, follow the procedure
below:
Step 1
Press the Options button
and then
Step 2
O p t io n s
, followed by your password
.
Scroll through the available functions until you reach
5. Agent State, or press 5 on your keypad to highlight this
option, and then press the Edit soft key.
NOTE If the option is not available and you need access, contact your
system administrator to request a change to your client type.
Step 3
Available options for agents are LoggedIn and LoggedOut,
and available options for supervisors are Logged In, Logged
Out, and Wrap-Up. Scroll to the desired option (see below)
and press the OK soft key.
Asterisk
indicates
that this is
the current
mode.
Step 4
Press the Done soft key.
31
Enabling or Disabling Handsfree Mode
Handsfree mode is for analog telephone users who are using headsets.
NOTE IP phone users should instead choose the Auto Off-Hook Preference.
See “Changing Automatic Off Hook Preference” on page 27 for more
information.
With handsfree mode enabled, you can place or receive calls by using a
headset or the speakerphone, and you can stay off-hook and dial tone will not
be played. By default, handsfree mode is disabled. You can enable handsfree
mode by doing the following:
Step 1
Press the Options button
and then
O p t io n s
.
Step 2
Scroll to Handsfree Mode or press 6 on the keypad until 6.
Handsfree Mode is highlighted.
Step 3
Press the Edit soft key.
Step 4
Available options for Handsfree mode are Disabled and
Enabled. Scroll to the desired option and then press the OK
soft key (see below).
Asterisk
indicates
that this is
the current
mode.
Step 5
32
, followed by your password
Press the Done soft key to exit.
DIRECTORY
You can use the Directory to find phone numbers on your network by pressing
, then:
D ire cto r y
• Press the keys that correspond with the first few letters of the extension's
owner's first or last name to have the Directory narrow the number of
entries for you. Press
for a space in a person's name and press
for
any character. If you press an incorrect key, press the Back soft key to
delete the character.
• Press
and
on the Scroll button next to the display to select the
desired name. Press the Dial soft key to dial the number.
You can also use the Directory to make an Intercom call by pressing the
Intcom soft key on this screen, or when using
on its own, and also when
using transfer, park, unpark, and conference. See those sections in this guide
for more information.
In t e r c o m
The Directory also lists any keypad speed dials you have configured in
Personal Call Manager or ShoreWare Web Access when you press Speed soft
key. To dial a number from this screen, press and hold the corresponding
number on the keypad, or use the Scroll button to select an entry, then press
the Dial soft key.
33
MANAGING CALLS – ADVANCED FEATURES
In addition to performing the regular functions of placing calls and answering
calls, your phone supports several other advanced functions. If you use any of
these features on a regular basis, you may benefit by having your system
administrator assign the desired function to the custom keys on your phone.
Programmable Custom Buttons
The 560/560g IP phone has six custom buttons that can be programmed with
different functions. The system administrator can configure the custom
buttons via ShoreWare Director on behalf of a user or can enable permissions
for an individual user so that the user can modify the custom buttons on the
IP phone via the telephone interface.
The list below contains the different functions that can be assigned to the
buttons of a phone, allowing you to create shortcuts for operations that would
normally require pressing two or three buttons.
• Barge In – Barge In allows users with proper permission to enter into an
existing call. This feature is useful for certain users including operators,
executive assistants, trainers, and ACD supervisors that must enter calls
for important business reasons. A custom key can be programmed to
invoke the barge in feature as well as optionally include a specific
extension for quick, one-touch feature operation. If you need this
feature, please review with your system administrator.
• Bridged Call Appearance – Bridged Call Appearances shares call
appearance information across many separate IP phones, offering the
benefit of faster call handling between users. The feature is intended for
key system environments (small offices or branch offices), such as an
auto dealership or small bank with 4 trunks and 8 IP phones. Please refer
to “Bridged Call Appearances” on page 37 for more information about
managing calls using Bridged Call Appearances.
• Call Appearance – Call appearance represents a phone call on your
extension. Please refer to “Answering Additional Calls” on page 14 for
more information about managing calls on your extension.
• Conference Blind – The ShoreTel system allows you to conference up to
three parties (six depending on configuration) without having to consult
with each new party before they enter the conference call. Please see
“Making a Conference Call” on page 15 for more information.
• Conference Consultative – The ShoreTel system allows you to
conference up to three parties (six depending on configuration) allowing
you to consult with each new party before they enter the conference call.
Please see “Making a Conference Call” on page 15 for more information.
• Conference Intercom – The ShoreTel system allows you to conference up
to three parties (six depending on configuration) allowing you to consult
using the intercom with each new party before they enter the conference
call. Please see section “Making a Conference Call” on page 15 for more
information.
34
• Dial Mailbox – The ShoreTel system allows you to call another user's
mailbox without ringing their phone. If you use this feature often,
contact your system administrator about programming a custom key. A
custom key can be programmed to invoke the dial mailbox feature as
well as optionally include a specific mailbox for quick, one-touch feature
operation.
• Dial Number (Speed Dial) – The ShoreTel system allows you to program
custom keys on your phone for speed dial, allowing you to dial an
extension or an external number with one touch.
• Intercom – The ShoreTel system allows users with the proper permission
to intercom other users on the system. When you intercom another user,
instead of their phone ringing, the called party will hear a tone then you
will be connected to their speakerphone. The dialed user must be using a
ShoreTel IP phone for proper operation. In addition to the fixed function
key, a custom key can be programmed to invoke the intercom feature
with a specific extension for quick, one-touch feature operation. Please
see “Using the Intercom” on page 16 for more information.
• Monitor Extension – The ShoreTel system allows users with proper
permission to monitor the extension of another user. This helps manage
incoming calls for that extension, and it also serves as a shortcut when
performing one of the following functions: dialing that extension,
transfer, conference, call parking, call pickup and intercom to that
extension. Please see “Extension Monitoring” on page 38 for more
information.
• Page – The ShoreTel system allows users with proper permission to
access the overhead paging system (or page a group of ShoreTel IP
phones), dial the number given by the system administrator, wait for the
confirmation tone, and then begin speaking. The message will be
broadcast over the on-site loudspeaker or through the speakers of the IP
phones. Please see “Overhead Paging” on page 40 and “Using Group
Paging” on page 41 for more information.
• Park – The ShoreTel system allows users to park a connected call on
another extension. Please see “Parking and Unparking Calls” on page 41
for more information.
• Park and Page – This also allows a user to park a call and simultaneously
do an overhead page.
• Pickup – The ShoreTel system allows users with proper permission to
pick up a ringing extension.
• Pickup Night Bell – The ShoreTel system allows calls to route to an
extension that will ring on an overhead speaker. This feature can be
convenient for off-hours when a caller needs to speak with anyone at a
site.
• Pickup/Unpark – The ShoreTel system allows users to park a connected
call on another extension, or unpark the call after it has been parked.
Please see “Parking and Unparking Calls” on page 41 for more
information.
• Record Call – The ShoreTel system allows users with proper permission
to record active calls they are currently on. This feature is useful for
certain users including writers, interviewers, sales people, lawyers that
35
•
•
•
•
•
•
•
•
•
36
must record calls for important business reasons. A custom key can be
programmed to invoke the record feature for quick, one-touch feature
operation. If you need this feature, please review with your system
administrator.
Record Extension – The ShoreTel system allows users with proper
permission to record an active call on another extension. This feature is
useful for certain users including ACD supervisors that must record calls
for important business reasons. A custom key can be programmed to
invoke the record feature as well as optionally include a specific
extension for quick, one-touch feature operation. If you need this
feature, please review with your system administrator.
Send Digits Over Call – The ShoreTel system allows users to send a
preconfigured set of DTMF tones out a trunk during a call. This feature is
useful to quickly navigate external IVR systems as well as external
systems requiring an account code. A custom key can be programmed to
invoke the send digits feature as well as include desired digits to be sent
for quick, one-touch feature operation. If you need this feature, please
review with your system administrator.
Silent Monitor – The ShoreTel system allows users with proper
permission to silently monitor a call on another extension. This feature is
useful for certain users including ACD supervisors that must monitor
calls for important business reasons. A custom key can be programmed
to invoke the silent monitor feature as well as optionally include a
specific extension for quick, one-touch feature operation. If you need
this feature, please review with your system administrator.
Transfer Blind – The ShoreTel system allows you to transfer a call to
another party without having to consult with that party before
completing the transfer. Please see “Transferring a Call” on page 15 for
more information.
Transfer Consultative – The ShoreTel system allows you to transfer a call
to another party allowing you to consult with that party before
completing the transfer. Please see “Transferring a Call” on page 15 for
more information.
Transfer Intercom – The ShoreTel system allows you to transfer a call to
another party allowing you to consult with that party using intercom
before completing the transfer. Please see “Transferring a Call” on
page 15 for more information.
Transfer to Mailbox – The ShoreTel system allows you to transfer a call
directly to another party's mailbox. Please see “Diverting a Call” on
page 14 for more information.
Transfer Whisper – The ShoreTel system allows a user with the proper
permission to break into an active call and communicate with one party
without the other party hearing the second ongoing conversation. In this
way, the user can consult with the other party before transferring the call
to him or her. In turn, the call recipient can respond privately (using the
whisper mute feature) without the other party hearing him or her.
Unpark – The ShoreTel system allows users to unpark a connected call
from another extension. Please see “Parking and Unparking Calls” on
page 41 for more information.
• Whisper Page – The ShoreTel system allows users with the proper
permission to enter a call on another extension and whisper to the
recipient without the other party hearing. The call recipient can talk back
to you privately using the whisper page mute feature.
• Whisper Page Mute – If you receive a whisper page, you can speak
privately back to the person using the whisper page mute feature.
Bridged Call Appearances
The Bridged Call Appearances (BCA) feature provides "bridged" information
between many IP phones, offering the benefit of faster call handling between
users. The feature is intended for key system environments, such as a branch
office, auto dealership, or a small bank with 4 trunks and 8 IP phones.
The way the feature works is that a custom button on each IP phone is
configured such that it will blink green when an inbound call arrives on the
extension associated with that BCA. If someone answers the call, the LED on
that person's phone turns solid green while the custom button on all of the
other IP phones turns red. In this way, information about the call to this BCA
extension is shared (or “bridged”) across the many phones in different parts of
the organization.
If you place an outbound call from a bridged call appearance extension, other
users can view the call activity. You can place an outbound call from a BCA
extension by pressing the BCA custom button, dialing the trunk access code
and then dialing the number. The LED on your phone turns solid green, and
the associated button turns solid red on all of the other phones. If the call is
placed on hold, the associated LEDs on all phones blink green. A button can
be programmed for each position in the call stack.
NOTE Pressing the top-most BCA custom button for outbound calls does not
necessarily access trunk 1. There is no one-to-one correlation between
the custom buttons programmed for BCA extensions and a particular
trunk. Outbound calls will follow the routing table defined by the
system administrator.
Another benefit of the BCA feature is that an outbound caller-id can be
associated with that button (configured by the system administrator). The
following rules determine which caller-id is displayed when an outgoing call is
made using BCA:
• Outbound to an internal extension – the name and number of the user
that initiated the BCA call will be used, and if that user is a "private" user,
then the caller-id is blank.
• Outbound to an external number – the caller-id will be used in following
order, based on availability:
• Outbound caller-id configured for that BCA
• DID number configured for that BCA
• External identification or caller-id number of the user that initiated
the BCA call
37
• Outbound to an external emergency number (such as 911) – the
emergency identification or a CESID number of that user will be sent.
For more information about Bridged Call Appearances, see your system
administrator. The system administrator can configure your bridged call
appearances to deliver Caller ID on inbound call, display Caller ID on active
calls, as well as turn on, turn off or delay the ringing on inbound calls.
Silent Monitor / Barge In
With the appropriate permissions (set by your system administrator for both
your phone and the target phone), you can listen to a call without being heard,
or join a call as a fully conferenced participant (“barge in”).
• To silently monitor a call, dial
the call is active.
• To barge in on a call, dial
call is active.
, then the extension on which
, then the extension on which the
NOTE If you use the Silent Monitor and Barge In features often, you should
have your system administrator configure a custom key to provide
one-button operation. See “Programming Your Custom Buttons” on
page 29 for more information.
Extension Monitoring
A monitored extension is a custom key (set by your system administrator) that
helps you manage incoming calls for that extension. It also serves as a shortcut
when performing one of the following functions: dialing that extension,
transfer, conference, call parking, call pickup and intercom to that extension.
Additionally, you can see when the monitored extension has unheard
messages by the
icon.
The ShoreTel 560/560g phone displays icons in the monitored extension's
label area to help you determine the operational status of the monitored
extension.
38
Answering a Monitored Extension's Call
In addition to the visual cues the monitored extension's icons and custom key
LED provide, you will also hear a different ring when a call comes in, and if
you're on a call, you will hear a higher pitched call waiting tone.
An incoming call for a monitored extension appears on your phone like this
(below):
Monitored
extension
Monitored
extension
name
Caller’s name
Caller’s number
Call
duration
Monitored
extension
You can pick up the call while it is ringing by pressing the custom key or by
pressing the Answer soft key. You can send it to the monitored extension's
voice mail by pressing To VM. You can also answer a call after the owner of
the monitored extension has put it on hold by pressing the Pickup soft key.
When you put a call that has come in to the monitored extension on hold, the
call is parked on the owner's phone, so that either of you may pick up the call
again.
The system administrator can configure your monitored extensions to deliver
Caller ID on inbound call, display Caller ID on active calls, turn on, turn off or
delay the ringing on inbound calls.
Whisper Page
With the appropriate permissions (set by your system administrator for both
your phone and the target phone), the Whisper Page feature lets you break
into an active call in order to speak with an internal user. This occurs without
the remote caller hearing the interruption and without you hearing the remote
caller.
To issue a Whisper Page to another user who is on a call, dial
, plus
the extension of that user. Note that the recipient must be on an IP110, IP210,
IP212k, IP230, IP530 or IP560/560g handset. If a Whisper Page call is sent to
39
any other phone (e.g., IP100, SoftPhone, or analog phone) the call will appear
as a second incoming call.
NOTE If you use the Whisper Page feature often, you should have your
system administrator configure a custom key to provide one-button
Whisper Page operation. See “Programming Your Custom Buttons” on
page 29 for more information.
Picking Up the Night Bell
A night bell, when activated by your system administrator, allows calls to
route to an extension that will ring on an overhead speaker. This feature can
be convenient for off-hours when a caller needs to speak with anyone at a site.
If you have access to the night bell function (set by your system
administrator), dial
to answer the call at your site.
If you hear an error tone when you try to pick up the night bell, the night bell
may not be configured at your site or you may not have the necessary
permissions. Contact your system administrator if this occurs.
NOTE If you use the Night Bell feature often, you should have your system
administrator configure a custom key to provide one-button Night Bell
operation. See “Programming Your Custom Buttons” on page 29 for
more information.
Toggling the Hunt Group Status
With the appropriate permissions, you can toggle the hunt group status from
busy to not busy (or vice versa) by dialing
, plus the extension of
the hunt group. This feature is especially useful when hunt group members
are in a meeting or leave work early. If you are a member of more than one
hunt group, you must enter the extension associated with the desired hunt
group after dialing the access code above.
Overhead Paging
If you have permission (set by your system administrator) to access the
overhead paging system, dial the number given to you by your system
administrator and wait for the confirmation tone, and then begin speaking.
Hang up when you are finished.
If you hear an re-order tone or intercept tone when you try to page, paging
may not be configured at your site or you may not have the necessary
permissions. Contact your system administrator if this occurs.
40
Using Group Paging
Similar to the paging feature, you can also send an audible message to a select
group of users that have been configured for group paging. By dialing the
paging group extension associated with those users, you can record a message
that will be broadcast over the individual speakers of those users’ ShoreTel IP
phones.
To use this feature, dial the Group Paging Extension given to you by your
system administrator and wait for the confirmation tone. After you hear the
tone, begin speaking. Note that you are creating a recording that will be
broadcast to the other members of the Paging Group. Hang up when you have
finished recording.
Parking and Unparking Calls
With the appropriate permissions (set by your system administrator), you can
park a connected call on another extension by doing the following:
Step 1
Press the Park soft key.
Step 2
Dial the extension, press its custom key, or use the Directory
to find the party.
Step 3
Press the Park soft key again. To unpark the call, press
Unpark, repeat step 2, and press Unpark again.
NOTE If you use the Park or Unpark feature often, you should have your
system administrator configure a custom key to provide one-button
park operation. See “Programming Your Custom Buttons” on page 29
for more information.
41
CALL MANAGER SOFTWARE
In addition to using the telephone interface of your 560/560g IP phone to
access the ShoreTel features, you can accomplish many of the same tasks with
ShoreTel’s Call Manager software. ShoreTel's Call Manager software provides a
visual, information-rich interface for managing and controlling
communications – both telephone calls and voice mail.
The user-friendly interface lets you access all of the features and functions of
your ShoreTel IP phone system, including unified messaging, point-and-click
call management, customizable call-handling, and visual voice mail from your
Windows-based PC.
The software works in concert with your 560/560g IP phone to let you
perform the following tasks:
•
•
•
•
•
dial by name or number
change the call handling mode
open a SoftPhone session
keep a 1000-line call history of inbound, outbound, and missed calls
interact with voice messages from your PC
Call Manager frees you from fruitless tasks like playing phone tag, looking up
numbers, struggling to set up conference calls, or interacting with voice mail
messages. Integrated presence eliminates phone tag by letting you know if a
line is busy or if an employee has redirected calls to another destination – all
before dialing. And a visual display of up to 16 callers lets you switch from one
caller to another, transfer callers to another destination, or initiate a
conference with a simple mouse click.
ShoreTel’s Call Manager software comes in five flavors, each offering access to
slightly different capabilities and feature sets:
•
•
•
•
•
Personal Call Manager
Advanced Call Manager
Workgroup Agent Call Manager
Workgroup Supervisor Call Manager
Operator Call Manager
For more information about Personal Call Manager and what features are
available to you, see your system administrator.
42
WEB ACCESS
ShoreTel Web Access is a browser-based interface by which users can manage
personal options and settings from any web browser from anywhere in the
world. Call handling details and notification settings can be managed securely
and easily from anywhere.
For more information about web access and what features are available to you,
see your system administrator.
43
TROUBLESHOOTING
Problem: The voice mail system is notifying your callers that your mailbox has
exceeded its limit and is unable to accept new messages.
Solution: The voice mail system includes recently deleted messages still
residing in the mailbox in the total count.3 If your mailbox is full, first purge
any backlog of deleted messages:
Step 1
At the Main Menu prompt, press
Step 2
Press
to remove deleted messages.
Step 3
Press
to confirm deletion.
.
Problem: Your display reads "No Service."
Solution: Your phone is temporarily inoperable. Contact your system
administrator.
Problem: No one can hear you when you talk on the speakerphone.
Solution: Check for objects (e.g. coffee cups, books, etc.) blocking the
microphone. Also, you should check your volume settings.
Problem: Your display is blank.
Solution: You have no power. Ensure the network cable is connected to the
LAN port on the phone and the appropriate network data port in your office
space. Additionally, check to see if you have a local AC power adapter plugged
in for your phone or if power is being supplied by a PoE switch on your
corporate network. Contact your system administrator if this does not correct
the issue.
Problem: You have no dial tone when you go off hook, but otherwise your
phone is working normally.
Solution: You have activated "Handsfree Mode," which is a feature used by
someone with an analog phone using a headset. See “Enabling or Disabling
Handsfree Mode” on page 32 for information on how to turn this feature off.
3. The system will prompt you that your mailbox is full the next time you
log into voice mail.
44
Problem: Your phone’s display does not show the date and time.
Solution: Your phone cannot locate the time server. Contact the system
administrator.
Viewing Phone Information
To view information about your phone, such as IP address, subnet mask,
version, and MAC address, follow these steps:
Step 1
With the phone on hook, press the Mute button
.
The LED should not light and you shouldn't hear any tones;
if this isn't the case, lift and replace the handset.
Step 2
Dial I-N-F-O on the keypad and then press
.
The following information is displayed and can be scrolled
through by pressing
:
• IP Address (DHCP)
• Subnet Mask
• Gateway
•
•
•
•
•
•
•
•
•
•
•
•
•
•
•
•
Link Speed4
FTP Server
Media Gateway Controller (MGC) Server
SNTP Server (IP address)
802.1Q VLAN ID setting
Application File Name
Boot File Name
Config File Date
Country
Language setting
Application Version
Boot Version
Model Number
MAC Address
Serial Number
Hardware Version
4. Number reflects speed for both ports.
45
Rebooting Your Phone
To reboot your phone, follow these steps:
NOTE This should only be done at the direction of your system administrator.
Step 1
With the phone on hook, press the Mute button
.
The LED should not light and you shouldn't hear any tones;
if this isn't the case, lift and replace the handset.
Step 2
Dial R-E-S-E-T on the keypad and then press
phone reboots.
. Your
Adjust Display Contrast
To adjust the contrast of your display, press and hold
while repeatedly
pressing
and
on the Scroll button (located to the left of the telephone
display) to add more or less contrast.
46
QUICK REFERENCE OF COMMON STAR CODES
Park a call
+ ext.
UnPark a call
+ ext.
Picking Up a Remote Extension
+ ext.
Picking Up the Night Bell
Using the Intercom
+ ext.
Barge In
+ ext.
Silent Monitor
+ ext.
Toggling the Hunt Group Status
+ HG ext.
Whisper Page
+ ext.
Changing Call Handling Mode
and Forwarding
V o ic e M a i l
+ password +
+
Changing Extension
Assignment
V o ic e M a i l
+ password +
+
Unassign Extension
Assignment
V o ic e M a i l
+ password +
+
Assign Extension to External
Number
V o ic e M a i l
+ password +
+
Office Anywhere Features
Transfer a call
+ destination +
Conference a call
+ destination +
Hold a call
Hang up
Access other star codes
+
?? (from table above)+ ext.
47
48