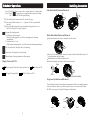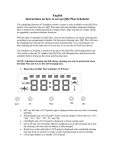
1
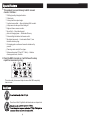
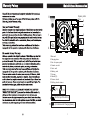
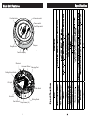
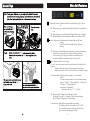
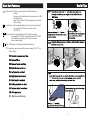
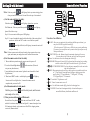
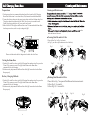
Table of Content
1
1
2
2
3
4
7
8
9
10
11
13
14
15
Setting ID with Main unit
17
19
21
22
Safety Precautions
Safety Instruction
24
Special Feature
1. This product is a revolutionary robotic vacuum
cleaner. It utilizes :
· 2 Rolling brush by triangle allocation .
· 2 Side brush .
· 2 storey dust bin unique design .
· 2 option clean method --- Non-collided and Soft-touched .
· 6 drop sensors to keep unit from falling off .
· High and silence vacuum suction .
· Sonic-Wall --- Virtual blocking unit .
· Auto self-charging base --- Smart and efficiency .
· Ultraviolet light to disinfect air from air outlet .
· Spot spiral movement --- Used remoter Mode 1, from
inside to outside cycling .
· All cleaning parts could renew from unit outside and by
yourself .
Cleaning
a wide variety of floor types .
·
· Optimum dimension 33*8cm(13*3.1inch) --- Enables
cleaning under beds, furniture .
2. Once the QQ5 is turned on, it will follow a five step
repetitive movement cycling :
Spot-
Spot-
Spot-
Spot-
This wide variety of movement helps to ensure that QQ5 completely
cleans a room.
Cautions
Do not touch the UV light bulb with bare hands or sharp article.
Warranty Polocy
Main Unit and Accessories
Spare parts
box
8
3
7
1
2
5
4
6
1.Main unit
2.Charging base
3.Box for spare parts
4.Remote control
5.Sonic-wall
6.Battery pack
7. Charger
8.Manual(*2)
9. Cleaner brush
10.Rolling-brush cleaner
3:
9:
10:
(*2)
(*2)
(On the top of dust bin)
(On the back of Charging base)
3
Specification
Main Unit Features
Dust-bin button
Remote control
Power switch
10
( 3ft )
Start/Stop switch
9
Bumper
Charger inlet
Wheel set
Universal-Wheel Charging-Pad
Rolling-Brush-Switch
UV-Light
Side-Brush
Air-outlet
Dust-bin unit Drop-Sensor(*6)
4
Rolling-Brush
Spot
RF
Function display
Main Unit Features
Useful Tips
:Main Power button : Push button then blue symbol light-up, QQ5 is power
QQ5
on.
TIP : During cleaning, if symbol is light-blinking in Red color, means BatteryLow.
TIP : During charging, if symbol is light-blinking in Blue, means "Charging".
TIP : During charging, if symbol is light-up in Blue, means Charged-Fully.
QQ5
:Start / Stop button : Push button and blue symbol light up, QQ5 start
working.
Push button and blue symbol light off, QQ5 stop
working.
TIP : During period 24hr of Main-Power-Button on, you also can use Remotecontrol to Power-on and Start / Stop QQ5. ( When QQ5 did not
work over 24hr, QQ5 will power-off itself to protect battery life.
You must push Main-Power-Button again to wake up QQ5.)
QQ5
QQ5
:
Timer/ Movement Mode / Error, display :
1. Timer : Yon can use remote-controll setting clean time, 80→60→40→20→
80 repeat.
During cleaning, the timer will be countdown the setting time.
(When next time turns on.Timer will be followed your last time setting)
QQ5
QQ5
2. Movement Mode : When QQ5 start working, it is set "Automatic
Mode".
You can use remote-control to choice 6 kinds movement
pattern : "1 Spiral", "2 Special-Bounce", "3 Along wall",
"4 S shape" , "5 Polygonal Spiral",
and return to "A Automatic".
The display will show "1" ~"5", and "A".
TIP : When you push "Battery" button of Remote-control.
The display will show "H", it means go "Home" to charge battery.
QQ5 will search "Charging base" then charging.
3. Error message: When QQ5 was unreasonable stop working.
The display will show "Error number" as "E1〜E10".
You can see the message on the Label of QQ5 bottom
side, or trouble shooting guide of Page ?.
5
Main Unit Features
Main Unit Features
Useful Tips
:Soft-touched: If the blue symbol light-off, the QQ5 will avoid
QQ5
collision.
You can push "collided"button of remote-control, to ONOFF the function.
When "Non-collided" ON, the bumper sensor will help
QQ5 cleaning.
:Suction Fan : The blue symbol light-up, the Suction-fan is activated.
You can push "Fan" button of remote-controll,
to ON-OFF it.
:
QQ5
QQ5
:UV Light : The blue symbol light-up, the UV-Light is activated.
You can push "UV" button of remote-controll, to ON-OFF it.
(When QQ5 start working, the UV Light is followed
your last time setting)
:
Error : If QQ5 got error, the Red symbol will be light-up.
TIP : Same time,you can see what kind error message "E1~E11" on
"Timer" display.
38cm
QQ5
E11:Battery over heating
QQ5
6
19
Remote Control Function
Setting ID with Main unit
Note: If the two symbol
Forward
are all light up (before you s tart setting), please
clear previous ID of Main unit. You can follow the step of instruction f.
Left
c) Let the sonic wall start to study:
Timer
are all light up,please clear previous
If the three symbol
ID of Main unit ;If the any one of three symbol
10.Collided
UV light
is not light up,
please follow below steps.
Home
Right
Reverse
Start/Stop
Mode
Vacuum Moror ON/OFF
Power ON/OFF
Step 1: Power on sonic wall the power LED light up ;
Step 2: Use one of toothpick to inset the hole at the back of the sonic wall and
press down, when it emit ’’BI’’ sounds ,one of the three symbol
Function of each Button:
1.
(must light off before) will light up, it means the sonic wall
complete the study .
Note: If there are more sonic walls need to study, please operate above steps
again, and at most you can play three sonic walls at the same time.
d) Let the remote control start to study:
1 Take out the battery to make sure the remote control is power off.
2 Press the Left and Right buttons
not press any other buttons)
at the same time. (Please do
3 Insert the battery for remote control. (please do not release the Left and
Right buttons)
’’
4 When heard DI-DI’’ sounds ,and the display symbol
5.
6.
7.
8.
9.
e) Let the main unit exit study mode:
to exit the study mode ,and the main
unit complete the study.
f) Clear previous information of Main unit:
’’
Press the Start / Stop button
all the time, until heard DI - DI ’’ sounds,
,
and all of six indicator lamps symbol are light off, it means cleared previous
ID of main unit already, and you must reset all of ID for charging station,
sonic- wall, Remote control.
18
3.
4.
will light up
(do not care if it was light before), it means the remote control
complete study or renew the ID.
Push the power button
2.
10.
ON/OFF: After power on main unit (by push down the Main power button), you
can press ON/OFF keypad to control QQ5.
(If the last power off QQ5 was over 24Hr, for power saving and battery
life reason, you can not power on by remote control, please power on by
Main power button)
START/STOP:Press the Button to begin the automatic cleaning of the room.
Or to stop the activity of the unit, and it will emit a long sound.
Timer: Use this button to set the cleaning time of the QQ5.
FORWARD: When press Forward, QQ5 go forward and the suction fan is working,
until user release the keypad. If touched obstacle, QQ5 will return.
LEFT/RIGHT/REVERSE:Use these buttons to manually drive the unit to the
right, left and backward
MODE: Movement pattern selected, press the keypad once to make the unit clean
in :"1" Spot Spiral ( From small spiral to bigger, then bigger spiral to
small, cycling ) "2" Special Bounce, "3" Along wall, "4" S sharp,
"5" Polygonal Spiral, "A" Automatic.
UV: Control the UV light turn on or off.
VAC: Control vacuum motor on or off.
Home: Use this Button to make QQ5 go back to the charging base.
COLLIDED: Control unit cleaning method by soft-touched bumper or
non-collided.Battery Installation and Removal
Setting ID with Main unit
Battery Installation and Removal
1.Please follow below drawing, step by step to install battery.
Step 1: Push down button, same time, pull out dust-bin.
Step 2: Let QQ5 flip over. Follow the Arrow direction of battery, and
take battery into slot.
Step 3: Let plastic hook lock battery ready.
Step 4: Put back dust-bin into QQ5.
Step 1
Step 2
Purpose:
If lost or buy new one of charging base, sonic wall, remote control.
You need setting ID into new unit for communication with QQ5.
How to set up ID:
Status of main unit indicator lamps when
studying:
Remote
control
Push down “Button", same
time Pull out "Dust-bin"
Charging station 1 Chargi ng station2 Sonic wall 1 Sonic wall 2 Sonic wall 3
Light up ------- Means the ID has been used already
Light off ------ Means the ID has not been used yet
Step 3
Step 4
Tip: Each one main unit at most can be equipped with one remote control, two
charging stations and 3 sonic walls at the same time.
Step: Each one of main unit, remote control , charging station,
sonic wall, for example:
2.Please follow below drawing, step by step to remove battery.
Step 1: Pull 2 hooks in the same time, battery will be popup itself.
Step 2: Take out battery.
Step 1
Step 2
a) Let the main unit into study mode:
Push the power button
on the main unit, press the Start / Stop button
the time, until heard ‘DI-DI’ sounds,and the display panel show【Cod 】,
it means the main unit into study mode already.
all
b) Let the charging station start to study:
There are two
Any one of
and
display symbols to locate two charging station.
symbols does not light up, you can follow the steps to set up ID.
Step 1: Power on the charging station.
’’
all the time, until heard DI - DI ’’
Step 2: Press the time setting button
sounds, and one of the two buttons symbol will light up (the symbol must
light off before),it means the charging station complete the study.
8
17
Sonic Wall Setup
Cleaning and Maintenance
The Sonic wall create an invisible barrier that QQ5 will not cross.
Cleaning Dust Bin and Air Filter
Follow Fig.12 take out the Hair-clean-tool from charging base.
Follow Fig.13 moved the tool to clean hairs in roller brush.
Fig 12
Fig 13
Power indicator LED
Power switch
Sonic receiver
Sonic receiver
Charging inlet
Battery cover
Instructions:
1.This CleanMate Sonic Wall is Powered by 2 AA batteries. Make sure to install the
included AA rechargeable batteries in correct polarity.
2.To turn on the Sonic Wall, slide the power switch to position ON.
3.When power on, the blue LED light up still 70 sec., then will light off into waiting
mode.After QQ5 start working in 6 sec., will wake up Sonic Wall and blue LED light
up.If QQ5 stop working, after 10 sec., Sonic Wall will into waiting mode for power
saving.
4.The best effective distance of Sonic Wall barrier is about 3M(10 ft).
5.When LED is blinking, it means battery low.
Cleaning the QQ5
Charging- base
DC inlet
QQ5
DC Plug
Slide switch
Sonic-Wall
You can charge battery by charging base, please see below drawing.
Step 1: The power switch of Sonic Wall, must set "ON" position.
Step 2: Press and Slide out the "Slide switch" from charging base.
Step 3: Plug the DC plug into DC inlet.
Step 4: Blue LED is blinking. When charging is complete, LED will light steady.
6.When QQ5 cleaning, the Sonic Wall position must be away from charging base at
least 1m(3 ft), and avoid face to charging base.
7.When QQ5 complete cleaning , you can power off the Sonic wall by slided the power
switch to "OFF" position.
QQ5 detects the invisible barrier,
it will turn around and head to another direction.
16
9
Cleaning and Maintenance
Self Charging Home Base
Cleaning and Maintenance
Preparations
QQ5
1. Find a proper place(we recommend a hard surface floor)to put the Self-Charging
Home Base in the room. Leave about 60cm (2ft) clearance around the Home Base.
2. Connect the battery charger to the power input socket on the back of home base first.
Then, place home base against the wall. Don’t leave loose wire around the wall.
Finally, plug battery charger to AC power outlet on the wall.
3. Make sure the LCD display on the Home Base is on. This means that the Home Base
has been powered on, and it is ready to charge the QQ5.
3.
on the
back and bottom of the unit.
charger socket
Cleaning Dust Bin and Air Filter
Please follow Fig.1 to Fig.6 to clean it.
(In Fig.2, you can see Open-button at side of dust bin)
60cm
Fig 1
60cm
Fig 2
Fig 3
Fig4
Wire slot
Please settle down the cable of charger into the back side slot of base.
Testing the Home Base
1. Put the QQ5 on the floor close to the Self-Charging Base and turn it on Now press the
"Home" key on remote control. The QQ5 should return to the Home Base
automatically for self-charging.
2. Make necessary adjustment to the Home Base if the QQ5 can not dock on the Home
Base properly.
Fig 5
Fig 6
Battery Charging Methods
Washing Dust Bin and Air Filter
1. Put the QQ5 on the floor close to the Self-Charging Base and turn it on Now press the
"Home" key on remote control. The QQ5 should return to the Home Base
automatically for self-charging.
2. Make necessary adjustment to the Home Base if the QQ5 can not dock on the Home
Base properly.
Please follow Fig.7 to separate Dust Bin and suction motor unit.
Follow Fig.8, 9 to wash it.
Follow Fig.10, 11 to install it.
Fig 7
Fig 8
Fig 9
Fig 10
Slot
Slot
Charger plug-in socket
10
15
Fig 11
Scheduler Operations
General Operation
Week Mo Tu We Th Fr
Time setting
Scheduler
QQ5
Auto cleaning
Button switch:
:Local time setting button : Push the button, the ":" pattern of LCD will stop
QQ5
QQ5
charging base.
QQ5
Full
The scheduling function of QQ5 is built in Charging-base.
User has the freedom to set up the cleaning time according to pre-programmed
schedule.
On this preset cleaning time, QQ5 will leave charging-base and start the cleaning
session automatically.
User can program it to start cleaning job at the same time on every day, or on any day of
week user choose.
The scheduler LCD display is located on the top of "charging-base" unit.
Before setting local time and cleaning time, user needs to plug in "Charger", to power
up the "Charging-base".
QQ5
3
Sa Su
blinking.
User can push the "Week", "Hour", "Min." button to
update local time.
For example: Push "week" button, will show "Monday", push again will show
next day of week.
Choose the true day, then push "
" button again.
The ":" pattern will regain blinking, the Day setting is completion.
The "Hour" and " Min." are same operation.
TIP : If user operating local time setting, the LCD display will show
" Time setting".
: Scheduling cleaning time button :
Step 1 : Push the button, the ":" pattern of LCD will stop blinking. and the LCD
will show "Scheduler".
Step 2 : Push "Week" button, LCD will show "Mo" and blinking.
You can push "Week" button again during in period 8 sec. to set “Mo" is
cleaning day.
If you did not push "Week" button over 8 sec., “Mo" will jump to "Tu"
automatically.
You can choose some days in one week. after finished setting, will show
on LCD.
Step 3 : Push "Hour" button to schedule hour setting, you can see "Hour" number
on LCD, Choose the right Hour number of cleaning time.
11
Scheduler Operations
Installing Accessories
Step 4 : Push "Min." button, same as above, setting "minutes" of cleaning time.
Step 5 : Push "
" again, when you completed the cleaning time setting.
The ":" pattern of LCD will regain blinking.
Side-brush Installation and Removal
TIP : The scheduler function must have "Day of week" setting.
TIP : You can push "Hour" button to "---:---" pattern of LCD, to stop scheduler
function.
TIP : If the "scheduling clean time" was not complete setting and over 60 sec.
The LCD will regain "Local time" display.
: Anytime Go cleaning button :
1. Push button ( Just one shoot ) :
When QQ5 is charging fully, it will leave charging-base to cleaning
automatically.
2. Push button (Over 3 sec).
If QQ5 seated on charging-base, it will leave base and cleaning immediately.
Roller Brush Installation and Removal
Push down button(do not release), then pull out roller-brush.
1
2
: Day of week button : Setting the day of week timing.
: Hour button : Setting the hour of day timing.
There are 2 color hairs on roller-brush, one is white, another is black.Also, there are 2
color push-buttons on QQ5 bottom.
Match the hairs color with push-button color.
Push down button(do not release), then insert roller-brush.
: Minute button : Setting what minutes of hour timing.
Display Pattern of LCD :
Black
: When you push "Start" button (just one shoot), the"
: During QQ5 charged fully,"
1
" will show on LCD.
" "Full" will show on LCD.
2
White
Roller-brush Button
Fragrance Installation and Removal
This Intelligent Automatic Vacuum has a compartment built into it for adding fragrance
to the air as the unit cleans. Any solid scent packet, insert, or dryer sheet can be used.
DO NOT use any type of Liquid or Oil Fragrance with this unit.
:
Step 1
12
Step 3
Step 2
13