1
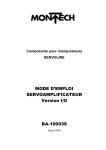
® Handling Components SERVOLINE USER MANUAL SERVO AMPLIFIER PROFIBUS DP BA-100042 Edition 02/06 Servo Amplifier (PROFIBUS DP) Edition 02/06 Change index Editions issued so far: Edition Comments 04/01 07/02 02/06 First edition Chapter 6. Elimination of faults, new New article number Order number (English version) 507026 507026 BA-100042 I Servo Amplifier (PROFIBUS DP) Edition 02/06 1. GENERAL ..............................................................................................................1-1 1.1 Introduction 1-1 1.2 Scope of delivery of servo amplifier 1-1 1.3 Dangers and safety information 1-2 1.4 CE conformance declaration (to MRL Appendix II A) 1-3 1.5 UL and cUL conformance 1-3 1.6 Product description and application 1-4 1.7 Additional information 1-5 1.8 Validity of the User Manual 1-5 1.9 Technical data 1.9.1 Function 1.9.2 Modes 1.9.3 Dimensions 1-6 1-7 1-7 1-8 2. BEHAVIOUR OF THE SERVO AMPLIFIER ..........................................................2-9 2.1 Switch-on and switch-off behavior 2-9 2.2 Emergency stop function according EN60204 (VDE 0113) 2-10 2.3 Motor holding brake (only SVA-130 and SVE-130) 2-11 3. INSTALLATION ...................................................................................................3-12 3.1 Procedure 3-12 3.2 Assembly 3-13 3.3 Wiring 3-14 3.4 Conductor cross-sections 3-15 3.5 External fusing 3-15 3.6 Connection diagram 3-16 3.7 Connection example for multi-axis system 3-17 3.8 Connection example for master-slave system 3-18 4. INTERFACES.......................................................................................................4-19 4.1 Pin assignments 4-19 4.2 Reference switch 4-20 4.3 Voltage supply 4.3.1 Mains connection (X0) 4.3.2 24V auxiliary supply (X4) 4-20 4-20 4-20 4.4 4-21 Motor connection (X9) 4.5 Feedback 4.5.1 Resolver connection (X2) 4.5.2 Encoder (X1) 4-22 4-22 4-23 4.6 Control signals 4.6.1 Digital control inputs (X3) 4.6.2 Digital control outputs (X3) 4.6.3 Profibus extension card (X12A or B) 4-24 4-24 4-25 4-26 II Servo Amplifier (PROFIBUS DP) Edition 02/06 4.7 Encoder emulation 4.7.1 Incremental encoder interface (X5) 4.7.2 SSI interface (X5) 4-27 4-27 4-28 4.8 PC connection, RS232 interface (X6) 4-29 4.9 Interface for master-slave operation, encoder configuration (X5) 4-30 4.10 Connection to SERVOSTAR™ 600 master, 5 V level (X5) 4-30 5. LED DISPLAY......................................................................................................5-31 5.1 Structure 5-31 5.2 Error messages 5-32 5.3 Warnings 5-33 6. ELIMINATION OF FAULTS .................................................................................6-34 7. SPARE PARTS LIST ...........................................................................................7-35 8. APPENDIX ...........................................................................................................8-36 8.1 Abbreviations and acronyms 8-36 8.2 Glossary 8-37 III Servo Amplifier (PROFIBUS DP) 1. General 1.1 Introduction Edition 02/06 This Manual explains the installation, wiring and interfaces of the digital servo amplifier (version PROFIBUS DP). The information is broadly arranged as follows: • • • • Chapter 1: General information Chapter 2: Behaviour of the servo amplifier Chapter 3: Installation Chapter 4: Interfaces This manual forms part of the complete documentation of the SERVOLINE products. The complete documentation consists of the following documents: • • • • Description Ref. No Communications Profile PROFIBUS DP Setup software (version PROFIBUS DP) Servo amplifier (version PROFIBUS DP) Mechanical design of the SERVOLINE products BA-100041 BA-100043 BA-100042 miscellaneous The documentation is available in the following language versions: German, English, French, Italian, Spanish and Swedish. 1.2 • • • • Scope of delivery of servo amplifier User manual for servo amplifier version PROFIBUS DP Servo amplifier SR600 PROFIBUS DP extension card (mounted) Counterplug X3, X4, X0A, X0B, X7 and X8 1-1 Servo Amplifier (PROFIBUS DP) 1.3 Edition 02/06 Dangers and safety information The servo amplifier may be operated only in a closed switch cabinet taking into account the ambient conditions defined in "Technical Data". The servo amplifier may be operated only on the three-phase, earthed industrial network (TN network, TT network with earthed neutral). When the servo amplifier is used in the residential area, in business and commercial areas and in small companies, additional filter measures must be taken by the user. • Only properly qualified personnel are permitted to perform activities such as installation, setup and maintenance. Properly qualified persons are those who are familiar with the assembly, installation, setup and operation of the product, and who have the appropriate qualifications for their job. The qualified personnel must know and observe the following standards or guidelines: IEC 364 and CENELEC HD 384 or DIN VDE 0100 IEC report 664 or DIN VDE 0110 National accident prevention regulations or VBG4 • Servo amplifiers must not be opened. Keep all covers, protective devices and switchgear cabinet doors closed during operation. There is a danger of life-threatening or severe personal injuries or material damage. • Servo amplifiers contain electrostatically sensitive components which can be damaged by incorrect handling. Avoid contact with highly insulated materials (artificial fabrics, plastic films etc.). Place the servo amplifier on a conductive surface. • Never undo the electrical connections to the servo amplifier while it is live. There is a danger of electric arcing with damage to contacts and danger to persons. • During operation, servo amplifiers, according to their degree of enclosure protection, may have uncovered live components. Control and power connections may be live, even if the motor is not rotating. • After disconnecting the servo amplifier from the mains supply voltage, wait at least two minutes before touching any live sections of the equipment (e.g. contacts) or undoing any connections. Capacitors can still have dangerous voltages present up to five minutes after switching off the supply voltages. To be sure, measure the voltage in the DC-link circuit and wait until it has fallen to below 40V. 1-2 Servo Amplifier (PROFIBUS DP) 1.4 Edition 02/06 CE conformance declaration (to MRL Appendix II A) Conformance with the EC Directive on EMC 89/336/EEC and the Low Voltage Directive 72/23/EEC is mandatory for the supply of servo amplifiers within the European Community. The servo amplifiers have been tested by an authorized testing laboratory in a defined configuration with the system components which are described in this documentation. Determinations and standards taken into account: • EC Directive on EMC 89//336/EEC • Low Voltage Directive 73/23/EEC 1.5 UL and cUL conformance UL (cUL)-certified servo amplifiers (Underwriters Laboratories Inc.) fulfil the relevant US and Canadian standards (in this case UL 840 and UL 508C). UL (cUL) certification relates entirely to the mechanical and electrical design and construction of the servo amplifier. UL 508C describes fulfilment by the design, of minimum requirements for electrically operated power conversion equipment such as frequency converters and servo amplifiers, which is intended to eliminate the risk of fire being caused by this product. UL 840 describes the fulfillment by design of air and insulation creepage spacings for electrical equipment and printed circuit boards. Determinations and standards taken into account: • UL 508C • UL 840 Manufacturer Seidel Servo Drives GmbH Wacholderstrasse 40-42 D-40489 Düsseldorf Tel. +49(0)2 03/99 79 - 0 Fax +49(0)2 03/99 79 – 1 55 1-3 Servo Amplifier (PROFIBUS DP) 1.6 Edition 02/06 Product description and application Servo amplifiers are components of the servo axes SHA, SVA and the servo cartensian system SFP which are intended to be incorporated into industrial equipment. The digital servo amplifier is required for position-controlled operation of the servoline products SHA, SVA and SFP. Operation of the servo amplifier is through the serial interface of a personal computer (PC) running the supplied operator software. When servo amplifiers are installed in machines or plants, the intended operation of the amplifier is prohibited until it has been established that the machine or plant fulfills the requirements of the EC Directive on Machines 89/392/EEC and the EC Directive on EMC (89/336/EEC). EN 60204 and EN 292 must also be observed. In connection with the Low Voltage Directive 73/23/EEC, the harmonized standards of the EN 50178 series are applied to the amplifiers, together with EN 60439-1, EN 60146 and EN 60204. The manufacturer of the machine or plant is responsible for ensuring that they meet the limits which are required by the EMC regulations. This documentation contains advice on the correct installation for EMC, such as shielding, grounding, and the laying out of cabling. The equipment manufacturer is obliged to prepare a hazard analysis of the equipment, and is also responsible for functional, mechanical and personal safety aspects in relation to the machine. The servo amplifiers are installed as components in electrical installations or machines and may be put into operation only as integrated components of the installation. The BTB contact must be wired into the safety loop of the system. The safety loop as well as the stop and emergency stop functions must comply with the requirements of EN60204, EN292 and VDI2853. Before operating the servo axes, all work is to be carried out as specified in the operator manuals of the servo amplifier and the Servoline axes. Strictly observe all safety regulations. • Assembly, installation, wiring and final check have been carried out according to the operator manual for the servo amplifier. • Assembly, installation, wiring and final check have been carried out according to the operator manual for the servo axes. 1-4 Servo Amplifier (PROFIBUS DP) 1.7 Edition 02/06 Additional information The present User Manual is intended to permit proper and safe use of the servo amplifier. If any information is missing for your particular application, please contact the manufacturer. When reordering operating instruction, it is imperative that you quote the serial number (see Fig. 1). This document is also available on our homepage www.montech.ch. Fig.1 R Bar code label CH-4552 DERENDINGEN GERWERBESTRASSE 12 *50530 105457.005* Article number Serial number MONTECH AG Management U. D. Wagner 1.8 C. Wullschleger Validity of the User Manual Our products are continually updated to reflect the latest state of the art and practical experience. In line with product developments, our User Manuals are continually updated. Every User Manual has an article number e.g. BA-100042. The article number and the date of edition are evident on the title page. 1-5 Servo Amplifier (PROFIBUS DP) 1.9 Edition 02/06 Technical data Voltage supply 3 x 230V (-10%) ... 480V (+10%); 50Hz ... 60Hz Rated power (S1 operation) 1 kVA Fuse for AC supply FN1/2/3 6 AT (max. 20AT) Interference supply integrated (Class A) suppression filter for power Auxiliary voltage supply SHA, SFP, SHE Auxiliary voltage supply SVA, SVE 24 VDC (-0% + 15 %); 1A 1) 24 VDC (-0% + 15%); 3A Fuse for 24 V supply FH1/2 max. 16 AF Interference suppression filter for auxiliary voltage supply integrated (Class A) Digital control inputs low 0 ... 7V / high 12 ... 36V / 7mA, PLC-compatible Digital signal outputs Open Collector Number of storable drive records EEPROM 180 Number of digital inputs 2) 4 Number of digital outputs 2) 2 Overload monitoring I2 t Acceleration ramps sine2 Teach-in, jogging mode or direct numerical input via PC keyboard Input mode of target positions (PC) Transmission procedure PROFIBUS DP according to EN 50170 Baud rates 187.5 kbaud to 12 Mbaud Support of PROFIBUS drive profile PROFIDRIVE Setup functions Reference traverses / Jogging mode Positioning functions Execute drive order from the servo amplifier memory Execute direct drive order Data transfer functions Reading / writing of drive orders and parameters Reading of actual values, error register and status register Connections for control signals 1 x Combicon, 18-pole Connections for power signals Power Combicon 4x4 + 1x6-pole Resolver input connection SubD 9-pole (jack) PC interface / PROFIBUS SubD 9-pole (plug) Own weight Ambient conditions: [kg] Temperature 2.5 [°C] 0 ... 55 Rel. humidity < 85% non-condensing Air purity Contamination level 2 according to EN60204 / EN50178 Servo controller protection category IP 20 Servo controller installation Dimensions (HxWxD) without plug Warranty period Vertical (switch cabinet) [mm] 275 x 70 x 265 2 years, beginning with the date of delivery 1) The servo vertical axis is equipped with a motor holding brake 2) Configurable 1-6 Servo Amplifier (PROFIBUS DP) 1.9.1 Edition 02/06 Function The servo amplifier is adapted before delivery to the appropriate linear axis and forms part of the scope of delivery. The PROFIBUS extension card is already mounted. By means of PROFIBUS, both drive orders from the memory of the servo amplifier and direct drive orders can be executed. The stored drive orders are started by specifying the drive order number and the start signal. In the case of direct drive orders, all drive order data (target position, speed, acceleration and drive order type) can be transmitted and started directly via PROFIBUS. 1.9.2 Modes • Execute drive orders • 180 drive orders storable in the EEPROM • Concatenation of drive orders • Absolute and relative travel • Reference travel • Jogging mode • Teach-In of position values • 4 position registers (signal thresholds, cam function) • Software limit switch • Lag error window adjustable • Window for InPosition signal adjustable • Sine2 acceleration and deceleration ramps • I2t overload monitoring Master-slave operation • 1 master, up to 16 slaves • Resolution (translation) adjustable Encoder emulation • ROD426-compatible (dec./bin.) • SSI (grey/binary) Integrated position controller 1-7 Servo Amplifier (PROFIBUS DP) 325 Dimensions 265 (with plug 273) 275 1.9.3 Edition 02/06 1-8 Servo Amplifier (PROFIBUS DP) 2. Behaviour of the servo amplifier 2.1 Switch-on and switch-off behavior Edition 02/06 The diagram below illustrates the correct functional sequence for switching the servo amplifier on and off. Fig.3 Intermediate circuit 2-9 Servo Amplifier (PROFIBUS DP) 2.2 Edition 02/06 Emergency stop function according EN60204 (VDE 0113) The emergency stop function is defined by EN 60204 (VDE 0113), Paragraph 9.2.5.4. It is used for stopping the servo axis as quickly as possible in the event of danger. • The emergency stop function must be capable of being triggered by handling by a single person. The emergency stop function must always be ready for operation and available. The user must not be required to think about the effect of this device. • The use of servo horizontal axes SHA, servo vertical axes SVA and servo twodimensional portals SFP in installations is permissible only when they are secured by means of movable, separating safety devices according to EN 292-2, Section 4.2.2.3. • In the case of an internal fault in the servo amplifier, the motor can no longer be operated in a controlled manner but becomes torque-free and revolves to a stop. All axes are however equipped with damped stops which absorb the resultant energy. Realization of the emergency stop function according to EN 60204 (VDE 0113) Category 1: Stoppage of the motor by disconnection of the enable signal (terminal X3/15) and the mains supply (L1, L2, L3) and controlled electronic braking. The 24 V voltage supply must be maintained. The elimination of the enable signal and of the power supply during traversing leads to emergency braking. The drive brakes with the set emergency braking ramp and remains stationary in the torque-free state. The vertical axes have a holding brake. If the speed has fallen below 3% of the maximum traversing speed, the holding brake is activated by switching off its voltage supply, and the output stage is disabled 100 ms later. The dropin delay time of the holding brake is 5 to 10 ms. Restarting: After the problem which led to the emergency stop situation has been solved, the mains supply must be connected. If an error message is present, the servo amplifier must be reset. No drive order can be executed without a prior reset and subsequent reference travel. 2-10 Servo Amplifier (PROFIBUS DP) 2.3 Edition 02/06 Motor holding brake (only SVA-130 and SVE-130) The holding brake installed in the motor is actuated directly by the servo amplifier. In the diagram shown below, the relationship between ENABLE signal, speed and braking power in terms of time and function is shown. Caution! • Actuation of the motor holding brake constitutes a risk to person safety! During the internal ENABLE delay time of 100 ms, the setpoint speed value of the servo amplifier is brought internally to 0 V with the emergency braking ramp. On reaching 3% of the set final speed or after 1 s at the latest, the brake output switches. Technical data Connected voltage Electric power 24 VDC (0% + 15%) Terminal X4 8W Air delay time tbrH 15 – 20 ms Activation delay time tbrL 5 – 10 ms 2-11 Servo Amplifier (PROFIBUS DP) 3. Installation 3.1 Procedure Edition 02/06 The following information is intended to assist with the installation and wiring in an expedient order without important points being forgotten. The individual points are described in the stated sections. Site In a closed switchgear cabinet. The site must be free from conductive or corrosive materials. Î Chapter 1.10 Î Chapter 3.2 Ventilation Check that the ventilation of the servo amplifier is unimpeded and keep within the permitted ambient temperature. Keep the required space clear above and below the servo amplifier. Î Chapter 1.10 Î Chapter 3.2 Assembly Assemble the servo amplifier and power supply close together on the conductive earthed mounting plate. Î Chapter 3.2 Cable selection Select cables according to EN 60204. Î Chapter 3.4 Grounding Shielding EMC-conform shielding and grounding. Earth the mounting plate and CNC-GND of the controls. Î Chapter 3.6, 3.7, 3.8 Wiring • Route power leads and control cables separately Î Chapter 4 • Wire the BTB/RTO contact in series into the safety loop of the installation. • Connect the digital control inputs to the servo amplifier • Connect the resolver cable • Connect the expansion card • Connect the reference switch • Connect the power lead to the motor • Connect the 24V auxiliary voltage (observe max. permissible voltage values) • Connect the main voltage (observe max. permissible voltage values) • Mount plug X8 ballast bridge Final check Carry out a final check of the wiring installed according to the appropriate wiring diagram. Æ Chapter 3.6, 3.7, 3.8 3-12 Servo Amplifier (PROFIBUS DP) 3.2 Edition 02/06 Assembly • Protect the amplifier from impermissible stresses. In particular, do not let any components become bent or any insulation distances altered during transport and handling. Avoid contact with electronic components and contacts. • Take care that the servo amplifier and motor are properly earthed. Do not use painted (non-conductive) mounting plates. The servo amplifier is installed vertically onto a conductive, earthed (galvanized) mounting plate (Fig. 4) in the switchgear cabinet. Assemble the servo amplifier and the power supply (24V) close together on the conductive, earthed mounting plate. Keep the required space clear above and below the servo amplifier. Ensure that there is an adequate flow of cool, filtered air into the bottom of the switchgear cabinet. It is imperative that the servo amplifier be properly earthed in the switchgear cabinet with the PE rail as a reference potential. Without low-resistance earth connection, personnel safety cannot be ensured. Fig. 4 Cable duct Cable duct Cabinet door Mounting panel conductive (zinc-coated) 265 (with plug) 273)) .......... Screw for hex key DIN 912 3-13 Servo Amplifier (PROFIBUS DP) 3.3 Edition 02/06 Wiring Only professional staff who are qualified in electrical engineering are allowed to install the servo amplifier. Instructions • • • • • • • • • Check the combination of servo amplifier and servo axis. Compare the serial numbers. The serial number of the servo amplifier is located on the front panel (Î Chapter 1.8), For location of the serial number of the servo horizontal axis, refer to the user manual of the servo horizontal axis (Chapter 1.8). The ground symbol in the wiring diagrams indicates that you must take care to provide an electrically conductive connection with the largest possible area between the unit indicated and the mounting plate in the switchgear cabinet. This connection is for the effective grounding of HF interference. Do not confuse the ground symbol with the PEsymbol (a protective measure according to EN 60204). Ensure that the max. permissible rated voltage at the connections L1, L2, L3 or +DC, — DC is not exceeded by more than 10% even in a worst-case scenario (see EN 60204-1 section 4.3.1). Excessive voltage at these connection can result in the servo amplifier being destroyed. Use the servo amplifier only on earthed three-phase mains supply networks for operation with the servo horizontal axes SHA. Fusing of the AC supply input and the 24V supply is to be installed by the user (Î Chapter 3.5). Route power and control cables separately. We recommend a separation of at least 20 cm. This improves the interference immunity required by EMC regulations. Install all heavy-current cables with an adequate cross-section, to EN 60204 (Î Chapter 3.4). Wire the BTB/RTO contact in series into the safety circuit of the installation. Only in this way is the monitoring of the servo amplifier assured. It is permissible to alter the servo amplifier settings by using the operator software. Any other alterations will invalidate the warranty. Caution! • Only install and wire up the equipment when it is not live, i.e. when neither the mains power supply nor the 24V auxiliary voltage nor the operating voltages of any other connected equipment are switched on. • Take care that the cabinet is safely disconnected (with a lock-out, warning signs etc.) • The individual voltages will be switched on for the first time during commissioning. • Never disconnect the electrical connections to the servo amplifier while they are live. In unfavorable circumstances this could result in the destruction of the electronics. Residual charges in the capacitors can have dangerous levels for up to 300 seconds after switching off the mains supply voltage. Measure the voltage in the DC link (+DC/-DC) and wait until the voltage has fallen below 40V. Control and power connections can still be live, even when the motor is not rotating. 3-14 Servo Amplifier (PROFIBUS DP) 3.4 Edition 02/06 Conductor cross-sections In line with EN 60204, we recommend the following for single-axis systems: AC connection 1.5 mm² DC link 1.5 mm² Motor cables up to 25 m length use motor cable supplied (1.5 mm². shielded) Resolver, thermostat-motor use resolver cable supplied (0.25 mm² twisted pairs, shielded) Control signals, BTB, DGND 0,5 mm² +24 V / XGND max. 2,5 mm², check voltage drop 3.5 External fusing Fusible cutouts or similar AC-supply FN1/2/3 6 AT (max. 20AT) 24V-supply FH1/2 max. 16 AF 3-15 Servo Amplifier (PROFIBUS DP) 3.6 Edition 02/06 Connection diagram 3-16 Servo Amplifier (PROFIBUS DP) 3.7 Edition 02/06 Connection example for multi-axis system 3-17 Servo Amplifier (PROFIBUS DP) 3.8 Edition 02/06 Connection example for master-slave system 3-18 Servo Amplifier (PROFIBUS DP) 4. Interfaces 4.1 Pin assignments Edition 02/06 4-19 Servo Amplifier (PROFIBUS DP) 4.2 Edition 02/06 Reference switch The length of the cable of the supplied inductive proximity switch is 5 m. Wiring of the proximity switch is according to the following diagram. After wiring, check the function of the proximity switch. 4.3 Voltage supply 4.3.1 Mains connection (X0) • • +24V DC control black plug X3 Digital-In blue digital GND control Directly to earthed 3~ supply, 400V, 50Hz, filter Class A integrated. Fusing 6AT (e.g. fusible cut-outs provided by the user). 4.3.2 • • • brown 24V auxiliary supply (X4) Electrically isolated, external 24 DC supply, e.g. with insulating transformer Required current rating 1A, voltage 24V (-0% + 15 %) Integrated EMC filter Class A for the 24V auxiliarysupply 24V auxiliary supply 4-20 Servo Amplifier (PROFIBUS DP) 4.4 Edition 02/06 Motor connection (X9) Use the connecting cable supplied. The connecting cable is shielded and capable of following. The brake wires are used only with the use of a servo vertical axis. Cores mm2 (4x1.5 + (2 x 0,75)) Operating temperature range °C -10 / +80 Outside diameter mm 11.5 Min. bending radius mm 120 Connecting plug Motor 1x6-pole, 4mm2 Amplifier Power Combicon 7.62 4-21 Servo Amplifier (PROFIBUS DP) Edition 02/06 4.5 Feedback 4.5.1 Resolver connection (X2) The resolver cable transmits the signals of the two-pole hollow-shaft resolver and the thermostat contact. Use the connecting cable supplied. The connecting cable is shielded and capable of following. Cores mm2 4x2x0.25 Operating temperature range °C -30 / +80 Outside diameter mm 6.9 Min. bending radius mm 60 Connecting plug Motor 18-pole, 2.5mm2 Amplifier SubD 9pol. Cosinus Sinus Reference Motor Thermal control 4-22 Servo Amplifier (PROFIBUS DP) 4.5.2 Edition 02/06 Encoder (X1) The SERVOLINE® products are optionally available with a multiturn sine-cosine encoder. This encoder is used by the servo amplifier as a feedback unit for drive tasks which require highly precise positioning or very good synchronism. The thermal protection contact in the motor is connected via the encoder line to the servo amplifier and is evaluated there. Voltage supply Thermal control 4-23 Servo Amplifier (PROFIBUS DP) 4.6 Control signals 4.6.1 Digital control inputs (X3) Edition 02/06 All digital inputs are separated by optocouplers and are potential-free relative to the servo amplifier. • • The logic is dimensioned for +24V / 7mA (PLC-compatible) High-level of +12...30V / 7mA, Low-level of 0...7V / 0mA Technical data Reference earth Digital-GND (DGND, terminal X3/18) Control inputs 24V/7mA, SPS compatible High-Pegel +12 ... 30V/7mA Low-Pegel 0 ... 7V/0mA Plug Combicon 5.08 / 18-pole, 2.5 mm2 Line Data up to 50 m long: 0. 5mm2, not screened Control 24V ref. to I/O-GND 4.6.1.1 ENABLE input The output stage of the servo amplifier is activated by the enable signal. (terminal X3/15, input 24V, active-high). In the inhibited state (low signal), the motor which is attached does not have any torque. 4.6.1.2 Freely programmable digital inputs You can use the digital inputs PSTOP / NSTOP / DIGITAL-IN1 and DIGITAL-IN2 to initiate preprogrammed functions that are stored in the servo amplifier. A list of the pre-programmed functions has been provided in the operator software manual. If an input is freshly assigned to a pre-programmed function, then the data set must be stored in the EEPROM of the servo amplifier, and the 24V auxiliary supply of the servo amplifier must be switched off and on again (to reset the amplifier software). 4-24 Servo Amplifier (PROFIBUS DP) 4.6.2 Edition 02/06 Digital control outputs (X3) All digital inputs are separated by optocouplers and are potential-free relative to the servo amplifier. Technische Daten Reference earth DIGITAL-OUT 1 and 2 BTB/RTO Digital-GND (DGND, Terminal X3/18) Open collector Relay output, max. 24 VDC, 42VAC, 0, SA Plug Combicon 5.08 / 18-pin, 2.5 mm2 Line Data –up to 50 m long: 0.5 mm2, not screened Control 4.6.2.1 Ready-to-operate contact BTB/RTO Operational readiness (terminals X3/2 and X3/3) is signaled by a floating relay contact. The contact is closed when the servo amplifier is ready for operation, the signal is not influenced by the enable signal, theI2t-limit, or the regen threshold. All faults cause the BTB/RTO contact to open and the output stage to switch off. A list of the error messages has been provided in the operator software manual. 4.6.2.2 Freely programmable digital outputs You can use the digital outputs DIGITAL-OUT1 and DIGITAL-OUT2 to output messages from preprogrammed functions that are stored in the servo amplifier. A list of the pre-programmed functions has been provided in the operator software manual. If a pre-programmed function is assigned anew to an input, then the data set must be stored in the EEPROM of the servo amplifier, and the 24V auxiliary supply voltage of the servo amplifier must be switched off and on again (to reset the amplifier software). Evaluate the outputs via inverting interface relays (see connection diagram), for example Phönix DEK-REL-24/I/1 (turn-on delay 6 ms, turn-off delay 16 ms). The described logic in the Setup Software manual refers to the output of the inverting interface relays. Consider the delay of the applied relay ! 4-25 Servo Amplifier (PROFIBUS DP) 4.6.3 Edition 02/06 Profibus extension card (X12A or B) The PROFIBUS extension card has two 9-pole Sub-D jacks wired in parallel. The voltage of the extension card is supplied by the servo amplifier. Cable selection, cable laying, screening, bus connector, bus terminator and run-times are described in "Setup guidelines for PROFIBUS-DP/FMS" of the PROFIBUS user organization PNO, Order No. 2.111. Control 4-26 Servo Amplifier (PROFIBUS DP) Edition 02/06 4.7 Encoder emulation 4.7.1 Incremental encoder interface (X5) The incremental encoder interface forms part of the scope of delivery. Use the encoder emulation function ROD (screen page «Encoder emulation»). The position of the motor shaft is calculated in the servo amplifier from the absolute cyclic signals of the resolver. From this information, the incremental encoder-compatible pulses are generated. At the SubD plug X5, pulses are output in two signals A and B electrically staggered by 90° and one zero pulse. The resolution can be set with the parameter RESOLUTION in the Encoder emulation window: 256/512/1024 pulses/rev. 2048/4096 pulses/rev. 8192 pulses/rev. 16384 pulses/rev. with feedback = resolver with feedback = EnDat with feedback = EnDat up to 3000 min -1 with feedback = EnDat up to 1500 min –1 The position of the zero pulse can be set within a mechanical revolution and stored (parameter NI-OFFSET). Owing to the compatibility with commercial pulse generators, the zero pulse can be set only for A=B=1. The driver supply is provided by an internal voltage. PGND must be connected to the control in each case. Connection and signal description for incremental encoder interface: Track A Zero I Track B * according to line impedance Flank spacing a ≥ 0.8 µs UH ≥ 2.0V/-20mA UL ≤ 0.5V/+20mA Flank slope tv ≤ 0.1 µs Delay N-I-td ≤ 0.1 µs Scanning frequency > 160kHz Limiting speed for electric encoder signals 6000min-1 4-27 Servo Amplifier (PROFIBUS DP) 4.7.2 Edition 02/06 SSI interface (X5) The SSI interface (synchronous serial absolute encoder emulation) forms part of the scope of delivery. Choose the encoder function SSI (screen page "Encoder emulation"). The position of the motor shaft is calculated in the servo amplifier from the absolute cyclic signals of the resolver. From this information, a position output compatible with the data format of commercial SSI absolute encoders is generated. At the SubD plug X5, this synchronous serial absolute cyclic 12-bit information is output. 24 bits are transmitted; the upper 12 bit are set to ZERO and the lower 12 bit contain the position data. The interface must be read in by a multiturn encoder which also gives a valid single-turn data item. The signal sequence can be output in the Gray format (standard) or in binary format (parameter SSI-CODE). A serial signal is read out synchronously by the control with the clock frequency (1.5 MHz). You can adapt the servo amplifier to the clock frequency of your SSI evaluation with the parameter SSI-CLOCK (200 kHz or 1.5 MHz and inverted). The driver is supplied by an internal voltage. PGND must be connected to the control in each case. Connection and signal description for SSI interface: The counting direction of the SSI interface is set to count incrementally when viewing along the motor axis with clockwise rotation. * according to line impedance Clock Binary Gray Monoflop Format : binary / Gray Data switching time tv ≤ 300 ns Max. transmission rate = 1.5 Mbaud Monoflop settling time tp < 15 µs Min. period T = 600 ns UH ≥ 2.0V/-20 mA UL ≤ 0.5V/+20mA 4-28 Servo Amplifier (PROFIBUS DP) 4.8 Edition 02/06 PC connection, RS232 interface (X6) Setting the motion-block parameters can be carried out on an ordinary commercial PC. Connect the PC interface (X6) of the servo amplifier while the supply to the equipment is switched off via a normal null-modem cable to a serial interface of the PC (do not use a null-modem link cable!). The interface is electrically isolated through an optocoupler, and is at the same potential as the CANopen interface. Pin No. see below female female female * only for symmetry female 4-29 Servo Amplifier (PROFIBUS DP) 4.9 Edition 02/06 Interface for master-slave operation, encoder configuration (X5) With the aid of this interface, you can interconnect several SERVOSTAR™ 600 amplifiers (master-slave operation). The slave amplifier is configured with the aid of the commissioning software (electrical gear). The resolution (number of pulses/revolution) is adjustable. AGND and DGND (terminal X3) must be bridged ! Signal diagram for encoder with RS422 output: 4.10 Connection to SERVOSTAR™ 600 master, 5 V level (X5) With the aid of this interface, several SERVOSTAR™ 600 amplifiers can be interconnected (master-slave operation). Up to 16 slave amplifiers are actuated by the master via the encoder output. SubD plug X5 is used for this purpose. Limiting frequency: 1 MHz, flank slope tv < 0.1µs AGND and DGND (terminal X3) must be bridged ! Track A Track B * according to line impedance (only once at end of bus) 4-30 Servo Amplifier (PROFIBUS DP) 5. LED display 5.1 Structure Status 1: Status 2: Status 3: Status 4: Edition 02/06 24V switched on unit indicates software version of the system software after 1 sec. Shift to status 2, 3 or 4 24V switched on Unit indicates current (in this example 1A) flashing dot 24V switched on, mains supply switched on unit indicates current and mains supply on flashing dot 24V switched on, mains supply switched on, unit enabled unit indicates current and mains supply on and enabled flashing dot 5-31 Servo Amplifier (PROFIBUS DP) 5.2 Edition 02/06 Error messages All errors which occur are displayed in succession for 4 flashing cycles each. All error messages result in the following action: the BTB contact (terminals X3/2 and X3/3) opens; the drive switches off in a managed way (braking with emergency ramp); and the output stage of the amplifier switches off (motor loses all torque). The holding brake of the motor is activated (SVA-130 only). Number F01* Designation Heat sink temperature Explanation Heat sink temperature is too high Limit has been set to 80°C by the manufacturer F02* Overvoltage Overvoltage in the DC-link circuit Limit depends on the mains supply voltage F03* Following error Message from the position controller F04 Feedback Cable break, short-circuit, short to ground F05* Undervoltage Undervoltage in the DC link Limit has been set to 100V by the manufacturer F06 Motor temperature Temperature sensor faulty or motor temperature too high Limit has been set to 145°C by the manufacturer F07 Auxiliary voltage Internal auxiliary voltage not OK F08* Overspeed Motor running away, speed is higher than is permissible F09 EEPROM Checksum error F10 Flash-EPROM Checksum error F11 Brake Broken cable, short-circuit, short to ground (SVA only) F12 Motor phase Motor phase is missing (broken cable or similar) F13* Internal temperature Internal temperature in the amplifier is too high F14 Output stage Fault in the power output stage F15 I²t max. I²t max. value exceeded F16* Mains BTB 2 or 3 supply phases are missing F17 A/D converter Error in the analog-digital conversion F18 Regen Regen circuit faulty or setting incorrect F19* Mains phase A supply phase is missing F20 Slot error Hardware error on the expansion card (PROFIBUS) F21 Handling error Software error on the expansion card (PROFIBUS) F22 Earth fault Inactive F23 CAN bus inactive Communication interrupted by CAN bus Reserved Reserved System fault System software not responding correctly F24-F31 F32 * = These error messages can be cleared without resetting the amplifier. If only one of these errors is present and the RESET button or the I/O function RESET is used, then too, only the error is cleared. 5-32 Servo Amplifier (PROFIBUS DP) 5.3 Edition 02/06 Warnings All warnings which occur are displayed in succession for 4 flashing cycles each. Faults that occur but do not cause a switch-off of the amplifier output stage (BTB contact remains closed) are displayed as a numerical warning code in the LED display on the front panel and on the screen page “STATUS”. Warnings that are recognised by the supply monitoring system will only be reported after the servo amplifier has been enabled. Number Explanation n01 I²t I²t message threshold exceeded n02 Regen power Preset regen power reached n03* FError Preset following error window exceeded n04* Response monitoring Response monitoring (field bus) active n05 Mains phase Mains phase missing n06* SW limit switch 1 Software limit switch 1 exceeded n07* SW limit switch 2 Software-limit switch 2 exceeded n08 Motion task_error A faulty motion task was started n09 No reference point No reference point set at start of task n10* PSTOP Hardware limit switch PSTOP activated (servo axes without hardware limit switch) n11* NSTOP Hardware limit switch NSTOP activated (servo axes without hardware limit switch) n12 Default values Inactive n13 Expansion card Expansion card (PROFIBUS) not functioning correctly n14 HIPERFACE® Inactive n15 Table error Inactive Reserved Reserved Firmware beta version Firmware version has not been released Reset RESET is present at DIGITAL IN1 n16-n31 n32 A *= Designation These warning messages lead to a controlled shut-down of the drive (braking with the emergency ramp) 5-33 Servo Amplifier (PROFIBUS DP) 6. Edition 02/06 Elimination of faults The following table provides some tips to enable you to eliminate errors. Depending on the system and the number of servo axes which you are operating, there may be hidden causes of errors. In case of doubt, please contact us. No. Error Possible cause of error F01 Error message Heat sink temperature Error message Overvoltage Following error` • Permissible heat sink temperature has been exceeded • Mains voltage too high Error mesage Feedback unit (resolver or encoder) Error message Undervoltage • Feedback plug has not been correctly connected • Feedback cable is broken, crushed, etc. • Mains voltage not present or too low when servo amplifier is enabled (enable ON) Error message Motor temperature Error message Auxiliary voltage Error message brake • Plug of feedback unit (resolver or encoder) loose or feedback cable broken • The auxiliary voltage generated in the servo amplifier is incorrect • Short-circuit in the voltage supply cable of the motor holding brake • Faults on the brake cable F02 F03 n03 F04 F05 F06 F07 F11 F13 F14 Error message Internal temperature Error message Output stage error • Reference switch incorrectly connected • Mechanical load too high • Check reference switch • Reduce dimensions and/or loading moment • Check plug connector • Check cable • Enable servo amplifier only when the mains voltage has been switched on. Delay > 500 ms. (See Section 2.1) • Screw plug tightly or use new feedback cable • Replace servo amplifier • Eliminate short-circuit • Check screen of brake cable • Replace motor • Improve ventilation • • • • • • • • • • • • • Output stage module overheated Faulty output stage module Motor cable has short-circuit or earth fault Motor has a short-circuit or earth fault Reference switch incorrectly connected Servo axis travels towards obstacle Mechanical load too high Error message I2t max. F16 Error message mains BTB • Controller was enabled although no mains voltage was present - Motor does not turn • At least 2 mains phases absent • Servo amplifier not enabled • Drive order (drive record, jogging mode or reference travel) is active • • Motor oscillates • Use mains transformer • Faulty motor holding brake • Permissible internal temperature exceeded F15 n01 - Measures for eliminating causes of errors • Improve ventilation • • • • • Improve ventilation Replace servo amplifier Replace motor cable Replace motor Check reference switch Check setup Reduce dimensions and/or loading moment • Enable servo amplifier only when the mains voltage has been switched on (see Section 2.1) • Check mains supply • Apply enable signal • Only when bit 0 in PZD5 (drive order active) has the value "0" can the next drive order be initiated Feedback cable (resolver or encoder) broken • Check feedback cable • Check motor cable Motor cable incorrectly connected (multiple axes) • Wire motor phases correctly Motor phases interchanged • Check brake actuation Brake has not released • Check mechanical system Servo axis is mechanically blocked • Replace feedback cable Screen of feedback cable (resolver or encoder) broken • Load correct data record Wrong data record loaded (multiple axes) 6-34 Servo Amplifier (PROFIBUS DP) 7. Item Edition 02/06 Spare parts list Designation Art.No. Supplier Material Digital servo controller 506152 Seidel Servo Drives GmbH Various Connector set for servo controller 506416 Seidel Servo Drives GmbH Various Resolver cable 5 m 506156 Seidel Servo Drives GmbH Sheath insulation: PUR polyurethane, 11Y Core insulation: PETP polyesteraphtalate, 12Y Resolver cable 10 m 506426 Seidel Servo Drives GmbH Sheath insulation: PUR polyurethane, 11Y Core insulation: PETP polyesteraphtalate, 12Y Resolver cable 15 m 506427 Seidel Servo Drives GmbH Sheath insulation: PUR polyurethane, 11Y Core insulation: PETP polyesteraphtalate, 12Y Resolver cable 20 m 506428 Seidel Servo Drives GmbH Sheath insulation: PUR polyurethane, 11Y Core insulation: PETP polyesteraphtalate, 12Y Resolver cable 25 m 506429 Seidel Servo Drives GmbH Sheath insulation: PUR polyurethane, 11Y Core insulation: PETP polyesteraphtalate, 12Y Motor cable 5 m 506155 Seidel Servo Drives GmbH Sheath insulation: PUR polyurethane, 11Y Core insulation: PETP polyesteraphtalate, 12Y Motor cable 10 m 506422 Seidel Servo Drives GmbH Sheath insulation: PUR polyurethane, 11Y Core insulation: PETP polyesteraphtalate, 12Y Motor cable 15 m 506423 Seidel Servo Drives GmbH Sheath insulation: PUR polyurethane, 11Y Core insulation: PETP polyesteraphtalate, 12Y Motor cable 20 m 506424 Seidel Servo Drives GmbH Sheath insulation: PUR polyurethane, 11Y Core insulation: PETP polyesteraphtalate, 12Y Motor cable 25 m 506425 Seidel Servo Drives GmbH Sheath insulation: PUR polyurethane, 11Y Core insulation: PETP polyesteraphtalate, 12Y User manual german 507025 Montech AG Paper User manual english 507026 Montech AG Paper User manual french 507027 Montech AG Paper User manual italian 507028 Montech AG Paper User manual spanish 507029 Montech AG Paper User manual swedish 507030 Montech AG Paper 7-35 Servo Amplifier (PROFIBUS DP) 8. Appendix 8.1 Abbreviations and acronyms Edition 02/06 The table below shows abbreviations and acronyms used in this manual Abbreviation / acronym AGND BTB/RTO CE CENELEC CLK COM DGND DIN Disk EEPROM EMC EN ESD IDC IEC IGBT INC ISO LED MB MS-DOS NI NSTOP PELV PGND PSTOP PWM RAM Rballast Rbext Rbint RES SPS SRAM SSI SW/SETP. UL V AC V DC VDE VGA VTA XGND Explanation Analogue ground Ready for operation Communité Européenne (European Community) European electrotechnical standards coordinating committee Clock (clock signal) Serial interface of a PC-AT Digital ground German technical standards organisation (Deutsches Institut für Normung) Magnetic storage (diskette, hard disk) Electrically erasable and programmable read-only memory Electromagnetic compatibility European standard Electrostatic discharge Analogue current monitor International Electrotechnical Commission Insulated Gate Bipolar Transistor Incremental interface International Standardisation Organisation Light Emitting Diode Megabyte Operating system for PC-AT Zero impulse Limit switch input, anticlockwise rotation Protective low voltage Ground of the interface used Limit switch input, clockwise rotation Pulse width modulation Volatile memory Ballast resistance External ballast resistance Internal ballast resistance Resolver Programmable logic controller PLC Static RAM Synchronous serial interface Sollwert (setpoint) Underwriter Laboratory Alternating voltage Direct voltage Association of German electrical engineers Graphic output with min. 640x680 pixels Analogue speed monitor Ground of the 24 V supply voltage 8-36 Servo Amplifier (PROFIBUS DP) 8.2 E Edition 02/06 Glossary EEPROM Electrically Erasable and Programmable Read-Only Memory Electrically erasable memory in the servo amplifier. Data stored in the EEPROM is not lost when the auxiliary voltage is switched off. C E2PROM See EEPROM Enable Enable signal for the servo amplifier (+24) Ipeak, peak current Effective value of peak current Irms, effective current Effective value of continuous current Reset Restart of the micro processor ROD interface Incremental position output Current controller Controls the difference between current setpoint and actual value of the current to 0. G GRAY format H Holding brake 2 Special form of binary code (with only one bit changing between sequential numbers) Motor brake which must only be applied with the motor at a standstill. I It Monitoring of the effectively required root-mean-square (RMS) current I Intermediate circuit Rectified and smoothed output voltage M Motion block Data packet with all position control parameters which are required for a motion task. O Optical coupler Optical connection between two electrically independent systems P Position controller Controls the difference between position setpoint and actual value to 0. R RAM Random Access Memory Volatile memory in the servo amplifier. Data stored in RAM are lost if the auxiliary voltage is switched off. S SSI interface Cyclically absolute serial position-output Z Zero pulse Is issued once per revolution by incremental transmitters; it is used for zeroing the machine. 8-37