1
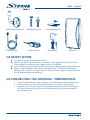
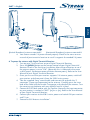
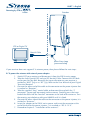
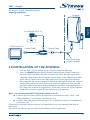
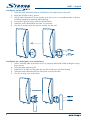
Digital Active Outdoor DVB-T
Antenna SRT ANT 15
User Manual
* €0,14/Min. from German wired line
* €0.42/Min. max. from mobile network
* €0,12/Min. from Austrian wired line
per March 2010
PART 1 • English
* €0,14/Min. from French wired line
Thank you for purchasing the STRONG SRT ANT 15 DVB-T Antenna. This antenna has
been specially designed to receive digital terrestrial signals. It can be connected to any
Digital Terrestrial Receiver (DVB-T), and is specially designed for Outdoor use. The antenna
housing is UV protected and weather-proof sealed. With the multi-functional mounting
materials supplied you can install the antenna on a wall, on your balcony or on a pole
outside the house.
This DVB-T Antenna is an “Active type” antenna, it has a built-in low noise amplifier that
amplifies the received signal for better performance. The antenna therefore needs 5 V power
supplied by your terrestrial receiver, or by an AC adaptor (supplied with the antenna).
We recommend that you carefully read this user manual before you install the antenna. This
will help you to get the best performance out of your antenna.
Specifications
Frequency range:
VHF 47 ~ 230 MHz, UHF 470 ~ 870 MHz
Gain:
45 dB for VHF and UHF
RF Output Impedance:
75 Ohm
Power Supply - 2 powering methods:5 V DC 40 mA via ANTENNA connector of the
digital terrestrial receiver or
9 V DC 100 mA via External 230 V AC to DC adapter
Special features
n Choice of installation methods: wall-mounted or pole-mounted installation
n Built-in VHF and FM filter
n Weather-proof and UV protected housing
n Built-in low noise amplifier technology
n Highly directional to optimise accurate pointing to the transmitter and to reduce
pick up of unwanted signals
2.0 Package contents
n
n
n
n
n
n
n
Active DVB-T Outdoor Antenna.
Multidirectional base.
Wall mounting kit.
Pole Mounting kit.
Coaxial Cable.
Power Injector.
AC Adaptor.
English
1.0 Introduction
PART 1 • English
Multi-directional base
Coaxial Cable
Wall Mounting kit
Power Injector
Pole Mounting kit
AC Adaptor
Main unit
3.0 Safety notes
n Use only originally supplied accessories
n Before you make any connections: disconnect your equipment from the 230 V
mains power to avoid electrical shocks during installation
n Short Circuit in the coaxial cable MAY permanently damage your Digital Receiver
n Never use AC Adaptors with incorrect specifications. This MAY permanently
damage your antenna or Digital Receiver. Always check voltages and polarisation
of the adaptor before connecting it
4.0 Connecting the antenna - preparations
1. Check if the broadcast in your country is Horizontally or Vertically polarised.
2. Fix the Antenna to the multi-directional base as shown in the pictures:
3. Depending on how the signals are broadcasted (Horizontal or Vertical) you
will have to mount your antenna in the Horizontal or Vertical position for
best performance.
English
PART 1 • English
(Vertical-Broadcast) antenna mounted V
(Horizontal-Broadcast) antenna mounted H
4. Your antenna needs 5 V power to work properly. Check in the menu or user
manual of your terrestrial receiver to see if it supports the needed 5 V power.
A. To power the antenna with Digital Terrestrial Receiver:
1. Turn on your TV set and turn on your Digital Terrestrial Receiver.
2. Press the [MENU] button on the remote control of your Digital Terrestrial
Receiver. Check in the Set-Up or Installation Menu of your Receiver to see if
the antenna power is set to “ON”. (Normally this is indicated in the menu
as ANT power, Ext Antenna power or Active antenna power). Refer to the User
Manual of your Digital Terrestrial Receiver.
3. Once you are sure that your receiver supports 5 V antenna power, switch off
your receiver and disconnect it from the 230 V mains power.
4. Take the supplied “long” coaxial cable and connect the end with the “F
connector” (screw type connector) to the antenna. Carefully press the inner
lead of the cable into the Female-F connector at the back of the antenna. Turn
the covering nut clockwise with your HANDS until it is fixed.
5. Connect the IEC Male end to your Set Top Box. Normally the input connector
on your receiver is marked as “ANT” (in) or as (in). Refer to the User Manual
of your Digital Terrestrial Receiver.
6. Connect your receiver to the 230 V mains power and switch ON your receiver
and TV set.
7. Proceed to 5.0 “Antenna installation”.
3
PART 1 • English
Powering by STB or Digital TV
Indoor
Outdoor
STB or Digital TV
Coaxial Cable
Water-Drop Loop
(recommended)
If your receiver does not support 5 V antenna power, then please follow the next steps:
B. To power the antenna with external power adaptor:
1. Switch OFF your receiver and disconnect it from the 230 V mains power.
2. Take the short Coaxial (IEC male to IEC female) Cable. Connect the IEC Male
end to your Set Top Box. Normally the input connector on your receiver is
marked as “ANT” (in) or as “RF” (in). Refer to the User Manual of your Digital
Terrestrial Receiver.
3. Connect the other end of the cable to the connector on the power injector that
is marked as “Receiver”.
4. Take the supplied “long” coaxial cable and connect the end with the “F
connector” (screw type connector) to the antenna. Carefully press the inner
lead of the cable into the Female-F connector at the back of the antenna. Turn
the covering nut clockwise with your HANDS until it is fixed.
5. Connect the other side of the cable to the connector at the power injector, it is
marked as “Antenna”.
6. Insert the adapter to the 230 V mains power and insert the connector at the
end of the lead to the power injector - it is marked as “DC 9 - 12 V”.
7. Proceed to chapter 5. “Installation of the antenna”.
4
PART 1 • English
Outdoor
English
For point B - please see drawing below:
Powering by Adaptor
Indoor
AC Adaptor (DC 9 V)
STB or Digital TV
Coaxial Cable
Coaxial Cable
Power injector
ater-Drop Loop
W
(recommended)
5.0 Installation of the antenna
1. Turn on your TV set and turn on your Digital Terrestrial Receiver.
2. Press the [MENU] button on the remote control of your Digital Terrestrial
Receiver. Select the Menu on your receiver that shows you the signal level
indicators. (Normally you can find the signal meter in the Channel Scan field
of the menu). Refer to the User Manual of your Digital Terrestrial Receiver.
3. Now optimise the signal strength by finding the best position for the antenna.
Keeping the antenna in your hand, try to reach the highest or best possible
position. Slowly move the antenna to different positions around the house, at
the same time monitor the signal bars in the menu, once the signal indicator
shows the maximum signal, fix the antenna on that position.
Note - It is recommended NOT to place the antenna near to:
n Devices that are strong source of radiation or interference such as DECT and
GSM telephones, Transmitters, Microwaves, etc.
n Devices with high power consumption such as Electrical Heater, Air conditioner,
Hairdryers, etc.
Once the best position for the antenna has been found it can be mounted and fixed in
that place.
You can fix the antenna on the wall, on the balcony or on a metal pole.
5
PART 1 • English
Installation on the wall
1. Take the multi directional base and hold it to the position on the wall
2. Mark the 4 holes with a pencil
3. Drill 4 holes diameter 5,8 mm (make sure you are in a secured position and wear
sufficient protective clothing while drilling
4. Insert the 4 plastic plugs into the drilled holes
5. Hold the multi directional base on it’s position
6. Use the 4 screws to fix the plastic mount on the wall
Installation on a metal pole, or on the balcony
1. Take a metallic pole and make sure it is properly fixed and stable enough to carry
the antenna
2. Take the pole mounting kit
3. Hook the 2 U bolts on the pole (or on the metal parts of the balcony)
4. Take the multi-directional base and place it over the bolts
5. Use the 4 wing nuts to fix them
6
Environmental Issues
Environmental Issues
STRONG is committed to reducing the impact of its products on the environment.
To maximise the benefits of our design enhancements, your co-operation is required.
Electronic product recycling
Do not dispose of this product with
your domestic rubbish.
At the end of its useful life, this
product
contains materials which when
processed correctly can be recovered
and recycled. By participating in the
responsible recycling of this product
you will be reducing the requirement
for new raw materials and
reducing the amount of material that
would otherwise end up in landfill.
When you purchase a new, similar
product your retailer may offer to take
this old one off you. Alternatively,
you can take it to your local recycling
centre. Your retailer or local
municipal authority will advise you
of the collection facilities available
for waste electronically products in
your area. User of this service will be
free to you.
Within the scope of the European
legislation on Waste Electrical and
Electronic Equipment (Directive
2002/96/EC valid as of August
2005) STRONG provides a recycling
system free of charge for consumers
to returning products after end of
life. For more information about
STRONG’s environmental policy
to you:
Packaging
When disposing of this
product packaging,
please ensure that it
is recycled. Packaging
material is to be
depolluted in waste
separation.
Power Saving
To save power and
money, please put the
product into standby
mode when not in use.
We also recommend
disconnection from mains supply
when not in use for longer periods
of time.
Batteries
Do not dispose of the
batteries from your
handset with your
domestic waste.
Where they are available,
participate in your local municipal
or retailer collection schemes
for spent batteries. Batteries
discarded in landfill sites or
incinerated increases the chances of
pollutants being dispersed into the
atmosphere.
www.strong.tv - select “About us”
and “Environmental Policy“ from the
submenu.
Alternations reserved 09/2010
Environmental Issues