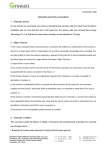
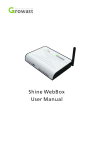
1
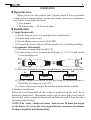
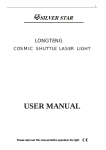
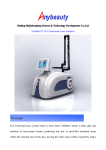
LONGTENG-VII
STAR LASER
USER MANUAL
Please read over this manual before operation the light
Installation
★Open the box:
When you receive the product, take it gently check if there is problem
which cause in transportation, On the other hand , please pay attention to
see if there is an adjunct enclosed:
1 User manual
1 XLR male plug, 1 XLR female plug
★Installation
1. Single flash install:
(1) Fix the lamp in a safe way and adjust the suitable angle.
(2) Put the plug in the socket.
(3) Set the change over-switch to MASTER.
(4) Connect the power. Adjust it till the suitable rate of flashing and light.
2. Synchronize flash install:
(1) The same as single flash install(1)(2)
(2) Connect line process: Connect the XLR plug (1-1,2-2,3-3) and use the
3 core shielding wire.
(3) Do as the illustration of connection(Reference instruction of function).
in
Light 1
out
in
Light 2
out
in
out
Light N
(4) Set the change over-switch of the first lamp as mother-machine to
MASTER, the others set to SLAVE.
(5) Connect the power. August the mother-machine till the suitable.
3.Handing installation:
Select the fixed lamp hold on the ceiling or pothhook on the wall. Screw
brackets to lamp hook . Through the safety-rope at safety-hole in one side of
the bracket, make it round the lamp hook and then through it from the other
side safety-hole bracket.
NOTE: The safety chain(cord) must hold at least 10 times the weight
of the fixture. Never use the carrying handles for secondary attachment.
Products should be install immobility.
Laser Light
Attention
¾ Please do not open the bottom cover yourself without permission.
Operate it accord the user manual. Please call the technician in case the
machine broken down.
¾ Do not use it under the damp and rain.
¾ Pay attention to prevent the light from strong bump.
¾ Prevent the dust into the product
¾ Keep the vent-pipe well while working.
¾ Keep the plug insert well before put into power.
¾ Don't look the light directly to prevent make some destroy with eyes.
Don't light or extinguish frequently, otherwise the life span of the light
tube will be shortened.
¾ In view of the special characters, after operated the light an hour the
product shall be paused about 15 minutes before be used next time.
¾ Don't touch the product and draw the power line if you hand wet.
¾ Keep the space between light equipments and the lighted things more
than one meter.
¾ Devise not open before it is cool off.
¾ Apertures to the ventilation during devise is working not uncover.
¾ During devise is working unconditional avoid that the cable can to touch
the case.
¾ Don't open the cover for there have no parts the user can repair.
¾ Don't operate the light without lamps.
¾ If the semiconductor laser doesn't as light as before or there have some
destroy with lens or other parts, please contact the distributor in time.
¾ When you want to retransfer the products, you'd better use the original
package to shockproof.
¾ Laser Class 3B product. Supervision obligatory! National regulations
must be watched for installation adjust and use.
¾ This appliance is to use by qualified personnel only.
¾ Unintended reflections of the laser beam from glossily or metallic parts
is dangerous.
¾ Not use the LASER exterior! Flight-security may be impaired.
¾ Appliance shall only be used with rated voltage and frequency.
¾ Use the appliance only in the described manner.
¾ If the appliance is not used, turn off and unplug.
Laser Light
.3.
¾ Do not use or stop the use if the appliance is damaged.
¾ Disconnect the appliance before cleaning and maintenance.
¾ The appliance should not be impeded by covering the ventilation
openings.
Instruction & Function
★Operation board instruction:
・POWER: Power socket; fuse out-in.
・FAN: Cooling fan.
・ON/OFF SECURITY KEY SWITCH: security on/off key switch
・MUSIC: Sound operation sensitivity.
・INPUT: Synchronized-signal control input socket.
・OUTPUT: Synchronized-signal control output socket.
・MICRO: Sound receive.
・ SLAVE MASTER: The MASTER is single or mother-machine in
synchronization. The SLAVE is son-machine in synchronization.
★Function
・ Sound operation change the comb laser beam, rotundity, starriness,
time tunnel and laser war.
・Single or synchronization control are available.
・ Use disconnected procedure to reflect out disconnection at the same
time.
Laser Light
Specification
・Voltage: AC230V~50Hz
・Rated power: 13W
・Net weight: 4.2Kg
・Size: 34×30.5×16cm
・Light source: 532nm/30mW (Green)
・Fuse: F0.25A 250V
Maintain
¾ Maintenance should be performed every 15-day period, by using a
sponge which is dipped with alcohol, rather than wet cloth or other
chemical liquid, to clean the mirror.
¾ Warning: Power must be disconnected before maintenance or repair. Do
not look at the light source directly.
ATTENTION: DISCONNECT INPUT POWER BEFORE MAINTAIN.
DON'T LOOK STRAIGHTLY AT THE LIGHT SOURCES.
NOTE: Don't seperate laser machine from laser power and repaire them
by yourself otherwise no good repair service will be supplied.
Announcement
¾ When we delivery the goods out of factory, it's function is good and
package is well. All users must obey all noted attentions and operate
rules. We won't serve free of charge repair if the destroy be caused by
your own wrong operate. All the problems which be caused by not
operate accord the user manual also not the duty of distributor.
¾ We won't inform again if there have any more changes of user manual.
Laser Light
.5.
ELECTRICAL DIAGRAM
y motor
Orange
red
green
brown
yellow
Orange
red
green
brown
yellow
LASER DIODE
x motor
Module port
Pin 5 cable
Pin 5 cable
Module board
of laser diode
Power board of
laser diode
Transformer 20W
Control board
Master /slave
switch
Potentiometer
Mic
Sh ield cable
Power supply
Fan
Pin 3 plastic canon plug
Laser Light
SITUATION
REASON
FAULTY
PART No.
Damaged fuse
Fuse
09-00-2001-00
Damaged transformer
20w/10.8v
06-00b004-01
No power
No music-active/
no maser /slave
mode
Damaged potentiometer 1m potentiometer
26-2A-201-00
Damaged MIC
16-04-0001-00
Mic
Damaged master-slave Switch
mode switch
Damaged IC AT89C52 Ic at89c52
Internal wires are
disconnected
Damaged IC 75176
Dirty lens
No light output
/light output low/
no blanking
08-08-0001-00
00-89C52-00
Carefully study the electrical
circuit diagram to check for
loose connections
Ic 75176
00-75176-00
Carefully study the electrical
Circuit diagram to check for 12-03-0009-00
Loose connections
Lens break off
Lens
07-01-0005-01
damaged laser diode
Laser diode
26-2A-201-00
damaged control PCB Control pcb
00-89C52-00
Damaged CPU of
control PCB
26-2A-201-00
Icat89c52
Control pcb
No patterns
Damaged CPU of
control board
Ic78e58
00-89C52-00
Step motor
15-00-0022-00