1
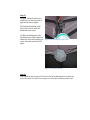
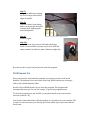
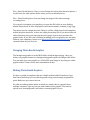
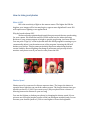
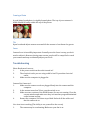
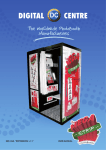
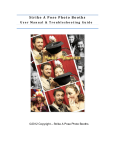
S t r i k e A P o s e P h o t o B o o t h s U s e r M a n u a l & T r o u b l e s h o o t i n g ©2012 Copyright – Strike A Pose Photo Booths Strike A Pose Photo Booth User Manual Table of Contents I Just Received My Photo Booth ..........................................................................................3 Running the booth for the first time. ................................................................................4 DSLR Remote Pro.....................................................................................................................8 Changing Photo Booth Graphics .........................................................................................9 How to take good photos.................................................................................................... 10 What is ISO? ......................................................................................................................................10 Framing a Photo ..............................................................................................................................10 Troubleshooting ................................................................................................................... 11 I Just Received My Photo Booth Congratulations on purchasing the most complete, portable, and technologically advanced photo booth on the market. Your photo booth is all contained within that one beautiful box. Go ahead and stand the booth upright so the monitor is on top. It should rotate easily up as it has wheels like a dolly built in. Open the back door and take a look inside. Inside you will see the 22” Touch screen computer, Canon Camera, power outlet, Full Spectrum light bulb box, photo umbrella, light socket w/adapter, & extension cord. If you purchased the Deluxe Photo Booth there will also receive a red backdrop, two white door curtains, popup canopy with wrinkle free drapes, and a carabineer for holding up the lights. Ready to test out the booth? Running the booth for the first time. Step 1) Run extension cord through side hole to an outlet and plug it in. Booth should power up: fan, camera, printer etc. (If booth does not power up.) 1-‐ Verify the booth power strip switch is turned on. 2-‐Try/ test different outlet. Step 2) Power up computer by pressing the ON button. The Dell computers power button is located on the left side of computer on the bottom, inside of booth. Step 3) - Deluxe Photo Booth Owners A) Remove Tent from Bag and place upright with legs on top. B)Extend all legs to first the distance position then flip to legs on ground. C) Expand tent as far as possible, at each corner on top of leg press metal tabs and push ceiling bar of tent to full locked position. D) Align front door so booth is on right side upon entering. (Front door is the open side of the black fabric.) Figure 1 : Open tent bag Figure 2: Clear cloth from tent legs Figure 3: Extend tent legs Figure 4: Open tent and extend frame Figure 5 : Push up here to open tent Figure 6: Tent frame needs to be above this button Figure 7: Finished tent look for Step 3 Step 3) – Freestanding Photo Booth – skip steps 4,6, and 7 Step 4) A) Hang light fixture left of booth by Carabineer on highest bar of tent in corner. Carabineer will not shut. B) Attach all four light bulbs to socket. Try not to touch glass section of bulbs directly. C) Wrap cord around bar of tent and run on outside of curtain through side hole of booth. Plug into lowest socket in power strip. Light should Figure 8: Hang Carabineer over frame turn on, then unplug until ready to open booth. -‐If lights do not turn on check light switch on back of socket. Figure 1 0: Attach light bulbs Figure 9: Pull out socket cord from tent Figure 11: Finished lighting Step 5) A) Open umbrella and locate small hole on black section of light socket above lights. B) Grab small tubular knob just to left of hole with left hand and twist open. C) While holding knob with left hand insert open umbrella shaft into hole until poking out other side and twist knob till tight. Figure 12: Umbrella hole in light socket Figure 13: Finished umbrella Step 6) The backdrop has a strip of Velcro on the back that matches up with the top of the tent. Use the Velcro strips to secure the backdrop to the tent. Step 7) Hang front white doors using the Velcro strips with folded edges in middle. Step 8) Grab two chairs from dining hall or event worker and place in booth with walking space from background. Step 9) Figure 14: Attach door fabric to Velcro Turn on Lights Step 10) Get table/chair for props on left hand side facing booth. Count number of props so you leave with the same number. Get table for photo album on right side. Now the booth is setup. You just need to start the program. Figure 15: Finished Booth DSLR Remote Pro Once your booth is setup and the computer is powered up, take a look at the desktop. The desktop is nice and clean. It has only DSLR remote pro, an images folder, and a DSLR template folder. Double click on DSLR Remote Pro to start the program. The program will automatically start up. You can hit “escape” to get to the program menu. To start the program you can click file > start photo booth or you can use the shortcut (control + f4). Your booth comes with either a blank template or customized to your business. The screen is a touch screen so you literally just touch which option you want and the booth runs. File > Photo Booth Options : Here you can change the time it takes between photos. I would leave the other options alone unless you are technically savvy. File > Video Booth Options: You can change the length of the video message recordings here. If you need to customize your graphics you open the file folder on your desktop named Photo Booth. In here are graphics with various names, example] 1.jpg, 2.jpg, The names need to remain the same. There is a folder called photo booth templates within the photo booth file. In here are adobe photo shop files. If you do not have an editor like photo shop you can open the other jpeg’s in paint and customize the graphic there. If you don’t feel confident in making your own graphics we can make them for your company. Contact us at Mike@strikeapose-‐photobooths.com and we can make them for you for a fee. Changing Photo Booth Graphics The background graphic is in the DSLR folder called background.jpg. Once you make your graphic rename it to background.jpg and replace the image in the folder. You can make your own graphic as a 1240x1800 pixel image or by using our online graphic maker. Contact us for more information on this. Making Photo Booth Graphics We have a couple of templates that are editable within Adobe Photoshop. If you don’t have Photoshop you can edit the graphic using a more simple program like paint. Make sure you center the text. We offer an online graphic maker in which you simply choose a graphic from multiple templates, type in your text, and it makes you a graphic. You can also upload your own image and it will make a custom graphic for you. How to take great photos What is ISO? ISO is the sensitivity of light to the camera sensor. The higher the ISO the brighter your images will be but may begin to appear more digitalized. Lower ISO will require more lighting to not appear dark. Why do I need to know ISO? We have already optimized and tested the aperture and shutter speed setting for your camera. We found that an ISO of 3200 works best for indoor shooting. However if your pictures appear to bright or people are glowing, just lower the iso. You can press “Page Up” on the keyboard while the DSLR program is running or you can manually adjust it on the main screen of the program. Lowering the ISO will darken your photos. This becomes particularly important when doing daytime events outdoors. Natural lighting can change in an instant and you may need to monitor each photo to see if you need to raise/lower the ISO. Figure 18: ISO too low Figure 19: ISO too high Shutter Speed Shutter speed is a term used to discuss exposure time. The longer the shutter is open the more light that can reach the camera sensor. The longest shutter time you should ever have is 1/160. If you went to say 1/80 your photos have a chance of blurring because the shutter is open too long. You can also lighten or darken your photos by changing the shutter speed. If your pictures are too bright (maybe because of the sun during an outside event) you can increase your shutter speed to 1/200 or even higher to lower the brightness. Framing a Photo A good photo booth photo is a tightly framed photo. The top of your customer’s heads should fit barely within the top of the picture. Figure 20: Well framed photo Tilt Open booth and adjust camera zoom and tilt the camera to best frame the guests. Focus Camera focus is incredibly important. Generally once the focus is setup you don’t need to adjust it. However during some events, people will be compelled to touch your camera and may accidentally adjust your focus. Troubleshooting Photo Booth won’t turn on 1. Is the power switch on the outlet turned on? 2. The electrical outlet you are using could be bad. Try another electrical outlet. 3. Make sure the computer is plugged in. Camera Not Connected -‐ 1. Make sure the camera cords are plugged firmly into the camera and the computer. 2. Is the camera turned on? If not, turn the switch to on. 3. Make sure two versions of the DSLR Remote Pro are not running. Close the current window and make sure they isn’t another program minimized on the bottom toolbar. 4. Restart the computer if all these steps failed. Recheck all the cables and that the camera is on. Live view is not working (The ability to see yourself on the screen) 1. The camera may be overheating. Make sure your fan is on. 2. Turn the camera off then back on. 3. Make sure the DSLR option for live view is turned on. Camera is timing out 1. Your camera should be set to manual. If your camera is on automatic, you need to set it to manual. 2. If that isn’t the issue, restart the camera. 3. If that doesn’t work, check all your cables. Is the camera on? 4. Restart the computer Printer is not connected 1. The printer is unplugged. Check the back of the computer and the back of the printer to make sure they are both plugged in firmly. DSLR Remote Pro is frozen 1. Close the program. 2. If you cant close the program. Press the following keys at the same time: alt + Control + Delete. Under the task manager end the task DSLR Remote Pro. 3. Worst Case scenario, restart the computer. The tent wont popup or is stuck. 1. Push the tent legs back together. 2. Take a look inside. Make sure one of the interior bars are not bent the wrong way. All four elbows should be visible. It may take some force to pull it back to the center.