1
S t r i k e A P o s e P h o t o B o o t h s U s e r M a n u a l & T r o u b l e s h o o t i n g G u i d e ©2012 Copyright – Strike A Pose Photo Booths
Strike A Pose Photo Booths User Manual
Table of Contents Shipping Inspection Checklist .............................................................................................3 I Just Received My Photo Booth ..........................................................................................4 Out of the box Setup................................................................................................................5 Running the booth for the first time. ................................................................................5 Starting the Photo Booth Program.....................................................................................9 Switching to Video Booth Mode ....................................................................................... 10 Video Booth Settings............................................................................................................ 10 Switching back to Photo Booth Mode............................................................................. 10 Changing Photo Booth Background Graphics ............................................................. 11 Making Photo Booth Graphics.......................................................................................... 11 How to take great photos ................................................................................................... 12 What is ISO? ......................................................................................................................................12 Shutter Speed ...................................................................................................................................12 Framing a Photo ..............................................................................................................................13 Tilt........................................................................................................................................................13 Focus ...................................................................................................................................................13 Green Screen Shooting........................................................................................................ 14 Introduction .....................................................................................................................................14 Creating the backgrounds and selecting green screen shooting....................................14 Switching Backgrounds ................................................................................................................16 Using profiles to select from more than 8 backgrounds ...................................................16 Troubleshooting ................................................................................................................... 19 Shipping Inspection Checklist Do not accept your photo booth from the shipper until you’ve completed this checklist! __ -‐ Exterior laminate free of damage __ -‐ Photo Booth corners free of damage __ -‐ Photo Booth interior free of damage __ -‐ Electronic Equipment in good shape We ship your photo booth in pristine condition and we want yours to arrive that way. If you see any serious problems with your photo booth, decline it from the shipper. They will send it back to us and we can then repair it or send you another brand new photo booth. If you are uncertain about anything please give us a call. Once you have signed off on your photo booth please continue with the rest of the user manual and Enjoy!
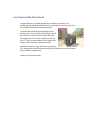
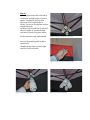
I Just Received My Photo Booth Congratulations on purchasing the most complete, portable, and technologically advanced photo booth on the market. Your photo booth is all contained within that one beautiful box. Go ahead and stand the booth upright so the monitor is on top. It should rotate easily up as it has wheels like a dolly built in. Open the back door and take a look inside. Inside you will see the 22” Touch screen monitor, Acer Aspire One Laptop, Canon Camera, and power outlet. Your photo booth canopy will arrive separately. The canopy will ship with a protective bag, red backdrop, two shear white doors, and the canopy itself. Ready to test out the booth? Out of the box Setup Watch our setup videos online at http://www.strikeapose-‐photoboothsforsale.com/training/ Step 1) The camera is shipped with it facing backwards for extra protection. Turn the camera so it faces the front of the photo booth (Towards the touch screen and camera hole). If the camera won’t move easily, you may need to loosen the bolt underneath the camera that holds it in place. After moving the camera, tighten the bolt underneath so it’s snug. Step 2) Find the photo booths black power cord. You will find this in the bottom of your photo booth. If you don’t see it in the bottom, check inside one of the boxes in the bottom of the booth. Plug this black power cord into your extension cord. Step 3) Install the printer paper and ink. Watch our video online or read the printer instructions for how to do this. http://www.strikeapose-‐photoboothsforsale.com/usingthebooth.html Running the booth for the first time. Watch our setup videos online at http://www.strikeapose-‐photoboothsforsale.com/training/ Step 1) Plug in the extension cord/power cord combo into the power outlet on the side of the photo booth and then into an electrical outlet. The Photo Booth components should power up (camera, printer, and fan). You will have to turn your laptop on manually. (If booth does not power up.) 1-‐ Verify the power outlet switch on the side of the booth is turned on. Verify the power strip on the inside is turned on. 2-‐Try/ test different outlet. Step 2) Open up your laptop and turn it on. Step 3) – (Does not apply to Freestanding photo booth) A) Remove Tent from Bag and place upright with legs on top. B)Extend all legs to the third (tallest) setting. Then flip the tent over. C) Expand tent as far as possible, at each corner on top of leg press metal tabs and push ceiling bar of tent to full locked position. D) Align front door so booth is on right side upon entering. (Front door is the open side of the black fabric.) Figure 1 : Open tent bag Figure 2: Clear cloth from tent legs Figure 3: Extend tent legs to highest setting Figure 4: Open tent and extend frame Figure 5 : Push up here to open tent Figure 6: Tent frame needs to be above this button Figure 7: Finished tent look for Step 3 Step 4) A) Hang light fixture left of booth by Carabineer on highest bar of tent in corner. Carabineer will not shut. B) Attach all four light bulbs to socket. Try not to touch glass section of bulbs directly. C) Wrap cord around bar of tent and run on outside of curtain through side hole of booth. Plug into lowest socket in power strip. Light should turn on, then unplug until ready to open booth. -‐If lights do not turn on check light switch on back of socket. Figure 1 0: Attach light bulbs Figure 8: Hang Carabineer over frame Figure 9: Pull out socket cord from tent Figure 11: Finished lighting Step 5) A) Open umbrella and locate small hole on black section of light socket above lights. B) Grab small tubular knob just to left of hole with left hand and twist open. C) While holding knob with left hand insert open umbrella shaft into hole until poking out other side and twist knob till tight. Figure 12: Umbrella hole in light socket Figure 13: Finished umbrella Step 6) The backdrop has a strip of Velcro on the back that matches up with the top of the tent. Use the Velcro strips to secure the backdrop to the tent. Step 7) Hang front white doors using the Velcro strips with folded edges in middle. Step 8) Grab two chairs from the venue and place them in the booth. Leave approximately 1.5 feet from the back of the canopy. Step 9) Figure 14: Attach door fabric to Velcro Turn on Lights Step 10) Get out your photo booth props. Count number of props you have so you leave with the same number. Get a table for a photo album (if applicable). Now the booth is setup. You just need to start the program. Figure 15: Finished Booth Starting the Photo Booth Program
Once your booth is setup and the laptop is powered up, take a look at the desktop. The desktop is nice and clean. It has only the program (DSLR Remote Pro), two folders (one for photo booth mode, one for video booth), and the folder where the images save. Double click on DSLR Remote Pro (camera icon) to start the program. The program will automatically start up. You can hit “escape” to get to the program menu. To start the program again, you can click file > Start Full Screen Photo Booth or you can use the shortcut (control + f4). Switching to Video Booth Mode 1.
2.
3.
4.
5.
Within the DSLR remote pro program. Click File > Photo Booth Settings On the bottom left of the popup menu hit “Load.” Click Desktop (Within the popup window) Open folder Named “Video Graphic Renamed Background goes here” Double click the xml file inside named “Videoboothsettings” Video Booth Settings To adjust the video booth settings do the following. Click on File > Videobooth settings. Here you can adjust the “Duration of captured video clip” and the countdown time before the video starts. We don’t recommend using a video clip duration longer than 20 seconds. Switching back to Photo Booth Mode 1.
2.
3.
4.
5.
Within the DSLR remote pro program. Click File > Photo Booth Settings On the bottom left of the popup menu hit “Load.” Click Desktop (Within the popup window) Open folder Named “Photo Graphic Renamed Background goes here” Double click the xml file inside named “Photoboothsettings” Changing Photo Booth Background Graphics
The background graphic is in the “Photo Graphic renamed background goes here for photo booth” folder called background.jpg. You can make your own graphics using photoshop, paint, or our online graphic maker. Once you have your graphic you simply drag it and drop it into the “Photo graphic renamed background goes here” folder found on the desktop. Read the next section to learn how to make a graphic. Making Photo Booth Graphics Email us if you would like some Photoshop templates for making your own graphics. Info@strikeapose-‐photobooths.com. If you are making your own graphics, the graphic needs to be 1240x1800 pixels. That leaves room for 2 photo strips split at 620 pixels. The 20 pixels on the left and right edge of the graphic (0-‐20, and 1220 to 1240) will be cutoff by the program/printer. Do not make the graphic 1200 pixels because it will not line up correctly. You can also create an overlay graphic that print on top of the photos. Create the file the same 1240x1800 size but make sure it’s transparent besides the images you want to overlay. Name the file overlay.png and put it inot the “photo graphic renamed background goes here” folder. ***We also offer an exclusive online graphic maker in which you simply choose a graphic from multiple templates; type in the text you want and it makes you a graphic. You can also upload your own image and it will make a custom graphic for you. Click Here for a video on how to use the online software. http://strikeapose-‐photobooths-‐for-‐sale.weebly.com/software.html How to take great photos
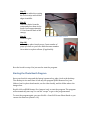
What is ISO? ISO is the sensitivity of light to the camera sensor. The higher the ISO the brighter your images will be but may begin to appear more digitalized. Lower ISO will require more lighting to not appear dark. Why do I need to know ISO? We have already optimized and tested the aperture and shutter speed setting for your camera. We found that an ISO of 3200 works best for indoor shooting. However if your pictures appear to bright or people are glowing, just lower the iso. You can press “Page Up” on the keyboard while the DSLR program is running or you can manually adjust it on the main screen of the program. Lowering the ISO will darken your photos. This becomes particularly important when doing daytime events outdoors. Natural lighting can change in an instant and you may need to monitor each photo to see if you need to raise/lower the ISO. Figure 18: ISO too low Figure 19: ISO too high Shutter Speed Shutter speed is a term used to discuss exposure time. The longer the shutter is open the more light that can reach the camera sensor. The longest shutter time you should ever have is 1/160. If you went to say 1/80 your photos have a chance of blurring because the shutter is open too long. You can also lighten or darken your photos by changing the shutter speed. If your pictures are too bright (maybe because of the sun during an outside event) you can increase your shutter speed to 1/200 or even higher to lower the brightness. Framing a Photo A good photo booth photo is a tightly framed photo. The top of your customer’s heads should fit barely within the top of the picture. You adjust the frame by using the cameras zoom function. You have to adjust the zoom manually with your hand by twisting the large part of the camera lens. Figure 20: Well framed photo Tilt Open booth and adjust camera zoom and tilt the camera to best frame the guests. The camera can tilt by loosening the bolts on the left/right of the camera mount and tilting it up/down. Re-‐tighten the bolts when you’re done adjusting. Focus Camera focus is incredibly important. Generally once the focus is setup you don’t need to adjust it. However during some events, people will be compelled to touch your camera and may accidentally adjust your focus. You adjust the camera focus by adjusting the small lens at the very front of the camera. Generally you only need small twists of this lens to change the focus. Green Screen Shooting Introduction Green screen shooting (aka chromakeying) is the technique of shooting a subject in front of a green background and automatically replacing the background with a background image. Green screen shooting is used for movie special effects and for TV e.g. weather forecasts where the presenter stands in front of a computer generated weather map. It is available for stills photobooth shooting with DSLR Remote Pro for Windows, NKRemote, PSRemote and Webcam Photobooth. The live view images shown to the user are also green screened allowing users to interact with the virtual background and see what the final photos will look like. An optional foreground overlay image can also be used with transparent or semi-‐transparent areas. The users will appear behind the foreground overaly and in front of the background image. Different green screen backgrounds can be used for each shot in the photo booth shooting sequence -‐ this is great fun at kids parties! DSLR Remote Pro for Windows, NKRemote, PSRemote and Webcam Photobooth all support green screen shooting in stills photo booth mode and no additional software is required. You will also need a green background and suitable lighting. Green backgrounds and background supports are available from professional photographic suppliers and online stores such as Amazon. Tungsten or fluorescent continous lighting is recommended for green screen shooting as this is easier to setup than flash. Flash is harder to use because it is difficult to get the right lighting for both the live view images, which don't use flash, and the actual photos which do use flash. The green background should be placed as far behind the subjects as possible to avoid problems with shadows being cast on the background as these may cause problems with the green screen removal. The green background should be evenly lit to give the best results. Creating the backgrounds and selecting green screen shooting The green screen background image can be any suitable JPEG image and should be placed in the photobooth images folder. For best results the background and overlay images should be the same aspect ration as the photos being taken by the camera otherwise they may appear stretched or squashed. The aspect ratio of photos from Canon and Nikon DSLRs is 3:2 (e.g. 1500 x 1000 pixels). Photos from Canon PowerShot cameras have an aspect ratio of 4:3 (e.g. 400x300 pixels). The aspect ratio of photos from a webcam will depend on the webcam being used and the resolution setting. The background image should be named greenscreen_background.jpg and saved in the photobooth images folder. An optional foreground overlay image can be used by creating a PNG image and saving it as a file named greenscreen_overlay.png in the photobooth images folder. The PNG overlay image should be a 24-‐bit color image with transparency information in the alpha channel. Different backgrounds and foreground overlays can be used for each shot in the shooting sequence by saving additional images in the photobooth images folder and naming them greenscreen_background_2.jpg, greenscreen_background_3.jpg etc. Once the foregrounds and backgrounds have been created green screen shooting can be enabled by selecting fullscreen photobooth mode and typing Ctrl+G to display the green screen setup dialog: First click on the checkbox to enable green screen display and then adjust the sliders so that all of the green screen background is replaced with the background image but the foreground subject is unaffected. The easiest way to do this is to move the "Green threshold" slider to the left until most of the background is replaced and then fine tune the settings by moving the "Red level" and "Blue level" sliders to the right. The best settings to use will depend on the lighting conditions and the quality of the green background. If areas of the subject show the background the settings are too strong and should be reduced by moving the red and blue sliders to the left of the green slider to the right. Select the "Blue screen mode" to use a blue background instead of a green one. Select the "Save copy of greenscreened photos in photo booth mode" option to save a green screened copy of the individual photos taken by the camera. These are stored with the original photos from the camera in a subfolder named "Greenscreen". Switching Backgrounds Users can be given a choice of backgrounds by saving each set of backgrounds in a different photobooth images folder and then use the profiles feature to switch between them. For example suppose you have backgrounds from major cities around the world and would like to let the user choose which set to use you could create separate photobooth image folders for each city and name them something like London, Paris and New York. Next copy the green screen background images, screen images etc. into each folder. Then edit the photobooth settings to use the first photobooth folder, London, and save the settings as London.xml. Repeat the process by setting the photobooth images folder to Paris and save the settings as Paris.xml and finally set the folder to New York and save the settings as New York.xml. Next click on the "Profiles..." button and assign profile 1 to London.xml, profile 2 to Paris.xml and profile 3 to New York.xml. The profiles dialog should look something like this: The ready.jpg screens in each of the folders should be edited to show which green screen background has been selected. Then when the photobooth is running the user can select London by typing Shift+Ctrl+1, Paris by typing Shift+Ctrl+2 or New York by typing Shift+Ctrl+3. If you are using external buttons and a StealthSwitch II to control the booth you could program dedicated buttons to select each profile. Alternatively you could use a touchscreen and define touchscreen areas to select each profile. An alternative way of switching green screen backgrounds is to copy the new greenscreen_background.jpg image (and optional greenscreen_overlay.png image) into the photo booth images folder. The photo booth software will detect that the background image has changed and will update the display automatically. A simple AutoHotKey script can be used to switch backgrounds when certain keys are pressed. The example script below is designed to be used with an external numeric kaypad and allows the + and -‐ keys to switch to the next or previous background and the other keys to load up to 14 different backgrounds directly. To use the script simply copy name the various backgrounds gs1.jpg, gs2.jpg, gs3.jpg etc. and copy them into the photobooth images folder. Then run the script by double clicking on it using Windows Explorer. Using profiles to select from more than 8 backgrounds The photo booth software only allows up to 8 profiles at a time to be defined but this doesn't limit the number of profiles that can be used. By using the {photoboothDir} token to specify the profiles each photo booth images folder can have its own set of 8 profiles. If each profile selects a different photo booth images folder it allows another 8 profiles to be used. For example suppose you want to offer the user the choice of 14 different green screen backgrounds this can be done be defining two pages of 7 profiles with a touchscreen action to switch between the two. First create 14 photo booth image folders to hold the different backgrounds and name them folder1, folder2, folder3 etc. Then save 7 sets of settings in folder1 and name them as follows: profile1.xml -‐ this switches to folder9 to display the next screen of 7 images profile2.xml -‐ this switches to folder1 to select green screen background 1 profile3.xml -‐ this switches to folder2 to select green screen background 2 profile4.xml -‐ this switches to folder3 to select green screen background 3 profile5.xml -‐ this switches to folder4 to select green screen background 4 profile6.xml -‐ this switches to folder5 to select green screen background 5 profile7.xml -‐ this switches to folder6 to select green screen background 6 profile8.xml -‐ this switches to folder7 to select green screen background 7 These settings files can then be copied to folders folder2 to folder7. Next save another 7 sets of settings in folder8 and name them as follows: profile1.xml -‐ this switches to folder1 to display the previous screen of 7 images profile2.xml -‐ this switches to folder8 to select green screen background 8 profile3.xml -‐ this switches to folder9 to select green screen background 9 profile4.xml -‐ this switches to folder10 to select green screen background 10 profile5.xml -‐ this switches to folder11 to select green screen background 11 profile6.xml -‐ this switches to folder12 to select green screen background 12 profile7.xml -‐ this switches to folder13 to select green screen background 13 profile8.xml -‐ this switches to folder14 to select green screen background 14 These settings files can then be copied to folders folder9 to folder14. Then define profiles using the {pho toboothDir} token as shown below: All the photo booth image folders can contain exactly the same screens etc. but will have different greenscreen_background.jpg images. You could then create two ready.jpg screens: one to be saved in folder1 to folder8 showing thumbnails for backgrounds 1 to 7 and a button for the next page and the other to be saved in folder8 to folder14 showing thumbnails for backgrounds 8 to 14 with a button for the previous page. A highlight could be added to the currently selected background by editing the ready.jpg screen in each folder to make it easier for the user to navigate through the various screens. An example of how to use profiles to select from 16 green screen backgrounds using DSLR Remote Pro for Windows and a 1920x1080 touchscreen can be downloaded from:gs_bg_example.zip Please see the ReadMe.txt files for usage instructions. Please note that this example is slightly more elaborate to the one described above as it allows up to 8 backgrounds to be selected from each page. Troubleshooting
Find troubleshooting tips, phone numbers, and support online at http://strikeapose-‐photoboothsforsale.com/support/ Photo Booth won’t turn on 1.
Is the power switch on the outlet turned on? 2.
The electrical outlet you are using could be bad. Try another electrical outlet. 3.
Make sure the computer is plugged in. Camera Not Connected -‐ 1.
Make sure the camera cords are plugged firmly into the camera and the computer. 2.
Is the camera turned on? If not, turn the switch to on. 3.
Make sure two versions of the DSLR Remote Pro are not running. Close the current window and make sure they isn’t another program minimized on the bottom toolbar. 4.
Restart the computer if all these steps failed. Recheck all the cables and that the camera is on. Live view is not working (The ability to see yourself on the screen) 1.
The camera may be overheating. Make sure your fan is on. 2.
Turn the camera off then back on. 3.
Make sure the DSLR option for live view is turned on. Camera is timing out 1. Your camera should be set to manual. If your camera is on automatic, you need to set it to manual. **** There are two locations the camera should be set to manual. On the lens itself (left side) make sure the switch is to MF not AF. On the top right of the camera the wheel should also be set to "M" 2. If that isn’t the issue, restart the camera. 3. If that doesn’t work, check all your cables. Is the camera on? 4. Restart the computer Printer is not connected 1. The printer is unplugged. Check the back of the computer and the back of the printer to make sure they are both plugged in firmly. 2. 2nd possibility is the following: Click on the start menu and select “Devices and Printers” on the right side. See if there is a Hiti Printer, Hiti Printer 1 Copy, etc. If there are copies of the Hiti printer, right click on the highest copy and select “Make Default Printer”. Then right click the printer again and select printer preferences. Go to the paper tab on top and then set the paper size to 4x6 combo print and then select apply. DSLR Remote Pro is frozen 1. Close the program. 2. If you cant close the program. Press the following keys at the same time: alt + Control + Delete. Under the task manager end the task DSLR Remote Pro. 3. Worst Case scenario, restart the computer. The tent wont popup or is stuck. 1. Push the tent legs back together. 2. Take a look inside. Make sure one of the interior bars are not bent the wrong way. All four elbows should be visible. It may take some force to pull it back to the center. Images not printing centered on the photo strip. 1. This can happen for a couple reasons. If your prints have always come out not completely centered please follow our solution online. http://strikeapose-‐photoboothsforsale.com/support/ 2. If this is a new occurrence please check your paper roll within the printer. Sometimes if you replaced the paper and didn’t tighten the roll all the way or left the edge of the paper not flush with the edge of the paper container it will pull it at a slight angle. Retract the paper, pull it out of the printer and make sure it is tight and flush with the edge. See the online video on how to change the paper. http://strikeapose-‐photoboothsforsale.com/support/