1
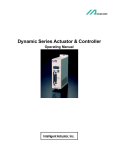
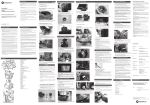
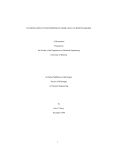
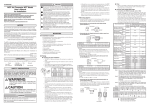
ORDERING INFORMATION PIPETTE DISPOSABLE TIP Cat.No. Capacity Q’ty/Bag 00‐31N‐1000 Volume Range 0.2~1.0mL 00‐MPT‐1 Cat.No. 0.2~1.0mL 1000 00‐31N‐2000 0.4~2.0mL 00‐MPT‐2 0.4~2.0mL 200 00‐31N‐5000 1.0~5.0mL 00‐BMT2‐X 1.0~5.0mL 200 00‐31N‐10000 2.0~10.0mL 00‐BMT2‐Z 2.0~10.0mL 200 Model 3100 is provided with accessories as follows. *One Piston Installing Tool *One grease *Tip(s) : 00‐31N‐1000 with 2pcs(00‐MPT‐1) , 00‐31N‐2000 with 2pcs(00‐MPT‐2), 00‐31N‐5000 with 1pc(00‐BMT2‐X), 00‐31N‐10000 with 1pc(00‐BMT2‐Z). *An operation manual For repair service or further information you may contact your local distributor: MANUFACTURER: 2014.Ver.1 CERTIFIED ISO9001 ● Thank you very much for purchasing MODEL 3100 ● Please read this manual carefully before using. Always Pursuing Originality Since 1944 MODEL 3100
MACRO PIPETTE
OC
K
LO
L
5
4
3
2
ml
1
FEATURES •
•
•
•
Excellent accuracy and precision. Four different volume ranges, 1mL, 2mL, 5mL and 10mL. Volume of pipetting is easily changed and fixed. Light design permits easy handling without fatigue. SPECIFICATIONS Accuracy: ± 1.0% Cat.No. Reproducibility Precision: ≤ 1.0% Volume Range Increments 00‐31N‐1000 0.2~1.0mL 0.1mL 00‐31N‐2000 0.4~2.0mL 0.1mL 00‐31N‐5000 1.0~5.0mL 0.5mL 00‐31N‐10000 2.0~10.0mL 0.5mL OPERATING PROCEDURES 1. Loosen the lock nut and turn the push button until the yellow cross‐line corresponds to the desired volume indicated by the volume scale, then lock by tightening the lock nut. 2. Attach a disposable tip firmly onto the syringe nozzle. 3. Depress thepush button several times to ensure smooth movement of the piston. Push the push button to the first stop. (Fig. 1, B) 4. Place the disposable tip into liquid to a depth of 3 to 4mm. 5. Slowly return the push button to its original “up” position. (Fig. 1, A) The sample will be drawn into the tip. The push button should be carefully released so not to flush the liquid into the tip of the pipette, especially for 5mL and 10mL model. 6. Touch the tip to the inside wall of the receiving vessel. 7. Press the push button again to the first A
stop to dispense most of the liquid. Wait one second with the push button B
Held in this position, then continue to C
push the push button to its limit (Fig. 1, C). This forces out the last remaining liquid Fig.1
from the tip. Keep the knob fully depressed until the tip is removed from the receiving vessel. Remove used tip from the pipette. ①
②
③
REPLACEMENT OF PARTS 1. PUSH BUTTON – It is easily removed by pulling it off the push button. 2. SYRINGE – Turn it counterclockwise to remove from the syringe connector. (Fig. 3) 3. PISTON – After removal of the syringe, keep the push button fully depressed, and push a pin by the probe of the piston installing tool. To install the piston, push the pin by opposite side of the tool. (Fig. 4) Note: The piston should be lubricated with a small amount of silicone grease provided after certain interval or after cleaning of the piston when contaminated. ④
PARTS AND
MATERIALS
5
4
3
2
1
ml
① Push Button
(Polypropylene)
② Shaft
(Stainless Steel)
③ Lock Nut
(Alumite plated
⑤
Aluminium)
④ Volume Scale
(Polymethylpentene)
⑥
⑦
⑤ Body
(Polypropylene)
⑥ Syringe Connector
(Polypropylene)
⑧
⑦ Piston
⑨
(Fluoroplastic)
⑧ Syringe
(Polypropylene)
⑩
⑨ Disposable Tip
(Polypropylene)
Fig.2
Syringe
Connector
Syringe
Connector
Plunger
Pin
Piston
Installing
Tool
Syringe
(to remove)
Syringe
Nozzle
Fig.3
Piston
Fig.4
(to install)