1
TM-S2000 Product Information Guide
Accessories . . . . . . . . . . . . . . . . . . . . . . . . . . . . . . . . . . . . . . . . . . . . . . . . . . . . . . . . . . . . . . . . . . . . . . . . . . . . . . . . . . . . . . . . .
Options . . . . . . . . . . . . . . . . . . . . . . . . . . . . . . . . . . . . . . . . . . . . . . . . . . . . . . . . . . . . . . . . . . . . . . . . . . . . . . . . . . . . . . . . . . . .
Specifications. . . . . . . . . . . . . . . . . . . . . . . . . . . . . . . . . . . . . . . . . . . . . . . . . . . . . . . . . . . . . . . . . . . . . . . . . . . . . . . . . . . . . . . .
Computer requirements . . . . . . . . . . . . . . . . . . . . . . . . . . . . . . . . . . . . . . . . . . . . . . . . . . . . . . . . . . . . . . . . . . . . . . . . . . .
Scanning specifications . . . . . . . . . . . . . . . . . . . . . . . . . . . . . . . . . . . . . . . . . . . . . . . . . . . . . . . . . . . . . . . . . . . . . . . . . . . .
MICR specifications . . . . . . . . . . . . . . . . . . . . . . . . . . . . . . . . . . . . . . . . . . . . . . . . . . . . . . . . . . . . . . . . . . . . . . . . . . . . . .
Media specifications . . . . . . . . . . . . . . . . . . . . . . . . . . . . . . . . . . . . . . . . . . . . . . . . . . . . . . . . . . . . . . . . . . . . . . . . . . . . . .
Print specifications . . . . . . . . . . . . . . . . . . . . . . . . . . . . . . . . . . . . . . . . . . . . . . . . . . . . . . . . . . . . . . . . . . . . . . . . . . . . . . .
Reliability . . . . . . . . . . . . . . . . . . . . . . . . . . . . . . . . . . . . . . . . . . . . . . . . . . . . . . . . . . . . . . . . . . . . . . . . . . . . . . . . . . . . . . .
Electrical specifications . . . . . . . . . . . . . . . . . . . . . . . . . . . . . . . . . . . . . . . . . . . . . . . . . . . . . . . . . . . . . . . . . . . . . . . . . . . .
Safety . . . . . . . . . . . . . . . . . . . . . . . . . . . . . . . . . . . . . . . . . . . . . . . . . . . . . . . . . . . . . . . . . . . . . . . . . . . . . . . . . . . . . . . . . .
Dimensions and weight. . . . . . . . . . . . . . . . . . . . . . . . . . . . . . . . . . . . . . . . . . . . . . . . . . . . . . . . . . . . . . . . . . . . . . . . . . . .
Environmental conditions . . . . . . . . . . . . . . . . . . . . . . . . . . . . . . . . . . . . . . . . . . . . . . . . . . . . . . . . . . . . . . . . . . . . . . . . .
Electronic Endorsement. . . . . . . . . . . . . . . . . . . . . . . . . . . . . . . . . . . . . . . . . . . . . . . . . . . . . . . . . . . . . . . . . . . . . . . . . . . . . . .
Lights and Buttons . . . . . . . . . . . . . . . . . . . . . . . . . . . . . . . . . . . . . . . . . . . . . . . . . . . . . . . . . . . . . . . . . . . . . . . . . . . . . . . . . . .
LEDs . . . . . . . . . . . . . . . . . . . . . . . . . . . . . . . . . . . . . . . . . . . . . . . . . . . . . . . . . . . . . . . . . . . . . . . . . . . . . . . . . . . . . . . . . .
Buttons. . . . . . . . . . . . . . . . . . . . . . . . . . . . . . . . . . . . . . . . . . . . . . . . . . . . . . . . . . . . . . . . . . . . . . . . . . . . . . . . . . . . . . . . .
Setting Up . . . . . . . . . . . . . . . . . . . . . . . . . . . . . . . . . . . . . . . . . . . . . . . . . . . . . . . . . . . . . . . . . . . . . . . . . . . . . . . . . . . . . . . . . .
Installing an Ink Cartridge . . . . . . . . . . . . . . . . . . . . . . . . . . . . . . . . . . . . . . . . . . . . . . . . . . . . . . . . . . . . . . . . . . . . . . . . . . . . .
Loading Sheets (Checks). . . . . . . . . . . . . . . . . . . . . . . . . . . . . . . . . . . . . . . . . . . . . . . . . . . . . . . . . . . . . . . . . . . . . . . . . . . . . . .
Ejecting Sheets (Checks). . . . . . . . . . . . . . . . . . . . . . . . . . . . . . . . . . . . . . . . . . . . . . . . . . . . . . . . . . . . . . . . . . . . . . . . . . . . . . .
Scanning ID Cards . . . . . . . . . . . . . . . . . . . . . . . . . . . . . . . . . . . . . . . . . . . . . . . . . . . . . . . . . . . . . . . . . . . . . . . . . . . . . . . . . . .
Reading Magnetic Stripe Cards (Factory Option) . . . . . . . . . . . . . . . . . . . . . . . . . . . . . . . . . . . . . . . . . . . . . . . . . . . . . . . . . . .
Check Flow Process . . . . . . . . . . . . . . . . . . . . . . . . . . . . . . . . . . . . . . . . . . . . . . . . . . . . . . . . . . . . . . . . . . . . . . . . . . . . . . . . . .
Cleaning the Case . . . . . . . . . . . . . . . . . . . . . . . . . . . . . . . . . . . . . . . . . . . . . . . . . . . . . . . . . . . . . . . . . . . . . . . . . . . . . . . . . . . .
Cleaning the Print Head . . . . . . . . . . . . . . . . . . . . . . . . . . . . . . . . . . . . . . . . . . . . . . . . . . . . . . . . . . . . . . . . . . . . . . . . . . . . . . .
Cleaning the MICR Unit. . . . . . . . . . . . . . . . . . . . . . . . . . . . . . . . . . . . . . . . . . . . . . . . . . . . . . . . . . . . . . . . . . . . . . . . . . . . . . .
Cleaning the Scanner Glass . . . . . . . . . . . . . . . . . . . . . . . . . . . . . . . . . . . . . . . . . . . . . . . . . . . . . . . . . . . . . . . . . . . . . . . . . . . .
Troubleshooting . . . . . . . . . . . . . . . . . . . . . . . . . . . . . . . . . . . . . . . . . . . . . . . . . . . . . . . . . . . . . . . . . . . . . . . . . . . . . . . . . . . . .
Clearing a Jam . . . . . . . . . . . . . . . . . . . . . . . . . . . . . . . . . . . . . . . . . . . . . . . . . . . . . . . . . . . . . . . . . . . . . . . . . . . . . . . . . . . . . . .
Paper jam . . . . . . . . . . . . . . . . . . . . . . . . . . . . . . . . . . . . . . . . . . . . . . . . . . . . . . . . . . . . . . . . . . . . . . . . . . . . . . . . . . . . . . .
Card jam. . . . . . . . . . . . . . . . . . . . . . . . . . . . . . . . . . . . . . . . . . . . . . . . . . . . . . . . . . . . . . . . . . . . . . . . . . . . . . . . . . . . . . . .
Transporting the TM-S2000 . . . . . . . . . . . . . . . . . . . . . . . . . . . . . . . . . . . . . . . . . . . . . . . . . . . . . . . . . . . . . . . . . . . . . . . . . . . .
Self-test . . . . . . . . . . . . . . . . . . . . . . . . . . . . . . . . . . . . . . . . . . . . . . . . . . . . . . . . . . . . . . . . . . . . . . . . . . . . . . . . . . . . . . . . . . . .
Error and Information Codes . . . . . . . . . . . . . . . . . . . . . . . . . . . . . . . . . . . . . . . . . . . . . . . . . . . . . . . . . . . . . . . . . . . . . . . . . .
Maintenance Counters . . . . . . . . . . . . . . . . . . . . . . . . . . . . . . . . . . . . . . . . . . . . . . . . . . . . . . . . . . . . . . . . . . . . . . . . . . . . . . . .
NV Memory . . . . . . . . . . . . . . . . . . . . . . . . . . . . . . . . . . . . . . . . . . . . . . . . . . . . . . . . . . . . . . . . . . . . . . . . . . . . . . . . . . . . . . . .
Memory Switches . . . . . . . . . . . . . . . . . . . . . . . . . . . . . . . . . . . . . . . . . . . . . . . . . . . . . . . . . . . . . . . . . . . . . . . . . . . . . . . . . . . .
Sensors. . . . . . . . . . . . . . . . . . . . . . . . . . . . . . . . . . . . . . . . . . . . . . . . . . . . . . . . . . . . . . . . . . . . . . . . . . . . . . . . . . . . . . . . . . . . .
2
2
3
3
3
3
4
4
5
5
5
5
5
5
6
6
6
6
7
7
8
8
8
9
9
9
9
9
10
10
10
10
10
10
11
12
12
12
12
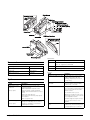
Connections
Accessories
Accessory
Part number
Ink cartridge (black) (SJIC8(K))
C33S020484
Cleaning kit
KWEPS-KCAP1
MICR cleaning sheet
CS1B15WS
Connector
Description
Power
PS-180 Model M159B (also called Adapter J)
24 V ± 7%, supplied with TM-S2000
USB 2.0
Type B. Plug and play.
USB HUB
Optional. Type A. Two-port USB HUB connector
Drivers
Driver
Functions
EPSON TM-S2000 Driver (API)
This API supports scanning, MICR
reading, endorsement, ID card
scanning, and printing on checks or
receipt sheets,
Windows printer driver for
TM-S2000
Only supports printing on cut sheets.
Does not support scanning, MICR,
endorsement, or ID cards.
TM Virtual Port Driver for TM-S
Changes the interface so that a printer
connected with the USB interface acts
as if it is connected with the serial/
parallel interface.
Options
Option
Description
MSR (magnetic stripe
reader) unit
Two-frequency coherent phase (2F2)
recognition method.
Reads ISO/IEC7810-compliant media.
Supports magnetic format ISO 7811-6,
AAMVA, previous California driver’s license
format.
Bidirectional swipe direction.
3.94 - 39.4"/s {10 - 100 cm/s} swipe speed.
Built-in buzzer.
99.5% recognition rate.
(factory option)
USB 2.0 hub (Type A)
(factory option)
2 - Epson TM-S2000
Two-port USB-HUB connector.
High-speed = 480 Mbps theoretical value.
Full-speed = 12 Mbps theoretical value.
USB self-power function.
Use this driver when you use
applications that directly send control
commands to printers connected with
the serial/parallel interface.
This driver supports the print function
only. The scanner function is not
available.
EPSON TM-S2000 TWAIN
driver
Supports scanning, MICR reading,
endorsement, ID card scanning. Does
not support printing on cut sheets.
Data format
Driver
Functions
EPSON TM-2000 Java wrapper
Controls the TM-S2000MJ from Java
applications. Used with the TM-S2000
Driver.
TM-S2000 Utility
Uses or sets the following functions of
the TM-S2000MJ.
❏
❏
❏
❏
❏
❏
❏
EPSON SANE for TM-S2000 for
Linux
EPSON TM-2000 Printer Driver
for Linux
Current Settings
Operation Check
Storing Logos
Backup/Restore
Printing Control
Device Settings
MSR Settings (only for MSR
installed models)
Supports scanning, MICR reading,
endorsement, and ID card scanning.
Does not support printing on cut
sheets.
Black and white (driver eliminates background on checks):
TIFF (200 dpi, binary, CCITT/Group 4
compression complies with ANSI X9.100181-2007) and BMP.
Grayscale:
TIFF, JPEG, BMP, raster.
24-bit color
TIFF, JPEG, BMP.
IR
Same as black and white and grayscale.
Image size (max.) 4.32" × 10.04" {109.728 × 255 mm}
Height note
4.32" {109.728 mm} is image sensor
height.
Length note
9.25" {235 mm} + margin = actual
maximum length of scanned document.
Supports printing on cut sheets. Does
not support scanning, MICR,
endorsement, or ID cards.
Driver auto size function automatically
tries to match document size to area to
scan.
Auto size adjustment
Crops image and adjusts to document size,
based on driver settings.
Specifications
Computer requirements
110-dpm model
200-dpm model
CPU
≥ Pentium 4, 2.0 GHz or
equivalent.
≥ Intel Core 2 Duo, 1.8
GHz or equivalent
Memory
≥ 512 MB, or above the
minimum operating system
requirement.
≥ 1 GB, or above the
minimum operating
system requirement.
HDD
≥ 30 MB free before installation of the driver.
Interface
USB 2.0 Hi-speed
Scanning specifications
Cut sheets
ID cards
Resolution
(dpi) (H × L)
300 × 300, 240 × 240,
200 × 200,120 × 120,
100 × 100
600 × 600, 300 × 300,
200 × 200
4.65"/s {118 mm/s}
Speed
(approx.)
31.5"/s {800 mm/s},
23.62"/s {600 mm/s},
15.75"/s {400 mm/s},
9.45"/s {240 mm/s}
Scan method
Contact image sensor (CIS).
Gradation
Binary (black and white) for cut sheets
only.
256-level grayscale.
24-bit color.
Binary and 256-level grayscale using
infrared (IR).
Data compression format
JPEG (grayscale) and CCITT/Group 4
(black and white).
Image quality
Complies with IQA (Image Quality
Assurance) set by FSTC (Financial
Services Technology Consortium).
Image deskewing
Based on TM-S2000 driver settings.
Insertion direction and scanning process
Place side printed with magnetic ink
outward with MICR ink at bottom.
Both sides of check are scanned.
Characters recognized by the optical character reader (OCR)
E13B, CMC7
OCR A, OCR B
Bar codes: UPC-A, UPC-E, JAN13/
EAN13, JAN8/EAN8, CODE39. ITF,
CODE128
OCR recognition rate
≥ 98% at 77°F {25°C} using characters
conforming to ANSI standards.
≥ 99% at 77°F {25°C} for bar codes.
MICR specifications
Supported fonts E13B, CMC7
(Alphabetic characters not supported.)
Recognition rate
≥ 99% at 77°F {25°C} using check paper
conforming to ANSI/ISO standards.
Checks must be flat without curls, folds,
wrinkles, tears, staples, or clips.
TM-S2000 must not be shaken or jarred
during reading.
Checks must be fed in straight.
Epson TM-S2000 - 3
The product should not be used near
magnetic fields, such as that created by a
display device.
Media specifications
Cut-sheet paper
Single ply only.
Maximum print speed
31.50"/s {800 mm/s}
23.62"/s {600 mm/s}
15.75"/s {400 mm/s}
9.45"/s {240 mm/s}
Print speed depends on image type. You
cannot print at 31.50"/s when printing an
image.
Height
2.36" to 4.72" {60 to 120 mm}
Length
4.72" to 9.25" {120 to 235 mm}
Thickness
0.003" to 0.008" {0.075 to 0.2 mm}
Character specifications
Weight
16 to 32 lb {60 to 120 g/m2}
Alphanumeric
ISO/IEC7810-compliant
Extended graphics
ID cards
95 characters
128 characters × 11 pages
(including user-defined page)
Height
2.12 to 2.13" {53.92 to 54.18 mm}
Length
3.37 to 3.38" {85.47 to 85.90 mm}
International
37 characters
Thickness
0.02 to 0.033” {0.5 to 0.84 mm}
Structure
Warpage
≤ 0.079" {2 mm}
Font A: 12 × 24
(including 2-dot horizontal spacing)
Font B: 9 × 17
(including 2-dot horizontal spacing)
MSR cards
ISO/IEC7810-compliant
(option)
Height
Length
2.12 to 2.13" {53.92 to 54.18 mm}
(same as ID cards)
3.37 to 3.38" {85.47 to 85.90 mm}
(same as ID cards)
Thickness
0.03 to 0.033" {0.76 to 0.84 mm}
Warpage
≤ 0.079" {2 mm}
Paper feed specifications
Feed method
Friction feed
Feed pitch
0.054" {0.1369 mm}
Feed speed
31.50"/s {800 mm/s}
15.75"/s {400 mm/s}
9.45"/s {240 mm/s}
Print specifications
Auto sheet feeder (ASF)/pocket capacities
Print method
Ink-jet printed line.
Nozzles
360 in 2 lines.
The auto sheet feeder feeds each document into the
TM-S2000 and the pockets hold the processed output.
Dot density
180 × 180 dpi.
Print color
Black.
Print direction
Fixed stroke control.
Print height
2" {50.8 mm}.
Lines printable
12 maximum with Font A.
16 maximum with Font B.
Line spacing
1/6" default {4.23 mm}.
Programmable by command.
Print width
3.94 to 8.46" {100 to 215 mm},
depending on paper length.
Characters per line (depending on paper length)
59 to 126 (Font A)
78 to 169 (Font B)
Character spacing
2 dots/0.01" {0.28 mm} for both fonts
Programmable by command.
4 - Epson TM-S2000
ASF capacity
≤ 100 sheets
(paper thickness = ≤ 0.005" {0.13 mm})
Total thickness of all sheets must be ≤
0.51" {13 mm}, including uneven sheets
(that were folded and straightened out,
etc.).
Insert the sheets along the bottom of the ASF.
One-pocket model
Pocket capacity
≤ 100 sheets
(paper thickness = ≤ 0.005" {0.13 mm})
Total thickness of all sheets must be ≤
0.51" {13 mm}, including uneven sheets
(that were folded and straightened out,
etc.).
Two-pocket model
Safety
Main pocket capacity
≤ 100 sheets
(paper thickness = ≤ 0.005" {0.13 mm})
Total thickness of all sheets must be ≤
0.51" {13 mm}, including uneven sheets
(that were folded and straightened out,
etc.).
EMI
Sub pocket capacity
≤ 50 sheets
(paper thickness = ≤ 0.005" {0.13 mm})
Total thickness of all sheets must be ≤
0.51" {13 mm}, including uneven sheets
(that were folded and straightened out,
etc.).
Paper must be flat without curls, folds, wrinkles, tears, staples,
or clips. Otherwise, jams may occur.
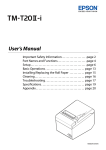
The ASF uses a translucent photosensor. Do not use paper
with holes at the sensor position. The illustration below shows
where holes are prohibited.
FCC/ICES-003 Class A
Safety standards
UL60950-1/
CSA C22.2 No. 60950-1
(Tested using Epson PS-180 Model M159B (Adapter J).)
Dimensions and weight
One-pocket model (H × W × D)
Two-pocket model (H × W × D)
6.97" × 9.84" × 10.39" (14.76")
6.97" × 6.58" × 11.76" (16.13")
{177 × 250 × 374.8 mm}
{177 × 167 × 298.8 (409.8) mm}
The dimensions in parentheses above represent the depth with the
pocket(s) fully extended.
One-pocket model
Two-pocket model
9.9 lb {4.5 kg} approx.
9.9 lb {4.5 kg} approx.
Environmental conditions
Temperature
Operating: 50 to 95°F {10 to 35°C}
Storage:
Packed –4 to 140°F {–20 to 60°C}
(≤ 120 hours at –4 or 140°F)
Humidity (no condensation)
Operating: 20 to 80% RH
Storage: 20 to 85% RH (ink charged)
Maximum absolute rated temperature
158°F {70°C}
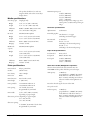
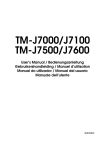
Reliability
2 million sheets, including reading of
checks and ID cards
ASF
2 million sheets
Print head
6 billion shots per nozzle
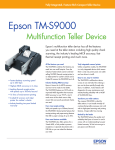
80
Humidity (%)
Life
55
20
MSR (option) life:
200,000 passes
MTBF:
180,000 hours
MCBF:
4,940,000 processes
Electrical specifications
Power supply
PS-180 Model M159B (also called
Adapter J) supplied with the TM-S2000
Supply voltage
24 V ± 7%
Ripple voltage
300 m Vpp maximum
Current consumption (cut-sheet unit)
Operation
1.3 A average, approx.
2.4 A peak, approx.
Standby
0.2 A average, approx.
50oF {10oC}
81oF {27oC} 95oF {35oC}
Temperature
Electronic Endorsement
The product can paste an electronically written image across
the front or back of entire scanned image of the check or other
document. The document does not need to be printed out for
the endorsement to be incorporated onto the check image.
It is possible to change images one at a time. Multiple images
can be pasted. Pasted images can use logos, graphics, and
TrueType fonts.
Epson TM-S2000 - 5
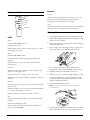
Lights and Buttons
Buttons
Cleaning
(Power) LED
Error LED
Document LED
When this button is held down for 3 seconds or more, the
product performs manual cleaning of the ink nozzles.
Cleaning is needed when the print is too light.
ID Card LED
Ink LED
Cleaning button
Power
This button on the front of the unit turns power on. Holding
the button down for 3 seconds powers the unit down.
Setting Up
LEDs
Power
On when TM-S2000 power is on.
Off when power is off.
Flashes during certain operations, such as power up or down,
ink charging, or cleaning.
1. The package should contain the unit, a USB cable, an AC
cable, 2 ink cartridges (SJIC18(K)), the AC adapter, a setup
guide, and a user’s manual.
2. Remove all packing tape, packing foam, and other shipping
materials from the unit.
3. Leave enough room around the product to open the covers,
pull out the ASF tray, and fully extend the pocket(s).
Error
Off when TM-S2000 is online.
On when product is offline (except during self-test and
cleaning).
Flashes if there is an error. (See “Error and Information
Codes” below.)
Document
On when cut-sheet paper (checks or other cut sheets in the
ASF) is set as the paper source.
4. Do not place the unit near a magnetic field, such as a
display device. (This reduces the MICR reader accuracy.)
5. Install the unit horizontally (within a tilt of ± 5°).
Off when ID card (or roll paper) is set as the source.
6. Make sure no cords or cables are caught inside the product.
Flashes when the product is waiting for document insertion or
removal.
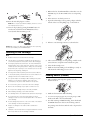
7. Connect the USB cable to the Type B connector on the
product. Attach the cable with the cable harness. (See the
bubble in the illustration below.)
ID Card
On when card is set as the paper source or when an ID card is
in the card slot.
8. Connect the USB cable to the host
Note: Do not turn on the unit until you have installed the
necessary drivers.
Off when cut sheet is set as the source. (The Document LED
is on.) (Also off if roll paper is selected.)
Flashes if waiting for a card to be inserted or removed.
Ink
On if no ink cartridge is installed or if a new ink cartridge is
required.
Off when the ink supply is OK.
Flashes if ink is low or if the ink cartridge installed is not
correct for the TM-S2000.
6 - Epson TM-S2000
9. Connect the AC cable to the AC adapter; then connect the
adapter’s DC cable to the unit’s power supply connector.
1. When ink is low, the Ink LED flashes; when ink is out, the
Ink LED stays on, the Error LED comes on, and printing
stops.
2. If the unit is not on already, turn it on.
10. Insert the AC cable plug into a socket.
3. Open the ink cartridge cover by putting a finger under the
left side of the cover and pulling it up, as shown below.
Caution: Use only the specified AC adapter, and never connect
to an improper power source.
11. Turn on the product by pressing the Power button. To
turn the unit off, hold down the Power button for 3
seconds, until the Power LED goes off.
4. If there is a used cartridge, remove it, as shown below.
Caution: Be sure the AC cable remains plugged in when powering
the unit off, and always use the Power button.
Installing an Ink Cartridge
Note:
❏
Read the instructions included with the cartridge.
❏
The first time an ink cartridge is installed in the product, ink is
consumed to prepare the unit to print. (This is called charging.)
❏
Ink charging requires about 4 minutes. The Power LED flashes
during this time. Do not turn off the unit, open any of the covers,
or tilt the product during this operation. Tilting can cause leakage,
and powering off or opening a cover causes the process to start
again from the beginning, wasting ink.
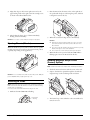
5. Take a new ink cartridge out of its package, install it in the
correct direction, and push it until it clicks into place.
6. Close the ink cartridge cover.
7. Make sure the Power LED goes from flashing to steady on.
This means the ink loading process is done.
❏
Ink usage varies with the printing environment and conditions.
❏
To insure print quality, a minimum amount of ink remains in the
cartridge when the Ink and Error LEDs come on.
Loading Sheets (Checks)
❏
Use genuine Epson ink cartridges. Other cartridges may cause
damage not covered by the warranty, and under some
circumstances, may cause erratic behavior in the product.
1. Fully extend the ASF and pocket guide(s). See the
illustration below.
❏
Do not touch the green IC card on the side of the cartridge.
❏
Remove the ink cartridge only to replace it with a new one.
❏
Do not open the cartridge until you are ready to install it.
❏
After installing a cartridge, use it within 6 months.
❏
Use cartridges before the expiration date printed on the package.
2. Make sure the Document LED is flashing.
❏
Do not puncture the convex area at the bottom of the ink
cartridge, and do not remove the transparent film on the bottom
of the cartridge.
3. You can insert single-ply paper only. You can put up to 100
checks in the ASF to be fed automatically.
❏
A used cartridge may have ink on the convex area on the bottom
of the cartridge. Avoid touching that area.
❏
Dispose of cartridges in accordance with local laws and
regulations.
❏
Transport or store this product for a long period after the unit has
been used, make sure an ink cartridge is installed.
4. For check scanning and MICR reading, insert checks with
the MICR characters at the bottom and facing outward.
For printing, insert the sheets with the side to be printed on
the inside.
Epson TM-S2000 - 7
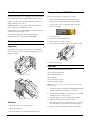
5. Align sheet edges to the bottom right corner and to the
paper loading mark on the right side of the cartridge cover,
as shown in the callout bubble below.
6. After loading the sheets, let go of them immediately.
Feeding starts automatically.
2. Place the ID card in the insertion slot on the right side of
the pocket with the photo side facing the pocket, and slide
it along the bottom of the slot.
3. When the card starts feeding, release it immediately.
Caution: Do not open covers while processing is in progress.
Caution:
❏ When the ID card is feeding, a part of it comes out of the
card carrier slit at the back of the product. Be sure not to
block this slit.
Ejecting Sheets (Checks)
When the checks are ejected, remove them. (For two-pocket
models, paper may be ejected into the main and sub pockets
separately, depending on the application.)
❏
Do not touch the ID card as it is being ejected. Doing so may
distort the image or cause other problems.
❏
Do not open the covers while processing is in progress.
4. When the ID card is ejected and the ID CARD LED is
flashing again, remove the ID card from the slot.
Reading Magnetic Stripe Cards
(Factory Option)
Note: Cards must match those listed under “Media Specifications.”
1. Check the insertion direction with the arrow on the card.
Caution: Do not overfill pockets with checks (main pocket: 100; sub
pocket: 50). Otherwise, a paper jam may occur.
2. Swipe it downward or upward through the slot with the
magnetic stripe on the card facing inside and down.
Scanning ID Cards
Note: Cards must match those listed under “Media Specifications.”
Make sure the ID card is flat and does not have excessive bending,
cracks, folds, or embossing.
Do not touch the external terminal when using an IC card.
1. Make sure the ID CARD LED is flashing.
ID Card LED
flashing
8 - Epson TM-S2000
3. The buzzer beeps 1 time when the read is successful and 3
times for an error.
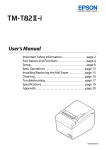
Check Flow Process
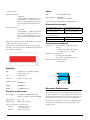
Cleaning the Scanner Glass
The TM-S2000 performs processes in the following order:
Clean the scanner glass if it gets dirty from ink or paper dust,
or at least once every 6 months or 100,000 passes.
4. The scanner section scans
both sides of the sheet.
3. The printer section prints
on the paper.
1. Pull the scanner cover lever to open the scanner cover, as
shown below.
5. The processed sheets are then
ejected into the pocket(s).
1. Sheets (checks) are loaded into
the Auto Sheet Feeder (ASF).
Note: For the best reading results, clean the scanner glass once a
week or after 2000 sheets.
2. The MICR reader section reads
the magnetic characters on the
check.
Cleaning the Case
1. Turn off the product by holding the Power button down
for 3 seconds. After the Power light goes out, unplug the
AC cord.
2. Wipe dirt off the case with a dry cloth or a slightly
moistened cloth.
Caution: Never use alcohol, benzine, thinner, or any other solvents.
Doing so may damage or break parts made of plastic or rubber.
2. Lightly wipe the two glass areas with a soft, dry cloth, as
shown in the picture below.
Caution: To prevent spots or stains, do not use synthetic detergent,
benzine, water, or other liquids to clean. Never apply any liquid
directly to the scanner glass.
Cleaning the Print Head
When print becomes faint or uneven, but the Ink LED is not
flashing, the print head may need to be cleaned.
1. Press and hold down the Cleaning button for 3 seconds.
2. During cleaning, the Power LED flashes. When cleaning is
complete, the light is steady.
Note: Cleaning nozzles uses ink, so do not clean unless necessary.
Do not power the unit off or open a cover during cleaning.
Cleaning the MICR Unit
Dirt or dust on the MICR unit can increase errors in reading
magnetic characters. Clean the MICR unit every 6 months or
100,000 passes.
Use KIC Team, Inc., Waffletechnology® MICR cleaning
cards (part number CS1B15WS)
3. If the scanner glass is smeared with grease, oil, ink, etc.,
wipe the glass with a cloth lightly dipped in alcohol.
Discard the cleaning sheet after one use. For the best reading
results, clean the MICR reader once a week or after 2000
sheets. It is recommended to clean the scanner after cleaning
the MICR reader.
4. Close the scanner cover firmly until it clicks in place.
Epson TM-S2000 - 9
Troubleshooting
Transporting the TM-S2000
If control panel lights are on or flashing, read the information
in the tables under “Error and Information Codes,” below.
Follow the steps below to transport the product.
If paper or an ID card is jammed, follow the instructions
under “Clearing a Jam,” below.
If MICR cannot be read properly, follow the instructions
under “Cleaning the MICR Unit,” above.
1. Once an ink cartridge has been installed in the unit,
transport the product with the ink cartridge installed.
As shown below, tape over the holes in the cartridge to
prevent any leakage.
If scanned data is not normal, follow the instructions under
“Cleaning the Scanner Glass,” above.
If you need to ship the product for repair, follow the
instructions under “Transporting the TM-S2000”.
2. Turn off the unit.
3. Confirm that the Power LED is off.
Clearing a Jam
4. Remove the power supply connector.
5. Store pocket guide and the ASF guide inside the product.
Paper jam
Depending on where paper has jammed, open the MICR
cover or scanner cover to remove the jammed paper. See the
illustrations below.
6. Pack the unit upright.
Self-test
The self-test checks the following functions:
❏ Control circuit functions
Opening MICR cover
❏ Product mechanisms
❏ Print quality
❏ Control software version
❏ Memory switch settings
Note: Paper for the self-test must be cut sheets of ≥ 2.76 × 5.98"
{≥ 70 × 152 mm}.
1. To start the self-test, hold down the Cleaning button while
turning on the product with all the covers closed.
2. The Document LED flashes, and the unit goes into standby
awaiting insertion of a sheet of paper.
Opening scanner cover
3. Insert the first sheet of paper, and the product begins
printing. Three sheets are required for the test.
Card jam
4. After printing the current product status, the unit ejects the
sheet and waits for you to insert the next sheet of paper.
1. Open the scanner cover as shown above.
5. Insert another sheet, and the unit begins printing again.
2. Remove the ID card.
3. Close the scanner cover until it clicks firmly in place.
10 - Epson TM-S2000
6. After a number of lines have been printed, the product
indicates the end of the self-test by printing
“***COMPLETED***.” The unit initializes and goes into
normal print mode.
Recoverable errors
Error LED (orange)
Cause and solution
Mechanism position error
This occurs when the ASF hopper or
pocket switch board sensor cannot
detect the home position during
initialization.
Approx. 320 ms
Error and Information Codes
The unit can recover if the error is
cleared and then an instruction is sent
from the driver or if the product is
turned off and back on.
Status messages
Power LED (green)
Cause and solution
Power on operation
The Power light flashes until the unit is
fully powered on and ready for
operation.
2. The ASF failed to feed paper.
3. A paper or ID card jam was detected.
The Power light flashes while the
product goes through an orderly power
down procedure.
4. The product detected paper that was
too long or too short.
Remove the jammed paper or other
error, be sure the covers are closed, and
send an instruction from the driver or
turn the unit off and back on again.
160 ms on; 2400 off
Document LED (green)
Cause and solution
Waiting for paper insertion
The unit is waiting for a check to be
inserted.
160 ms intervals
One of 4 things has happened:
1. Paper is not ejected after a set
amount of paper has been fed.
320 ms intervals
320 ms intervals
Power off operation
Paper jam error
Insert paper for processing.
Paper feed error
320 ms intervals
One of 5 things has happened:
1. Double-feeding of cut-sheet paper.
2. Check paper was inserted upside
down or back to front.
ID Card LED (green)
Cause and solution
3. Incorrect paper feeding caused an
error in confirmation mode.
Waiting for ID card insertion
The unit is waiting for an ID card to be
inserted.
4. Data is longer than the specified
length of the cut-sheet paper.
Insert card into slot for processing.
5. Noise was detected during MICR
reading.
160 ms intervals
Waiting for ID card removal
160 ms on twice; then
2080 ms off
The unit is waiting for an ID card to be
removed.
After the cause of the error is fixed, the
unit can recover from the error if it
receives an instruction from the driver
or if the unit is turned off and back on.
Remove the card.
Unrecoverable errors
Automatically recoverable errors
Error LED (orange)
Cause and solution
Print head too high or low
temperature status
Recovers automatically when the print
head temperature reaches the normal
level.
Error LED (orange)
Cause and required action
Drive circuit error
One of the following problems has
occurred:
1. An internal circuit is not working
correctly.
2. There is an abnormality in the
thermistor.
320 ms intervals
Turn off power as soon as
possible.
Read/write error
A read/write check did not end
normally.
Turn off power as soon as
possible.
High voltage error
Power supply voltage is too high.
Turn off power as soon as
possible.
Epson TM-S2000 - 11
Error LED (orange)
Cause and required action
Low voltage error
Power supply voltage is too low.
Turn off power as soon as
possible.
CPU pp
execution error
The CPU is trying to execute an
order to an invalid address.
Turn off power as soon as
possible.
Communication device error
IJ maintenance error
The TM-S2000 has an NV (nonvolatile) graphics memory
area for registering logos and other images and a users NV
memory area for storing text data to be used multiple times
and for storing information on customizing and maintenance.
Storing graphics requires the TM-S2000 Utility, which is
described in the TM-S2000 Utility Manual.
An error has occurred with a USB
device.
The user also can create a user-defined page to print characters
not resident in the printer.
Turn off power as soon as
possible.
Memory Switches
The ink jet mechanism does not
work correctly.
Turn off power as soon as
possible.
Double-feeding detector noise
error
NV Memory
The double-feed detector detected
noise.
Setting the memory switches requires the TM-S2000 Utility,
which is described in the TM-S2000 Utility Manual. The
following settings are available.
Setting
Function
Power on information Do not transmit (Initial value)
Transmit
Double-feeding detector error
Maintenance error
Turn off power as soon as
possible.
Auto line feed
The double-feed detector does not
work correctly.
Remote wake-up
Turn off power as soon as
possible.
Time in use for
regular ink jet head
cleaning
One of the following problems has
occurred:
Validation settings
1. An internal circuit is not working
correctly.
2. There is an abnormality in the
thermistor.
Turn off power as soon as
possible.
Always disabled (Initial value)
Always enabled
Enabled (Initial value)
Disabled
hh:mm
(Initial value = 20:00)
Top margin (Initial setting = 0)
Bottom margin (Initial setting = 0)
Slip settings
Top margin (Initial setting = 0)
Bottom margin (Initial setting = 0)
Time without use
before unit enters
power saver mode
Can be set from 100 ms to 3600 ms
(Initial setting = 3000 (5 minutes))
Maintenance Counters
Sensors
The product has the following maintenance counters, all of
which are cumulative and resettable.
The scanner has the following sensors.
Sensor
Function
Counter
Units
Paper Sensors
Number of ink jet head shots (column A)
1000 shots
ASF sensor
Located in the feeder paper path. When this
sensor detects paper, the unit turns on the
Document LED.
Paper length
sensor
Located in the cut-sheet paper path. Used for jam
detection if paper remains in the path and for
internal processing.
Middle sensor
Located in the cut-sheet paper path. Used for jam
detection if paper remains in the path and for
internal processing.
Number of ink jet head shots (column B)
1000 shots
Count of pump motor operations
Operations
Count of ASF feeds
Feeds
Count of cut-sheet paper scans
Scans
Count of card scans
Scans
Count of magnetic ink characters read
Reads
Count of pocket switches
Switches
Count of hopper opens/closes
Opens/closes
Duration of product operation
Hours
12 - Epson TM-S2000
Sensor
Function
Paper Sensors
Eject sensor
Located in the cut-sheet paper path. This sensor
detects whether paper has been ejected properly
and stored in the pocket(s).
Pocket near full
sensors
These sensors are present only in two-pocket
models. One sensor is in the main pocket, and one
is in the sub pocket. They detect whether the
sheets in the pockets need to be removed.
ID card sensor
Located in the card path. This sensor detects
whether a card is inserted or removed. Based on
the sensor status, the ID CARD indicator comes
on, turns off, or flashes.
Cover sensors
Ink cartridge cover
sensor
Monitors whether the cover is open or closed. If
the sensor detects a cover open, processing stops
immediately and the unit goes offline. When the
cover is closed, the unit goes back online. Opening
a cover during processing (MICR reading,
scanning, etc.) affects the quality of the result, and
the process may need to be redone.
MICR cover sensor Monitors whether the cover is open or closed. If
the sensor detects a cover open, processing stops
immediately and the unit goes offline. When the
cover is closed, the unit goes back online. Opening
a cover during processing (MICR reading,
scanning, etc.) affects the quality of the result, and
the process may need to be redone.
Scanner cover
sensor
Monitors whether the cover is open or closed. If
the sensor detects a cover open, processing stops
immediately and the unit goes offline. When the
cover is closed, the unit goes back online. Opening
a cover during processing (MICR reading,
scanning, etc.) affects the quality of the result, and
the process may need to be redone.
Other sensors
Pocket sensors
These sensors are only on two-pocket models.
They are located on the switch board that
determines which pocket receives the ejected
sheet. There is another sensor that keeps track of
the current switch board position.
ASF hopper sensor This sensor detects the position of the hopper that
holds sheets in the ASF.
Cartridge sensors
Cartridge sensor
Detects whether the ink cartridge is installed or
not. If no cartridge is detected, the Ink and Error
lights both come on.
Ink low sensor
This sensor detects when the cartridge becomes
low and when it is out of ink. When ink is low, the
Ink LED flashes. When the cartridge is out of ink,
the Ink light becomes steady, the Error light comes
on, and the unit goes offline.
© 2014 Epson America, Inc., 2/14
EPSON is a registered trademark and EPSON Exceed Your Vision is a
registered logomark of Seiko Epson Corporation.
General Notice: Other product names used herein are for identification
purposes only and may be trademarks of their respective owners. Epson
disclaims any and all rights in those marks.
Epson TM-S2000 - 13