1
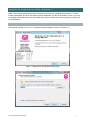
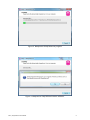
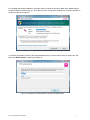
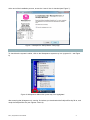
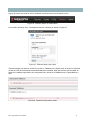
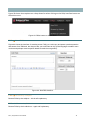
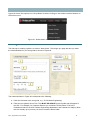
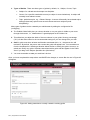
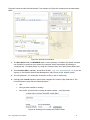
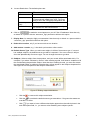
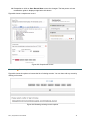
National University of Science and Technology (Zimbabwe) NuSpace Institutional Repository Library http://ir.nust.ac.zw Library Reports 2012-11 SubjectsPlus User Manual Kujenga, Amos EIFL. http://ir.nust.ac.zw/xmlui/handle/123456789/274 This article was downloaded from NUST Institutional repository, and is made available under the terms and conditions as set out in the Institutional Repository Policy. Downloaded from NuSpace Institutional Repository, NUST, Zimbabwe SubjectsPlus User Manual Amos Kujenga November 2012 Tabl e of Contents Table of Contents .......................................................................................................................2 Introduction ................................................................................................................................4 GETTING S TARTED ....................................................................................................................... 4 S YSTEM REQUIREMENTS ............................................................................................................... 4 SubjectsPlus Installation on WAMP (Windows 7) ....................................................................5 DOWNLOAD AND INSTALL WAMPSERVER .......................................................................................... 5 INSTALLING S UBJECTSPLUS .......................................................................................................... 8 CONFIGURE M YSQL AND CREATE DATABASES................................................................................ 11 CONFIGURE SUBJECTSPLUS ........................................................................................................ 20 SubjectsPlus Interfaces: Public View ...................................................................................... 22 SPLASH PAGE ........................................................................................................................... 22 GUIDES LIST (S UBJECT GUIDE SPLASH PAGE) ................................................................................ 23 DATABASE PAGES (A-Z) ............................................................................................................. 23 (FAQS)FREQUENTLY ASKED QUESTIONS ...................................................................................... 24 TALKBACK (SUGGESTION B OX) .................................................................................................... 24 STAFF L IST ............................................................................................................................... 25 SubjectsPlus Interfaces: Admin View ..................................................................................... 25 RESET PASSWORD ..................................................................................................................... 26 UPDATE Y OUR B IOGRAPHICAL DETAILS ......................................................................................... 26 UPDATE HEADSHOT ................................................................................................................... 26 RECENT ACTIVITY AREA .............................................................................................................. 26 BACKGROUND OPTIONS .............................................................................................................. 26 LOGGING OUT OF ADMIN V IEW ..................................................................................................... 26 NAVIGATION .............................................................................................................................. 26 ADMIN V IEW TABS...................................................................................................................... 26 Managing SubjectsPlus ........................................................................................................... 27 ADMIN MENU............................................................................................................................. 27 Admin Add New User ....................................................................................................... 27 Admin Manage Users....................................................................................................... 28 Admin Manage Guides..................................................................................................... 29 Admin Departments ......................................................................................................... 29 Admin Sources ................................................................................................................ 30 Admin FAQ Collections .................................................................................................... 30 TALKBACK ................................................................................................................................ 31 FAQS ...................................................................................................................................... 32 FAQ New FAQ ................................................................................................................ 32 FAQ Browse by Subject ................................................................................................... 32 FAQs Browse by Collection .............................................................................................. 32 GUIDES .................................................................................................................................... 33 Guides Creating a New Guide .......................................................................................... 33 Guides Adding Content To A Guide .................................................................................. 35 Guides Designing Your Guide .......................................................................................... 36 Guides New Record ......................................................................................................... 41 Guides Metadata ............................................................................................................. 42 Guides Browsing existing Guides...................................................................................... 42 Guides Managing Files .................................................................................................... 42 RECORDS ................................................................................................................................. 43 Records Creating a New Record....................................................................................... 43 Records Browsing Items .................................................................................................. 46 Getting Help .............................................................................................................................. 47 DOCUMENTATION ....................................................................................................................... 47 MAILING L IST ............................................................................................................................ 47 EXAMPLES OF SUBJECTSPLUS IN USE ........................................................................................... 47 D IRECT C ONTACTS .................................................................................................................... 47 EIFL | SubjectsPlus User Manual 3 Introduction Getting Started Overview of basic steps to be followed (these will be explained in more detail as you proceed through this document): 1. Download the SubjectsPlus zip file by following the instructions at http://subjectsplus.com/download.php 2. Unzip files to your web server 3. Set up a database and user in MySQL 4. Edit configuration file 5. Customise the public pages with your own header and/or footer 6. Create some content System Requirements SubjectsPlus runs under the XAMPP environment. X stands for Windows or Linux, A stands for the Apache web server, M stands for MySQL, and P stands for PHP (the second P stands for Perl, not relevant to SubjectsPlus). The easiest way to ensure all of these components are present is to download and install Wampserver (instructions below). You should not need to know the following, but are listed for information only, the particular versions of these components that are required are described below: Apache (recommended) or Internet Information Services (IIS) MySQL 4+ PHP 5.2+ (SubjectsPlus can run with missing functionality on earlier versions but this is not recommended). The following extensions are required, all of which are explained in this manual: cURL Mysql Multibyte string SimpleXML (for reading RSS feeds) JSON Gettext (if you need translations/internationalisation) GD Please note that in addition to Wampserver, Javascript should be enabled for the SubjectsPlus Admin interface to work properly. EIFL | SubjectsPlus User Manual 4 Subj ectsPlus Install ation on WAMP (Wind ows 7) Make sure you have admin rights on the computer you will use for installing SubjectsPlus. If you are familiar with MySQL and PHP, the whole process should take you about 10 minutes or less. If you are not familiar with MySQL there are a few steps which may be a little more time consuming, but they are not at all difficult. Downl oad and in stall Wampserver Download and install WampServer, accept the default settings as shown in Figures 1-4. Figure 1. Wampserver Setup Wizard initial page. Figure 2. Wampserver Setup Wizard installation destination selection page. EIFL | SubjectsPlus User Manual 5 Figure 3. Wampserver Setup Wizard in progress Figure 4. Wampserver Setup Wizard browser selection. EIFL | SubjectsPlus User Manual 6 It is possible that during installation, Windows will try to block the process. Make sure Windows does not block Apache from running. So, click “Allow access” at this point, making sure “Private networks ” is checked as shown in Figure 5. Figure 5. Wampserver Setup Wizard - possible Windows security scenario. You will be prompted to specify PHP mail parameters but if you do not know what to enter here, just leave the default values in place (see Figure 6). Figure 6. Wampserver Setup Wizard. Setting mail parameters. EIFL | SubjectsPlus User Manual 7 At the end of the installation process, ensure the 'Launch' box is checked (see Figure 7). Figure 7. Wampserver Setup Wizard. Final page. In stalling Subj ectsPlu s To check that the system is online, click on the Wampserver system tray icon (a green W – see Figure 8). Figure 8. Wampserver Menu with system tray icon highlighted. After ensuring that Wampserver is running, find where you downloaded the SubjectsPlus zip file to, and unzip the SubjectsPlus file (see Figures 9 and 10). EIFL | SubjectsPlus User Manual 8 Figure 9. Extracting SubjectsPlus from downloaded zip file. Figure 10. Extracted folder. Copy the extracted 'sp' folder to the Wampserver 'www' folder as shown in Figures 11 and 12. Figure 11. Copying the sp folder from SubjectsPlus to Wampserver. EIFL | SubjectsPlus User Manual 9 Figure 12. sp folder copying to new location. Open the readme.txt file in the ‘sp’ folder within the ‘www’ folder (Figure 13). Figure 13. Opening the sp readme text file. In this readme.txt file, you will find some installation instructions (Figure 14). Figure 14. The readme text file including some installation instructions. EIFL | SubjectsPlus User Manual 10 Configure MySQL and create d atabases Start phpMyAdmin in Wampserver in order to work on MySQL, as instructed in the readme.txt file. To do this, left-click on the green Wampserver system tray icon to bring up the menu shown in Figure 15. Figure 15. Starting phpMyAdmin via Wampserver. Once in phpMyAdmin, click on the Databases menu tab and something similar to Figure 16 should appear. Figure 16. Databases menu in phpMyAdmin. EIFL | SubjectsPlus User Manual 11 Create a new database called sp (or any other suitable name) (Figures 17 and 18). Figure 17. Creating a new database. Figure 18. Database has been created. Clicking on the name of your new blank database in the list will bring up a blank database as shown in Figure 19. Figure 19. Blank database. EIFL | SubjectsPlus User Manual 12 Click on the SQL menu tab (Figure 20). Figure 20. Click on the SQL menu. Open the .sql file in the sp folder using a suitable text editor, e.g., WordPad (Figures 21 -23). Figure 21. Opening the .sql file. EIFL | SubjectsPlus User Manual 13 Figure 22. Selecting a program to open the .sql file. Figure 23. Selecting WordPad as the default program to open .sql files. EIFL | SubjectsPlus User Manual 14 Select all text in the file, and copy it by right-clicking on the selected text (Figures 24-25). Figure 24. Select All the text in the file. Figure 25. Copying the text. EIFL | SubjectsPlus User Manual 15 Paste it in the SQL text box in ‘phpMyAdmin' (in sp database) (Figures 26-27). Figure 26. Pasting the text into MySQL. Figure 27. Text pasted into the MySQL box. EIFL | SubjectsPlus User Manual 16 Click on “Go” to execute the command (Figure 28) Figure 28. Click Go to execute the command. Click on the “Home” icon then reloadthe sp database (by clicking the database menu tab then the name of the sp database in the list) to show the new contents (Figures 29-30). Figure 29. Click on Home to reload the sp database. Figure 30. The reloaded database. EIFL | SubjectsPlus User Manual 17 Click on Privileges to create a new user (Figure 31). Figure 31. Click on Privileges to create a new user. Click on “Add a new user” (Figure 32). Figure 32. Adding a New User. EIFL | SubjectsPlus User Manual 18 Under “Database for user”, select “Grant all privileges on database sp” (Figure 33). You may also click “Check All” under “Global Privileges” (Figure 34). Note that you can refine the privileges after the system is up and running. Next, click “Go” or “Add User” to execute the commands. Figure 33. Granting all privileges on sp database. Figure 34. Click All under Global Privileges and then click Go. EIFL | SubjectsPlus User Manual 19 Configure Subj ectsPlus Next, you need to edit the SubjectsPlus configuration file (sp\control\includes\config.php). To do this, open it using a suitable text editor such as WordPad (see Figure 35). Figure 35. Open config.php using WordPad. You will need to change the following lines (this is the minimum – you can change more to suit your needs if you know what you are doing): From (Default Value) $BaseURL = ""; To $BaseURL = "http://196.220.115.92/sp/"; or $BaseURL = "http://www.africost.org/sp/"; $institution_name = ""; $administrator_email = ""; $institution_name = "African College of Science & Technology"; $administrator_email = "[email protected]"; $hname = "localhost"; $hname = "196.220.115.92"; $uname = ""; $uname = "joebloggs"; $pword = ""; $pword = "joebloggs"; $dbName_SPlus = ""; $dbName_SPlus = "sp"; Comment A static IP address is preferred if you are to access the system from another machine. Alternatively, you may use the Fully Qualified Domain Name This is the name of the institution The administrator’s mail is important as the system will send an email each time a user posts a comment through the “Talkback” facility. The hostname; may use domain name as well. The username to use to connect to MySQL Password for abovementioned user. The MySQL database for SubjectsPlus When you have finished modifying the config.php file in WordPad, be sure to click Save before moving on to the next step. EIFL | SubjectsPlus User Manual 20 Next, go to a browser and enter, e.g., http://196.220.115.92/sp (depending on what you entered for $BaseURL above). You should see a page like the one shown in Figure 36. Figure 36. Available public pages showing in a browser. If you see errors being displayed, disable the display of errors by unchecking “display errors” via the Wampserver system tray icon > PHP > PHP Settings > Display errors (as shown in Figure 37). Figure 37. Unchecking 'Display Errors' via the Wampserver system tray icon menu. Your guides should now display properly, as in Figure 38. If they do not, and you are using a local Wampserver installation, you may have to return to the config.php file and enter new values for the username ($uname = "root") and password ($pword = ""). Figure 38. Guides should now display without errors. EIFL | SubjectsPlus User Manual 21 To access the admin interface and to start building your actual subject guides enter into the browser http://196.220.115.92/sp/control where 196.220.115.92 is replaced with your own details e.g. if using a Wampserver local installation these digits will likely be replaced with localhost. Enter the default values, i.e., [email protected] for Login and k1tt1! for Password (see Figure 39). Make sure you change these as soon as you’ve successfully logged in – this is very important for security purposes, do not omit to change the password. Figure 39. Entering login and password. You can now start creating users and managing the guides! (see Figure 40 – and the rest of this guide!) Figure 40. Ready to begin creating users and managing guides. Subj ectsPlus Interfaces: Public View The Public View is what your patrons see via a web browser. It can be customised to look as you want it to. Spl ash Pag e The root of the SubjectsPlus installation by default is, e.g., http://DOMAIN-NAME/sp/index.php. When this is typed in the browser address bar, the following Splash page appears. This Splash page displays a number of links as shown in Figure 41. EIFL | SubjectsPlus User Manual 22 Figure 41. Links shown by default on Splash page. You can choose to redirect users to, for example, the Guides List (see next section) instead of making this the home page for your SubjectsPlus interface. Gu id es List (Subject Gu ide Spl ash Page) By default this list displays all guide types - that is, subject, course, and topic guides. However, this can be customised to display the desired output in the desired way (see Figure 42). Figure 42. Example Guides List from an established SubjectsPlus implementation. Database Pag es (A-Z) This lists, for example, all the journal databases that the library subscribes to. Depending on the adopted policy, it could also be used to list the individual journals in alphabetical order (see Figure 43). Figure 43. A-Z database list (user view). EIFL | SubjectsPlus User Manual 23 (FAQs)Frequentl y Asked Qu estion s Frequently Asked Questions (FAQs) are common questions and their corresponding answers that the library compiles to assist users. They can be categorised into subjects and collections (see Figure 44). Figure 44. Frequently Asked Questions page (user view). Talkb ack (Sugg estion Box) Patrons can ask questions of the library staff, or submit comments, via a browser. Library staff or management can then moderate the input before posting the responses for public viewing (Figure 45). This is a good way to generate more FAQs (see 4.1.4) but you must ensure that whoever receives the questions and comments is available to provide timely responses. To prevent issues arising when that person is on leave, it is best practice to set up a group email account that several staff are charged with monitoring. Figure 45. TalkBack suggestions and responses (user view). EIFL | SubjectsPlus User Manual 24 Staff List The Staff List gives details of the library’s members of staff (Figure 46). Clicking on a name will open a page with more details on that particular person. This is a great help for users trying to find the right person to whom to direct a question. Figure 46. Staff list (user view). Subj ectsPlus Interfaces: Admin View To access this view type: http://YOUR-DOMAIN/sp/control and login. You should see the screen shown in Figure 47. Figure 47. Admin View interface. EIFL | SubjectsPlus User Manual 25 Reset Password You can readily reset the Super (administrator) user password. Because the default password is the same for all users as it is for the’ Super’ user (aka the administrator i.e. you!), you are highly advised to change this password as soon as you can access this window. Update Your Biographical Detail s Biographical details will appear on the Staff List page and will provide a template for other members of library staff to follow, so ensure your page is as rich and vibrant as possible. Update Headsh ot This allows you to upload a picture for the Super/Admin user – your Subject Librarians will also end up adding their photographs to the subject guides, so if you do not have standard university headshots it would be worth you setting a precedent for size and style of picture at this point. Recent Activity area This shows you the tasks that you performed recently. This list will be empty when you first open the Admin View. However, it is useful if you only get discrete time slots to work on SubjectsPlus as it acts as an easy reminder of where you got to the last time. Backg round Options SubjectsPlus allows you to set the background for the Admin View to one of three available choices: Grey, Flocking and Metamorphosis. Note that these backgrounds only appear in the Admin View. More backgrounds can be added by an administrator if desired. Logging Out of Admin View If you move the mouse pointer over your username in the top right corner of the screen a logout link will appear on the dropdown menu (see Figure 48). Another way to logout is to simply close your browser window or tab. Navig ation Clicking on the SubjectsPlus logo in the top left corner from anywhere in the Admin View will take you to the Admin Splash (or start) page. Ad min View Tabs This is where library staff create content that is then displayed through the public view (interface). The user (library staff) may see different tabs (see Figure 48) depending on what permissions they have been granted by the SubjectsPlus system administrator (you). Figure 48. Admin View tabs. EIFL | SubjectsPlus User Manual 26 What actions are possible under each tab can be summarised as follows: Tab Description Records Add/modify/delete a record Guides Add/modify/delete a guide Manage uploaded files Create a page of delicious links Add/modify/delete a faq FAQs (Frequently Asked Questions) Talkback Admin Respond to/delete (if inappropriate) a user-submitted comment/modify a response Administrative tasks including managing users and permissions, adding new departments, sources, and FAQ collections Man ag ing SubjectsPlus Ad min Menu There are six options under the admin menu (see Figure 49). Most are fairly self-explanatory. Figure 49. Admin Menu. A dmin Add N ew User Obviously this option enables you to add a new user to the SubjectsPlus installations – this could be another technician, the subject librarians who will write and manage the subject guides, or the librarians who respond to the Talkback queries, for example (see Figure 50). Here John Sibanda can be given permissions to access the Talkback, FAQ, Records, Subject Guides or admin functions – he can also be marked as NOFUN which means he will not be able to modify anyone else's guides or view records. EIFL | SubjectsPlus User Manual 27 Figure 50. Add New User page. A dmin Manage Users In Figure 51, Clare Smith does not have access to the Talkback menu. This may be because she’s a part-time staff member and so cannot be relied upon to be able to serve this function in a timely manner. Figure 51. Manage Users view. Available privileges are listed in the table below: Feature Description talkback Allows user to view and respond to questions and comments posted by patrons faq Allows user to administer FAQs records Allows access to both Record and Guide tabs eresource_mrg Allows the user to see all the information about a record (and delete it), and quickly see all guides admin Allows access to the overall admin of the site NOFUN Means user cannot modify other people’s guides, or view records EIFL | SubjectsPlus User Manual 28 A dmin Manage Guides This shows you the list of subject guides that have been created (see Figure 52). The list also shows you the author of each guide, and whether it is a Subject, Course or Topic Guide. Figure 52. Manage Guides view. Clicking on the symbols provides the following functions: to view/edit guide metadata. to preview the guide in a browser. to verify URLs in guide. Clicking on a guide name enables you to edit the guide’s design. A dmin Depar tments These are the departments that your library (staff) users belong to. You need to specify a name and telephone number for each department (see Figure 53) – either a department within the library or within the wider institution. This is necessary because often the people creating the subject guides are academic librarians based in departments rather than in the library itself. Figure 53. Departments view. Clicking on the red cross will delete a department. EIFL | SubjectsPlus User Manual 29 A dmin Sourc es Sources are categories that your records will fall under when they are displayed in the browser. These are not subject categories, but source types such as Journals, Newspapers, Theses etc … (see Figure 54). Figure 54. Sources View. To add a new source, simply type in a name in the “Source Name” text box and then click on “Add New Source” to add it to the list of existing sources. New sources are by default placed at the top of the list. However, you can rearrange the order in which the sources appear in the Public View by dragging a particular source to a desired position. Clicking on the red cross will delete a source. A dmin FAQ Collec tions Frequently Asked Questions collections are groups to which related FAQs can then be added. These make the FAQs more approachable to users by enabling them to be grouped. This becomes especially useful when you have built up quite a number of FAQs and wish to display them in a particular way rather than in a long, apparently random, list. See Figure 55 for the interface. Figure 55. FAQ management view. EIFL | SubjectsPlus User Manual 30 Talkb ack Figure 56 shows the location of the Talkback interface button on the admin menu. Figure 56. Talkback button on Admin Menu. In the public (browser) view, a user/patron enters a comment as shown in Figure 57. Figure 57. Talkback facility (user view). These messages can then be viewed if you click on Talkback in the Admin view as shown in Figure 58. On the list, both answered and unanswered talkbacks are listed. Note also that the system sends an email to the address specified in the configuration file, whenever a TalkBack entry is generated by a user. Figure 58. Talkback facility (Admin View). EIFL | SubjectsPlus User Manual 31 FAQs Figure 59 shows three options on a drop-down list when clicking on the FAQs interface button on the admin menu. Figure 59. FAQs button on Admin Menu. FAQ New FAQ Figure 60 shows the interface for creating a new FAQ (you could copy and paste a precise question and answer from Talkback, but chances are you would want to tidy up the language to make it more concise and perhaps remove specific details to make it more generic). Figure 60. New FAQ interface. FAQ Brows e by Subjec t Browse FAQs by the subjects – this is self-explanatory. FAQs Brows e by Collec tion Browse FAQs by their collections – again self-explanatory. EIFL | SubjectsPlus User Manual 32 Gu id es Figure 61 shows four options on a drop-down list when clicking on the Guides interface button on the admin menu. Figure 61. Guides button on Admin Menu. Guides Creating a New Guide The first step in creating a guide is to click on “New Guide”. This brings up a page that lets you enter the initial metadata for your new guide as shown in Figure 62. Figure 62. Create New Guide interface. The numbered items in Figure 62 correspond to the following: 1. Enter the full name of the new guide, e.g., Civil & Water Engineering 2. Enter the new guide’s Short Form. This MUST BE UNIQUE for each guide and will appear in the URL. For example, for Computer Science you could use TCWS (where TCW is the institutional code for the Civil & Water Engineering department, and S stands for Subject). Note that it is entirely up to you how you wish to construct these codes. EIFL | SubjectsPlus User Manual 33 3. Types of Guides. There are three types of guides by default, i.e., Subject, Course, Topic: Subject: for a broad area that maps to a discipline. Course: for a specific examinable course (or subject in some institutions). A subject will normally have related courses. Topic: particular topics, e.g., Climate Change. A course will normally have related topics although these may span across several courses and even subjects (multidisciplinarily). More types of guides can be created by an administrator by editing the configuration file (config.php). 4. The Publish Guide facility lets you choose whether or not your guide is visible to your users through the browser, i.e., it determines if it gets displayed on the Guides List. 5. This slider lets you adjust the width of the two columns in your guide. Seventy percentage (70%) for the main column is the recommended setting but you can change it as you wish. 6. Staff. A guide must have at least one librarian associated with it, i.e., the person who will maintain it. By default, the person who creates the guide will appear here. You can add more from the dropdown list. Selecting a librarian allows him/her to modify the guide. However, an admin can modify any guide. Librarians associated with a guide will also appear in the Public View if you drag in the Subject Specialist box (See below). 7. You must remember to save your work lest it be lost. Once you have completed the steps above and SAVED the changes, a screen like the one in Figure 63 will appear. Figure 63. Adding metadata to a newly created or existing guide. EIFL | SubjectsPlus User Manual 34 Your new guide will now appear in the Guides List and you can view it in the browser by refreshing the Guides List page and following the relevant link. Note, however, that it will be empty for now because there are no records associated with it. If you click on “View Your Guide” located in the upper-right side, your screen will appear as in Figure 64. Figure 64. View Your Guide menu bar. Guides Adding C ontent To A Guide The next step is to add content to the newly created guide. You can either drag in content from the New Box button (see Figure 65), or you can add in existing content via the ‘Find Box’ button (this is an unlinked copy and may be modified). Figure 65. Elements of the screen for adding content to a guide. The numbered items in Figure 65 correspond to the following: 1. Clicking on the button toggles the Admin View menu as shown above. By default, the menu is hidden but clicking this button brings it up. 2. New Box – this brings up a range of options that can be seen in Figure 66. These are explained further in the next section (‘Guides Designing Your Guide’). Figure 66. New Box menu. EIFL | SubjectsPlus User Manual 35 3. Find Box. This can be used to insert a content block that exists in another subject guide. 4. New Record. Provides a quick way to create a new record associated with that guide. It is the same as clicking on “New Record” under the Records menu (see also section ‘Guides New Record’). 5. Metadata. Another shortcut to modifying your guide’s metadata (see also section ‘Guides Metadata’). 6. The title of your guide. Click this link to view the public version of the guide in a browser. 7. The drop zones. Content is dragged from the New Box menu into one of the boxes. Whatever is put in the drop left box is displayed in the left column (remember the 70% width setting?). For example, the Subject Specialist box is usually dropped into the right side box so that it appears in the right side (30% of screen width) column because it is rather narrow and displays well here. You may then drag boxes in a column either up or down to rearrange them as you wish. Guides Des igning Your Guide The New Box menu (see above) is the central tool when designing the layout of your guides. It allows you to add different types of boxes by dragging and dropping them into either the left or the right drop zones. Note that you can create and add boxes of your own. For an example of this, see: www.subjectsplus.com/wiki/index.php?title=Creating_a_Custom_Pluslet:_Meebo_Widget Designing Your Gu ide New box Editable Box An Editable Box is the default basic box. Figure 67. Dragging an Editable Box into the Drop Left zone. If you drag and drop an Editable Box into the Drop Left zone (as shown in Figure 67), a new WYSIWYG (What You See Is What You Get) box with title at the top is created and you can then add some detail to the box (see Figure 68). Figure 68. Adding detail to the guide. EIFL | SubjectsPlus User Manual 36 Figure 69 shows what an editable box looks like when you first add it into a page. Basically, you give it a title and put some content in the body and you're done. Figure 69. Editable Box showing key elements. The numbers in Figure 69 correspond to the following: 1. The title for the box. 2. Options. You can use these to get some help, toggle the body visible/invisible, delete the box, and, if you aren't in editing mode, edit the box (pencil icon; not shown above). 3. The usual WYSIWYG buttons. It's a subset of all possible icons, your administrator can add some more. 4. Custom buttons. These allow you to do more actions: Insert database link. Use this to locate and insert the token for an item stored in the Records tab. Insert or Upload Document. Use if you want to load a file to the server and link to it. Not the same as, e.g., embedding an image. That is done with the regular WYSIYWG image icon. Insert FAQs. Allows you to insert a specific FAQ. If you want to insert ALL the FAQs associated with this subject, use the FAQs box instead. Insert Link to Catalog Record. If you want to link to a record in the library catalog. This creates a useable string; if your catalog has persistent URLs, just add a link using the WYSIWYG option. 5. The box's body. You may type in anything here and mark it up with the buttons in the toolbar above. EIFL | SubjectsPlus User Manual 37 Images 70-73 follow various stages in the design of a guide. Figure 70. Developing a new guide. Figure 71. Further development of the guide showing About This Guide text entered. Figure 72. Development of the guide showing altered placement of the FAQs. EIFL | SubjectsPlus User Manual 38 Figure 73. Developing guide (user view). Designing Your Gu ide New box Heading If you wish to use a heading to divide the contents of your guide, you may use this box. It comprises a title bar that is slightly shorter than the regular box. Designing Your Gu ide New box Delicious/RSS/Flickr/T witter Allows you to insert a content feed. For Delicious feeds, enter your Delicious username and the tag you want to display and for the others, just enter the entire RSS feed. If you don't know what any of these are, just skip past this step. Designing Your Gu ide New box Table of Contents Shows a list of the boxes (contents) in the guide. Designing Your Gu ide New box All Items by Source This is the list of records (for example, links to journals) associated with a guide. If there are no records associated with the guide you are working on, this option will NOT appear. Figure 74 shows where in the menu it would appear. Figure 74. Menu showing 'All items by Source' option. EIFL | SubjectsPlus User Manual 39 Figure 75 shows an “All Items by Source” option placed within the guide design. Figure 75. All Options by Source option added to the guide. Figure 76 shows a guide design featuring several boxes. Figure 76. Guide design featuring several boxes. EIFL | SubjectsPlus User Manual 40 Designing Your Gu ide New box Key to Icons This is used to inform the user about provided links (see Figure 77). Figure 77. Key to icons (user view). Designing Your Gu ide New box Subject Specialist This box displays details of all librarians associated with a particular guide (see Figure 78). Figure 78. Details of librarians associated with a guide (user view). Designing Your Gu ide New box FAQs This displays FAQs that are associated with a particular guide (see Figure 79). Figure 79. FAQs (user view). Guides New R ecor d You can create a new record here. It provides a quick way to create a new record associated with t hat guide. It is the same as clicking on “New Record” under the Records menu. This is self-explanatory. EIFL | SubjectsPlus User Manual 41 Guides Metadata This brings up the metadata for the guide which you can then edit as you wish (see Figure 80). Figure 80. Guide metadata (admin view). Guides Brows ing exis ting Guides Click on “Browse Guides” - this is self-explanatory. Guides Managing Files Click on “Manage Files” - this is self-explanatory (see Figure 81). Figure 81. Manage Files interface. EIFL | SubjectsPlus User Manual 42 You can click on “Admin guide” to edit it or on “Public guide” to view it (see Figure 82). Figure 82. Toggle between 'admin guide' (admin view) or 'public guide' (user view). Records The Records menu is at the left end of the main toolbar (see Figure 83). Figure 83. Location of Records menu on the toolbar. A single record can appear in several guides (edit once, update everywhere!). All the records associated with a subject can be used to quickly generate the “All Items by Source” content of a guide. A record can appear: on the A-Z Databases List if your admin so chooses, in your guide in one of two ways: if you insert all linked records via the “All Items by Source” box. if you insert a specific record via the WYSIWYG editor in a basic “Editable Box”. Records C reating a N ew Recor d Figure 84 shows the New Record dropdown. Figure 84. New Record dropdown menu. EIFL | SubjectsPlus User Manual 43 Figure 85 shows the New Record interface. The numbers on Figure 85 correspond to the items listed below. Figure 85. New Record interface. 1. The Description field is a WYSIWYG editor or more precisely, FCKeditor. By default, a limited set of buttons is shown but your admin can customise which ones appear (by editing the config.php file). To simplify things, try using the “Paste as Plain Text” option when pasting text. 2. This Location (URL), ordinarily, should be a full URL , e.g., www.emeraldinsight.com If you use ezproxy or Innovative’s Web Access Management, still put such a URL without a prefix. 3. The “life preserver”, if it works well, should test a URL to see if it looks okay. 4. Changing the Format dropdown menu option changes the Location (URL) field above. The Format dropdown menu has the following options: URL Print (put class number in catalog) Print w/URL (put both link to catalog and class number – see Figure 86) Figure 86. Entering both Catalog and Class number. EIFL | SubjectsPlus User Manual 44 5. Access Restrictions. The default options are: Option Effect None No restrictions Restricted If you choose this option, the proxy string will be automatically added to the URL. The proxy string is set in the config.php configuration file On Campus Only access On Campus Only Rest-No Proxy This option WILL NOT prefix the proxy string, but will show the little restricted icon 6. Click on to make the record appear on your A-Z list of Databases. Note that only an Admin or a person with the “eresource_mgr” permission will have this option. 7. Display Note, for example, Highly recommended. Note that only an Admin or a person with the “eresource_mgr” permission will have this option. 8. Delete this Location, only if you have more than one location. 9. Add another Location, e.g., it has both a print and an online version. 10. Default Source Type. When you add a new subject, it will be of that source type. If a record has multiple subjects, the default source type will be computed. If it’s a new record, it will just show the alphabetically first source type. You can change the source type later. 11. Subjects. Select a subject from the dropdown, and your record will be associated with it. For example, if you select “All Items by Source” when creating a guide, it will insert a sorted list of all the records listing that particular subject. Note that when creating records, you must first create the associated guides (or subjects) otherwise they will not appear in the Subjects dropdown list. See Figure 87 for the options to alter subject associations. Figure 87. Editing subject associations. Click the Click the to override the default source type association. If it’s green that means an override is in effect. Click if you want to have a different description appear than that which shows in the main description field, i.e., you want to write something more subject specific. EIFL | SubjectsPlus User Manual to remove this subject association. 45 12. Remember to click on Save Record Now to save the changes. The last person to have modified the guide is displayed right below this button. Figure 88 shows a sample new record. Figure 88. Sample new record. Records Br owsing Items Figure 89 shows the options to browse the list of existing records. You can then edit any record by clicking on its name. Figure 89. Browsing existing records options. EIFL | SubjectsPlus User Manual 46 Getting Help Docu mentation SubjectsPlus Wiki: www.subjectsplus.com/wiki Videos: www.youtube.com/user/SubjectsPlus Mail ing List Google Groups: http://groups.google.com/group/subjectsplus Participants will be sent an invitation that they may ignore if they do not wish to join the group. Exampl es of Subj ectsPlus in Use Sites Using SubjectsPlus: http://subjectsplus.com/wiki/index.php?title=Sites_using_SubjectsPlus Direct Contacts Andrew Darby [Principal SubjectsPlus Maintainer] University of Miami Libraries USA [email protected] Amos Kujenga NUST Library Zimbabwe [email protected] [email protected] EIFL | SubjectsPlus User Manual 47