1
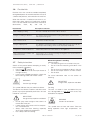
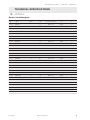
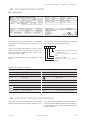
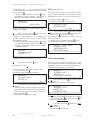
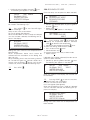
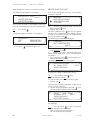
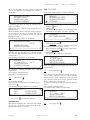
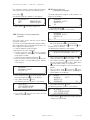
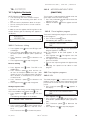
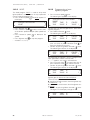
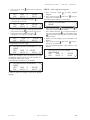
OPERATING INSTRUCTIONS BOILING PAN , 600 mm TILTING HEIGHT SMART, SMART VARIOMIX, SMART PROMIX READ BEFORE USE! DOC No: ST0 9184-02 EDITION 2 | EN | 12-2014 OPERATING INSTRUCTIONS | SMART LINE | BOILING PAN WE’RE THINKING OF YOU Thank you for choosing an Electrolux product. This is a product that comes with decades of professional experience and innovation; a sophisticated product that is intelligently designed and developed with your needs in mind. You can be sure that every time you use this product, the results will be outstanding. Welcome to Electrolux. CUSTOMER CARE AND SERVICE We recommend using only spare parts made by Electrolux Professional. If you contact customer service, please have the following documents to hand. You can find the PNC and model number on the nameplate on your appliance. Other documents concerning this product are available from the Customer Service Centre: Service handbook Replacement parts catalogue Wiring diagram IMPORTANT! Indicates dangerous situations that can lead to life-threatening injuries. NOTE Important instructions that must always be obeyed. ENVIRONMENT Environmental information Producer: SteelTech i Alingsås AB. Lärkvägen 4. SE-441 40 Alingsås. Sweden Phone: +46 322 668930 . Fax: +46 322 10870Email: [email protected] .www steeltech.se Original language: Swedish These Installation and Operating Instructions relate to a range of appliance models. The product images in this guide serve only as an example, are not to scale and may vary from your particular model. No liability is assumed for any errors, inaccuracies or changes. EN | 02-2015 DOC.NO: ST09184-02 3 OPERATING INSTRUCTIONS | SMART LINE | BOILING PAN TABLE OF CONTENTS SAFETY 1. 1.1 1.2 1.3 1.4 1.5 1.6 1.7 INSTRUCTIONS FOR SAFETY AND USE . . . . . . . . . . . . . . . . . . . . . . . . . . . . . . . . . . Safety instructions for handling electrical appliances . . . . . . . . . . . . . . . . . . . . . . . . . . . . . . . Installation and initial operation . . . . . . . . . . . . . . . . . . . . . . . . . . . . . . . . . . . . . . . . . . . . . . . . . . Obligations of the operator . . . . . . . . . . . . . . . . . . . . . . . . . . . . . . . . . . . . . . . . . . . . . . . . . . . . . Use Electric hobs . . . . . . . . . . . . . . . . . . . . . . . . . . . . . . . . . . . . . . . . . . . . . . . . . . . . . . . . . . . . . Personal protective equipment . . . . . . . . . . . . . . . . . . . . . . . . . . . . . . . . . . . . . . . . . . . . . . . . . . Residual risk . . . . . . . . . . . . . . . . . . . . . . . . . . . . . . . . . . . . . . . . . . . . . . . . . . . . . . . . . . . . . . . . . Safety instructions . . . . . . . . . . . . . . . . . . . . . . . . . . . . . . . . . . . . . . . . . . . . . . . . . . . . . . . . . . . . . 6 6 7 7 7 7 8 8 TECHNICAL SPECIFICATION 2.MODELS . . . . . . . . . . . . . . . . . . . . . . . . . . . . . . . . . . . . . . . . . . . . . . . . . . . . . . . . . . . . . . . . . . . 9 3. TESTING / CERTIFICATION . . . . . . . . . . . . . . . . . . . . . . . . . . . . . . . . . . . . . . . . . . . . . . 10 4. APPLIANCE IDENTIFICATION . . . . . . . . . . . . . . . . . . . . . . . . . . . . . . . . . . . . . . . . . . . . . 11 4.1 Rating plate . . . . . . . . . . . . . . . . . . . . . . . . . . . . . . . . . . . . . . . . . . . . . . . . . . . . . . . . . . . . . . . . . 11 5. CONSTRUCTION OF THE APPLIANCE . . . . . . . . . . . . . . . . . . . . . . . . . . . . . . . . . . . 11 GENERAL INFORMATION 6.PACKAGING . . . . . . . . . . . . . . . . . . . . . . . . . . . . . . . . . . . . . . . . . . . . . . . . . . . . . . . . . . . . . . 12 7. RESPONSIBILITY / LIABILITY . . . . . . . . . . . . . . . . . . . . . . . . . . . . . . . . . . . . . . . . . . . . . 13 8. CUSTOMER SERVICE, REPAIR AND MAINTENANCE . . . . . . . . . . . . . . . . . . . . 14 7.1Liability . . . . . . . . . . . . . . . . . . . . . . . . . . . . . . . . . . . . . . . . . . . . . . . . . . . . . . . . . . . . . . . . . . . . . 13 7.2 Storing the operating instructions . . . . . . . . . . . . . . . . . . . . . . . . . . . . . . . . . . . . . . . . . . . . . . . 13 7.3 Target groups . . . . . . . . . . . . . . . . . . . . . . . . . . . . . . . . . . . . . . . . . . . . . . . . . . . . . . . . . . . . . . . 13 8.1 Maintenance periods . . . . . . . . . . . . . . . . . . . . . . . . . . . . . . . . . . . . . . . . . . . . . . . . . . . . . . . . . 14 9.CLEANING . . . . . . . . . . . . . . . . . . . . . . . . . . . . . . . . . . . . . . . . . . . . . . . . . . . . . . . . . . . . . . . 15 9.1 9.2 9.3 Handling stainless steel . . . . . . . . . . . . . . . . . . . . . . . . . . . . . . . . . . . . . . . . . . . . . . . . . . . . . . . 15 Suitable cleaning products . . . . . . . . . . . . . . . . . . . . . . . . . . . . . . . . . . . . . . . . . . . . . . . . . . . . 15 Cleaning the appliance . . . . . . . . . . . . . . . . . . . . . . . . . . . . . . . . . . . . . . . . . . . . . . . . . . . . . . . . 15 10. TRANSPORT, HANDLING AND STORAGE 11. 11.1 Safety valve . . . . . . . . . . . . . . . . . . . . . . . . . . . . . . . . . . . . . . . . . . . . . . . . . . . . . . . . . . . . . . . . 11.2 Cheecking the afety valve . . . . . . . . . . . . . . . . . . . . . . . . . . . . . . . . . . . . . . . . . . . . . . . . . . . . . . 11.3Manometer . . . . . . . . . . . . . . . . . . . . . . . . . . . . . . . . . . . . . . . . . . . . . . . . . . . . . . . . . . . . . . . . . 11.4 Staem trap . . . . . . . . . . . . . . . . . . . . . . . . . . . . . . . . . . . . . . . . . . . . . . . . . . . . . . . . . . . . . . . . . SAFETY SYSTEM . . . . . . . . . . . . . . . . . . . . . . . . . . . . . . . . . . . . . . . . . . . . . . . . . . . . . . . . . 17 17 17 17 17 12. CONTROL PANEL . . . . . . . . . . . . . . . . . . . . . . . . . . . . . . . . . . . . . . . . . . . . . . . . . . . . . . . . . 18 . . . . . . . . . . . . . . . . . . . . . . . . . . . . . . . 16 16 16 16 16 16 10.1Transport . . . . . . . . . . . . . . . . . . . . . . . . . . . . . . . . . . . . . . . . . . . . . . . . . . . . . . . . . . . . . . . . . . . 10.2Unloading . . . . . . . . . . . . . . . . . . . . . . . . . . . . . . . . . . . . . . . . . . . . . . . . . . . . . . . . . . . . . . . . . . . 10.3 Notes on handling . . . . . . . . . . . . . . . . . . . . . . . . . . . . . . . . . . . . . . . . . . . . . . . . . . . . . . . . . . . 10.4 Moving and setting down appliances . . . . . . . . . . . . . . . . . . . . . . . . . . . . . . . . . . . . . . . . . . . . 10.5Storage . . . . . . . . . . . . . . . . . . . . . . . . . . . . . . . . . . . . . . . . . . . . . . . . . . . . . . . . . . . . . . . . . . . . 4 DOC.NO: ST09184-02 EN | 02-2015 OPERATING INSTRUCTIONS | SMART LINE | BOILING PAN OPERATING INSTRUCTIONS 13. 13.1 Instant start BOILING . . . . . . . . . . . . . . . . . . . . . . . . . . . . . . . . . . . . . . . . . . . . . . . . . . . . . . . . . 13.2 Programmed start . . . . . . . . . . . . . . . . . . . . . . . . . . . . . . . . . . . . . . . . . . . . . . . . . . . . . . . . . . . . 13.3BOILING . . . . . . . . . . . . . . . . . . . . . . . . . . . . . . . . . . . . . . . . . . . . . . . . . . . . . . . . . . . . . . . . . . . . 13.4 Delayed start . . . . . . . . . . . . . . . . . . . . . . . . . . . . . . . . . . . . . . . . . . . . . . . . . . . . . . . . . . . . . . . . 13.5 Load program . . . . . . . . . . . . . . . . . . . . . . . . . . . . . . . . . . . . . . . . . . . . . . . . . . . . . . . . . . . . . . . 13.6 BOILING/HOT KEEP . . . . . . . . . . . . . . . . . . . . . . . . . . . . . . . . . . . . . . . . . . . . . . . . . . . . . . . . . . 13.7BOILING/COOLING . . . . . . . . . . . . . . . . . . . . . . . . . . . . . . . . . . . . . . . . . . . . . . . . . . . . . . . . . . . 13.8COOLING . . . . . . . . . . . . . . . . . . . . . . . . . . . . . . . . . . . . . . . . . . . . . . . . . . . . . . . . . . . . . . . . . . . 13.9 Changes in food preparation program . . . . . . . . . . . . . . . . . . . . . . . . . . . . . . . . . . . . . . . . . . . 13.10 Name the food preparation program . . . . . . . . . . . . . . . . . . . . . . . . . . . . . . . . . . . . . . . . . . . . . OPERATING INSTRUCTIONS . . . . . . . . . . . . . . . . . . . . . . . . . . . . . . . . . . . . . . . . . . . . . 19 19 19 19 20 20 21 22 23 24 24 14. AGITATOR . . . . . . . . . . . . . . . . . . . . . . . . . . . . . . . . . . . . . . . . . . . . . . . . . . . . . . . . . . . . . . . . 25 14.1.1 Continous stirring . . . . . . . . . . . . . . . . . . . . . . . . . . . . . . . . . . . . . . . . . . . . . . . . . . . . . . . . . . . . . . 14.1.2 Agitation without grid (SMARTMIX) . . . . . . . . . . . . . . . . . . . . . . . . . . . . . . . . . . . . . . . . . . . . . . . . . 14.1.3 Preset agitator program . . . . . . . . . . . . . . . . . . . . . . . . . . . . . . . . . . . . . . . . . . . . . . . . . . . . . . . . . 14.2 Fixed agitator program . . . . . . . . . . . . . . . . . . . . . . . . . . . . . . . . . . . . . . . . . . . . . . . . . . . . . . . . . . 14.2.1MIX . . . . . . . . . . . . . . . . . . . . . . . . . . . . . . . . . . . . . . . . . . . . . . . . . . . . . . . . . . . . . . . . . . . . . . . . 14.2.2WHIP . . . . . . . . . . . . . . . . . . . . . . . . . . . . . . . . . . . . . . . . . . . . . . . . . . . . . . . . . . . . . . . . . . . . . . . 14.2.3 Programming of own agitator program . . . . . . . . . . . . . . . . . . . . . . . . . . . . . . . . . . . . . . . . . . . . . . 14.2.4 Name agitator program . . . . . . . . . . . . . . . . . . . . . . . . . . . . . . . . . . . . . . . . . . . . . . . . . . . . . . . . . 14.3 Agitator Promix . . . . . . . . . . . . . . . . . . . . . . . . . . . . . . . . . . . . . . . . . . . . . . . . . . . . . . . . . . . . . . 14.3.1 Continous stirring . . . . . . . . . . . . . . . . . . . . . . . . . . . . . . . . . . . . . . . . . . . . . . . . . . . . . . . . . . . . . . 14.3.2 Agitation without grid (SMARTMIX) . . . . . . . . . . . . . . . . . . . . . . . . . . . . . . . . . . . . . . . . . . . . . . . . . 14.3.3 Preset agitator program . . . . . . . . . . . . . . . . . . . . . . . . . . . . . . . . . . . . . . . . . . . . . . . . . . . . . . . . . 14.3.4 Fixed agitator program . . . . . . . . . . . . . . . . . . . . . . . . . . . . . . . . . . . . . . . . . . . . . . . . . . . . . . . . . . 14.4 Programming of own agitator program . . . . . . . . . . . . . . . . . . . . . . . . . . . . . . . . . . . . . . . . . . . . . . 14.4.1 Name agitator program . . . . . . . . . . . . . . . . . . . . . . . . . . . . . . . . . . . . . . . . . . . . . . . . . . . . . . . . . 14.5 Change values during operation . . . . . . . . . . . . . . . . . . . . . . . . . . . . . . . . . . . . . . . . . . . . . . . . 14.5.1 If keeping hot or cooling is in progress . . . . . . . . . . . . . . . . . . . . . . . . . . . . . . . . . . . . . . . . . . . . . . 14.6 Tilting of pan . . . . . . . . . . . . . . . . . . . . . . . . . . . . . . . . . . . . . . . . . . . . . . . . . . . . . . . . . . . . . . . . 14.7 Tilting return of pan . . . . . . . . . . . . . . . . . . . . . . . . . . . . . . . . . . . . . . . . . . . . . . . . . . . . . . . . . . . 25 25 25 25 26 26 26 27 28 28 28 28 28 29 29 30 30 31 31 14.1 Agitator, Variomix . . . . . . . . . . . . . . . . . . . . . . . . . . . . . . . . . . . . . . . . . . . . . . . . . . . . . . . . . . . . 25 15. LANGUAGE SELECTION 16. SELECTION OF PROGRAM OPTIONS . . . . . . . . . . . . . . . . . . . . . . . . . . . . . . . . . . . . 31 17. TOOLS AND ACCESSORIES . . . . . . . . . . . . . . . . . . . . . . . . . . . . . . . . . . . . . . . . . . . . . 32 18. AGITATOR MAINTENANCE . . . . . . . . . . . . . . . . . . . . . . . . . . . . . . . . . . . . . . . . . . . . . . . 32 19. Messages and error codes . . . . . . . . . . . . . . . . . . . . . . . . . . . . . . . . . . . . . . . . . . . . . . . . 33 20. CLEANING . . . . . . . . . . . . . . . . . . . . . . . . . . . . . . . . . . . . . . . . . . . . . . . . . . . . . . . . . . . . . . . . 34 21. MAINTAENANCE OF THE VESSEL BEARINGS . . . . . . . . . . . . . . . . . . . . . . . . . . . 35 22. OTHER DOCUMENTS . . . . . . . . . . . . . . . . . . . . . . . . . . . . . . . . . . . . . . . . . . . . . . . . . . . . . 35 17.1 17.2 17.3 20.1 20.2 20.3 . . . . . . . . . . . . . . . . . . . . . . . . . . . . . . . . . . . . . . . . . . . . . . . . . 31 Agitator tool Variomix . . . . . . . . . . . . . . . . . . . . . . . . . . . . . . . . . . . . . . . . . . . . . . . . . . . . . . . . . 32 Agitator tool Promix . . . . . . . . . . . . . . . . . . . . . . . . . . . . . . . . . . . . . . . . . . . . . . . . . . . . . . . . . . 32 Supplementary equuipment . . . . . . . . . . . . . . . . . . . . . . . . . . . . . . . . . . . . . . . . . . . . . . . . . . . . 32 In the event of hard water . . . . . . . . . . . . . . . . . . . . . . . . . . . . . . . . . . . . . . . . . . . . . . . . . . . . . . 34 Cleaning the lid . . . . . . . . . . . . . . . . . . . . . . . . . . . . . . . . . . . . . . . . . . . . . . . . . . . . . . . . . . . . . . 34 Cleaning when the equipment is not in use . . . . . . . . . . . . . . . . . . . . . . . . . . . . . . . . . . . . . . . 34 EN | 02-2015 DOC.NO: ST09184-02 5 OPERATING INSTRUCTIONS | SMART LINE | BOILING PAN SAFETY 1. INSTRUCTIONS FOR SAFETY AND USE IMPORTANT! Danger of fire, explosion and death • This appliance is intended for use only for the preparation and processing of food in commercial kitchens such as restaurants, hospitals, staff canteens, butcher shops and food production companies. Any other use is in breach of the intended purpose and may cause damage or constitute a hazard for humans and animals. • The appliance must only be operated if all safety equipment and safety devices are available, installed properly and fully functional. • The appliance must only be inspected and operated by technically trained people. • This appliance is not for use by children or persons with reduced physical, sensory or intellectual abilities, or inexperienced and untrained persons, unless under the supervision of a qualified person who is responsible for their safety. Do not allow children to play with this appliance. • Before cleaning, the appliance must be disconnected from the power supply and cooled down completely to avoid the risk of scalding or electric shock. • Do not spray the appliance or its parts with a high-pressure cleaner or a steam cleaner; this may cause it to malfunction. Our appliances are properly thermally insulated and insulated. Due to the high cooking temperatures in industrial kitchen appliances, individual components get extremely hot (e.g. lids, panels). This does not constitute a design flaw but is a result of the thermal conductivity of stainless steel. The noise level of the unit is negligible. Legal indications are complied with. The sound pressure level is below 70dB (A). Our appliances are not suitable for installation outdoors or in spaces exposed to the effects of weather (rain, direct sunlight, etc.). • The appliance must not be operated in the vicinity of inflammable materials or vapours. IMPORTANT! Danger of fire, explosion and death • This appliance must not be used to heat/freeze closed containers (cans, tins, bottles, tubes, etc.). Danger of explosion! • Any work on the electrical wiring must be carried out according to the supplied electrical diagrams and under consideration of the country-specific and local regulations. • The use of corrosive, poisonous and inflammable materials in our cooking appliances is strictly forbidden. • The appliance's performance data must not be changed. • In the event of a defect that prevents operation, switch the appliance off. Always call for an authorised professional if the troubleshooting section states as such, if the defect is not described or is not obvious, or if any necessary intervention requires the removal of panels. Until the defect is resolved, the appliance must be switched off and disconnected from the power supply. • Before starting any service, repair or maintenance work, the appliances must be disconnected from the mains supply (turn the main switch off or remove the fuses from the power supply) and drinking water pipes closed off. 6 • This appliance must be connected to a point indicated on a potential equalisation system with a minimum conductor cross section of 10 mm². When installing multiple appliances, connect them all together through potential equalisation. • To avoid damage and injury, if there is any damage to the local mains supply it must replaced by a qualified electrician in accordance with the applicable local and national regulations. 1.1 Installation and initial operation The electricity and water supply must be installed and the appliance first operated by carefully following this instruction manual and must be done only by a certified specialist under consideration of the country-specific and local regulations. You are responsible for this. DOC.NO: ST09184-02 EN | 02-2015 OPERATING INSTRUCTIONS | SMART LINE | BOILING PAN 1.2 Obligations of the operator Responsibility for and guarantee of the permanent correct operation of all safety-related components lie with the responsible manager. The correct operation of these components must be tested at least once each calendar year by Electrolux Professional authorised specialist engineers and replaced if necessary. 1.3 Obligations of the operator Responsibility for and guarantee of the permanent correct operation of all safety-related components lie with the responsible manager. The correct operation of these components must be tested at least once each calendar year by Electrolux Professional authorised specialist engineers and replaced if necessary. 1.4 IMPORTANT! Danger of fire, explosion and death • Do not place any other objects apart from cookware on the cooking area as it gets hot. Danger of scalding and burning • Do not touch the hobs as this could cause scalding You can find the model name (F.Mod.) on the name plate on the appliance itself. For more information, please refer to section 4 of this manual. This appliance is intended for cooking food indirectly in pans and must not be used for any other purpose. Any other use is considered improper. IMPORTANT! Danger of fire, explosion and death Use SMART boiling pans This manual refers to the following models: SMART SMART VARIMIX SMART PROMIX • Do not place any other objects apart from cookware on the cooking area as it gets hot. Danger of scalding and burning You can find the model name (F.Mod.) on the rating plate on the appliance itself. For more information, please refer to section 4 of this manual. This appliance is intended for cooking food indirectly in pans and must not be used for any other purpose. Any other use is considered improper. • Do not touch the hobs as this could cause scalding. 1.5 Personal protective equipment The following table gives an overview of the personal protective equipment (PPE) you must wear in the various stages of using the appliance. PPE mandatory PPE available, wear as appropriate PPE not necessary Protective clothing Safety shoes Protective gloves Eye protection Head protection Phase Transport X Handling X Unpacking X Installation Regular machine use X X X X Settings X Regular cleaning X X Special cleaning X X Maintenance X X Disassembly X Scrap X EN | 02-2015 DOC.NO: ST09184-02 7 OPERATING INSTRUCTIONS | SMART LINE | BOILING PAN 1.6 Residual risk Residual risks that cannot be avoided completely during development or are eliminated with the use of suitable safety devices, are marked on the machine. When the machine is installed, ensure there is sufficient free space around it to reduce the residual risks. The area around the machine must be free of obstructions, clean, dry, and well lit. Residual risk Description of the risk Risk of slipping or falling The user could slip due to water or dirt on the floor. Danger of scalding or abrasions The operator may be injured when touching internal parts of the machine without protective gloves. Risk of electric shock When touching live electrical components e.g. during maintenance work, if the power is not disconnected. Danger of tipping loads The appliance may be damaged if unsuitable lifting measures are used during transport and handling, or if the load is improperly distributed. Danger from chemical substances Injury due to accidental inhalation of chemicals (e.g. refrigerant) Please always take note of the stickers on the appliance. Risk of injury during installation and maintenance work Serious injury can occur when touching moving parts such as fans without adequate protective clothing. 1.7 Safety instructions Switch off the power before attempting to rectify faults or operating problems. • Press On/Off . (see Fig. 3) • Switch off the Main circuit switch (on the rear of the right column.) • In the case of a double connection, check that both incoming cables are without current. WARNING! • • • 8 For more information refer to the section on Cleaning. Caution high voltage! This symbol indicates the pans electrical cabinet. The door of the electrical cabinet and other cover panels may only be opened by technicians who are trained for such work. • When the agitator is rotating obseve caution! • The measuring stick must not be in the pan • Do not insert the measuring stick down in the pan • Do not insert any implements down in the pan • Do not use the pan columns as work surfaces • Do not taste For tilting The area 1.5 metres in front and behind the pan must be regarded as a risk zone with access only allowed for the operator. IMPORTANT! Danger of fire, explosion and death Do not spray water straight at the columns or the outside of the pan. If water comes into contact with live components it could be fatal. Always take care when cleaning, especially when close to electrical components. Use a damp cloth for cleaning. IMPORTANT! Danger of fire, explosion and death WARNING! Caution hot enviroment This symbol warns of heat and steam. Take care during operation when high temperatures can occur. DOC.NO: ST09184-02 EN | 02-2015 OPERATING INSTRUCTIONS | SMART LINE | BOILING PAN TECHNICAL SPECIFICATIONS 2. MODELS Smart Line boiling pans PNC F. Mod. Heating Kg/h Total power kW Voltage V / neutral conductor Frequency Hz Max. phase current A 232218 SM6B50 - 15 400 V / 3N 50/60 22 232219 SM6B100 - 22.5 400 V / 3N 50/60 33 232220 SM6B150 - 30 400 V / 3N 50/60 44 232221 SM6B200 - 37.5 400 V / 3N 50/60 55 232222 SM6B300 - 50 400 V / 3N 50/60 73 232223 SM6V50 - 15.8 400 V / 3N 50/60 27 232224 SM6V100 - 24 400 V / 3N 50/60 39 232225 SM6V150 - 31.5 400 V / 3N 50/60 51 232226 SM6V200 - 39.7 400 V / 3N 50/60 62 232227 SM6V300 - 52.2 400 V / 3N 50/60 80 232228 SM6P100 - 24.7 400 V / 3N 50/60 39 232229 SM6P150 - 32.2 400 V / 3N 50/60 51 232230 SM6P200 - 40.5 400 V / 3N 50/60 66 232231 SM6P300 - 53 400 V / 3N 50/60 84 232232 SM6B50S 24 0.2 230 V / 1N 50/60 2 232233 SM6B100S 36 0.2 230 V / 1N 50/60 2 232234 SM6B150S 47 0.5 400 V / 3N 50/60 3 232235 SM6B200S 59 0.5 400 V / 3N 50/60 3 232236 SM6B300S 78 0.5 400 V / 3N 50/60 3 232237 SM6V50S 24 1.0 400 V / 3N 50/60 7 232238 SM6V100S 36 1.7 400 V / 3N 50/60 9 232239 SM6V150S 47 2.0 400 V / 3N 50/60 9 232240 SM6V200S 59 2.8 400 V / 3N 50/60 10 232241 SM6V300S 78 2.8 400 V / 3N 50/60 10 232242 SM6P100S 36 2.4 400 V / 3N 50/60 9 232243 SM6P150S 47 472.8 400 V / 3N 50/60 9 232244 SM6P200S 59 3.6 400 V / 3N 50/60 14 232245 SM6P300S 78 3.6 400 V / 3N 50/60 14 EN | 02-2015 DOC.NO: ST09184-02 9 OPERATING INSTRUCTIONS | SMART LINE | BOILING PAN Smart Line boiling pans with dual connection Total power kW Voltage V / neutral conductor Frequency Hz Max. phase current A PNC F. Mod. Weight Kg 232222 + 928091 SM6B300 480 25 / 25 400 V / 3N 50/60 36 / 36 232226 + 928092 SM6V200 400 25 / 14.7 400 V / 3N 50/60 36 / 25 232227 + 928092 SM6V300 480 25 / 27.2 400 V / 3N 50/60 36 / 43 232230 + 928092 SM6P200 400 25 / 15.5 400 V / 3N 50/60 36 / 29 232231 + 928092 SM6P300 500 25 / 28 400 V / 3N 50/60 36 / 47 Smart Line kokgrytor med tillval isvattenkylning Total power kW Voltage V / neutral conductor Frequency Hz Max. phase current A PNC F. Mod. Weight Kg 232223 + 928153 SM6V50 180 15.8 400 V / 3N 50/60 27 232224 + 928154 SM6V100 280 24 400 V / 3N 50/60 39 232225 + 928155 SM6V150 400 31.5 400 V / 3N 50/60 51 232226 + 928156 SM6V200 400 39.7 400 V / 3N 50/60 62 232227 + 928157 SM6V300 480 52.2 400 V / 3N 50/60 80 3. TESTING / CERTIFICATION All appliances are tested and certified according to the relevant standards and approved engineering rules by internationally recognised testing bodies. This guarantees that all internationally required quality and safety standards have been met. Each appliance features the CE marking on its nameplate. All appliances have passed the testing for protection class IP X5 (water protection). To ensure continued compliance with this protection class, all seals must remain in a perfect condition and all components must be assembled properly after installation, repairs and maintenance work. 10 CE- DIRECTIVES Boiling pans are manufactured in compliance with directives MD 2006/42/EG (AFS 2008:3), LVD 2006/95/EG, EMC 2004/108/ EG, PED 97/23/EG (AFS 1994:4). The machine is regarded as an appliance. The appliance consists of a CE approved safety valve (Category IV) and a CE approved pressure vessel (Category II). Procedures for assessing compliance of the appliance are drawn up in accordance with Module A. (Standards: EN13886:2005+A1:2010,EN ISO 12100:2010, EN 60204-1 A1:2009, EN13445-1-5) and are CE labelled. DOC.NO: ST09184-02 EN | 02-2015 OPERATING INSTRUCTIONS | SMART LINE | BOILING PAN 4. APPLIANCE IDENTIFICATION 4.1 Rating plate The illustration shows an example of an unlabelled rating plate and may differ from the one on your appliance. There is one rating plate affixed at a clearly visible spot on the outside of the unit. There is another rating plate inside the appliance which you can see after removing the panels. For the exact identification of your appliance, see 'PNC'. The eight-digit serial number (Ser. No.) on the rating plate contains the following information: 4 25 1 0003 3. Appliance with this PNC, produced in calendar week 25 Third digit of the year in numbers (2014) Calender week (25) Fourth digit of the year in numbers (2014) Definition of the data on the label: Model Description of the boiling pan Max. phaseload A Current Int.code Internal code Prod. year Production year Prod. No. Production code/codes CE CE identification Ser. No. Serial number V~ Supply voltage ~ phase Max. Pressure Maximum operating pressure,vessel Hz Mains frequency Min. Pressure Minimum operating pressure Tot. kW Maximum power consumption Max.temp Maximum temperature Motor power consumption Min.temp Minimum temperature Steam consumption Typ No. Vessel production, drawing number Steam consump. WEEE symbol 5. CONSTRUCTION OF THE APPLIANCE The outer and inner structure parts of the overall appliance are made of high-quality steel (AISI 304). EN | 02-2015 The surface of the appliance is highly polished, ensuring an excellent level of hygiene, universal versatility and making it easy to clean while preventing any mixing of flavours. DOC.NO: ST09184-02 11 OPERATING INSTRUCTIONS | SMART LINE | BOILING PAN GENERAL INFORMATION 6. PACKAGING ENVIRONMENT Help protect our environment All packaging materials used are environmentally-friendly. They may be stored without risk, taken to a recycling centre or incinerated in special waste incineration plants. Plastic parts that can be recycled are marked: The symbol on the products indicate that this product may not be treated as normal household waste, but must be disposed of in the correct manner to prevent potential, negative impacts on our environment and our health. For information on recycling of this product, please contact the distributor of the product, our customer service or the garbage disposal service in the region. Polyethylene: Outer packaging PE Polystyrene: Protective corners PS 12 DOC.NO: ST09184-02 EN | 02-2015 OPERATING INSTRUCTIONS | SMART LINE | BOILING PAN 7. ESPONSIBILITY / LIABILITY 7.1 Liability 7.2 Storing the operating instructions The manufacturer is exempted from all liability for the product in the following cases: These installation and operating instructions must be kept intact for the whole life cycle of the appliance up until it is disposed of. These installation and operating instructions must always accompany the appliance if it is transferred, sold, rented, allowed to be used by others or leased. • Disregarding the information in this Installation and Operating Instructions • Disregarding country-specific regulations • Repairs that were performed improperly and the use of replacement parts that are not listed in the replacement parts catalogue (the installation and use of non-original replacement parts or non-original accessories can cause long-term damage to the operation of the appliance) • Interventions by unqualified technicians • Unapproved modifications or interventions • Negligent maintenance • Improper use of the appliance • Exceptional unforeseeable circumstances • Use of the machine by untrained persons • Non-compliance with the regulations for workplace safety, hygiene and health that are in force in the appliance user’s country Furthermore, any liability for damage that is caused by conversions and independent modifications made by the user or the customer will not be accepted. The employer or the person responsible for safety in the workplace is responsible for the selection of personal protective equipment, which will be made available to personnel in accordance with the regulations applicable in the country in which the appliance is used. EN | 02-2015 Store the documents so that they are always available for users. Additions and amendments to the Installation and Operating Instructions which Electrolux Professional will, if necessary, send to customers, form an integral part of the guide and must be kept with it. 7.3 Target groups The installation instructions are intended for: • Staff who are responsible for transport and handling • Engineers who set up and commission the appliance • The employer of the appliance users and the safety officer at the workplace • Staff using the appliances • Customer service technicians • Disposal officers DOC.NO: ST09184-02 13 OPERATING INSTRUCTIONS | SMART LINE | BOILING PAN 8. CUSTOMER SERVICE, REPAIR AND MAINTENANCE Service, repair and maintenance work must only be carried out by Electrolux Professional or Electrolux partner dealers. Country-specific and local regulations apply. This applies in particular to safety and regulatory installations. A service contract is therefore recommended. Before starting any service, repair or maintenance work, the appliances must be disconnected from the mains supply (turn the main switch off or remove the fuses from the power supply), the gas supply turned off and drinking water pipes closed off. Parts requiring replacement must be replaced by original parts from Electrolux Professional. The warning and information notices fitted to the appliances must be obeyed by specialist and customer service staff and must not be removed or altered. During service / repair and maintenance work, distractions and stress factors must be avoided. As such, unauthorised persons must be kept away from the appliance. Servicing may be not carried out on ships at sea. IMPORTANT! Danger of fire, explosion and death • Repairs and service on the appliances must be carried out when heating elements have cooled down. • Any internal electrical wiring in the appliance and the connections to the earth cable are in accordance with the respective wiring diagrams and must not be modified. All metal parts which have electrical connections on them must remain earthed. • After completion of the maintenance and repair work, the service technician must carry out checks to ensure all operating modes of all functional and safety components are in accordance with the operating instructions. 8.1 Maintenance periods Similarly constructed appliances are not under obligation to be certified. They are subjected to a pressure and function test at the factory in accordance with the relevant guidelines. Depending on the frequency and intensity of use, functional parts must be maintained and tested consistently at regular intervals. However this must be at least once a calendar year. • When operating the appliance and during maintenance, you must make sure there are no moving parts, such as vents, inside the appliance. Take extreme care. 14 DOC.NO: ST09184-02 EN | 02-2015 OPERATING INSTRUCTIONS | SMART LINE | BOILING PAN 9. CLEANING 9.1 Handling stainless steel The types of stainless steel used on industrial kitchen appliances are highly sophisticated, tried and tested materials. Thanks to its positive characteristics, stainless steel is an ideal material for preparing food. swarf from cables, iron-rich water) this can lead to corrosion. 9.2 Suitable cleaning products The reason stainless steel can resist corrosion and rust is its passive layer which builds up when oxygen hits the metal surface. There is sufficient oxygen in the air to do this. If this passive layer is physically broken or damaged by chemical substances, leaving it unable to regenerate itself, even rust-free stainless steel can be subject to corrosion. It is possible to develop or regenerate the passive layer by treating it with running, oxygen-rich water. Oxygen-starving abrasives such as hydrochloric acid, chlorides and spice concentrates, mustard, vinegar essences, spice cubes and cooking salt solutions can lead to chemical damage or rupture of the passive layer, depending on the concentration and temperature. Extraneous rust (iron particles), the formation of galvanic elements and lack of oxygen could cause more damage. If the appliance is kept in an environment with corrosive substances (e.g. chlorine), it is advisable to apply a thin layer of Vaseline oil to its cleaned stainless steel surfaces. ENVIRONMENT Help protect our environment • For environmental protection reasons it is recommended that the appliance is cleaned only with products which are more than 90% biologically degradable. The appliances must be cleaned with commercially available, food compatible cleaning agents. No bleaching, chlorine-based, highly flammable, granular or abrasive cleaning agents must be used to clean the appliance. 9.3 Cleaning the appliance IMPORTANT! Danger of fire, explosion and death • Before cleaning, the appliance must be disconnected from the power supply and cooled down completely to avoid the risk of scalding or electric shock. • Do not clean the appliance with flammable liquids. NOTE Please follow these instructions • Keep stainless steel surfaces clean at all times and make sure they are well ventilated. • Do not place the lid on appliances when not in use so that air can get to the surface. • Remove limescale, fat, starch and protein layers with regular cleaning to avoid corrosion. De-scale the appliance with a solution of 10% vinegar, 10% phosphoric acid or a suitable de-scaling solution available for purchase. • Do not let stainless steel parts come into prolonged contact with acids, spices, salts, etc. Rinse off work surfaces with fresh water. This applies especially after cooking potatoes, pasta or rice in salted water. Clean the appliance after each use. The surfaces of our appliances must be washed with hot water and mild detergent. After cleaning, the surfaces must be thoroughly rinsed with water and rubbed dry. Accessories such as tools and strainer plates must be cleaned outside of the appliance. NOTE Please follow these instructions • Do not spray the appliance or its parts with a high-pressure cleaner or a steam cleaner; this may cause it to malfunction. • Must not be cleaned with steel brushes, steel wool, copper cloths, sand-based or similar products! • Avoid physical damage to the stainless steel surface, especially with other metals. If stainless steel comes into contact with iron (wire wool, EN | 02-2015 DOC.NO: ST09184-02 15 OPERATING INSTRUCTIONS | SMART LINE | BOILING PAN 10. TRANSPORT, HANDLING AND STORAGE The transport, handling and storage of the appliances must be carried out only by specialist workers who: • Have specific technical training and experience • Know the safety regulations and the legal provisions of their specialist area • Have knowledge about general safety provisions • Are able to recognise and avoid possible dangers The staff who are responsible for the transport, handling and storage of the appliances must be trained in the use of hoisting aids and have sufficient knowledge to use the individual means of protection for the work to be carried out (e.g. work wear, safety shoes, safety gloves and hard hats). 10.1 Transport Transport (relocation) and handling (moving inhouse) must be carried out by using lifting means of suitable load-bearing capacity. 10.3 Notes on handling Observe the following precautions to ensure safe handling: • Use appropriate lifting means with sufficient load-bearing capacity (e.g. forklift or lifting truck) • Cover the edges • Check the lifting forks and adhere to the instructions on the packaging • Prior to lifting: • Ensure that all employees are at a sufficiently safe distance and that unauthorised persons have no access to the workspace • Check the stability of the load • Make sure that no goods can fall off while lifting; avoid sudden movements and impacts • Lift the appliance as little as possible when in motion • Appliances may be not be lifted on removable or unsuitable load-bearing parts (protective panels, cable guides, etc.) The appliance can be transported by truck, train or ship. Except for road transport, the appliance is sent in a container together with other appliances. The appliances can be loaded inside the container by the assigned carrier. 10.4 Moving and setting down appliances Due to the appliance dimensions it is not permitted to stack the appliances on top of each other during transport. In such case the manufacturer shall not be liable should the load tip over. Before setting down the load, check that there are no obstacles and that the surface is flat and designed to support the weight of the load. The manufacturer shall under no circumstances be liable for damage during transport or damage to the packaging. 10.2 Unloading Prior to removing the transport fastenings you must ensure that the stability of the appliance components does not depend on the fastenings and that the load cannot fall from the vehicle as a result. Standing under hanging loads during loading and unloading is prohibited. Unauthorised persons are prohibited from accessing the work area. 16 The person controlling the lifting aid must have a good overview of the route and must be able to halt his/her manoeuvres at any time in case of danger. 10.5 Storage The appliances and/or their parts must be protected from moisture and stored in a dry, vibration-free room with a non-aggressive atmosphere and a temperature of 5°C / 41°F to 50°C / 122°F. The location must have a horizontal, level surface in order to prevent the appliances becoming misshapen or the adjustable feet being damaged. The accessories delivered with the appliances must not be changed. Any parts that have been lost or are faulty must be replaced with original parts. DOC.NO: ST09184-02 EN | 02-2015 OPERATING INSTRUCTIONS | SMART LINE | BOILING PAN 11. SAFETY SYSTEM WARNING!OVERHEATING Observe If overheating occurs, a buzzer will sound and the following text will appear in the display 11.2 Checking of safety valve ELEMENT OVERHEATED The heat will shut off in the event of a fault to the element sensor. Switch off the pan by: • Pressing On/Off (see Fig. 3) for resetting the overheating protection. The display goes out. • Wait 5 seconds! • Press On/Off . Display lights. If the warning is still lit • Check the water level in the pressure vessel. (See Filling pressure vessel with water in the installation instructions.) • If the warning is still lit, call in a qualified technician. The water level in the vessel should be checked at least once/quarter. (See Filling pressure vessel with water in the installation instructions.) If you cannot get the valve to open (blow)it must be replaced immediately. Call in a qualified technician. NOTE! Boiling pans with the level control option regulates the water level in the vessel automatically. There is no need to check the water level in the vessel. 11.1 Safety valve Fig 2 • A:1 A:2 Lift the handle to allow the steam free passage through the safety valve, Fig.2 pos. A:1 and Fig.2 pos. A:2. 11.3 Manometer Manometer Fig. 1 pos.B, measures the steam pressure. May not exceed 1.5 bars. If the display goes into the red field • Switch off the pan immediately and call in a qualified technician. * For the correct display of the pressure, the green cap on the manometer can be lifted. NOTE:The green cap must be pressed in when the pan is tilted. 11.4 Steam trap Steam trap Fig. 1 pos.C, releases the cold air into the steam generator when starting the pan. When the water in the steam generator starts to boil and hot steam starts to flow out, the steam trap closes automatically. Fig.1 A. Safety valve B. Manometer C. Steam trap D. Meter tap (for accredited authority at final inspection) A properly functioning safety valve is an extremely important part of the pan’s safety system. Safety valve (Fig. 1 pos. A) opens automatically if the pressure exceeds 1.5 bar. • Switch off the pan immediately and call in a qualified technician. Warning! If the safety valve (Fig. 1 pos. A) opens, hot steam will blow out from the valve. Regular checks of the safety valve should be performed by trained personnel. We recommend: once a week. EN | 02-2015 DOC.NO: ST09184-02 17 OPERATING INSTRUCTIONS | SMART LINE | BOILING PAN 12. CONTROL PANEL 1 2 3 5 7 8 4 6 13 14 Variomix agitator 9 Promix agitator 11 11 9 12 12 10 10 1.On/Off 2. Display 3. Menu forwards 4. Menu back 5. Increase value 6. Decrease value 7. Start 8. Stop 9. Agitator start 10. Agitator stop 11. Increase speed 12. Decrease speed 13. Tilting 14. Tip return 15. Emergency stop 16. Main switch 17. Pushbutton, agitation without grid (Smart mix) 17 15 18 DOC.NO: ST09184-02 16 Fig. 3 EN | 02-2015 OPERATING INSTRUCTIONS | SMART LINE | BOILING PAN 13. OPERATING INSTRUCTIONS 13.1 Instant start BOILING (Fig.3) • Press On/Off for 1.5 seconds. Display lights. The following text appears in the display: ENU SETTINGS M I I I I V V The pan is to be in working position. (See Tilting/ Tilt return). • Press START . Red LED lights with a fixed light. The following text appears in the display: BOILING -h --min XXX°C WATER 000+000 AGITATOR 000rpm BOILING BOILING/HOT KEEP BOILING/COOLING COOLING • Press Decrease value down. or • press Increase value moves up. . The cursor moves and the cursor 13.3 BOILING • Confirm the selected option by pressing Menu forwards once. The following options appear in the display: MANUAL FILLING WATER XXXL The pan starts and the pan temperature automatically rises to 100°C. For use of agitator (See Agitator). 1. 13.2 Programmed start Settings If you do not want to go through all the steps, you can press START at anytime in the programming to start the process. • Press On/Off for 1.5 seconds. Display lights. The following text appears in the display: The arrow points to the associated function button. ENU SETTINGS M I I I I V V Press Increase value once to start the filling of the water. The amount of water, that is filled into the pan, can be read in the display (if the flow sensor option has been selected). • Press Decrease value or STOP once to stop the filling of the water. • Press Decrease value for 5 seconds to set the value to zero (if the flow sensor option has been selected). If Menu forwards is activated before the water filling is stopped, press STOP to stop the filling. BOILING SET TEMPERATURE XXX°C • Press Menu forwards once. The status of the pan appears in the display: BOILING -h --min XXX°C WATER XXX+XXX AGITATOR 000rpm • Press Menu forwards once. The following options can appear in the display (depending on the options selected): 2. Press Increase value to increase the temperature (max 121°C) or press Decrease value to decrease the temperature (min 30°C). • Confirm by pressing Menu forwards once. The following options appear in the display: BOILING SET TIME -h --min 3. Press Increase value to set the required boiling time (max 7h and 59 min) or shorten the time by pressing Decrease value . rpm = revolutions per minute EN | 02-2015 DOC.NO: ST09184-02 19 OPERATING INSTRUCTIONS | SMART LINE | BOILING PAN If the display shows - h -- min, this means that there is unrestricted time and the pan must be switched off using STOP . • Confirm by pressing Menu forwards once. The following settings appear in the display (if the flow sensor option has been selected): BOILING SET WATER 13.4 Delayed start (if the flow sensor and/or mat temp. sensor options have been selected). If Delayed start has been deselected, this menu is not shown (see Page 18). Press Menu forwards once. The following text appears in the display: (XXX+) XXXL NOTE: The settings do not work while manual water filling is in progress. 4. Press Increase value for setting the number of litres of water to be filled. If there is a value in brackets ( ) in the display, this specifies how many litres of water have already been filled into the pan. • Confirm by pressing Menu forwards once. The following settings appear in the display (if the flow sensor and mat temp sensor options have been selected): BOILING Xh XXmin XXX°C WATER XL -- -- DELAYED START SETTING TIME -h --min 7. Press Increase value to add a longer delay to the start (max 99h 59min) or press Decrease value to shorten the delay. If no delayed start is required, 00h 00min must appear in the display. • Confirm by pressing Menu forwards once. The following text appears in the display: DELAY XXh XXmin Xh XXmin XX°C WATER XXX+XXX AGITATOR 000rpm To select the settings made without saving: 13.5 Load program 5. (if the flow sensor and/or mat temp. sensor options have been selected). If programming has been deselected, this menu is not shown (see Page 18). The following text appears in the display: Press Menu forwards twice. Continued from step 7. To save the settings that have just been made: • Press Increase value The following text appears in the display: BOILING Xh XXmin XXX°C WATER XL 01 6. The number of a free program flashes in the display. Other numbers, that are not flashing, are not selected here. (See Changes in existing programs). • Select this free program number by pressing Menu forwards . Tip! Write down the program number. BOILING Xh XXmin XXX°C WATER XL RETRIEVE PROGRAM -- -- 8. Press Increase value or Decrease value once. The following text appears in the display: BOILING Xh XXmin XXX°C WATER XL RETRIEVE LAST -- -- The last can be the program that was just saved. The program number does not appear in the display. • Press Increase value or Decrease value to display all stored programs. 9. Press Menu forwards to load the selected program. • Repeat step 7. If Programmed start is selected rpm = revolutions per minute 20 DOC.NO: ST09184-02 EN | 02-2015 OPERATING INSTRUCTIONS | SMART LINE | BOILING PAN • Confirm by pressing Menu forwards once. The following text appears in the display: (if the mat temp. sensor option has been selected) DELAY XXh XXmin Xh XXmin XX°C WATER XXX+XXX AGITATOR 000rpm When this appears in the display, the machine can be started in the following ways: 10. Press START to start. Red LED lights with a fixed light. Delay to start starts to count down. For use of agitator (See Agitator). When the countdown to start is ready or if delayed start has not been selected, the following text appears in the display: BOILING Xh XXmin XXX°C WATER XXX+XXX AGITATOR 000rpm Boiling time starts when the set temperature has been reached. NOTE: Temperatures above 100°C cannot be achieved and the countdown of the boiling time does not start. When the boiling time is over, the heating switches off. The red LED goes out, a buzzer sounds for 2 minutes and the display flashes until the pan switches off, which is done in the following ways: 11. Press STOP 13.6 BOILING/HOT KEEP BOILING BOILING/HOT KEEP BOILING/COOLING COOLING • Confirm the selected option by pressing Menu forwards once. • Repeat steps 1-4. The following text appears in the display: HOT KEEP SET TEMPERATURE XXX°C 12. Press Increase value to increase the keeping hot temperature or press Decrease value to decrease the temperature. • Confirm by pressing Menu forwards once. To select the settings made without saving: • Press Increase value twice. • Continued from step 13. To save the settings that have just been made: • Repeat step 6. If delayed start has been selected (if the flow sensor option has been selected) • Confirm by pressing Menu forwards once. The following text appears in the display: . DELAY XXh XXmin Xh XXmin XX°C XXX°C WATER XXX+XXX AGITATOR 000rpm When this appears in the display, the machine can be started by: 13. Pressing START to start the machine. Red LED lights with a fixed light. Delay to start starts to count down. For use of agitator (See Agitator). When the countdown to start is ready or if delayed start has not been selected, the following text appears in the display: BOILING/HOT KEEP Xh XXmin XXX°C WATER XXX+XXX AGITATOR 000rpm Boiling time starts when the set temperature has been reached. EN | 02-2015 DOC.NO: ST09184-02 21 OPERATING INSTRUCTIONS | SMART LINE | BOILING PAN When boiling time is over, it transfers to hot keep. The following text appears in the display: BOILING/HOT KEEP XXX°C WATER XXX+XXX AGITATOR 000rpm The time for hot keep is unrestricted and the pan must be switched off manually in the following way: 14. Press STOP . The following question appears in the display: INTERRUPT? YES PRESS STOP NO PRESS START • Press STOP 13.7 BOILING/COOLING (if the jacket cooling and mat temp. sensor options have been selected) BOILING BOILING/HOT KEEP BOILING/COOLING COOLING 15. Confirm the selected option by pressing Menu forwards once. • Repeat steps 1-4. Left LED in Agitator starts flashing. The agitator function starts automatically when boiling switches to cooling. The agitator function can be deselected by pressing agitator stop . The following text appears in the display: COOLING SET TEMPERATURE XXX°C , the red LED goes out. • Press Increase value and the cooling temperature increases (hotter). If ”_ _” appears this means unlimited cooling. (only option without food temp. sensor ”food temperature probe”) • Press Decrease value and the cooling temperature decreases (colder). The following text appears in the display: BOILING/COOLING Xh XXmin XX°C WATER XXX+XXX -- -- XX°C To select the settings made without saving: 16. Press Increase value twice. • Continued from step 17. To save the settings that have just been made: • Repeat step 6. If delayed start has been selected (if the flow sensor option has been selected) • Confirm by pressing Menu forwards once. The following text appears in the display: DELAY XXh XXmin Xh XXmin XX°C XXX°C WATER XXX+XXX AGITATOR 000rpm When this appears in the display, the machine can be started by: 17. 22 Pressing START to start the machine. Red LED lights with a fixed light. Delay to start starts to count down. For use of agitator (See Agitator). DOC.NO: ST09184-02 EN | 02-2015 OPERATING INSTRUCTIONS | SMART LINE | BOILING PAN When the countdown to start is ready or if delayed start is not selected, the following text appears in the display: 13.8 COOLING If the boiling pan does not heat up, see error messages on page 20. Boiling time starts when the set temperature has been reached. When the boiling time is over, the heating switches off and the pan switches to cooling. The agitator starts to rotate at a speed of 25 rpm if it has not been deselected. The following text appears in the display: • Confirm the selected option by pressing Menu forwards once. • Repeat step 1. The following text appears in the display (if the mat temp sensor option has been selected): BOILING/COOLING Xh XXmin XXX°C WATER XXX+XXX AGITATOR XXXrpm BOILING/COOLING XX°C WATER XXX+XXX AGITATOR 025 rpm When the correct cooling temperature has been reached, the red LED goes out, a buzzer sounds for 2 minutes and the display flashes until the pan switches off: The following text appears in the display: BOILING -h --min XX°C XX°C WATER XXX+XXX AGITATOR 025 rpm To continue cooling towards temperature: Press START (SV6I/SP6I only). Switch off in the following way: the adjusted Press STOP . For unlimited cooling: Switch off the pan manually in the following way: Press STOP . The following question appears in the display: INTERRUPT? YES PRESS STOP NO PRESS START COOLING SET TEMPERATURE XXX°C • Press Increase value and the cooling temperature increases (hotter). If “_ _” appears this means unlimited cooling (the only option without mat temp. sensor). • Press Decrease value and the cooling temperature decreases (colder). • Repeat step 4. The following text appears in the display: COOLING -h --min XXX°C WATER XXX+XXX AGITATOR 000rpm 19. Pressing START . The cooling starts now (if the mat temp. sensor option has been selected). When the correct cooling temperature has been reached, the red LED goes out, a buzzer sounds for 2 minutes and the display flashes until the pan switches off. To continue cooling towards the adjusted temperature: Press START (SV6I/SP6I only). The following text appears in the display: BOILING -h --min XX°C WATER XXX+XXX AGITATOR XXXrpm , the red LED goes out. Switch off the pan by: SV6I/SP6I only. After STOP the boiling pan will empty the refrigerant. Do not turn off the machine while draining is progressing (approx. 3 minutes). EN | 02-2015 BOILING BOILING/HOT KEEP BOILING/COOLING COOLING When this appears in the display, the machine can be started by: 18. • Press STOP (if the jacket cooling option has been selected) 20. DOC.NO: ST09184-02 Pressing STOP . 23 OPERATING INSTRUCTIONS | SMART LINE | BOILING PAN For unlimited cooling/ without food temp.sensor, switch off the pan manually in the following way: 13.10Name the food preparation program Press STOP . The following question appears in the display: The food preparation program to be named is to appear in the display: INTERRUPT? YES PRESS STOP NO PRESS START • Press STOP XXXXXXX Xh XXmin XXX°C WATER XL XX , the red LED goes out. • Press Menu back . The following text appears in the display: 13.9 Changes in food preparation program (if the mat temp. sensor and flow sensor options have been selected) The values in the food preparation programs BOILING, BOILING/HOLD or BOILING/COOLING, can be changed in the following way: • Load the program to be changed. Load programs that are stored by: • Pressing Increase value until the program number appears in the display. Tilt Write down the program number. • Confirm by pressing Menu forwards . • Enter the values to be changed e.g.: temp, boilingtime, water , until the following text appears in the display: XXXXXXX Xh XXmin XXX°C WATER XL -- -• Press Increase value until the program number to be replaced appears in the display. • Press Menu forwards once. The following question appears in the display: REPLACE? YES, PRESS START NO, PRESS STOP XXXXXXX Xh XXmin XXX°C WATER XL XX • Press Increase value until the program number to be replaced appears in the display. • Press Increase value and STOP simultaneously for 3 seconds. The following text appears in the display: SELECT PROGRAM _ NO. X • Press Increase value or Decrease value to select the necessary letter or number. • Press Menu forwards to move forwards to the next character position or press Menu back to move back. (Max 17 characters). • Repeat until the program name is entered in the display. • Press Increase value and STOP simultaneously for 3 seconds and the new program name appears in the display. xxxxxx XhXXmin XX°C WATER XL XXXXXXXX XX • Press Menu forwards once. The following question appears in the display: • Press START and the new values are now stored in the old number. REPLACE? YES, PRESS START NO, PRESS STOP • Press START and the new values are now stored in the old number. 24 DOC.NO: ST09184-02 EN | 02-2015 OPERATING INSTRUCTIONS | SMART LINE | BOILING PAN 14. AGITATOR 14.1.2 AGITATION WITHOUT GRID 14.1 Agitator Variomix (SMARTMIX) NOTE: When the agitator is rotating • The measuring stick must not be in the pan • Do not insert the measuring stick down in the pan • Do not insert any implements down in the pan • Do not use the pan columns as work surfaces • Do not taste This function is used to rotate the agitator when the grid is open and in the event of tilting. • Press the pushbutton and hold to rotate the agitator at 20 rpm. • Release the button and the agitator tool will stop. In order to start the agitator the lid or grid must be closed. Without grid the following text appears in the display: There are 2 fixed agitator programs and 5 positions for own programs • Press Increase speed once. The following text appears in the display: AGITATOR LID/GRID ON 14.1.1 Continuous stirring • Press Agitator start • • • once. Left LED lights with a fixed light. Press Increase speed and the stirrer starts at the lowest speed of 25 rpm. (Max. speed 100 rpm.) Press Decrease speed to decrease the speed. Press Agitator stop to stop the agitator. Reverse stirring • Press Agitator start • • • twice. The LED in the middle lights. Press Increase speed once and the stirrer starts at the lowest speed of 25 rpm. (Max speed 100 rpm.) The agitator rotates clockwise for 15 seconds, 5 second pause, 15 second anti-clockwise etc. Press Decrease speed to decrease the speed. Press Agitator stop to stop the agitator. Change to pause time Pause time in the stirring can be altered when the LED in the middle of the Agitator start is lit: • Press Agitator start and the right LED also lights. The following text appears in the display: PAUSE TIME Xmin XXs • Press Increase value to add a longer pause to the stirring. (Max, 9 min 55 s and min, 0 min 05 s). Press Decrease value to shorten the pause. EN | 02-2015 14.1.3 Preset agitator program PRESET AG.PROGR MIX • Press Increase speed until the appropriate program appears in the display. When the program to be used appears in the display: • Press Agitator start . The agitator starts the selected program. • The agitator stops automatically when the program has finished. • You can also stop the agitator with Agitator stop . • Changing the speed can be done in each program. 14.2 Fixed agitator programs 14.2.1 MIX The fixed program MIX is used to mix more solid products such as minced meat. Operating time and pause time are shorter than for normal stirring with pause. • Press Increase speed until MIX appears in the display: AGITATOR PROGRAM FIXED MIX • Press Agitator start . • Press Increase speed and the stirrer starts at the lowest speed of 25 rpm. (Max speed 100 rpm). • Press Decrease speed to decrease the speed. • Press Agitator stop to stop the program. DOC.NO: ST09184-02 25 OPERATING INSTRUCTIONS | SMART LINE | BOILING PAN 14.2.2 WHIP The fixed program WHIP is used to whip more lighter products such as cream. A whip implement can be used with good results*. • Press Increase speed until WHIP appears in the display: PRESET AG.PROGR WHIP • Press Agitator start . • Press Increase speed and the stirrer starts at the lowest speed of 25 rpm. (Max speed 200 rpm). • Press Decrease speed to decrease the speed. • Press Agitator stop to stop the program. 14.2.3 Programming of own agitator program • Press Increase speed once. The following text appears in the display: ADJ AGITATOR PROGRAM 1 NAME SPD TIME R PAUSE XXX XX:XXX XX:XX1 The text that can be changed flashes. (See Name agitator program). • Press Menu forwards once. The following text flashes in the display: SPD XXX TIME R XX:XX X PAUSE XX:XX * Available as accessory • Press Increase value to add a higher speed (max 100 rpm) or press Decrease value to lower the speed (min 25 rpm.). • Confirm by pressing Menu forwards once. The following text flashes in the display: SPD XXX TIME R XX:XXX PAUSE XX:XX1 The total time the agitator is to run is programmed here. Specified in minutes and seconds If ” --:--” appears, this means unlimited time. • Press Increase value to extend the time or press Decrease value to shorten the time. • Confirm by pressing Menu forwards once. The following text flashes in the display: SPD XXX TIME R XX:XX N 1 The letter R means Reverse, which means that the agitator goes in reverse function and pause. There are two options to select: N stands for No which means that the agitator only runsclockwise … or Y stands for Yes which means that the agitator runs in reverse. • Confirm by pressing Menu forwards once. The figure 1 in the display changes to 2. SPD XXX TIME R XX:XX N 2 … or 26 DOC.NO: ST09184-02 EN | 02-2015 OPERATING INSTRUCTIONS | SMART LINE | BOILING PAN • Press Increase value once and the following text flashes. SPD XXX TIME R XX:XXJ PAUSE XX:XX1 • Confirm by pressing Menu forwards The following text flashes: SPD XXX TIME R XX:XXJ . PAUSE XX:XX1 • Press Increase value to add a longer pause or press Decrease value to shorten the pause. • Confirm by pressing Menu forwards . The figure 1 in the display changes to 2. SPD XXX TIME R XX:XXJ PAUSE XX:XX1 The following text flashes again: ADJ AGITATOR PROGRAM 1 NAME SPD TIME R PAUSE XXX XX:XXX XX:XX2 Repeat the procedure from the beginning to add the different agitator values that are required. This can be done three times in total. The following text appears in the display: 14.2.4 Name agitator program • Press Increase speed to select agitator program. • Press Increase value and STOP simultaneously for 3 seconds. The following text appears in the display: SELECT PROGRAM NAME • Press Increase value or Decrease value to select the suitable letter or number. • Press Menu forwards to move forwards to the next character position or press Menu back to move back to the previous character. (Max 17 characters). • Repeat until the program name is entered in the display. • Press Increase value and STOP simultaneously for 3 seconds. The new agitator program name appears in the display: ADJ AGITATOR PROGRAM 1 XXXXXXXXXX SPD TIME R PAUSE XXX XX:XXX XX:XX1 ADJ AGITATOR PROGRAM 1 NAME SPD TIME R PAUSE XXX XX:XXX XX:XX1 In order to select this program: See Preset agitator program. EN | 02-2015 DOC.NO: ST09184-02 27 OPERATING INSTRUCTIONS | SMART LINE | BOILING PAN 14.3 Agitator Promix NOTE: When the agitator is rotating • The measuring stick must not be in the pan • Do not insert the measuring stick down in the pan • Do not insert any implements down in the pan • Do not use the pan columns as work surfaces • Do not taste In order to start the agitator the lid or grid must be closed. Without grid the following text appears in the display: AGITATOR LID/GRID ON 14.3.1 Continuous stirring • Press Agitator start • • • once. The LED lights with a fixed light. Press Increase speed and the stirrer starts at the lowest speed of 25 rpm. (Max. speed 170 rpm for 100 & 150 litre / 140 rpm for 200 & 300 litre pans). Press Decrease speed to decrease the speed. Press Agitator stop to stop the agitator. 14.3.2 AGITATION WITHOUT GRID (SMARTMIX) This function is used to rotate the agitator when the grid is open and in the event of tilting. • Press the pushbutton and hold to rotate the agitator at 20 rpm. • Release the button and the agitator tool will stop. 28 14.3.3 Preset agitator program There are 1 fixed agitator programs and 5 positions for own programs • Press Increase speed once. The following text appears in the display: AGITATOR PROGRAM FIXED GENTLE STIRRING • Press Increase speed until the appropriate program appears in the display. When the program to be used appears in the display: • Press Agitator start . The agitator starts the selected program. • The agitator stops automatically when the program has finished. • You can also stop the agitator with Agitator stop . • Change to speed can be done in each program. 14.3.4 Fixed agitator programs GENTLE STIRRING The fixed program GENTLE STIRRING is used to stir products gently such as hotpots. The operating time is 2 minutes and the pause time is 5 minutes. • Press Increase speed until GENTLE STIRRING appears in the display: PRESET AG.PROGR GENTLE STIRRING • Press Agitator start . • Press Increase speed and the stirrer starts at the lowest speed of 25 rpm. • Press Decrease speed to decrease the speed. • Press Agitator stop to stop the program. DOC.NO: ST09184-02 EN | 02-2015 OPERATING INSTRUCTIONS | SMART LINE | BOILING PAN 14.4 Programming of own agitator program 14.4.1 Name agitator program • Press Increase speed to select agitator program. • Press Increase value and STOP simultaneously for 3 seconds. The following text appears in the display: • Press Increase speed once. The following text appears in the display: ADJ AGITATOR PROGRAM 1 NAME SPD TIME XXX XX:XX 1 The text that can be changed flashes. (See Name agitator program). • Press Menu forwards once. The following text flashes in the display: SPD XXX TIME XX:XX 1 • Press Increase value to add a higher speed (Max. speed 170 rpm for 100 & 150 litre / 140 rpm for 200 & 300 litre pans ) or press Decrease value to lower the speed (min 25 rpm.). • Confirm by pressing Menu forwards once. The following text flashes in the display: SPD XXX TIME XX:XX 1 SELECT PROGRAM NAME • Press Increase value or Decrease value to select the suitable letter or number. • Press Menu forwards to move forwards to the next character position or press Menu back to move back to the previous character. (Max 17 characters). • Repeat until the program name is entered in the display. • Press Increase value and STOP simultaneously for 3 seconds. The new agitator program name appears in the display: ADJ AGITATOR PROGRAM 1 XXXXXXXXXX SPD TIME R PAUSE XXX XX:XXX XX:XX1 The total time the agitator is to run is programmed here. Specified in minutes and seconds If ” --:--” appears, this means unlimited time. • Press Increase value to extend the time or press Decrease value to shorten the time. • Confirm by pressing Menu forwards . The figure 1 in the display changes to 2. SPD XXX TIME XX:XX 2 The following text flashes again: ADJ AGITATOR PROGRAM 1 NAME SPD TIME XXX XX:XX 2 Repeat the procedure from the beginning to add the different agitator values that are required. This can be done three times in total. The following text appears in the display: ADJ AGITATOR PROGRAM NAME SPD TIME XXX XX:XX EN | 02-2015 1 1 DOC.NO: ST09184-02 29 OPERATING INSTRUCTIONS | SMART LINE | BOILING PAN 14.5 Change values during operation Temperature settings: (if the mat temp. sensor option has been selected) The status of the pan appears in the display: Keeping hot when boiling/keep hot or BOILING -h --min XXX°C WATER XXX+XXX AGITATOR 000rpm Cooling when boiling/cool (if the mat temp. sensor and jacket cooling options have been selected) Temperature settings without going into the menu • Press Increase value or Decrease value to change the temperature directly without going to the menu. Manual water filling • Press Menu forwards • Press Increase value • once. Filling of water Temperature settings Boiling • Press Menu forwards twice. • Press Increase value to increase the temperature or press Decrease value to decrease the temperature. Only cooling (if the mat temp. sensor and jacket cooling options have been selected) • Press Menu forwards twice. • Press Increase value to increase the cooling temperature (hotter) or Decrease value to decrease the cooling temperature (colder). Boiling time (if the mat temp. sensor option has been selected) • Press Increase value time or • press Decrease value time. 14.5.1 If keeping hot or cooling is in progress The status of the pan appears in the display: once. once. Filling of water starts. Press Decrease value stops. • Press Menu forwards • Press Menu forwards five times. • press Decrease value to decrease the temperature. BOILING/XXXXXXX XX°C WATER XXX+XXX AGITATOR 000rpm • Press Increase value to increase the temperature or press Decrease value to decrease the temperature. Or: • Press Menu forwards five times. • Press Increase value to increase the temperature or press Decrease value to decrease the temperature. Agitator/speed (if the agitator option has been selected) • Press Increase speed to increase the speed or press Decrease speed to decrease the speed. Repeat for preset agitator program • Press Increase speed and select the appropriate program. three times. to extend the boiling to shorten the boiling Water filling preselected number of litres • Press Agitator start . Pause in the stirring (if the Variomix agitator option has been selected) • Press Agitator start . The right LED lights. • Press Increase value to add a longer pause to the stirring. Press Decrease value to shorten the pause. (if the flow sensor option has been selected) • Press Menu forwards four times. • Press Increase value until the required amount of water in litres apears in the display. 30 DOC.NO: ST09184-02 EN | 02-2015 OPERATING INSTRUCTIONS | SMART LINE | BOILING PAN 14.6 Tilting of pan • Press Tilting and keep the button pressed until the pan reaches the desired position or stops at max. tilted position. NOTE: Tilting can only be done when the lock and grid are raised. NOTE: Tilting can also be done during water filling (e.g. when cleaning). 16. SELECTION OF PROGRAMMING OPTIONS There is the option of deselecting Programming and Delayed start if they are not used and make the menus easier to use. The following text appears in the display: ENU SETTINGS M I I I I V V 14.7 Tilt return of pan • Press Tilt return and keep the button pressed until the pan reaches the desired position or stops in working position. In order for tilt return to work, the pan must be tilted more than 5° from working position. • Press STOP . Increase value simultaneously for 3 seconds. The following text appears in the display: LANGUAGE ENGLISH 15. LANGUAGE SELECTION • Press Menu forwards . The following text appears in the display: PROGRAMMING NO YES NOTE: Factory settings are in English. The languages available are: Dansk Deutsch English Español Française Nederlands* Italiano Norsk Suomi Svenska Eesti Русский* • Press Increase value or Decrease value to select the required option, Yes to retain the programming option or NO to deselect it. • Press Menu forwards once again. The following text appears in the display: DELAYED START NO YES • Press Increase value or Decrease value to select the required option, Yes to retain the Delayed start or NO to deselect it. * The language is ordered as special The following text appears in the display: ENU SETTINGS M I I I I V V • Press START to confirm the selection. If you do not want to go through all the steps, you can press START at any time to continue. • press STOP . Increase value simultaneously for 3 seconds. The following text appears in the display: LANGUAGE ENGLISH • Press Increase value or Decrease value to browse through the languages • Press START to confirm and store the selected language. EN | 02-2015 DOC.NO: ST09184-02 31 OPERATING INSTRUCTIONS | SMART LINE | BOILING PAN 18. AGITATOR MAINTENANCE 17. TOOLS AND ACCESSORIES 17.1 Agitator tool Variomix Gate agitators are used to mash, mix or whip the contents of the pan. You can use the gate agitator with or without scrapers. The scrapers are used to avoid certain food produce sticking. The agitator bearing is filled with grease from the factory. Refilling grease should take place during installation and then at least twice per year. Grease filling should be performed by trained personnel. • Use grease with high temperature properties*: * Order Number: ST8 00 24-00 • Grease should be pumped in so that it is forced out through the overflow hole on the bearing housing. Fig.4 pos.A. 17.2 Agitator tool Promix A Promix propeller is used to pulp, mix or whip the contents of the pan. Bottom agitator is attached to the Promix agitator to process light and /or smaller amounts of food produce more efficiently. The baffle plates are used to avoid splashes from low-viscosity food. 17.3 Supplementary equipment and accessories • Check the grease that is forced out. If it shows signs of being mixed with water, the agitator bearing and seal should be removed for inspection and if necessary replaced. 17.3.1 Smart 18.1 If the pan with agitator is taken out Fig. 4 A. Overflow hole of service Equipment Accessories Measuring stick Strainer plate Cleaning brush, short Cleaning brush, long 17.3.2 Smart Variomix Equipment Accessories Gate agitator Measuring stick Bottom scraper Side scraper Strainer plate Cleaning tool Bottom agitator Whip tool Cleaning brush, short Cleaning brush, long For operation stoppages for periods longer than one month: • Pour in 2-3 litres of silicone oil to counteract the desiccation of the agitator seals. • Heat the pan to 60-80°C. • Follow the instructions above. Appropriate oil is e.g. Whiterex 309 (Mobil). 18.2 When the pan is put back into service • Pour off the oil and clean the pan. 17.3.3 Smart Promix Equipment Accessories Propeller agitator Bottom agitator Baffle plate Measuring stick Strainer plate Cleaning tool Cleaning brush, short Cleaning brush, long 32 DOC.NO: ST09184-02 EN | 02-2015 OPERATING INSTRUCTIONS | SMART LINE | BOILING PAN 19. MESSAGES AND ERROR CODES Message Red LED in START flashes. The following text appears in the display: Cause Action The pan is not in working position. Press Tilt return . TILTING Xh XXmin XXX°C ATOR 000rpm AGITATOR LID/GRID ON Buzzer sounds and the following text appears in the display: ELEMENT OVERHEATED INTERRUPT? YES PRESS STOP NO PRESS START The agitator has stopped. The following text appears in the display: OVERLOADED SHUT-OFF BOILING PAN DURING APPROX 1 MIN The grid is fully or partly open. Close the grid and press Agitator start . Overheating of heating element. • Press On/Off . The display goes out. The heat will shut off in the event • Wait 5 seconds! of a fault to the element sensor. • Press On/Off . Display lights. If the warning is still lit: • Press On/Off to close the pan. The display goes out. See Warning! Overheating and contact authorised personnel. STOP has been pressed dur- Follow the instructions in the display. ing operation. • Press STOP to stop. or • Press START to return to the program. Overloaded agitator • Press On/Off The display goes out. • Turn the main switch to position 0. Wait for approx 1 minute. • Turn the main switch to position 1. • Press On/Off . Display lights. Increase agitator speed or reduce the amount of food in the pan PT-1000 FOOD INTERRUPT Interrupt in PT-1000 sensor Contact authorised personnel. Short circuit in PT-1000 sensor Contact authorised personnel. PT-1000 ELEMENT INTERRUPT Interrupt in PT-1000 sensor Contact authorised personnel. Short circuit in PT-1000 sensor Contact authorised personnel. WATER INTERAPTION Fault in water meter or no water in to the pan Contact authorised personnel. SET WATER UNSETTABLE DURING WATER FILLING TIME TO SERVICE CONTINUE? YES, PRESS STOP Manual water filling in progress Press STOP ter filling. Attained service intervals Order service by authorized personnel EMERGENCY STOP The emergency stop is activated Reset the emergency stop PT-1000 FOOD SHORT CIRCUIT PT-1000 ELEMENT SHORT CIRCUIT Red LED in the START button is lit. Boiling is selected. The boiling pan does NOT heat up. EN | 02-2015 to interrupt the manual wa- SVI, SPI, during cooling, the boiling Start the COOLING program and stop it after pan has become de-energized. approximately 20 seconds. Restart the BOILING program (Only boiling pans with Ice-water cooling). DOC.NO: ST09184-02 33 OPERATING INSTRUCTIONS | SMART LINE | BOILING PAN 20. CLEANING 20.2 Cleaning the lid (Fig. 5) Following usage and for daily cleaning of the pan: • Use a neutral detergent and hot water. • Run the agitator for 10-30 minutes at a speed of 3050 rpm. A cleaning tool can be beneficial to use, available as accessory. For usage of cleaning tool: • • • • • • . Press the cleaning tool on the shaft and lock using the handle. . Put on the grid . Run the agitator for 10-30 minutes at a speed of 30-50 rpm. Empty the pan, wash and rinse thoroughly. Be extra careful when cleaning and rinsing if salt is used when preparing food in the pan. Salt that can dry hard may damage the surface of the pan vessel. Also clean the pan’s external stainless steel surfaces with hot water. If necessary you can also use a neutral detergent, and a soft brush or sponge. Panels and knobs should be wiped off with a damp cloth. Do not use steel wool or abrasive cleaning materials when cleaning stainless steel surfaces. Do not use cleaning agents that contain chlorine. If chlorine or chlorine compounds come into contact with stainless steel, they can damage the surface. 20.1 In the event of hard (limy) water Dry the pan internally following use every day with a soft rag or paper moistened with acetic acid. • The lid (1) can be rotated 90 degrees to be rinsed off so the water flows down into the vessel. Remove the lid with knob (5). • The lid (1) and cover lid (2) can advantageously be cleaned in a dishwasher. • Remove the lid and cover lid by means the knob (3). • Hold the handle (4) when the lid is loosened, the arm will open by itself. Warning! Beware of uncontrolled movement. Lid and cover lid are put in place again using the knob (3). • Make sure the lid is securely attached before the handle (4) is released. Dry the lid with a soft rag and detergent, that does NOT contain acetic acid or ammonia. Rinse with water. 20.3 When the equipment is not in use Follow the instructions below when the pan is not used for a long period of time. • Clean the pan. See below (On pan with agitator ) • Press On/Off . The display goes out. See Fig.3 • Switch off the main switch . • Open the lid so that air can circulate. This prevents mould and odours from developing in a closed environment. • Turn off the water supply. Call in qualified personnel. 4 3 5 1 2 4 34 Fig. 5 DOC.NO: ST09184-02 EN | 02-2015 OPERATING INSTRUCTIONS | SMART LINE | BOILING PAN 21. MAINTENANCE OF VESSEL BEARINGS The vessel bearings should be inspected and greased once a year. Grease nipple Fig.6 22. OTHER DOCUMENTATION Manufacturer’s Declaration Installation Instructions Service Manual* Spare Parts Catalogue* * Not supplied. May be ordered from the supplier or the supplier’s representative. EN | 02-2015 DOC.NO: ST09184-02 35 Electrolux Professional MODELS 232218 232230 232242 232219 232231232243 232220 232232232244 232221 232233232245 232222232234 232223232235 232224232236 232225232237 232226232238 232227232239 232228232240 232229232241