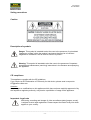
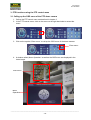
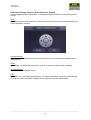
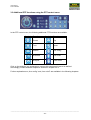
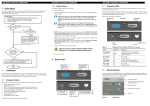
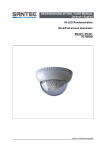
1
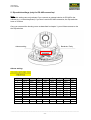
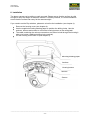
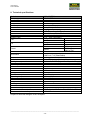
USER MANUAL HD-CVI PTZ Speed Dome Model: SCC-242KZNA Version 1.0sfi/0715/engl/A5 Dear customer, Thank you for purchasing a high quality SANTEC device. We recommend that you read this manual thoroughly before operating your new system for the first time. Please follow all instructions and observe the warnings contained in this manual. Please contact your local dealer or SANTEC directly if you have any questions or if you wish to claim for a service or warranty. You will find further information on our website: www.santec-video.com Imprint: All rights reserved. This publication may not be reproduced, stored in a retrieval system or transmitted, in any form or by any means (electronic, mechanical, photocopying, recording or otherwise), without the written prior permission of SANTEC BW AG. No reproduction of any part or excerpts thereof are permitted. Errors excepted. Specifications are subject to change without notice for quality improvement. SANTEC is a registered trademark of SANTEC BW AG. All other companies or products mentioned in this publication are trademarks, registered trademarks or brands of the respective company. © Copyright: SANTEC BW AG An der Strusbek 31 22926 Ahrensburg Germany www.santec-video.com User Manual SCC-242KZNA Table of contents Safety precautions Safety instructions About this user manual 4 5 6 PART I: CAMERA DESCRIPTION, TECHNICAL SPECIFICATIONS, INSTALLATION 1. Items included in the delivery 7 2. Technical drawing 7 3. Connections 8 4. How to open and close the housing 8 5. Dip-switch settings (only for RS-485 connection) 9 6. Installation 11 7. Self-diagnosis 12 8. Technical specifications 13 PART II: CAMERA CONFIGURATION VIA A CONNECTED RECORDER 1. General 14 2. Calling-up the PTZ control menu 14 3. PTZ functions using the PTZ control menu 3.1 Calling-up the OSD menu 3.2 PTZ functions using the OSD menu 3.2.1 System setting 3.2.2 Display setting 3.2.3 Camera setting 3.2.4 Function setting 3.2.5 Alarm setting 3.2.6 Exit 3.3 Additional PTZ functions using the PTZ control menu 3.3.1 Aux configuration 3.3.2 Aux on/off 16 16 18 18 19 20 22 26 26 27 28 30 _________________________________________________________________________________ -3- User Manual SCC-242KZNA Safety precautions Caution Description of symbols Danger: This symbol is intended to alert the user to the presence of uninsulated "dangerous voltage" within the product’s enclosure that may be of sufficient magnitude to constitute a risk of electric shock to a person. Warning: This symbol is intended to alert the user to the presence of important operating and maintenance (servicing) instructions in the literature accompanying the appliance. CE compliance This appliance complies with the CE guidelines. If you require an EC Declaration of Conformity for this device, please send a request to: [email protected] Attention: Any changes or modifications to this appliance which have not been explicitly approved of by the respective regulatory authority, may lead to a prohibition of usage of this appliance. Important: Legal note Monitoring, recording and storage of video surveillance data (images, sound), is subject to strict legal regulations. Please respect the Data Privacy Act which applies to your country. _________________________________________________________________________________ -4- User Manual SCC-242KZNA Safety instructions Before operating the appliance, please read this manual carefully and retain it for further reference. Before cleaning the appliance, it has to be switched off and unplugged from the power outlet. Wipe the appliance with a soft damp cloth. Do not use harsh cleansers or aerosols for cleaning. The type label may not be replaced. Do not use attachments unless recommended by the manufacturer as they may affect the functionality of the appliance and result in the risk of fire, electric shock or injury. Never install the appliance in areas exposed to water or other liquids. The appliance has to be installed in a safe and stable location according to the instructions of the manufacturer. Care should be used when moving heavy equipment. Quick stops, excessive force, and uneven surfaces may cause the appliance to fall causing serious injury to persons and damage to objects. Openings in the appliance, if any, are provided for ventilation to ensure reliable operation of the appliance and to protect if from overheating. These openings must not be covered or blocked. Please make sure that the appliance does not overheat. The appliance should only be operated from the type of power source indicated on the marking label. If you are not sure of the type of power supplied at the installation location, please contact your local dealer. An appliance which is powered through a polarized plug (a plug with one blade wider than the other) will fit into the power outlet only one way. This is a safety feature. If you are unable to insert the plug into the outlet, try reversing the plug. Do not defeat the safety purpose of the polarized plug. If the appliance is powered through a grounding-type plug, the plug will only fit into a grounding-type power outlet. This is a safety feature. If your outlet does not have the grounding plug receptacle, contact your local electrician. Route power cords and cables in a manner to protect them from damage by being walked on or pinched by items places upon or against them. For protection of the appliance during a lightning storm or when it is left unattended and unused for a longer period, unplug the appliance from the wall outlet. Disconnect any antennas or cable systems that may be connected to the appliance. This will prevent damage to the appliance due to lightning or power-line surges. Do not overload wall outlets and extension cords as this can result in a risk of fire or electric shock. Never insert items into the openings of the appliance. They may touch parts under electric current which may cause an electric shock. Never pour any liquids over the appliance. In case of any operating interruption or a complete operating failure please switch off the appliance and disconnect it from the wall outlet. Never attempt to service or repair the appliance yourself, as opening or removing covers may expose you to dangerous voltage or other hazards. Refer all servicing to qualified service personnel. When replacement parts are required, be sure that the service technician uses replacements parts specified by the manufacturer or that have the same characteristics as the original part. Unauthorized substitutions may result in fire, electric shock or other hazards. _________________________________________________________________________________ -5- User Manual SCC-242KZNA Upon completion of any service or repairs to the appliance, ask the service technician to perform safety checks to verify that the appliance is in proper operating condition. The appliance should only be installed by qualified service personnel and has to comply with local specifications and regulations. Never point the camera at an object with a high degree of luminance. Bright vertical or horizontal lines can result in a distortion (outshine) of the entire image on the monitor. This artifact is not an error but a particularity of semiconductor CCDs when they are directly exposed to a powerful light source. If the camera is operated in locations with extremely differing light conditions, the aperture has to be adapted. Please respect the local legal regulations on waste if you need to dispose of discarded appliances. This symbol means that electrical appliances need to be disposed of properly and not simply with unsorted household refuse. Please respect local regulations on waste disposal. About this user manual This manual aims at assisting the user on how to operate the described cameras. This manual is subject to rigid quality control. However, no guarantee can be given that mistakes are not present. We reserve the right to make changes to the manual without prior notice. Before operating the appliance, please read this manual carefully and retain it for further reference. Verify that all appliance items are included in the delivery. Should items be missing, do not operate the appliance and contact your local dealer. Never attempt to repair the appliance yourself. This should only be done by qualified service personnel. Improper handling of the appliance will invalidate the warranty. Subject to technical changes without prior notice. Errors excepted _________________________________________________________________________________ -6- User Manual SCC-242KZNA Part I: Camera description, technical specifications, installation 1. Items included in the delivery 1x Camera SCC-242KZNA 1x Allen wrench 1x Mounting drawing paper 1x Quick installation guide and security notes 2. Technical drawing All dimensions in mm. Drawing not true to scale. Subject to technical changes. Errors excepted. _________________________________________________________________________________ -7- User Manual SCC-242KZNA 3. Connections The dome camera comes with the following connection options (open cable ends): Connection Colour Red Black Yellow-green White Black Yellow Orange Red Brown White Blue Black with heat shrink tube * 24 V AC 24 V AC Earth Audio In GND A+ BAlarm_IN1 Alarm_IN2 Alarm_COM Alarm_OUT GND Video output Power Audio RS-485 Alarm Video Out * Heat shrink tube: The video connector is covered by a heat shrink tube. Once you have connected the dome camera, you may use a heating device (e.g. a hot air gun) to heat the tube to shrink-fit it to the cable. 4. How to open and close the housing To open the housing, please loosen the screws and pull-off the housing cover of the housing bottom. To close the housing, please ensure that the marks on the housing bottom and the one on the housing cover are aligned. Then screw the housing tight. Loosen 3x screws Align marks Notes: Transport securing ring: Prior to the installation, please open the dome housing and remove the white foamed ring which served as transport security. Do not remove the little sachet with dry granulate. _________________________________________________________________________________ -8- User Manual SCC-242KZNA 5. Dip-switch settings (only for RS-485 connection) Note: Dip-switch settings are only relevant if you connect an external device via RS-485 to the camera (e.g. a control keyboard). If you don’t use the RS-485 connection, the Dip-switches have no function. Once you removed the housing cover as described in chapter 3, you will have access to the the Dip-switches. Adress setting Baudrate, Parity Adress setting: Address 1 1 1 2 3 4 5 6 7 8 …… 254 255 OFF ON OFF ON OFF ON OFF ON OFF 2 3 4 5 6 7 OFF OFF OFF OFF OFF OFF OFF OFF OFF OFF OFF OFF ON OFF OFF OFF OFF OFF ON OFF OFF OFF OFF OFF OFF ON OFF OFF OFF OFF OFF ON OFF OFF OFF OFF ON ON OFF OFF OFF OFF ON ON OFF OFF OFF OFF OFF OFF ON OFF OFF OFF ………………………………………………………………… OFF ON ON ON ON ON ON ON ON ON ON ON ON ON 8 OFF OFF OFF OFF OFF OFF OFF OFF OFF ON ON _________________________________________________________________________________ -9- User Manual SCC-242KZNA Baudrate and parity: Setting the Baudrate (switches 1 and 2): 1 2 Baudrate OFF OFF 9600bps ON ON 4800bps OFF ON 2400bps ON ON 1200bps Einstellung der Parität (Schalter 3 und 4): 3 4 Parity OFF OFF NONE EIN OFF EVEN OFF ON ODD ON ON EVEN The following default settings apply (factory default): Address: 1 Baudrate: 9600 Parity: None If you change the Dip-switch settings, you need to reboot the camera. Please ensure that the settings (address, Baudrate, parity) of the device connected via RS-485 align with the camera. _________________________________________________________________________________ - 10 - User Manual SCC-242KZNA 6. Installation The dome camera can be ceiling or wall mounted. Please ensure that the surface is solid enough to carry the weight of the dome camera. For safety reasons, it is recommended to ensure that the surface can carry 8x the camera weight. If you need to set the Dip-switches, please do so before the installation (see chapter 4). Remove the housing cover (see chapter 4). Use the supplied mounting drawing paper to position the drilling holes. Use the anchors, sleeves and screws to mount the housing bottom on the ceiling/wall. The cable containing the various connections can either be led through the housing’s side or its bottom (additional drilling hole required). Put the housing cover back on (see chapter 4). Mounting drawing paper Anchors Housing bottom Sleeves Screws _________________________________________________________________________________ - 11 - User Manual SCC-242KZNA 7. Self-diagnosis If you run the dome camera for the first time of if you have reset it to factory default settings, the camera will perform a self-diagnosis test. The following information will be displayed for approx. 4 minutes: ADDR BR PARITY VERSION : : : : 001-H 9600 None V1.00.0.R The self-diagnosis information will disappear if the dome receives the first command. _________________________________________________________________________________ - 12 - User Manual SCC-242KZNA 8. Technical specifications Model Camera type Installation Video norm Image sensor Effective pixel Resolution Frame rate SN ratio Lens Zoom Angle of view Pan Tilt Preset PTZ Illumination Noise reduction White balance Backlight compensation Privacy masking zones Video output Classification OSD menu IR LEDs Voltage Power consumption Operating temperature Storage temperature Dimensions Weight Housing color Certification Recommended power adapter Recommended recorder Recommended control keyoard SCC-242KZNA HD-CVI PTZ dome camera and outdoors PAL / NTSC 1/2.8” 2 Megapixel Exmor CMOS 1944 (H)x 1092 (V) 1080p, 720p 25fps@1080p / 50fps@720p > 55 dB 5.1 – 61.2 mm, F1.6 – F3.0 12x optical, 16x digital 51.3° - 4.64°(horizontal) Range 0° - 360° Speed 0.1°/s – 300°/s Range -2° - 90° Speed 0.1°/s – 120°/s Number 300 300°/s (Pan) Speed 200°/s (Tilt) 300 Preset, 5 Pattern, 8 Tour, 5 Scan, Auto Pan 0.05 Lux, F1.6 (Colour) 0.005 Lux, F1.6 (Black/white) 2D NR, 3D NR Auto, ATW, Indoor, Outdoor, Manual BLC, HLC, DWDR (Digital Wide Dynamic Range) 24 HD-CVI IP66, IK10 English only No 24 V DC ±10% Max. 12 watt -10° to +60° C 0° to +60° C 170 x 155 mm approx. 1.8 kg White CE VCA-12V-1.5ASA SCVR-2411K, SCVR-2411TK, SCVR-2812TK KSC-3505 Subject to technical changes. Errors excepted. _________________________________________________________________________________ - 13 - User Manual SCC-242KZNA Part II: Camera configurations via the connected recorder 1. General You cannot make any settings or configurations at the camera directly (except for the Dipswitches; see part I chapter 4). All camera configurations are made using the connected HDCVI recorder. Recommended SANTEC HD-CVI recorder models: SCVR-2411K SCVR-2411TK SCVR-2812TK Connect the dome camera, a mouse and a monitor to the recorder. Note: The settings described in this manual are based on using a SANTEC HD-CVI recorder, model SCVR-2411K. It is exemplary for the other SANTEC recorders models. 2. Calling-up the PTZ control menu Login to the recorder using your user name and password. If you are in live view mode (either in multi-split mode or in full screen mode), right-click to call-up the quick menu. Use the menu item “Pan/Tilt/Zoom” to call-up the PTZ control menu of the dome camera. Left-click into the live view to close the quick menu again. If you click on “Pan/Tilt/Zoom”, the following PTZ control menu: Speed: Define the speed for the PTZ movements (1-8). Click on the speed number to bring-up the virtual keyboard. Enter the desired speed. Alternatively, you can set the speed using the OSD menu (see chapter 4.4): Function Setting Auto Pan Pan Speed _________________________________________________________________________________ - 14 - User Manual SCC-242KZNA Zoom, Focus, Iris: Use the plus/minus buttons to adjust the zoom, focus and iris. PTZ direction: Use the 8 direction arrows to move the dome into the desired direction. Select zoom area: In the center of the direction arrows, you will find a button to select a zoom area. Click on this center button. Then use the mouse to draw an area into the image which you would like to zoom in. Release the mouse button and the selected area will be zoomed in at max. 16x speed. The smaller the selected area, the higher the zoom speed. To return to the normal view, there are 2 options: 1. In the PTZ control menu, click on the minus zoom button. 2. Use the mouse wheel. _________________________________________________________________________________ - 15 - User Manual SCC-242KZNA 3. PTZ functions using the PTZ control menu 3.1 Calling-up the OSD menu of the PTZ dome camera 1. Call-up the PTZ control menu as described in chapter 2. 2. In the PTZ control menu, click on the arrow on the right hand side to extend the menu: 3. Click on the symbol „Enter menu“ to call-up the OSD menu of the dome camera. Enter menu 4. A window called „Menu Operation“ as well as the OSD menu are displayed in the video image. OSD menu Menu Operation _________________________________________________________________________________ - 16 - User Manual SCC-242KZNA OSD menu settings using the „Menu Operation“ window: Use the displayed „Menu Operation“ to navigate through the OSD menu by clicking on the arrows. Note: You cannot mouse-click directly on a OSD menu item but you have to use the arrows in the „Menu Operation“ window. Arrows up/down: Scroll up/down the OSD menu to select a menu item. The selected item is marked with a diamond icon. Enter: Click „Enter“ to confirm the selection of an item. A sub-menu is opened (if available). Arrows right/left: Use these arrows to adjust values. ESC: Click „ESC“ to close (hide) the OSD menu. The “Menu Operation” window is still displayed. To close the “Menu Operation” window as well, right-click into the video image. _________________________________________________________________________________ - 17 - User Manual SCC-242KZNA 3.2. PTZ functions using the OSD menu Navigate through the OSD menu by using the „Menu Operation“ window (see chapter 2). You can define how long the OSD menu is to be displayed on the screen. See chapter 4.4: Function Setting Next Page Menu Idle The OSD menu is currently only available in English. It is structured as follows: Main menu: 1. System Setting 2. Display Setting 3. Camera Setting 4. Function Setting 5. Alarm Setting 6. Exit 3.2.1 System Setting Use the up/down arrows in the „Menu Operation“ window to select the menu item „System Setting“. It is now marked with a diamond. Confirm your selection by clicking on „Enter“. Use the up/down arrows to select a sub-menu item. Use “Enter” to confirm your selection. Use the left/right arrows to changes the values (if available). Menu item System Information Address Information Sub-menu item Address BR Parity Version Camera Version Back, Exit Address Type Address Hard Address Soft Set North Language Video Output Factory Default Restart Back, Exit Save Back, Exit OK Englisch HD, SD Additional items / Remarks Baudrate Select between „Hard“ and „Soft“ Address for Dip-switches; cannot be edited by the software (OSD menu). Address can be edited by the software (OSD menu. Set a dome benchmark direction to that you can know the angle between the benchmark and the current location. Click “Enter” to see “OK”. Now you have set the north direction. No other language available at the moment. See next page „Importante note“ Restore to factory default settings. Restart/Reboot the camera _________________________________________________________________________________ - 18 - User Manual SCC-242KZNA Important note on menu item "Video Output: HD/SD": It is possible to change the video output from HD-CVI (item “HD” in the OSD menu) to 960H CVBS (analogue) (item “SD” in the OSD menu). If you do so, please note the following: When changing the video output of this HD-CVI dome from “HD“ to “SD“, the dome will behave like a SD dome, thus an analogue dome. In general, analogue domes can neither be controlled via a coax link nor by a connected recorder; instead they can only be controlled via the RS-485 connection. This means that you have to connect an external RS-485 device to the RS-485 port of the dome, e.g. a control keyboard, in order to change the dome’s parameters. Access to the OSD menu is only possible via the external RS-485 device. If there is no external RS-485 device connected to the dome, you cannot reset the video output from „SD“ to „HD“ because this would require access to the OSD menu. For this reason, the video output should only be changed to SD (and thus to analogue) if absolutely required and if an external RS-485 devices is connected because otherwise you will neither have access to the dome, nor access to the OSD menu and no way of resetting to the dome to “HD”. 3.2.2 Display Setting Use the up/down arrows in the „Menu Operation“ window to select the menu item „Display Setting“. It is now marked with a diamond. Confirm your selection by clicking on „Enter“. Use the up/down arrows to select a sub-menu item. Use “Enter” to confirm your selection. Use the left/right arrows to changes the values (if available). Menu item Preset Title Sub-menu item On, Off Additional items / Remarks Display the preset title (preset settings see chapter 3.2.4) Azimuth Display Position On, Off Display the coordinates (x/y axis) into the video image Display the angle between the benchmark and the current location. Zoom Display Inside Temperature Alarm Display Pattern Display Back, Exit On, Off On, Off Off, °C, °F On, Off On, Off _________________________________________________________________________________ - 19 - User Manual SCC-242KZNA 3.2.3 Camera Setting Use the up/down arrows in the „Menu Operation“ window to select the menu item „Camera Setting“. It is now marked with a diamond. Confirm your selection by clicking on „Enter“. Use the up/down arrows to select a sub-menu item. Use “Enter” to confirm your selection. Use the left/right arrows to changes the values (if available). Menu item WB Setting Exposure Setting Sub-menu item WB Mode Additional items / Remarks White balance settings: Auto, Manual, ATW, Outdoor, Indoor, Outdoor Auto, NA Lamp/NA Lamp Auto (only for externally added illuminators) R Gain B Gain Back, Exit AE Mode Only available if „WB Mode“ is set to„Manual“ Gain Setting Shutter Iris Setting Exposure Compensation BLC (Next Page) Slow Shutter Slow Shutter Limit AGC Gain Limit NR Camera 3D NR High Light Reduce (Next Page) AE Recovery WDR Setting Back, Exit Auto exposure settings: Auto, Manual, Iris Prio, Shutter Prio, 1-16 Shutter: 1/3, 1/6, 1/12, 1/25, 1/50, 1/75, 1/100, 1/120, 1/150, 1/215, 1/300, 1/425, 1/600, 1/1000, 1/1250, 1/1750, 1/2500, 1/3500, 1/6000, 1/10000, 1/30000 1-18 1-15 Backlight compensation on/off Lower the camera auto exposure time. Especially for lower illumination environment. 1/1, 1/2, 1/3, 1/6, 1/12, 1/25 1-3 Noise reduction: Off, 1-16 CKamera 3D noise reduction: Off, 1-16 High light reduction: Off, 1-4 Off, 1 hour, 2 hours, 5 min, 15 min, 30 min WDR Mode (Wide Dynamic Range): On, Off (continue on next page) _________________________________________________________________________________ - 20 - User Manual SCC-242KZNA Menu item Day/Night Setting Sub-menu item Day/Night Type Threshold Focus Setting Back, Exit Focus Mode Focus Limit AF Sensitivity IR Correction Image Adjust Zoom Speed (Next Page) Aperture Aperture Restrain Digital Zoom Picture Flip Lens Initialisation Picture Mode (Next Page) Camera Factory Default Camera Restart Back, Exit Back, Exit Hue Brightness Saturation Chroma Suppress Gamma Contrast Style Back, Exit 1-8 1-16 1-16 Off, On Off, On OK 1080P/25, 1080P/30, 720P/25, 720P/30, 720P/50, 720P/60 Additional items / Remarks Day/night switching: Auto, Night, Day Mechanism, Electron. Switching the day/night mode according to the here defined threshold: 1-8 Setting the focus: Auto, Semiauto, Manual Threshold for focus: Auto, 10cm, 1m, 2m, 3m, 5m Auto focus sensitivity Low, Mid, High IR correction Off, On, Auto 0-100 0-100 0-100 1-4 1-16 1-100 Standard, Soft, Natural Zoom speed can also be set in PTZ control menu (see chapter 2) Reduce the aperture to lower the video noise if in low illumination environment. Picture flip by 180° Resolution/frae rate Reset the camera to factory default settings Restart/reboot the camera _________________________________________________________________________________ - 21 - User Manual SCC-242KZNA 3.2.4 Function Setting Use the up/down arrows in the „Menu Operation“ window to select the menu item „Function Setting“. It is now marked with a diamond. Confirm your selection by clicking on „Enter“. Use the up/down arrows to select a sub-menu item. Use “Enter” to confirm your selection. Use the left/right arrows to changes the values (if available). Menu item Preset Sub-menu item Preset No. Title Setting Call Additional items / Remarks 1-300 Preset title (name) is automatically assigned and is identical with the preset number, e.g. title=Preset25 (cannot be edited) Setting a preset: Go to the PTZ control menus and move the camera in the desired direction for the preset. Go to the preset menu. Define a preset number. The preset title will be assigned automatically (see above). Go to „Setting“ and confirm with „Enter”. “OK” pops up briefly. The preset is now set. Go to „Call“ and confirm with „Enter“ to call-up the preset. Alternatively: Open the PTZ control menu to callup the preset (see chapter 2). Back, Exit (continue on next page) Special presets for using PELCO protocol: If you control the dome camera via an external control device (e.g. KSC-3505) using the RS485 connection and if you use the PELCO protocol, the following special preset commands apply: Call preset: Preset 28 or 95: Call-up the OSD menu. Preset 29 or 99: Call-up the scan function. Preset 24 or 81: Call-up the pattern function. Preset 25 or 82: Call-up the tour function. Preset 30 or 96: Stop scan or pattern. Preset 31 or 83: Start dome rotation. Preset 33: Start 180° dome rotation. Preset 34: Set dome position as zero. Set preset:: Preset 26 or 92: Set left scan limit. Preset 27 or 93: Set right scan limit. Preset 22 or 79: Start record. Preset 23 or 80: Stop record. _________________________________________________________________________________ - 22 - User Manual SCC-242KZNA Menu item Auto Pan Sub-menu item Pan Speed Run Stop Auto Scan Back, Exit Auto Scan No. Set Left Limit Set Right Limit Scan Speed Call Stop Tour Back, Exit Tour No. Setting Additional items / Remarks Pan speed: 1-8 Alternatively, set the speed using the PTZ contorl menu (see chapter 2). Manual start: The dome begins 360° continuous rotation. Manual stop: The dome stops 360° continuous rotation. 1-5 Limit the left scan area range: Go to the PTZ control menu and move the dome to the position of the left limit. Go to the auto scan menu. Define a scan number (see above). Go to „Set Left Limit“ and confirm with „Enter“. “OK” pops-up briefly. The left limit is now set. Limit the righ scan area range: Go to the PTZ control menu and move the dome to the position of the righ limit. Go to the auto scan menu. Go to „Set Right Limit“ and confirm with „Enter“. “OK” pops-up briefly. The right limit is now set. Scan speed: 1-5 Manual start: The dome rotates in the defined limits. Manual stop: The dome stops rotating in the defined limits. Tour number 1-8 For each tour, presets, dwell time and speed can be defined. NO 01 02 03 … 32 Delete Call Stop Back, Exit PRESET DWELL 000 005 000 005 000 005 … … 000 BACK 005 EXIT SPEED 013 013 013 … 013 Delete the selected tour. „OK“ pops-up briefly. Start the selected tour manually. Stop the selected tour manually. (continue on next page) _________________________________________________________________________________ - 23 - User Manual SCC-242KZNA Menu item Pattern Idle Motion Sub-menu item Pattern No. Program Start Program Stop Call Stop Back, Exit Idle Function Idle Time Idle Action Parameter Back, Exit (Next Page) Privacy Masking Privacy No. Activate Setting Additional items / Remarks Pattern number 1-5 Define a start point. Define a stop point. Start the selected pattern manually. Stop the selected pattern manually. If the dome is idle for a defined period of time, you can define the action type it is to perform (on, off). Period of idle time. 1-720 minutes Type of action the dome is to perform after the defined time has elapsed: None, preset, pattern, tour, scan Select the number for preset/pattern/tour/scan. Privacy masking zones 1-24. These areas are covered/hidden in the video image. When the dome moves, the masked areas/objects continue to be masked. Enable/disable the privacy zone (On, Off). Move the dome to the desired position. The object/area which you would like to mask should be positioned in the center of the video image because the privacy zone will be positioned in the center of the image, too. The position of the privacy zone cannot be changed later but only its size. Go to the „Privacy Masking“ menu and then on „Setting“ and „Resize“. „Resize“: Adjust the size of the privacy zone: Reduce the width of the privacy zone Enlarge the width of the privacy zone Enlarge the height of the privacy zone Reduce the height of the privacy zone After you have selected one of the adjustment arrows, click on the „Enter“ button several times until the zone has reached the desired size. Go to „Save“. For „Activate“, please select „On“. The privacy zone is now displayed in the video image. Privacy zones cannot be deleted but only be enabled (shown) or disabled (hidden) and they can be resized (see above). Back, Exit (continue on next page) _________________________________________________________________________________ - 24 - User Manual SCC-242KZNA Menu item PTZ Speed Set Zero Power Up Menu Password Sub-menu item 1-3 OK Power Up Parameter Back, Exit Password Setting Menu Idle (Next Page) PTZ Auto Stop PTZ Correction Back, Exit Back, Exit Off, 1 min., 2 min., 3 min., 4 min., 5 min. 5/10/15/20/25/30 sec, Off On, Off Additional items / Remarks Move the dome to the horizontal coordinates. Define the PTZ action the dome has to assume when it is booted: None, auto, preset, pattern, tour, scan Select the number for prreset/pattern/tour/scan. Define whether the OSD menu is to be protected by a password (On, Off). Set the password for accessing the OSD menu and then „Save“ it. Password protection is then active (“On”). (see above). Note: If an invalid password is entered three times, the system shows an 8-digit internal code. Please contact the technical engineer for help. If you set a time here, the OSD menu will disappear once this time has elapsed. If you select “Off”, the OSD menu will be displayed at all times. If you wish to close/hide theOSD menu, click on “Enter” or “Exit” (see below). The dome will stop all PTZ operations when there is no command for the specified time. _________________________________________________________________________________ - 25 - User Manual SCC-242KZNA 3.2.5 Alarm Setting Use the up/down arrows in the „Menu Operation“ window to select the menu item „Alarm Setting“. It is now marked with a diamond. Confirm your selection by clicking on „Enter“. Use the up/down arrows to select a sub-menu item. Use “Enter” to confirm your selection. Use the left/right arrows to changes the values (if available). Menu item Alarm No. Action Sub-menu item 1-2 None, Preset, Tour, Scan Parameter Contact Relay Out N/O, N/C Off, 1-5 sec. Reset Delay 3/10/30/60/120 sec. Save Additional items / Remarks Alarm number1 or 2. Action the dome has to perform if an alarm occurs. Select the number of preset/tour/scan aus. Normal Open, Normal Close Relay 1 will be active for 5 seconds after an alarm occurs. The other alarm contacts will be active for the specified time. Speichern 3.2.6 Exit Use the up/down arrows in the „Menu Operation“ window to select the menu item „Exit“. It is now marked with a diamond. Confirm your selection by clicking on „Enter“. The OSD menu is now closed. _________________________________________________________________________________ - 26 - User Manual SCC-242KZNA 3.3 Additional PTZ functions using the PTZ control menu In the PTZ control menu, the following additional PTZ functions are available: Symbol Function Symbol Function Preset Flip Tour Reset Pattern Aux config. Autoscan Aux on/off Autopan Enter menu Click on the symbols (e.g. autoscan) to execute this command (it has to be defined accordingly). Please read the respective sections in chapter 3.2.4. Further explanations on „Aux config.“ and „Aux on/off“ are available in the following chapters. _________________________________________________________________________________ - 27 - User Manual SCC-242KZNA 3.3.1 Aux configuration Note: The following settings can also be made by using the OSD menu (see chapter 3.2.4). Click on the “Aux config.” symbol. The following window is displayed: Preset: For preset settings, use the direction arrows to move the dome camera into the desired position. Enter a preset number. Save the settings by clicking on „Set“. Use “Del preset“ to delete a preset. Tour: For tour settings, use the direction arrows to move the dome camera into the desired position. Enter a preset number for this tour. Save the settings by clicking on „Add preset“. Use „Del preset“ or „Del tour“ to delete a preset or tour. _________________________________________________________________________________ - 28 - User Manual SCC-242KZNA Pattern: For pattern settings, use the direction arrows to move the dome camera into the desired position. Enter a pattern number. Click on „Begin“ or „End“. Border: Use the direction arrows to position the camera within its left and right borders. _________________________________________________________________________________ - 29 - User Manual SCC-242KZNA 3.3.2 Aux on/off Click on the aux symbol. The follow window is displayed: The settings defined here depend on the selected protocol. “Direct aux” represent the aux on/off button of a decoder. _________________________________________________________________________________ - 30 - User Manual SCC-242KZNA Notes: _________________________________________________________________________________ - 31 - Your local distributor: __________________________________________________________________________ www.santec-video.com