1
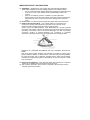
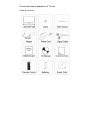
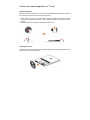
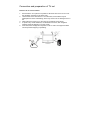
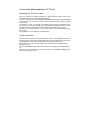
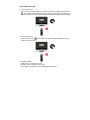
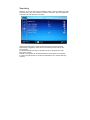
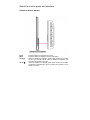
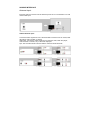
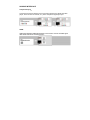
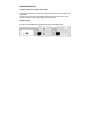
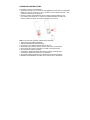
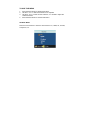
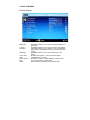
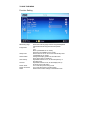
USER’S MANUAL
Thank you very much for choosing the LCD TV. We suggest that you spend several minutes to read carefully this manual
before you install and turn on the TV.
Note: Since this product is being continuously improved, changes may be made
to this manual without notice.
*In case of discrepancy between the graphics attached herein and the ones
shown on the physical screen, the latter shall prevail.
USER’S MANUAL
Table Of Contents
........................... .....3
Read before operating equipment..................... ....3
Connection and preparation of the TV set.................... ....5
Packing list...... ............................. ....5
Attaching the base.... ............................. .....6
Removing the base ......................... .... ....6
Place the TV on a solid surface.. ... ................ ....7
Mounting the TV set to a wall ....................... .....8
Power connection .......................... ... .....8
Turn On/Off the LCD.... ... ............... .... ... .....9
Searching.... .... .... .... .... .... .... .... .. ...10
About the control panel and interface..................... ......11
Pannel control knobs ......................... ..... ..11
Source Interface.... ......................... ........ . 12
Antenna input. .... ...................... ..........13
Video/S-terminal input ...................... ........ .13
Component input.... ..................... ..........14
HDMI input. .... .......................... ........14
Computer signal and computer audio input........... ........15
Headphone jack............................ .........15
Operating instructions. ......................... ......... .16
To use the remote control................... .......... 16
To install the remote control batteries... ...... ........... .17
To use the menu................. .......... .......... ..18
Source Menu................. ........ ........... .18
Picture setting................. ........ ........... .19
Sound setting (the same for all modes).......... ........... .20
Important safety instructions
Function setting...........
.................. .......21
Tuning............. ..................... ........22
PC images............ .................... .......23
Tips............... .......................... .......24
Product specification............ ................... ......25
Supported resolution........... ................... .......26
Before calling service.......... ................... .......28
Glossary............... ....................... .......30
IMPORTANT SAFETY INSTRUCTIONS
Read before operating equipment
1. Read these instructions。
2. Keep these instructions。
3. Heed all warnings.
4. Follow all instructions.
5. Do not use the monitor near water, e.g. near a bathtub, washbowl, kitchen
sink, laundry tub, swimming pool or in a wet basement. In case the unit
accidently becomes wet, pull out the power plug immediately and then contact
the authorized dealer.
6. Clean only with a dry cloth. Cut off the power before cleaning the TV.
7. Do not touch, press, scrub or knock the screen with any hard object, as the screen
may be scratched or you could cause permanent damage.
8. Do not block any of the ventilation openings. Install in accordance with the
manufacturers instructions.
9. Do not install near any heat sources such as radiators, heat registers, stoves, or
other apparatus (including amplifiers) that produce heat.
10.Always use a P/N type grounding plug. The P/N type plug has two pins (a wider
one and a narrower one), while the grounding type plug has two pins and a third
grounding pin. Both the wider pin and the third pin are for safety purposes. When
the provided plug does not fit into your outlet, consult an electrician for
replacement of the obsolete outlet.
11.Protect the power cord from being walked on or pinched particularly at plugs,
convenience receptacles, and the point where they exit from the apparatus.
12.Only use attachments/accessories specified by the manufacturer.
13.Use only with a cart, stand, tripod, bracket, or table specified by the
manufacturer, or sold with the apparatus. When a cart is used, use caution
when moving the cart/apparatus combination to avoid injury from tip-over.
14.The TV should be operated only from the type of power source indicated on the
label. If you are not sure of the type of power supplied to your home, consult your
dealer or local power company.
15.Unplug this apparatus during lightning storms or when unused for long periods
of time
16.Refer all servicing to qualified service personnel. Servicing is required when
the apparatus has been damaged in any way, such as power-supply cord or
plug is damaged, liquid has been spilled or objects have fallen into apparatus,
the apparatus has been exposed to rain or moisture, does not operate
normally, or has been dropped.
17.This product may contain lead or mercury. Disposal of these materials may be
regulated due to environmental considerations. For disposal or recycling
information, please contact your local authorities or the Electronic Industries
Alliance: www.eiae.org.
18.Damage Requiring Service – The appliance should be serviced by qualified
service personnel when:
A. The power supply cord or the plug has been damaged; or
B. Objects have fallen, or liquid has been spilled into the appliance; or
C. The appliance has been exposed to rain; or
D. The appliance does not appear to operate normally or exhibits a marked
change in performance; or
E. The appliance has been dropped, or the enclosure damaged.
IMPORTANT SAFETY INSTRUCTIONS
19. Tilt/Stability – All televisions must comply with recommended international
global safety standards for tilt and stability properties of its cabinets design.
y
Do not compromise these design standards by applying excessive pull force
to the front, or top, of the cabinet, which could ultimately overturn the
product.
y
Also, do not endanger yourself, or children, by placing electronic
equipment/toys on the top of the cabinet. Such items could unsuspectingly
fall from the top of the set and cause product damage and/or personal
injury.
20. Power Lines – An outdoor antenna should be located away from power lines.
21. Outdoor Antenna Grounding – If an outside antenna is connected to the
receiver, be sure the antenna system is grounded so as to provide some
protection against voltage surges and built up static charges.
Section 810 of the National Electric Cord, ANSI/NFPA No. 70-1984, provides
information with respect to proper grounding of the mats and supporting structure
grounding of the lead-in wire to an antenna-discharge unit, size of grounding
connectors, location of antenna-discharge unit, connection to grounding
electrodes and requirements for the grounding electrode. See Figure below.
EXAMPLE OF ANTENNA GROUNDING AS PER NATIONAL ELECTRICAL
CODE
Note to the CATV system installer: This reminder is provided to call the CATV
system installer’s attention to Article 820-40 of the NEC that provides guidelines
for proper grounding and, in particular, specifies that the cable ground shall be
connected to the grounding system of the building, as close to the point of cable
entry as practical.
22. Objects and Liquid Entry – Care should be taken so that objects do not fall and
liquids are not spilled into the enclosure through openings.
23. This is Class I equipment, which must be connected to the power grid using a
plug with protective grounding.
Connection and preparation of TV set
Packing Contents
Connection and preparation of TV set
Attaching the Base
Take the TV set and the base out of the carton and assemble them with the screws in
the accessory box as shown in the following picture:
1. Place the TV set on a piece of soft cloth or cushion on the desk with the front side
facing down. Tighten the screws on the base to attach the pin base and the
bracket.
2. Insert the base into the hole in the bottom of the TV set.
Removing the base
Insert the tip of a screwdriver into the bracket fixing hole and firmly press down and
remove the base at the same time.
Connection and preparation of TV set
Place the TV on a solid surface
1.
2.
3.
4.
5.
Ensure that the TV is placed in a position to allow free flow of air. Do not cover
the ventilation openings on the back cover.
Leave at least 15cm around the TV set. Otherwise, air-circulation may be
inadequate and cause overheating, which may cause a fire or damage to the TV
set.
Never place the TV set in hot, oily humid or excessively dusty places.
To prevent any unsafe situations, no naked flame sources, such as lighted
candles, should be placed on or in the vicinity.
Avoid heat, direct sunlight and exposure to rain or water. The equipment shall
not be exposed to dripping or splashing.
Connection and preparation of TV set
Mounting the TV set to a wall
This unit conforms to VESA standards for wall mounting. Please refer to the
specification page for the wall hanging dimensions.
In case of wall mounting, use the OEM wall hanging bracket and have specialized
personnel carry out mounting in order to ensure your safety and to prevent damage
to the TV set.
To hang the TV set on the wall, all connecting wires must be inserted into the
interface of the TV set first. At least a 6 cm gap must be kept between the TV set and
the wall surface to ensure sufficient space for all the interfaces to be inserted.
Wherever you place or hang the TV set, ensure that air can circulate freely through
the air duct.
Do not place the TV set inside an enclosed space.
Power connection
Insert one end of the power cord into the hole “Power In” of the adapter, and connect
the other end to a 220V main supply socket, then insert the DC Power Out port of the
power adaptor into the "Power In" hole in the lower rear part of the unit.
Never place the TV set on the AC power cord. Otherwise, fire disaster or electric
shock may occur.
The TV set will still consume some power when it is in standby state while power is
on.
When the TV set is not used for a long period of time, it is preferable to pull the power
cord out of the power socket.
Turn On/Off the LCD
1. Turn on the LCD:
Switch on the AC power supply on the back of the TV set and press the Power key
on the remote controller or press the Power key on the panel. The indicator will
turn blue and the LCD TV will enter normal operating mode several seconds later.
2. Turn off the LCD:
Press the Power key
on the remote controller or press the Power key on the
panel to turn off the LCD.
3. Indicator status
①.Normal, the TV indicator turns blue.
②.Standby, the TV indicator turns orange.
③.Off, the blue TV indicator goes off after flashing three times.
Searching
Press the “TV” key on the remote controller to switch to the TV signal source, then
press the “Menu” key on the remote controller or the “Menu” key on the right side
of the panel to enter the main menu page.
Press the Searching key or enter the searching page to search channels
automatically. Suggestion: select Auto for the color system and DK for the
sound system.
To select automatic searching: It will search for all TV programs and save
them to the memory.
Normally TV programs can be watched after the above steps are completed.
In case of any abnormality or to further understand the unit, read the following
contents.
About the control panel and interface
PANNEL CONTROL KNOBS
Input:
Menu:
CH▲/ :
Vol ▲/
:
Press this button to change input source.
Press this button to display or exit the OSD menu.
When the OSD menu appears, press these two buttons to select
the item you want to execute; when no OSD menu appears, use
to change channels in TV mode.
When the OSD menu appears, press these two buttons to select
or adjust the selected item; when no OSD menu appears, use to
adjust the volume.
SOURCE INTERFACE
Several signal source devices can be connected to your TV set. The following
diagram shows how to connect them.
Tips: If you want to hang the TV set on the wall, all connecting wires must be inserted
into the interfaces of the TV set first.
Whenever a peripheral device is connected to the TV set, ensure that the TV set is
turned off.
When connecting a peripheral device, connect the cable to the connecting terminal
that is the same color as the cable color.
SOURCE INTERFACE
Antenna Input:
Insert the antenna connector into the antenna jack of the TV. The interface is a 75 Ω
coaxial cable input.
Video/S-terminal input:
Connect the video signal source or S-terminal cable to a device such as a DVD, laser
disc player, video recorder or camera.
Audio input: Connect the audio signal source (computer, DVD, laser disc player,
video recorder or camera, etc.) to the audio input port.
Tips: The S-terminal audio is shared with the video and audio terminals。
SOURCE INTERFACE
Component Input:
Connect the sound and picture of the component signal source (DVD, laser disc
player, video recorder or camera, etc.) to the component signal input port.
HDMI:
HDMI (High-Definition Multimedia Interface) can be used to connect the HDMI signal
cable to the DVD player and other devices.
SOURCE INTERFACE
Computer signal and computer audio input:
Connect the host signal to the computer input port at the back of the TV via the VGA
signal cable.
Connect one end of the PC audio cable to the PC audio input port of the TV, and
connect the other end to the audio cable port of the PC host.
Headphone jack:
The user can use headphones by inserting the plug into the headphone jack.
OPERATING INSTRUCTIONS
TO USE THE REMOTE CONTROL
POWER
Press
to
power
ON/OFF (standby) TV.
(Note:TV
is
never
completely power off
unless
physically
unplugged.)
CH
Press to change TV
channel up or down
“∧”,“∨”,“<”,“>”,
Press to adjust the
various function items
on the menu.
TV
Press to choose TV
source mode directly.
OK
Press to display the
submenu
VIDEO
Press repeatedly to
toggle between AV
and S-VIDEO source
modes
MENU:
Press to open or exit
MENU.
WIDE
Press to choose the
display aspect.
HDMI/PC
Press
to
toggle
between HDMI and PC
source modes 。
DISPLAY
Press to show the
information about the
input source or TV
channel.
Component Signal
Press
to
choose
Component
source
mode directly.
0~9、1-Press to enter channel
numbers.
PRE CH
Press to display the
previous channel
VOL
Press ∧ or ∨ to adjust
the volume.
SOURCE:
Press to choose the
input source : PC
Signal input, HDMI
input, Video input,
S-Video
input,
Component
input
and TV input.
NICAM
Press to activate the
TV sounds,
PICTURE
Press to switch the
preset of video preset
mode:
SOUND
Press to switch the
preset of audio preset
mode.
Sleep
Press to set sleep
timer, setting 0~120
minutes before your TV
turn off automatically.
OPERATING INSTRUCTIONS
To install the remote control batteries
1. Remove the battery cover. Insert two AAA batteries into the battery compartment.
Make sure that you match the + and – symbols on the batteries with the + and –
symbols in the battery compartment.
2. Point the remote controller directly to the remote receiving window on the
front casing of the main unit. In case of any barriers between the main unit
and the remote controller, the remote controller may not work.
Note: To ensure safe operation, please do the following:
1. Use two AAA (#7) alkaline batteries.
2. Replace both batteries simultaneously.
3. Do not use a new battery together with an old one.
4. Avoid letting the remote come into contact with water or other liquids.
5. Do not place the remote controller in a humid or hot environment.
6. Do not drop the remote controller.
7. If the battery liquid leaks inside the remote controller, carefully clean
the battery compartment and insert new batteries.
8. Improperly replacing batteries may also lead to an explosion hazard.
9. Dispose of used batteries according to the instructions on the battery.
TO USE THE MENU
1.
2.
3.
4.
Press the Menu button to display Main Menu.
Use the V- or V+ to select the function to be adjusted.
Use the P- or P+ to enter into the submenu, or to enable or adjust the
selected function.
Press the Menu button to exit the Main Menu.
SOURCE MENU
Press the Source button to enter the Source Menu: PC, HDMI, AV, S-Video,
Component, TV.
TO USE THE MENU
Picture Setting
Brightness
Contrast
Saturation
Sharpness
Color Temp.
DNR
Picture Mode
DCR
Reset
Adjustable between 0-100, set the backlight brightness of
the picture.
Adjustable between 0-100, set the contrast of the picture.
Adjustable between 0-100, adjust the color concentration
of the picture. (unavailable for PC and Component Signal
modes)
Adjustable between 0-100, set the sharpness of the
picture.
Provides three options – Cold, Normal and Warm.
(unavailable for PC mode)
Provides four options – Mild, Standard, Vivid and User.
Turn on/off dynamic contrast mode
Restore the picture settings to the default mode.
TO USE THE MENU
Sound Setting (the same for all modes)
Sound Mode
Bass
Treble
Balance
Reset
Switch between the five preset sound modes
Adjust the intensity of the bass
Adjust the intensity of the treble
Adjustable between 0-60. While adjusting in the range of
30-0, the sound of the right channel fades out to zero. While
adjusting in the range of 30-60, the sound of the left channel
fades out to zero.
Restore the sound settings to the default setting.
TO USE THE MENU
Function Setting
MENU language
Image Ratio
Sleep Timer
OSD Position
OSD Transp.
Timeout
Power Saver
Power On Recall
Reset
Select the OSD language between English/Simplified
Chinese/Russina/Portuguese/French/Spanish.
4:3
16:9
Movie (unavailable for PC mode)
Panorama (unavailable for PC mode)
Set the time for the TV set to enter the standby state
(unavailable for PC mode)
Change the display position of the OSD menu.
There are a total of 9 positions.
Adjustable between 0-10, set the transparency of
the OSD menu.
Adjustable between 5-60, set the display time (in
seconds) of the OSD menu.
Turn on/off the power saving mode
Turn on/off the power on recall function
Restore the function settings to the default mode.
TO USE THE MENU
Tuning (the following menus appear only in TV mode)
Channel Nr.
Frequency
Color
System
Sound
System
Update
Search
Auto Search
Manual Fine
Tune
Channel
Skip
Display the number of the current TV channel.
Display the frequency of the current TV channel.
Display the color system of the current TV signal. (displayed as
Auto after automatic saving)
Display the sound system of the current TV signal. (displayed
as Auto after automatic saving)
It is used for the user to search the channel automatically and
save the TV program. Pressing the “Menu’ key will exit the
Auto Search mode.
Press and hold the Left or Right key for more than 3 seconds
to enter the Manual Search mode; in case of program with
signal, exit the Semi-Auto Search and save the current
program in the current program number.
It can be set as On and Off. When it is set as On, press the
Channel Skip on the remote controller or on the panel
TO USE THE MENU
PC Setting (the following menus appear only in the PC mode)
Auto Config
H. Position
V. Position
Clock
Phase
Reset
Automatically config the optimal position of the picture to the
optimal time sequence position.
Adjust the horizontal position of the picture
Adjust the vertical position of the picture
Eliminate the vertical interfering lines
Eliminate the horizontal interfering lines
Restore the function settings to the default mode
Tips
Care of the screen
Do not rub or strike the screen with anything hard as this may scratch, mar, or
damage the screen permanently.
Unplug the screen before cleaning the screen. Dust the TV by wiping the screen and
the cabinet with a soft, clean cloth. If the screen requires additional cleaning, use a
clean, damp cloth. Do not use liquid cleaners or aerosol cleaners.
Mobile telephone warning
To avoid disturbances in picture and sound, malfunctioning of your TV, keep away
your mobile telephone from the TV.
End of life directives
We are paying a lot of attention to produce environmentally friendly in green focal
areas. Your new receiver contains materials which can be recycled and reused.
At the end of its life specialized companies can dismantle the discarded receiver to
concentrate the reusable materials and to minimize the amount of materials to be
disposed of.
Please ensure you dispose of your old receiver according to local regulations.
Product Specification
Model
Display area
V22t
546mm (21.5”)
V24t
598mm (23.6”)
Recommend frequency
Visual angle
1920 x1080
Horizontal:170°
Vertical:160°(Typ.)
250cd/m²
60000:1
2Wx2
PAL/NTSC
(D/K,B/G,I)/(D/K,B/G,I
,M)
75Ω
AC100-240V
50/60Hz
1920 x1080
Horizontal:170°
Vertical:160°(Typ.)
300cd/m²
60000:1
2Wx2
PAL/NTSC
(D/K,B/G,I)/(D/K,B/G,I,
M)
75Ω
AC100-240V 50/60Hz
Power Consumption
Power Consumption
(Stand by)
Dimensions
(W)x(H)x(D) (mm)
(with stand)
≤35W
≤1W
≤60W
≤1W
551.6x456x220.2
599.4x485.55x220.2
Table stand
Wall Mounting
Not include.
100 x100mm
M4x4 pcs (Screws)
Not include.
100 x100mm
M4x4 pcs (Screws)
0℃~40℃
15% to 90%
-20℃~60℃
15% to 90%
0℃~40℃
15% to 90%
-20℃~60℃
15% to 90%
Brightness
Contrast
Sound output
Color systems
Sound Systems
Antenna input impedance
Power Voltage
Environmental
Considerations:
Operating Temperature
Operating Humanity
Storage Temperature
Storage Humanity
SUPPORTED RESOLUTION
PRRESET PC MODE
STANDARD
RESOLUTION
HORIZONTAL
FREQUENCY
(kHz)
VERTICAL
FREQUENCY
(kHz)
VGA
640×480 @60Hz DMT
31.469
59.940
VGA
640×480 @67Hz MAC
35.000
66.667
VGA
640×480 @72Hz DMT
37.861
72.809
VGA
640×480 @75Hz DMT
37.500
75.000
Dos-mode
720×400 @70Hz DOS
31.469
70.087
SVGA
800×600 @56Hz DMT
35.156
56.250
SVGA
800×600 @60Hz DMT
37.879
60.317
SVGA
800×600 @72Hz DMT
48.077
72.188
SVGA
800×600 @75Hz DMT
46.875
75.000
SVGA
832×624 @75Hz
49.725
74.500
XGA
1024×768 @60Hz DMT
48.363
60.004
XGA
1024×768 @70Hz DMT
56.476
70.069
XGA
1024×768 @75Hz DMT
60.023
75.029
XGA
1024×768 @75Hz MAC
60.241
74.927
***
1152×864 @75Hz DMT
67.500
75.000
***
1280×960 @60Hz DMT
60.000
60.000
SXGA
1280×1024 @60Hz DMT
63.981
60.02
SXGA
1280×1024 @75Hz DMT
79.976
75.025
WXGA+
1440×900 @60Hz
CVT16:10
55.935
59.887
WXGA+
1440×900 @60Hz RB
CVT16:10
55.469
59.901
SUPPORTED RESOLUTION
WSXGA
1680X1050 @60Hz CVT16:10
65.290
59.954
WSXGA
1680X1050 @60Hz RB CVT16:10
64.674
59.883
HD
1920×1080@60Hz
67.500
60.000
SD
480P@60Hz for SDTV Digital only
31.469
59.94
SD
576P@50Hz for SDTV Digital only
31.250
50.000
HD
720P@60Hz for HDTV Digital only
45.000
60.000
HD
720P@50Hz for HDTV Digital only
37.500
50.000
HD
1080i@60Hz for HDTV Digital only
33.750
60.000
HD
1080i@50Hz for HDTV Digital only
28.125
50.000
HD
1080P@60Hz for HDTV Digital only
67.500
60.000
HD
1080P@50Hz for HDTV Digital only
56.250
50.000
Before Calling Service
Please make these simple checks before calling service. These tips may save you
time and money since charges for receiver installation and adjustments of customer
controls are not covered under your warranty.
Symptoms
“Ghost” or
image
double
No power
Dots of constant color
appear on the TV
screen
No sound or picture,
and the red lamp on
the
front
panel
doesn’t go on
No image appears
Good picture but no
sound
No sound for some
channels
Sound is OK but color
is poor
Poor picture quality
Items to Check and Actions to follow
*This may be caused by obstruction to the antenna
due to high rise buildings or hills. Using a highly
directional antenna may inprove the picture.
*Check that the TV’s AC power cord is plugged into
the mains socket.
*Unplug the TV, wait for 60 seconds. Then re-insert
plug into the mains socket and turn on the TV again.
No measures are required because the liquid crystal
panel manufactured with high technology is able to
show fine picture details. Sometimes, some inactive
pixels may appear on the screen in the form of red,
blue, green or black fixed dots. This does not affect
the TV’s performance.
Press the Power key on the remote controller or the
front panel.
Check the antenna connection on the back of the TV
set for the correct connection with the TV set.
It may be the Radio Station’s problem. Give other
channels a try.
Adjust the contrast and brightness settings.
*Increase the VOLUME.
*Check that the TV is not muted; press the button on
the remote control.
Check whether the correct TV system is selected.
Adjust the contrast, saturation and brightness
settings.
When it is connected to other peripheral devices (e.g.
S-VHS video recorder or camera) simultaneously, the
quality of the picture will be poorer. Turn off other
peripheral devices in this case.
Before Calling Service
Snowy picture and
noise
Horizontal dotted line
Television
not
responding to remote
control
VGA mode doesn't
work
Black stripes appear on
the top and bottom of
the screen in VGA
mode
*Check the antenna connection
*This may be caused by electrical interference (e.g.
hairdryer, nearby neon lights, etc.)
*Turn off the equipment.
*Check whether the batteries are working. Replace
if necessary
*Clean the remote control sensor lens on the TV.
*You can still use the buttons at the front of your TV.
Check whether the VGA line connections are firm.
Check whether the correct signal source is
selected. If not, select the correct signal source.
Check whether you have set the PC to a compatible
display resolution.
Check the settings of the display card
Change the refresh frequency of the PC to 60 Hz.
GLOSSARY
Audio / Video Inputs
Located on the rear and the front of the receiver these connectors (RCA phono type
plug) are used for the input of audio and video signals. Designed for use with VCRs
(or other accessories) in order to receive higher picture resolution and offer sound
connection options.
S-Video Input
Allows direct connection of high-resolution video sources, such as a Super VHS
videocassette recorder, Laser Disc player, etc. Provides improved picture resolution,
sharpness, and clarity.
Component signal Cr (Pr), Cb (Pb), Y Input:
Connect the component signal source of audio and video (DVD player, Laser Disc
player, videocassette recorder or camcorder) to the Component Input port.
Menu
An on-screen listing of feature controls shown on the TV screen that are made
available for user adjustments.
RF
Radio Frequency or modulated signal design used as the carrier for television
broadcasts.
Sleep Timer
Function with which you can set a time period after which the TV should turn
itself off.