1
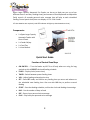
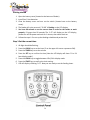
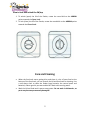
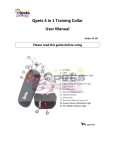
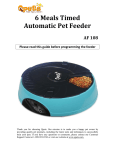
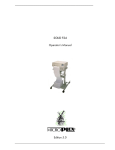
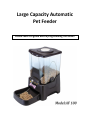
Large Capacity Automatic Pet Feeder Please read this guide before programming the feeder Thank you for choosing Qpets. Our mission is to make you a happy pet owner by providing quality pet products, including the latest tools and technique to successfully train your pets. If you have any questions or comments, please contact our Customer Support Center at 1-909-923-8743 or visit our website at www.lavasat.com. Table of Contents Components…………………………………………………………………………………………2 QUICK START GUIDE………………………………………………………………………………2 Function of control panel keys….……………………………………………….….2 Getting started……………………………………………………………………………...3 Step 1-set the current time………………………………………………………...…3 Step 2-set the feeding time and number of feedings daily……………..4 Step 3-set the feeding volume/portion size……………………………………4 GENERAL OPERATION………………………………………………………………….…………5 How to review the settings…………………………………………………….…….5 How to change a scheduled feeding time…………………………………….5 How to change a pre-set feeding portion size………………………………5 How to set the number of days to feed………………………………………….6 How to erase the pre-set feeding time and feeding volume…………6 How to record voice message to be played at the feeding times……6 How to manually feed your pet……………………………………………………6 Alarm…………………………………………………………………………………………..6 How to lock and unlock the lid/top………………………………………………7 CARE AND CLEANING………………………………………………………………………………7 DISCONNECT AND RECONNECT OF THE FOOD TANK……………………………….8 Disconnect the food tank from the base…………………………………….....8 Connect the food tank from the base……………………………………….……8 IMPORTANT TIPS (Please Read)……………………………………………………………….9 CUSTOMER SUPPORT CENTER………………………………………………………………10 1 Qpets Large Capacity Automatic Pet Feeder can be set to feed your pet up to four different times in one day. Feeding time(s) and amount of food dispensed are adjustable. Easily record a 6 seconds personal voice message that will play at each scheduled feeding. Control panel clock/timer can display a 12 or 24 hr format. 4 D-size batteries are required (a red LED indicator will light up when batteries are low.). Components: 1 x Qpets Large Capacity Automatic Feeder with Control Panel 1 x Feeder lid/top 1 x Food Tray 1 x User Manual Quick Start Guide Function of Control Panel Keys ON SWITCH — Turn the feeder on/off. Turn off only when not using for long periods as this will RESET clock and feeding schedule CLOCK—Display clock (current time) TIMER—Switch between preset feeding times VOL—Adjust feeding volume/portion-size SET—Enter SET mode, and confirm any feeding time you enter and advance to the scheduled next feeding time. Also use with VOL key to perform manual feeding START—Start the feeding schedule, confirm the clock and feeding time settings DAY—Set the number of days to feed REC—Record your personal voice message PLAY—Play back your personal voice message 2 Getting started 1. Open the battery cover (located at the bottom of feeder). 2. Install four D size batteries. 3. Close the battery cover and turn on the switch. (located next to the battery cover). 4. The feeder will cycle once until “12:00” is flashing on the LCD display. 5. You have 90 seconds to set the current time in order for the feeder to work properly. If longer than 90 seconds The ‘1 07’ will display on the LCD display, please turn off the power and wait for 1 minute, then switch back on. 6. Follow the steps 1-3 to set up the feeding schedule and portion size. Step 1-Set the current time 1. 2. 3. 4. All digits should be flashing. Press the CLOCK key to set the hour (P on the upper left corner represents PM). Press the TIMER key to set the minute. Press the SET key to confirm the time (Now the LCD display will show ‘12 or 24 hour display mode’). 5. Press the CLOCK key to toggle between 12hr/24 hr display mode. 6. Press the START key to confirm the clock setting. 7. LCD will display a flashing ‘1 07’. Now you are ready to set the feeding times. 3 Step 2-Set the feeding time and number of feedings per day 1. ‘1 07’ will be flashing now. The first digit1 represents either the 1st, 2nd, 3rd, or 4th daily feeding. Digit-3 and digit-4 are the feeding time (in hour increments). 2. The LCD display show the 1st feeding time (1 07) represent ( 1st feeding at 7am) 3. With (1 07) Flashing, press and hold the SET key for 2 seconds until digit-3 & digit4 start flashing(07). 4. Press the TIMER key to set the desired hour for feeding. Notice the (P) on the top left corner stands for PM when using 12 hour time. 5. Press SET key ONLY if you want to continue to set another feeding time. If you do not wish to continue setting another one, then just press START to save and exit. 6. Repeat 4-5 to set the desired hour for another feeding time. The feeder allows MAX. 4 feeding times to be scheduled per day. 7. If you want to change the previous feeding schedule, press the Timer key and then press the SET key and hold it for 2 seconds. This will allow you to go back to the 4-5 for setting the feeding time again. Note: Feeding times must be set in ascending order for the feeder to work properly. LCD displays the next feeding time. Press CLOCK to see current time. Step 3-Set the feeding volume/portion size 1. 2. 3. 4. Press the VOL key to display feeding volume/portion size Press and Hold the SET key for 2 seconds until the digit-4 blinks Press the VOL key to set the desired volume Press the START key to confirm the volume/portion size Note: A Feeding volume of 1 equals ¼ cup of food, 2 equal ½ cup of food, and 3 equal ¾ cup of food and so on. Setting the volume/portion size to 0 represents the maximum portion size which is equal to 10 portions/2.5 cups of food 4 General Operation How to review the settings 1. Press the TIMER key to cycle through and view the feeding times. Only set feeding times will be displayed. For example if only 2 feedings per day were set, then only the 1st and 2nd feedings will display. 2. Press the VOL key once to view the volume/portion size and feeding days left 3. Press DAY key to display feeding days left. 4. Press the CLOCK key once to display the current time, the CLOCK icon will turn on now. 5. If no key is pressed for more than 8 seconds, the display will switch back to show the next feeding time with the timer icon flashing. Note: A flashing timer icon means the feeding time has not been reached while a solid timer icon means the feeding time has already passed. How to change a scheduled feeding time 1. Press the Timer key and then press the SET key and hold it for 2 seconds. This will allow you to go back to set the feeding time again. 2. Press the TIMER key to change the desired hour for feeding. It will start from the fist preset feeding time. 3. Press SET key ONLY if you want to continue to edit another feeding time. If you do not wish to continue editing another feeding time, then just press START to save and exit. How to change a pre-set feeding portion size 1. 2. 3. 4. Press the VOL key to display feed-volume/portion size. Press and Hold the SET key for 2 seconds until the digit-4 blinks. Press the VOL key to set the desired volume. Press the START key to confirm the volume/portion size. Note: The volume/portion and number of consecutive days to feed share the same display screen. For example, (20_4) represents 20 more days of scheduled feedings with a volume/portion size of 4 (1 cup). 5 How to set the number of days to feed 1. Press the DAY key and the left side of the LCD shows the number of days your automatic feeder will feed your pet until it stops. The default setting of (0) means the feeder is set to continuously feed every day. 2. To change the number of days to feed, press the DAY key then press and hold the SET key for 2 seconds until the days flashing on the LCD display 3. Press the DAY key to change the number of days. Hold down the DAY key to speed through the numbers. 4. If you set a number of days to feed (1 to 99), then the feeder Alarm will start beeping at 6am after the last day in the setting. 5. To repeat the same schedule without any changes, just press the START key. 6. To feed continuously, set the number of days to 0. How to erase the feeding time and feeding Volume You can erase the preset feeding time and feeding volume by pressing the SET and START keys at the same time. Then just reset the feeder from the beginning. How to record voice message to be played at the feeding times 1. 2. 3. 4. Press and hold the REC key, the Red LED light will turn on. Speak to the feeder for your message. You have up to 6 seconds. When finished, release the REC key. Press the PLAY key to listen the message you just record. Repeat 1-3 if you want to record it again. Note: Your message will be played 3 times at each feeding time How to manually feed your pet Press the SET and VOL keys at same time to manually dispense ¼ cup of food. Set feeding schedule is not affected. Alarm 1. Your AF-100 Automatic Pet Feeder has an ALARM (a continuous beeping) to alert you when your feeding schedule has ended and no more food will be dispensed. 2. Then alarm will start at 6:00AM the next morning to avoid disturbing anyone at night. You can press any key to stop the beeping. 6 How to lock and unlock the lid/top 1. To unlock (open) the lid of the Feeder, rotate the round dial so the ARROW points towards the Open Lock. 2. To lock (close) the lid of the Feeder, rotate the round dials so the ARROW points towards the Closed Lock. Care and Cleaning When the food tank starts getting dirty and there is a lot of loose food at the bottom of the food tank, you can remove the lid and food tank for cleaning. Use a soft damp cloth to clean the feeder base (contains the control panel and batteries). Never get this part wet and do NOT wash with running water. Wash the lid and food tank in warm soapy water. Do not wash in dishwasher, as parts may become permanently damaged! 7 Disconnect and Reconnect of the Food Tank To disconnect the food tank from the base Use your thumbs to press down and open the spring tensioned locks located on the sides of the feeder. To release the food tank both locks need to be pressed open at the same time then the food tank can be lifted up with your fingers. The locks are spring tensioned so use care so the spring tight locks do not cause injury should they snap back. To reconnect the food tank from the base Align the food tanks atop the feeder base. Use your thumbs to press down and open the spring tensioned locks located on the sides of the feeder. Both locks need to be pressed open at the same time allowing the food tank to be lowered onto the base. Once the food tank is set into position GENTLY release the spring tensioned locks as to not cause injury. 8 Important Tips: (Please Read) 1. The clock can display in either 12 or 24 hour display format. In 12hr mode PM is represented by (P) in the upper left corner. 2. The number of consecutive days to feed can be changed at any time but the previous schedule will be replaced. 3. The feeding times and feeding volume can be changed at any time and the new settings will be for the rest of feeding day’s schedule. 4. Once the schedule has started, the DAYS displayed will be reduced by 1 every day at 0:00 (midnight) until the end is reached. It will then revert back to the original number of set DAYS and the Feed Alarm will sound. Just press the START key to start your original program/setting again. 5. If the timer icon is OFF and all numbers are flashing then no feeding schedule has been set and need to set up again. 6. Only when CLOCK is pressed and the CLOCK icon on is the current time displayed. 7. When RED (LOW BATT) Light FLASHES, the batteries are low and must be replaced. Change all the batteries ASAP. You need to reprogram all your settings after you replace the batteries. 8. When the LCD display shows (Err), the food delivery door is not closing properly. You need to remove any food that jams the door. Turn the power off, remove all food and turn the feeder upside down. Clean both doors hinges with a soft brush. After cleaning turn the switch ON again and refill with food. Note: You will have to reprogram all your original settings before you can use your feeder again Made in China 9 Customer Support Center Tel: 1-909-923-8743 Monday – Friday 8:30AM – 5:00 PM Pacific Time Email:[email protected] Add: LAVA Electronics Inc. 2580 E Philadelphia ST #D Ontario, CA 91761 This product has a limited Manufacturer Warranty. Details of the warranty can be found on www.lavasat.com or by calling our Customer Care Center. 10 LAVA Electronics Inc 2580 E Philadelphia St #D Ontario, CA 91761, USA 1-909-923-8743 www.lavasat.com Email:[email protected] Copyright © LAVA Electronics Inc. 2011. All rights reserved.