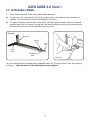
1
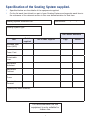
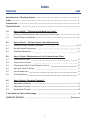
Custom Home Chair
(Moulded)
USER’S MANUAL
ALL USER’S OF THE EQUIPMENT SHOULD BE AWARE
OF THIS DOCUMENT AND ITS CONTENT
CUSTOM MADE DEVICE
ISSUE 6
Specification of the Seating System supplied.
•
•
Specified below are the details of the equipment supplied.
On the list each item ticked is a part of your Seating System and opposite each item is
the reference of the relevant section in this user documentation for that item.
Seating System Reference No.
Date Issued: / /
Seating System Type
User Manual Reference
Item
Tick if
supplied
No. of Items Supplied
Moulded Seat
Insert (MSI)
Foam Cast
Detachable
Liner
Adjustable
Headrest
Adjustable
Footrest
Cover
Detachable
Pommel
Specify any other features;
It is recommended that this
equipment is only suitable for
Indoor use.
1
Page
Section
Index
CONTENTS
PAGE
Specification of Seating System
1
Index
2
Introduction
3
Clinical Review
4
1.0
User’s Guide “Lifting and Handling the Client”
1.1
Lifting and Handling the Client in and out of the Chair 5
1.2
Client Straps, Harnesses 5
2.0
User’s Guide “Custom Home Chair Adjustments”
2.1
Powered Linear Actuator Operation 6 & 7
2.2
Handle Height Adjustment 8
2.3
Stability Adjustment
8
3.0
User’s Guide “Maintenance of the Custom Home Chair”
3.1
Cleaning the Chair
9
3.2
Cleaning the Covers
9
3.3
Cleaning the Zip & Panel Exterior Covers
10
3.4
Harness, Pads & Straps
11
3.5
Visual Inspection 11
3.6
Fire Retardancy 11
4.0
User’s Guide “Optional Features”
4.1
Adjustable Headrest
12
4.2
Adjustable Footrest
12
4.3
Detachable Pommel
13
If You Detect a Fault or Breakage 14
CONTACT DETAILS
2
Backpage
CUSTOM HOME CHAIR
(Custom Made Device)
Introduction
• This Users Guide for the Custom Home Chair is designed to give guidance on its use
•
•
•
•
•
•
•
•
and maintenance.
The Custom Home Chair is custom made to suit an individual clients postural
requirements.
Each Custom Home Chair is manufactured for a particular individual and must not be
used to seat anyone else.
The Custom Home Chair gives customized postural support so the clients weight is
evenly distributed over a large area and therefore improves comfort and tolerance
during daily use.
The Custom Home Chair comes complete with its own mobility base with an integral
Tilt-in-Space reclining mechanism to assist with daily postural management.
It is recommended that initial use of the Custom Home Chair by the client after hand
over is closely monitored for the first few days. Particular attention should be given
to checking the client for any signs of pressure areas, which appear to be caused by
sitting in the Chair. If there is any indication of any abnormal pressure areas then refer
the client back to Specialised Orthotic Services (see contact details on the back of
this booklet).
If the incidence of pressure is very severe then it is recommended that the client stops
using the Custom Home Chair until this can be assessed more closely.
It is recommended that the amount of time a client sits in the Custom Home Chair is
controlled, this will vary due to circumstances, but where possible periods of sitting in
the Chair should not exceed more than 3 hours at a time. Removing the client from
the Custom Home Chair is advised after such a period to offer a change of posture. By
doing this you will improve a clients tolerance to sitting in the Custom Home Chair on a
daily basis and improve overall postural management.
The maintenance and safety instructions described in the manual must be adhered to.
By following these instructions you will be ensuring correct use of the Custom Home
Chair and its safety in use.
3
Clinical Review
• To ensure that the Custom Home Chair still meets the clinical requirement of the client,
•
it is recommended that the Chair is reviewed by a qualified person such as a therapist
or clinician.
If a client has had an Custom Home Chair over twelve months it is recommended that
it is reviewed to confirm that it is still suitable for the client. This will ensure that the
Custom Home Chair is maintaining the clinical needs of the client.
4
USER GUIDE 1.0
1.1. LIFTING & HANDLING THE CLIENT IN & OUT OF THE
CUSTOM HOME CHAIR
•
•
BEFORE lifting the client in or out of the chair you MUST always apply the brakes.
•
It is important that all carers are aware of the
Health & Safety guidelines for ‘Lifting and
Handling’. •
•
•
•
•
•
Most users of Custom Home Chairs will need to
be hoisted into the equipment. Manually lifting
the client is not recommended, however with
some clients it may not be possible to hoist them
safely by conventional means and in instances
such as this you are recommended to carry out
a ‘RISK ASSESSMENT’ to assess the risks
involved in any such action.
Before lifting the client make sure all straps are
placed out of the Custom Home Chair. This will
avoid the straps becoming trapped under the client when seated.
When using the hoist, make sure that you follow the hoist manufacturers
instructions regarding correct use.
On lowering the client into the Custom Home Chair make sure that the client’s hips /
pelvis are located as far back as possible into the Custom Home Chair.
Leaving the hoist sling in the Custom Home Chair once the client has been placed
is not recommended as this could cause discomfort and pressure areas to be
generated. However, if any management issues require the sling to be left in situ,
then it is recommended that the most appropriate sling be used. If you require further
information regarding this, contact your local Wheelchair Service Therapist.
Please note, that it is very important that the client is correctly positioned to
give maximum comfort and support.
When leaving the client and the Custom Home Chair unattended for long
periods of time (i.e. after positioning the chair in front of a TV, etc.) you MUST
apply all four wheel brakes to prevent accidental movement and any possible
risks if not braked.
1.2. CLIENT STRAPS / HARNESSES
• Secure all straps / harness supplied. Straps and
•
•
harness must be tightened firmly to work correctly.
It is dangerous to have straps too loose or not in
place on the client.
If the Custom Home Chair has been fitted with a
‘Butterfly X Harness’, it is important that it is correctly
adjusted to maintain safe clearance at the top of the
harness as illustrated in the diagram opposite at ‘X’.
5
‘X’
Keep bottom straps of
harness tight.
USER GUIDE 2.0
CUSTOM HOME CHAIR ADJUSTMENT
2.1. POWERED LINEAR ACTUATOR OPERATION
Operating
•
•
•
•
•
Make sure all the control cables are plugged into the control unit (Fig.2.1a). Note: will
need to remove the rear upholstered panel to gain access (see page 10).
Make sure the control unit is switched on by rotating the red button clockwise
(Fig.2.1b), it should be in the raised position when on.
To tilt the seat forward ~ press and hold the UP button (Fig.2.1c) on the handset until
the desired position is achieved.
To tilt the seat back ~ press and hold the DOWN button (Fig.2.1c) on the handset until
the desired position is achieved.
When not using the actuator for long periods, swith off the control unit by pressing the
red button down (Fig.2.1d) to conserve battery power.
Remote
Actuator
Charger
Fig.2.1a
Forward
Fig.2.1b
Back
Fig.2.1d
Fig.2.1c
6
USER GUIDE 2.0 (Cont.)
2.1. POWERED LINEAR ACTUATOR OPERATION (Cont.)
Charging
•
•
DO NOT let the battery go completely flat as damage can occur to the battery.
•
To test the battery: Press either of the buttons on the remote, the battery charge
level is shown on the remote (Fig.2.1e), if only one light is shown charge the battery
immediately.
•
•
•
If the battery is flat you must charge it up before use as the actuator cannot be used
from the mains supply.
To charge the battery: Plug the charger lead
into a wall socket. Note: The actuator cannot be
operated whilst on charge, 3 bleeps will be heard
to warn you that it is on charge when any of the
buttons on the remote are pressed.
The charge indicator light will show up on the
charger (Fig.2.1f), a red light shows it is charging
and a green light shows that it is fully charged.
After charging (about 3 to 8 hours), unplug the
charger cable from the mains. The charger cable
should be neatly stored under the seat or can be
removed from the charger (Fig.2.1g) for safety.
Fig.2.1f
Fig.2.1e
Fig.2.1g
IF ANY PROBLEMS ARE ENCOUNTERED WITH THE ACTUATOR OR ASSOCIATED
CONTROL COMPONENTS ~ PLEASE CONTACT OUR CUSTOMER SERVICES
DEPARTMENT OR THE WHEELCHAIR SERVICES FOR ADVICE.
7
USER GUIDE 2.0 (Cont.)
2.2. HANDLE HEIGHT ADJUSTMENT
• Release the lock nut (Fig.2.2a) and lift (or lower) handle to its desired position
•
(Fig.2.2b).
When in position re-tighten the lock nut (Fig.2.2a).
Lock Nut
Fig.2.2a
Fig.2.2b
2.3. STABILITY ADJUSTMENT
• Make sure that all the client is NOT in the Custom Home Chair whilst adjusting the
•
•
•
•
legs.
Remove the nut & bolt (Fig.2.3a) from the legs that need adjusting (always adjust in
pairs, i.e. both front).
Slide the leg in or out (Fig.2.3b) until the next hole lines up, refit the nut & bolt
(Fig.2.3a).
Place the client in the Custom Home Chair and check the stability.
Repeat the above procedures if required, making sure that the client is NOT in the
Custom Home Chair whilst making adjustments.
Nut &
Bolt
Fig.2.3a
Fig.2.3b
8
USER GUIDE 3.0
MAINTENANCE OF THE CUSTOM HOME CHAIR
To make sure that the Custom Home Chair remains satisfactory it is necessary to carry out
simple maintenance.
3.1. CLEANING THE CUSTOM HOME CHAIR
• During use the Custom Home Chair will require cleaning. This can be done by simply
•
•
•
•
•
applying a warm damp cloth with a mild detergent to the inside surface of the seat to
remove any soiling and towel dry. Note: The cover MUST be removed prior to any
cleaning of the inner customized foam moulding.
If the Chair remains slightly damp simply leave for a short period at room temperature
to dry.
The customised foam moulding is manufactured from an open cell foam and is sealed
in an air permeable but waterproof plastic liner. This liner must not be removed under
any circumstances or the foam will very quickly become contaminated and unsuitable
for use.
If this plastic liner is damaged or worn out you will need to contact Specialised
Orthotic Services (see contact details on the back of this booklet) directly.
To clean the outside of the seat or the frame simply wipe down with a warm damp
cloth (a mild detergent may be used) and wipe dry.
DO NOT USE SCOURERS OR CAUSTIC SUBSTANCES SUCH AS BLEACH
3.2. STRETCH COVERS
• The Custom Home Chair cover will require occasional cleaning, dependant upon client
•
•
•
•
usage, for cleaning of removable cover please refer to wash label on the inside of the
padded cover.
To remove the cover simply undo the zips at the rear of the cover (for Foam Cast refer
to section 3.3), taking care to guide any straps etc. through the cover before removing.
Make a note of how the cover came off so you understand how it needs to be refitted.
When placing the cover back on the seat after cleaning, please note that the inner
label should be positioned at the top of the seat to ensure correct alignment of the
straps and general fit into the Custom Home Chair.
ANY DEVIATIONS FROM THE ABOVE MAY AFFECT THE FIRE RETARDANCY OF
THE COVER(S).
9
USER GUIDE 3.0 (Cont.)
3.3. ZIP & PANEL COVERS
• All the panels attached to the frame are clipped on and upholstered with a removable
•
•
•
•
•
pad which can be removed by simply unzipping the cover.
For cleaning of removable cover please refer to wash label on the inside of the padded
cover.
To remove the covers simply unclip the appropriate panel from the frame (Fig.3.3a)
and remove the cover by undoing the zip on each pad, taking care to guide any straps
etc. through the cover before removing. Replace the cover after cleaning and clip the
panel back onto the frame (Fig.3.3b).
PLEASE NOTE THAT THERE IS NO WATERPROOF LINING ON THE EXTERNAL
COVERS.
ANY DEVIATIONS FROM THE ABOVE MAY AFFECT THE FIRE RETARDANCY OF
THE COVER(S).
DO NOT GET THE FOAM WET ON THE FOAM CAST SEAT AS THIS FOAM WILL
ABSORB WATER AND WILL BE A PROBLEM TO DRY OUT.
Panel
Clip
Fig.3.3a
Fig.3.3b
10
USER GUIDE 3.0 (Cont.)
3.4. HARNESSES, PADS & STRAPS
• Make sure all straps are in good working order and that buckles work correctly.
• If any show signs of fraying or any buckles are broken or faulty contact your Wheelchair
•
Service immediately, DO NOT ATTEMPT TO REPAIR.
Harnesses may be cleaned by applying a warm damp cloth with a mild detergent,
DO NOT USE POLISH.
3.5. VISUAL INSPECTION
• Every 3 - 4 weeks check the condition of the Custom Home Chair, if you notice any
•
•
faults or broken parts please notify Specialised Othotic Services immediately, DO
NOT ATTEMPT TO REPAIR.
Look at the tubular frame of the Custom Home Chair and make sure there are no
signs of distortion.
If the covers become very worn and need replacing please contact Specialised
Othotic Services.
3.6. FIRE RETARDANCY
• Fire retardant materials have been used in the construction of this seating system.
• It is important that no accelerants are introduced to the materials (e.g. Hairspray, fabric
cleaners, deodorants, polish etc..), as this may adversely affect the fire retardancy of
your equipment.
11
USER GUIDE 4.0
OPTIONAL FEATURES
4.1. ADJUSTABLE HEADREST
• If the Custom Home Chair has been fitted
•
•
with an adjustable headrest, the headrest
will have been adjusted when the Custom
Home Chair was originally supplied.
The headrest is adjustable for height and
reach (Fig.4.1a).
NOTE: Cover & panels removed for
clarity.
Fig.4.1a
4.2. ADJUSTABLE FOOTREST
• If the Custom Home Chair has an adjustable footrest, it is important that the feet
•
are well supported and the footrest positioned correctly. The footrest will have been
correctly adjusted when the equipment was handed over in clinic.
The footrest is adjustable for height (Fig.4.2a) and reach (Fig.4.2b).
Fig.4.2a
Fig.4.2b
12
USER GUIDE 4.0 (Cont.)
4.3. DETACHABLE POMMEL
• If the Custom Home Chair has a detachable pommel:
A) To remove, turn locking knob (Fig.4.3a) at the front of the bracket anti-clockwise to
release. The pommel can then be withdrawn (Fig.4.3b)
B) To replace simply insert bracket stem back into the square socket, slide into desired
position and lock into place, turning the lock knob clockwise until secure making sure
that the barrel lock is correctly positioned (Fig.4.3a).
Fig.4.3a
Bracket
Barrel
Lock
Lock
Nut
Lock
Knob
Threaded
Rod
Fig.4.3b
You can identify all the relevant parts supplied with your Custom Home Chair by referring
to Page 1, “Specification of the Seating System supplied”.
13
IF YOU DETECT A FAULT OR BREAKAGE
1. IF YOU DETECT A FAULT OR BREAKAGE OF THE EQUIPMENT THEN REPORT
THIS IMMEDIATELY.
2. UNDER NO CIRCUMSTANCES ARE ANY MODIFICATIONS / ALTERATIONS TO BE
DONE BY ANYONE OTHER THAN SPECIALISED ORTHOTIC SERVICES LTD (see
contact details enclosed).
3. TO CONTACT SPECIALISED ORTHOTIC SERVICES LTD PLEASE REFER TO THE
INFORMATION INCLUDED IN THIS USER MANUAL.
REPAIRS & SERVICE
Within the warranty period.
All Seating Systems manufactured by Specialised Orthotic Services Ltd. carry a guarantee
on the main parts for 12 months, excluding covers and straps which are guaranteed for
3 months, when used normally. If during this period the product becomes defective and
needs repair then please contact SOS (please see the end of this users guide for details).
You can also contact your local wheelchair service regarding any faults requiring attention.
Outside the warranty period.
For any goods requiring repair or attention after the guaranteed period, then assessment
can be made as to the cost of the work required to effect the repair.
On acceptance of this quotation the work will proceed.
Misuse or neglect.
The repairs necessary resulting from misuse or neglect, whether within the warranty
period or not will be charged for.
MEDICAL DEVICES DIRECTIVE 93 / 42 EEC
Specialised Orthotic Services Ltd. in compliance with the Medical Devices Directive
have an obligation to investigate and take corrective action on defective devices. To assist
us with this procedure we would appreciate your assistance in meeting this obligation by
informing us as soon as possible and make the device available for inspection as soon as
possible having become aware of a defect.
We are required to notify the Competent Authority of certain types of incidents within 10 to
30 days.
As part of our quality system we have established procedures to deal with such incidences
and would appreciate your swift notification to us via our telephone, fax or e-mail details at
the end of this users manual.
14
If you require further copies of this handout or require further details relating to any of its
content, then please contact us (Copyright applies):
Units 127/128, Fauld Industrial Park, Tutbury, Staffordshire. DE13 9HS
Tel: 0044 (0)1283 520400 Fax: 0044 (0)1283 520401
E-mail: [email protected]
Web: www.specialisedorthoticservices.co.uk