1
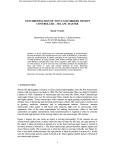
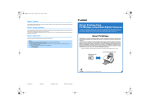
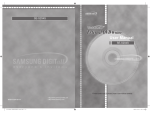
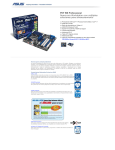
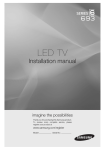
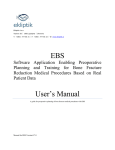
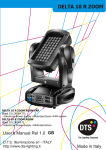
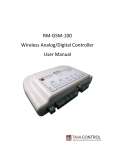
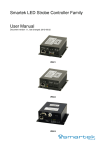
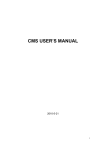
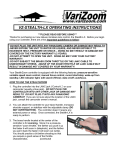
3D LANC Master
User Manual
Version 0.11
“3D LANC Master” is a device that synchronises two camcorders or still cameras. The device
can also keep in synchronisation some of Sony camcorders by modifying camcorder’s framerate.
1. Basic description of 3D LANC Master
The device consists of 4 keys, LCD screen, 15-pole male connector, 9-pole female connector
(DB9), 2,5mm stereo socket, 2 switches and one power-supply connector.
Figure 1 shows the front view of 3D LANC Master. There are 4 keys, where 3 are function
keys and one is Menu/Shift key. Function dedicated to each function key is displayed at the
top line of LCD display. Short click on Menu/Shift key changes current set of functions
dedicated to function keys. The available number of set of functions depends on connected
devices.
Function keys
Menu/Shift key
Functions
Status
Time disparity
Figure 1. Front view of 3D LANC Master.
Table 1. Available set of functions for camcorders (by shortly pressing Menu/Shift key). Bold
characters denote abbreviations shown on display.
Set
1
2
3
1st key function
Tel = Tele zoom
command (zoom in)
Men = accessing
camcorder’s menu
2nd key function
Wid = Wide angle zoom
command (zoom out)
3rd key function
Rec = Record; start recording
video to the tape
Up = go up in menu
Dwn = go down in menu
Cc1 = user-defined
command 1
Cc2 = user-defined
command 2
Disp = toggle display setting
(time disparity in µs or
recommended shutter speed)
If connected devices are camcorders, there are 3 sets of functions available (see table 1). Short
click on Menu/Shift key, when the current set is 3, bring us to set 1.
Longer press of Menu/Shift key (without depressing it!) invokes additional “shift” functions.
They are accessible by keeping Menu/Shift key pressed while pressing function keys. The
“shift” functions (also shown on LCD display) depend on current set of functions (1 to 3).
They are given in table 2.
Table 2. Available set of “shift” functions for camcorders (by keeping pressed Menu/Shift
key). Bold characters denote abbreviations shown on display.
Set
1
2
3
1st key function
RST = switch camcorder
OFF/ON (reset); note that
switching off is performed
only if camcorder is on.
Sbm = accessing
camcorder’s sub-menu
Cc3 = user-defined
command 3
2nd key function
3rd key function
OFF = switch camcorder
off
CL = go into the closedloop (maintain
synchronisation)
Ffr = focus far (change
focus to distant objects)
Cc4 = user-defined
command 4
Fnr = focus near (change
focus to near objects)
If connected devices are still cameras, there is only one set of functions available (see table 3).
Similarly, as for camcorders, longer press of Menu/Shift key (without depressing it!) invokes
“shift” functions. They are accessible by keeping Menu/Shift key pressed while pressing
function keys. The “shift” functions (also shown on LCD display) are given in table 4.
Table 3. Available set of functions for still cameras (by shortly pressing Menu/Shift key).
Bold characters denote abbreviations shown on display.
Set
1
1st key function
Tel = Tele zoom
command
2nd key function
Wid = Wide angle zoom
command
3rd key function
Prt/Cap = Pre-trigger/Capture
function
Table 4. Available set of “shift” functions for still cameras (by keeping pressed Menu/Shift
key). Bold characters denote abbreviations shown on display.
Set
1st key function
2nd key function
1
RST = switch camera
OFF/ON (reset)
OFF = switch camera off
3rd key function
Disp = toggle display setting
(time disparity in µs or
recommended shutter speed)
Current time disparity between both connected camcorders/still cameras is shown at the left
side of LCD’s bottom line. Initially, time disparity in µs (with resolution 1 µs) is shown.
Optionally, the recommended shutter speed can be displayed (this option can be selected in
the third set of functions for camcorders (see table 1) or among “shift” functions for still
cameras (see table 4)):
TS =
0.1
,
S
(1)
where TS is shutter speed (in s-1) and S is time disparity (in s). Namely, in stereoscopy it is
frequently recommended to use shutter speeds slower or equal to one-tenth of the inverse
value of time disparity.
Some status parameters are shown at the right side of LCD’s bottom line (see Figure 1). The
meaning of the letters and numbers is given in table 5.
Table 5. Meaning of letters/numbers at the right-bottom side of LCD display.
Character
number
Values
1
N, L, R
2
O, C
3
0..9
Description
N – no device connected
L – left device missing
R – right device missing
empty space – both devices present
O – open-loop (synchronisation is not under control)
C – closed-loop (synchronisation is permanently under control)
Rechargeable battery voltage:
0..2 – empty battery (refill the battery)
3..6 – normally filled battery
7..9 – fully charged battery
There are one serial (RS232) 9-pin connector, re-charge switch and power-supply socket at
the right side of 3D LANC Master (see Figure 2). With serial communication we can:
-
adjust some configuration parameters of 3D LANC Master,
graphically observe (and save) time disparity,
send commands to camcorders/still cameras from the PC (the software is under
development) and
modify some camcorders / still cameras internal settings.
The connected pins are given in table 6. Shorter description of programmes for adjusting 3D
LANC Master and camcorder settings is given in section 2. The re-charge switch controls
recharging of internal batteries. When it is ON, the internal rechargeable batteries are filled by
the connected external power-supply (through power-supply socket) or by LANC powersupply signals of connected camcorders or still cameras (they have to be switched on). Note
that battery charging is much more efficient when 3D LANC Master is switched off
(controlled by the power ON/OFF switch – see Figure 3).
At the left side of 3D LANC Master there is 15-pole male connector, 2,5mm stereo socket and
power ON/OFF switch (see Figure 3). First five pins of male connector are connecting 3D
LANC Master with camcorders/still cameras by LANC signals, while some of remaining pins
are used for connecting external keys.
serial (RS232) female connector
(DB9) for connection with PC
external
power-supply
socket
re-charge
switch
Figure 2. Serial 9-pole (RS232) connector is placed at the right side of 3D LANC Master.
Table 6. Connected pins of the serial (RS232) connector.
Pin number
2
3
5
1,4,6-9
Description
RxD (Received Data)
TxD (Transmitted Data)
Signal Ground
NC (not connected)
15-pole (DB15-SUB) male
connector for 2 LANC inputs &
external keys
LANC input for
external remote
Power ON/OFF
switch
Figure 3. 15-pole connector and 2,5mm stereo socket for external LANC remote is placed at
the left side of 3D LANC Master. Two 3,5mm sockets are not used.
Table 7. Connected pins of 15-pole male connector.
Pin number
1
2
3
4
5
6
7
8
9
10-15
Description
Ground (0V)
Left LANC power supply (5V)
Left LANC signal
Right LANC power supply (5V)
Right LANC signal
External key 1 signal
External key 2 signal
External key 3 signal
External key 4 signal
Reserved for future use
2. Basic functionality of 3D LANC Master
Before first use of 3D LANC Master, it is recommended to fill up the internal rechargeable
batteries. Set the voltage on external DC charger to 4.5V – 6V (set + polarity of inner contact)
and plug in the universal DC charger into the power-supply connector (Figure 2). Switch on
recharge switch (Figure 2) while keeping 3D LANC Master switched off. Note that first
charging of 3D LANC Master should take about 24 hours and subsequent ones about 14
hours.
When the charging is over, it is recommended to adjust some internal settings of 3D LANC
Master before connecting it to camcoders/still cameras. This can be done by connecting 3D
LANC Master and PC with serial (RS232) cable, switching on 3D LANC Master and opening
the programme “3D LANC Communicator” on the PC. The screenshot of the programme is
given in Figure 4. First, serial port (COM1 or COM2) should be chosen (see number 1 in
Figure 4). The status (number 2) shows functioning of the chosen port. Some internal settings
of 3D LANC Master can be viewed by selecting particular items in “combo box” (number 3).
The value of chosen setting is shown below (number 4). The list of internal settings is given
in Table 8.
The internal settings can be modified by selecting the appropriate setting (number 3),
modifying the value (number 4) and clicking “Write to E2PROM” button (number 5). The
new setting will be valid the next time 3D LANC Master is switched on. The modified
settings are valid immediately (without turning off 3D LANC Master), by clicking button
“E2PROM -> working” (number 6) after clicking “Write to E2PROM” button.
3D LANC Communicator can graphically display time disparity between both camcorders or
still cameras by clicking button “Start measurement” (number 7). The graph is shown at the
right side (number 8), where x-axis shows time in seconds and y-axis is time disparity in
microseconds. Some details of the graph (during the measurement is taken) can be zoomed in
by keeping left mouse button pressed and dragging the mouse from left-up to right-bottom
corner of the area which should be enlarged. Double click draws complete graph.
The measurement can be stopped by pressing the button “Stop measurement” (number 7). The
measurement can be saved in ASCII format (the first column is time and the second is time
disparity in microseconds) by pressing button “Save measurements” (number 9). Graph can
also be saved as a picture in wmf format by pressing button “Save picture” (number 10).
After adjusting internal settings of 3D LANC Master, it can be connected to camcorders or
still cameras via 15-pole connector (Figure 3). The time disparity is shown in the second line
of LCD display1. If the number is positive, it means that right (slave) camcorder or still
camera (the LANC cables are marked) is delayed and vice versa. The first set of functions is
shown on LCD display. If connected devices are camcorders, the first set of functions is
shown on LCD display (see table 1). For example, by pressing button “Tel” or “Wid”, the
camcorders are zooming in or out synchronously. By pressing “Rec” button, the camcorders
start recording video. Available functions can be changed by pressing Menu/Shift key (Figure
1), all according to details given in section 1. List of all functions is given in tables 1 and 2.
1
If both camcorders/still cameras are connected and powered-on then there should be only two characters
written at the low-right corner of LCD display (N, L or R characters should not appear), all according to table 5.
Table 8. List of internal settings of 3D LANC Master which can be accessed via 3D LANC
Communicator programme.
Setting
Oscillator Page
Oscillator Address
Oscillator Data
Power-on duration
(ms): camcorder
Power-on delay (us):
camcorder
Power-on duration
(ms): still camera
Power-on delay (us):
still camera
Command1:
camcorder
Command2:
camcorder
Command3:
camcorder
Command4:
camcorder
Proportional Factor
Integral Factor
Description
Page of data responsible for modifying camcorder’s frame rate
Address of data responsible for modifying camcorder’s frame rate
The initial value of data before it is modified (for security only)
Duration of power-on pulse in millisecons when connected
devices are camcorders
Delay between two power-on pulses on camcorders in
microseconds. Namely, if the sync between two camcorders is
mostly some positive or negative value, it can be compensated by
adjusting delay between both power-on pulses.
Duration of power-on pulse in millisecons when connected
devices are still cameras
Delay between two power-on pulses on still cameras in
microseconds. Namely, if the sync between two cameras is mostly
some positive or negative value, it can be compensated by
adjusting delay between both power-on pulses.
User-defined command 1 for camcorder (accessible by keys on 3D
LANC Master)
User-defined command 2 for camcorder (accessible by keys on 3D
LANC Master)
User-defined command 3 for camcorder (accessible by keys on 3D
LANC Master)
User-defined command 4 for camcorder (accessible by keys on 3D
LANC Master)
Proportional factor (1/proportional gain) of PI controller for
keeping camcorders in sync
Integral factor (1.28/integral gain) of PI controller for keeping
camcorders in sync
Tele/Wide command
(camcorders)
Definition of speed of tele/wide command for camcorders.
Power-off time [s]
Duration in seconds when camcorders/still cameras are switched
off before switched on again (when using RST = switch OFF/ON
function)
One of the most useful functions is “RST” function, which can be obtained in “shift” function
set 1 by keeping Menu/Shift key pressed (table 2). By pressing “RST” button (while keeping
pressed Menu/Shift button), both camcorders are switched off (if the left camcorder is
functioning) and on synchronously. Namely, synchronous power-on pulse usually brings both
camcorders close to synchronisation.
If connected devices are still cameras, the first set of functions is slightly modified (see table
3). Instead of “Rec” button, there is “Prt” button. By pressing it, both cameras go into pretrigger mode, where focus and exposure settings are fixed and locked. The function “Prt” is
replaced by “Cap” on LCD display. By pressing the same (“Cap”) button again, the picture is
taken. List of all functions for still cameras are given in tables 3 and 4.
Some camcorder’s internal settings can be modified by programme 3D LANC Doctor (the
settings can be modified only in left (master) camcorder/still camera). It can show and modify
the camcorder’s data at particular page/address. First, 3D LANC Master should be connected
to the PC with serial (RS232) cable and switched on. Then the programme “3D LANC
Doctor” should be opened on the PC. The screenshot of the programme is given in Figure 5.
First, serial port (COM1 or COM2) should be chosen (see number 1 in Figure 5). The status
(number 2) shows functioning of the chosen port. The data value at particular page/address
can be inspected by entering appropriate page and address (number 3) and pressing button
“Go to Page/Addr” (number 5). After few seconds, the data is displayed in the right column
(number 4). The data in volatile memory can be changed by entering page, address and
desired data (number 3) and pressing the key “Change Data” (number 6). The non-volatile
memory can be modified by entering page, address and desired data (number 3) and pressing
the key “Save Data” (number 7). Extreme caution should be taken when modifying volatile
and, especially, non-volatile data, since camcorder or still camera can become non-functional!
Search of desired page/address can be terminated by pressing button “STOP” (number 8).
1
2
3
4
9
5
6
8
7
10
Figure 4. Adjusting parameters of 3D LANC Master and monitoring time disparity can be
done by 3D LANC Communicator.
Figure 5. Adjusting of camcorder's and still camera's internal settings can be done by 3D
LANC Doctor.
Additional information:
[email protected]
http://www-e2.ijs.si/3dlancmaster