1
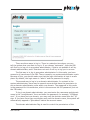
SIP-PBX
User Manual
Version 2.0.3
© 2007 pbxnsip Inc.
All Rights Reserved. This document is supplied by pbxnsip Inc. No part of this document
may be reproduced, republished or retransmitted in any form or by any means whatsoever,
whether electronically or mechanically, including, but not limited to, by way of photocopying,
recording, information recording or through retrieval systems, without the express written
permission of pbxnsip Inc.
pbxnsip Inc reserves the right to revise this document and make changes at any time and
without the obligation to notify any person and/or entity of such revisions and/or changes.
Product specifications contained in this document are subject to change without notice.
Comments are welcome. Please send them by email to [email protected].
Version: 2.0.3
Page 2
Preface
This user manual will show you how you can use your phone with the pbxnsip
PBX. If you have been using a “traditional” private branch exchange (PBX) system
before, you will recognize many familiarities.
However, due to the new technology there may also be a few things that
are handled differently. For your specific phone, there might be additional features
available, for example the address book. Because the PBX supports a large variety
of VoIP-enabled phones, we will not address such topics in this manual. Please see
the manual for your phone for such topics.
Our goal is to make the usage of the telephone system as efficient as
possible. We know that your job is hard and you want to get things done as soon
as possible. Therefore, we put a special focus on increasing your productivity with
features like cell phone integration or Hot Desking support. It is worth spending a
few minutes to flip through this manual and see what features are available. When
you need them, you can always come back to this manual and see the details on
how to use the features.
We keep an updated manual on our web server. Please see http://wiki.
pbxnsip.com for the latest user manual.
The pbxnsip team.
Preface
Page 3
Page 4
Preface
Contents
1
1.1
1.1.1
1.1.2
1.1.3
1.2
1.2.1
1.2.2
1.2.3
1.2.4
1.2.5
1.2.6
1.3
1.3.1
1.3.2
1.4
1.5
1.5.1
1.5.2
1.5.3
1.5.4
1.5.5
1.5.6
1.5.7
1.6
1.7
1.8
1.9
1.9.1
1.9.2
1.9.3
1.10
1.10.1
1.10.2
1.10.3
1.10.4
2
2.1
2.2
2.3
2.4
2.5
2.6
2.7
2.8
Using the PBX from a phone..........................................................9
Basic Calling ...............................................................................9
Dialing an Internal Number ...........................................................9
Dialing an Outside Number ...........................................................9
Receiving Incoming Calls ..............................................................9
Mailbox .................................................................................... 10
Leaving Mailbox Messages .......................................................... 10
First Call to Your Mailbox ............................................................ 10
Picking Up Mailbox Messages ...................................................... 10
Main Mailbox Menu .................................................................... 11
Logging into your Mailbox ........................................................... 11
Forwarding Messages per Email ................................................... 12
Call Forwarding ......................................................................... 12
Call Redirection ......................................................................... 12
Do Not Disturb .......................................................................... 13
Redial and Call Return ................................................................ 13
Parking, Pickup and Transfer ....................................................... 14
Holding a call ............................................................................ 14
Call pickup ............................................................................... 14
Call park and retrieve................................................................. 15
Attended and unattended transfer ............................................... 15
Transfer with *77 ...................................................................... 16
Transferring or calling directly to voicemail .................................... 16
Transfer between different registered devices ................................ 17
Caller-ID Treatment ................................................................... 17
Call Data Record........................................................................ 17
Recording Prompts .................................................................... 17
Call Mixing................................................................................ 18
Call Barge-In ............................................................................ 18
Call Teach-Mode ........................................................................ 18
Call Listen-In ............................................................................ 19
Hot Desking .............................................................................. 19
Purpose ................................................................................... 19
Logging In ................................................................................ 19
Logging Out .............................................................................. 19
Limitations ............................................................................... 20
Web Interface ........................................................................... 20
Login ....................................................................................... 20
General Settings........................................................................ 22
User Redirection Settings............................................................ 24
User Mailbox Settings................................................................. 25
User Email Settings ................................................................... 26
User Instant Message ................................................................. 27
Mailbox View............................................................................. 28
Missed Call List ......................................................................... 28
Table of Contents
Page 5
2.9
2.10
2.10.1
2.10.2
2.10.3
2.11
2.11.1
2.11.2
2.11.3
2.11.4
2.11.5
2.11.6
2.12
Personal Call Log ....................................................................... 29
Scheduling Conferences ............................................................. 29
Creating a new conference .......................................................... 30
Editing existing conferences ........................................................ 30
In a conference ......................................................................... 31
Address Book ............................................................................ 31
Purpose ................................................................................... 31
Speed Dial ............................................................................... 31
Black List and White List ............................................................ 31
Personal Address Book .............................................................. 32
Domain Address Book ............................................................... 33
Address Book Import ................................................................ 34
User Status .............................................................................. 34
Page 6
Table of Contents
1
Using the PBX from a phone
This section will show you how to use the pbxnsip PBX with a standard Voice
over IP-phone. Although the usage of different phones varies significantly, you can
use most of the features of the PBX in a similar way.
The access codes shown in this manual are the default codes. Your system
administrator may assign different codes for the available features. In that case,
you should receive a list of the functional feature codes.
Many phones require that you press the Ok button (like on the cell phone) to
start a call; other phones may accept pressing the pound (#) key or a check mark
key instead. However, for the usage of the PBX that does not make any difference.
1.1 Basic Calling
Making phone calls using an IP-PBX is not much different from traditional
telephone systems.
1.1.1
Dialing an Internal Number
To call another extension, just dial the number. For example, if you want to
reach extension 123—just enter "123" and start the call.
There are several services that your PBX System Administrator may have
programmed for you (like auto attendant and conference mixing) that can also be
reached by dialing an extension number.
1.1.2
Dialing an Outside Number
To dial an outside number, just enter the number that you want to reach.
Please note that your system administrator may require a prefix before the number
that you want to dial (for example "9"). On some VoIP phones, you may have a dial
plan that automatically dials the number without requiring that you press the start
key.
The PBX allows the administrator to assign an outside dial plan to each
user. Depending on company policy, this feature may be used to restrict certain
extensions from placing outside calls or from placing calls to expensive numbers.
If you are not in your office and your company has a strict telephone bill
policy, you might want to tell the PBX that you want to bill an outgoing call to your
extension number. This feature is useful if you are located in a room that has no
permission to place outside calls, for example a kitchen. You must dial *91 to use
this feature. The system will prompt you for your extension number, your access
code and the destination number.
1.1.3
Receiving Incoming Calls
Incoming calls are usually indicated with a ring tone. Calls from another
extension sound different than calls from an outside line (depending on the phone
Installation and Quick Start
Page 7
model that you are using).
You should see the Caller-ID on your phone. If the Caller-ID is in your
personal address book or in the domain‘s address book, the PBX will insert the
name of the caller.
1.2 Mailbox
1.2.1
Leaving Mailbox Messages
When a user is not available, the voice mail system may pick up the call. In
this case the caller will hear an announcement indicating that he/she may leave a
message after the tone. If the extension did not record a name, the PBX will spell
the extension number.
After leaving the message, the caller can simply hang up (the message will
be delivered) or the caller can press the pound sign to access the standard message
option features.
In this case the caller has three options:
•
If an operator number is available, pressing "0" will send the message and
connect the caller with the operator.
•
Pressing "1" will delete the message. If the caller presses the "2" option after
that he can leave a new message; otherwise no message will be sent.
•
Pressing "2" will give the caller the opportunity to record a new message.
•
Pressing "3" will make the message as urgent.
If the mailbox is full, the caller will hear an announcement that makes this
clear. If the mailbox is full, but there are saved messages, the PBX will make room
for a new message by deleting the oldest saved message.
1.2.2
First Call to Your Mailbox
The system administrator may assign a mailbox to your account. The mailbox
will pick up messages when you are not available. The message will either be stored
for telephone retrieval or forwarded as email.
To go to the voicemail system, you just dial *97 or your extension number.
The first time you call your mailbox, you will have the opportunity to
record your name and a personal greeting. This name recording will be used in
announcements to callers. If you choose not to record your name, your extension
number will be recited to callers. You many record your name later at any time.
1.2.3
Picking Up Mailbox Messages
If you have a voice message in your mailbox and the message has not been
forwarded to you by email, your phone should indicate that a message is waiting for
you Message Waiting Indication (MWI).
Page 8
Installation and Quick Start
Usually this is a blinking LED light. Depending on your phone type, you may
be able to press the message retrieval button, which is just a shortcut for dialing
the mailbox number (for example *97). The system will automatically start reading
out your messages.
During message playback the following keys are available:
•
"1" will start reverse playback like on a tape recorder. If pressed again, the
reverse playback will be faster.
•
"2" will stop/resume playback.
•
"3" will start fast forward the playback. If pressed again, the playback will be
faster.
•
"4" will read the message again (without envelope information).
•
"5" will read the message again, including the "envelope information". This
means the time and caller will be included in the message announcement.
•
"6" can be used to move the message into another mailbox. The PBX will ask
for an extension number and after a verification move the message to another
mailbox.
•
"7" will delete the message and move to the next message.
•
"8" will leave the mailbox and call the number that has left the message (if that
number is not an anonymous number). The PBX will prompt for verification,
pressing a star will get the user back to the message readout.
•
"9" will save the message in the mailbox.
•
"0" will play a help text
After all your messages are played, you will hear the main menu for our voice
mailbox.
1.2.4
Main Mailbox Menu
From the main mailbox menu you can listen to your messages; change the
access code (Mailbox PIN) for your voice mail; or record your name or record a
personal greeting.
•
"1" will read new and saved messages.
•
"2" makes it possible to change the PIN code for the mailbox
•
"3" will ask for a new name recording
•
"4" will ask for a new personal greeting message.
•
"*" will start dialing a star code. For example, this way you can record a new
announcement for the auto attendant of the office while you are in your mailbox
(e.g. from a cell phone while you are traveling).
1.2.5
Logging into your Mailbox
When calling your mailbox from a different phone you will hear the mailbox
announcement. The PBX assumes that you are someone who might want to leave a
Installation and Quick Start
Page 9
message. To retrieve your voice mail, just enter your access code (Mailbox PIN). If
the code matches, the system will start reading out messages.
Usually a voice mailbox is set up without an access code. In this case you
must call from your extension into the mailbox (by simply dialing your extension or
*97). You can follow the main menu instructions to set up the access code if you
choose to have one. Using an access code is normally advised.
1.2.6
Forwarding Messages per Email
If your system administrator has set the PBX up with your email address, you
may choose to have your voicemail forwarded to your email. To turn this feature
on, call *95. Ask someone to leave a message on your mailbox to check that the
forwarding works. If there are problems, ask your administrator to check the email
address and the settings for the email server.
Call *96 to disable the email forwarding.
1.3 Call Forwarding
1.3.1
Call Redirection
There are several events that may trigger the redirection of an incoming call.
The PBX differentiates between the following cases:
•
Always: All incoming calls are forwarded. For example, this can be used when
you are away and a colleague is answering your phone or when you want to
redirect all calls to your cell phone.
•
No answer: Calls are redirected after a certain time when the extension does
not pick up. Typically, you use this to redirect incoming calls to an assistant or to
your secondary phone in case that you are not sitting next to your telephone
•
Busy: Calls are forwarded if the extension is busy. Typically you will program this
number to redirect calls to a team assistant or to a colleague. This way incoming
calls are answered when you are busy on another call.
To turn the "call forward always" on, dial *71. You will hear an announcement
that asks you to enter the call forwarding number. Enter the number and press the
pound key (#). The system will repeat the number and then hang up. If you want
to change the forwarding number just call *71 again.
Alternatively you can turn on "call forward always" by dialing the *71 code
plus the redirection number and then starting the call. This has the advantage that
you can check the number on the display of your phone.
To disable "call forward always" dial *72. You will hear an announcement
saying call forwarding has been turned off.
Programming "call forwarding on busy" works in a similar way. Dial 73 to turn
it on and program the forwarding number. Like with the other codes, you can also
put the number directly behind the star (*) code.
Page 10
Installation and Quick Start
Dial *74 to turn "call forward on busy" off. To turn "call forward on no
answer" on, dial *75. Like with the other codes, you can also put the number
directly behind the star code (*). Your system administrator has set the time limit
at which un-answered calls are forward. Please contact your system administrator if
you want to change this value.
To disable the "call forward on no answer", dial *76.
1.3.2
Do Not Disturb
Do Not Disturb (DND) is similar to the call forward already described in the
previous section. However, the typical case is that you temporarily don’t want to be
disturbed (for example, because you have a meeting). To turn DND on, dial *78.
To turn DND off, dial *79.
If you are a member of a hunt group, the call forwarding conditions for your
extension will not apply when the hunt group is called. But if you turn DND on, even
calls that go to the hunt group will leave your phone silent.
Most VoIP phones have a button that acts in a similar way. However this DND
function might not be available or might not work as reliably as setting DND for
your phone on the PBX.
DND can be overridden by a person that has the DND override permission.
Typically this is a secretary who should be able to call the boss, even if he is on
DND.
1.4 Redial and Call Return
To redial the last number called, just dial *66.
Call Return (*69) will dial the number of the last call that you missed. The
number will be available until you establish a call to that number. This will prevent
you from calling back the same person twice.
If you reach an external mailbox the system will believe that the call was
established successfully and clear the number. If you reach a mailbox of another
extension on your PBX system, the call return number will not be cleared and you
will be able to try to reach that extension later by dialing the call return code. The
PBX will only store a call return number for calls that contain a valid caller-ID.
Please also note that if you have several telephones that share the same
extension number, these devices will share the same redial and call return number.
Installation and Quick Start
Page 11
1.5 Parking, Pickup and Transfer
Before you can perform parking, pickup or transfer, you must
first put your last call on hold. Then you can dial the star code as a
regular call.
Please note that the Sipura devices from Linksys by default are
not able to support star codes with more than two digits.
Putting the call on hold first males sure that the PBX can
differentiate between DTMF pass through as a part of the ongoing
call and requesting something from the PBX. For example if you are
calling an external IVR system like your bank, and they require you to
enter *77, you would not be able to do that if the PBX interprets and
executes the star code.
1.5.1
Holding a call
Putting a call on hold is a important first step before making transfers or
parking calls. Most phones have a "hold” key, all you need to do is push that
hold key. Some phones have a "R” key that is used for holding a phone call
("Rückfrage”). Other phones use the hook flash to detect the request to hold the
line.
Please note that in the common language, many people say "park the call”
when they technically just want to hold the call. For example, for a call pickup, you
don’t need to park the call; it is enough to hold the call and tell the other person to
pick up the call.
1.5.2
Call pickup
Call pickup is used to pick up ringing calls, for example calls to an extension
or to a hunt group. If you want to retrieve calls that were already connected and
now are on hold or are parked, please use the retrieve code.
There are two ways or picking up calls. The directed call pickup is used to
pick up a call from a specific account, while the undirected call pickup searches for
a call that can be picked up.
The directed call pickup uses the call pickup code together with the account
from which a call should be picked up. For example, *87123 will tell the PBX to
pick a call up from account 123. Please note that the code must be dialed as one
number. The call pickup can be done for the following account types:
•
Hunt groups. If there is a call that goes to the specified hunt group, the PBX
will stop the hunt group and send the call to the extension that dials the pickup
code. If there are several calls that ring the hunt group, then the PBX will pick
up the first call that went to that hunt group.
•
Extensions. When the account number is an extension, the PBX will search for
calls that go directly to the specified extension. These calls can come from an
Page 12
Installation and Quick Start
auto attendant or through direct extension dialing. Calls that ring the extension
because it is part of a hunt group or an agent group will not be considered for
call pickup.
•
Agent groups. Like with the hunt group, the PBX will pick up a call from the
specified agent group. If there are calls in the ringing state, it will pick the first
call which in that state. Otherwise, it will pick the call that entered the queue
first.
The undirected call pickup goes through the list of calls and searches for calls
that can be picked up. It will use the following preference for this:
•
It will first try to pick up calls from a hunt group.
•
If no call has been found, it will try to pick up a call for an extension.
•
If that also is not possible, it will try to pick up a call for an agent group.
For all pickup attempts, the extension that attempts the pickup must have
the Dialog Permissions for seeing the state of the account. If this is not the case,
then the PBX will not allow picking the particular call up.
Please note that the pickup mechanism changed in version 2.0.2. The pickup
policy in previous versions was too difficult to understand and was causing many
problems. The loose and strict pickup policy has been given up and was replaced
with a single, loose policy. The Dialog Permissions concept can be used to limit the
access to specific accounts.
1.5.3
Call park and retrieve
While in many cases you may dispose of a call by transferring it to a specific
extension, in certain situations you will want to "park" a call so that it can be picked
up by an unspecified extension.
Parking a call so that it may be picked up by any extension is a two-step
process. First put the call on hold; then, dial *85 to park the call. You will hear an
announcement that the call has been parked. At that point, the call can be picked
up by any extension that dials *86.
Again, your telephone system administrator may have configured your PBX
with a more strict pickup policy. In that case, you will specify a group to which you
are parking the call (*85610 for example for group 610). Any member of that group
can then pick up the parked call by dialing *86.
1.5.4
Attended and unattended transfer
If your telephone has a transfer button, the PBX will receive the transfer
signal and switches the call to the provided destination. There are generally two
types of transfer. The simplest transfer is called a "blind" transfer. The other type
is often referred to as an "attended" or a "consultative" transfer. In an attended
transfer, you speak with the party to whom the call will be transferred to ensure
that the call is wanted. In a blind transfer, you simply transfer the call with no
knowledge of whether the person called will be available to take the call.
Installing the IP-PBX Appliance
Page 13
To initiate a "blind" transfer, just press the transfer button on your phone and
dial the extension to which you are transferring by pressing the extension number
keys and the call start key.
To initiate an attended transfer, first put the caller on hold (using the hold
button on the phone); then dial the number to which you will transfer the call. If
the person on the receiving end of your call is prepared to take the call you can
just press the transfer key and the call that is on hold will be transferred. You do
not have to press the hold button to free the call. If the person is not available to
take the call, you can press the hold key to reclaim the call and discuss the caller‘s
options with him or her.
1.5.5
Transfer with *77
Many mobile devices do not have options to transfer calls. However they are
able to put a call on hold. The PBX supports blind transfers for such devices in the
following way:
•
Put the call that should be transferred on hold;
•
Then dial *77 followed by the destination number. This number must be dialled
as one number. For example you would dial *771234, not *77 and then press
1234 by DTMF.
Then the PBX will put the call off hold and redirect it to the destination.
Please notice that a blind transfer does not check if the call will be connected.
If the number is busy, does not exist or just does not pick up, the PBX will not send
automatically the call back.
Transfer requires that you then dial the star code together with
the transfer destination. That means you cannot first dial *77 and
then the destination number. You must dial the transfer destination
together with the star code, for example *771234.
If you want to transfer a call to an external location, you must
also have a dial plan for the extension that initiates the transfer. Either
you must have a default domain dial plan or you must assign a dial
plan directly to the extension.
Also it should be noted that most SIP devices support the REFER method to
initiate a transfer. This method does not need a star code.
1.5.6
Transferring or calling directly to voicemail
If your PBX System Administrator has enabled a prefix (normally "8") to
enable you to call a voice mailbox directly, you can "blindly" transfer a call to
someone‘s voice mail by pressing the transfer key, then that mailbox prefix key,
followed by the extension number and the call start key. Of course you can also
call any person’s voice mailbox directly by similarly pressing the mailbox prefix key
followed by the extension number and the call start key.
Page 14
Installing the IP-PBX Appliance
1.5.7
Transfer between different registered devices
Let’s assume you picked up a call on your WiFi phone and you are getting
back to your desk and you want to continue your conversation with your regular
phone. Both phones are registered to the same extension number, so you cannot
just simply transfer the call.
In order to achieve this, you must first park the call on your extension and
then pick the call up from your desktop phone. In order to do this, put the call on
hold on your mobile device, dial *85 (park) and wait until the PBX disconnects the
call. Then go to your desktop phone and pick up the call with *86.
1.6 Caller-ID Treatment
Caller-ID’s are usually telephone numbers. By providing your caller-ID to the
party that you are calling, the called party may be able to look you up in an address
book, initiate a callback, or just see who is calling.
Sometimes you want to reject calls that come from callers whose Caller
ID does not reveal their identity. Most VoIP systems use the name "anonymous"
in the caller-ID in such a case. To treat these calls, dial *88. If you have set the
call forwarding on busy condition, the PBX will forward anonymous calls to that
destination (for example, your assistant). This way, you can make sure that
anonymous calls get screened first before you take the call. If you have not set the
call forward on busy, the system will play an announcement to the caller that tells
him that the call can not be taken because of the blocked Caller-ID.
To allow anonymous calls again, dial *89.
If you want to place a call without showing your caller-ID, dial *67. You will
hear an announcement that the caller-ID will be blocked for all future calls.
To enable your caller-ID again, dial *68. Please note that the caller-ID will
always be presented for internal calls.
1.7 Call Data Record
Sometimes you receive a call from someone that you have to call back. If
your system administrator has set up your extension with your email address,
instead of asking the person on the phone to spell the phone number and scribble
it down on a notepad, you can direct the PBX to send you an email with the call
details.
To receive a "data record", dial *63 after the call. The system will send you
an email with the Caller-ID, the duration of the call and the time of the call.
1.8 Recording Prompts
The attendant and the agent group support the recording of customized
greetings. You can record those greetings from any telephone in your network.
Installing the IP-PBX Appliance
Page 15
Consult the system administrator manual if you want to restrict the
extensions that are allowed to record greetings.
In order to record a greeting, dial *98 followed by the account number (e.g.
*98123 if 123 is the number of your auto attendant). The PBX will prompt you for
your new prompt. If you just want to delete the old prompt and use the standard
prompt, press the star key during the announcement.
The agent group has up to ten announcements. The announcement with
the number 0 is the initial announcement; the announcements 1 to 9 are placed
in a loop. In order to record those announcements, you need to dial *98 + the
group number + * + the announcement number (for example, *98123*4 to record
announcement 4 in the account 123).
1.9 Call Mixing
One of the benefits of the PBX architecture is that existing calls can be
interrupted and monitored.
All three modes, and especially the listen in mode, are severely affecting
the privacy of the calls on the PBX. Therefore, those modes are only available to
extensions that are specifically allowed to use those features. In the permissions
tab of the respective extension, the domain or system administrator has to enable
the features. Please consult corporation and government regulations if turning these
features is allowed in your environment. Illegal listening to phone calls is a severe
crime, and system administrators must be aware about that.
To see which calls are active, you can monitor the extension‘s state of the
state of a CO-line. For example, you can do this by using the LED key of a SIP
phone with the associated display.
1.9.1
Call Barge-In
In call barge in, two persons that are talking to each other are put into a
kind of conference with a third person. Typically, this third person is a secretary
reminding ("saving") the boss about another appointment. Both parties will hear
the third person come into the call ("knock knock") and both parties will be able to
hear what the third person has to say. The existence of the barge in call depends on
the existence of the underlying conversation.
In order to barge into a call, dial *81 followed by the extension number that
you would like to interrupt, then press dial.
1.9.2
Call Teach-Mode
In teach mode, only one side of the call can hear the third party. This is
typically useful in a call center when a trainer wants to give tips to a new agent, so
that the customer does not know about the teacher in the background. This mode is
also sometimes called whisper mode, because the agent‘s phone must have a real
good echo cancellation so that the customer does not hear some background echo.
Page 16
Installing the IP-PBX Appliance
In order to start the teach mode, dial *82 followed by the extension number
that should hear your voice, and then press dial.
1.9.3
Call Listen-In
The listen mode is similar, but completely stealth mode. The two persons
talking to each other are not notified about the listen in and cannot hear what the
third person says on the phone (e.g. breathing).
In order to start listening to calls, dial *83 followed by the extension number
that you would like to monitor.
1.10 Hot Desking
1.10.1 Purpose
"Hot Desking" (see for example http://en.wikipedia.org/wiki/Hot_desking)
makes it possible that employees temporarily or permanently change the routing of
all their calls to a specific physical device. Then all calls to that extension, also as
part of the hunt group or agent group, get routed to that extension.
Hot Desking means that the person takes ownership on the phone. That
means that outbound calls from this phone will show his caller-ID. It is not expected
that other significant inbound traffic goes to the originally registered extension. This
fact suggests that offices use "virtual" and "real" extension numbers:
•
"Real" extension numbers are used for employees with a fixed location (e.g.
switch board, management)
•
"Virtual" extensions don’t have any registrations. They are just used for routing
calls to a specific user. They use real extension numbers that are not assigned
to any other person, so that there is no conflict between identities on a specific
physical device.
In cases when an employee just wants calls to his extension being routed to
a colleague‘s office, it is better to use the unconditional redirection feature of the
PBX. This feature must be turned on before the user leaves his office.
1.10.2 Logging In
When you want to log in, enter the Hot Desking star code (typically "*70").
The PBX will prompt for the extension number and the PIN code for that extension
number and acknowledge the Hot Desking with a "the service is active now".
1.10.3 Logging Out
In order to log out, you just need to call the Hot Desking star code from a
location that is currently registered as hot desk or from the phone that holds a
registration for extension in question. The PBX will answer with a "the service is
inactive now".
User Manual
Page 17
1.10.4 Limitations
Hot Desking has limitations. Because the configuration of the device does
not change during Hot Desking, you will not be able to move telephone preferences
(like ring tones, address book programming, etc.) to another desk.
2
Web Interface
In this chapter you will see what you can do as user of the system by logging
on to the built-in web server of the PBX.
2.1 Login
You can use a standard web browser for the communication with the PBX.
Where ever inside or outside of your network you can connect to the web port of
the PBX, you can log in to the PBX. The PBX uses http sessions to keep track of the
context that the user is in. The session identifier is stored as a temporary cookie in
your web browser. Usually those cookies are allowed today, if that is not the case
you need to allow it.
To get a login prompt, just enter the address of the web server of the PBX.
By default, this will be port 80, which is the default port of the system. If you want
to log on to the local system, just use the address http://localhost.
The PBX also supports the secure transport https. If you use this transport
layer, the data between the PBX and the web browser is transported using the
secure https protocol (see the documentation on https in the Internet). The PBX will
usually offer a certificate that will cause an alert on the local web browser. Please
ignore the alert or add it to the trusted certificates of your web browser. To log on
to the secure connection, use a login prompt like "https://localhost". By default, the
PBX will run the service on port 443, but during the installation you may put it on
any other port that you like.
Page 18
User Manual
There are three ways to log in. There is a selection box where you can
tell the system how you want to log in. If you choose "automatic", then the PBX
will first try to log you is as system administrator, if that is not possible it will try
domain administrator, and if that does not work it will try to log you in as user.
The first way is to log in as system administrator. In this mode, you have
access to all resources of the PBX. There is exactly one system administrator mode.
Because of this, you should make sure that the login information is kept in a safe
place. By default, the login name is "admin" and the password is empty.
The second way to log in is as domain administrator. In contrast to the
system administrator, there may be several accounts that have the permission to
act as domain administrator, even within one domain. The password in this mode
is the password for this extension, which is the same as the SIP password (but not
the PIN code).
To log in as domain administrator, you must enter the username and domain
name in the "user@domain" form and enter the password, for example "123@test.
com". If you have just one domain, you may omit the domain name after the "@"
sign. If you have more than one domain and omit the domain name, the system will
automatically append a "@localhost" behind the account name.
The domain administrator flag is used to control the permissions of the
User Manual
Page 19
extension. If the flag is set to true, the web interface will accept the user‘s login
(same as their extension registration) and allow them to change the settings of the
domain.
The third mode to log you in is the user mode. The login for this is similar to
the domain administrator mode, but you are just taken to a different web page and
you can make only changes in your account’s realm.
If the PBX could not allocate the port that you specified as http port, you
need to locate the port number. This situation can happen for example if another
web service already took the port. In these situations you can use the Windows
command line command netstat -a -p to locate the process and find out which TCP
ports it has allocated. Usually you are then able to log in. The first thing that you
should do then is select another port that is available, so that after a restart the
PBX will be able to allocate the specified port.
2.2 General Settings
Page 20
User Manual
The settings "First name" and "Last name" store the display name of the
extension. This name will be used for internal calls. Phones that are able to display
the names will show it on the screen. These names will also be searched by the
auto attendant if the caller chooses the dial by name feature.
The "Password" is used for SIP and HTTP traffic. It should be reasonable safe;
just a few digits of digits will not be enough. However, it is up to the user to choose
a safe password. When the user enters a new password, the current HTTP session
will stay valid until the next login. Permanent cookies will be invalidated on the next
login.
The "PIN" is used in several dialogs of the PBX, for example when entering
the mailbox. Although it is also possible to do brute force attacks on PIN codes, it
takes more time to perform such attacks. We recommend using at least 5 digits, so
that an attacker has at least 100,000 combinations to choose from.
The "Cell phone number" is associated with the extension. When someone
tries to call the extension directly, the PBX may include that number in the list
of devices that is being called. The setting "When calling the extension" controls
if and when the cell phone is being called. For more information, see Cell Phone
Integration for more information.
The "Timezone" tells the PBX in which time zone the user is. This setting is
used for example in the mailbox (reading out timestamps), but it is also used when
the PBX generates configuration files for attached phones.
The "IVR Language" settings controls which language the user prefers. This is
setting is used for example, when the user calls the mailbox or when the caller calls
into the PBX from the associated cell phone.
The "Web Language" is used when the user logs into the web interface of the
PBX. This setting is also used when emails are sent to the user.
The "Watch the calls of the following extensions" is used for automatic
generation of the configuration files of the phones. The PBX will try to put the listed
extensions into the settings for the phone. This setting depends on the used device.
For this setting you can use Wildcard Patterns. For example, if you use just a star,
the PBX will try to put all extensions of the domain into this list.
The setting "Watch the presence of the following extensions" is similar,
but it does not provision calls, but asks the device to subscribe for the presence
state of the listed extensions. The PBX itself will just forward the presence state of
the phones; the phones themselves are responsible for generating the presence
information.
If the "Limit own visibility to this list" is set, the PBX allows only the listed
users to watch the extension. It also uses Wildcard Patterns.
If you upload a picture in the "Upload a picture" setting, the PBX will
automatically insert a SIP header that can be used by SIP phones to show the
picture of the extension. This is similar to the display name of the extension, with
User Manual
Page 21
the difference that in addition of a text a picture is rendered. The picture must be in
BMP format that the endpoint understands.
The setting "Block outgoing caller-ID" is used when making outbound calls. If
the setting is set to "yes", the PBX will ask the gateway or SIP provider to hide the
Caller-ID for this call.
2.3 User Redirection Settings
The "Do not disturb" (DND) settings is used to keep the user from incoming
calls. If this setting is turned on, then this extension will not receive incoming calls.
Only extensions that have the permission to override DND will be able to call the
extension. However, the extension can a all times place outbound calls.
•
The setting "Incoming anonymous calls" controls how incoming calls to the
extension are treated. This setting does not affect calls that come from a hunt or
agent group or internal calls.
•
The "no special treatment" mode turns this feature off and sends all calls directly
to the extension.
•
The mode "reject call" will inform the caller that the extension does not accept
anonymous calls. Calls will not be put through to the extension.
•
The mode "pretend to be busy" also does not put the call through, but does not
tell the caller why. The PBX will not offer camp on.
•
The mode "ask for name" will prompt the caller for the name and then put him
on hold while calling the extension. After reading out the recorded name, the
extension may decide what to do with the call. Either the call can be accepted,
or it can be sent to the mailbox or it can be rejected.
•
The mode" ask for name even if the caller-id is present" will always ask for
recording the name, even if the caller-id is available. Only callers which are on
the white list are directly put through.
The "Hot Desking" setting is described in the separate page Hot Desking.
There are several ways of doing call forwarding.
•
If you want to temporarily redirect all calls to another extension you can use
the "Call forward all calls" setting. This setting affects only calls that are going
Page 22
User Manual
directly to the extensions. If the extension is part of a hunt group or an agent
group or the call origins from a paging group, the call is not being redirected.
•
The "Call forward calls when busy" forwards calls only when the extension is
busy. This condition is either true if the phone itself signals it is busy or the
"Lines" parameters has been set for the extension and this number has been
reached (see Registrations).
•
The Call forward on no answer" kicks in when the phone rings, but there is no
answer. The waiting time is defined in the domain and can be overridden by a
user setting ("Call forward no answer timeout"). If the mailbox picks up earlier,
this setting has no effect; if the call is being redirected, the mailbox timeout is
cancelled.
All redirection settings can have one number, either internal or external. If
the call is being redirected to an external destination, the PBX will use the dial plan
of the extension for placing this call and it will charge the extension for this call.
2.4 User Mailbox Settings
The user may decide if the mailbox should be enabled or not. For this
purpose, the web page offers the setting "Mailbox Enabled".
As with the redirection setting, the user may override the default setting until
the PBX redirects the call to the mailbox. This can be done in the setting "Time until
mailbox picks up".
The "Announcement Mode" can have the following values:
•
If the user selects the "Anonymous Announcement" mode, the PBX will just read
out the number of the extension.
•
If the user selects "Name Announcement" the PBX will pay back the recorded
name of the extension, if present.
•
The setting "Personal Announcement" will read out the recorded announcement
of the extension, if present.
If the PBX should send a notification to registered phones, the setting "Send
message waiting indication" must be turned on.
If the PBX should call the cell phone after a message has been recorded, the
setting "Call cell phone when new message arrives" needs to be turned on. The PBX
User Manual
Page 23
will charge the extension for this call.
If the mailbox should be shared with other extensions, those extensions can
be listed (separated by space) in the setting "Share the mailbox with the following
extensions". If the mailbox does not require a PIN code, those extensions can
directly dial into the mailbox and listen to messages. Those extensions will also
receive the message waiting indication, if the sending has been activated and the
phones register for MWI events.
2.5 User Email Settings
The setting "Email Address" tells the PBX where to send email messages.
The domain administrator must enable Email, so that this setting actually enables
sending out emails.
The setting "Send a mailbox message by email" defines how the PBX sends
emails out:
•
"Send emails without attachments" will just send a notification to the user
by email. The voicemail message itself is not sent and must be retrieved
either through the web interface or by calling the mailbox. This mode has the
advantage that the emails are relatively short; this way it is a useful feature
when using mobile devices that support reading emails.
•
"Send message as attachment to email" will also send an email, but put the
voicemail itself as attachment to the email. This is a good choice if you are
using email during the whole day and you are using a personal computer for
processing emails.
•
"Do not send an email" is a good choice if you are just using your SIP phone to
receive voicemail messages.
You can decide what you want to do with the message after an email has
been sent. "Keep the message as new message" will keep the message in your
mailbox and it will count as a new message. This mode has the potential danger
that your mailbox eventually might become full. If you choose the mode "Mark
message as read", the PBX will still keep the message in your mailbox, but when
the mailbox is becoming full, it will drop the oldest message to make room for a
new message and your mailbox will not become full. However, in this mode most
SIP phones will not turn on their message waiting indicator (because only new
messages trigger this behaviour). If you decide to "Delete the message", the PBX
will delete the message after sending the email. This keeps your mailbox clean, but
Page 24
User Manual
the system relies on a reliable transport of the voicemail.
If you want to receive emails when you miss a call, turn the setting "Send
email on missed calls" on. The PBX will send this email only if the call went directly
to your extensions; calls to a hunt group or agent group do not count.
The PBX can also send you emails when your status changes "Send email on
status changes". This email is being sent when the DND status or the redirection
changes.
2.6 User Instant Message
Usually you would use a SIP endpoint to send instant messages (IM) to
another extension. However, most of the SIP devices do not support that feature
today. Therefore, the PBX offers a possibility to do that from the web interface.
Sending an IM is simple. Just enter the destinations in the "Destination"
field and the text that you want to send in the "Message" field, then click on the
"Create" button. You can send the message to more than one destination by listing
the extensions separated by spaces. The PBX will then send the message to all
registered devices for the extensions that you selected.
The PBX will tell you how many messages have been sent in total.
User Manual
Page 25
2.7 Mailbox View
The mailbox page shows you the content of the mailbox. It contains the
following information:
•
The "Time" is the time stamp when the message was recorded. The time is
shown in the time zone of the extension that received the message.
•
The "Number" shows the Caller-ID and, if available, the name of the person who
left the message.
•
The "Duration" shows how long the message is. The format is "minutes:
seconds".
The "Flags" field shows several icons:
•
The delete icon can be used to delete the message.
•
The loudspeaker icon will download the message as WAV file and offer this file
for playback on the web browser.
•
The "New!" symbol indicates that the PBX keeps that message as unread.
•
The red exclamation mark message indicates that the caller marked this
message as urgent.
2.8 Missed Call List
The missed call list shows what calls were attempted to the current
extension, but did not connect. If there were display-names available, the PBX will
show them in the list. The "Time" column shows when the call was started.
The PBX offers click-to-dial by clicking on the number listed on the web page.
The PBX will call the extension and ask it to acknowledge the click-to-dial initiation.
The call resulting from the click-to-dial will be charged to the extension.
The length of the list is set by the domain administrator. The PBX has only a
Page 26
Login
specified context in which it keeps the necessary records for the call list feature.
2.9 Personal Call Log
The call list shows what calls were made from or to the current extension. If
there were display-names available, the PBX will show them in the list. If the call
was not connected the duration will be empty. Otherwise, it will show the duration
in minutes and seconds. The "Time" column shows when the call was started.
The PBX offers click-to-dial by clicking on the number listed on the web page.
The PBX will call the extension and ask it to acknowledge the click-to-dial initiation.
The call resulting from the click-to-dial will be charged to the extension.
The length of the list is set by the domain administrator. The PBX has only a
specified context in which it keeps the necessary records for the call list feature.
2.10 Scheduling Conferences
Users of the PBX may schedule conferences. In order to do this, the domain
administrator has to set up at least one conference room that allows scheduled
conferences.
Login
Page 27
2.10.1 Creating a new conference
In order to set up a conference, you need to specify a conference name, the
start time and the end time.
The name is just used for describing the conference, so that the participants
know the subject of the conference.
The start time must be in the format MM/DD HH:MM (month and day, hours
and minute). The PBX will use the selected time zone of the extension that is
logged in. The end time must in the same format, however you may leave out the
day information. In this case the PBX will automatically choose the day information
of the start time stamp.
You may also list the participants. If your domain has been set up for sending
out emails, the PBX will send out an invitation to the listed participants. The list
of the participants must be separated by semicolons (this is different than in
most other places of the system). You may either specify the email address of the
participant or the extension number. If the extension number has an email stored,
the PBX will use this email address to send out the email. The email contains a
calendar event, which can be read by most scheduling tools. The tool will then popup a conference reminder with the relevant conference information.
2.10.2 Editing existing conferences
Currently, it is only possible to delete an existing conference. To do this, just
click on the delete icon in the conference list.
Conferences are automatically deleted after 24 hours. If there are still
participants in the conference, they may continue talking.
Page 28
System Administration
2.10.3 In a conference
If you are the creator of a conference and also participate in the conference,
you can use the following special codes to control the conference:
•
*9 removes all other participants of the conference. This is useful when you
want to make sure that the conference is cleared up before you leave the
conference yourself.
2.11 Address Book
2.11.1 Purpose
The address book stores associations of numbers with names, speed dial
entries and types.
Numbers are generally telephone numbers. The PBX does not support SIP
URI numbers in the address book. Numbers may contain readability characters.
The PBX internally converts the numbers into purified numbers, so that matches
with other numbers become more easy and consistent. If your domain has selected
a specific dial plan scheme (for example, North American dial plan), the PBX also
internally automatically converts the number into a consistent presentation. If the
PBX requires that a name must be presented as one string (for example, in the SIP
display name), it will automatically put a space character between the first and the
last name if both names are not empty.
Names consist of the first name and the last name. The purpose of this
separation is to make searches easier; sometimes the user searches for first and
sometimes for the last name. Otherwise the PBX treats the names transparently.
Names should be encoded in UTF-8 format. The web browser usually performs
the necessary conversations, so that the end user does not have to deal with this
problem.
2.11.2 Speed Dial
The speed dial entry is a two-digit star code (for example, *12). The range
should be in the lower feature code range, so that they do not overlap with the
other feature codes that are available on the system. If there is an overlap, the
speed dial numbers have a higher priority.
Speed dial numbers are useful if you want to store numbers that you are
using frequently, especially if your telephone does not support an address book.
Used in the domain mode, they also might be useful to hide the number that is
being dialed (however, that kind of security is very weak).
2.11.3 Black List and White List
An address book entry also has a type flag. This flag can be set to "white",
"black" or unset. If it is "white", that address book entry is on the white list, if it
is black, it is on the black list. The white list usually contains the contacts that are
System Administration
Page 29
trusted and therefore get a preferred treatment. The black list usually contains the
list of contacts that are known and unwanted. For example, it makes sense to put a
family member‘s number on the white list, while the caller-ID of an aggressive sales
person might end up in the black list.
If that flag is set to "white", the number is part of the white list. That
means, when a caller has the type "white", he will never be intercepted by the auto
attendant to record the name.
Callers on the white list are allowed to receive a call back when the extension
becomes available.
If a caller is on the black list, the behavior of the PBX depends on the
settings of the user for anonymous call treatment. If the caller should be blocked,
then the PBX will block that call. Otherwise the PBX will always ask the person to
leave his name before calling the extension.
Callers on the black list will also no be allowed to camp on an extension.
2.11.4 Personal Address Book
user.
The address book entries in the personal address book are only visible to the
To see the personal address book, you must be logged in as user in the web
interface of the PBX. In this screen, you can edit and delete address book entries by
clicking on the edit and delete button.
Page 30
System Administration
If you want to add an address book entry, you can manually add this entry
from the web interface. You may also load a CSV-file into the system (see below).
You can also add a number to the address book by dialing the black list and
white list star code. If the number does not exist, the PBX will automatically create
an address book entry for this number.
2.11.5 Domain Address Book
The domain address book entries are visible to all members of the domain.
That means they can search the domain address book and calls coming to that
domain will automatically see the name of the calling party.
All names in a domain are automatically included in names searches in the
domain.
You can also use the address book to indicate which DID number has been
dialed. If you add an address book entry that matches the specific DID, the PBX
will add the display name to the caller-ID, and the phone then can display the text
associated with the caller-ID.
System Administration
Page 31
2.11.6 Address Book Import
Most address management programs support the export of a CSV (comma
separated value) file. The PBX can read this format, if the below guidelines are
kept.
•
The field separator must be a semicolon.
•
The first column must contain the first name; the second column must contain
the last name.
•
The third column must have the number. The number must have numeric
characters. The characters "-", "(", ")", " " (space), "/" and "." are ignored and
may be included for readability. The first character may be a ‚+‘, so that global
telephone numbers may be used. For example, the numbers "(978) 543 6545"
and "+49 (30) 386-12345" are valid numbers, while the text "WIRELESS CALLER
9785436534" is not a valid number.
•
The fourth column may have a speed dial number. The number must contain a
star character in the beginning. If the star code was already used by another
entry, the PBX will clear the other star code entry during the import process.
•
The text must be encoded in UTF-8 format.
Because the number must have numeric characters, it is ok if the first
contains the field description. For example, most programs use a name like
"Number" to identify the column, and because that name is not a phone number
the system will not include that row in the address book.
The following example shows an address book that can be imported:
First Name;Last Name;Number;Speed Dial
Fred;Feuerstein;(978) 123 4567
Carl;Clever;(212) 324 4334;*12
Franky;Fahrenheit;(515) 234 3334
"A;B;C";;(123) 543 3453
2.12 User Status
The user status page shows essential information about the state of the
account.
You can see the settings for call redirection, the current state of do not
disturb (DND), and the last number that have been dialed or received from that
extension.
Page 32
System Administration
System Administration
Page 33
pbxnsip Inc.
http://www.pbxnsip.com
Email: [email protected]
1600 Osgood St, North Andover, MA 01845
United States of America