1
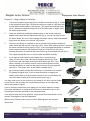
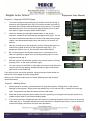
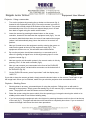
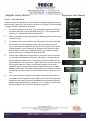
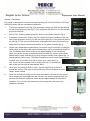
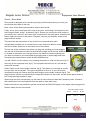
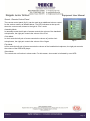
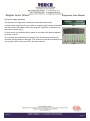
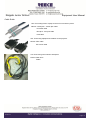
Reigate Junior School
Equipment User Manual
Contents
Projector
Using a laptop or visualiser
Page 2
Using the DVD/VCR player
Page 3
Using a camcorder
Page 4
Sound
Assembly Mode
Page 5
Choir Mode
Page 6
Film Mode
Page 7
Show Mode
Page 8
Remote control panel
Page 9
Using the stage speakers
Page 10
Lighting
Page 11
Cable Guide
Page 12
Troubleshooting
Page 13-14
Changing radio microphone batteries
Page 15
Version 2.1
Reigate Junior School
Equipment User Manual
Projector - Using a laptop or visualiser
1.
Turn on the projector by pressing the on button on the remote (fig 1), located
in the equipment rack (fig 2). Ensure the remote is turned on, this done with
a small switch at the bottom of the remote. The remote automatically turns
off so if it does not respond simply turn it off and then back on again using
the switch at the bottom.
2.
Fig 1
Lower the screen by pressing the down button on the screen controller,
located on the wall near the equipment rack (fig 3). You do not need to hold
the button down, but once it has reached the bottom (where it will automatically
stop) return the button to its central “off” position.
3.
4.
5.
Fig 2
Connect your laptop or visualiser to one of the three input sockets located at
either end of the hall and the centre (fig 4 & 5). Use a VGA cable to do this, it will have
the same connectors on as shown in fig 6. If you’ve plugged the laptop or visualiser
into the socket located in the equipment rack you’ll need to turn this on by
entering the power on code into the panel at the top of the equipment rack (fig 7).
The equipment will then turn on, this will take around 60 seconds.
If you want to have sound from the laptop then connect this too,
using a 3.5mm jack—jack cable (fig 8), plugging this into the iPod
input next to the video input socket you have used (fig 4 & 5). If you
haven't already, you will then need to turn on the equipment rack by
entering the power on code into the panel at the top of the equipment
rack (fig 7). Then press “film” on the audio controller (fig 9).
By now the projector should have started up, so we need to tell it where
it is getting its signal from. If you’ve used the socket on stage you’ll
need to press input 2 on the projector remote, if you’ve used either the
one at the back or side you’ll need to press input 1 (fig 1).
You may need to turn on the socket on your laptop if you don’t have an image
on the screen, this is usually done by pressing two keys on the laptop but
varies from laptop to laptop.
Fig 3
Fig 4
Fig 5
Fig 6
Fig 7
If you’re using the sound from your laptop you can either adjust the volume
from within windows or by using the iPod volume up and down keys on the
front panel of the audio controller in the equipment rack.
If you wish to have the screen go black, simply press the shutter button on the
remote. Press again to get the image back.
When you’ve finished, make sure you follow “Shutting down the projector”
instructions.
Version 2.1
Fig 8
Fig 9
Page 2
Reigate Junior School
Equipment User Manual
Projector - Using the DVD/VCR player
1.
Turn on the projector by pressing the on button on the remote (fig 1),
located in the equipment rack (fig 2). Ensure the remote is turned on,
this done with a small switch at the bottom of the remote. The remote
automatically turns off so if it does not respond simply turn it off and
then back on again using the switch at the bottom.
2.
Lower the screen by pressing the down button on the screen
controller, located on the wall near the equipment rack (fig 3). You do
not need to hold the button down, but once it has reached the bottom
(where it will automatically stop) return the button to its central “off”
position.
Fig 1
Fig 2
3.
Next you’ll need to turn the equipment rack by entering the power on
code into the panel at the top of the equipment rack (fig 7). The
equipment will then turn on, this will take around 60 seconds.
4.
By now the projector should have started up, so we need to tell it
where it is getting its signal from, do this by pressing input 3 on the
projector remote (fig 1).
5.
Next we need to put the audio system in the correct mode, do this by
pressing “Film” on the audio controller (fig 9).
Fig 7
6.
You can now put in the DVD or video tape and control using either the
remote control or the buttons located beneath the flap in the bottom
right corner of the DVD/VCR.
Fig 9
Fig 3
If you wish to have the screen go black, simply press the shutter button on
the remote. Press again to get the image back.
When you’ve finished, make sure you follow “Shutting down the projector”
instructions below.
Projector - Shutting Down
1.
Shutting down is an easy, yet essential part of using the projector. Failing to do so will result in
damage to the projector. Simply press the standby key on the remote (fig 1), located in the top right,
twice. The projector will now shut down and cool itself down.
2.
Raise the screen using the screen switch, this time pressing up, but again returning the switch to its
middle position when it has finished winding away.
3.
If you’ve turned on the equipment rack, shut it down by entering the same code into the unit at the top
of the rack (fig 7). This again will take around 60 seconds to completely shut down. If you re-enter the
code at this stage it will cancel the shut down procedure.
Version 2.1
Page 3
Reigate Junior School
Equipment User Manual
Projector - Using a camcorder
1.
Turn on the projector by pressing the on button on the remote (fig 1),
located in the equipment rack (fig 2). Ensure the remote is turned on,
this done with a small switch at the bottom of the remote. The remote
automatically turns off so if it does not respond simply turn it off and
then back on again using the switch at the bottom.
2.
Lower the screen by pressing the down button on the screen
controller, located on the wall near the equipment rack (fig 3). You do
not need to hold the button down, but once it has reached the bottom
(where it will automatically stop) return the button to its central “off”
position.
Fig 1
Fig 2
3.
Next you’ll need to turn the equipment rack by entering the power on
code into the panel at the top of the equipment rack (fig 7). The
equipment will then turn on, this will take around 60 seconds.
4.
By now the projector should have started up, so we need to tell it
where it is getting its signal from, do this by pressing input 3 on the
projector remote (fig 1).
5.
Next we need to put the audio system in the correct mode, do this by
pressing “Film” on the audio controller (fig 9).
Fig 7
6.
Now you can connect your camcorder to the front of the DVD/VCR
player, into the yellow, red and white connectors on the bottom left of
the DVD/VCR (fig 10).
Fig 9
7.
On the DVD/VCR remote, press “input select” until the display says
“INPUT 3”.
Fig 3
Fig 10
If you wish to have the screen go black, simply press the shutter button on the remote. Press again to get
the image back. When you’ve finished, make sure you shut the projector down as detailed below.
Projector - Shutting Down
1.
Shutting down is an easy, yet essential part of using the projector. Failing to do so will result in
damage to the projector. Simply press the standby key on the remote (fig 1), located in the top right,
twice. The projector will now shut down and cool itself down.
2.
Raise the screen using the screen switch, this time pressing up, but again returning the switch to its
middle position when it has finished winding away.
3.
If you’ve turned on the equipment rack, shut it down by entering the same code into the unit at the top
of the rack (fig 7). This again will take around 60 seconds to completely shut down. If you re-enter the
code at this stage it will cancel the shut down procedure.
Version 2.1
Page 4
Reigate Junior School
Equipment User Manual
Sound - Assembly Mode
Assembly mode is designed to be used when the children/audience is facing
the side wall. It gives you use of the iPod inputs, CD Player, DVD/VCR player
or Organ and the 4 wireless microphones.
1.
Turn on the equipment rack (fig 2) by entering the power on code into
the panel at the top of the equipment rack (fig 7). The equipment will
then turn on, this will take around 60 seconds.
2.
Select “Assembly” mode by pressing the Assembly button on the audio
controller (fig 9).
3.
4.
5.
If required, connect your iPod to one of the three iPod inputs (located
on the wall next to the equipment rack (fig 5), half way up the hall
(fig 11) and at the far end of the hall (fig 4). The volume of this can be
controlled either on the iPod itself, by using the iPod volume up and
down buttons on the audio controller (fig 9), or by using the remote
control panel (fig 11) located half way up the hall.
Get as many handheld microphones as you require, simply turn them
on using the on/off switch on the body, after about 1 second they will
be automatically ready for use. The battery level will be shown on the
digital display on the microphone. Again, the volume can be controlled
by using the radio mic volume up and down buttons on the audio
controller (fig 9) or by using the remote control panel (fig 11) located
halfway up the room. The radio microphones can be turned on and off
as required, they do not have to be left on all the time if they are not in
use.
Fig 2
Fig 4
Fig 5
Fig 7
Fig 9
Once you’ve finished, simply turn the radio microphones off and turn
the system off by entering the code again into the unit in the top of the
equipment rack, this will start the shutdown procedure which will take
approximately 60 seconds to complete. If you re-enter the code at any
point during this it will cancel the shutdown procedure.
Fig 11
Version 2.1
Page 5
Reigate Junior School
Equipment User Manual
Sound - Choir Mode
Choir mode is designed to be used when the children/audience is facing the stage. It gives
you use of the choir microphones, CD Player, radio microphones, iPod and organ input.
1.
Ensure the choir microphones are plugged in before you go any further. They should
not be plugged in while “Choir” mode is selected on the audio controller (fig 9).
2.
Turn on the equipment rack (fig 2) by entering the power on code into the panel at
the top of the equipment rack (fig 7). The equipment will then turn on, this will take
around 60 seconds.
3.
Select “Choir” mode by pressing the Choir button on the audio controller (fig 9).
4.
If required, connect the organ using the blue cable that comes from underneath the
equipment rack. The end of the cable has a mains socket for plugging it in, along
with an audio connector to plug in the panel located underneath the organ. The
volume of this can be controlled on the audio controller (fig 9) by using the Org/DVD
volume up and down buttons.
5.
Fig 2
Fig 4
Get as many handheld microphones as you require, simply turn them on using the on/off
switch on the body, after about 1 second they will be automatically ready for use. The
battery level will be shown on the digital display on the microphone.
Again, the volume can be controlled by using the radio mic volume up
and down buttons on the audio controller (fig 9) or by using the remote
Fig 7
control panel (fig 11) located halfway up the room. The radio
microphones can be turned on and off as required, they do not have to be left
on all the time if they are not in use.
Fig 5
Fig 9
6.
Select which “choir zones” you want to use by pushing the buttons “Choir
Zone 1” - “Choir Zone 4”. The red light next to each button indicates this zone is NOT in use,
by default all zones will be off. You can then control the overall volume of the choir
microphones by using the Choir volume up and down buttons on the audio controller.
7.
If you want to make use of the speakers facing towards stage, for example when singing
along to a backing track, see the “Using the stage speakers” page.
8.
Once you’ve finished, simply turn the radio microphones and turn the system off by entering
the code again into the unit in the top of the equipment rack,
this will start the shutdown procedure which will take
Microphone Zones
approximately 60 seconds to complete. If you re-enter the
Zone 3
Zone 4
Zone 3
code at any point during this it will cancel the shutdown
Zone 1
Zone 2
Zone 1
procedure.
Fig 11
Stage
Version 2.1
Page 6
Reigate Junior School
Equipment User Manual
Sound - Film Mode
Film mode is designed to be used for events requiring use of the iPod inputs, CD Player,
DVD/VCR player and the 4 wireless microphones.
1.
Turn on the equipment rack (fig 2) by entering the power on code into the panel at
the top of the equipment rack (fig 7). The equipment will then turn on, this will take
around 60 seconds.
2.
Select “Film” mode by pressing the Film button on the audio controller (fig 9).
3.
If required, connect your iPod to one of the three iPod inputs (located on the wall
next to the equipment rack (fig 5), half way up the hall (fig 11) and at the far end of
the hall (fig 4). The volume of this can be controlled either on the iPod itself or by
using the iPod volume up and down buttons on the audio controller (fig 9).
4.
5.
6.
Get as many handheld microphones as you require, simply turn them on using the
on/off switch on the body, after about 1 second they will be automatically ready for
use. The battery level will be shown on the digital display on the microphone.
Again, the volume can be controlled by using the radio mic volume up and down
buttons on the audio controller (fig 9) or by using the remote control panel (fig 11)
located halfway up the room. The radio microphones can be turned on and off as
required, they do not have to be left on all the time if they are not in
use. These can be controlled on the remote panel (fig 11) located half
way up the hall using the arrows labelled “Mics”.
When your are playing a DVD or video, use the Org/DVD Up & Down to
control the volume. It can also be controlled from the remote panel using the
“Music” arrow buttons.
Fig 2
Fig 4
Fig 5
Fig 7
Fig 9
Once you’ve finished, simply turn the radio microphones off and turn the system
off by entering the code again into the unit in the top of the equipment rack, this
will start the shutdown procedure which will take approximately 60 seconds to
complete. If you re-enter the code at any point during this it will cancel the
shutdown procedure.
Fig 11
Version 2.1
Page 7
Reigate Junior School
Equipment User Manual
Sound - Show Mode
Show mode is designed to be used during all your performances where you have your
sound desk at the back of the hall.
Note - None of the iPod inputs should be used in show mode.
Firstly, set up your sound desk at the rear of the room, connecting it to the panel on the
wall using the small “snake”, as shown in fig 12. Ensure you connect the main output of
your desk to the “main left” and “main right” connectors on the patch panel, located in the
bottom right hand corner of the panel. If required, connect your auxiliary output to the
stage monitors socket.
The panel also has connectors for the 4 choir mic zones and the 4 radio
microphones to enable you to connect them to your desk to be able to control
the level of these, these are on the bottom row of connectors.
Fig 2
Fig 7
The top row of the connectors are where you plug into anything you have plugged
into the end of the snake mounted on the wall at the stage end of the hall. Multicore
A located on the bottom row, also go to here. Use these to connect anything else
you wish to connect to your sound desk by plugging them in at the stage end, then
connecting the same number socket at the sound desk end.
Fig 9
You will need to turn the system on by entering the power on code into the panel (fig 7)
at the top of the equipment rack (fig 2). The equipment will then turn on, this will take
around 60 seconds.
Select “Show” mode on the audio controller (fig 9). The system is now ready to receive
an input from the sound desk. The volume by default is set to 0, so you will need to
Fig 12
increase this using the iPod up and iPod down buttons on the audio controller (fig 9). The
stage monitors volume is controlled by the Organ/DVD buttons in this mode, not the control panel shown in
the “Using the stage speakers” page.
When using the choir microphones you will need to ensure that your desk has “phantom power” turned on,
this sends power to the microphones from the desk to make them work.
Please note that it is not possible to get the sound from the DVD/VCR player or the organ (when plugged into
the blue cable) into the sound desk.
Choir Microphone Zones
Zone 3
Zone 4
Zone 3
Zone 1
Zone 2
Zone 1
Stage
Version 2.1
Page 8
Reigate Junior School
Equipment User Manual
Sound - Remote Control Panel
The remote control panel (fig 21) can be used as an additional volume control
for the various modes, as detailed below. The LED indicators at the top will
show the current mode, shown to the right in “Film” mode.
Assembly Mode
In assembly mode the left pair of arrows controls the volume of the handheld
microphones, the right pair controls the volume of the iPod.
Choir Mode
In choir mode the left pair of arrows controls the volume of just the choir
microphones, the right pair controls the volume of the Organ.
Fig 21
Film Mode
In film mode the left pair of arrows controls the volume of the handheld microphones, the right pair controls
the volume of the DVD/VCR player.
Show Mode
The controls do not function in show mode. For this reason, show mode is indicated by a red LED.
Version 2.1
Page 9
Reigate Junior School
Equipment User Manual
Using the stage speakers
The speakers on stage work in both choir mode and show mode.
In show mode, simply connect your desk to “stage monitor” socket at the back
and then control the master volume by using the “Org/DVD” up and down on
the main controller (fig 9).
Fig 9
In choir mode, it is controlled by the panel on the side of the black cupboard,
as shown in fig 21.
The volumes are controlled by turning the knob at the bottom clockwise to
increase, anti-clockwise to decrease. The volume level will be indicated by the
row of green LED’s, the more LED’s, the more volume!
Fig 21
Version 2.1
Page 10
Reigate Junior School
Equipment User Manual
Lighting - Basic day to day use
1.
Open the black cupboard and turn on the dimmers using the two large
switches shown in the middle of fig 13.
2.
If the lighting control rack (top of fig 13) is not powered (indicated by the
LED’s on the various units) then open the lid to the fuse box (bottom of fig 13)
and turn on the switch labelled “Lighting Control”.
3.
Using the lighting desk at the top, firstly push the master fader to 100%, this is
located on the far right hand side of the desk.
4.
Push up the faders for each of the lights you want on, the higher you push the
fader the brighter the light. This is usually the first four faders for the stage
lighting, however this depends on how the system has been left after the
previous show.
5.
Fig 13
To power down the system, reverse the above procedure. To preserve lamp
life, you should not turn on the system with any faders up so the lights do not
come straight on.
Lighting - Show use
1.
For show use, follow steps 1 & 2 above to power up the lighting system.
2.
You will also potentially need the normal sockets on the lighting bars (fig 16)
to have power, to turn these on go to the fuse box on the wall near to the
black metal equipment rack (fig 14). Ensure that the switch labelled “Lighting
bar sockets” is on.
3.
Plug your lighting desk into the socket at the back of the hall, labelled DMX, located at the top left of the panel (fig 15).
4.
Your desk will now transmit DMX to the dimmers and all of the
sockets located on the lighting bars (fig 16), for use with your
colour changing and moving lights.
Note - The levels on the desk located in the cupboard are merged with your
lighting desk, so if the dimmers receive a signal from both desks they will take the
higher value. For example, if you’ve got channels 1 and 2 set to 80% on the desk
in the cupboard and at 100% on your desk, they will be at 100%. However if you
fade them out to 0% on your desk, as soon as you get to 80% they will stop
dimming due to the signal from the desk in the cupboard.
Version 2.1
Fig 14
Fig 15
Fig 16
Page 11
Equipment User Manual
Reigate Junior School
Cable Guide
Use: Connecting iPod or Laptop to the 3 iPod connection points.
Names: 3.5mm jack - 3.5mm jack cable
PC Audio cable
Mini jack - mini jack cable
iPod cable
Use: Connecting laptops and visualiser to the projector.
Names: VGA cable
PC screen cable
Use: Connecting sound desk to wall panel
Names: Desk loom
Snake
Version 2.1
Page 12
Reigate Junior School
Equipment User Manual
Troubleshooting
Problem:
The screen will not lower.
Solutions: 1. Check the fuse box above the switch (fig 14), is the fuse for the
screen on?
2. Is there power getting to fuse box above the switch? Try pressing the
test button on the fuse for the screen, if it goes from the on position to
the off position then yes there is. Otherwise check the fuse labelled
“Feed to Gym/AV sub distribution board” in the fuse box above the black
cupboard (fig 17).
Fig 14
3. Check the fuse in the fuse holder to the right of the screen switch.
Problem:
The projector will not come on.
Solutions: 1. Check the remote is functioning correctly - turn it off and on using the
switch at the bottom in case the remote has entered power saving
mode. Check the batteries in the back of the remote control do not need
replacing.
2. The cable connection may have come dislodged, remove the plug
from the top of the remote and reinsert.
3. The projector has no power - check the fuse inside the fuse box on
Fig 17
the wall near the equipment rack. Is the fuse for the projector on? Is
there power getting to fuse box above the switch? Try pressing the test button on the fuse for the
screen, if it goes from the on position to the off position then yes there is. Otherwise check the
fuse labelled “Feed to Gym/ AV sub distribution board” in the fuse box above the black cupboard.
4. Check the fuse in the fuse holder located to the left of the screen switch.
Problem:
No image on the screen.
Solution:
1. Is the screen blue? If no then the projector is not on or is receiving a black image. If yes:
2. Is the projector on the correct input?
3. Is your laptop/visualiser definitely sending a signal?
Problem:
No sound from laptop or iPod.
Solution:
1. Check the audio controller is in the correct mode (Assembly).
2. Check the volume is turned up on your laptop/iPod is turned up.
3. Check the volume is turned up on the audio controller.
Version 2.1
Page 13
Reigate Junior School
Equipment User Manual
Troubleshooting
Problem:
The system doesn't come on when you enter the code
Solutions: Does the top unit where you enter the code have a green light on? If yes, double check you are
entering the code correctly. Otherwise check the fuse box above the equipment rack (fig 14), is
the fuse for the “Audio & Video Rack” on? If yes, is there power getting to fuse box? Try pressing
the test button on the fuse for the screen, if it goes from the on position to the off position then yes
there is and the light on the code panel should be illuminated. Otherwise check the fuse labelled
“Feed to Gym/AV sub distribution board” in the fuse box above the black cupboard (fig 17).
Problem:
The lighting system is not working
Solution:
Ensure all the equipment is on (see lighting system page for details on how to turn all on).
If all the switches in the cupboard are on but there is still no power then it has been isolated
elsewhere, please ask Steve for assistance in turning the power on to the cupboard.
Problem:
Radio microphone not working
Solution:
Check the display on the microphone, if it is blank then the batteries need changing. See radio
microphone battery changing page for details.
Problem:
Projector input is selected but there is no image on the screen.
Solution:
If the input button has been pressed repeatedly it may have changed the setup of the input. To tell
if this has happened, look in the top left of the image on the screen when you press the input
button. It should read as “RGB (PC Analogue)” for Input 1, “RGB” for Input 2 & “Video” for Input 3.
If this is not what it says, press the input button repeatedly to scroll through until it displays the
correct name, this will then have reconfigured the input correctly.
Problem:
No sound coming out of the speakers on stage.
Solution:
Ensure you have turned up the separate control for the stage speakers, as described on the
“using the stage speakers” page.
Version 2.1
Page 14
Reigate Junior School
Equipment User Manual
Sound - Changing Radio Microphone Batteries
To change the batteries in the radio microphones:
1.
Unscrew the top grill of the microphone until it has loosened (fig 18).
Note that the top grill will not completely remove.
2.
Open the metal battery cover flap (fig 19), then remove it completely
to reveal the batteries (fig 20).
3.
Remove the used batteries, taking note of which way around they
go and replace with new ones.
4.
Carefully re-align the top grill of the microphone onto the thread and
retighten.
Fig 18
Fig 19
Fig 20
Version 2.1
Page 15