1
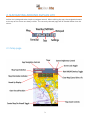
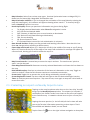
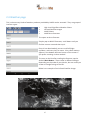
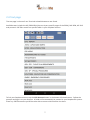
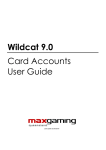
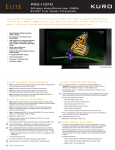
for Android
User Guide
Version 1.1
1. INTRODUCTION
Thank you for choosing AvPlan Lite, the premier portable paper replacement Electronic Flight Bag (EFB)
for Android. It has been designed to be straightforward and easy to learn for those pilots who don’t
require a full suite of flight planning tools or require a backup to a full EFB.
AvPlan Lite is fully CASA certfied under CAR 233 1(h) and allows you to:
•
Download and save copies of all aviation maps, ERSA, DAP and AIP. Important when there is
intermittent or no network access.
•
Download and view NAIPS weather briefings, RAIM reports and NOTAMs.
•
Display a direct-to routing and the aircraft’s current location on a seamless VFR or IFR map.
•
At a glance, view flight dynamic flight information via the heads up display.
•
Provide easy access to ERSA and DAP information at any stage of flight.
1.1 Help
Support for AvPlan Lite can be requested at: [email protected]
1.2 Getting AvPlan Lite
The app is available with a one month fully featured free trial. Simply download the free app from the
Google Play Store as you would any other Android app. On completion of the trial period the aeronautical data will no longer be accessible.
After this trial period you will require the AvPlan Lite VFR subscription as a minimum to continue to use
the app. There is also an IFR upgrade pack available, too. Subscriptions are sold on a yearly subscription
basis, and do not automatically renew.
Note: Subscriptions are valid for a single pilot on a maximum of three devices.
The AvPlan Lite VFR subscription enables full use of the app, with the AIP, ERSA (AU) and the local available VFR maps (e.g. Sectional [also known as mega VFR], mega WAC, ERC Low, ERC High and Satellite).
At the completion of the subscription period the App will no longer function.
The IFR Upgrade includes the DAP.
1.3 Licensing and subscriptions
Subscriptions can be purchased from www.avsoft.com.au. To purchase a subscription use the following
steps:
AvPlan Website:
1.
Navigate to the AvPlan website using your favourite browser and select the <Store> option from
the list of options along the top of the home page.
2.
Scroll through the list of options to find the subscription(s) you require. To select the subscription, press the grey Add to Cart button to the below the subscription type. Do this for each of the
subscriptions you require.
1
3.
Once you have made your selections press the Checkout button to the right of the store webpage. Review your selections and amend as required. PayPal is the only payment option currently available via the website. If you wish to pay via a credit card you can do so by phoning AvPlan directly (see
website contact details).
Note: If you are not already logged into the website, you will be asked to login before you can
complete your purchases.
The new renewal end date will be 12-months from the current subscription end date or the corresponding period from the purchase date, whichever is the latter.
Also, tapping Settings > Subscriptions from within the app is a shortcut to our website.
1.4 Getting an AvPlan username
You can get an AvPlan username via the AvPlan Lite app or via the AvPlan website. Once you have your
username configured you can use it to synchronise the subscription on all of your AvPlan Lite enabled
devices.
If you don’t have a username already, you will be prompted to register when you first attempt to make a
subscription purchase from the AvPlan website. In the Register section of the webpage simply enter your
preferred email address and a memorable password, press register and you’re done.
From the AvPlan Lite app, select Settings > User Settings (in that order) where you will be presented
with the option to Sign In, Sign Up or Reset your password. As with the website enter your preferred
e-mail address and a memorable password, press the Sign Up button and you’re done.
1.5 A note to AvPlan EFB (iOS) users
If you have a current AvPlan EFB subscription for iOS and wish to use an Android device as a backup,
your subscription will cover you for no additional cost. Simply enter the same email address and password either in the Login Details screen when you first start AvPlan Lite or tap Settings > User Settings
and enter your details there. Remember your AvPlan subscription can be shared on up to three devices.
Please note: Geo-Referenced charts are not available in AvPlan Lite for Android.
1.6 Starting AvPlan Lite for the first time
The first time AvPlan Lite is run, the app will complete the unpacking and setup process. During this
time it will download some more data, so it is recommended that your device is connected to a good
WiFi connection as mobile internet connections may incur extra costs.
Depending on your connection and device, this initial process could take up to a few minutes. It is best
to leave the device to complete this task, as stopping in the middle of it could mean unexpected app
behaviour in the future.
2
2. NAVIGATING AROUND AVPLAN LITE
AvPlan Lite is designed to be simple to navigate around. When utilising the app, the navigation buttons
at the top of the screen are always visible. The currently selected page will be shaded darker than the
others.
2.1 Map page
3
•
•
•
•
•
•
•
•
•
•
•
Map Selection: Select from various map types. Sectional (otherwise known as Mega VFR), En
Route Low, En Route High, Mega WAC and Satellite map.
Map Orientation Indicator: If you’ve changed the orientation of the map (done by twisting the
map with two fingers), this indicator will appear showing where north is. To instantly bring it
back to North Up, tap this icon once.
Heads Up Display: Shows you pertinent information at a glance during flight.
o
To: Displays desired destination when Direct To navigation is active
o
ALT: GPS derived altitude AMSL
o
DIST: Distance in NM from your current location to destination
o
DTK: Desired Track (Static bearing to destination)
o
TRK: Current heading
o
GS: Ground speed in Knots
o
ETI: Estimated time interval (arrival at destination in minutes)
Own Aircraft Position: Displays current position and heading information. Note that this icon
does not change colour according to GPS accuracy.
Centre Map on Aircraft: When on, it keeps the aircraft in the middle of the map as you fly along.
When off, the aircraft may fly off the edge of the map if left unchecked. A message will appear for
a few seconds, alerting you to which mode the map is in.
Map Zoom Controls: A manual way to zoom the map in and out. The touchscreen ‘pinch to
zoom’ can also be used.
Clear Map/Cancel Direct-To: Removes currently selected destination and clears the line drawn on
the map.
Rain RADAR overlay: Overlays an animation of the latest rain detection on the map. Toggle to
switch on and off. Note that this feature requires an active data connection.
Screen Lock: Toggle this to prevent the screen being accidentally pressed in flight.
Screen Brightness Control: Tap then slide left and right to alter the device backlight intensity.
Timer: A multi-purpose count-up timer. Tap once to start, once again to stop and a third time to
restart from zero.
2.1.1 Selecting an airport via Nearby Airports menu
Tapping on the map (anywhere other than on the ‘own ship’ aircraft)
brings up the Nearby Airports window. The airports (or helipads, if
switched on) are listed in order from closest to the point you tapped,
to the farthest away. It is not the closest items to your current position.
Tapping the name portion (i.e. the left side) of the list item will take
you to the Terminal information pertaining to that airport. That’s
where ERSA and Weather details, etc are found.
Tap the Direct To
4
icon on the right initiates navigation to that place.
2.1.2 Direct to navigation
.
Once you’ve tapped the direct to button navigation begins
immediately. AvPlan will draw a line on the map from your
current position to the intended destination. This line is fixed
and does not move as the flight progresses; much like a bearing
to a VOR. If you diverge track left or right (due to cloud, for
example), you can easily return to the original track.
The HUD (Heads Up Display) is also now fully populated with
information about the flight.
To fly Track Up, simply twist the map around with two fingers
until the line runs up and down the page. To quickly return at
any time to North Up, tap the Map Orientation Indicator that
appears in the top left hand corner of the map.
To stop navigation, simply tap Clear Map in the top right hand
corner of the map.
2.2 Terminal page
The Terminal page is where airport details are accessed. When
you first press the Terminal button, you will see an airport name
with some of its details listed at the top.
The screen will default to the ‘Comms’ tab, which lists frequencies used when operating at or near the airport.
TAF, NOTAM and RAIM reports are instantly requested and
returned when their button it tapped. No need for NAIPS logins,
etc as this is already sorted for you. Data connectivity is required
to access these reports.
Viewing ERSA or DAP charts is simply a matter of tapping Charts
and selecting the desired page from the list.
An alternate method of selecting an airport to view is to tap the
Select Airport button. Airports can be searched either by their
name (i.e. Bankstown), or their identifier (i.e. YSBK).
5
2.3 Weather page
This is where many kinds of weather products provided by NAIPS can be accessed. They are grouped
into four types:
•
•
•
•
High Level Significant Weather Charts
Infrared Satellite Images
NAIPS Charts
NAIPS Area Forecasts
To request an Area Forecast:
Simplay tap on NAIPS Forecasts, scroll down until you
find the correct area and then tap it.
Once it has downloaded, you can scroll left/right
up/down, and even pinch to zoom. Also, zoom buttons
appear in the bottom left-hand corner of the screen if
you prefer zooming via that method.
To return to the list after reading the forecast, tap the
Android Back Button. These come in different designs
depending on the make of your device, but are usually an
arrow or triangle facing to the left.
Below is an example of an Infrared Satellite image:
2.2 Terminal Page
6
2.4 Text page
The text page is where all non-Terminal related documents are found.
Available texts include the AIP, ERSA GEN (the non airport specific pages of the ERSA), DAP GEN, AIP SUP
and personal .PDF files stored in a specific folder in your Dropbox account.
To link your Dropbox account, tap the Link Account button in the bottom left-hand corner. Follow the
prompts and sign in to your account. A folder will automatically be created in your Dropbox file system.
Place any .PDF documents you’d like to be able to access within AvPlan Lite there.
7
2.5 Scratchpad page
This is a very handy in-flight note taking tool. Simply scribble with your finger the information you wish
to keep for future reference. It can be especially handy for taking down ATIS information, or noting
aircraft registrations just in case direct communication is required.
To clear the area ready for reuse, tap the trash bin icon in the bottom right hand corner.
8
2.6 Settings page
Settings to personalise your AvPlan Lite are found here. You will also be able to prepare your device for
use in flight by downloading maps, charts and plates to be stored locally in memory and manage your
login/subscription details.
2.6.1 Data downloads
Before taking AvPlan Lite with you in flight, maps and charts will need to be downloaded and saved to
your device. Tap Data Downloads to access this.
Ensure you select either Low Altitude
or High Altitude maps. This is selected
in the top left-hand corner.
Also ensure you are connected to a
good WiFi or hotspot.
Note that the map is broken up into
various segments. Search for the
area(s) you’d like to have available on
your device at all times (even when
data connectivity is not available) and
tap it. This will request the area to be
downloaded.
Several progress bars will appear. Allow the device to download and install each part of the area before
going off and doing other things with the app. This will ensure the most timely download and install.
When it is complete, the progress bars will disappear and the area you seleted will turn green (as per
Western Australia in the above screenshot).
9
2.6.2 User settings
This is an important part of fully setting up and customising your AvPlan Lite experience.
If this is the first time you have used AvPlan Lite,
and you are making use of the free one month
trial, you do not have to enter anything in the top
two fields at this stage. Simply enjoy trialling the
app.
If you’d like to sign up to our email database, type
your email address and create a password for
yourself then tap Sign Up.
If you have already purchased a subscription
(either an AvPlan Lite subscription, or you wish to
use your existing AvPlan EFB subscription), type
the same email address and password that you
use to login to access our website or your iOS app.
Once that’s all in place, tap Sign In. If you are not
sure what your password is/was, you may elect to
tap Reset Password. This prompts our server to
generate a new password and send it to your
email address.
When the sign in procedure is fully completed,
AvPlan Lite wil display a list of your current
subscriptions with their end dates.
AvPlan Lite can be used in conjunction with the X-Plane flight simulator.
To enable and use the X-Plane interface:
•
Enable the X-Plane interface in AvPlan. Note the IP address of your device.
•
In X-Plane enable sending of data to AvPlan:
a.
Click on Settings, Data Input and Output.
b.
Tick only the row labelled ‘lat, lon, alt’.
c.
Click on Settings, Net Connections and Advanced.
d.
Enter your device IP address, and the port number is 49002.
AvPlan will receive location information from X-Plane.
Check Show Heliports if you’d like Helicopter Landing Sites to be included in the Nearby Airports list.
The three other checkboxes all turn on and off data from various countries. To remove clutter, un-check
the countries you do not need data/charts/text for and ensure Australia is checked.
10
2.6.3 Subscriptions
This is a convenient direct link to our website online subscription store if a new subscription is required.
2.6.4 License
Tap this option to display the end user license agreement.
2.6.5 Contact us
This is a convenient direct link to our support email desk if you have any further queries about AvPlan
Lite.
3. EXITING AVPLAN LITE
Unlike other Android apps, AvPlan Lite is designed to be persistent. The app will not exit just by pressing
the back button several times - the last thing you want in the air is for the app to exit on you with an
accidental button push. You can press the Home button, which will background it temporarily.
In order to fully exit the app, you must use Android’s multitasking or task manager. Each version is
slightly different, but most involve tapping the task button and flicking the AvPlan Lite entry from the list.
Consult your devices’ user manual for instructions on how to launch and use your task manager.
11